7 Creating a Hierarchical Flex Family
Creating a flex family with a multi-level hierarchy and single-valued definitions will give you a basic understanding of the flex asset model in WebCenter Sites. On completing these steps, you’ll also have a model that you might want to use to create similar hierarchies.
Topics:
Hierarchical Organization and Flex Family Specifications describe the flex family that you will create. Creating a Sample Flex Family Using a Real-World Example is a tutorial, where you create a small flex family with generic names for its family members.
7.1 Hierarchical Organization
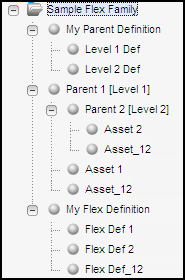
You’re going to create a flex family with three levels: a top-level parent, a second level parent, and assets.
-
A top-level parent (named Parent 1 [Level 1] in our example).
-
A second-level parent (named Parent 2 [Level 2] in our example).
-
Assets, at the third level. One asset is placed directly under its level 1 parent; another asset is placed directly under its level 2 parent; the third asset is placed under both the level 1 parent and the level 2 parent.
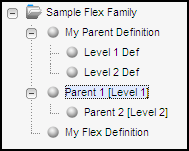
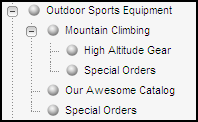
In the WebCenter Sites interface, the hierarchy looks exactly as shown in the left side of the following figure. The representation is formulaic. The right side of this graphic shows how it translates to a real-world model, represented by the avisports sample site.
Figure 7-1 Formulaic Data Model vs. Real World Data Model

Description of "Figure 7-1 Formulaic Data Model vs. Real World Data Model"
On the sample site (Right side of the above figure):
-
Parent 1 [Level 1] is named Outdoor Sports Equipment.
-
Parent 2 [Level 2] is named Mountain Climbing, a subtype of Outdoor Sports Equipment.
-
Asset 1 is named Our Awesome Catalog, an asset of the type Outdoor Sports Equipment.
-
Asset_12 is named Special Offers. It displays under both Outdoor Sports Equipment and Mountain Climbing.
7.2 Flex Family Specifications
Flex family members that you’ll create in your flex family.
The following table lists the flex family members that you will create:
Table 7-1 Flex Family Members
| Flex Family Member | Name | Instances | Based on Parent Definition | Based on Flex Definition |
|---|---|---|---|---|
|
Flex Attribute Type |
My Attribute |
Attribute_1Foot 1 Attribute_2 |
n/a |
n/a |
|
Flex Parent Definition Type |
My Parent Definition |
Level 1 Def Level 2 Def |
n/a Level 1 Def |
n/a |
|
Flex Definition Type |
My Flex Definition |
Flex Def 1 Flex Def 2 Flex Def_12 |
Level 1 Def Level 2 Def Level 1 Def and Level 2 Def |
n/a |
|
Flex Parent Type |
My Parent |
Parent 1 [Level 1] Parent 2 [Level 2] |
Level 1 Def Level 2 Def |
n/a |
|
Flex Asset Type |
My Asset |
Asset 1 Asset 2 Asset_12 |
n/a |
Flex Def 1 Flex Def 1 Flex Def_12 |
|
Flex Filter Type |
n/a |
n/a |
n/a |
n/a |
Footnote 1
Suffixes 1, 2 and _12 refer to levels of the hierarchy (_12 denotes both levels 1 and 2). For example, Asset 1 denotes an asset that is placed under level 1. Asset_12 denotes an asset that is placed under both levels 1 and 2.
7.3 Creating a Sample Flex Family Using a Real-World Example
You’ll create a small flex family whose family members you’ll give generic names. This approach will help you visualize the formula for building hierarchies.
At the end of this tutorial, you will change the names of selected family members to real-world names to understand how a formulaic data model translates to a business-related data model. You will also add more parents and assets to the hierarchy, giving them real-world names as you create them.
This section includes the following topics:
7.3.1 Creating a Flex Family
In this step, you create a flex family by naming its required members.
To create the flex family:
-
Launch the Admin interface.
-
In the General Admin tree, expand the Admin node, then expand Flex Family Maker, and then double-click Add New Family.
-
In the Flex Family Maker form, fill in the fields exactly as shown in the following table:
Table 7-2 Flex Family Maker Form
Field Name Enter Comments Flex Attribute
MyAttribute
In this step, name the database tables that WebCenter Sites creates for the flex family. The names must not contain spaces.
Flex Parent Definition
MyParentDefinition
n/a
Flex Definition
MyFlexDefinition
n/a
Flex Parent
MyParent
n/a
Flex Asset
MyAsset
n/a
Flex Filter
n/a
n/a
-
Click Continue.
-
In the next form, fill in the fields for each new member of the family as follows:
-
In the Description field, enter the same name as in step 3, but separate the words in the name with spaces.
The name that you enter is used throughout the WebCenter Sites interface to identify the asset type.
-
In the Plural field, enter the plural form of the name used in the preceding step.
-
Click Add New Flex Family.
-
-
Wait for WebCenter Sites to create the flex family and return the message indicating that the flex family members (asset types) were successfully installed.
7.3.2 Enabling the New Flex Asset Types
In this step, you enable the flex family members for the avisports sample site. You also create start menu items for the members, so that you can create and search for their instances in subsequent steps.
To enable the new flex asset types:
-
In the General Admin tree, expand the Admin node, and then expand the Sites node and complete the following steps:
-
Expand avisports (the sample site where the flex family is enabled), or a site of your choice.
-
Under that site, expand Asset Types and double-click Enable.
-
From the list, select the asset types that you just created (MyAsset, MyAttribute, MyFlexDefinition, MyParent, MyParentDefinition).
-
Click Enable Asset Types.
-
-
In the Enable Asset Types form:
-
Ensure all Start Menu options are selected (so that, later, you can create and search for instances of the family members.)
-
Click Enable Asset Types.
-
-
-
Wait for WebCenter Sites to display the message indicating that the asset types have been enabled for the site.
7.3.3 Adding a Flex Family Tab to the WebCenter Sites Tree
In this step, you add a tab that tracks the creation of your flex family. You set up this tab to display selected members of the flex family as you finish creating them.
To add the tree tab:
7.3.4 Creating Parent Definition Assets
In this step, you create two parent definitions. The first parent definition establishes the top level of the hierarchy, and the second parent definition establishes the second level.
To create the first parent definition asset:
-
In the menu bar, click New.
-
From the list of options that display, select New My Parent Definition.
-
In the next form:
-
Fill in the fields as in the table.
Table 7-4 New My Parent Definition Form
Field Name Enter or Select Comments Name
Level 1 Def
This is our name for the definition of the first level of the hierarchy.
Description
Level 1 Def
N/A
Parent Select Style
Select Box
N/A
My Parent Definitions
n/a
No parent definitions are selected (or available) in this field. Therefore, this parent definition establishes the first level of the hierarchy.
-
Click the Save icon.
-
To create the second parent definition asset:
-
In the menu bar, click New.
-
From the list of options that display, select New My Parent Definition.
-
In the next form:
-
Fill in the fields as in the table.
Table 7-5 New My Parent Definition Form
Field Name Enter or Select Comments Name
Level 2 Def
This is our name for the definition of the second level of the hierarchy.
Description
Level 2 Def
N/A
Parent Select Style
Select Box
N/A
My Parent Definitions
Level 1 Def
Note: Under Single Value, click the Required arrow to move your selection to the Selected list.
Choosing Level 1 Def subordinates the current parent definition to Level 1 Def. Chaining definitions in this manner establishes Level 2 Def as the second level.
When parents are created and based on the current parent definition (Level 2 Def), they are subordinated to parents that are based on Level 1 Def.
-
Click the Save icon.
-
-
Refresh the page.
-
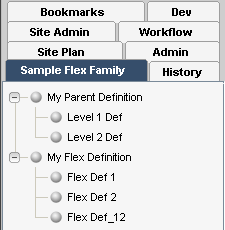
Click the Sample Flex Family tab and expand its contents to make sure they are identical to this figure:
Figure 7-3 Sample Flex Family Tab with Parent Definition
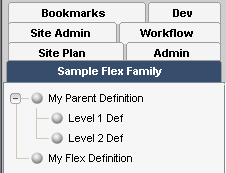
Description of "Figure 7-3 Sample Flex Family Tab with Parent Definition"
7.3.5 Creating Flex Parent Assets
In this step, you create two flex parent assets, and base them on the flex parent definitions that you created in the previous step. The first parent asset occupies the top level of the hierarchy. The second parent asset occupies the second level of the hierarchy.
To create the top-level parent of the hierarchy:
-
Switch to the Oracle WebCenter Sites: Contributor interface by clicking the Contributor icon on the top.
-
From the Content menu, choose New, then New My Parent.
-
In the form that opens, fill in the fields as in the table.
Table 7-6 New My Parent Form
Field Name Enter or Select Comments Name
Parent 1 [Level 1]
This is our name for a level 1 parent in the hierarchy (a generic name simply to help you identify the level).
Note: At the end of this tutorial, you will change the name to a business-specific name (Outdoor Sports Equipment, in our example, which describes the inventory of a company dealing with sports gear.)
My Parent Definition
Level 1 Def
Choosing Level 1 Def places the parent you are creating at the top level of the hierarchy.
-
On top of the form, click the Save icon.
To create the second-level parent of the hierarchy:
7.3.6 Creating Flex Definition Assets
In this step, you create three flex definition assets:
-
The first flex definition asset is used to place assets under Parent 1 [Level 1].
-
The second flex definition asset is used to place assets under Parent 2 [Level 2].
-
The third flex definition asset is used to place the asset under both levels of the hierarchy.
To create the first flex definition asset:
-
Switch to the Admin interface by clicking the Admin icon, located in the applications bar.
-
In the menu bar, click New.
-
From the list of options that display, select New My Flex Definition.
-
In the form that opens, fill in the fields as in the table.
Table 7-8 New My Flex Definition Form
Field Name Enter or Select Comments Name
Flex Def 1
N/A
My Parent Definitions
Level 1 Def
Note: Under Single Value, click the Required arrow.
Choosing Level 1 Def and Single Value means that when you use the current flex definition to create flex assets, the assets can be placed under only one parent that use Level 1 Def as its parent definition. In our example, the asset is placed under Parent 1 [Level 1].
Note: Selecting a Multiple Values option allows you to place the asset under any and all parents that use Level 1 Def as their parent definition.
-
Click the Save icon.
To create the second flex definition asset:
-
From the button bar, click New.
-
From the list of options that display, select New My Flex Definition.
-
In the form that opens, fill in the fields as in the table.
Table 7-9 New My Flex Definition Form
Field Name Enter or Select Comments Name
Flex Def 2
N/A
My Parent Definitions
Level 2 Def
Note: Under Single Value, click the Required arrow.
Choosing Level 2 Def and Single Value means that when you use the current flex definition to create flex assets, the assets can be placed under only one parent that uses Level 2 Def as its parent definition. In our example, the asset is placed under Parent 2 [Level 2].
Note: Selecting a Multiple Values option allows you to place the asset under any and all parents that use Level 2 Def as their parent definition.
-
Click the Save icon.
To create the third flex definition asset:
7.3.7 Creating Flex Assets
In this step, you complete the flex family by adding the third level of the hierarchy; the flex assets. You create three assets:
-
The first asset you place under Parent 1 [Level 1].
-
The second asset you place under Parent 2 [Level 2].
-
The third asset you place under both Parent 1 [Level 1] and Parent 2 [Level 2].
To create the first flex asset:
-
Switch to the Contributor interface by clicking the Contributor icon on the top.
-
From the Content menu, choose New, then New My Asset.
-
In the form that opens, fill in the fields as in the table.
Table 7-11 New My Asset Form
Field Name Enter or Select Comments Name
Asset 1
N/A
My Flex Definition
Flex Def 1
Choosing Flex Def 1 places the asset you are creating under Parent 1 (Level 1].
-
Click the Save icon.
To create the second flex asset:
-
Switch to the Contributor interface by clicking the Contributor icon on the top.
-
From the Content menu, choose New, then New My Asset.
-
In the form that opens, fill in the fields as in the table.
Table 7-12 New My Asset Form
Field Name Enter or Select Comments Name
Asset 2
N/A
My Flex Definition
Flex Def 2
Choosing Flex Def 2 places the asset you are creating under Parent [Level 2].
-
In the next form, click Save.
To create the third flex asset:
7.3.8 Translating the Formulaic Data Model into a Real-World Data Model
In this step, you rename the parent definitions, parents, and assets to translate the formulaic data model you just created into a real-world model. (In practice, instead of renaming flex family members, you would name them directly in their business context, as you create them.)
In our example, the real-world model describes a business that deals with sports gear. The flex parents and assets, after you finish renaming them, are listed in your Content Tree tab as shown in the following figure.
To create the real-world model:
-
Rename the parent definitions as follows:
-
Open the Admin interface.
-
In the Sample Flex Family Tree, right-click Level 1 Def and choose Edit from the context menu.
-
Replace the parent's name with Level 1 Def (Type of Sports Equipment), and click the Save icon.
-
In the same manner, replace the name of Level 2 Def with Level 2 Def (Sport).
-
-
Rename the parents as follows:
-
Switch to the Contributor interface.
-
Click Content Tree to display its contents.
-
In the Sample Flex Family Tree, right-click Parent 1 [Level 1], and choose Edit from the context menu.
-
Replace the parent's name with Outdoor Sports Equipment, and click the Save icon.
-
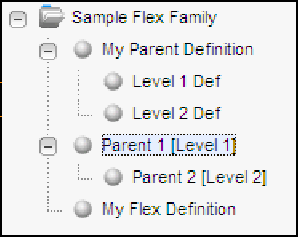
In the same manner, replace the name of Parent 2 [Level 2] with Mountain Climbing. The Sample Flex Family Tree should look like the following figure.
Figure 7-11 Sample Flex Family Tree Node Expanded
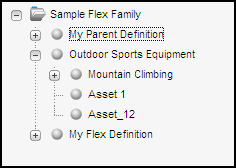
Description of "Figure 7-11 Sample Flex Family Tree Node Expanded"
-
-
Rename the assets as follows:
-
In the Sample Flex Family Tree, expand Outdoor Sports Equipment.
-
Right-click Asset 1 and choose Edit.
-
Replace the asset's name with Our Awesome Catalog, and then click the Save icon.
-
In the same manner, expand Mountain Climbing and replace the name of Asset 2 with High Altitude Gear.
-
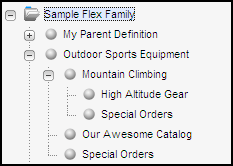
Replace the name of Asset_12 with Special Orders.
The assets you renamed should look like the following figure.
Figure 7-12 Sample Flex Family Tree Node Expanded
Description of "Figure 7-12 Sample Flex Family Tree Node Expanded"
-
7.3.9 Developing Your Real-World Model
In this step, you develop your data model by creating a new parent and its asset, giving each a real-world name. You do the following:
-
Create a second level-2 parent and name it White Watering.
-
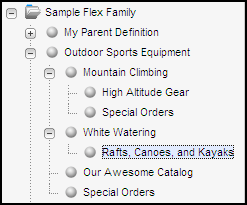
Create the parent's asset (a catalog) and name it Rafts, Canoes, and Kayaks. Expand White Watering to display its assets, as shown in this figure:
Figure 7-13 Sample Flex Family Tree Node Expanded
Description of "Figure 7-13 Sample Flex Family Tree Node Expanded"
To create the level-2 parent:
-
Switch to the Contributor interface by clicking the Contributor icon on the application bar.
-
From the Content menu, choose New, then New My Parent.
-
In the form that opens, fill in the fields as in the table:
Table 7-14 New My Parent Form
Field Name Value Name
White Watering
My Parent Definition
Level 2 Def (Sports)
-
Click the Save icon.
To create the parent's asset:
