3 Logging In and Getting Started
3.1 Logging In to Oracle WebCenter Sites
It’s the responsibility of the general administrator to first set up an administrator account for themselves using the default system account. They must then set up accounts for all users based on their specific roles in the organization.
The following instructions show you how to log in to the Oracle WebCenter Sites Admin and WEM Admin interfaces as the general administrator.
Note:
If you are not the general administrator and must log in as a site administrator or workflow administrator, obtain your user name and password from the general administrator before following the steps below. Also bear in mind that your permissions to the Oracle WebCenter Sites interfaces are limited by your role.
3.1.1 If You Selected the Admin Icon
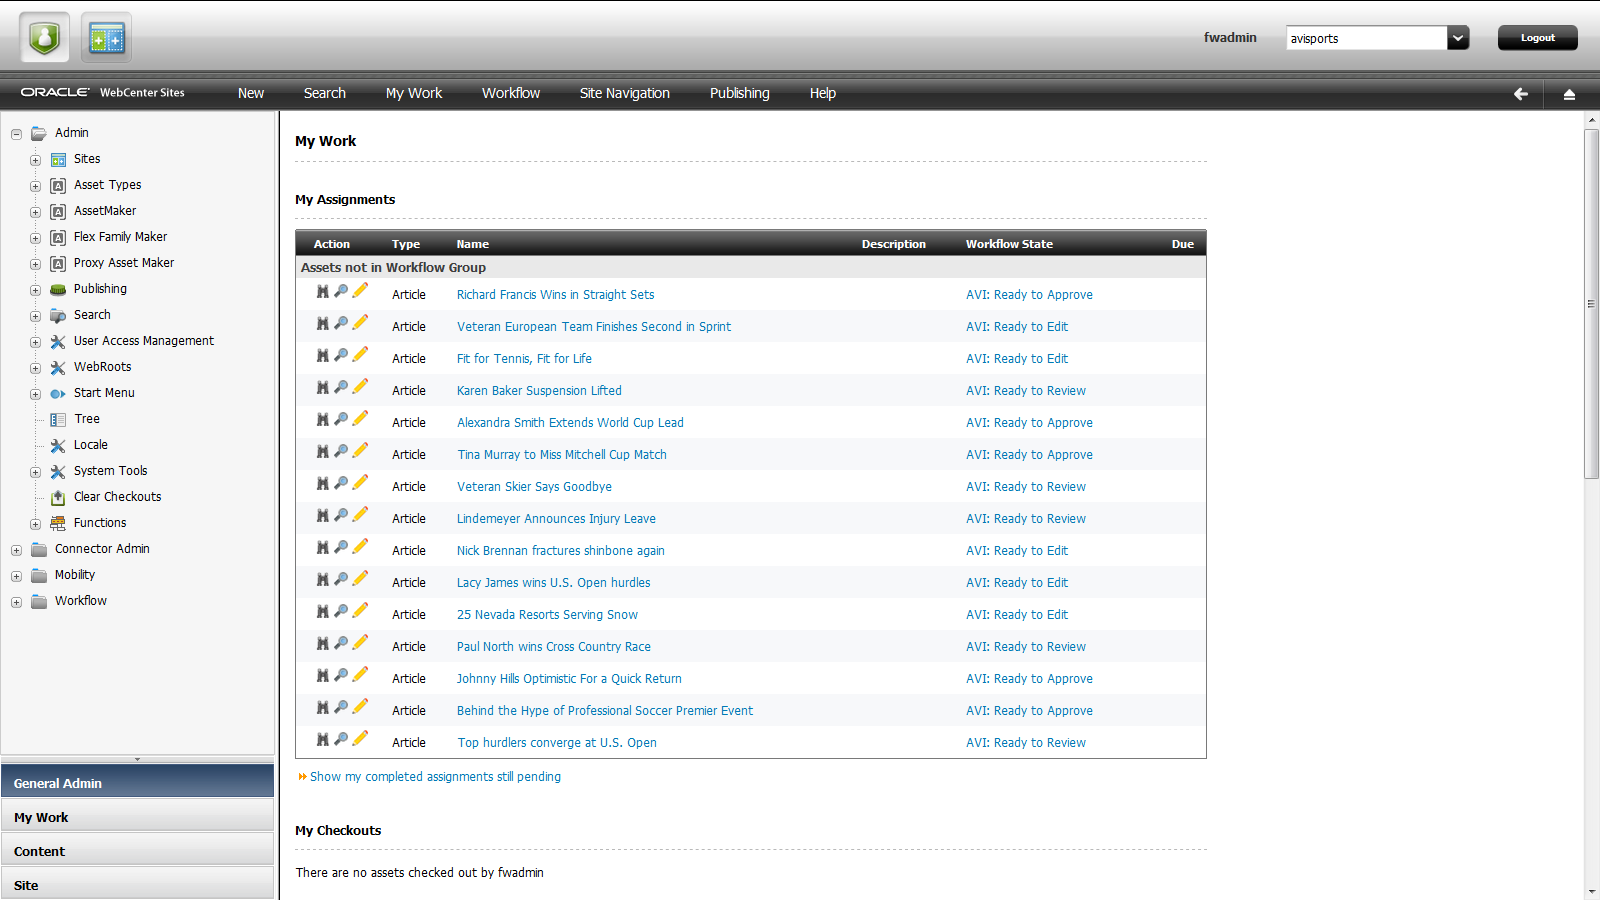
When you select the Admin icon, the Admin interface loads (shown in the following figure). As an administrator, you can perform all administrative tasks from this interface.
This figure shows the main parts of the Admin interface:
-
The menu bar, at the top of the window, contains the following content management options:
-
New: Enables you to create assets whose asset types are enabled on the selected site. The Admin interface supports the creation of only high-level assets such as Templates and CSElements. All other types of assets are created in the Contributor interface. See What Can You Do in the Contributor Interface? in Using Oracle WebCenter Sites.
-
Search: Enables you to search for all high-level assets created for the current site. To search for content assets, you must access the Contributor interface.
-
My Work: Provides information about your workflow assignments, checkouts, and bookmarked assets.
-
Workflow: Enables you to create a workflow report, create a workflow group, view existing workflow groups, and view saved workflow reports. See Creating and Managing Workflow Processes.
-
Site Navigation: Available only if the site contains a site navigation. This option enables administrators to rename site navigations, re-order site navigations (shown on the Site Tree in the Contributor interface), and place and unplaced pages in a site navigation.
-
Publishing: Enables administrators to select a publishing destination, and view active publishes, scheduled publishes, and publish history.
-
-
The navigation pane is located to the left of the window and allows you to perform administrative functions from the available tabs. Select a bar at the bottom of the pane to select a tree. Most administrative tasks can be performed from the General Admin tree. The General Admin tree contains data for all sites in the system, not just the site you are logged in to.
-
The main window of the Admin interface is where you perform administrative functions. Any option you select from the menu bar or site navigation pane is displayed in the main window of the Admin interface. For example, when you select Search from the menu bar, the Search form opens in the main window. See Administrator-Specific Trees and Nodes.
-
The applications bar (at the top of the interface) shows the icons of the applications available to you on the current site, a link to your profile, a menu of sites accessible to you, the Logout button, and the Up/Down arrow you use to expand and collapse the applications bar.
When running more than five applications, the Switch Apps drop-down menu is shown for selecting the additional applications. When you select an application from the Switch Apps menu, the icon of the selected application replaces the icon of the least-used application's icon currently shown.
3.1.2 If You Selected the WEM Admin Icon
If you are a general administrator and you selected the WEM Admin icon, the WEM Admin interface loads. The WEM Framework determines your status as a general administrator or site administrator and enables only the forms and interface functions that you must work with.
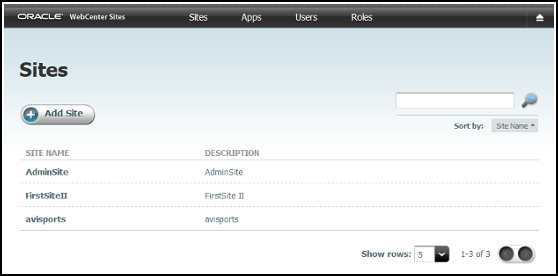
The following figure shows the Sites form in the WEM Admin interface.
Figure 3-2 WEM Admin Interface: Sites Form

Description of "Figure 3-2 WEM Admin Interface: Sites Form "
The menu bar shown in this figure contains the following options you can use to manage your system's sites, applications, users, and roles:
-
Sites: Opens the Sites form which lists all the sites in the system. Site administrators see only the sites in which they are assigned the
SiteAdminrole. If you logged in as a general administrator you also have access to the Apps, Users, and Roles forms. -
Apps: Accessible only to general administrators. Opens the Apps form which enables you to edit application information (tooltip and description) and manage the roles assigned to assign an application to sites.
-
Users: Accessible only to general administrators. Opens the Users form which enables you to create and manage users, including assigning users to sites.
-
Roles: Accessible only to general administrators. Opens the Roles form which enables you to create and manage roles for your content management system.
3.2 How to Reset a WebCenter Sites Password
It’s not unusual for users to forget their login passwords. As a general administrator you can reset these passwords.
To reset a user’s password:
3.3 How to Edit Your Oracle WebCenter Sites Profile
Each WebCenter Sites user has a WebCenter Sites profile, which contains information about their user name, email, locale, time zone, preferred devices, and password.
-
Log in to WebCenter Sites, select a site, and an application icon.
-
In the menu bar, click the down-arrow to open the applications bar.
-
In the applications bar, click your user name.
-
In the Edit Profile form, you can make the following changes:
-
To change your profile image, in the Image Preview field, click Browse and then select the image you want to assign to your profile.
-
To add or change your email address, use the Email field.
-
To change your assigned locale, use the Locale drop down field.
-
To change your assigned time zone, use the Time Zone drop-down field.
-
To change your password, do the following:
-
In the Old Password field, enter your current password.
-
In the New Password field, enter your new password.
-
In the Confirm Password field, enter your new password.
-
-
-
Click Save and Close.
The Edit Profile form closes and the interface from which you accessed your profile is re-displayed.
 and
and  icons. Select