7 Managing Recognition Processing
Capture’s Recognition Processor provides automated bar code recognition, document separation, and indexing for image documents in a Capture workspace. This chapter describes how you configure and manage recognition jobs and their processing.
This chapter includes the following sections:
-
Configuring Bar Code, Patch Code, and Separator Page Definitions
-
Specifying a Static or Dynamically Determined Document Profile
7.1 Introduction to Recognition Processing
The Recognition Processor is designed to accommodate a wide variety of document scenarios and configurations. A common recognition processing scenario works as follows:
-
A recognition job runs as a post-processing step after Capture client users scan and release large batches containing documents.
-
The recognition job detects bar codes and/or patch codes on each page in the batch.
-
Based on the job’s selected document organization method, the Recognition Processor separates the batch’s pages into individual documents.
-
The recognition job indexes documents by applying bar code values, default values, or database lookup values to document metadata fields.
-
As a post-processing step after recognition processing, the batch is released to the Commit Processor.
This section describes the main concepts underlying the Recognition Processor. It includes the following topics:
7.1.1 About Document Organization Methods
To perform document organization, the Recognition Processor expects a batch to contain a single, image formatted document, even though that single document might actually be composed of multiple documents. During batch processing, the Recognition Processor organizes the batch into logical documents based on the document organization method you choose. For example, you might specify that each document contains a fixed number of pages, or that documents include separator pages between them.
While the Recognition Processor expects batches to contain a single, image formatted document, you also have the option of configuring the recognition job to skip document organization. For example, you might skip document organization with a job that processes batches containing already separated documents that need bar code recognition only.
You specify a document organization method on the recognition job’s Document Organization train stop, as shown in Figure 7-1. You can select one of the following methods:
-
Fixed number of pages per document (Configuring a Job for Documents Containing a Fixed Number of Pages)
-
Same bar code value on each page (Configuring a Job for Documents with the Same Bar Code Value on Each Page)
-
Separator pages (Configuring a Job for Batches with Separator Pages between Documents)
-
Hierarchical separator pages (Configuring a Job for Documents with Hierarchical Separators)
-
None: Do not perform document organization (Configuring a Job for Batches that do not need Document Organization)
Figure 7-1 Choosing How Documents are Organized When Creating a Recognition Job
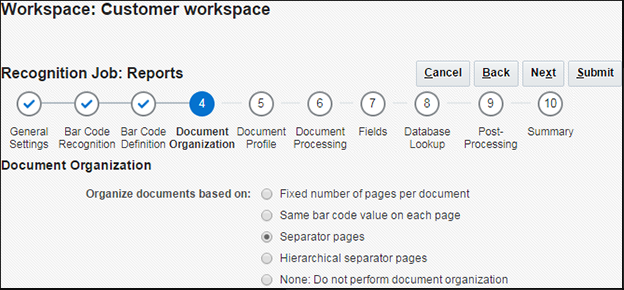
Description of “Figure 7-1 Choosing How Documents are Organized When Creating a Recognition Job”
7.1.2 Other Key Recognition Processor Job Settings
About Document Organization Methods describes the integral role that the document organization method plays in a recognition job. This section describes other key interrelated recognition job settings that enable the Recognition Processor to perform automated bar code recognition, document separation, and indexing. These settings include:
In addition to recognition job settings, you can use JavaScripts to customize Recognition Processor functions. For example, if a bar code contains three values that are concatenated, you could use a script to parse the values and correctly assign them to metadata fields. See Customizing Recognition Processing Using Scripts.
7.1.2.1 How are bar codes and patch codes detected and identified?
When creating a recognition job, you specify how Recognition Processor detects and identifies bar codes:
- On the Bar Code Recognition train stop, you specify which barcode engine to use, which bar codes to detect, and other settings specific to bar codes and patch code detection. During processing, the Recognition Processor searches through all pages, recognizing bar codes set for detection in the job. The following options are available on this train stop:
Table 7-1 Bar Code Recognition Options
Option Description Bar Code Engine Select the bar code engine to use for recognition processing. The options available are Universal Decoder and Windows Decoder. The Universal Decoder is selected by default.
The Windows Decoder bar code engine is available only on supported Windows operating systems.
If Capture is upgraded, existing recognition jobs use the Windows Decoder as the bar code engine.Table 7-2 Universal Decoder Options
Option Description 1-D Symbologies Select from a list of 1-D bar code symbologies that you want Recognition Processor to search for.
1-D symbologies that you can choose include:
Code 128
Code 392-D Symbologies Select the 2-D bar code symbologies you want Recognition Processor to search for.
2-D symbologies that you can choose include:
Data Matrix
PDF417
QR codeMaximum Bar Codes per Image Specify the maximum number of bar codes per image between 0 and 10. The decoder will stop processing an image once it detects or exceeds the value specified in this setting. This setting helps to optimize system performance.
By default, this option is set to 1.Minimum Bar Code Height Specify the height of the shortest bar code that may exist on an image between 0.2 in and 3 in.
By default, this option is set to 0.5 in.
This setting applies only to 1-D bar code symbologies.
Using this setting is helpful in the recognition of diagonal bar codes.Unit of Measure Select the unit of measure for the Minimum Bar Code Height setting and Maximum Bar Code Width setting from the drop-down list. The options available are inch and cm. The decimal precision is 3. Maximum Bar Code Width Specify the maximum width of the widest bar code that may exist on an image between Minimum Bar Code Height and 10 in.
By default, this option is set to 2 in.
This setting applies only to 1-D bar code symbologies.
Using this setting is helpful in the recognition of diagonal bar codes.Minimum Bar Code Characters Specify the minimum number of characters for a bar code to be considered for processing between 1 and 1000.
By default, this option is set to 1.Interpret Bar Code Value as Patch Code This setting is used to map a bar code value to a patch code type.
If a specified bar code value is recognized, you can specify to interpret it as a patch code type and not as a bar code value.
Specify an alphanumeric bar code value in the Bar Code Value text fields adjacent to each patch code type listed under Patch Code:
I
II
III
IV
VI
T
Only the first match in a page will be converted into patch code. The rest of the bar codes will not be used to convert to patch codes even if their values match the ones specified in the mapping.
Bar code value comparison is case sensitive.Table 7-3 Windows Decoder Options
Option Description Enable Auto-Detect If you do not know which bar code symbologies are used, select this field, and Recognition Processor will check for the most common bar codes.
Note: Disabling this field and specifying specific symbology is faster and more accurate.Auto-Detectable 1-D Symbologies Select from a list of auto-detectable 1-D bar code symbologies that you want Recognition Processor to search for.
1-D symbologies that you can choose include:
Codabar
Code 128
Code 39
Code 93
EAN-13
EAN-8
Interleaved 2/5
UCC/EAN 128
UPC-A
UPC-EOther 1-D Symbologies Select from a list of non auto-detectable 1-D bar code symbologies that you want Recognition Processor to search for.
1-D symbologies that you can choose include:
Airline (IATA) 2/25
Code 32
Datalogic 2/5
Industrial 2/5
ISBN Addon 2
ISBN Addon 5
Matrix 2/5
Postnet/Planet
Patch Code2-D Symbologies Select the 2-D bar code symbologies you want Recognition Processor to search for.
2-D symbologies that you can choose include:
Data Matrix
PDF417
QR codeValidate optional checksum Checksum validation is optional in certain symbologies. It is recommended that you select this option if your bar code contains a check sum value. For example, if a Code 39 bar code does not contain a checksum, this setting prevents the bar code from being recognized. Also, if this option is not selected and a Code 39 bar code with a checksum is recognized, the checksum character will be included in the bar code data. Note: It is recommended to select the bar code symbology if it is known, because it improves performance and decreases the risk of detecting unknown bar codes that may interfere with processing.
-
On the Bar Code Definition train stop, you specify one or more bar code definitions, which identify a bar code by its characteristics, such as its length in characters. The following validation rules are available when creating a bar code definition:
-
Length
-
Mask
-
Regular Expression
-
Choice List (where a bar code on the page must match a value contained in the selected choice list)
-
None (where a script can provide validation)
As the Recognition Processor recognizes bar codes, they are assigned to a bar code definition when the validation condition is met. In the job, you use these bar code definitions in a variety of ways, such as for metadata assignment and page separation. For information on managing bar code definitions, see Adding, Editing, or Deleting Bar Code Definitions.
-
7.1.2.2 How are documents separated?
Capture provides a range of options for defining document separation, including bar code and/or patch code separators.
The document organization method you choose, described in About Document Organization Methods, is related to how documents are separated. As a result, the document separation options you specify on the Document Processing train stop depend on your selected document organization.
-
If you specify that documents contain a fixed number of pages, you must specify the number of pages per document. When the job reaches this number, it identifies a new document and restarts counting for the next document in the batch. No separators are needed.
-
If you specify that documents include the same bar code value on each page, you must specify the bar code definition to use for separation. When the job encounters that bar code definition with a different bar code value, it creates a new document. No separators are needed.
-
If you specify that documents are organized based on separator pages, either single separators or hierarchical separators, you must specify bar code and/or patch code separator rules.
-
If you specify that no document organization be performed, any previous document separation remains. In certain atypical configurations, you can optionally use separators.
7.1.2.3 How are attachments handled?
You can specify if and how to include the source document’s attachments to the created documents using the options available on the Document Processing train stop. You can choose from the following options available in the Source Document Attachments field:
-
Select the Include all attachments to created documents (default) option to include all the attachments of the source document to the created documents.
-
Select the Include attachments with matching Document Profile attachment types option to include all attachments of the source document that match the attachment types specified in the document profile.
-
Select the Do not include attachments option if you do not want to include source document’s attachments to the created documents.
Note: The Source Document Attachments field is not available on the Document Processing train stop if None: Do not perform document organization option is selected on the Document Organization train stop.
7.1.2.4 How are documents classified?
As part of processing, the Recognition Processor determines the document profile to use, which identifies the metadata fields available to index a document. On the Document Profile train stop, you specify how a document profile is assigned to documents as they are processed by the recognition job. See Specifying a Static or Dynamically Determined Document Profile. The document organization method you choose affects document profile assignment options. You can choose a document profile assignment that is:
-
Static, by completing the Default Document Profile field.
The recognition job uses the default document profile when the Do not determine dynamically field is selected or when no matching dynamically determined document profile is found.
-
Dynamically determined, based on a bar code or separator page value, depending on document organization.
7.1.2.5 How are metadata values assigned?
You can configure a recognition job to assign metadata values in the following ways:
-
On the Fields train stop, configure metadata fields from the workspace to auto populate with any of the following values: bar code value, batch name, default value, scan date, or index date.
-
On the Database Lookup train stop, configure a database search for either a metadata field value or a bar code value. The return fields defined for the database lookup will be applied to the document.
7.1.2.6 What happens after recognition processing?
Use settings on the Post-Processing train stop to specify what happens after recognition processing completes, depending on processing success:
-
If no system errors occur, specify the next batch processor and if applicable, the specific job to run. For example, you might set Commit Processor as the next step. You can also specify None for no post-processing action. (If None is selected, the client must be used to process the batch. For example, a client user may review the batch for accuracy and release the batch to the Commit Processor.) You can also send an email notification, and change batch name, status, and priority after successful recognition processing completes.
-
If one or more system errors occur, specify the next batch processor and if applicable, the specific job to run. You can also specify None for no post-processing action. For example, you might set None if you want batches released after recognition processing so that client indexing users can complete them. You can also send an email notification, and change batch name, status, and priority to alert the appropriate people when recognition processing system errors are encountered.
7.2 Configuring General Recognition Processor Job Settings
This section covers common tasks you perform in working with Recognition Processor jobs. (See Configuring Jobs Based on Their Document Organization for information on configuring specific types of recognition jobs.) This section includes the following topics:
7.2.1 Adding, Copying, or Editing a Recognition Job
To add, copy, or edit a recognition job:
-
In a selected workspace, click the Processing tab.
-
In the Recognition Processor Jobs table, click the Add button or select a job and click the Edit button.
You can also copy a Recognition Processor job by selecting one, clicking the Copy button, and entering a new name when prompted. Copying a job allows you to quickly duplicate and modify it.
-
Complete settings on the General Settings train stop.
-
Enter a name for the job in the Recognition Job Name field.
-
The Online field is automatically selected. For more information about activating or deactivating jobs, see Activating or Deactivating Recognition Jobs.
-
If the recognition job uses a script, select it in the Script field. For information about using scripts, see Customizing Recognition Processing Using Scripts.
-
-
On the Bar Code Recognition train stop, specify settings specific to bar code recognition and identify bar code types (symbologies) for the recognition job to detect.
It is recommended to select the bar code symbology if it is known, because it improves performance and decreases the risk of detecting unknown bar codes that may interfere with processing.
-
On the Bar Code Definition train stop, add bar code definitions.
For background information, see How are bar codes and patch codes detected and identified?. For steps, see Adding, Editing, or Deleting Bar Code Definitions.
-
On the Document Organization train stop, specify how documents in batches are composed.
-
On the Document Profile train stop, specify a document profile to use, or configure one to be dynamically determined. The settings that display depend on the selected document organization method. You must select a default document profile.
For background information, see How are documents classified?. For steps, see Specifying a Static or Dynamically Determined Document Profile.
-
On the Document Processing train stop, specify how documents are separated and processed. The settings that display depend on the selected document organization method. If documents are separated by single or hierarchical separators, configure bar code or patch code separator rules.
For background information, see How are documents separated?. For steps, see Configuring a Separator Page Definition.
On this train stop, you can also specify if and how to include attachments if you choose a document organization method in the Document Organization train stop. See How are attachments handled?.
-
On the Fields train stop, set bar codes or other values to auto populate Capture metadata fields for each document.
-
On the Database Lookup train stop, optionally configure a database lookup for the recognition job.
-
On the Post-Processing train stop, specify what happens after recognition processing completes, depending on processing success.
-
Review settings on theSummary train stop and click Submit.
-
Configure how batches flow to the Recognition Processor job. See Configuring Batch Flow to a Recognition Processor Job.
-
Test the Recognition Processor job.
7.2.2 Deleting a Recognition Job
Deleting a recognition job makes it unavailable for batches for whom it is set as a post-processing step. Before deleting a recognition job, you may want to take it offline for a time first to resolve unexpected issues with it, as described in Activating or Deactivating Recognition Jobs.
To delete a recognition job:
-
In a selected workspace, select the Processing tab.
-
In the Recognition Processor Jobs table, select a job to delete and click the Delete button.
-
When prompted, click Yes to confirm the deletion.
7.2.3 Activating or Deactivating Recognition Jobs
If online, recognition jobs run when selected in a client profile or processor job’s Post-Processing train stop. You can temporarily stop the job from running (take it offline) or change a deactivated job to run again.
Note: When reactivating a job, it may take up to a minute for the job to resume processing batches that were queued while the job was offline.
Follow these steps to change a Recognition Processor job to online or offline:
-
On the Processing tab, select a job in the Recognition Processor Jobs table. Notice that the Status column displays Online or Offline for each job.
-
Click the Toggle Online/Offline button to either activate the job or deactivate it.
You can also deactivate or activate a Recognition Processor job by selecting or deselecting the Online field on the General Settings train stop.
7.2.4 Configuring Post-Processing and Monitoring
Use a Recognition Processor job’s post-processing options to specify what happens after processing completes. You specify the following settings separately for batches that processed successfully and for those that generated system errors:
To configure post-processing settings:
-
In a selected workspace, add or edit a Recognition Processor job. See Adding, Copying, or Editing a Recognition Job.
-
Click the Post-Processing train stop.
The screen lists the same processing options for successful processing (no system errors) and unsuccessful processing (one or more system errors).
-
In the Batch Processor and Batch Processor Job fields, specify which processing step, if any, occurs after recognition processing completes. You can choose a batch processor of None (no processing occurs), Commit Processor, Recognition Processor, or Document Conversion Processor or an XML transformation processor. If you choose Recognition Processor or Document Conversion Processor, specify a processor job.
For example, you might send batches with no system errors to the Commit Processor. You might specify None for batches with system errors, then change their batch status or prefix to facilitate further processing in the client.
-
In the email address fields, optionally enter an address to which to send an email after processing completes successfully or fails. While configuring and testing a Recognition Processor job, you might set yourself to receive email notifications upon system errors, then later automatically alert an administrator of processing errors.
-
In the remaining fields, specify how to change processed batches.
-
Rename batches by adding a prefix. For example, rename batches that were unsuccessful with the prefix
ERRfor follow-up. -
Change batch status or priority. For example, you might change the status of batches with system errors, then create a client profile with batch filtering set to this status to allow qualified users to manually edit and complete batches that encountered errors.
-
-
Click Submit to save the job.
7.2.5 Configuring Batch Flow to a Recognition Processor Job
To run a recognition job, you must configure batches to flow to the job for processing. You do this by identifying the Recognition Processor job as the post-processing step in a client profile or other processor job. To configure batch flow from:
-
A client profile, see Configuring a Client Profile’s Post-Processing.
-
An Import Processor job, see Configuring Post-Processing.
-
A Document Conversion Processor job, see Configuring Post-Processing and Monitoring.
For example, you might create a client profile that users use to scan documents into batches, and then release for recognition processing. Or, you might create an Import Processor job that imports email messages and their PDF attachments, then sends them to the Document Conversion Processor for conversion to image format, then send on for recognition processing.
Remember that unless you plan to skip document organization, Recognition Processor expects batches to contain a single, image formatted document, as described in About Document Organization Methods.
7.3 Configuring Jobs Based on Their Document Organization
Defining a recognition job’s organization method is integral to configuring its document separation and indexing. This section describes how to configure recognition jobs for different organization types:
-
Configuring a Job for Documents Containing a Fixed Number of Pages
-
Configuring a Job for Documents with the Same Bar Code Value on Each Page
-
Configuring a Job for Batches with Separator Pages between Documents
-
Configuring a Job for Documents with Hierarchical Separators
-
Configuring a Job for Batches that do not need Document Organization
7.3.1 Configuring a Job for Documents Containing a Fixed Number of Pages
With this document organization method, batches contain documents with a fixed number of pages. On the job’s Document Processing train stop, you specify the number of pages per document and the number of pages within a document to read bar codes.
Examples of this organization method include:
-
One page documents where a bar code exists on each page and each page represents a unique document, as illustrated in Figure 7-2. In this example, because each page must contain a bar code, Page 3 (where no bar code was found or recognized) would require manual data entry.
-
Two page documents, such as the front and back sides of a page scanned in duplex mode. While the document’s first page typically includes the bar code, the second page would include the bar code if the page’s back side was inadvertently scanned first.
-
Form documents consisting of a fixed number of pages. For example, an organization’s business agreement may always consist of five pages. If the number of pages is unknown or attachments are scanned with documents, you may need to use a separator page method, as described in Configuring a Job for Batches with Separator Pages between Documents.
Figure 7-2 Example: Documents With a Fixed Number of Pages (Single Page)
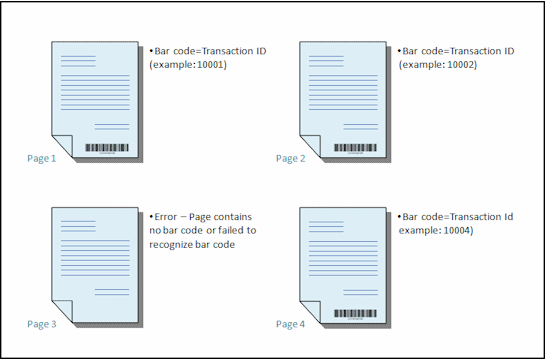
Description of “Figure 7-2 Example: Documents With a Fixed Number of Pages (Single Page)”
To configure a recognition job for documents containing a fixed number of pages:
-
On the Processing tab, add or edit a Recognition Processor job. See Adding, Copying, or Editing a Recognition Job.
-
On the Document Organization train stop, select the Fixed number of pages per document method.
-
On the Bar Code Recognition train stop, configure bar codes to be recognized.
-
On the Bar Code Definition train stop, configure how bar codes are detected. See How are bar codes and patch codes detected and identified? and Adding, Editing, or Deleting Bar Code Definitions.
-
On the Document Profile train stop, specify the group of metadata fields to apply to the recognition job by selecting a previously created document profile (Managing Document Profiles) in the Default Document Profile field. You can determine a document profile dynamically using a selected bar code. See Specifying a Static or Dynamically Determined Document Profile.
-
On the Document Processing train stop, complete settings specific to Fixed number of pages per document jobs, whose organization is set on the Document Organization train stop.
-
In the Number of Pages Per Document field, enter the fixed number of pages each document contains.
-
Specify a number in the Number of pages per document to read bar codes field.
This setting optimizes performance by executing bar code recognition on the first specified number of pages of each document. For example, if the bar code is on page 3 of 10, you would specify 3 so that bar code recognition occurs on the first 3 pages of each document. You can also use this field to ensure that conflicting bar codes in later document pages are disregarded.
-
Specify an action in the If more than one value is found for a bar code within a document field: use the first value found, overwrite the bar code value, or clear the bar code value.
-
Specify if and how to include source document’s attachments to the created documents. See How are attachments handled?.
-
-
Configure metadata assignment settings on the Fields (Specifying Metadata Field Auto Population) and Database Lookup (Configuring Database Lookups in Recognition Processing Jobs) train stops.
-
Click Submit and test the recognition job’s functionality.
7.3.2 Configuring a Job for Documents with the Same Bar Code Value on Each Page
With this document organization method, batches consist of multiple page documents where each page of a document contains the same bar code value. Thus, a change in bar code value between pages indicates the start of a new document. For example, a customer agreement document might contain a customer ID bar code on each page.
On the job’s Document Processing train stop, you specify which bar code the job uses to determine document separation and a maximum number of pages per document.
Figure 7-3 shows documents with the same bar code value on each page.
Figure 7-3 Example: Documents With the Same Bar Code Value on Each Page
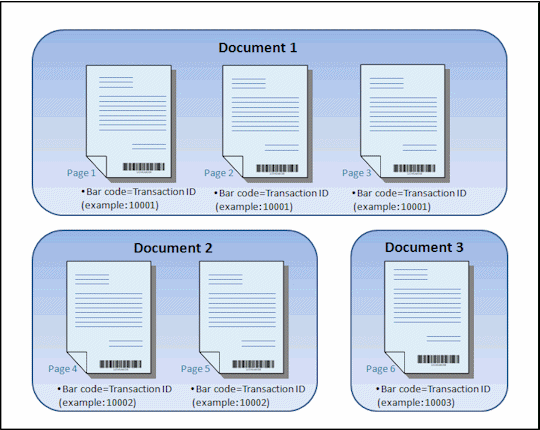
Description of “Figure 7-3 Example: Documents With the Same Bar Code Value on Each Page” To configure a job for documents with the same bar code value on each page:
-
On the Processing tab, add or edit a Recognition Processor job. See Adding, Copying, or Editing a Recognition Job.
-
On the Document Organization train stop, select the Same bar code value on each page organization.
-
On the Bar Code Recognition train stop, configure bar codes to be recognized.
-
On the Bar Code Definition train stop, configure how bar codes are detected. See How are bar codes and patch codes detected and identified? and Adding, Editing, or Deleting Bar Code Definitions. At a minimum, create the bar code definition that will determine document separation.
-
On the Document Profile train stop, specify the group of metadata fields to apply to the recognition job by selecting a previously created document profile (Managing Document Profiles) in the Default Document Profile field. You can determine a document profile dynamically using a selected bar code. See Specifying a Static or Dynamically Determined Document Profile.
-
On the Document Processing train stop, complete settings specific to the selected Document Organization (Same bar code value on each page).
-
Select the bar code definition you created in step 4 in the Bar Code That Determines Document Separation field.
-
Specify a number in the Maximum Number of Pages Per Document field to limit the number of pages permitted in a document. This is an optional field. Specify 0 to skip specifying the maximum number of pages per document.
-
In the Process Option field, optionally enable the optimistic bar code detection feature. If a bar code cannot be read or is not present on a page and this feature is active, the Recognition Processor compares values for the previous and next pages and assigns a value accordingly.
For example, a three page batch contains page 1 with bar code A, page 2 with no bar code, and page 3 with bar code A. When the optimistic bar code detection feature is enabled, the Recognition Processor groups all 3 pages in the same document. When it is not enabled, pages 1 and 3 are grouped into one document excluding page 2.
-
Specify an action in the If more than one value is found for a bar code within a document field: use the first value found, overwrite the bar code value, or clear the bar code value.
-
Specify if and how to include source document’s attachments to the created documents. See How are attachments handled?.
-
-
Configure metadata assignment settings on the Fields (Specifying Metadata Field Auto Population) and Database Lookup (Configuring Database Lookups in Recognition Processing Jobs) train stops.
-
Click Submit and test the recognition job’s functionality.
7.3.3 Configuring a Job for Batches with Separator Pages between Documents
With Separator pages selected as the Document Organization method, batches consist of multiple page documents that are separated by a document separator page. (Document organization for hierarchical levels of document separators is covered in Configuring a Job for Documents with Hierarchical Separators.) With this organization type:
-
The separator page indicates the beginning of a new document. Separator pages can be retained or removed from the document.
-
The separator page can contain bar codes and/or patch codes to indicate a new document.
-
You create rules that govern how separator pages are detected. For example, you configure document separation to occur when either a specified bar code or a patch code is detected or require that both are detected. See Configuring a Separator Page Definition.
Figure 7-4 displays documents with separator pages that contain a bar code and two patch codes. In this example, because the separator pages do not contain content other than bar codes and patch codes, they are discarded.
Figure 7-4 Example: Documents With Separator Pages Between Them
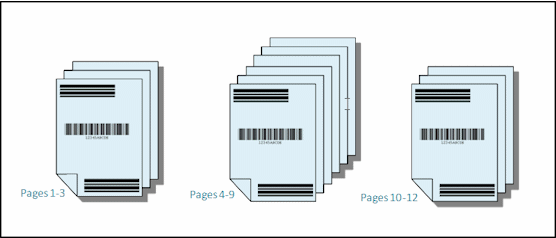
Description of “Figure 7-4 Example: Documents With Separator Pages Between Them”
Figure 7-5 displays another example of documents with separator pages. These separator pages are detected by a PDF417 bar code. Because the bar code page is part of the actual document, the separator pages are retained.
Figure 7-5 Example: Documents With Separator Pages Between Them
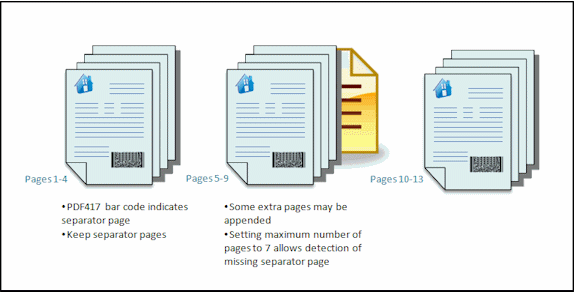
Description of “Figure 7-5 Example: Documents With Separator Pages Between Them”
To configure a job for batches with separator pages between documents:
-
On the Processing tab, add or edit a Recognition Processor job. See Adding, Copying, or Editing a Recognition Job.
-
On the Document Organization train stop, select the Separator pages method. (This method is the default document organization.)
-
On the Bar Code Recognition train stop, configure bar code symbologies to be recognized.
-
On the Bar Code Definition train stop, configure bar code settings for the documents to process. See How are bar codes and patch codes detected and identified? and Adding, Editing, or Deleting Bar Code Definitions. Configure all bar codes, including the separator page bar code and any others that might provide document profile or metadata values.
-
On the Document Profile train stop, specify the group of metadata fields to apply to the recognition job by selecting a previously created document profile (Managing Document Profiles) in the Default Document Profile field. You can determine a document profile dynamically using a selected bar code. See Specifying a Static or Dynamically Determined Document Profile.
-
On the Document Processing train stop, complete settings specific to the selected Document Organization (Separator pages).
-
Click Configure and configure the separator page. See Configuring a Separator Page Definition.
-
Specify a number in the Blank Page Byte Threshold field to limit the size of the page and select the Remove Blank Pages checkbox. If the threshold value is zero or Remove Blank Pages is unchecked, then page separation or deletion is not applicable. If the size of the pages is less than or equal to the threshold value and the Remove Blank Pages checkbox is also selected, then this page will be removed. If the size of the page is more than the threshold value, then the page will not be considered a blank page.
Note: When you scan a document that has all the blank pages, and if you select the option Remove Blank Pages, all the pages will be removed. So, the batch will become empty and will get deleted.
-
Specify a number in the Maximum Number of Pages Per Document field to limit the number of pages permitted in a document. This is an optional field. Specify 0 to skip specifying the maximum number of pages per document.
This field is helpful in detecting missing separator pages or separator pages that failed recognition. If Recognition Processor reaches this number, images between the last valid document and the next separator sheet detected remain in the batch for manual indexing. For example, if you know that documents in the job’s batches do not exceed 25 pages, enter this number to ensure that multiple documents are not combined if a document separator page is not detected or missing.
-
Specify an action in the If more than one value is found for a bar code within a document field: use the first value found, overwrite the bar code value, or clear the bar code value.
-
Specify if and how to include source document’s attachments to the created documents. See How are attachments handled?.
-
-
Click Submit and test the recognition job’s functionality.
7.3.4 Configuring a Job for Documents with Hierarchical Separators
Recognition Processor’s hierarchical separator feature allows you to process and organize documents within a hierarchy of levels. For example, you might use a two level hierarchy with folder and document levels, where documents inherit higher level folder metadata values until the next folder level separator page is detected.
Hierarchical separators are particularly useful in configuring back file conversions, where large volumes of documents stored in folders and boxes are digitized. A third party application can generate the hierarchical separator pages needed, which preparers insert to prepare stacks of documents, folders, and/or boxes for scanning and recognition processing.
Figure 7-6 shows a hierarchy with two levels:
-
A top Customer Folder level, with a Customer Folder separator page whose patch code identifies a folder level and whose bar code identifies the customer using a Customer Number.
-
A lower Document level, with a Document separator page whose patch code identifies a document level and whose bar code identifies the document type. Documents inherit customer folder metadata values.
When a new Customer Folder separator page is encountered, the Customer Folder metadata value (Customer Number) is cleared and replaced, which also causes the last Document Type metadata value to be cleared.
Note:
If a document separator is detected but the metadata values are not obtained, all metadata values are cleared at the applicable level and below to prevent unintentionally applying the wrong metadata values to a document.
In the case of hierarchical separator pages, a top level separator page must be the first page of the document, while lower level separator pages cannot be the first page, but may or may not be the second page.
Figure 7-6 Example: Hierarchical Document Separators With Two Levels
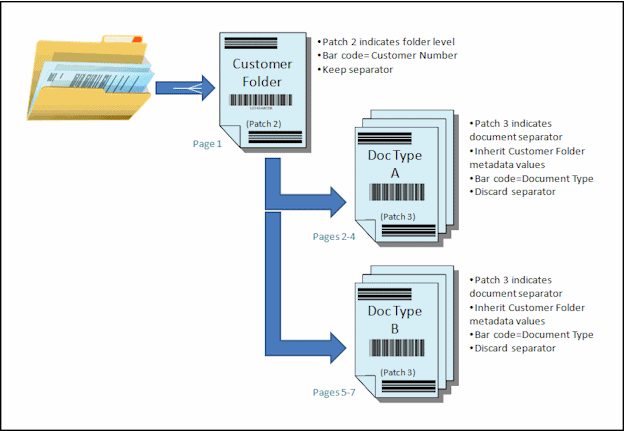
Description of “Figure 7-6 Example: Hierarchical Document Separators With Two Levels”
Figure 7-7 shows a more complex hierarchy with three levels:
-
A top Box level, with a Box separator page whose bar code identifies the box number and whose patch code identifies the folder level.
-
An intermediate Customer Folder level, with a Customer Folder separator page whose bar code identifies the customer number and whose patch code identifies the customer folder level.
-
A lowest Document level, with a Document separator page whose patch code identifies the document level and whose bar code identifies the document type. Documents inherit both customer folder and box levels.
When a new Customer Folder separator page is encountered, the Customer Folder related metadata value (Customer Number) is cleared and replaced, which also clears the last Document Type metadata value. When a new Box separator page is encountered, the Box Number, Customer Number, and Document Type metadata values are all cleared.
Figure 7-7 Example: Hierarchical Document Separators With Three Levels
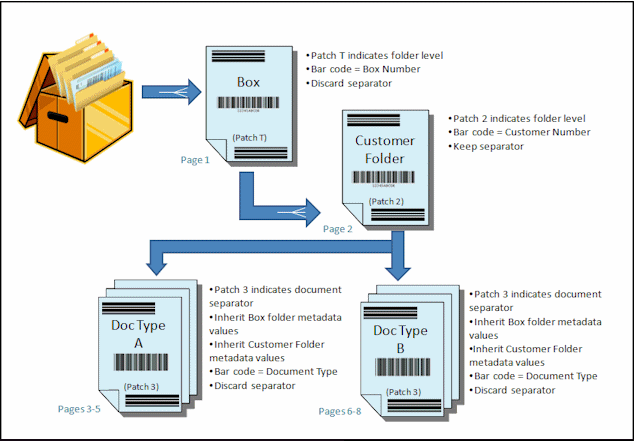
Description of “Figure 7-7 Example: Hierarchical Document Separators With Three Levels”
To configure a job for batches with hierarchical separators to organize documents:
-
On the Processing tab, add or edit a Recognition Processor job. See Adding, Copying, or Editing a Recognition Job.
-
On the Document Organization train stop, select the Hierarchical separator pages method.
-
On the Bar Code Recognition train stop, configure bar codes to be recognized.
- On the Bar Code Definition train stop, configure bar code settings for the documents to process. See How are bar codes and patch codes detected and identified? and Adding, Editing, or Deleting Bar Code Definitions. Configure all bar codes, including separator pages and any others that provide document profile or metadata values.
-
On the Document Profile train stop, specify the group of metadata fields to apply to the recognition job by selecting a previously created document profile (Managing Document Profiles) in the Default Document Profile field. You can determine a document profile dynamically using a previously created bar code or page separation definition. See Specifying a Static or Dynamically Determined Document Profile.
-
On the Document Processing train stop, complete settings specific to hierarchical separator jobs.
-
Specify an action in the If more than one value is found for a bar code within a document field: use the first value found, overwrite the bar code value, or clear the bar code value.
-
Configure hierarchical separator pages in the Document Hierarchy Separator Pages table. See Configuring Hierarchical Separator Page Definitions.
-
If you chose to determine a document profile dynamically using a separator page defined in step 5, a Document Profile column displays in the Document Hierarchy Separator Pages table for mapping page separator definitions with document profiles.
-
Specify if and how to include source document’s attachments to the created documents. See How are attachments handled?.
-
-
Configure metadata assignment settings on the Fields (Specifying Metadata Field Auto Population) and Database Lookup (Configuring Database Lookups in Recognition Processing Jobs) train stops.
- Click Submit and test the recognition job’s functionality.
7.3.5 Configuring a Job for Batches that do not need Document Organization
If batches are already organized into documents, you can skip the document organization process and proceed to recognize bar codes and index documents.
-
Batches processed with this method are already separated into documents. For example, you might choose this option for batches created by the Import Processor where each document in a batch represents an email attachment.
-
Unlike other organization methods, batches processed with this method may contain image and non-image documents. Because documents must be in image format for Recognition Processor to read their bar codes or patch codes, any non-image documents encountered are unaffected.
Figure 7-8 displays two scenarios where all pages in the batch are indexed as a single document:
-
In Scenario A, a bar code is found on the first page.
-
In Scenario B, the pages containing the bar codes used to index the document (Customer Number and Document Type) are on different pages (pages 2 and 4, respectively).
Figure 7-8 Example: Documents Needing No Organization
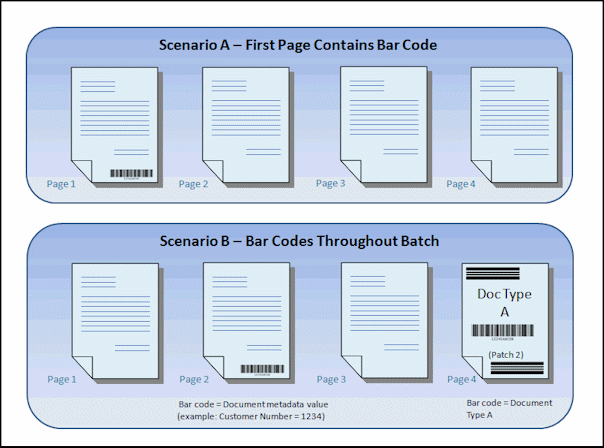
Description of “Figure 7-8 Example: Documents Needing No Organization”
To configure a job for batches that do not need document organization:
-
On the Processing tab, add or edit a Recognition Processor job. See Adding, Copying, or Editing a Recognition Job.
-
On the Document Organization train stop, select the None: Do not perform document organization method.
-
On the Bar Code Recognition train stop, configure bar codes to be recognized.
-
On the Bar Code Definition train stop, configure bar code definitions for the documents. See How are bar codes and patch codes detected and identified? and Adding, Editing, or Deleting Bar Code Definitions.
-
On the Document Profile train stop, specify the group of metadata fields to apply to the recognition job by selecting a previously created document profile (Managing Document Profiles) in the Default Document Profile field. You can determine a document profile dynamically using a selected bar code. See Specifying a Static or Dynamically Determined Document Profile.
-
On the Document Processing train stop, complete settings specific to no document organization jobs.
-
Optionally, click Configure and set up a separator page definition. See Configuring a Separator Page Definition.
Note: The purpose of detecting a separator for this type of job is to remove it from the document.
-
Specify a number in the Number of pages per document to read bar codes field. Specify 0 to perform bar code recognition on all document pages.
This setting optimizes performance by executing bar code recognition on the first specified number of pages of each document. For example, if the bar code is on page 3 of 10, you would specify 3 so that bar code recognition occurs on the first 3 pages of each document. You can also use this field to ensure that conflicting bar codes in later document pages are disregarded.
-
Specify an action in the If more than one value is found for a bar code within a document field: use the first value found, overwrite the bar code value, or clear the bar code value.
-
-
Configure metadata assignment settings on the Fields (Specifying Metadata Field Auto Population) and Database Lookup (Configuring Database Lookups in Recognition Processing Jobs) train stops.
-
Click Submit and test the recognition job’s functionality.
7.4 Configuring Bar Code, Patch Code, and Separator Page Definitions
This section describes how you configure definitions for bar codes and separator pages for a recognition processing job.
Note:
You can use bar code definitions throughout the job.
You can define patch codes for page separation. You can combine patch code detection with bar codes by creating separation page definition rules.
This section covers the following topics:
7.4.1 Adding, Editing, or Deleting Bar Code Definitions
A bar code definition identifies a bar code by its validation rule, such as its length in characters. As bar codes are recognized, they are assigned to a bar code definition based on the definition’s validation rule which considers the data characteristics of the bar code value. Once defined, you can use a bar code definition throughout a recognition job, including for page separation, auto populating metadata fields, assigning document profiles, and performing database lookups. (Bar code definitions are not shared between Recognition Processor jobs.)
-
Add or edit a recognition job, as described in Adding, Copying, or Editing a Recognition Job.
-
On the Bar Code Definition train stop, click the Add button in the Bar Code Definitions table.
-
In the Bar Code Definition window, enter a name for the bar code definition.
- In the Validation Rule field, specify how Recognition Processor should validate the bar code, as described in Table 7-4.
Table 7-4 Validation Rule Types
Validation Rule Type Description Example None Specifies no validation. This option is typically used to allow a script to populate the bar code definition value. See Customizing Recognition Processing Using Scripts. Length Maps any bar code value where the length of the bar code value matches the definition.
The length does not include unique bar code symbols such as start, stop and check digits (unless included).To match a value three characters in length, enter:
3Mask Specify a filter that controls which values are accepted, such as numbers or alphanumeric characters. To match an ID number such as 123-45-6789, you might enter:
###-##-####
Available mask characters are listed in Table 7-5.Regular Expression Specify a regular expression that defines which values are accepted. To match a value of a, b, or c, you would enter:
[abc]
For more information, refer to documentation relating to using and formatting regular expressions, such as the following:
http://docs.oracle.com/javase/tutorial/essential/regex/Choice List A bar code value must match a value contained in the specified choice list. A job contains documents with bar codes that identify their document type. A document type choice list contains values such as mortgage application, credit report, and credit reference. Any bar code value that is read that matches a choice list value is assigned to the specified bar code definition. After you select a rule, additional value fields are displayed (Length for length-type validation, Mask for mask-type validation, Regular Expression for regular-expression validation, and choice list fields for choice list validation).
-
Below the Validation Rule field specify validation values for the selected validation rule.
If specifying an input mask, enter a mask that describes the bar code value in the Mask field displayed. A recognized bar code is assigned to this bar code definition if the value meets the requirements of the mask you specify.
Note: Avoid configuring bar code definitions that conflict, such as two bar codes with the same length in characters. If necessary, consider using a script to use business logic to assign bar codes.
Table 7-5 Input Mask Characters
Mask Regular Expression They Convert To Explanation ? . (period) Use to match any single character. # \d Use to match any single number.
If a job contains documents with an identification number (for example, 123-45-6789), the mask would be ###?##?####.* .* Use to match zero, one, or more characters. [abc] [abc] Matches any single character specified from a group of one or more characters. Be sure to include the brackets ([]). To search for a specific bar code such as claim, the format would be [c][l][a][i][m]. [!abc] [^abc] Matches any single character not specified. Functions the same as [abc], except that with the exclamation point, a match results if any character except the characters specified in [abc] is found. [a-zA-Z] [a-zA-Z] Use a hyphen (-) to specify a range of characters. Character ranges must be specified in ascending order ([A-Z], not [Z-A]). For example, [A-Z] results in a match if a character in the A-Z range is found. -
ClickOK. The definition is listed in the Bar Code Definitions table.
- Repeat steps 2 through 6 to create additional bar code definitions.
7.4.2 Configuring a Separator Page Definition
As described in How are documents separated?, if you choose to organize documents using separator pages, you must configure one or more rules that define how separators are detected and used. Follow these instructions to configure separator pages. To configure hierarchical separator page definitions, see Configuring Hierarchical Separator Page Definitions.
-
In a selected workspace, create a Recognition Processor job with a document organization method of Separator pages or None: Do not perform document organization.
-
On the Document Processing train stop, click the Configure button next to Separator Page. To delete the separator page definition, click the Delete button next to the Configure button.
The Separator Page Definition screen displays, on which you define or edit the separator page by specifying one or more rules.
- In the Name field, enter a name for the separator page definition. Optionally, select the Remove separator page field to remove the separator page from the document. If deselected (the default), separator pages are included in the document.
- Click the Add button in the Rules table. To edit a rule, select it and click the Edit button.
-
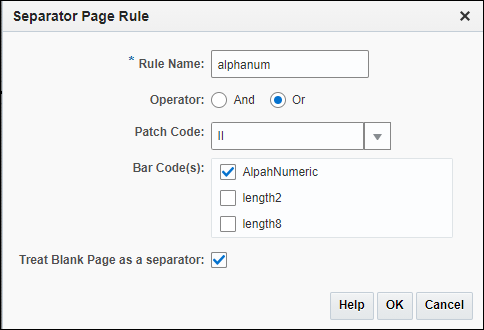
In the Separator Page Rule window, create a rule as shown in Figure 7-9.
-
Enter a name in the Rule Name field.
-
To indicate the start of a new document, select a patch code (I, II, III, IV, VI, or T), a previously created bar code definition, or both.
-
If you specify a patch code and a bar code or specify multiple bar code definitions or a blank page, select Or or And in the Operator field to indicate if one or more must be detected on a page for the page to be identified as a separator.
-
Click OK.
Figure 7-9 Separator Page Rule to Start a New Document Upon Detecting a Specified Bar Code, Patch Code, Blank Page or All
-
-
Repeat steps 4 and 5 to create additional rules in the Rules table.
-
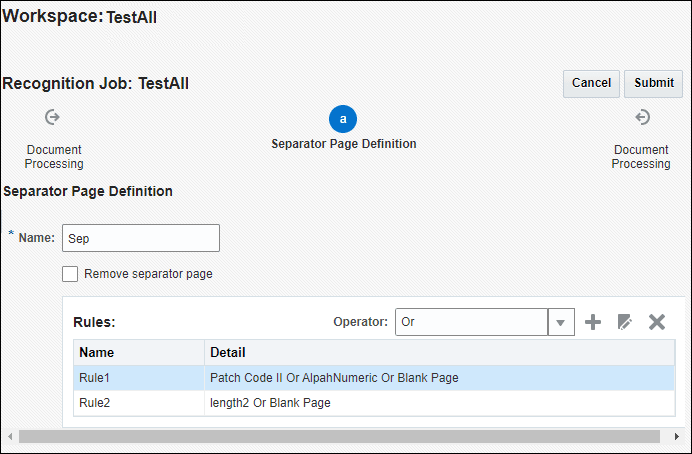
In addition to specifying And or Or conditions within rules (see Figure 7-9), you specify And or Or conditions between rules, by selecting And or Or in the Operator field in the Rules table. In Figure 7-10, either Rule 1 OR Rule 2 must match for separator detection, and each rule provides methods for matching (patch code OR bar code OR blank page).
Note: The blank page separator is only applicable for OR operator.
-
To remove a separator page rule, select it in the Rules table and click the Delete button.
-
Click Submit to save the separator page definition.
Figure 7-10 Separator Page Definition for Document Separation
Description of “Figure 7-10 Separator Page Definition for Document Separation”
-
- Click Submit to save the job.
7.4.3 Configuring Hierarchical Separator Page Definitions
As described in How are documents separated?, if you choose to organize documents using hierarchical separators, you must configure separator page definitions for each hierarchy level that detect patch codes and/or bar codes, or blank page. (To configure document separation for single level separator jobs or no organization jobs, see Configuring a Separator Page Definition.)
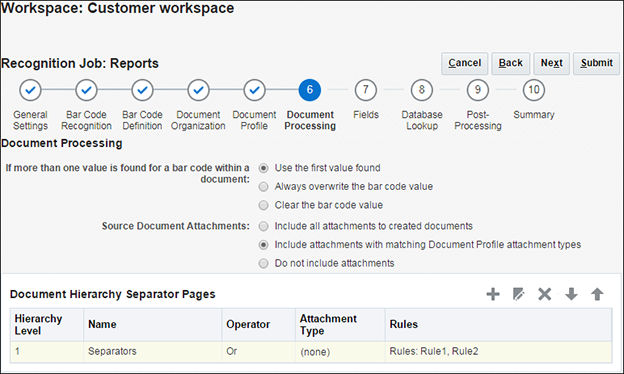
For example, Figure 7-11 displays hierarchical separator pages defined for box, customer, and document levels.
Figure 7-11 Hierarchy of Separator Page Definitions
Description of “Figure 7-11 Hierarchy of Separator Page Definitions”
To configure page separation for hierarchical separator jobs:
- In a selected workspace, add or edit a hierarchical separator page job. See Configuring a Job for Documents with Hierarchical Separators.
-
On the Document Processing train stop, click the Add button in the Document Hierarchy Separator Pages table to add a hierarchical separator page definition. To edit a definition, select it and click the Edit button.
-
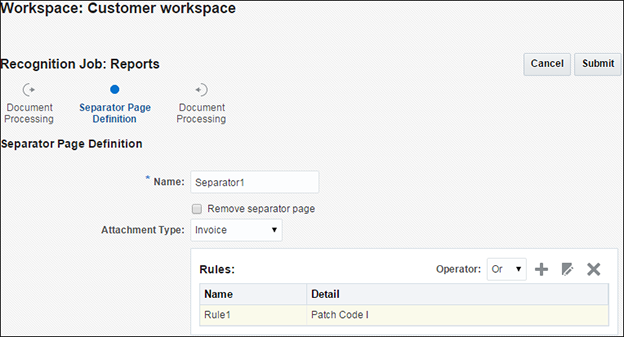
On the Separator Page Definition screen, create a definition for one of the hierarchy levels. For example, Figure 7-12 shows a definition for Customer level separation.
-
In the Name field, enter a name for the separator page definition.
-
Optionally, select the Remove separator page field to remove the separator page from the document or attachment. If deselected (the default), separator pages are included in the document or attachment.
Figure 7-12 Separator Page Definition for Document Separation
Description of “Figure 7-12 Separator Page Definition for Document Separation”
-
- In the Attachment Type field, select an attachment type from the list of defined attachment types to define a separator page to be included to an attachment. The Document Profile field is available only when you select Determine dynamically using separator page option in the Dynamic Document Profile Option field on the Document Profile train stop. The Attachment Type field is set to None and is disabled if you select a document profile in the Document Profile field. You can define an attachment type separator page only at the last hierarchy level.
-
Add or edit rules for the separator page definition.
-
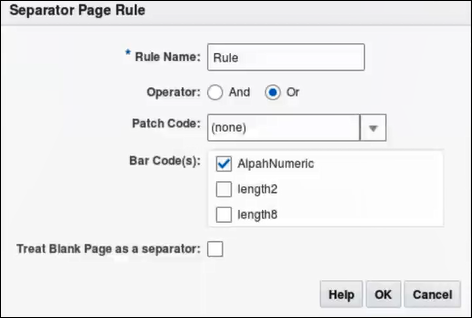
In the Separator Page Rule window, define a rule as shown in Figure 7-13.
-
Enter a name in the Rule Name field.
-
To indicate the start of a new document or attachment, select a patch code (I, II, III, IV, VI, or T), a previously created bar code definition, or both.
-
If you specify a patch code and a bar code or specify multiple bar code definitions or a blank page, select Or or And in the Operator field to indicate if one or more must be detected on a page for the page to be identified as a separator.
-
Click OK.
Figure 7-13 Separator Page Rule to Start a New Document Upon Detecting a Specified Bar Code, Patch Code, Blank Page or All
 Description of “Figure 7-13 Separator Page Rule to Start a New Document Upon Detecting a Specified Bar Code, Patch Code, Blank Page or All”
-
-
Repeat steps 5 and 6 to create additional rules for the page separator.
-
In addition to specifying And or Or conditions within rules (see Figure 7-13), you specify And or Or conditions between rules by selecting And or Or in the Operator field in the Rules table. For example, you might require both Rule 1 AND Rule 2 to match for separator detection, although each rule may provide methods for matching (patch code OR bar code OR blank page).
Note: The blank page separator is only applicable for OR operator.
-
To remove a separator rule, select it in the Rules table and click the Delete button.
-
Click Submit to save the separator page definition.
-
-
The separator page definition you created is listed in the Document Hierarchy Separator Pages table. Repeat steps 2 through 7 to create additional page separator definitions.
-
To remove a definition, select it in the table and click the Delete button.
-
Click the Up or Down buttons to move a selected definition up or down in the hierarchy to correctly reflect how the separator pages will be organized within a batch.
-
- Click Submit to save the job.
7.5 Specifying a Static or Dynamically Determined Document Profile
This section describes how to configure a recognition job to determine the document profile, which identifies the metadata fields available to index a document. For background information, see How are documents classified?.
-
In a selected workspace, create a Recognition Processor job. See Adding, Copying, or Editing a Recognition Job.
-
Select the Document Profile train stop to specify settings.
-
In the Default Document Profile field, specify a profile.
The recognition job uses the default document profile when the Do not determine dynamically field is selected or when no matching dynamically determined document profile is found.
-
In the Dynamic Document Profile Option field, specify if and how to dynamically determine a document profile. You can determine the document profile in the following ways:
-
Specify a static one by selecting Do not determine dynamically and choosing a profile in the Default Document Profile field.
-
Determine dynamically using a bar code definition, by selecting Determine dynamically using bar code and completing step 5.
-
Determine dynamically using separator page definition, by selecting Determine dynamically using separator page and completing step 6. This option is available only when Hierarchical separator pages is selected as the document organization method.
-
-
If you selected Determine dynamically using bar code in step 4, complete configuration, as shown in Figure 7-15.
-
In the Bar Code field, select a bar code definition whose value will be used as mapped in the table to determine the document profile.
-
In the Document Profile and Bar Code Value Mappings table, map possible bar code values with the document profile to use.
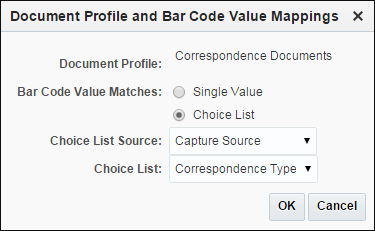
Click the Edit button. In the Document Profile and Bar Code Value Mappings window shown in Figure 7-14, specify if the bar code value must match a single value or match any item in a specified choice list. If matching a single value, specify the value. If matching any item in a choice list, specify the choice list source and choice list.
Figure 7-14 Separator Page Rule to Start a New Document Upon Detecting a Specified Bar Code, Patch Code, or Both
Map additional document profiles to bar code values in the table, if needed.
Figure 7-15 Determining Document Profile Dynamically Using Bar Code
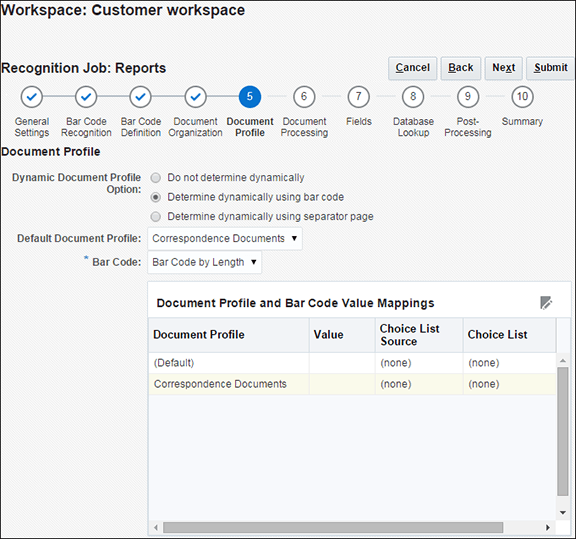
Description of “Figure 7-15 Determining Document Profile Dynamically Using Bar Code”
-
-
If you selected Determine dynamically using separator page in step 4, complete configuration.
-
Click the Document Processing train stop. A Document Profile column displays in the Document Separator Hierarchy Pages table.
-
Click the Add or Edit button in the table.
-
On the Separator Page Definition screen, select a profile in the Document Profile field for the hierarchy separator page. This field is set to None and is disabled if you select an attachment type in the Attachment Type field.
-
Repeat steps 6.b and 6.c to assign document profiles to hierarchy separator page definitions.
-
-
Click Submit to save the job.
7.6 Specifying Metadata Field Auto Population
During recognition processing, you can auto populate Capture metadata fields using a bar code value, batch name, default value, index date, or scan date. To configure auto populating:
-
In a selected workspace, create a Recognition Processor job. See Adding, Copying, or Editing a Recognition Job.
-
Click the Fields train stop. A table listing metadata fields defined for the workspace displays.
-
Select a field to auto populate and click the Edit button.
-
In the Edit Recognition Job window that displays, select an auto population method in the Auto Populate With field.
-
If auto populating with a bar code value or default value, specify the bar code or default value in the additional field that displays, and click OK.
-
Repeat steps 3 through 5 to configure additional fields for auto population.
-
Click Submit to save the job.
7.7 Configuring Database Lookups in Recognition Processing Jobs
You can use database lookups to populate metadata fields during recognition processing in several ways:
7.7.1 Using a Bar Code Value to Perform a Database Lookup
Follow these steps to perform a lookup that searches a database for a matching bar code value. For example, you might search on an account number detected on a bar code to populate additional metadata fields with account information during processing.
-
In a selected workspace, create the database lookup profile on the Metadata tab.
-
Create or edit a Recognition Processor job. See Adding, Copying, or Editing a Recognition Job.
-
On the Bar Code Definition train stop, add a bar code definition.
-
On the Database Lookup train stop, choose Bar Codein the Using field.
-
In the Bar Code field, select the bar code definition you created in step 3.
-
In the Database Lookup Profile field, select the database lookup profile you created in step 1.
-
In the Database Search Field, select a search field from those defined in the database lookup profile.
When the job runs, Recognition Processor searches this database field for a value that matches the bar code value. If a match is found, it populates the other metadata fields from the database record based on the return fields defined in the database lookup profile.
-
Specify actions for the job in the When more than one record is found and When no record is found fields.
-
Click Submit to save the recognition job.
-
Test the database lookup.
For example, view its results in the client. Ensure that the specified metadata fields were populated correctly.
7.7.2 Using a Metadata Value to Perform a Database Lookup
Follow these steps to perform a lookup that searches a database for a matching metadata value. When would you search on a metadata value rather than a bar code value? For example, if the bar code contained multiple field values that were separated using a script and you wanted to perform a database search on one of the values, you would configure the search using a metadata value and not the bar code value.
-
In a selected workspace, create the database lookup profile on the Metadata tab.
-
Create or edit a Recognition Processor job. See Adding, Copying, or Editing a Recognition Job.
-
On the Database Lookup train stop, choose Field Valuein the Using field.
-
In the Field Name field, select a metadata field from those defined for the workspace on the Metadata tab.
-
In the Database Lookup Profile field, select the database lookup profile you created in step 1.
-
In the Database Search Field, select a search field from those defined in the database lookup profile.
When the job runs, Recognition Processor searches this database field for a value that matches the metadata value. If a match is found, it populates the other metadata fields from the database record based on the return fields defined in the database lookup profile.
-
Specify actions for the job in the When more than one record is found and When no record is found fields.
-
Click Submit to save the recognition job.
-
Test the database lookup.
For example, view its results in the client. Ensure that the specified metadata fields were populated correctly.
7.8 Customizing Recognition Processing Using Scripts
To customize Recognition Processor behavior, incorporate a JavaScript. For example, you might use a script to split a single bar code value into multiple field values.
To use a script in a Recognition Processor job:
-
From a developer, obtain a Recognition Processor JavaScript file.
See Creating Recognition Processor Scripts in Developing Scripts for Oracle WebCenter Enterprise Capture.
-
On the workspace’s Advanced tab, import a script, specifying Recognition Processor as its script type, and identifying the script file. See Managing Capture Scripts.
-
On the Processing tab, select the Recognition Processor job and click the Edit button.
-
In the Script field on the General Settings train stop, select the Recognition Processor script you imported.
-
Test the results of the added recognition script.
On the Post-Processing train stop, set the Batch Processor to None so that you can observe the post processing results within the client.
7.9 Handling Recognition Processing System Errors
A Recognition Processor job might encounter system errors such as the following during processing:
-
Errors processing the image or performing bar code recognition.
-
Errors performing a database lookup.
-
Errors related to accessing the database, such as a network failure.
If an error occurs with a document’s separation or its bar code or patch code recognition, it becomes unclassified and is put in an unlocked (hold) state. Qualified client users can then classify and index the document.
In addition to email notification, the Capture system administrator can consult the Recognition Processor performance metrics and logs to address system issues.