A HTML Conversion Editor User Interface
The Dynamic Converter HTML Conversion Editor consists of several administrative pages that you use to customize your HTML conversion templates. The HTML Conversion Editor gives you broad control over how a template interprets a source document and converts it to HTML. It provides an intuitive interface for setting the various options that control the content and appearance of output generated by the conversion.
The following sections describe the various parts of the user interface and the options available to the template author. The interface is organized according to these four options:
-
Document Handling: This page contains several tabs that allow you to customize the formatting of your converted files according to file type.
-
Document Properties: This section of the HTML Conversion Editor allows you to specify predefined and custom document properties to be placed in the head or body of the document.
-
Generated Content: Generated content is made up of two kinds of elements:
-
Text elements, which define custom strings that can be used as replacement strings in the template or at run-time via a server API call. These strings can be output as-is or with formatting defined in the template.
-
Navigation elements, which automatically generate navigation links.
The following pages are available:
-
-
Output Pages: The Output Pages section contains options for HTML output, including markup items, and formatting of text, page layouts, and navigation layouts. This section of the interface contains the following pages that allow you to customize output:
A.1 Getting Started
The menu bar at the top of the HTML Conversion Editor contains three items:
-
File, which contains the command to exit the editor. If the template has been modified, the user is prompted to save the changes before exiting.
-
Tools, which contains commands to validate the template and to display the XML contents of the template.
Note:
The template is validated automatically when it is saved. It is not required to validate templates manually during edits.
-
Help, which contains commands to display this help file and the About box.
Beneath the menu bar is a button bar that lets you enter the content ID of a document that will be used to preview the effects of the template in a conversion prior to checking in the template. Click Preview to run the conversion and display the output using the default web browser.
The left side of the editor displays the different categories of options, organized as a functional flow from input document to finished output.
-
Document Handling includes options specific to each document type.
-
The Document Properties page allows the user to specify which document properties to display in the output, or create custom properties.
-
In Generated Content, the template author defines navigation elements and custom text elements.
-
Output Pages allows the user to specify basic characteristics of the generated output, such as the character set and the format for exported graphics. Output Text Formats allows the creation of text formats and mapping rules for transforming word-processing document content. In Output Markup Items the template author defines custom markup to be inserted into the output. Finally, the layout of the generated content is defined in the Output Page Layouts page.
A.2 Document Handling
The Document Handling page allows you to customize the formatting of your converted files according to file type:
A.2.1 Text/Word Processing Tab
The Text/Word Processing tab allows you to set formatting options for text and word processing files.
Figure A-1 Document Handling - Text/Word Processing Tab
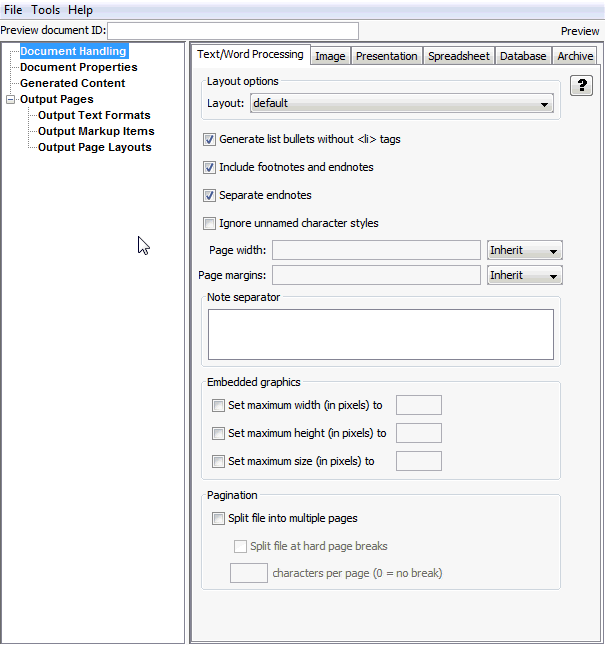
Table A-1 lists the Text/Word Processing Tab elements and the element descriptions.
Table A-1 Text/Word Processing Tab Elements and Descriptions
| Element | Description |
|---|---|
|
Layout |
Select which layout to use for this type of document. The layout controls the overall look of the document. Page layouts are defined under Output Page Layouts, and can then be selected from the drop-down menu. |
|
Generate list bullets without <li> tags |
Specifies whether lists should be output using HTML list tags (ordered list/unordered list) or as normal paragraphs with the appropriate decoration to indicate the list item. In some cases, greater fidelity to the source document is possible when this option is selected. |
|
Include footnotes and endnotes |
If checked, footnotes and endnotes from the input document are included in the output. Footnotes are always placed at the bottom of their respective pages. Endnote placement is determined by the Separate endnotes option. |
|
Separate endnotes |
If checked, endnotes are placed on a separate page at the end of the document. Otherwise, they are placed on the last page of output. |
|
Ignore unnamed character styles |
If checked, formatting from unnamed character styles in the source document is ignored. This is useful when creating a template that normalizes the formatting of document content, either directly or through external CSS. |
|
Page width and Page margins |
Page width and Page margins can be specified, inherited from the source document, or omitted. |
|
Note separator |
This allows you to specify markup, such as a <hr> tag, for separating footnotes and endnotes from the document content on a page. If both footnotes and endnotes are output on the same page, there will still be one occurrence of the separator markup between the document content and the first footnote. |
|
Embedded graphics |
These options allow you to impose size limits on embedded graphics, by width, height, or total number of pixels. The aspect ratio of the graphic is preserved regardless of the method specified. A value of 0 indicates no limit. |
|
Pagination |
These options enable the splitting of the output into multiple files and determine the conditions for creating a new page. Pages can be defined by hard page breaks and/or a word count. Note that tables will never be split across page boundaries. |
A.2.2 Image Tab
The Image tab allows you to customize formatting options specific to image files.
Figure A-2 Document Handling - Image Tab
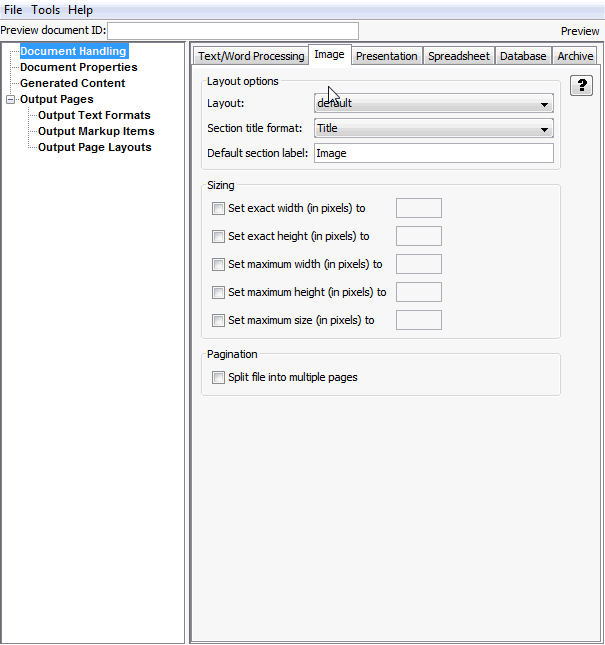
Table A-2 lists the elements and element descriptions for Document Handling - Image tab.
Table A-2 Document Handling - Image Tab Elements and Descriptions
| Element | Description |
|---|---|
|
Layout |
Selects which layout to use for image files. The layout controls the overall look of the document. Page layouts are defined under Output Page Layouts, and can then be selected from the drop-down menu. |
|
Section title format |
Specifies the format to be applied to the Section Title layout item. |
|
Default section label |
Specifies the default label to be used in section-based navigation. |
|
Set exact width (in pixels) to x |
Shrinks or enlarges the image so that the width exactly matches the specified value. If Set height to exactly x is not set, then the image will be scaled without altering its original aspect ratio. Setting this option to zero causes it to be ignored. |
|
Set exact height (in pixels) to x |
Shrinks or enlarges the image so that the height exactly matches the specified value. If Set width to exactly x is not set, then the image will be scaled without altering its original aspect ratio. Setting this option to zero causes it to be ignored. |
|
Set maximum width (in pixels) to x |
Shrinks very large images to no more than this many pixels wide. If size reduction is required, the aspect ratio of the source image is preserved. The default (0) means there is no maximum width. |
|
Set maximum height (in pixels) to x |
Shrinks very large images to no more than this many pixels high. If size reduction is required, the aspect ratio of the source image is preserved. The default (0) means there is no maximum height. |
|
Set maximum size (in pixels) to x |
Shrinks very large images to no more than this many pixels in area. If size reduction is required, the aspect ratio of the source image is preserved. The default (0) means there is no maximum size. |
|
Split file into multiple pages |
If checked, the images in multi-section graphic files such as TIFF or DXF will be output on separate pages. |
A.2.3 Presentation Tab
The Presentation tab allows you to customize the formatting options for presentations.
Figure A-3 Document Handling - Presentation Tab
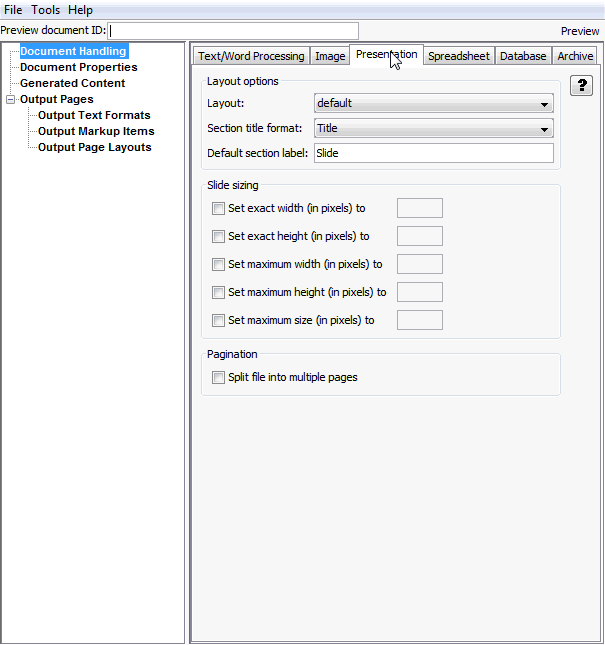
Table A-3 lists the elements and element descriptions for Document Handling - Presentation tab.
Table A-3 Document Handling - Presentation Tab Elements and Descriptions
| Element | Description |
|---|---|
|
Layout |
Selects which layout to use for presentation files. The layout controls the overall look of the document. Page layouts are defined under Output Page Layouts, and can then be selected from the drop-down menu. |
|
Section title format |
Specifies the format to be applied to the Section Title layout item. |
|
Default section label |
Specifies the default label to be used in section-based navigation. |
|
Set exact width (in pixels) to x |
Shrinks or enlarges the slide so that the width exactly matches the specified value. If Set height to exactly x is not set, then the slide will be scaled without altering its original aspect ratio. Setting this option to zero causes it to be ignored. |
|
Set exact height (in pixels) to x |
Shrinks or enlarges the slide so that the height exactly matches the specified value. If Set width to exactly x is not set, then the slide will be scaled without altering its original aspect ratio. Setting this option to zero causes it to be ignored. |
|
Set maximum width (in pixels) to x |
Shrinks very large slides to no more than this many pixels wide. If a change is needed, the aspect ratio of the source slide is preserved. The default (0) means there is no maximum width. |
|
Set maximum height (in pixels) to x |
Shrinks very large slides to no more than this many pixels high. If a change is needed, the aspect ratio of the source slide is preserved. The default (0) means there is no maximum height. |
|
Set maximum size (in pixels) to x |
Shrinks very large slides to no more than this many pixels in area. If a change is needed, the aspect ratio of the source slide is preserved. The default (0) means there is no maximum size. |
|
Split file into multiple pages |
If checked, each slide in the document will be output in a separate file. |
A.2.4 Spreadsheet Tab
The Spreadsheet tab allows you to set formatting options relevant to spreadsheets.
Figure A-4 Document Handling - Spreadsheet Tab
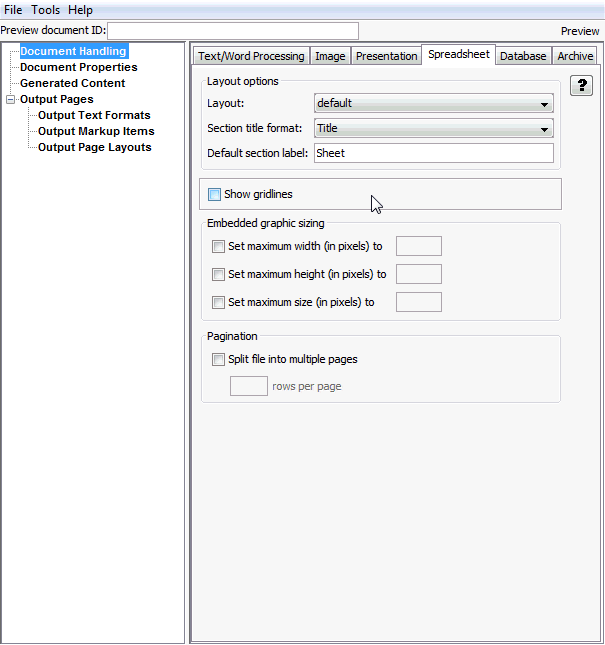
Table A-4 lists the elements and element descriptions for Document Handling - Spreadsheet Tab.
Table A-4 Document Handling - Spreadsheet Tab Elements and Descriptions
| Element | Description |
|---|---|
|
Layout |
Selects which layout to use for this type of document. The layout controls the overall look of the document. Page layouts are defined under Output Page Layouts, and can then be selected from the drop-down menu. |
|
Section title format |
Specifies the format to be applied to the Section Title layout item. |
|
Default section label |
Specifies the default label to be used in section-based navigation. |
|
Show grid lines |
HTML tables are used to render spreadsheets. This option causes the table to be output with the "border" attribute set, so that the cell boundaries are visible. If the option is not set, only borders specified by the document will be output. |
|
Set maximum width (in pixels) to x |
Shrinks very large images to no more than this many pixels wide. If a change is needed, the aspect ratio of the source image is preserved. The default (0) means there is no limit. |
|
Set maximum height (in pixels) to x |
Shrinks very large images to no more than this many pixels high. If a change is needed, the aspect ratio of the source image is preserved. The default (0) means there is no limit. |
|
Set maximum size (in pixels) to x |
Shrinks very large images to no more than this many pixels in area. If a change is needed, the aspect ratio of the source image is preserved. The default (0) means there is no limit. |
|
Split file into multiple pages |
Checking this option will cause each sheet in the document to be output on a separate page. Note that tables will never be split across page boundaries. |
|
x rows per page |
If the rows per page option is set to a nonzero value, the spreadsheet will be rendered as a series of tables containing up to the specified number of rows on each page. |
A.2.5 Database Tab
The Database tab allows you to specify formatting options specific to database files.
Figure A-5 Document Handling - Database Tab
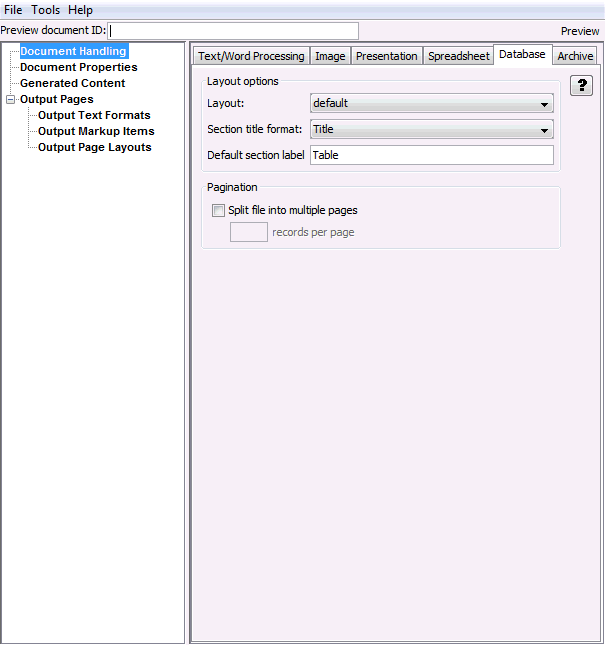
Table A-5 lists the elements and their descriptions for Document Handling - Database Tab.
Table A-5 Document Handling - Database Tab Elements and Descriptions
| Element | Description |
|---|---|
|
Layout |
Selects which layout to use for this type of document. The layout controls what the overall look of the document. Page layouts are defined under Output Page Layouts, and can then be selected from the drop-down menu. |
|
Section title format |
Specifies the format to be applied to the Section Title layout item. |
|
Default section label |
Specifies the default label to be used in section-based navigation. |
|
Split file into multiple pages |
Setting this option will cause each section of the document to be output on a separate page. |
|
x records per page |
If the records per page option is set to a nonzero value, the database will be rendered as a series of tables, each containing up to the specified number of records. |
A.2.6 Archive Tab
The Archive tab allows you to specify formatting options specific to archive files.
Figure A-6 Document Handling - Archive Tab
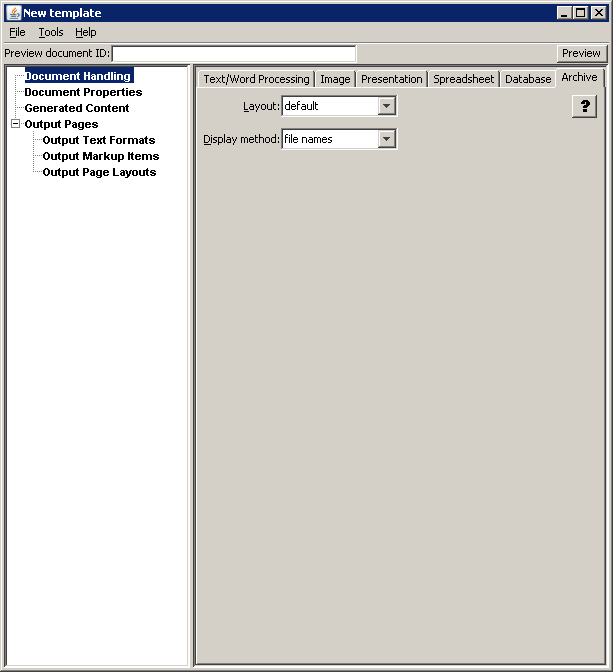
Table A-6 lists the elements and descriptions for the Document Handling - Archive tab.
Table A-6 Document Handling - Archive Tab Elements and Descriptions
| Element | Description |
|---|---|
|
Layout |
Selects which layout to use for this type of document. The layout controls the overall look of the document. Page layouts are defined under Output Page Layouts, and can then be selected from the drop-down menu. |
|
Display method |
Archive files (for example, ZIP) are rendered as a series of tables representing the file hierarchy of the archive. The default display method is file names, in which only the file list will be output. If the display method is set to decompressed files, each file in the archive will also be rendered based on the appropriate template settings for that document type. The file listing will contain links to the rendered files. |
A.3 Document Properties
This section of the Editor allows you to specify predefined and custom document properties to be placed in the head or body of the document.
The following pages are available in this section:
A.3.1 Add Document Property
The Add Document Property page allows to you add and remove document properties.
Figure A-7 Add Document Property
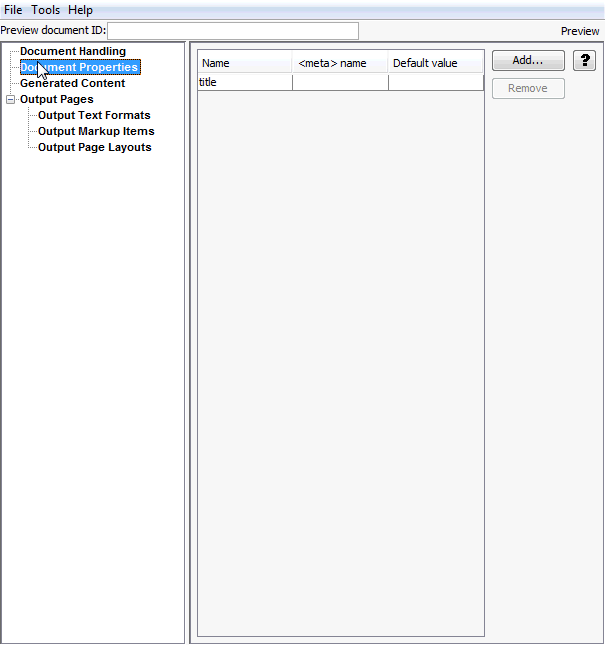
Table A-7 lists the elements and descriptions for Add Document Property tab.
Table A-7 Add Document Property Elements and Descriptions
| Element | Description |
|---|---|
|
Add |
Click this button to add a new document property. |
|
Remove |
Select a defined document property from the list and click this button to remove it. A property may not be removed if it is used by a page layout. |
A.3.2 Document Property
The Document Property page allows you to define two types of document properties: predefined and custom.
Figure A-8 Document Property
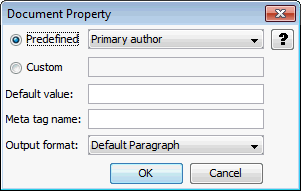
Table A-8 lists the elements and descriptions for Document Property tab.
Table A-8 Document Property Tab - Elements and Descriptions
| Element | Description |
|---|---|
|
Predefined |
Predefined properties are metadata fields stored in many file formats. An example of this is the Primary author, which is the author of the input document. Exactly which properties are available is highly dependent on the input file format and in most cases it is also dependent on whether or not the author provided this information. |
|
Custom |
Custom properties are defined by the author. These can be used to insert arbitrary text and HTML markup into the output files. By default, no document properties are defined. In order to include them in the output from the conversion, each desired document property must first be defined here. They must then be added to the output from the conversion by inserting them into page layouts defined under Output Page Layouts. |
|
Default value |
The default value to use if the property is not found in the input document being converted. This is also used as the value for custom properties. Providing a default value is optional. |
|
Meta tag name |
If the property is to appear in an HTML meta tag, then this is the value of the "name" attribute to use in the meta tag. The value of the "content" attribute will be taken from the source document or the Default value option set above, as appropriate. If there is no author specified in the input document, then the meta tag generated will be as follows: <meta name="author" content="Unknown"> While providing a meta tag name is optional, it must be specified if the property is to be included with the rest of the meta tags in the <head> of the output files. |
|
Output format |
Name of the output paragraph format to use to format the property when including the property's value in the output as visible text. |
A.4 Generated Content
Generated content is made up of two kinds of elements:
-
Text elements, which define custom strings that can be used as replacement strings in the template or at run-time via a server API call. These strings can be output as-is or with formatting defined in the template.
-
Navigation elements, which automatically generate navigation links.
The following pages are available:
A.4.1 Add Text Elements
The Add Text Elements page enables you to access the Text Elements page, which allows you to specify text to be inserted into the converted output.
Figure A-9 Add Text Elements
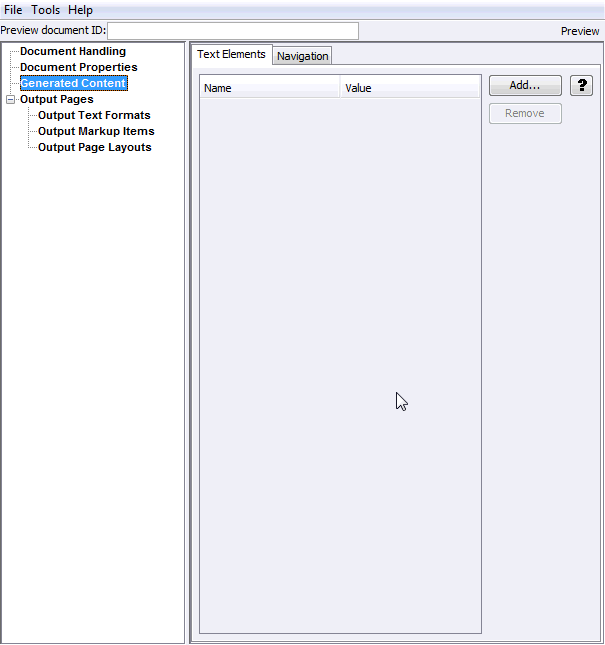
Table A-9 lists the elements and descriptions for Add Text Elements tab.
Table A-9 Add Text Elements - Elements and Descriptions
| Element | Description |
|---|---|
|
Add |
Click this button to display the Text Element page to add a new text element. |
|
Remove |
Select a defined text element from the list and click this button to remove it. An element may not be removed if it is used by a page layout. |
A.4.2 Text Element
The Text Element page allows you to set a name/value for new text elements.
Figure A-10 Text Element
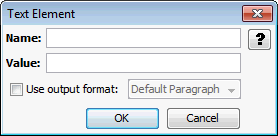
Table A-10 lists the elements and descriptions for Text Element tab.
Table A-10 Text Element tab - Elements and Descriptions
| Element | Description |
|---|---|
|
Name |
The name by which this text element will be referred when creating/editing page layouts. This field is required. |
|
Value |
The value to insert into the output when this text element is used in a page layout. By default, this is left blank. |
|
Use output format |
The name of the output format. This will be used to format the text element when including its value in the output as visible text. |
A.4.3 Add Navigation Element
The Add Navigation Element page enables you to access pages that allow you to place navigation links in the converted output. There are three kinds of navigation elements: document navigation, page navigation, and section navigation.
Figure A-11 Add Navigation Element
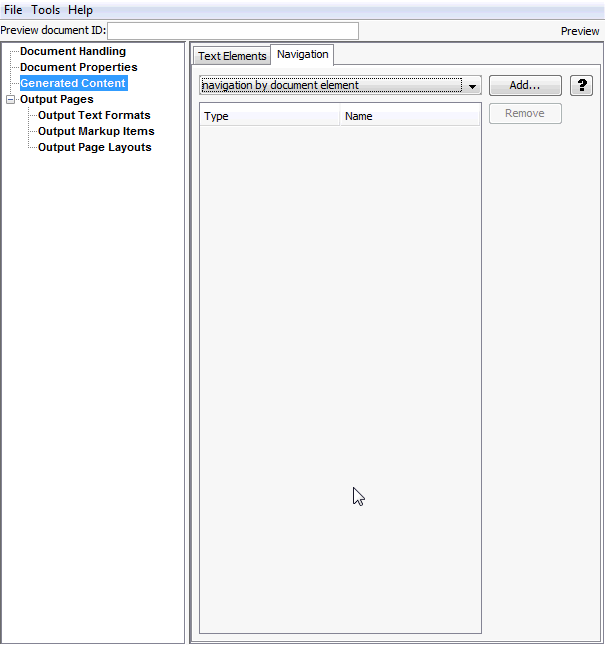
Table A-11 lists the elements and descriptions for Add Navigation Element tab.
Table A-11 Add Navigation Element tab - Elements and Descriptions
| Element | Description |
|---|---|
|
navigation by ... |
Click the drop-down box next to the Add button to select whether a document navigation, page navigation, or section navigation element will be added. |
|
Add |
Click this button to display the document navigation, page navigation, or section navigation page to define the element. |
|
Remove |
Highlight a navigational item and click this button to remove navigational elements that are no longer needed. A navigational element may not be removed if it is used by a page layout. |
A.4.4 Element Navigation
The Element Navigation page enables you to provide local/global navigation to document elements for word processing documents. It has the following subordinate Link Set pages:
Figure A-12 Element Navigation
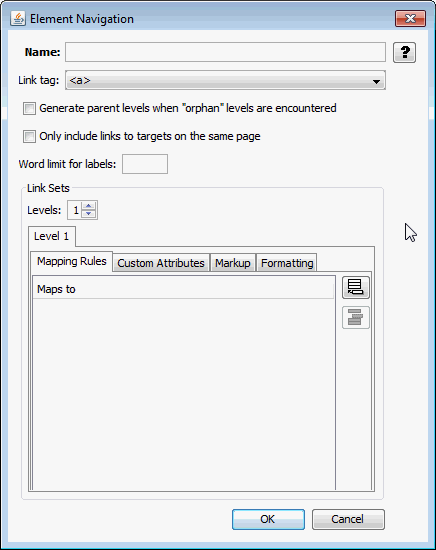
Table A-12 lists the elements and descriptions for Element Navigation tab.
Table A-12 Element Navigation tab - Elements and Descriptions
| Element | Description |
|---|---|
|
Name |
Name by which the page layouts will refer to this navigation element. Required. |
|
Link tag |
Specifies whether to use <a> or <option> to enclose the links in this element. |
|
Generate parent levels when "orphan" levels are encountered |
This option causes missing link levels to be added so that the link hierarchy starts at level 1. |
|
Only include links to targets on the same page |
This is used to generate a small set of links to targets that all appear in the same output HTML page. An example of this would be to break a document up so there is one outline level 1 paragraph in each output HTML page. You could then set this option as part of creating a line of links across the top of the page that go to all the outline level 2's that appear on the page. If this option is not set (the default), then links to targets across the entire document are generated. |
|
Word limit for labels |
The link's label is taken from the text of the document element. Some target elements may contain large amounts of text. This can cause problems in the formatting of the list of links. Setting this option truncates the label after the specified number of words, in which case an ellipsis will be output to indicate the truncation. Setting this option to 0, the default, causes the entire target element's text to be used as the link label. |
|
Link Sets |
The Link Sets section has four tabs:
|
|
Levels |
Once link sets have been added, their order may be arranged by using these up/down arrows. The order that link sets appear in the window establishes navigation hierarchy. When a link set is moved up or down, its name changes accordingly; for example, if two link sets are defined (Level 1 and Level 2) and the second one is selected and moved up, it becomes the Level 1 link set. |
|
Remove |
Highlight a link set and click this button to remove it. |
A.4.4.1 Mapping Rules Tab
The Mapping Rules tab allows you to access the Link Mapping Rule page. Link mapping rules establish which parts of the input document will be used to create links.
Figure A-13 Link Mapping Rule
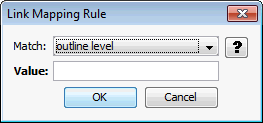
Table A-13 lists the elements and descriptions for Link Mapping Rule.
Table A-13 Link Mapping Rule - Elements and Descriptions
| Element | Description |
|---|---|
|
Add/Remove Link Mapping Rule |
Click the Add Link Mapping Rule icon to add a new link mapping rule to mark document content for navigation. Highlight a rule and click the Remove icon to delete it. |
|
Move Up and Move Down |
Once mapping rules have been added, their order may be arranged by using these buttons. The mapping rules are ordered so that the first rule that matches is the one that is applied. |
|
Match on |
This determines what kind of mapping rule is being created. There are two choices:
|
|
Value (outline or style) |
|
A.4.4.2 Custom Attributes Tab
The Custom Attributes tab allows you to define custom attributes and custom markup to insert before or after the link set.
Table A-14 lists the elements and descriptions for Custom Attributes Tab.
Table A-14 Custom Attributes tab - Elements and Descriptions
| Element | Description |
|---|---|
|
Custom link attributes |
Displays custom attributes specified by the user. Use the Add attribute and Remove Attribute buttons to add and delete attributes, respectively. |
|
Name/Value |
Any name/value pairs you wish to define. By default, this is empty. |
A.4.4.3 Markup Tab
The Markup tab allows you to define HTML markup to be inserted before, between, and/or after links.
Table A-15 lists the elements and descriptions for Markup Tab.
Table A-15 Markup Tab - Elements and Descriptions
| Element | Description |
|---|---|
|
Markup to insert before link |
Any desired text or HTML that should appear before the first link. By default, this is empty. |
|
Markup to insert between links |
Any desired text or HTML that should appear between links. By default, this is empty. |
|
Markup to insert after link |
Any desired text or HTML that should appear after the last link. By default, this is empty. |
|
Markup to insert before/after each link |
Any desired text or HTML that should appear before or after each link. By default, this is empty. |
A.4.4.4 Formatting Tab
The Formatting tab allows you to define an external CSS class, or directly define character formatting for the link set.
Figure A-14 Element Navigation - Formatting Tab
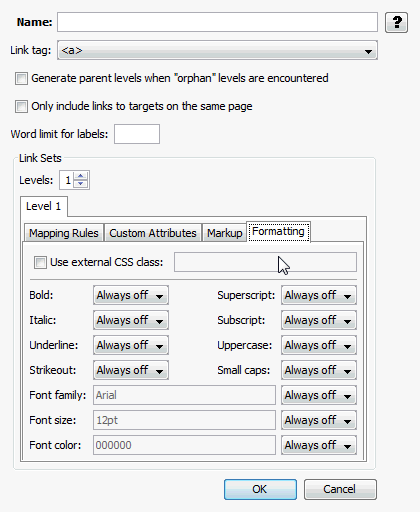
Table A-16 lists the elements and descriptions for Element Navigation - Formatting tab.
Table A-16 Element Navigation - Formatting Tab Elements and Descriptions
| Element | Description |
|---|---|
|
Use external CSS class |
If this option is selected, then the author must enter the name of a class from an external CSS file here. The URL of the external CSS file is specified with the External user stylesheet option set under Output Pages. |
|
Character Formatting |
Each available type of character-level formatting can be set to one of two values:
|
A.4.5 Page Navigation
Page Navigation provides page-relative navigation. This page has the following three tabs:
A.4.5.1 Markup Tab
The Markup tab allows you to insert markup before and/or after the set of links.
Figure A-15 Page Navigation - Markup Tab
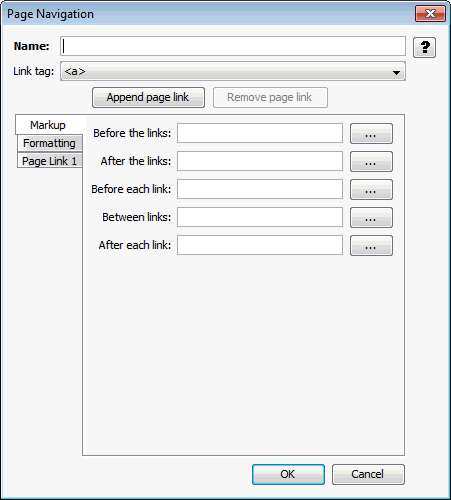
Table A-17 lists the elements and descriptions for Page Navigation - Markup Tab.
Table A-17 Page Navigation - Markup Tab Elements and Descriptions
| Element | Description |
|---|---|
|
Name |
Name by which the page layouts will refer to this navigation element. Required. |
|
Link tag |
Choose between anchor and option for the HTML tag to be used for the link. |
|
Markup to insert before this set of links |
Any desired text or HTML that should appear before the set of links. By default, this is empty. |
|
Markup to insert between this set of links |
Any desired text or HTML that should appear between the set of links. By default, this is empty. |
|
Markup to insert after this set of links |
Any desired text or HTML that should appear after the set of links. By default, this is empty. |
|
Markup to insert before/after each link |
Any desired text or HTML that should appear before/after each link. By default, this is empty. |
A.4.5.2 Formatting Tab
The Formatting tab allows you to specify formatting for navigation links.
Figure A-16 Page Navigation - Formatting Tab
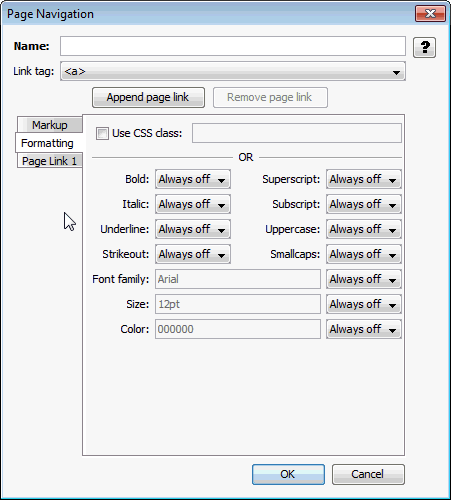
Table A-18 lists the elements and descriptions for Page Navigation - Formatting Tab.
Table A-18 Page Navigation - Formatting Tab Elements and Descriptions
| Element | Description |
|---|---|
|
Name |
Name by which the page layouts will refer to this navigation element. Required. |
|
Link tag |
Choose between anchor and option for the HTML tag for this link. |
|
Use CSS class |
Specify the name of an externally defined class here. The URL of the CSS file is specified by the External user stylesheet option set under Output Pages. |
|
Character Formatting |
The available types of character-level formatting are presented. Each type of formatting can be set to one of two values:
|
A.4.5.3 Page Link Tab
The Page Link tab allows you to add page navigation links, and then determine their order.
Figure A-17 Page Navigation - Page Link Tab
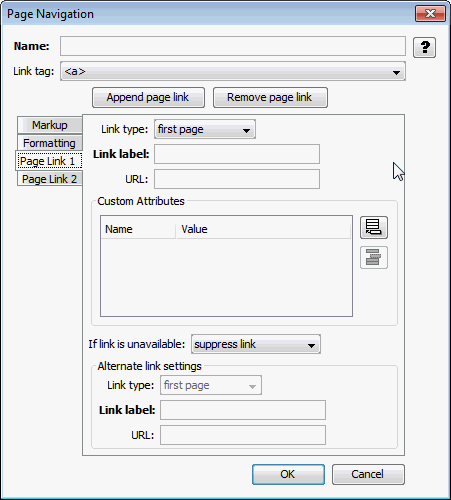
Table A-19 lists the elements and descriptions for Page Navigation - Page Link tab.
Table A-19 Page Navigation - Page Link Tab Elements and Descriptions
| Element | Description |
|---|---|
|
Append page link |
Click Append page link to add a page navigation link. Highlight a link and click Remove page link to delete it. |
|
Link type |
Defines the link as one of the following types:
|
|
Link label |
The text to place between the HTML begin and end anchor tags. This may be any valid HTML, including an <img> tag for a graphic to use as a button for the link. |
|
URL |
Required if the Link type option above is set to Custom URL. |
|
Add/Remove Custom Attributes |
Click the Add Attribute icon to add new attributes to include in the HTML anchor tag for the page link. After clicking the button, an entry will appear in the Name/Value table. Replace the default name with the name of the attribute. Replace the default value with the value for the attribute. As an example, you might choose alt and generated, respectively. Highlight a name/value pair and click the Remove Attribute icon to delete it. |
|
If link is unavailable |
This option specifies how to handle situations when the given link is unavailable; for example, the Next link is not available when generating the last page of the document. The following choices are available:
|
|
Alternate link settings |
If Provide alternate link was selected above, the following settings become available. Link type - The following choices are available:
Link label - No matter what Link type is chosen, this is the text and/or HTML that will be used for the replacement link. No default is provided. URL - URL to use if the Link type is set to Custom URL. This must be set to a valid URL. No default is provided. |
A.4.6 Section Navigation
Section navigation is used for multi-section document types, such as presentations and spreadsheets, and is useful for creating links to each section when pagination is not used. This is the simplest type of navigation element; the section labels are used as the link labels, and the other options in the dialog are the ones common to all of the navigation elements. This page has three tabs:
At the top of the page, two items are displayed for all three tabs.
Table A-20 lists the elements and descriptions for Section Navigation tabs.
Table A-20 Section Navigation Elements and Descriptions
| Element | Description |
|---|---|
|
Name |
Name by which the page layouts will refer to this navigation element. Required. |
|
Link tag |
Specifies whether to use <a> or <option> to enclose the links in this element. |
A.4.6.1 Custom Attributes Tab
The Custom Attributes tab allows you to insert custom markup before or after the set of links.
Figure A-18 Section Navigation - Custom Attributes Tab
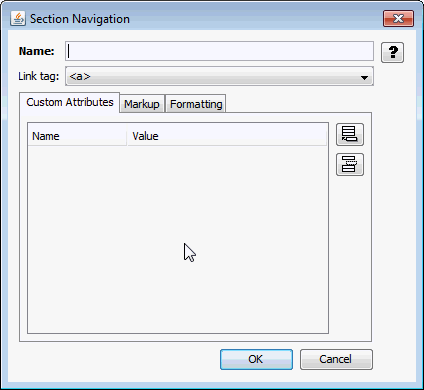
Table A-21lists the elements and descriptions for Section Navigation - Custom Attribute Tab.
Table A-21 Section Navigation Custom Attribute tab Elements and Descriptions
| Element | Description |
|---|---|
|
Custom attributes |
Displays custom attributes specified by the user. Use the Add attribute and Remove attribute buttons to add and delete attributes, respectively. |
|
Name/Value |
Any desired Name/Value pairs you wish to define. By default, this is empty. |
A.4.6.2 Markup Tab
The Markup tab allows you to insert HTML markup before, between, and/or after links.
Figure A-19 Section Navigation - Markup Tab
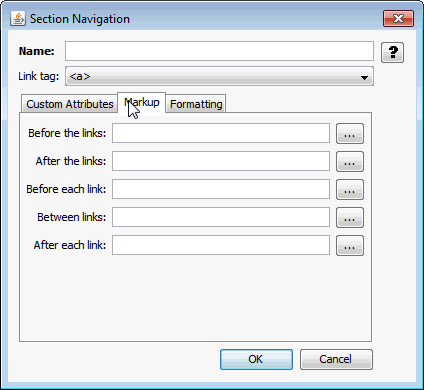
Table A-22 lists the elements and descriptions for Section Navigation - Markup Tab.
Table A-22 Navigation - Markup Tab Elements and Descriptions
| Element | Description |
|---|---|
|
Markup to insert before link |
Any desired text or HTML that should appear before the first link. By default, this is empty. |
|
Markup to insert between links |
Any desired text or HTML that should appear between links. By default, this is empty. |
|
Markup to insert after link |
Any desired text or HTML that should appear after the last link. By default, this is empty. |
|
Markup to insert before/after each link |
Any desired text or HTML that should appear before/after each link. By default, this is empty. |
A.4.6.3 Formatting Tab
The Formatting tab provides you with two different methods to specify the formatting for links.
Figure A-20 Section Navigation - Formatting Tab
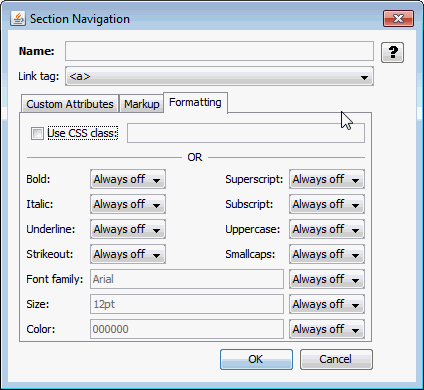
Table A-23 lists the elements and descriptions for Section Navigation - Formatting tab.
Table A-23 Section Navigation - Formatting Tab Elements and Descriptions
| Element | Description |
|---|---|
|
Use CSS class |
Specify the name of an externally defined class here. The URL of the CSS file is specified by the External user stylesheet option set under Output Pages. |
|
Character Formatting |
Each type of available character-level formatting can be set to one of two values:
|
A.5 Output Pages
The Output Pages section contains options for HTML output, including markup items, and formatting of text, page layouts, and navigation layouts. This section of the interface contains the following pages that allow you to customize output:
A.5.1 Output Pages
The Output Pages page allows you to set a variety of options regarding HTML output.
Figure A-21 Output Pages
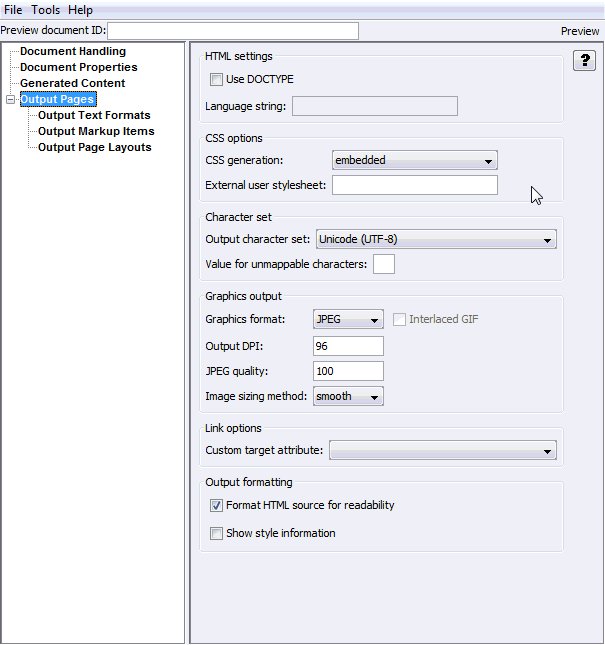
Table A-24 lists the elements and descriptions for Output Pages tab.
Table A-24 Output Pages Tab Elements and Descriptions
| Element | Description |
|---|---|
|
Use DOCTYPE |
Check this option to have the technology insert a DOCTYPE statement at the top of each output file. If CSS is enabled, the HTML generated conforms to the XHTML 1.0 Transitional DTD. If CSS is disabled, HTML 4.0 Transitional-conformant HTML is output. This option is enabled by default. |
|
Language string |
Specifies the value of the "lang" attribute of the <html> tag. This indicates the primary natural language of the document. |
|
CSS generation |
CSS enables Dynamic Converter to create output with higher fidelity with respect to the source document. Please note that CSS support varies from browser to browser. This option can be set to the following values:
By default, the CSS is embedded in the HTML of each output file. This reduces the total number of files generated by the conversion, as there is no need to create a separate CSS file. Note that if a style is needed anywhere in the final output of the conversion, it will appear in the style definitions of every HTML file. |
|
External user stylesheet |
Specifies the URI of a stylesheet to be referenced by the output. This is used in conjunction with the Use external CSS class option in the Character and Paragraph Formatting tabs to allow the template author to control the formatting of the document content. |
|
Output character set |
This option allows you to specify which character set should be used in the output file. The technology then translates or "maps" characters from the input document's character set to the output character set as needed. |
|
Value for unmappable characters |
This option specifies the character used when a character cannot be found in the output character set. This option takes the Unicode value for the replacement character specified in hexadecimal (the default value of 2A corresponds to the asterisk ("*") character). You must ensure that the selected replacement character is available in the output character set. |
|
Graphics format |
This option allows the developer to specify the format of the graphics produced by the technology. The following values are allowed:
|
|
Interlaced GIF |
This item is available if you have selected GIF as the Graphics format. Check this box if the output graphic is to be an interlaced GIF. |
|
Output DPI |
This option allows you to specify the output graphics device's resolution in DPI and only applies to objects whose size is specified in physical units (in/cm). For example, consider a 1" square, 100 DPI graphic that is to be rendered on a 50 DPI device ("Output DPI" option set to 50). In this case, the size of the resulting JPEG, GIF, or PNG will be 50 x 50 pixels. |
|
JPEG Quality |
If the format selected is JPEG, this allows you to set the quality (1-100) of the JPEGs created by the technology. |
|
Image sizing method |
This option determines the method used to size graphics. You can choose among three methods, each of which involves some degree of trade off between the quality of the resulting image and speed of conversion:
|
|
Custom target attribute |
Some input documents contain hyperlinks. Template authors may have a preference for the frame or window in which the browser opens the source document links. This option allows the template author to specify a value to use for the "target" attribute of the hyperlinks generated by the technology, and will override any target information from the source document. It does not affect hyperlinks in navigation layout items or markup. If this option is left blank, the "target" attribute will only be set if the source document provides a value for it. The following are valid values for the "target" attribute in HTML:
|
|
Format HTML source for readability |
Checking this option causes the technology to write newlines to the output strictly to make the generated HTML more readable and visually appealing. These newlines only appear in the places where you have set Add a newline before this paragraph. It is important to note the things that setting this option does not do:
|
|
Show style information |
Checking this box will cause Dynamic Converter to include information about source document style names and how they are mapped. You can see what format has been mapped to a particular paragraph or text sequence by mousing over it. |
A.5.2 Add Output Text Formats
The Add Output Text Formats page allows the user to add and remove output text formats, which define formatting attributes of output document text. Output text formats define text and formatting attributes of output document text. These formats will define such attributes as the font family, size, and color, standard text attributes (bold, italic, underline, etc.), and border attributes to use for tables. This allows the author to standardize the look of the output despite differing formatting styles used by the various authors of the source documents.
Figure A-22 Output Text Formats - Formats Tab
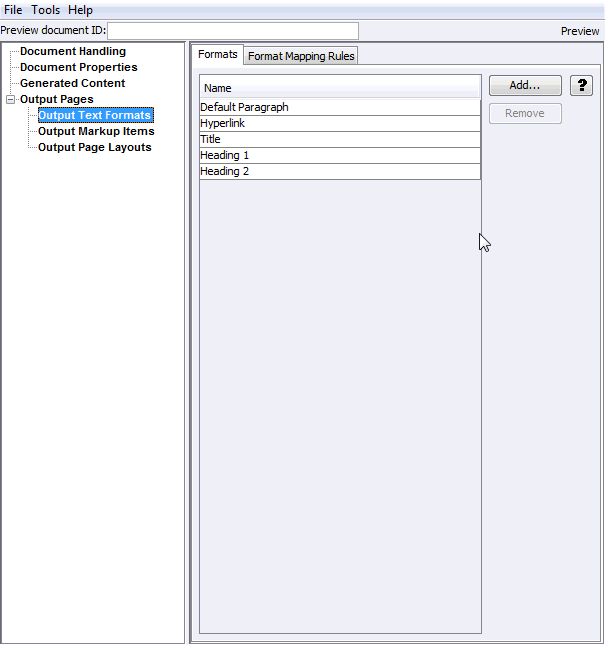
Table A-25 lists the elements and descriptions for Output Text Formats - Formats Tab.
Table A-25 Output Text Formats - Formats Tab Elements and Descriptions
| Element | Description |
|---|---|
|
Add |
Click the Add button to add a new output text format. The newly added item will appear in the left side tree view and you will be taken to that item for editing. The Default Paragraph format is always available. It essentially instructs the technology to leave the formatting in the output the same way it was in the input documents. |
|
Remove |
Select an output text format in the table and click Remove to delete it. |
A.5.3 Output Text Formats
The Output Text Formats page has two tabs:
A.5.3.1 Output Text Formats - Markup Tab
This tab allows you to define custom text formatting markup to be associated with elements in the output pages.
Figure A-23 Output Text Formats - Markup Tab
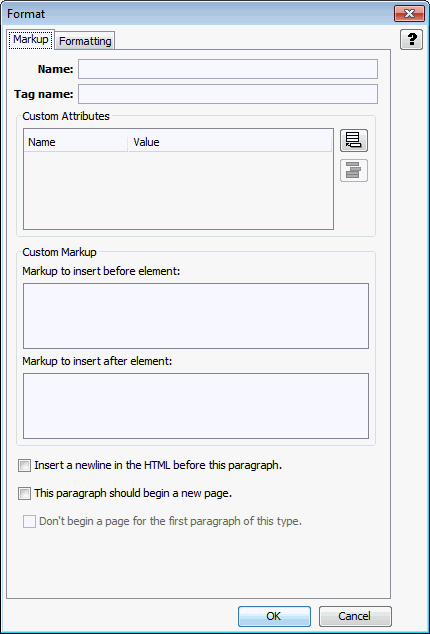
Table A-26 lists the elements and descriptions for Output Text Formats - Markup Tab.
Table A-26 Output Text Formats - Markup Tab Elements and Descriptions
| Element | Description |
|---|---|
|
Name |
Name to use to refer to this format. This field is required. |
|
Tag name (default = p) |
The HTML paragraph level tag to put around paragraphs using this format. Note that any tag name may be entered here, whether or not it is legal. Only the tag name should be entered, not the surrounding angle brackets ("<" and ">"). The paragraph tag ("p") is the default. |
|
Add Attribute |
Adds a new name/value pair to the Custom Attributes table. These attributes apply to the tag whose name was specified by the "Tag name" option above. To set the name and value of the new attribute, just click on them in the Custom Attributes table. |
|
Remove Attribute |
Highlight an entry in the Custom Attributes table and click this button to remove the entry. |
|
Markup to insert before element |
HTML (and/or regular text) to write out before all paragraphs using this format. |
|
Markup to insert after element |
HTML (and/or regular text) to write out after all paragraphs using this format. |
|
Insert a newline in the HTML before this paragraph |
This option, if checked, will cause a newline character to be inserted into the HTML before the start tag for the paragraph if Format HTML source for readability option is set under Output Pages. This option does not affect how the output looks in the browser. |
|
This paragraph should begin a new page |
When set, a new output page is created every time this format is applied to a paragraph. By default, this option is off. |
|
Don't begin a page for the first paragraph of this type |
If This paragraph should begin a new page is selected, then this option turns that behavior off for the first paragraph only. The purpose of this option is to avoid empty or mostly empty pages at the beginning of the output. |
A.5.3.2 Output Text Formats - Formatting Tab
You can choose one of two ways to specify the formatting for paragraphs: use an external CSS or define formatting in this page.
Note:
This formatting primarily applies to paragraph styles, though named character styles are also supported. Source documents must be styled correctly in order to enable style overrides from the template. This means that when altering the formatting of a paragraph, the user needs to edit the paragraph style rather than selecting text in the paragraph and manually applying formatting; doing the latter causes the word processor to enclose the text in an unnamed character style. Microsoft Word, for example, indicates this fact by displaying the style as "Heading1+ italic" -- the italic formatting is not part of the style. The correct way to style the paragraph is to create a new "Heading 1(italic)" style and set the formatting attributes accordingly, then apply it to the paragraph.
Figure A-24 Output Text Formats - Formatting Tab
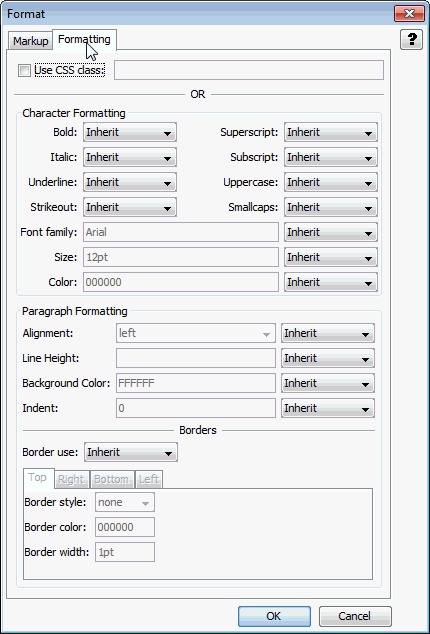
Table A-27 lists the elements and descriptions for Output Text Formats - Formatting Tab.
Table A-27 Output Text Formats - Formatting Tab Elements and Descriptions
| Element | Description |
|---|---|
|
Use CSS class |
Specify the name of an externally defined class here. The URL of the CSS file is specified by the External user stylesheet option under Output Pages. |
|
Character Formatting |
Each type of character level formatting available here can be set to one of these values:
|
|
Paragraph Formatting |
Paragraph level formatting to apply to the text. The types of formatting available are shown in this section. If the format is mapped to a character style, the paragraph formatting will be ignored. Note: All colors are specified as an RGB value in the range 000000 to FFFFFF. Each type of paragraph level formatting available here can be set to one of the following options:
|
|
Border use |
This element lets you specify how to handle paragraph borders. This can be set to one of the following options:
|
|
Border style/color/width |
For each border side (Top, Right, Bottom, Left) the following attributes can be specified:
|
A.5.4 Add Format Mapping Rules
The Add Format Mapping Rules page allows you to access the Format Mapping Rules page. In order to know which text format to use, Format Mapping Rules must be created. Mapping rules pick the formatting based on checking the type of source document text.
Figure A-25 Output Text Formats - Format Mapping Rules
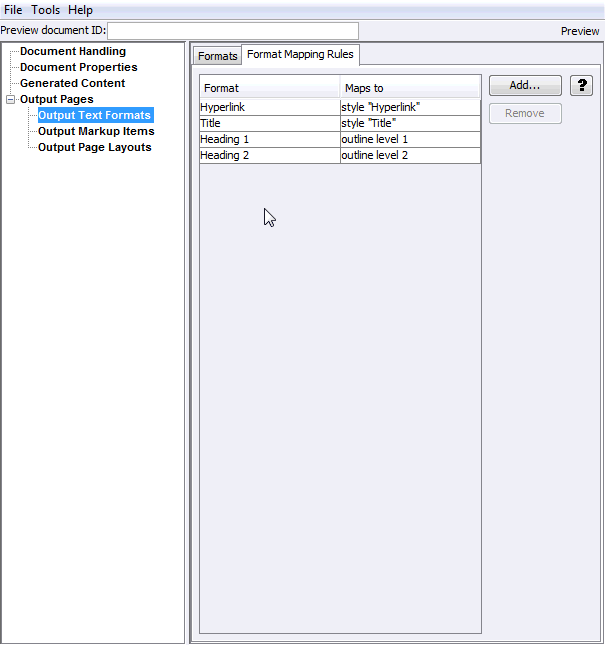
Table A-28 lists the elements and descriptions for Output Text Formats - Format Mapping Rules tab.
Table A-28 Output Text Formats - Format Mapping Rules tab Elements and Descriptions
| Element | Description |
|---|---|
|
Add Format Mapping Rule |
Click this button to add a new format mapping rule. |
|
Move Up and Move Down |
Once mapping rules have been added, their order may be arranged by using these buttons. The mapping rules are ordered so that the first rule that matches is the one, and only one, that is applied. For example, a rule may be created for mapping paragraphs in the "My Style" style. Below that rule, another rule may exist for mapping paragraphs with "outline level 1" applied. An input document may have one or more paragraphs in the "My Style" style that also have "outline level 1" applied. In this example the technology will only apply the "My Style" formatting to such paragraphs and ignore the "outline level 1" rule for them. |
|
Remove |
Highlight a mapping rule and click this button to remove it. |
A.5.5 Format Mapping Rules
The Format Mapping Rules page is used to map output text formats to output text.
Figure A-26 Output Text Formats - Format Mapping Rule
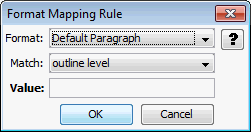
Table A-29 lists the elements and descriptions for Output Text Formats - Format mapping Rule tab.
Table A-29 Output Text Formats - Format mapping Rule tab Elements and Descriptions
| Element | Description |
|---|---|
|
Format |
Choose one of the defined formats to apply when this mapping rule is in effect. The Default Paragraph format is always available and is always the default. |
|
Match on |
Defines the paragraph formatting information to have the rule check.
|
|
Value |
If Match on above is set to Outline level, then this defines which outline level to match. If Match on above is set to Style name, then this defines which source document paragraph or character style name to match. When matching on style names, the author is required to supply a style name here and no default value is provided. The name must exactly match the style name from the source document. Style name matching is done in a case-sensitive manner. |
A.5.6 Add Output Markup Items
The Add Output Markup Items page allows you to access the Output Markup Items page, where you can add or remove customized markup to output pages.
Figure A-27 Output Markup Items
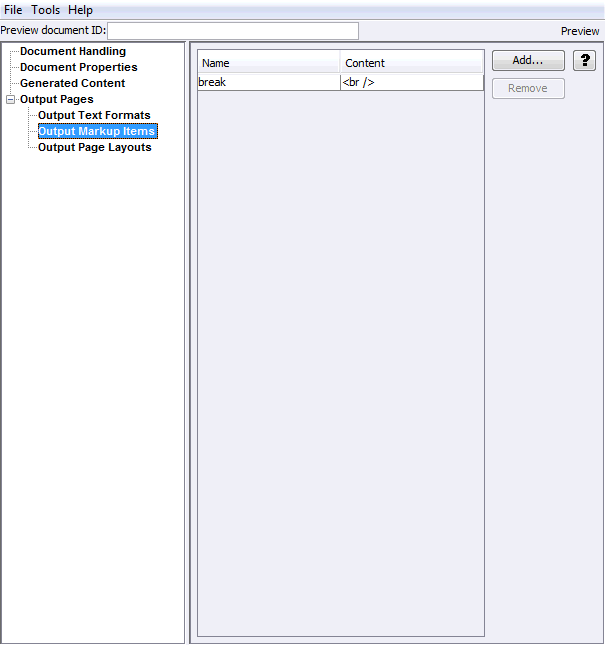
Table A-30 lists the elements and descriptions for Output Markup Items tab.
Table A-30 Output Markup Items Tab Elements and Descriptions
| Element | Description |
|---|---|
|
Add |
This button allows you to add a break or another markup item to an output page. Click the button to add an element of this type. |
|
Remove |
Highlight an output markup item and click this button to remove markup items that are no longer needed. |
A.5.7 Output Markup Items
The Output Markup Items page allows you to define markup to be associated with output items.
Figure A-28 Markup
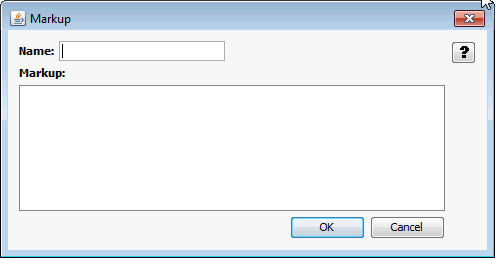
Table A-31 lists the elements and descriptions for Markup tab.
Table A-31 Markup Tab Elements and Descriptions
| Element | Description |
|---|---|
|
Name |
The name to use for referencing this piece of markup. This field is required. |
|
Markup |
Enter the HTML to be inserted into the Markup text entry field. |
|
OK/Cancel |
Save this item by clicking OK, or click Cancel to quit. |
A.5.8 Add Output Page Layouts
The Add Output Page Layouts page allows you to access the Output Page Layouts page. Page layouts are used to organize how the various pieces of the output are arranged.
Figure A-29 Output Page Layouts
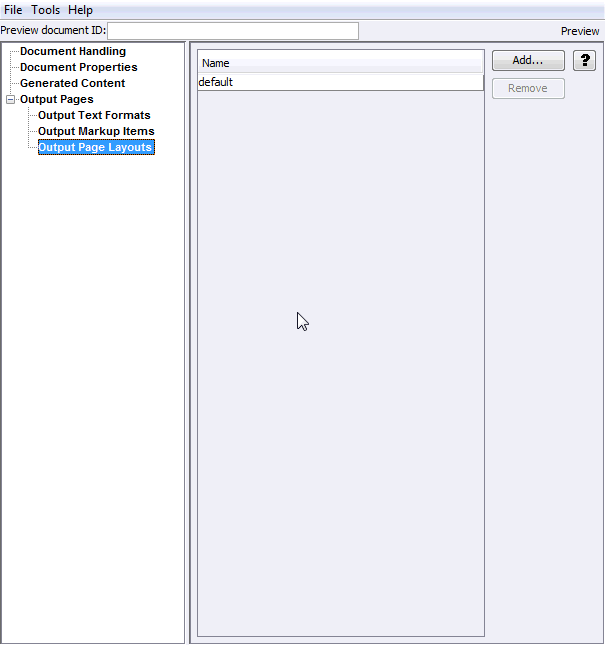
Table A-32 lists the elements and descriptions for Output Page Layouts tab.
Table A-32 Output Page Layouts Tab Elements and Descriptions
| Element | Description |
|---|---|
|
Add |
Click this button to add a new layout. The newly added layout will appear on the left side navigation pane and you will be auto-navigated to the new layout for editing. |
|
Remove |
Select a layout from the list and click this button to remove it. At least one layout must be defined in the template. To ensure this, the default layout cannot be deleted. You may redefine and/or rename the default layout as desired. |
A.5.9 Output Page Layouts
The Output Page Layouts page allows you to define an output page layout and link it to a navigation layout. This is where you define such aspects of the output page as where to place the table of contents. A default layout has been provided for users who need output that is pleasing to the eye, but are not particular about the details of their output. You may create multiple page layouts, which allows you to customize a document navigation system according to file type. Each Document Handling tab allows you to specify a page layout created here to use for that file type.
The <title> source portion of this page allows you to select where the template will get the value to use for the HTML <title> tag. By default, this is empty for new layouts, although the <title> tag will always be output in order to conform to the DTD. The source of the <title> text will be determined from the child elements present.
Figure A-30 Layout - General Tab
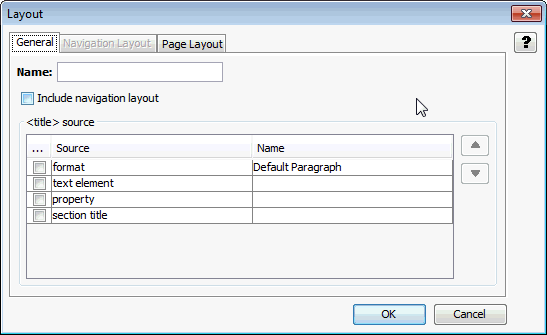
Table A-33 lists the elements and descriptions for Layout - General Tab.
Table A-33 Layout - General Tab Elements and Descriptions
| Element | Description |
|---|---|
|
Name |
Fill in the name to use to refer to this layout (required). Once this has been done, click on the Plus sign on the left side of the name ("default" in this example) to expand the levels underneath this one. |
|
Include navigation layout |
This allows you to create a Table of Contents page as a separate file containing markup and links to the document content specified in the page layout. Use of a navigation layout is optional. If you place a check in the box in front of this item, the Navigation Layout tab will become available. |
|
Source/Name |
Click this to add places to search for the title. The following sources may be examined:
|
|
Move Up and Move Down |
The order that the items are listed in the box matches the search order that Dynamic Converter will use to find the title. If no title is available from the first source on the list, then the next source is checked and so on down the list. Use these two buttons to adjust the order as needed. |
A.5.10 Navigation Layout
The purpose of the navigation layout is to generate a separate Table of Contents HTML page based on mapping rules defined under Mapping Rules Tab. This navigation page becomes the first output file of the conversion and is completely independent of other document page-breaking rules in the output.
The navigation layout triggers the creation of a separate file with links to the actual document content. Only navigation items and markup can be inserted into the body of the navigation layout. Page navigation is not supported in the navigation layout; it is intended for use with document and section layout items.
Use of a navigation layout is optional. If one is used, the author can add a page navigation item, with a navigation page link, to the main layout in order to provide access to the navigation page from the other pages of the output document.
Figure A-31 Navigation Layout
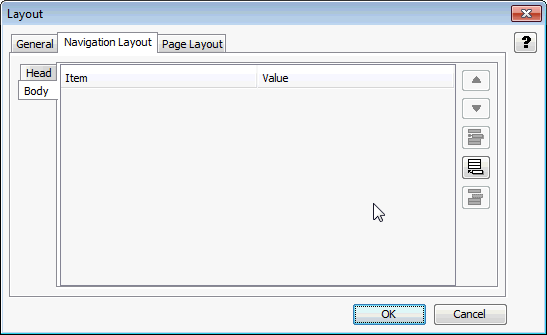
There are two layout sections under Navigation Layout: Head and Body. They are listed in Table A-34.
Table A-34 Navigation Layout Sections
| Layout Sections | Description |
|---|---|
|
Head |
This page defines the content that will be placed in the HTML <head> of all of the output files this layout applies to. The technology automatically places the following in the head:
|
|
Body |
This page defines the content that will be placed in the body of the navigation page created by this layout. |
Each layout section contains the following elements listed in Table A-35 to control adding, deleting, and setting the sequence of items.
Table A-35 Layout Section Elements
| Section | Description |
|---|---|
|
Move Up and Move Down |
The order that the items are listed in the box matches the order that they will appear at the top of each page. Use these two buttons to adjust the order as needed. |
|
Remove |
Highlight an entry and click this button to remove entries that are not wanted. This only removes the entry from inclusion at the top of each page, the definition of the entry is NOT removed by clicking this button. |
|
Add |
Click this to add entries to the top of each page in the layout. The following items may be placed in the top:
|
A.5.11 Page Layout
The Page Layout page defines how the document contents are arranged in the output HTML pages.
Figure A-32 Page Layout
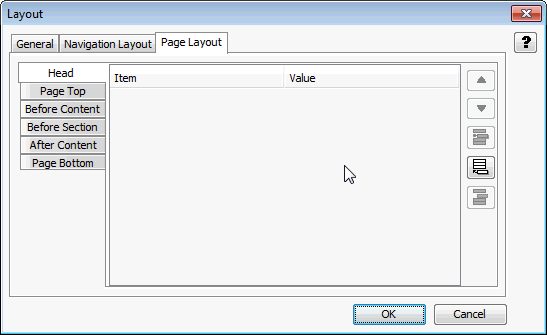
Click on each of the following layout sections listed in Table A-36 to define how document contents are arranged.
Table A-36 Page Layout Sections
| Layout Section | Description |
|---|---|
|
Head |
Allows you to add markup items to be placed in the HTML <head> of each output file. |
|
Page Top |
Allows you to specify items to be placed at the top of each output page. The following items may be placed:
|
|
Before Content |
Allows you to specify markup items to be output before the document content. The following items may be placed:
|
|
Before Section |
Allows you to specify items to be inserted before each section of a multi-section document. Note that this is not applicable to word-processing documents. The following items may be placed:
|
|
After Content |
Allows you to specify items to be output after the document content. The following items may be placed:
|
|
Page Bottom |
Allows you to specify items to be placed at the bottom of each output page, for example, a copyright notice. The following items may be placed:
|
A.6 Previewing and Saving your Template
This section covers the following topics:
A.6.1 Previewing the Template XML Structure
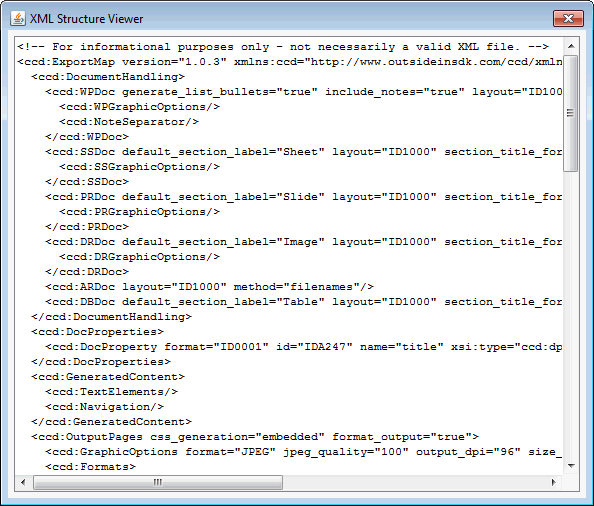
The HTML Conversion Editor allows you to preview the XML structure of the template as you create it. This preview lets you see the choices you have made in configuring the template. At the top left of the interface, select Tools > View XML structure. The XML structure viewer window is displayed.
Figure A-33 XML Structure Viewer
A.6.2 Previewing a Converted Document
As you configure your template, there is a useful tool that allows you to see how a specified source document would appear after the template is applied.
- The first step is to set the document for preview. At the top left of the interface, enter the Preview document ID in the text field. This is the Content ID for a document previously checked into Content Server that you want to preview.
- Click the Preview button at the top right of the interface. Your default browser is launched and displays a preview of the converted document.