How To Create, Delete, and Customize Worklist Views
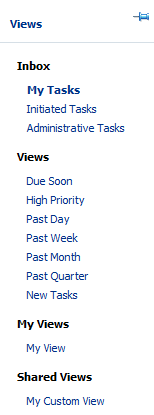
The Views menu, shown in Figure 32-11, displays the following:
-
Inbox—Shows all tasks that result from any filters you may have used. The default shows all tasks.
-
Standard Views—Shows standard views and views that you defined.
-
My Views—Shows views that you have created.
Use Views to create, share, and customize views.
To create a worklist view:
-
In the Views section, click Add View. The Create User View dialog box appears as shown in figure
-
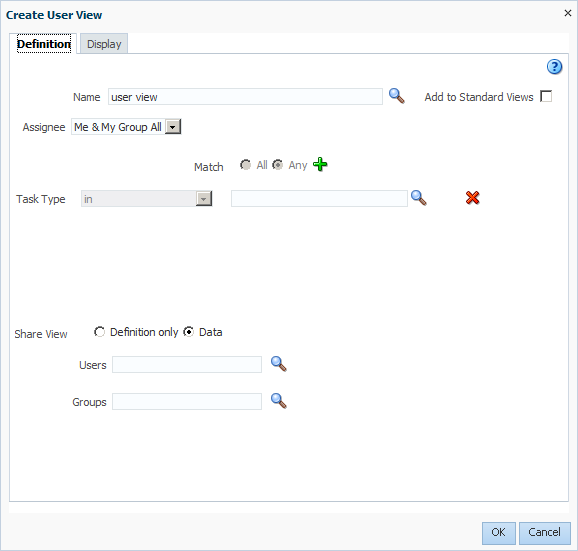
Use the Definition tab of the Create User View dialog box, shown in Figure 32-12, to do the following:
-
Name—Specify a name for your view.
-
Add to Standard Views—This option applies to administrators only. Administrators select this option to create the view as a standard view, which then appears in the Standard Views list for all worklist users.
-
Assignee—Select Me, My Group, Me & My Group, Me (Previously), Me (Review Only), Creator, Reportees, Admin, Owner.
-
Match—Select All or Any to match the conditions you added.
-
Add Condition (a plus sign)—Select the conditions that apply to your view.
-
Share View—You can grant access to another user to either the definition of this view, in which case the view conditions are applied to the grantee's data, or to the data itself, in which case the grantee can see the grantor's worklist view, including the data. Sharing a view with another user is similar to delegating all tasks that correspond to that view to the other user; that is, the other user can act on your behalf. Shared views are displayed under My Views.
-
Users—Specify the users (grantees) who can share your view.
-
Groups—Specify the groups who can share your view.
-
-
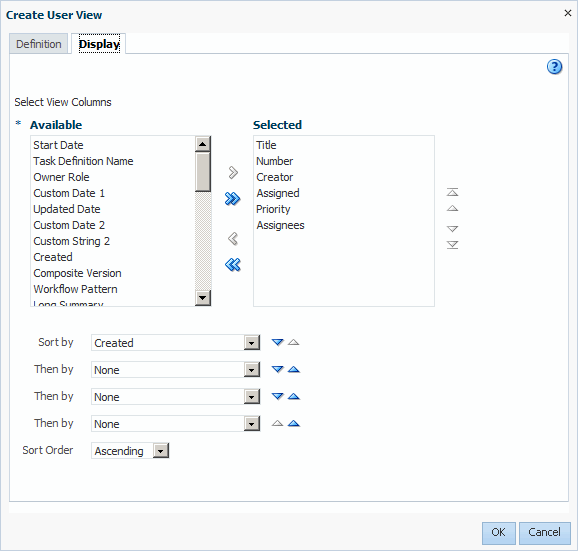
Use the Display tab of the Create User View dialog, shown in Figure 32-13, to customize the fields that appear in the view.
Figure 32-13 Displaying Fields in a Worklist View

Description of "Figure 32-13 Displaying Fields in a Worklist View"-
Select View Columns—Specify which columns you want to display in your task list. They can be standard task attributes or mapped attributes that have been mapped for the specific task type. The default columns are the same as the columns in your inbox.
-
Sort by—Select a column to sort on.
-
Then by—Select a second column to sort on.
-
Then by—Select a third column to sort on.
-
Then by—Select a forth column to sort on.
-
Sort Order—Select ascending or descending order.
-
-
Click OK.
The saved view appears in the Views panel under My Views
To delete a view:
Note:
If an administrator inadvertently deletes the pre-seeded standard views, then those views do not remain permanently deleted. They are recreated when the server restarts.
- In the Views panel, select a view.
- Click the Delete icon.
- The Confirm Delete dialog box prompts you to confirm that you want to delete the view.
- Click Yes. The view is deleted.

