- Developing SOA Applications with Oracle SOA Suite
- Using Binding Components
- Getting Started with Binding Components
- Creating Tokens for Use in the Binding URLs of External References
- How to Create Tokens for Use in the Binding URLs of External References
How to Create Tokens for Use in the Binding URLs of External References
Follow the steps in this section to create tokens for use in the binding URLs of external references.
To create tokens for use in the binding URLs of external references:
- In Oracle JDeveloper, access the SOA composite application in which to create tokens.
- Above the SOA Composite Editor, click the Binding URL Tokenizer icon. Figure 36-7 provides details.
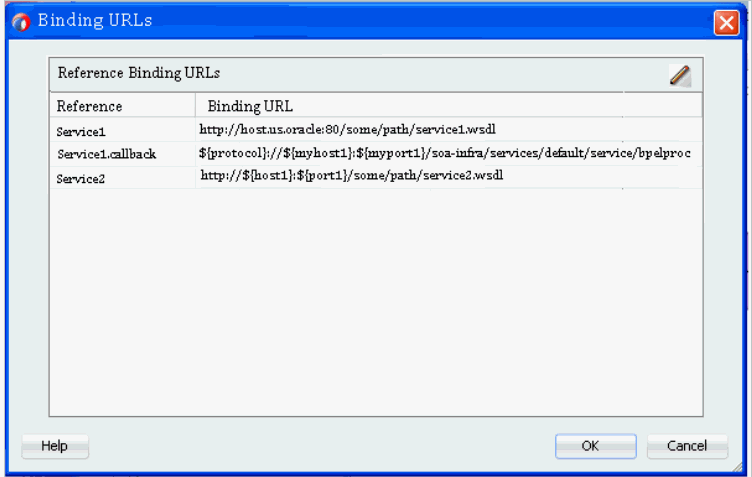
The Binding URLs dialog appears, as shown in Figure 36-8.
-
Binding URLs of each external reference that has a
binding.wselement with alocationattribute in thecomposite.xmlfile that starts with the following entries are automatically displayed:-
http -
https -
${(for a URL that uses tokens in place of the hardcoded HTTP protocol, host, or port values) -
callbackServerURL
-
-
Binding URLs for REST references with the
locationattribute of thebinding.restelement are automatically displayed.
The Service2 reference in Figure 36-8 also includes an override of the callback location using a reference property such as
callbackServerURL:<property name="callbackServerURL" type="xs:string" many="false"> ${protocol}://${myhost1}:${myport1}/soa-infra/services/default/service/ bpelprocess1_client_ep</property>The
callbackServerURLproperty can be tokenized as shown in Figure 36-8. -
- Double-click a row or select the row and click the Edit icon to create tokens for the HTTP protocol, host, and port values in the binding URLs of external references.
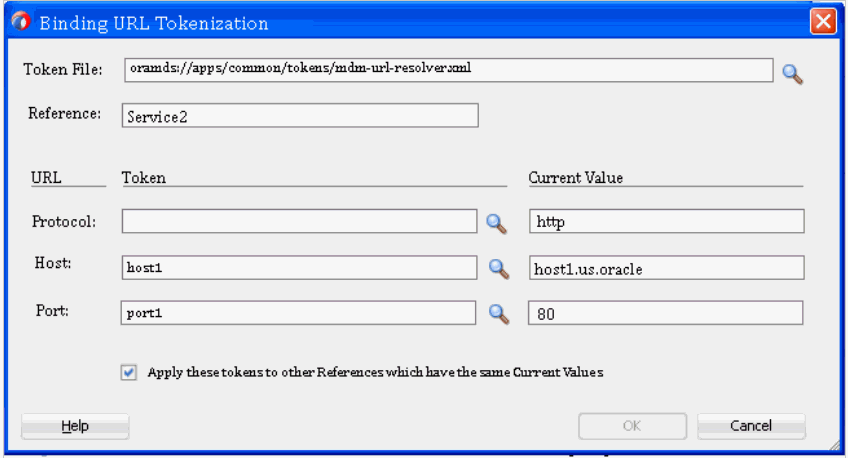
The Binding URL Tokenization dialog appears, as shown in Figure 36-9.
Figure 36-9 Binding URL Tokenization Dialog

Description of "Figure 36-9 Binding URL Tokenization Dialog" - Provide values appropriate to your environment, as described in Table 36-4, and click OK.
Table 36-4 Binding URL Tokenization Dialog
Field Description Token File
Perform either of the following options:
-
Click the Browse button to access a dialog for selecting the token file that includes the token names and values. The file can be on the local file system. The names and values specified in this file replace the hardcoded names and values for protocol, host, and port in the
binding.wselement. This field is automatically populated with your file selection on subsequent invocations of this dialog. If you specify a token file from the file system, it must be an XML file that follows this format:<?xml version="1.0" encoding="UTF-8"?> <!DOCTYPE properties SYSTEM "http://java.sun.com/dtd/properties.dtd"> <properties> <comment> URL Resolver file used by the Metadata manager to resolve $<variable> in URLs </comment> <entry key="protocol">oramds</entry> <entry key="host">MyHost</entry> <entry key="port">80</entry> </properties> -
Skip this field entirely if you want to manually enter new token names and values in the Token and Current Values fields, respectively.
Tokens that are not saved to a file are only placed in the
locationattribute of thebinding.wselement in the composite. It is expected that you supply a token file at runtime that has tokens matching those manually entered at design time.
Reference
Displays the external reference you selected in Step 3.
Protocol
Displays the field in which to specify the protocol token name.
-
Click the Browse icon to select the token name to use from the Token Picker dialog. The Token Picker dialog is populated with the token names that appear in the token file you imported in the Token File field. The token name you select (for example, port1) and its default value (for example, 80) are added to the Token and Current Value fields, respectively. If the token file is writable (meaning an unprotected file in the file system), you can change the current value of the token name. See Step 5 for details about accessing the Token Picker dialog. If the file is read-only, you are warned with a message and allowed to cancel the operation and continue.
-
Manually enter the token name and value to use. You can manually enter information in these fields regardless of whether you imported a file in the Token File field. If you imported a file that is writable in the Token File field and manually enter a token name, it is added to the file if it does not already exist. The current value for the new token name defaults to the value in the URL that is being tokenized.
Host
Displays the field in which to specify the host token name. See the description of the Protocol field for details about how to specify information.
Port
Displays the field in which to specify the port token name. See the description of the Protocol field for details about how to specify information.
Apply these tokens to other References which have the same Current Values
Deselect this check box if you do not want other external references with the same protocol, host, and port values to be replaced with the same tokens.
If this check box is selected and you tokenize just one or two of the URL objects, then the references for only those objects are modified. For example, if you only tokenize the host (with a current value of host1.us.oracle), all references that have that same host value are updated.
-
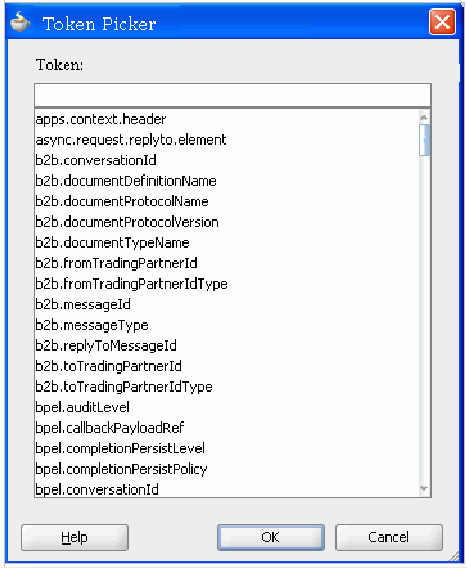
- If you selected the Browse button in the Protocol, Host, or Port fields, the Token Picker is displayed, as shown in Figure 36-10. This dialog lists all the tokens that you have defined in the file imported in the Token File field of the Binding URL Tokenization dialog.
- Select the token name to use through one of the following options:
-
Scroll through the list and select the token.
-
Begin entering the name in the Token field until the name is automatically completed and the token is selected in the list.
-
- Click OK.
You are returned to the Binding URL Tokenization dialog with the selected token name and value displayed in the Token and Current Value fields, respectively.

