41 Creating Transformations with the XQuery Mapper
This chapter includes the following sections:
41.1 Introduction to the XQuery Mapper
The XQuery Mapper supports XQuery 1.0. The older XQuery 2004 is also supported.
The XQuery Mapper includes the following views:
-
XQuery Mapper Graphical View
-
XQuery Mapper Source Editor
Note:
The XQuery Mapper graphical view is not supported for XQuery 2004 files. Only the source view is supported for this older XQuery version.
When you create a new XQuery file, it opens in the graphical view by default. The graphical view can also be accessed by clicking the XQuery Mapper tab at the bottom of the XQuery map.
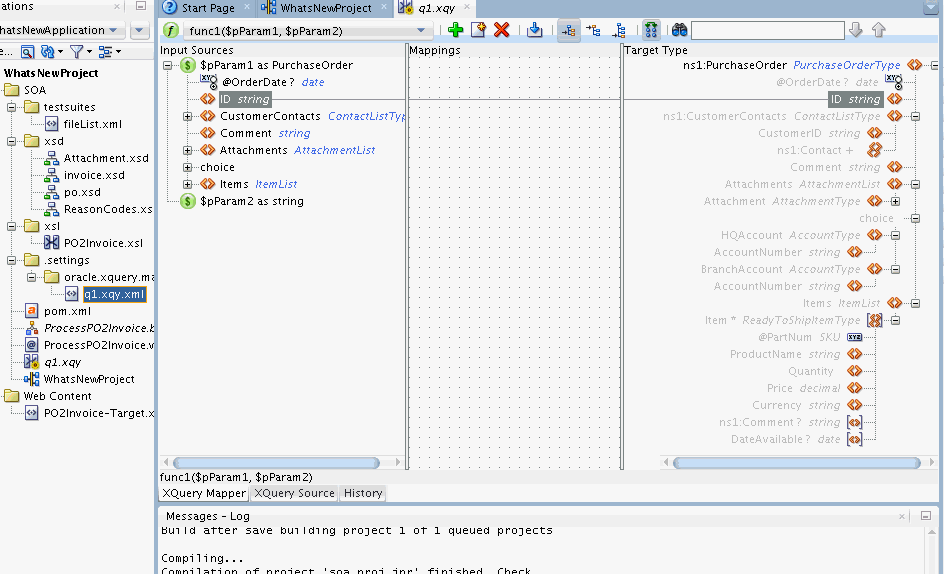
Figure 41-1 shows the graphical view of the XQuery mapper.
The left pane of the XQuery Mapper includes the input sources or parameters for the XQuery function. If your XQuery file has multiple functions, you can choose the function to display using the toolbar over the mapper panes.
The right pane includes the target schema tree, which corresponds to the XQuery function's result type. The center pane helps you map the source and the target schema elements using XQuery functions.
41.1.1 About the Source and Target Trees
The left pane of the XQuery Mapper shows the source tree, and the right pane shows the target tree. Tree nodes can be XML elements, attributes, and some other XQuery constructs.
XML elements are identified by the <> icon. Attributes use a different icon, and attribute names are prefixed with the @ symbol, as they appear in an XPath expression. The element or attribute multiplicity is shown using the following standard suffixes:
-
?: Zero or one occurrence of an element/attribute.
-
+: One or more occurrences of an element/attribute.
-
*: Zero or more occurrences of an element/attribute.
The source tree shows the input sources or parameters for the selected XQuery function. The root level elements represent the input parameters for the function. If a root node is a complex element, then its child elements and attributes appear under the root node.
The target tree can include XML elements, attributes, and some programming control structures. The elements and attributes can appear in the following forms:
-
Grayed Font: An element that is part of the target schema, but not defined yet. Once you map a grayed element to a source element, it appears in normal font.
-
Normal Font: An element that either corresponds to an element constructor in the source, or copied implicitly from the source data.
-
Underlined Font: An element that is incompatible with the specified target schema. This element may appear because of an incorrect element name used in an element constructor, or because of a sequence assignment with an incorrect schema type.
The target tree can also contain programming control structures like If-Then-Else, Union operator, and comma operator:
-
If-Then-Else Operator: The If-Then-Else operator shows up as a node called Conditional. The Conditional node has nested branches for If Then and Else. You can choose the Make Conditional option from the context menu of a node to make it conditional.
-
Union Operator (and other sequence combining operators): These cannot be created in the graphical view of the XQuery Mapper. However, if the source view contains such an operator, it is represented in the target tree with a node called All, and the operands are represented as subnodes of the all node.
-
Comma Operator: The comma operator shows up as a node called List. The subnodes represent the comma-limited operands of the comma operator. You can choose the Clone option from the context menu of target tree node to apply a comma operator.
41.1.2 Using the XQuery Mapper Toolbar
The XQuery Mapper toolbar is located above the XQuery Mapper panes. The toolbar contains various tools to work with the graphical mapper. Figure shows the XQuery Mapper toolbar.
The XQuery Mapper toolbar contains the following tools:
-
Function Selector: The function selector box is identified by a green icon with the letter f on it. You can use the Function Selector to select the function to display in the source pane. This is useful if your XQuery map contains multiple functions.
-
Add New Function: The Add New Function button is identified by the green plus (+) sign. Use Add New Function to add a new function to the XQuery map file.
-
Rename Function: The Rename Function button is to the right of the Add New Function button. Use the Rename Function button to rename a function in the XQuery map file.
-
Delete Function: The Delete Function is identified by a red cross (X) sign. Use Delete Function to delete a function from the XQuery map file.
-
Import Library Module: The Import Library Module button is to the right of the Delete Function button. Use Import Library Module to import a library XQuery function into the map. You must specify the library module files to be imported.
-
Mapping Mode: The XQuery mapper can use different mapping modes. These modes affect the XQuery expressions created when the user drags and drops a line from a source node to a target node. The next three buttons are used to select the corresponding mapping mode:
-
Value Mapping: Constructs target XML elements and attributes from the input source, and copies the input source values, using XML constructors. For example:
<ID>{fn:data($pParam1/ID)}</ID>The above code creates the
IDelement in the target from theIDelement in the input source parameter.Value mapping is the default mapping mode.
-
Overwrite Mapping: The XML elements from the input source parameters are copied to the result sequence. Any existing mapping are replaced with the new mapping. For example:
{$pParam1/Items}
The above code copies the Items subtree, together with its child elements and attributes, to the target tree.
-
Append Mapping: This mode works like overwrite mapping, except that any existing mappings are not overwritten. New additional mapping are created.
See Using the XQuery Mapper for more information on using the mapping modes.
-
-
Show/Hide Target Type Differences: Use the Show/Hide Target Type Differences button to manage the visibility of XML elements and attributes in the right target tree. You can choose to hide elements and attributes that haven't been mapped yet.
-
Search: Use the Search field to search for elements, attributes, data types, and so on in the source and target trees. Use the Up and down arrows to look for the next and previous items respectively.
41.1.3 Using the Properties Window
The Properties window displays the XQuery expression for the node selected in the target tree. XQuery expressions created using drag and drop can be edited in the Properties window. The Properties window can also be used to create more complex XQuery expressions.
The Properties window is located below the XQuery Mapper, by default. If the Properties window is not visible, click Properties under the JDeveloper Window menu to display the Properties window.
Tip:
When working with the XQuery Mapper, you might want to move the Properties window from the bottom right hand corner of the screen to the bottom of the screen, directly below the mapper window. A larger Properties window makes it easy to edit XQuery expressions and view the variable tree.
You can directly edit the XQuery expression, for the selected target node, in the Properties window. You can also drag XQuery functions, constructs, and operators from the Components window into your XQuery expression in the Properties window. The Components window is located to the right of the XQuery Mapper, by default. If you cannot see the Components window, select Window > Components from the Oracle JDeveloper menu bar.
To save the changes, click the Commit button in the top left corner of the Properties window. The XQuery is recompiled, and the XQuery Mapper view is updated.
If you make an error when editing the XQuery expression, click Revert to mapper sources, in the top left area of the Properties window, to undo the changes and start again.
The Properties window also includes a variable tree on the left hand side. The variable tree shows all variables, both local variables and XQuery function parameters, that are visible in the current scope. The scope is determined by the node highlighted in the target tree pane. You can drag and drop nodes from the variable tree into your XQuery expression in the right pane.
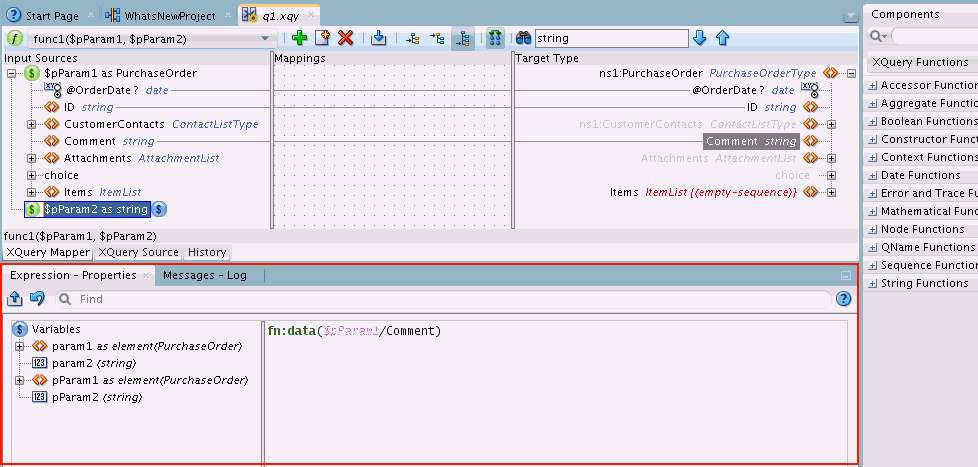
Figure 41-3 shows the Properties window. The Properties window is highlighted in red. The comment node is shown selected in the target tree. The corresponding variable tree and XQuery expression (fn:data($pParam1/Comment)) appears in the Properties window.
41.1.4 Using the Components Window
The Components window contains all the XQuery functions and operators that you can use in your XQuery maps. These functions and operators can be dragged and dropped to the center pane of the XQuery Mapper. You can also drag and drop a function onto a target tree node, if the target tree node has already been created using the Insert context menu option.
Note:
You can also drag functions and operators to an XQuery expression in the Properties window, as described in the preceding section.
When a function is dragged and dropped on an existing link between a source and target node, for example, it becomes a part of the expression corresponding to that link. Some functions without parameters must be dragged to an empty area of the center pane, and associated with a target node. Functions can also be chained together.
The Components window organizes the XQuery function and operators into the following categories:
-
XQuery Functions: Includes various categories of XQuery functions, like aggregate functions, date functions, mathematical functions, string functions, and so on.
-
XQuery Constructs: Includes standard XQuery constructs like If-Then-Else and FLWOR constructs.
-
XQuery Operators: Includes various categories of XQuery operators, like logical operators, node comparison operators, and so on.
-
User-Defined Functions: Includes all the functions that you have defined in the current XQuery map file, and any functions from imported library modules.
-
My Components: Includes your favorite components that you can add to this category. It also includes the recently used functions.
41.1.5 Source Editor
The source editor enables you to edit the XQuery map directly, and also allows you to perform tasks that cannot be directly performed in the graphical view.
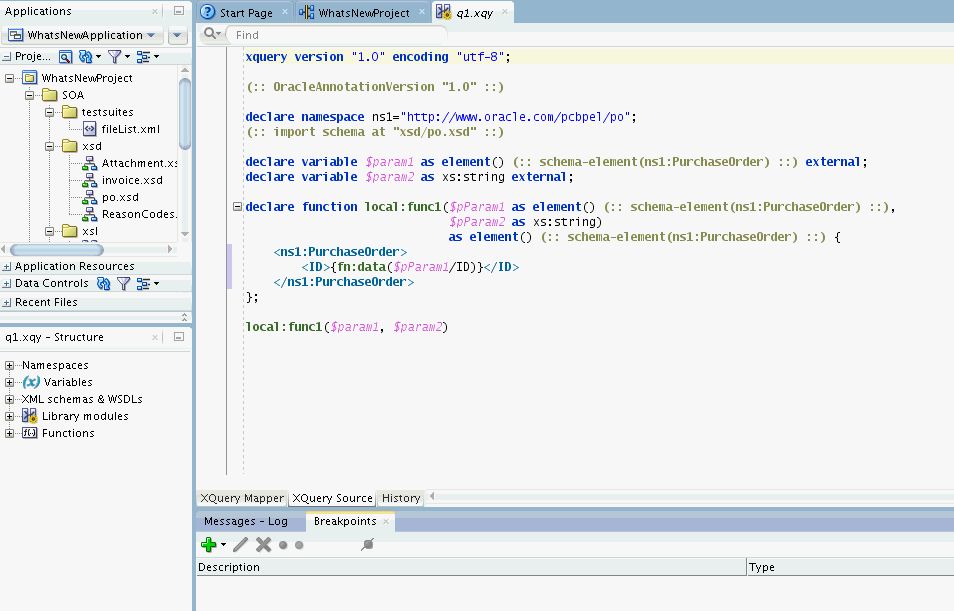
Click the XQuery Source tab at the bottom left of the XQuery Mapper graphical view to display the source editor. Figure 41-4 shows the XQuery Mapper source editor.
The XQuery source view provides code editing features like code highlighting, code completion, error highlighting, and code folding. You can also use Ctrl + click (click the left mouse button while holding down the Ctrl key) on a function name, variable name, schema, or schema element to navigate to the corresponding declaration for the function, variable, schema, or schema element respectively.
41.2 Creating an XQuery Map File
Use Oracle JDeveloper to create XQuery maps. XQuery maps are included in the project as .xqy files.
XQuery maps can be created as main modules and library modules. A main module is an executable XQuery file. A library module is used to group and store XQuery functions. When you import a library module into a main module, all functions in the library module become available in the main module.
41.3 Using the XQuery Mapper
This section contains the following topics:
41.3.1 How to Use Value Mapping to Copy a Leaf Element Value to a Target Leaf Element
To create a value map for a leaf element:
41.3.2 How to Use Overwrite Mapping to Copy an Element Subtree to the Target Tree
To create an overwrite map for an element subtree
41.3.3 How to Use Append Mapping to Copy an Element Subtree to the Target Tree
To create an append map for an element subtree
41.4 Using XQuery Functions
You can add XQuery functions to your existing XQuery map. The Components window contains a list of XQuery functions that you can drag and drop into the source editor or the center pane of the XQuery mapper.
The Components window also includes a set of XQuery constructs, like FLWOR, and XQuery operators, like logical AND. These constructs and operators can only be dragged and dropped into the source editor.
41.4.1 How to Add an XQuery Function in the XQuery Mapper
You can drag and drop an XQuery function from the Components window to the center pane of the XQuery mapper.
41.4.1.1 To add an XQuery function:
-
Make sure that the Components Window is visible. The default location is the top right hand corner of Oracle JDeveloper.
If the Components Window is not visible, select Components from the Window menu.
-
In the Component Window, select the XQuery Functions page.
-
Click the Category that contains your function. For example, to add the concat function, click String Functions.
-
Drag the desired function from the Components window to the center pane of the XQuery mapper. When you drag the function to the center pane, the output of the function connects to different target nodes, as you move along.
Figure 41-9 shows a function being dragged to the center pane of the XQuery Mapper.
Figure 41-9 Dragging a Function to the Center Pane of the XQuery Mapper
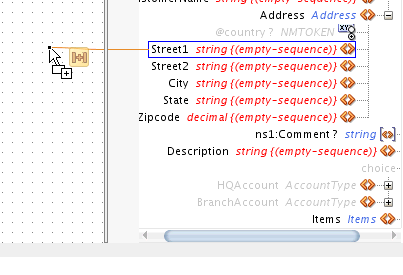
Description of "Figure 41-9 Dragging a Function to the Center Pane of the XQuery Mapper" -
Drop the function on the center pane when the function output is shown connected to the desired target node.
Note:
You can also drop a function to an existing map line in the center pane of the XQuery mapper.
The function gets connected to both the source (input) and target (output) nodes.
-
If the function requires additional input parameters, then a Warning icon appears on the function icon. Drag a line from a source node to the left end of the function to specify an input parameter.
-
Repeat the previous step for any more source nodes that you must add as input parameters.
41.4.1.2 To edit a function's parameters:
-
Click the function icon in the center pane. The expression corresponding to the function appears in the Properties window.
The Properties window is located at the lower right-hand corner of Oracle JDeveloper, by default. If the Properties window does not appear, click Properties under the Window menu to display the Properties window. You can optionally choose to drag the Properties window to any convenient location within the JDeveloper window. You can also resize the Properties window, as desired.
-
Edit the expression that appears in the right pane of the Properties window.
The left pane of the Properties window shows the variable tree that includes all variables visible in the current scope. You can drag and drop variables to the expression on the right to help build your function definition.
-
Click Commit at the top left corner of the Properties window to save the changes. Alternatively, click Revert to mapper sources to revert changes made in the Properties window.
41.5 Using Library Modules
How to Create an XQuery Main/Library Module discusses the process of creating a library module file. To use a library module, you can import the library module into the main module. This makes all the library module functions available in the main module.
41.6 Working with Zones and FLWOR Constructs
You can create FLWOR (For, Let, Where, Order By, Return) expressions in the Source View. FLWOR expressions are represented as zones in the XQuery Mapper target tree.
Zones identify areas in the target tree that are associated with FLOWR constructs or If-Then-Else conditional constructs. Zones are represented by yellow brackets to the left of the target tree.
If you move the mouse over a yellow line representing a zone, the line turns blue. For FLWOR zones, additional buttons appear, corresponding to the For-Let, Where, and Order By clauses. Figure 41-10 shows a sample XQuery with zones.
Figure 41-10 Zones and FLWOR Zones in XQuery Mapper
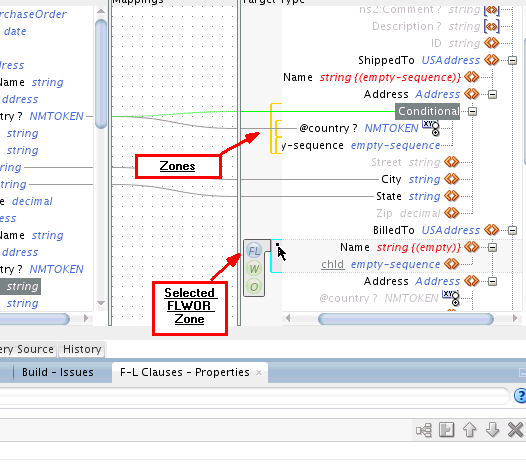
Description of "Figure 41-10 Zones and FLWOR Zones in XQuery Mapper"
41.7 Using Type Annotations to Improve XQuery Performance
When an XQuery is run, the XQuery engine performs schema type validations in the XQuery file before running the XQuery. This may cause performance overheads for certain applications.
If you must optimize your XQuery for performance, you can use type annotations to specify schema information in the XQuery file. Type annotations enable you to hide the schema type definitions from the XQuery execution engine. The schema definitions are still visible to the Xquery Mapper, which enables you to edit your XQuery map in the usual fashion.
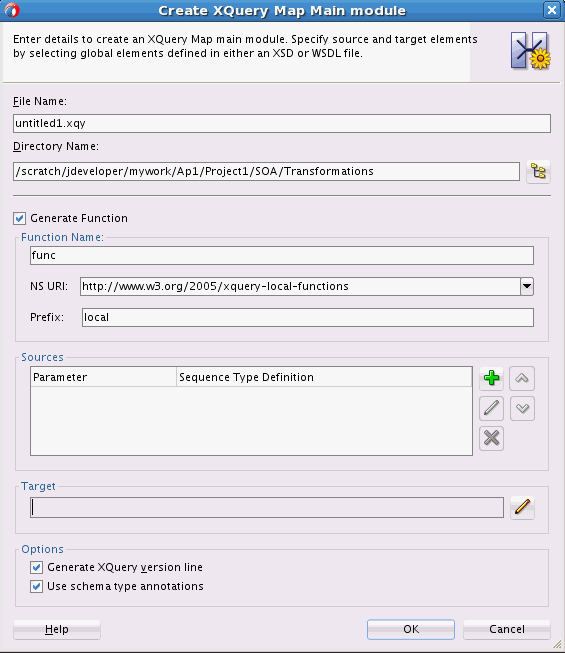
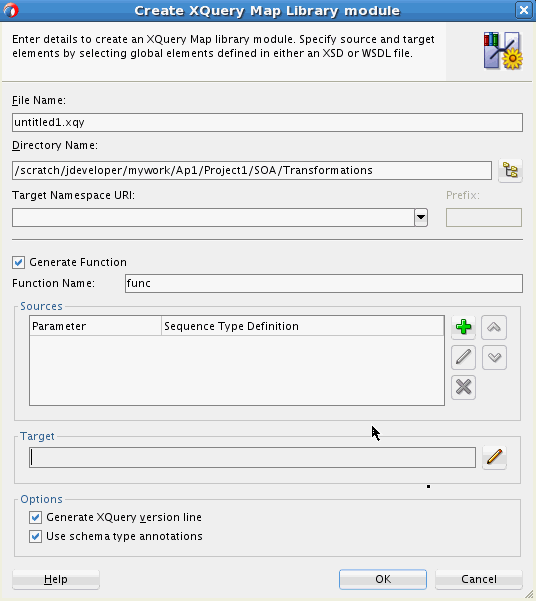
To use type annotations in your XQuery file, select Use Schema Type Annotations in the Create XQuery Map Main/Library Module dialog when creating a new XQuery file. See How to Create an XQuery Main/Library Module for more information on creating an XQuery file.
Type annotations, in an XQuery file, look similar to standard XQuery comments. While standard XQuery comments are delimited by the parentheses and colon, type annotations use parentheses and double colons. So, for example:
(: This is an XQuery comment :)
(:: This is a type annotation ::)
An XQuery file that uses type annotations has the following version annotation at the beginning of the file, immediately following the version declaration:
(:: OracleAnnotationVersion "1.0" ::)
The following example compares a few XQuery constructs with and without the type annotations.
-
Schema import (without type annotation):
import schema namespace ns1="http://www.oracle.com/pcbpel/po" at "../Schemas/PurchaseOrder.xsd";
Schema import (with type annotation):
declare namespace ns1="http://www.oracle.com/pcbpel/po";
(:: import schema at "../Schemas/PurchaseOrder.xsd" ::)
-
Variable declaration (without type annotation):
declare variable $test_param as schema-element(ns1:PurchaseOrder) external;
Variable declaration (with type annotation):
declare variable $test_param as element()
(:: schema-element(ns1:PurchaseOrder) ::) external;
