29 Configuring Human Tasks
For information about troubleshooting human workflow issues, see Human Workflow Troubleshooting in Administering Oracle SOA Suite and Oracle Business Process Management Suite.
29.1 Accessing the Sections of the Human Task Editor
Learn how to access the sections of the Human Task Editor.
To access the sections of the Human Task Editor:
29.2 Specifying the Title, Description, Outcome, Priority, Category, Owner, and Application Context
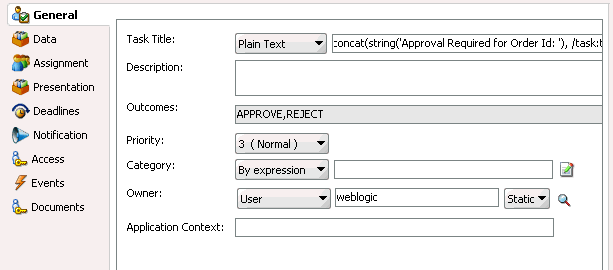
Learn how to specify the task details such as the title, description, outcome, priority, category Owner and the Application context.
To specify the details of a task:
29.2.1 How to Specify a Task Title
Enter an optional task title. The title defaults to this value only if the initiated task does not have a title set in it. The title provides a visual identifier for the task. The task title displays in Oracle BPM Worklist. You can also search on titles in Oracle BPM Worklist.
To specify a task title:
29.2.2 How to Specify a Task Description
You can optionally specify a description of the task in the Description field of the General section. The description enables you to provide additional details about a task. For example, if the task title is Computer Upgrade Request, you can provide additional details in this field, such as the model of the computer, amount of CPU, amount of RAM, and so on. The description does not display in Oracle BPM Worklist.
To add a task description:
-
Select the drop-down menu and choose either Plain Text or Translation.
-
Provide the description:
Plain text:
-
Type a description into the dialog box.
-
Click Ok.
Translation:
-
Click the Lookup button.
-
Locate a resource bundle and provide a description.
-
Click Ok.
-
29.2.3 How to Specify a Task Outcome
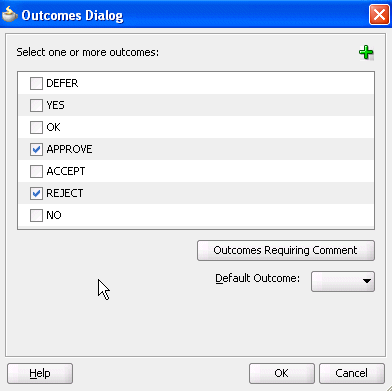
Task outcomes capture the possible outcomes of a task. Oracle BPM Worklist displays the outcomes you specify here as the possible task actions to perform during runtime. Figure 29-3 provides details.
Figure 29-3 Outcomes in Oracle BPM Worklist
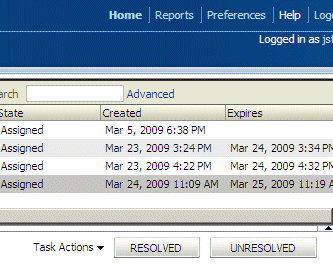
Description of "Figure 29-3 Outcomes in Oracle BPM Worklist"
You can specify the following types of task outcomes:
-
Select a seeded outcome
-
Enter a custom outcome
The task outcomes can also have runtime display values that are different from the actual outcome value specified here. This permits outcomes to be displayed in a different language in Oracle BPM Worklist. For more information about internationalization, see How to Specify Multilingual Settings.
To specify a task outcome:
29.2.4 How to Specify a Task Priority
Specify the priority of the tasks. Priority can be 1 through 5, with 1 being the highest. By default, the priority of a task is 3. This priority value is overridden by any priority value you select in the General tab of the Create Human Task dialog box. You can filter tasks based on priority and create views on priorities in Oracle BPM Worklist.
From the Priority list in the General section, select a priority for the task to specify a priority.
For more information about specifying a priority value in the Create Human Task dialog box, see Specifying the Task Initiator and Task Priority.
29.2.5 How to Specify a Task Category
You can optionally specify a task category in the Category field of the General section. This categorizes tasks created in a system. For example, in a help desk environment, you may categorize customer requests as either software-related or hardware-related. The category displays in Oracle BPM Worklist. You can filter tasks based on category and create views on categories in Oracle BPM Worklist.
To specify a task category:
29.2.6 How to Specify a Task Owner
The task owner can view the tasks belonging to business processes they own and perform operations on behalf of any of the assigned task participant types. Additionally, the owner can also reassign, withdraw, or escalate tasks. The task owner can be considered the business administrator for a task. The task owner can also be specified in the Advanced tab of the Create Human Task dialog box described in Specifying a Task Owner. The task owner specified in the Advanced tab overrides any task owner you enter here.
For more information about the task owner, see Task Stakeholders.
To specify a task owner:
For more information about users, groups, and application roles, see Task Assignment and Routing.
29.2.6.1 Specifying a Task Owner Statically Through the User Directory or a List of Application Roles
Task owners can be selected by browsing the user directory (Oracle Internet Directory, Java AuthoriZatioN (JAZN)/XML, LDAP, and so on) or a list of application roles configured for use with Oracle SOA Suite.
To specify a task owner statically through the user directory or a list of application roles:
-
In the first list to the right of the Owner field in the General section, select User, Group, or Application Role as the type of task owner. Figure 29-5 provides details.
Note:
By default, group names in human tasks are case sensitive. Therefore, if you select Group and enter a name in upper case text (for example,
LOANAGENTGROUP), no task is displayed under the Administrative Tasks tab in Oracle BPM Worklist. To enable group names to be case agnostic (case insensitive), you must set the caseSensitiveGroups property tofalsein the System MBeans Browser. For information, see Administering Oracle SOA Suite and Oracle Business Process Management Suite.Figure 29-5 Specify a Task Owner By Browsing the User Directory or Application Roles

Description of "Figure 29-5 Specify a Task Owner By Browsing the User Directory or Application Roles" -
In the second list to the right of the Owner field in the General section, select Static.
-
See the step in Table 29-4 based on the type of owner you selected.
-
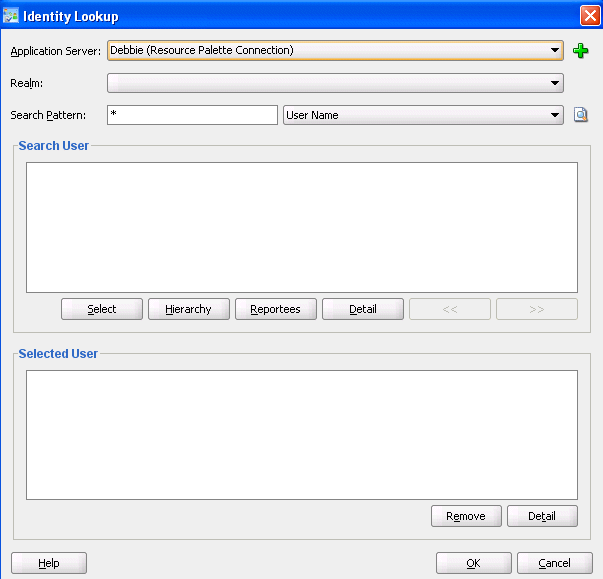
If you selected User or Group, the Identity Lookup dialog box shown in Figure 29-6 appears.
To select a user or group, you must first create an application server connection by clicking the Add icon. Note the following restrictions:
-
Do not create an application server connection to an Oracle WebLogic Administration Server from which to retrieve the list of identity service realms. This is because there is no identity service running on the Administration Server. Therefore, no realm information displays and no users display when performing a search with a search pattern in the Identity Lookup dialog box. Instead, create an application server connection to a managed Oracle WebLogic Server.
-
You must select an application server connection configured with the complete domain name (for example,
myhost.us.example.com). If you select a connection configured only with the hostname (for example,myhost), the Realm list may not display the available realms. If the existing connection does not include the domain name, perform the following steps:-
In the Resource Palette, right-click the application server connection.
-
Select Properties.
-
In the Configuration tab, add the appropriate domain to the hostname.
-
Return to the Identity Lookup dialog box and reselect the connection.
-
-
Select or create an application server connection to display the realms for selection. A realm provides access to a policy store of users and roles (groups).
-
Search for the owner by entering a search string such as
jcooper, j*, *,and so on. Clicking the Lookup icon to the right of the User Name field fetches all the users that match the search criteria. Figure 29-7 provides details. One or more users or groups can be highlighted and selected by clicking Select.Figure 29-7 Identity Lookup with Realm Selected
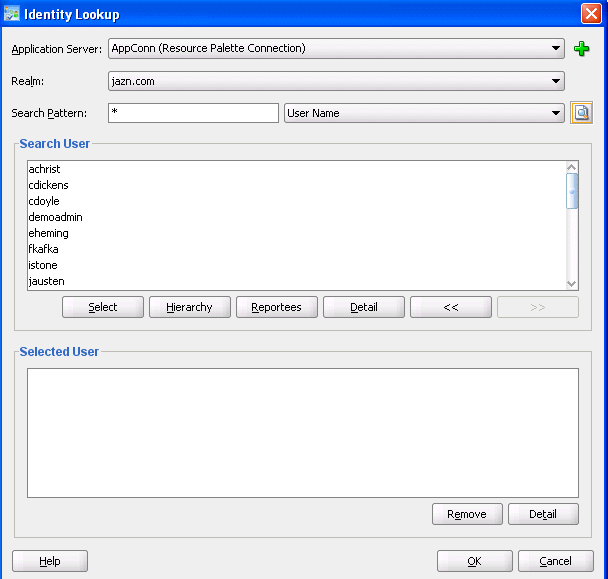
Description of "Figure 29-7 Identity Lookup with Realm Selected" -
View the hierarchy of a user by highlighting the user and clicking Hierarchy. Similarly, clicking Reportees displays the reportees of a selected user or group. Figure 29-8 provides details.
Figure 29-8 User Hierarchy in Identity Lookup Dialog
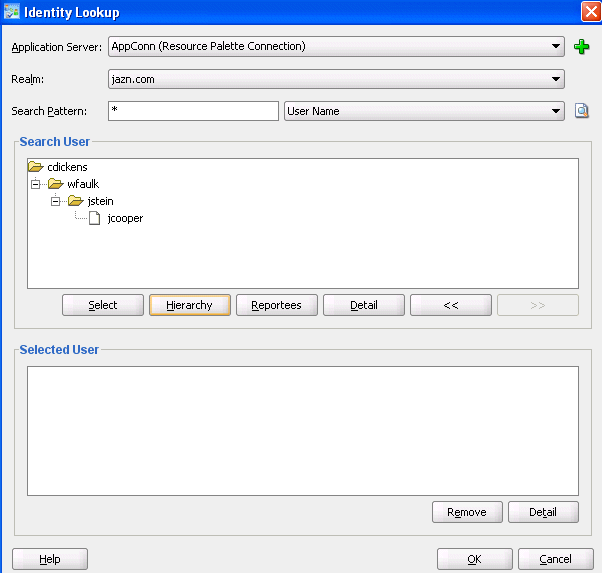
Description of "Figure 29-8 User Hierarchy in Identity Lookup Dialog" -
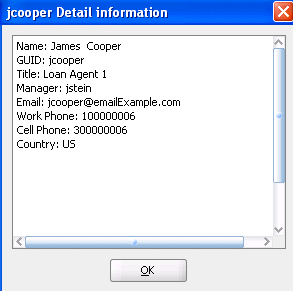
View the details of a user or group by highlighting the user or group and clicking Detail. Figure 29-9 provides details.
-
Click OK to return to the Identity Lookup dialog box.
-
Click Select to add the user to the Selected User section.
-
Click OK to return to the Human Task Editor.
Your selection displays in the Owner field.
-
-
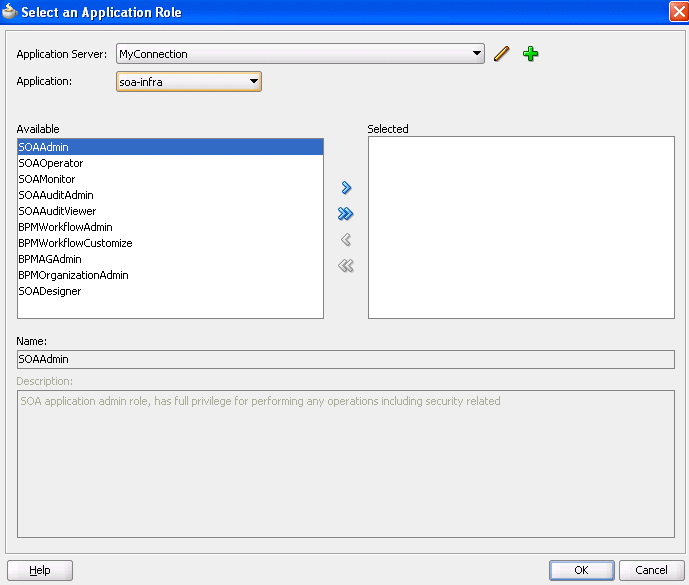
If you selected Application Role, the Select an Application Role dialog box appears.
-
In the Application Server list, select the type of application server that contains the application role or click the Add icon to launch the Create Application Server Connection wizard to create a connection.
-
In the Application list, select the application that contains the application roles (for example, a custom application or soa-infra for the SOA Infrastructure application).
-
In the Available section, select appropriate application roles and click the > button. To select all, click the >> button. Figure 29-10 provides details.
-
Click OK.
-
29.2.7 How To Specify an Application Context
You can specify the name of the application that contains the application roles used in the task. This indicates the context in which the application role operates. If you do not explicitly create a task, but end up having one, you can set up the context.
Note:
An application context is required to be set in the task definition in order to be able to reassign the task to an application role in the Oracle Process Workspace and Oracle BPM Worklist applications.
In the Application Context field of the General section, enter the name to specify an application context.
29.3 Specifying the Task Payload Data Structure
Learn how to specify the structure (message elements) of the task payload (the data in the task) defined in the XSD file.
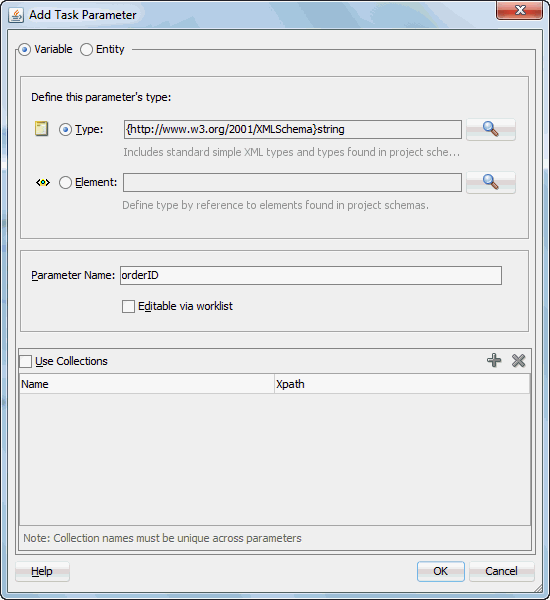
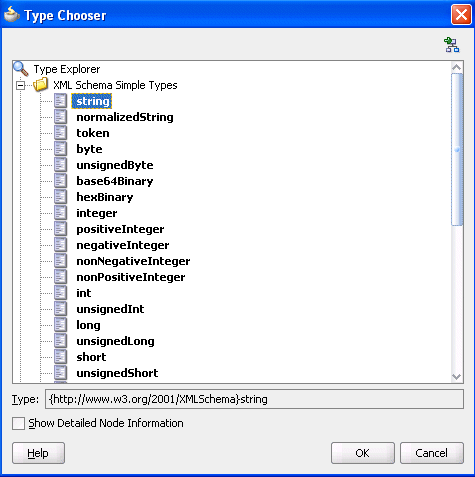
Create parameters to represent the elements in the XSD file. This makes the payload data available to the workflow task. For example:
-
You create a parameter for an order ID element for placing an order from a store front application.
-
You create parameters for the location, type, problem description, severity, status, and resolution elements for creating a help desk request.
Figure 29-13 shows the Data section of the Human Task Editor.Task payload data consists of one or more elements or types. Based on your selections, an XML schema definition is created for the task payload.
Figure 29-13 Human Task Editor — Parameters Section

Description of "Figure 29-13 Human Task Editor — Parameters Section"
29.4 Assigning Task Participants
Learn how to select a participant type that meets your business requirements. While configuring the participant type, you build lists of users, groups, and application roles to act upon tasks.
Figure 29-16 shows the Assignment section of the Human Task Editor.
Figure 29-16 Human Task Editor — Assignment Section
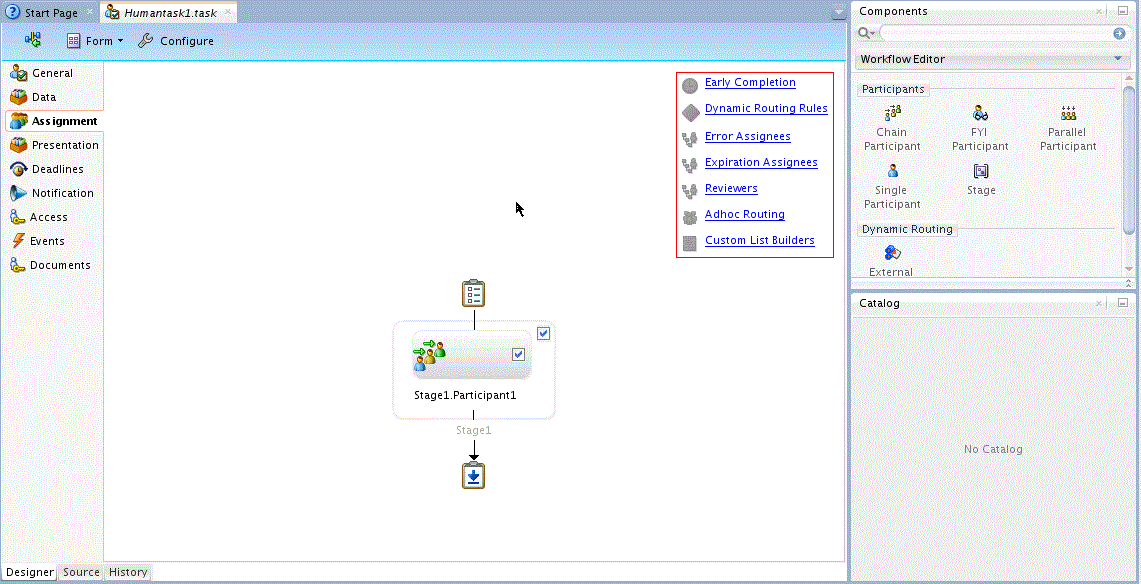
Description of "Figure 29-16 Human Task Editor — Assignment Section"
You can easily mix and match participant types to create simple or complex workflow routing policies. You can also extend the functionality of a previously configured human task to model more complex workflows.
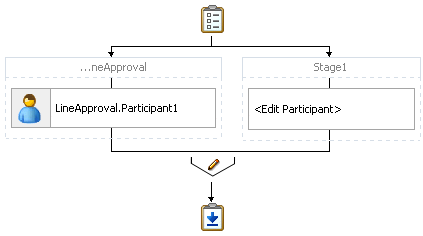
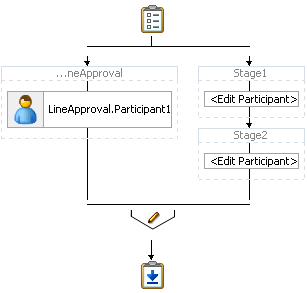
A participant type is grouped in a block under a stage (for example, named Stage1 in Figure 29-16). A stage is a way of organizing the approval process for blocks of participant types. You can have one or more stages in sequence or in parallel. Within each stage, you can have one or more participant type blocks in sequence or in parallel. The up and down keys enable you to rearrange the order of your participant type blocks.
For example:
-
You can create all participant type blocks in a single stage (for example, a purchase order request in which the entire contents of the order are approved or rejected as a whole).
-
You can create more complex approval tasks that may include one or more stages. For example, you can place one group of participant type blocks in one stage and another block in a second stage. The list of approvers in the first stage handles line entry approvals and the list of approvers in the second stage handles header entry approvals.
Each of the participant types has an associated editor that you use for configuration tasks. The sequence in which the assignees are added indicates the execution sequence.
To specify a different stage name or have a business requirement that requires you to create additional stages, perform the following steps. Creating additional stages is an advanced requirement that may not be necessary for your environment.
For more information about participant types, see Task Assignment and Routing.
29.4.1 How to Specify a Stage Name and Add Parallel and Sequential Blocks
The stage is named Stage1 by default, however you can change the name.
To specify a stage name and add parallel and sequential blocks:
29.4.3 How to Configure the Single Participant Type
Figure 29-20 shows the Edit Participant Type dialog box for the single participant type. Figure 29-21 shows the expanded Advanced section.
Figure 29-20 Edit Participant Type — Single Type
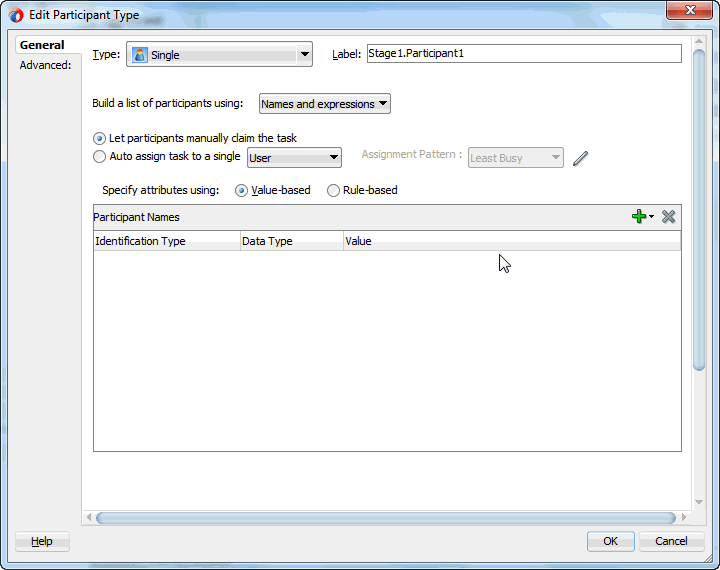
Description of "Figure 29-20 Edit Participant Type — Single Type"
Figure 29-21 Edit Participant Type — Advanced Tab
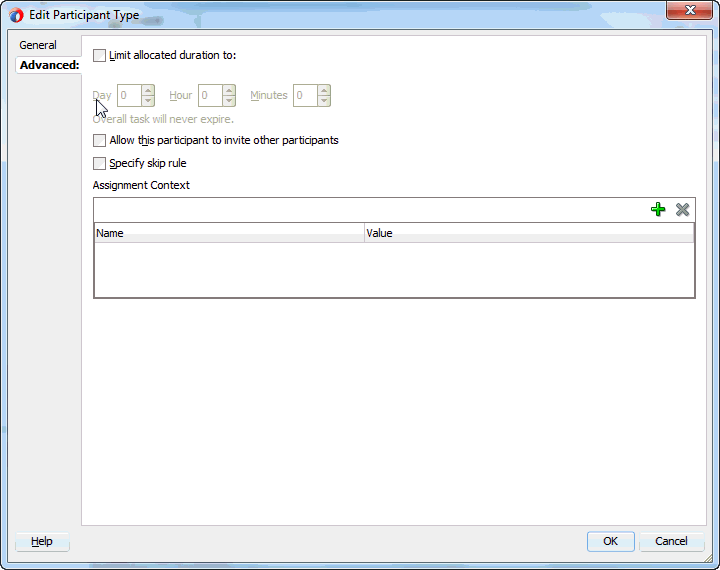
Description of "Figure 29-21 Edit Participant Type — Advanced Tab"
To be dynamically assigned to a task, a single participant can be selected from a group, an application role, or a participant list.
To configure the single participant type:
29.4.3.1 Creating a Single Task Participant List
Users assigned to a participant list can act upon tasks. In a single-task participant list, only one user is required to act on the task. You can specify either a single user or a list of users, groups, or application roles for this pattern. If a list is specified, then all users on the list are assigned the task. You can specify either that one of them must manually claim and act upon the task, or that one user from the list is automatically selected by an assignment pattern. When one user acts on the task, the task is withdrawn from the task list of other assignees.
You can create several types of lists for the single user participant, and for the parallel, serial, and FYI user participants, for example:
-
Value-based name and expression lists
These lists enable you to statically or dynamically select users, groups, or application roles as task assignees.
-
Value-based management chain lists
Management chains are typically used for serial approvals through multiple users in a management chain hierarchy. Therefore, this list is most likely useful with the serial participant type. This is typically the case if you want all users in the hierarchy to act upon the task. Management chains can also be used with the single participant type. In this case, however, all users in the hierarchy get the task assigned at the same time. As soon as one user acts on the task, it is withdrawn from the other users.
For example, a purchase order is assigned to a manager. If the manager approves the order, it is assigned to their manager. If that manager approves it, it is assigned to their manager, and so on until three managers approve the order. If any managers reject the request or the request expires, the order is rejected if you specify an abrupt termination condition. Otherwise, the task flow continues to be routed.
-
Rule-based names and expression lists and management chain lists
Business rules enable you to create the list of task participants with complex expressions. For example, you create a business rule in which a purchase order request below $5000 is sent to a manager for approval. However, if the purchase order request exceeds $5000, the request is sent to the manager of the manager for approval. Two key features of business rules are facts and action types, which are described in How to Specify Advanced Task Routing Using Business Rules.
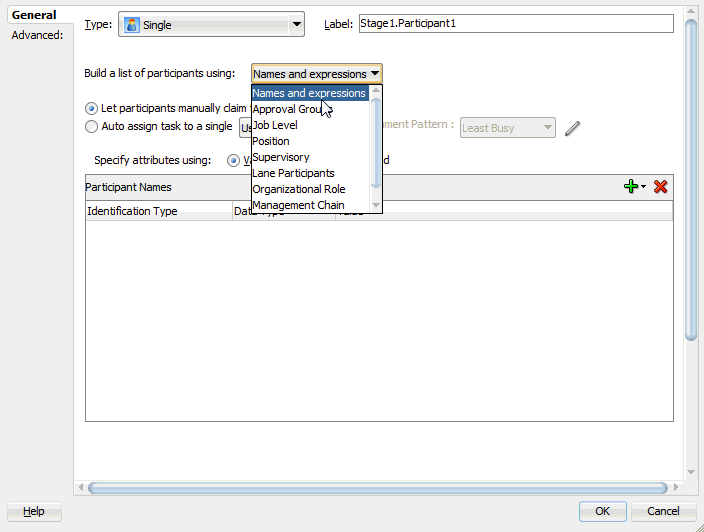
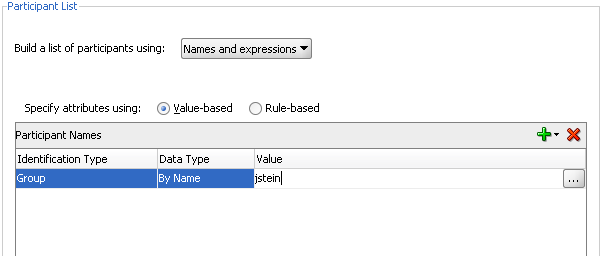
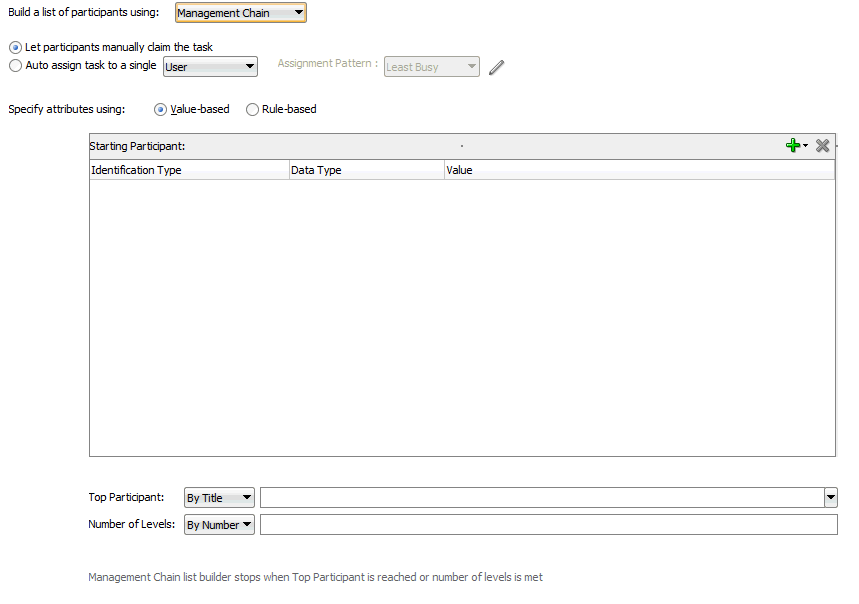
When you select a participant type, a dialog box enables you to choose an option for building your list of task participant assignees (users, groups, or application roles), as shown in Figure 29-22. The three selections described above are available: Names and expressions, Management Chain, and Rule-based.
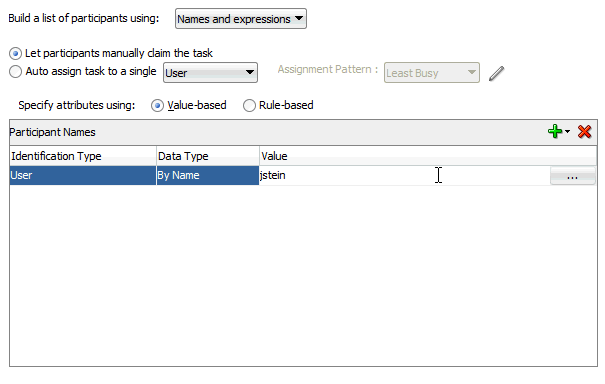
After selecting an option, you dynamically assign task participant assignees (users, groups, or application roles) and a data type, as shown in Figure 29-23.
This section describes how to create these lists of participants.
29.4.3.1.1 Creating Participant Lists Consisting of Value-Based Names and Expressions
Select a method for statically or dynamically assigning a user, group, or application role as a task participant. If the participant list contains a user, the selecting a group or an application role causes the dynamic assignment to fail.
For conceptual information about:
-
Users, groups, or application roles, see Task Assignment and Routing.
-
Statically and dynamically assigning task participants, see Static, Dynamic, and Rule-Based Task Assignment.
To create participant lists consisting of value-based names and expressions:
29.4.3.1.2 Creating Participant Lists Consisting of Value-Based Management Chains
Select a method for statically or dynamically assigning management chain parameters as task participants.
For conceptual information about:
-
Users, groups, or application roles, see Task Assignment and Routing.
-
Statically and dynamically assigning task participants, see Static, Dynamic, and Rule-Based Task Assignment.
-
Management chains, see Creating a Single Task Participant List.
To create participant lists based on value-based management chains:
29.4.3.1.3 Creating Participant Lists Consisting of Rulesets
A ruleset provides a unit of execution for rules and for decision tables. In addition, rulesets provide a unit of sharing for rules; rules belong to a ruleset. Multiple rulesets can be executed in order. This is called rule flow. The ruleset stack determines the order. The order can be manipulated by rule actions that push and pop rulesets on the stack. In rulesets, the priority of rules applies to specify the order of firing of rules in the ruleset. Rulesets also provide an effective date specification that identifies that the ruleset is always active, or that the ruleset is restricted based on a time and date range, or a starting or ending time and date.
The method by which you create a ruleset is based on how you access it. This is described in the following section.
Note:
You cannot update facts after the rule dictionary is created.
To specify participant lists based on rulesets:
Business rules can define the participant list. There are two options for using business rules:
-
Rules define parameters of a specific list builder (such as Names and Expressions or Management Chain). In this case, the task routing pattern is modeled to use a specific list builder. In the list builder, the parameters are listed as coming from rules. Rules return the list builder of the same type as the one modeled in Oracle JDeveloper.
-
From the Build a list of participants using list, select Names and expressions or Management Chain.
-
From the Specify attributes using list, select Rule-based.
-
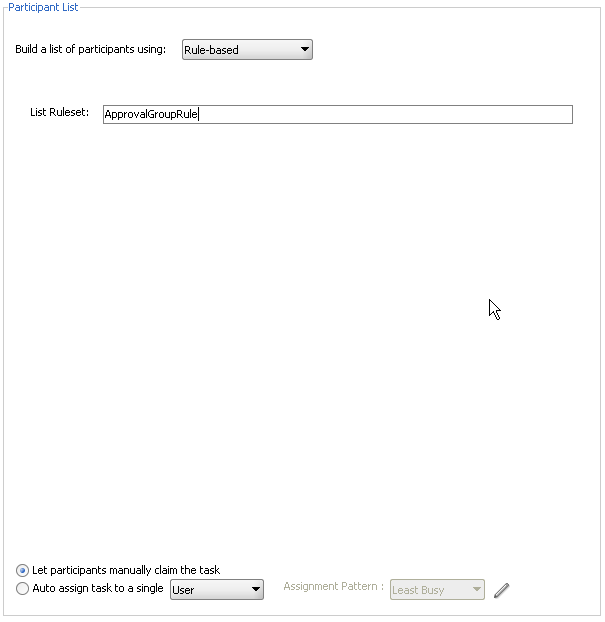
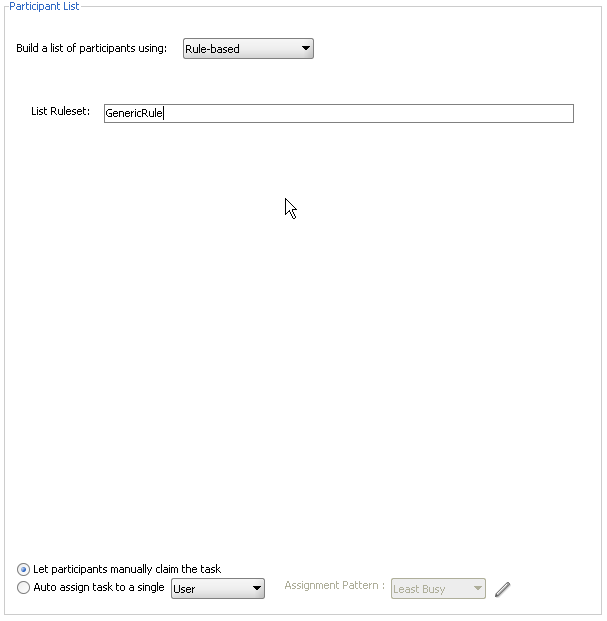
In the List Ruleset field, enter a ruleset name.
Figure 29-27 provides details.
-
Do either of the following:
-
Select Let participants manually claim the task. If you select this option, then the task is assigned to all participants in the list. An individual user from the task assignees can then manually claim the task to work on it.
-
Select Auto-assign to a single list, select User, Group, or Application Role, then select an assignment pattern.
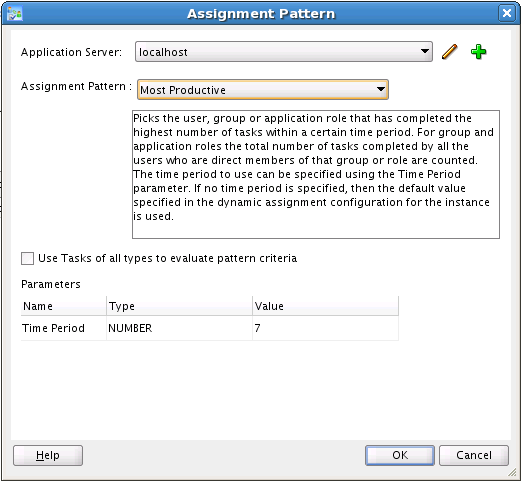
To find out more about each assignment pattern, and to select and configure it, click Assignment Pattern. The Assignment Pattern dialog box appears. Figure 29-24 shows an example of an Assignment Pattern dialog box.
When you specify an application server connection in the Application Server field, the assignment patterns are loaded into the Assignment Pattern list. When you select one of the patterns from the Assignment Pattern list, a description of your selection appears in the text box.
If you want the assignment pattern to consider all types of tasks, then select Use tasks of all types to evaluate pattern criteria. Otherwise, the pattern considers only this task type when determining the selected user. For example, to assign a vacation request task to the least busy user, and you select Use tasks of all types to evaluate pattern criteria, then all assigned tasks are taken into consideration when determining the least busy user. If you do not select Use tasks of all types to evaluate pattern criteria, then only assigned vacation request tasks are considered when determining the least busy user.
A particular pattern may enable you to specify input parameters that control how the pattern is evaluated. For example, as shown in Figure 29-24, the Most Productive pattern enables you to specify the Time Period (in days) over which the productivity is calculated. Input values can be static, or can be dynamically set by using an XPath expression. Not all patterns accept parameters.
-
-
Click OK.
-
-
Rules define the list builder and the list builder parameters. In this case, the list itself is built using rules. The rules define the list builder and the parameters.
-
From the Build a list of participants using list, select Rule-based.
-
In the List Ruleset field, enter a ruleset name.
Figure 29-28 provides details.
-
Do either of the following:
-
Select Let participants manually claim the task. If you select this option, then the task is assigned to all participants in the list. An individual user from the task assignees can then manually claim the task to work on it.
-
Select Auto-assign to a single list, select User, Group, or Application Role, then select an assignment pattern.
To find out more about each assignment pattern, and to select and configure it, click Assignment Pattern. The Assignment Pattern dialog box appears. Figure 29-24 shows an example of an Assignment Pattern dialog box.
When you specify an application server connection in the Application Server field, the assignment patterns are loaded into the Assignment Pattern list. When you select one of the patterns from the Assignment Pattern list, a description of your selection appears in the text box.
If you want the assignment pattern to consider all types of tasks, then select Use tasks of all types to evaluate pattern criteria. Otherwise, the pattern considers only this task type when determining the selected user. For example, to assign a vacation request task to the least busy user, and you select Use tasks of all types to evaluate pattern criteria, then all assigned tasks are taken into consideration when determining the least busy user. If you do not select Use tasks of all types to evaluate pattern criteria, then only assigned vacation request tasks are considered when determining the least busy user.
-
-
Click OK.
-
Both options create a rule dictionary, if one is not already created, and preseed several rule functions and facts for easy specifications of the participant list. In the rule dictionary, the following rule functions are seeded to create participant lists:
-
CreateResourceList -
CreateManagementChainList
The Task fact is asserted by the task service for basing rule conditions.
29.4.3.1.3.1 Viewing the Rule Dictionary
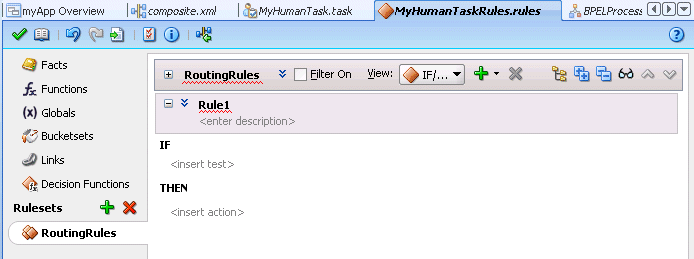
After the rule dictionary is created, the Oracle Business Rules Designer is displayed.
-
Model your rule conditions. In the action part, call one of the above functions to complete building your lists. Figure 29-29 provides details.
The parameters for the rule functions are similar to the ones in Oracle JDeveloper modeling. In addition to the configurations in Oracle JDeveloper, some additional options are available in the Oracle Business Rules Designer for the following attributes:
-
responseType: If the response type is REQUIRED, the assignee must act on the task. Otherwise, the assignment is converted to an FYI assignment.
-
ruleName: The rule name can create reasons for assignments.
-
lists: This object is a holder for the lists that are built. Clicking this option shows a pre-asserted fact Lists object to use as the parameter.
An example of rules specifying management chain-based participants is shown in Figure 29-30.
If multiple rules are fired, the list builder created by the rule with the highest priority is selected.
-
29.4.3.2 Specifying a Time Limit for Acting on a Task
You can specify the amount of time a user, group, or application role receives to act on a task. If the user, group, or role does not act in the time specified, the global escalation and renewal policies that you set in the Deadlines section (known as the routing slip level) of the Human Task Editor are applied. For example, if the global policy is set to escalate the task and this participant does not act in the duration provided, the task is escalated to the manager or another user, as appropriate.
To specify a time limit for acting on a task:
29.4.3.3 Inviting Additional Participants to a Task
You can allow a task assignee to invite other participants into the workflow before routing it to the next assignee in this workflow. For example, assume the approval workflow goes from James Cooper to John Steinbeck. If this option is checked, James Cooper can decide to first route it to Irving Stone before it goes to John Steinbeck.
This is also known as ad hoc routing. If this option is selected, Adhoc Route is added to the Actions list in Oracle BPM Worklist at runtime.
Note:
Do not add adhoc assignees either above or below an FYI participant.
To invite additional participants to a task:
- Expand the Advanced section of the Edit Participant Type dialog box for the single type, as shown in Figure 29-31.
- Select Allow this participant to invite other participants.
29.4.4 How to Configure the Parallel Participant Type
The parallel participant type is used when multiple users, working in parallel, must act simultaneously, such as in a hiring situation when multiple users vote to hire or reject an applicant. You specify the voting percentage that is needed for the outcome to take effect, such as a majority vote or a unanimous vote. In case of parallel routing with parallel participants, the voting and the percentage rule takes precedence to decide the final outcome of the parent task.
For example, a business process collects the feedback from all interviewers in the hiring process, consolidates it, and assigns a hire or reject request to each of the interviewers. At the end, the candidate is hired if the majority of interviewers vote for hiring instead of rejecting.
Figure 29-32 and Figure 29-33 display the upper and lower sections of the Parallel dialog box.
Figure 29-32 Edit Participant Type — Parallel Type (Upper Section of Dialog)
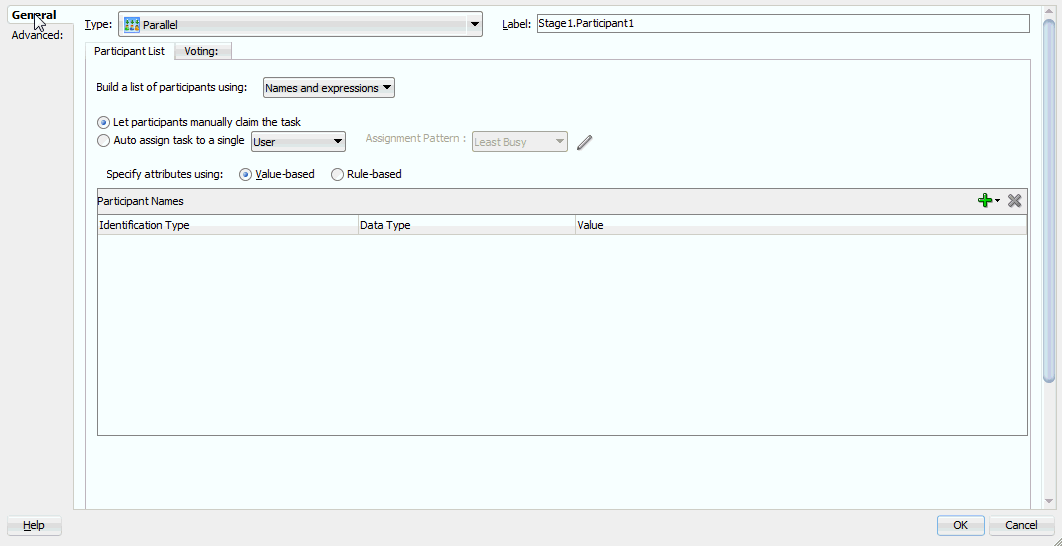
Description of "Figure 29-32 Edit Participant Type — Parallel Type (Upper Section of Dialog)"
Figure 29-33 Edit Participant Type — Parallel Type (Lower Section of Dialog)

Description of "Figure 29-33 Edit Participant Type — Parallel Type (Lower Section of Dialog)"
To assign participants to the parallel participant type:
29.4.4.1 Specifying the Voting Outcome
You can specify a voted-upon outcome that overrides the default outcome selected in the Default Outcome list. This outcome takes effect if the required percentage is reached. Outcomes are evaluated in the order listed in the table.
To specify group voting details:
29.4.4.2 Creating a Parallel Task Participant List
Users assigned to the list of participants can act upon tasks. You can create several types of lists:
-
Value-based name and expression lists
-
Value-based management chain lists
-
Rule-based names and expression lists
-
Rule-based management chain lists
-
Rule-based links
For information about creating these lists of participants, see section Creating a Single Task Participant List.
29.4.4.3 Specifying a Time Limit for Acting on a Task
You can specify the amount of time a user, group, or application role receives to act on a task. If the user, group, or role does not act in the time specified, the global escalation and renewal policies that you set in the Deadlines section (known as the routing slip level) of the Human Task Editor are applied. For example, if the global policy is set to escalate the task and this participant does not act in the duration provided, the task is escalated to the manager or another user, as appropriate.
To specify a time limit for acting on a task:
- In the Advanced section of the Edit Participant Type dialog box for the parallel type, click the Advanced tab to expand the section shown in Figure 29-33.
- Select Limit allocated duration to.
- Specify the amount of time.
For more information about setting the global escalation and renewal policies in the Deadlines section of the Human Task Editor, see Escalating, Renewing, or Ending the Task.
29.4.4.4 Inviting Additional Participants to a Task
You can allow a task assignee to invite other participants into the workflow before routing it to the next assignee in this workflow. For example, assume the approval workflow goes from James Cooper to John Steinbeck. If this option is checked, James Cooper can decide to first route it to Irving Stone before it goes to John Steinbeck.
To invite additional participants to a task:
- In the Advanced section of the Edit Participant Type dialog box for the parallel type, click the Advanced icon to expand the section (if not expanded).
- Select Allow this participant to invite other participants.
29.4.4.5 Bypassing a Task Participant
You can bypass a task participant (user, group, or application role) if a specific condition is satisfied. For example, if a user submits a business trip expense report that is under a specific amount, no approval is required by their manager.
To bypass a task participant:
29.4.5 How to Configure the Serial Participant Type
This participant type enables you to create a list of sequential participants for a workflow. For example, if you want a document to be reviewed by John, Mary, and Scott in sequence, use this participant type. For the serial participant type, they can be any list of users or groups.
Figure 29-35 displays the Serial dialog box. Figure 29-36 shows the expanded Advanced section.
Figure 29-35 Edit Participant Type — Serial Type
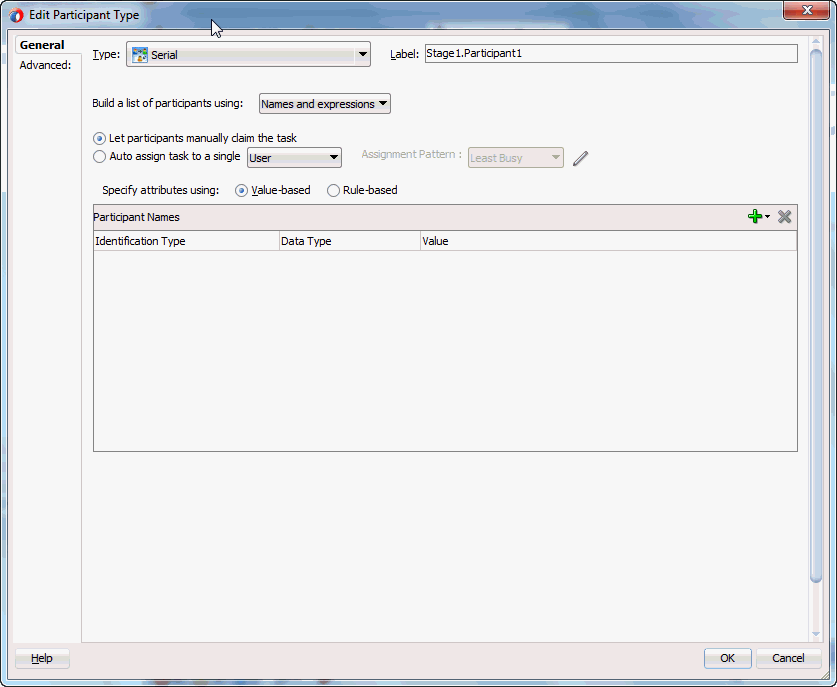
Description of "Figure 29-35 Edit Participant Type — Serial Type"
Figure 29-36 Edit Participant Type — Serial Type (Advanced Tab)
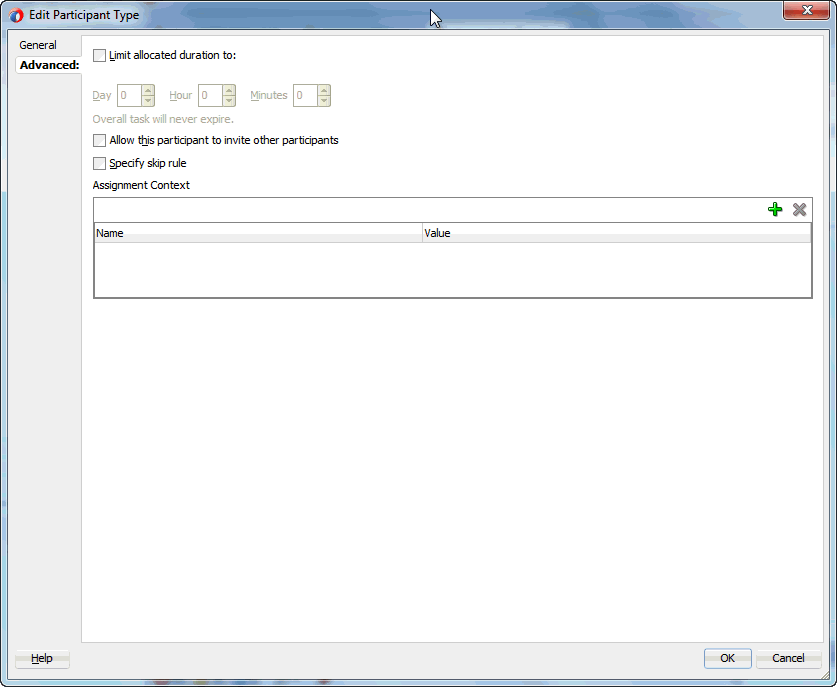
Description of "Figure 29-36 Edit Participant Type — Serial Type (Advanced Tab)"
To configure the serial participant type:
29.4.5.1 Creating a Serial Task Participant List
Users assigned to the list of participants can act upon tasks. You can create several types of lists:
-
Value-based name and expression lists
-
Value-based management chain lists
-
Rule-based names and expression lists
-
Rule-based management chain lists
-
Rule-based lists
See section Creating a Single Task Participant List for instructions on creating these lists of participants.
29.4.5.2 Specifying a Time Limit for Acting on a Task
You can specify the amount of time a user, group, or application role receives to act on a task. If the user, group, or role does not act in the time specified, the global escalation and renewal policies that you set in the Deadlines section (known as the routing slip level) of the Human Task Editor are applied. For example, if the global policy is set to escalate the task and this participant does not act in the duration provided, the task is escalated to the manager or another user, as appropriate.
To specify a time limit for acting on a task:
29.4.5.3 Inviting Additional Participants to a Task
You can allow a task assignee to invite other participants into the workflow before routing it to the next assignee in this workflow. For example, assume the approval workflow goes from James Cooper to John Steinbeck. If this option is checked, James Cooper can decide to first route it to Irving Stone before it goes to John Steinbeck.
To invite additional participants to a task:
29.4.5.4 Bypassing a Task Participant
You can bypass a task participant (user, group, or application role) if a specific condition is satisfied. For example, if a user submits a business trip expense report that is under a specific amount, no approval is required by their manager.
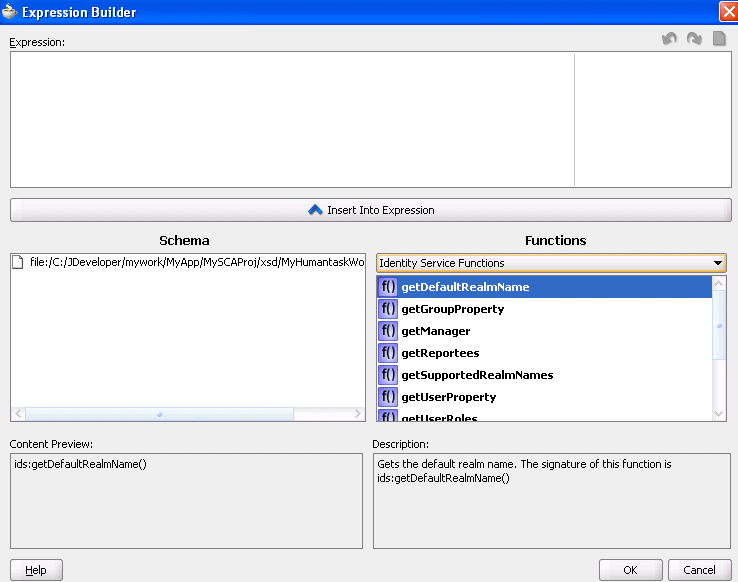
In the Advanced section of the Edit Participant Type dialog box for the serial type, select the Specify skip rule check box to bypass a task participant. This action displays an icon for accessing the Expression Builder dialog box for building a condition. The expression must evaluate to a boolean value.
For more information about a valid XPath expression for skipping a participant, see Bypassing a Task Participant.
29.4.6 How to Configure the FYI Participant Type
This participant type is used when a task is sent to a user, but the business process does not wait for a user response; it just continues. FYIs cannot directly impact the outcome of a task, but in some cases can provide comments or add attachments.
For example, a magazine subscription is due for renewal. If the user does not cancel the current subscription before the expiration date, the subscription is renewed. This user is reminded weekly until the request expires or the user acts on it.
Figure 29-37 displays the Edit Participant Type dialog box for the FYI type. This dialog box also includes a Participants Exclusion List at the bottom that is not displayed in Figure 29-37.
Figure 29-37 Edit Participant Type — FYI Type
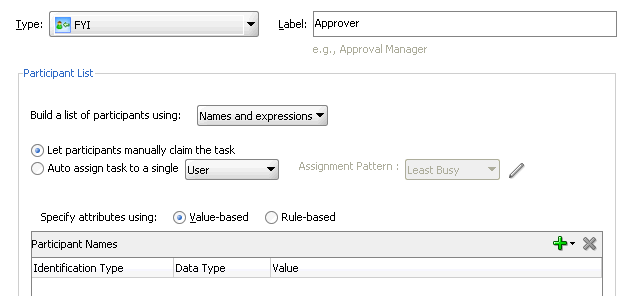
Description of "Figure 29-37 Edit Participant Type — FYI Type"
To configure the FYI participant type, in the Label field, enter a recognizable label for this participant. This label must be unique among all the participants in the task definition (for example, Approval Manager, Primary Reviewers, and so on).
29.4.6.1 Creating an FYI Task Participant List
Users assigned to the list of participants can act upon tasks. You can create several types of lists:
-
Value-based name and expression lists
-
Value-based management chain lists
-
Rule-based names and expression lists
-
Rule-based management chain lists
-
Rule-based lists
See section Creating a Single Task Participant List for instructions on creating these lists of participants.
29.5 Selecting a Routing Policy
You can select a routing policy in the Human Task Editor.
After you configure a participant type and are returned to the Human Task Editor, use the links on the top right corner as shown in Figure 29-38.
Figure 29-38 Human Task Editor — Assignment Section

Description of "Figure 29-38 Human Task Editor — Assignment Section"
Table 29-10 describes the routing policy methods provided.
Table 29-10 Routing Policy Method
| Routing Policy Selection | Use This Policy In Environments Where... | Section |
|---|---|---|
|
A participant can select users or groups as the next assignee (ad hoc) when approving the task. |
Allow All Participants to Invite Other Participants or Edit New Participants |
|
A participant in a task can accept or reject it, thus ending the workflow without the task being sent to any other participant. For example, a manager rejects a purchase order, meaning that purchase order is not sent to their manager for review. |
|
|
Note: This option is for environments in which you have multiple stages and participants working in parallel. Participants perform subtasks in parallel, and one group's rejection or approval of a subtask does not cause the other group's subtask to also be rejected or approved. |
|
|
Note: This option is for environments in which you have multiple stages and participants working in parallel. Participants perform subtasks in parallel, and one group's rejection or approval of a subtask causes the other group's subtask to also be rejected or approved. |
|
|
Use Advanced Rules |
The participants to whom the task is routed are determined by the business rule logic that you model. For example, a loan application task is designed to go through a loan agent, their manager, and then the senior manager. If the loan agent approves the loan, but their manager rejects it, the task is returned to the loan agent. |
|
|
Use External Routing |
The participants in a task are dynamically determined. For example, a company's rules may require the task participants to be determined and then retrieved from a back-end database during runtime. |
|
|
Assignment tab |
A participant is assigned a failed task for the purposes of recovery. |
29.5.1 How to Customize Tasks Routing
Tasks are reviewed by all the selected participants in the order they appear. This is the default routing. However, you can add some Adhoc or Dynamic routing rules.
Dynamic and Adhoc Routing Rules
Dynamic and Adhoc Routing help you with the following:
-
Allowing all participants to invite other participants
-
Completing a task when a participant chooses
-
Enabling early completion in parallel subtasks
-
Completing parent subtasks of early completing subtasks
29.5.1.1 Exclude Task Creator from Approval List
Before you create the task and create routing rules for the tasks, you can exclude the task creator from the list of approvers by adding the creator to the excluded participant list. At the same time, you can assign to the task to the task creator’s manager.
-
When you select only the Skip Creator from Approval List option:
-
If there are multiple users in the task and one of the users is the task creator, then the assignment is skipped for the task creator and assigned to other users.
-
If there is only one user and the user is the task creator, then the task moves to completed state. There is no assignee for the task.
-
-
When you select both the Skip Creator from Approval List and Assign to Creator’s Manager options:
-
If there are multiple users in the task and one of the users is the task creator, then the creator’s manager is fetched from the identity store and the task is assigned to the manager along with other users.
-
If there is only one user in the task and the user is the task creator, then the creator’s manager is fetched from the identity store and the task is assigned to the manager.
-
29.5.1.2 Allow All Participants to Invite Other Participants or Edit New Participants
This check box is the equivalent of the ad hoc workflow pattern of pre-10.1.3 Oracle BPEL Process Manager releases. This applies when there is at least one participant. In this case, each user selects users or groups as the next assignee when approving the task.
To allow all participants to invite other participants:
- Click Adhoc Routing.
- Select the Allow all participants to invite other participants check box for this task assignee to invite other participants into the workflow before routing it to the next assignee in this workflow.
- Select the Allow participants to edit new participants check box for this task assignee to edit other adhoc participants that were added to the routing slip.
Note:
Do not add adhoc assignees either above or below an FYI participant.
29.5.1.3 Allow Initiator to Add Participants
In the Adhoc Routing screen, select the Allow all initiator to add participants check box so this task initiator can invite other participants into the workflow before routing to the next assignee in this workflow.
29.5.1.4 Stopping Routing of a Task to Further Participants
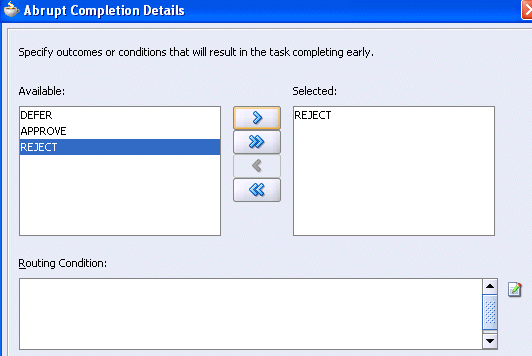
You can specify conditions under which a task can be marked complete early, regardless of the other participants in the workflow.
For example, assume an expense report goes to the manager, and then the director. If the first participant (manager) rejects it, you can end the workflow without sending it to the next participant (director).
To abruptly complete a condition:
29.5.1.4.1 Enabling Early Completion in Parallel Subtasks
You can use this option in the following environments:
-
Multiple stages and groups of participants perform subtasks in parallel.
-
A participant in one group approves or rejects a subtask, which causes the other participants in that same group to stop acting upon the task. However, this does not cause the other parallel group to stop acting upon subtasks. That group continues taking actions on tasks.
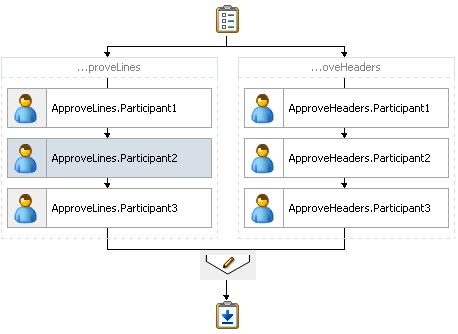
For example, assume there are two parallel subgroups, each in separate stages. One group acts upon lines of a purchase order. The other group acts upon headers of the same purchase order. If participant ApproveLines.Participant2 of the first group rejects a line, all other task participants in the first group stop acting upon tasks. However, the second parallel group continues to act upon headers in the purchase order. In this scenario, the entire task does not complete early. Figure 29-40 provides details.
Figure 29-40 Early Completion of Parallel Subtasks
Description of "Figure 29-40 Early Completion of Parallel Subtasks"
29.5.1.4.2 Completing Parent Subtasks of Early Completing Subtasks
You can use this option in the following environments:
-
Multiple stages and groups of participants perform subtasks in parallel.
-
A participant in one group approves or rejects a subtask, which causes the other participants in that same group to stop acting upon the task. This also causes the other parallel group to stop acting upon subtasks.
For example, assume there are two parallel subgroups, each in separate stages, as shown in Figure 29-40. One group acts upon lines of a purchase order. The other group acts upon headers of the same purchase order. If participant ApproveLines.Participant2 of the first group rejects a line, all other task participants in the first group stop acting upon tasks. In addition, the second parallel group stops acting upon headers in the purchase order. In this scenario, the entire task completes early.
29.5.2 How to Specify Advanced Task Routing Using Business Rules
Use advanced routing rules to create complex workflow routing scenarios. The participant types (single, parallel, serial, and FYI) are used to create a linear flow from one set of users to another with basic conditions such as abrupt termination, skipping assignees, and so on. However, there is often a need to perform more complex back and forth routing between multiple individuals in a workflow. One option is to use the BPEL process as the orchestrator of these tasks. Another option is to specify it declaratively using business rules. This section describes how you can model such complex interactions by using business rules with the Human Task Editor.
29.5.2.1 Introduction to Advanced Task Routing Using Business Rules
You can define state machine routing rules using Oracle Business Rules. This action enables you to create Oracle Business Rules that are evaluated:
-
After a routing slip task participant sets the outcome of the task
-
Before the task is assigned to the next routing slip participant
This action enables you to override the standard task routing slip method described in How to Route Tasks to All Participants in the Specified Order and build complex routing behavior into tasks.
Using Oracle Business Rules, you define a set of rules (called a ruleset) that relies on business objects, called facts, to determine which action to take.
29.5.2.2 Facts
A fact is an object with certain business data. Each time a routing slip assignee sets the outcome of a task, instead of automatically routing the task to the next assignee, the task service performs the following steps:
-
Asserts facts into the decision service
-
Executes the advanced routing ruleset
Rules can test values in the asserted facts and specify the routing behavior by setting values in a TaskAction fact type.
Table 29-11 describes the fact types asserted by the task service.
Table 29-11 Fact Types Asserted By the Task Service
| Fact Type | Description |
|---|---|
|
|
This fact contains the current state of the workflow task instance. All task attributes can be tested against it. The task fact also contains the current task payload. This fact enables you to construct tests against payload values and task attribute values. |
|
|
This fact describes the previous task outcome and the assignee who set the outcome. The previous outcome fact contains the following attributes:
|
|
|
This fact is not intended for writing rule tests against it. Instead, it is updated by the ruleset, and returned to the task service to indicate how the task should be routed. Rules should not directly update the |
Some fact types can only be used in workflow routing rules, while others can only be used in workflow participant rules. Table 29-12 describes where you can use each type.
Table 29-12 Use of Fact Types
| Fact Type | Can Use in Routing Rules? | Can Use in Participant Rules? |
|---|---|---|
|
|
Yes |
Yes |
|
|
Yes |
No |
|
|
Yes |
No |
|
|
No |
Yes |
|
|
No |
Yes |
|
|
No |
Yes |
|
|
No |
Yes |
|
|
No |
Yes |
|
|
No |
Yes |
|
|
No |
Yes |
|
|
No |
Yes |
29.5.2.3 Action Types
To instruct the task service on how to route the task, rules can specify one of many task actions. This is done by updating the TaskAction fact asserted into the rule session. However, rules should not directly update the TaskAction fact. Instead, rules should call one of the action RL functions, passing the TaskAction fact as a parameter. These functions handle the actual updates to the fact. For example, to specify an action of go forward, you must add a call GO_FORWARD(TaskAction) to the action part of the rule.
Each time a state machine routing rule is evaluated, the rule takes one of the actions shown in Table 29-13:
Table 29-13 Business Rule Actions
| Action | Description | Parameters |
|---|---|---|
|
|
Goes to the next participant in the routing slip (default behavior). |
None |
|
|
Goes back to the previous participant in the routing slip (the participant before the one that just set the task outcome). Note: Pushback is designed to work with single approvers and not with group votes. Pushback from a stage with group vote (or parallel) scenario to another stage is not allowed. Similarly, you cannot push back from a single assignee to a group vote (or parallel) scenario. |
None |
|
|
Goes to a specific participant in the routing slip. |
A string that identifies the label of the participant (for example, |
|
|
Finishes routing and completes the task. The task is marked as completed, and no further routing is required. |
None |
|
|
Escalates and reassigns the task according to the task escalation policy (usually to the manager of the current assignee). |
None |
29.5.2.4 Sample Ruleset
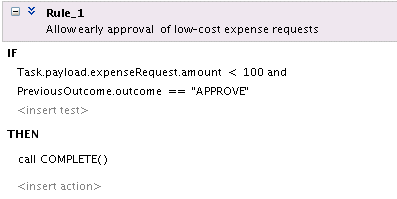
This section describes how to use rules to implement custom routing behavior with a simple example. A human workflow task is created for managing approvals of expense requests. The outcomes for the task are approve and reject. The task definition includes an ExpenseRequest payload element. One of the fields of ExpenseRequest is the total amount of the expense request. The routing slip for the task consists of three single participants (assignee1, assignee2, and assignee3).
By default, the task gets routed to each of the assignees, with each assignee choosing to approve or reject the task.
Instead of this behavior, the necessary routing behavior is as follows:
-
If the total amount of the expense request is less than $100, approval is only required from one of the participants. Otherwise, it must be approved by all three.
-
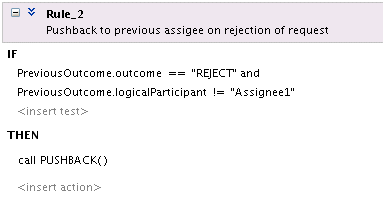
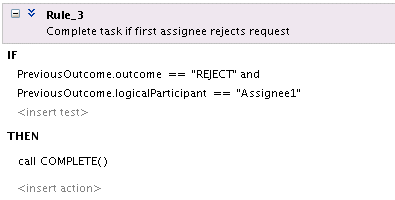
If an expense request is rejected by any of the participants, it must be returned to the previous participant for re-evaluation. If it is rejected by the first participant, the expense request is rejected and marked as completed.
This behavior is implemented using the following rules. When a rule dictionary is generated for advanced routing rules, it is created with a template rule that implements the default GO_FORWARD behavior. You can edit this rule, and make copies of the template rule by right-clicking and selecting Copy Rule in the Oracle Business Rules Designer.
If the amount is greater than $100 and the previous assignee approved the task, it is not necessary to provide a rule for routing a task to each of the assignees in turn. This is the default behavior that is reverted to if none of the rules in the ruleset are triggered:
-
Early approval rule (Figure 29-41):
-
Push back on the rejected rule (Figure 29-42):
Figure 29-42 Push Back On The Rejected Rule
Description of "Figure 29-42 Push Back On The Rejected Rule" -
Complete the
Assignee1rejected rule (Figure 29-43):Figure 29-43 Completion of the Assignee1 Rejected Rule
Description of "Figure 29-43 Completion of the Assignee1 Rejected Rule"
For information about iterative design, see the workflow-106-IterativeDesign sample available with the Oracle SOA Suite samples.
29.5.2.5 Linked Dictionary Support
For human workflow, business rule artifacts are now stored in two rules dictionaries. This is useful for scenarios in which you must customize your applications. For example, you create and ship version 1 of an application to a customer. The customer then customizes the rulesets in the application with Oracle SOA Composer. Those customizations are now stored in a different rules dictionary than the base rules dictionary. The rules dictionary that stores the customized rulesets links with the rules in the base dictionary. When you later ship version 2 of the application, the base rule dictionary may contain additional changes introduced in the product. The ruleset customization changes previously performed by the customer are preserved and available with the new changes in the base dictionary. When an existing application containing a task using rules is opened, if the rules are in the old format using one dictionary, they are automatically upgraded and divided into two rules dictionaries:
-
Base dictionary
-
Custom dictionary
For more information about customizations, see Customizing SOA Composite Applications .
29.5.3 How to Use External Routing
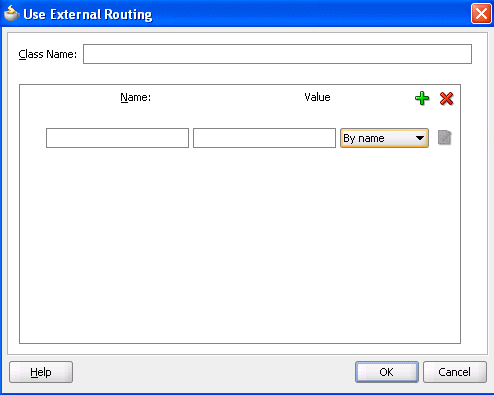
You configure an external routing service that dynamically determines the participants in the workflow. If this routing policy is specified, all other participant types are ignored. It is assumed that the external routing service provides a list of participant types (single approver, serial approver, parallel approver, and so on) at runtime to determine the routing of the task.
Use this option if you do not want to use any of the routing rules to determine task assignees. In this case, all the logic of task assignment is delegated to the external routing service.
Note:
If you select Use External Routing in the Configure Assignment dialog box, specify a Java class, and click OK to exit, the next time you open this dialog box, the other two selections (Route task to all participants, in order specified and Use Advanced Rules) no longer appear in the drop-down list. To access all three selections again, you must delete the entire assignment.
To use external routing
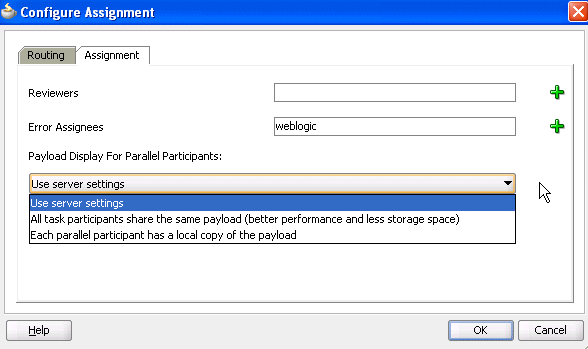
29.5.4 How to Configure the Error Assignee and Reviewers
Tasks can error for reasons such as incorrect assignments. When such errors occur, the task is assigned to the error assignee, who can perform corrective actions. Recoverable errors are as follows:
-
Invalid user and group for all participants
-
Invalid XPath expressions that are related to assignees and expiration duration
-
Escalation on expiration errors
-
Evaluating escalation policy
-
Evaluating renewal policy
-
Computing a management chain
-
Evaluating dynamic assignment rules. The task is not currently in error, but is still left as assigned to the current user and is therefore recoverable.
-
Dynamic assignment cyclic assignment (for example, user A > user B > user A). The task is not currently in error, but is still left as assigned to the last user in the chain and is therefore recoverable.
The following errors are not recoverable. In these cases, the task is moved to the terminating state ERRORED.
-
Invalid task metadata
-
Unable to read task metadata
-
Invalid
GOTOparticipant from state machine rules -
Assignment service not found
-
Any errors from assignment service
-
Evaluating custom escalate functions
-
Invalid XPath and values for parallel default outcome and percentage values
During modeling of workflow tasks, you can specify error assignees for the workflow. If error assignees are specified, they are evaluated and the task is assigned to them. If no error assignee is specified at runtime, an administration user is discovered and is assigned the alerted task. The error assignee can perform one of the following actions:
-
Ad hoc route
Route the task to the actual users assigned to the task. Ad hoc routing allows the task to be routed to users in sequence, parallel, and so on. Note: Do not add adhoc assignees either above or below a FYI participant.
-
Reassign
Reassign the task to the actual users assigned to this task
-
Error task
Indicate that this task cannot be rectified.
If there are any errors in evaluating the error assignees, the task is marked as being in error.
This dialog box enables you to specify the users or groups to whom the task is assigned if an error in assignment has occurred.
To configure the error assignee:
For more information about users, groups, or application roles, see Task Assignment and Routing.
29.5.4.1 How to Change Server Settings
To change the default setting of SharePayloadAcrossAllParallelApprovers property, perform the following steps:
- Right-click soa-infra and select Administration > System MBean Browser.
- Expand Application Defined MBeans > oracle.as.soainfra.config > Server: server_name > WorkflowConfig > human-workflow.
- Click SharePayloadAcrossAllParallelApprovers.
- Change this property in the list, and click Apply.
29.6 Specifying Multilingual Settings and Style Sheets
You can specify resource bundles to displaying task details in different languages and custom style sheets.
The Presentation section shown in Figure 29-47 enables you to specify resource bundles for displaying task details in different languages in Oracle BPM Worklist and WordML and custom style sheets for attachments.
29.6.1 How to Specify WordML and Other Style Sheets for Attachments
To specify WordML style sheets for attachments:
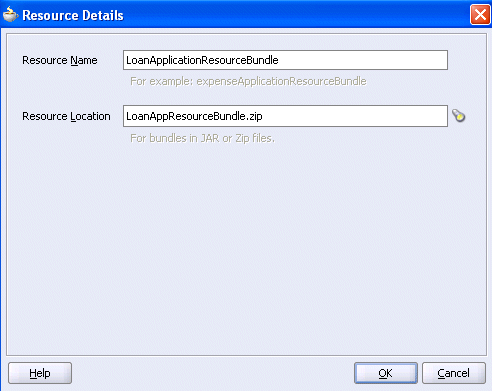
29.6.2 How to Specify Multilingual Settings
You can specify resource bundles for displaying task details in different languages in Oracle BPM Worklist. Resource bundles are supported for the following task details:
-
Displaying the value for task outcomes in plain text or with the
message(key)format. -
Making email notification messages available in different languages. At runtime, you specify the
hwf:getTaskResourceBundleString(taskId, key, locale?)XPath extension function to obtain the internationalized string from the specified resource bundle. The locale of the notification recipient can be retrieved with the functionhwf:getNotificationProperty(propertyName).
Resource bundles can also simply be property files. For example, a resource bundle that configures a display name for task outcomes can look as follows:
-
APPROVE=Approve -
REJECT=Reject
To specify multilingual settings:
29.7 Specifying What to Show in Task Details in the Worklist
The Presentation section enables you to specify the records in the runtime history section of the task details form in worklistapp.
Merge repeating stages: Select this option to view one aggregated entry for all repeating stages. The Worklist UI also provides an option to set or unset this option.
Show future participants: Select this option to see details about all future participants in the task.
Show only user performed actions: By default, task history details contain records for Admin and system actions, such as root task updates. Select this option to not see only user-performed action updates in the task details.
29.8 Escalating, Renewing, or Ending the Task
You can specify the expiration duration of a task in this global policy section (also known as the routing slip level).
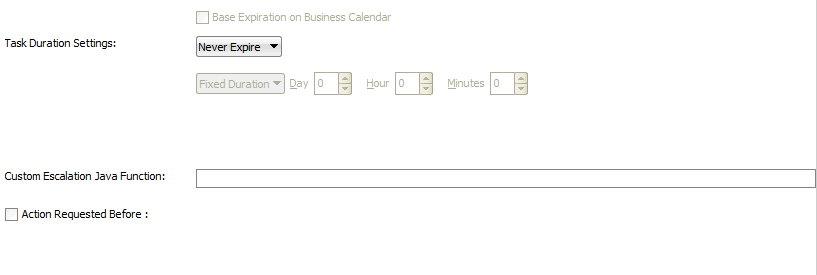
Figure 29-49 shows the Deadlines section of the Human Task Editor.
If the expiration duration is specified at the routing slip level instead of at the participant type level, then this duration is the expiration duration of the task across all the participants. However, if you specify expiration duration at the participant type level (through the Limit allocated duration to check box), then those settings take precedence over settings specified in the Deadlines section (routing slip level).
You can also specify that a task be escalated to a user's manager after a specified time period. For more information, see Specifying a Time Limit for Acting on a Task.
Figure 29-49 Human Task Editor — Deadlines Section
Description of "Figure 29-49 Human Task Editor — Deadlines Section"
29.8.1 Introduction to Escalation and Expiration Policy
This section provides an overview of how specifying the expiration duration at this level makes this setting the expiration duration of the task across all the participants.
For example, participant LoanAgentGroup and participant Supervisor have three days to act on the task between them, as shown in Figure 29-50:
If there is no expiration specified at either the participant level or this routing slip level, then that task has no expiration duration.
If expiration duration is specified at any level of the participants, then for that participant, the participant expiration duration is used. However, the global expiration duration is still used for the participants that do not have participant level expiration duration. The global expiration duration is always decremented by the time elapsed in the task.
The policy for interpreting the participant level expiration for the participants is described as follows:
-
Serial
Each assignment in the management chain gets the same expiration duration as the one specified in the serial. The duration is not for all the assignments resulting from this assignment. If the task expires at any of the assignments in the management chain, the escalation and renewal policy is applied.
-
Parallel:
-
In a parallel workflow, if the parallel participants are specified as a resource, a routing slip is created for each of the resources. The expiration duration of each created routing slip follows these rules:
The expiration duration equals the expiration duration of the parallel participant if it has an expiration duration specified.
The expiration duration that is left on the task if it was specified at the routing slip level.
Otherwise, there is no expiration duration.
-
If parallel participants are specified as routing slips, then the expiration duration for the parallel participants is determined by the routing slip.
-
Note:
When the parent task expires in a parallel task, the subtasks are withdrawn if those tasks have not expired or completed.
29.8.2 How to Specify a Policy to Never Expire
You can specify for a task to never expire.
In the drop-down list in the Deadlines section, as shown in Figure 29-49, select Never Expire to specify a policy to never expire.
29.8.3 How to Specify a Policy to Expire
You can specify for a task to expire. When the task expires, either the escalation policy or the renewal policy at the routing slip level is applied. If neither is specified, the task expires. The expiration policy at the routing slip level is common to all the participants.
To specify for a task to expire:
29.8.4 How to Extend an Expiration Policy Period
You can extend the expiration period when the user does not respond within the allotted time. You do this by specifying the number of times the task can be renewed upon expiration (for example, renew it an additional three times) and the duration of each renewal (for example, three days for each renewal period).
To extend an expiration policy period:
29.8.5 How to Escalate a Task Policy
You can escalate a task if a user does not respond within the allotted time. For example, if you are using the escalation hierarchy configured in your user directory, the task can be escalated to the user's manager. If you are using escalation callbacks, the task is escalated to whoever you have defined. When a task has been escalated the maximum number of times, it stops escalating. An escalated task can remain in a user inbox even after the task has expired.
To escalate a task policy:
29.8.6 How to Specify Escalation Rules
This option allows a custom escalation rule to be plugged in for a particular workflow. For example, to assign the task to a current user's department manager on task expiration, you can write a custom task escalation function, register it with the workflow service, and use that function in task definitions.
The default escalation rule is to assign a task to the manager of the current user. To add a new escalation rule, follow these steps.
To specify escalation rules:
29.8.7 How to Specify a Due Date
A due date indicates the date by which the task should be completed. The due date is different from the expiration date. When a task expires it is either marked expired or automatically escalated or renewed based on the escalation policy. The due date is generally a date earlier than the expiration date and an indication to the user that the task is about to expire.
You can enter a due date for a task, as shown in Figure 29-49. A task is considered overdue after it is past the specified due date. This date is in addition to the expiration policy. A due date can be specified irrespective of whether an expiration policy has been specified. The due date enables Oracle BPM Worklist to display a due date, list overdue tasks, filter overdue tasks in the inbox, and so on. Overdue tasks can be queried using a predicate on the TaskQueryService.queryTask(...) API.
To specify a due date:
Note:
You cannot specify business rules for to-do tasks.
For more information, see How To Create a ToDo Task.
29.9 Specifying Participant Notification Preferences
Notifications indicate when a user or group is assigned a task or informed that the status of the task has changed. Notifications can be sent through email, instant message (IM), or SMS. Notifications are sent to different types of participants for different actions. Notifications are configured by default with default messages. For example, a notification message is sent to indicate that a task has completed and closed. You can create your own or modify existing configurations.
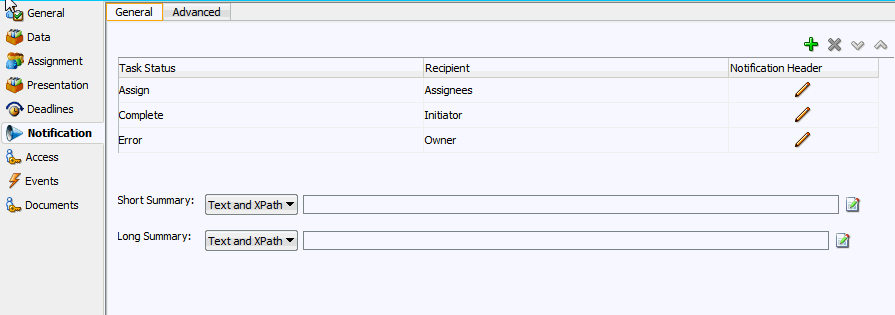
Figure 29-54 shows the General tab of the Notification section of the Human Task Editor (when fully expanded).
Note:
Embedded LDAP does not support group email addresses. Therefore, when a task is assigned to a group ID, emails are sent to all of its members instead of to the group email address.
Figure 29-54 Human Task Editor — General Tab of Notification Section
Description of "Figure 29-54 Human Task Editor — General Tab of Notification Section"
To specify participant notification preferences:
29.9.1 How to Notify Recipients of Changes to Task Status
You can configure to send notifications to users when there is a change in Task Status. You can configure for multiple Task Status types like Assign, Complete, Suspend and so on and also for multiple recipients like Assignee, Initiator, Approvers, Owner, and Reviewer.
To notify recipients of changes to tasks status:
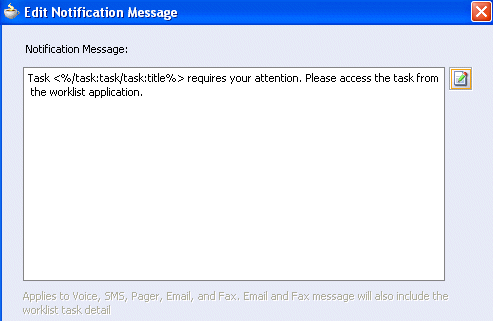
29.9.2 How to Edit the Notification Message
A default notification message is available for delivery to the selected recipient. If you want, you can modify the default message text.
To edit the notification message:
For more information about notification preference details, see Notifications from Human Workflow.
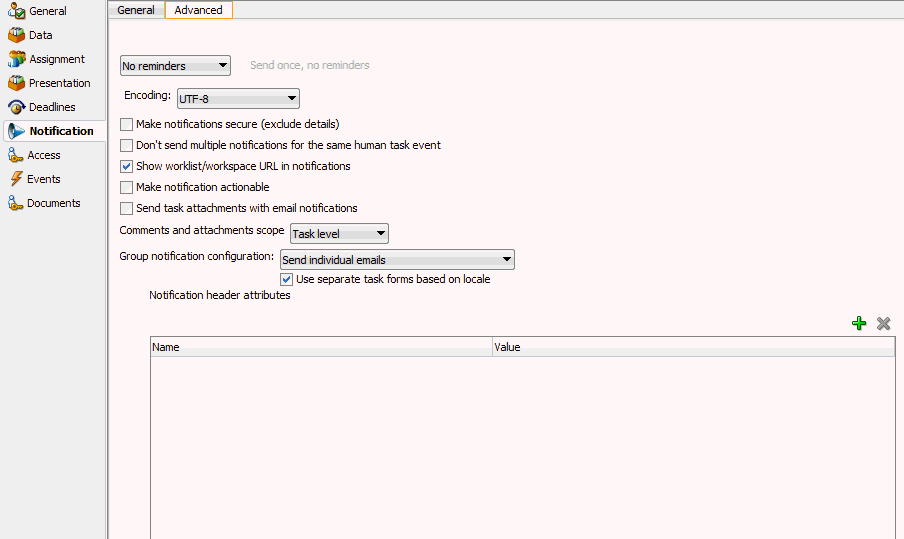
29.9.3 How to Set Up Reminders
You can send task reminders, which can be based on the time the task was assigned to a user or the expiration time of a task. The number of reminders and the interval between the reminders can also be configured.
To set up reminders:
- In the Notification section, click the Advanced tab.
- From the list, select the number of reminders to send.
- If you selected to remind the assignee one, two, or three times, select the interval between reminders, and whether to send the reminder before or after the assignment.
For more information, see How to Send Reminders.
29.9.4 How to Change the Character Set Encoding
Unicode is a universally-encoded character set that enables information from any language to be stored using a single character set. Unicode provides a unique code value for every character, regardless of the platform, program, or language. You can use the default setting of UTF-8 or you can specify a character set with a Java class.
To change the character set encoding
- In the Notification section, click the Advanced tab.
- From the Encoding list, select Specify by Java Class.
- Enter the Java class to use.
29.9.5 How to Secure Notifications to Exclude Details
To secure notifications, make messages actionable, and send attachments:
29.9.6 How to Display the Oracle BPM Worklist URL in Notifications
You can configure whether to display the Oracle BPM Worklist URL in email notification messages.
To display the Oracle BPM Worklist URL in notifications:
- In the Notification section, click the Advanced tab.
- Select the Show worklist URL in notifications check box to display the Oracle BPM Worklist URL in email notification messages. If this check box is not selected, the URL is not displayed.
29.9.8 How to Send Task Attachments with Email Notifications
You can send task attachments with email notifications.
To send task attachments with email notifications:
- In the Notification section, click the Advanced tab.
- Select Send task attachments with email notifications.
29.9.9 How to Send Email Notifications to Groups and Application Roles
You can send email notifications to groups and application roles to which tasks are assigned.
To send email notifications to groups and application roles:
29.9.10 How to Customize Notification Headers
Custom notification headers are used to specify name and value pairs to identify key fields within the notification. These entries can be used by users to define delivery preferences for their notifications. For example:You can set Name to ApprovalType and value to Expense or Name to Priority and value to High.Users can then specify delivery preferences in Oracle BPM Worklist. These preferences can be based on the contents of the notification.
The rule-based notification service is only used to identify the preferred notification channel to use. The address for the preferred channel is still obtained from the identity service.
To customize notification headers:
29.10 Specifying Access Policies and Task Actions on Task Content
You can specify access rules on task content and actions to perform on that content.
You can specify access rules that determine the parts of a task that participants can view and update. Access rules are enforced by the workflow service by applying rules on the task object during the retrieval and update of the task.
Note:
Task content access rules and task actions access rules exist independently of one another.
29.10.1 Introduction to Access Rules
Access rules are computed based on the following details:
-
Any attribute configured with access rules declines any permissions for roles not configured against it. For example, assume you configure the payload to be read by assignees. This action enables only assignees and nobody else to have read permissions. No one, including assignees, has write permissions.
-
Any attribute not configured with access rules has all permissions.
-
If any payload message attribute is configured with access rules, any configurations for the payload itself are ignored due to potential conflicts. In this case, the returned map by the API does not contain any entry for the payload. Write permissions automatically provide read permissions.
-
If only a subset of message attributes is configured with access rules, all message attributes not involved have all permissions.
-
Only comments and attachments have add permissions.
-
Write permissions on certain attributes are meaningless. For example, write permissions on history do not grant or decline any privileges on history.
-
The following date attributes are configured as one in the Human Task Editor. The map returned by
TaskMetadataService.getVisibilityRules()contains one key for each. Similarly, if the participant does not have read permissions onDATES, the task does not contain any of the following task attributes:-
START_DATE -
END_DATE -
ASSIGNED_DATE -
SYSTEM_END_DATE -
CREATED_DATE -
EXPIRATION_DATE -
ALL_UPDATED_DATE
-
-
The following assignee attributes are configured as one in the Human Task Editor. The map returned by
TaskMetadataService.getVisibilityRules()contains one key for each of the following. Similarly, if the participant does not have read permissions onASSIGNEES, the task does not contain any of the following task attributes:-
ASSIGNEES -
ASSIGNEE_USERS -
ASSIGNEE_GROUPS -
ACQUIRED_BY
-
-
Mapped attributes do not have individual representation in the map returned by
TaskMetadataService.getVisibilityRules(). -
All message attributes in the map returned by
TaskMetadataService.getVisibilityRules()are prefixed byITaskMetadataService.TASK_VISIBILITY_ATTRIBUTE_PAYLOAD_MESSAGE_ATTR_PREFIX (PAYLOAD).
An application can also create pages to display or not display task attributes based on the access rules. This can be achieved by retrieving a participant's access rules by calling the API on oracle.bpel.services.workflow.metadata.ITaskMetadataService. as shown in the example below:
public Map<String, IPrivilege> getTaskVisibilityRules(IWorkflowContext context,
                                      String taskId)
   throws TaskMetadataServiceException;
For more information about this method, see Workflow Services Java API Reference for Oracle SOA Suite.
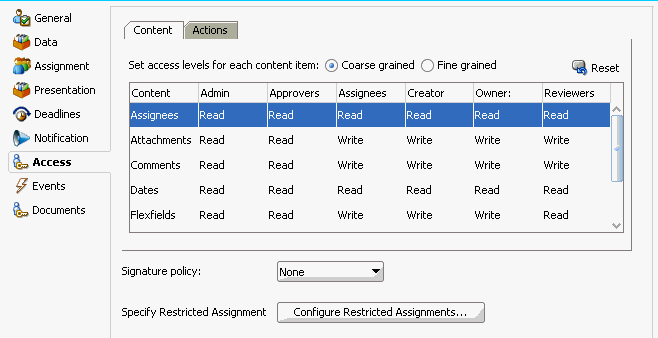
29.10.2 Specifying User Privileges for Acting on Task Content
You can specify the privileges that specific users (such as the task creator or owner) have for acting on specific task content (such as a payload).
To specify user privileges for acting on task content:
Note:
Access rules are always applied on top of what the system permits, depending on who is performing the action and the current state of the task.
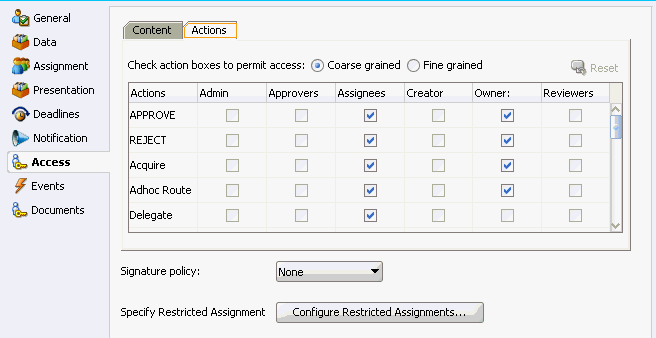
29.10.3 Specifying Actions for Acting Upon Tasks
You can specify the actions (either access or no access) that specific users (such as the task creator or owner) have for acting on the task content (such as a payload) that you specified in the Configure Task Content Access dialog box.
To specify actions for acting upon tasks:
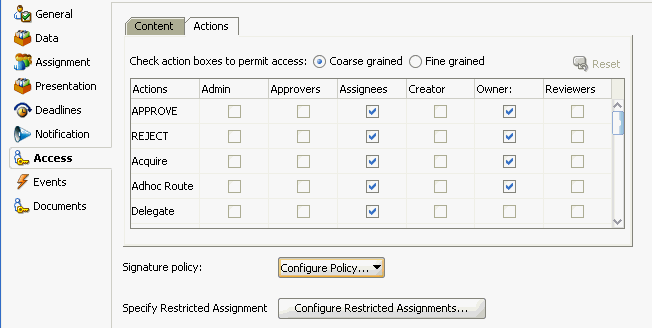
29.10.4 How to Specify a Workflow Digital Signature Policy
Digital signatures provide a mechanism for the nonrepudiation of digitally-signed human tasks. This ability to mandate that a participant acting on a task signs the details and their action before the task is updated ensures that they cannot repudiate it later.
Note:
If digital signatures are enabled for a task, actionable emails are not sent during runtime. This is the case even if actionable emails are enabled during design time.
To specify a workflow digital signature policy:
For more information, see Evidence Store Service and Digital Signatures.
29.10.4.1 Specifying a Certificate Authority
To use digital signatures, you must specify CAs you consider trustworthy in the System MBean Browser in Oracle Enterprise Manager Fusion Middleware Control. Only certificates issued from such CAs are considered valid by human workflow.
To specify a certificate authority:
29.11 Specifying Restrictions on Task Assignments
You can restrict the users to which a task can be reassigned or routed by using a callback class.
The user community seeded in a typical LDAP directory can represent the whole company or division. However, it may be necessary at times to limit the potential list of users to associate with a task based on the scope or importance of the task or associated data. For example, in a large company with thousands of users, only a few people have the ability to approve and create purchase orders. Specifically for such tasks, the users that can be chosen for ad hoc routing and reassignment should not be the whole company. Instead, only a few users who are relevant or have the right privilege should be chosen. This can be achieved by the restricted assignment functionality. This is implemented as a callback class that can implement the logic to choose the right set of users dynamically based on the task object that is passed containing the instance data.
Note:
Certain functions, such as restricted task reassignment, are available only when a single task is selected. If multiple tasks that use restricted reassignment are selected, then the restricted reassignment algorithm is not invoked. In that case, the complete list of users gets returned as though restricted reassignment had not been specified.
29.12 Specifying Java or Business Event Callbacks
You can specify Java or business event callbacks. You can register callbacks for the workflow service to call when a particular stage is reached during the lifecycle of a task.
Note:
If you implemented a callback, then the user callback implementation overrides any other form of restricted assignment. When you perform a search, the result only shows the users that the user callback returns.
Two types of callbacks are supported:
-
Java callbacks: The callback class must implement the interface
oracle.bpel.services.workflow.task.IRoutingSlipCallback. Make the callback class available in the class path of the server. -
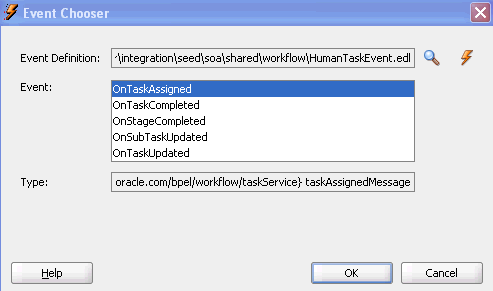
Business event callbacks: You can have business events raised when the state of a human task changes. You do not need to develop and register a Java class. The caller implements the callback using an Oracle Mediator service component to subscribe to the applicable business event to be informed of the current state of an approval transaction.
To specify callback classes on task status:
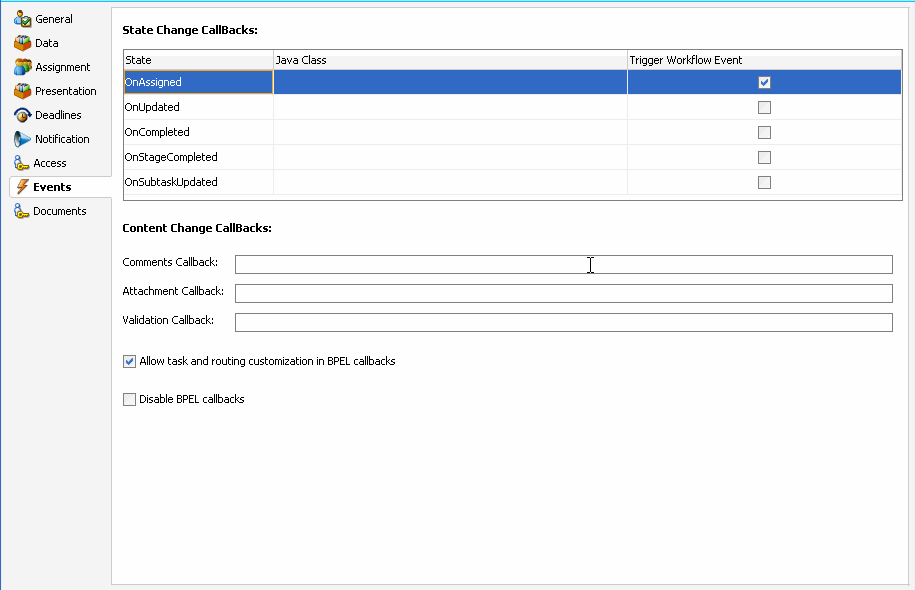
-
Click the Events tab.
The following state change callbacks are available for selection:
-
OnAssigned
Select if the callback class must be called on any assignment change, including standard routing, reassignment, delegation, escalation, and so on. If a callback is required when a task has an outcome update (that is, one of the approvers in a chain approves or rejects the task), this option must be selected.
-
OnUpdated
Select if the callback class must be called on any update (including payload, comments, attachments, priority, and so on).
-
OnCompleted
Select if the callback class must finally be called when the task is completed and control is about to be passed to the initiator (such as the BPEL process initiating the task).
-
OnStageCompleted
Select if the callback class must be called to enable business event callbacks in a human workflow task. When the event is raised, it contains the name of the completed stage, the outcome for the completed stage, and a snapshot of the task when the callback is invoked.
-
OnSubtaskUpdated
Select if the callback class must be called on any update (including payload, comments, attachments, priority, and so on) on a subtask (one of the tasks in a parallel-and-parallel scenario).
If your Oracle JDeveloper installation is updated to include both the BPEL and BPM extensions, then the following content callbacks are also available for selection:
-
Comments Callback
Select if the callback class must be called to store the comments in a schema other than the
WFCOMMENTScolumn. The callback class must implement theoracle.bpel.services.workflow.callback.NotesStoreinterface. -
Attachment Call Back
Select if the callback class must be called to store the attachments in a schema other than the
WFATTACHMENTtable in the soa-infra schema. The callback class must implement theoracle.bpel.services.workflow.callback.AttachmentStoreinterface. -
Validation Callback
Select if the callback class must be called to validate either the task or payload before updating, approving, and so on. The callback class must implement the
oracle.bpel.services.workflow.task.ITaskValidationCallbackinterface.
-
-
See the following section based on the type of callback to perform.
29.12.1 Specifying Java Callbacks
To specify Java callbacks:
-
In the State column of the Events section, select a task state.
-
In the Java Class column, click the empty field to enter a value. This value is the complete class name of the Java class that implements
oracle.bpel.services.workflow.task.IRoutingSlipCallback. Figure 29-60 provides details.Figure 29-60 CallBack Details Dialog with Java Selected
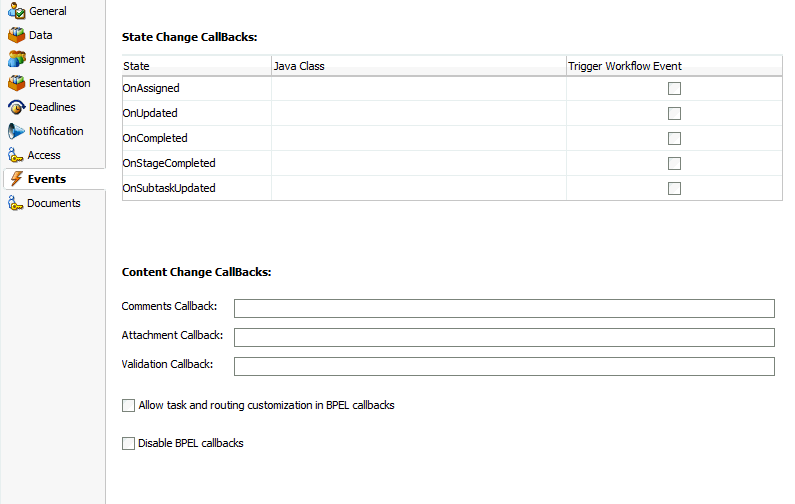
Description of "Figure 29-60 CallBack Details Dialog with Java Selected" -
Click OK.
29.12.2 Specifying Business Event Callbacks
To specify business event callbacks:
See the following documentation for additional details about business events and callbacks:
-
Using Business Events and the Event Delivery Network for specific details about business events
-
Sample workflow-116-WorkflowEventCallback, which is available with the Oracle SOA Suite samples.
29.12.3 How to Specify Task and Routing Customizations in BPEL Callbacks
In general, the BPEL process calls into the workflow component to assign tasks to users. When the workflow is complete, the human workflow service calls back into the BPEL process. However, if you want fine-grained callbacks (for example, onTaskUpdate or onTaskEscalated) to be sent to the BPEL process, you can use the Allow task and routing customization in BPEL callbacks option.
Make sure to manually refresh the BPEL diagram for this callback setting.
To specify task and routing customizations in BPEL callbacks:
- In the Events section, select the Allow task and routing customization in BPEL callbacks check box.
- Return to Oracle BPEL Designer.
- Open the task activity dialog box.
- Click OK.
This creates the while, pick, and onMessage branch of a pick activity for BPEL callback customizations inside the task scope activity.
For more information about specifying task and routing customizations, see Invoking BPEL Callbacks.
29.12.4 How to Disable BPEL Callbacks
A user talk activity (in Oracle BPEL Designer) has an invoke activity followed by a receive or pick activity. Deselecting the Disable BPEL callbacks check box enables you to invoke the task service without waiting for a reply.
To disable BPEL callbacks:
- In the Events section, deselect the Disable BPEL callbacks check box.
- Click OK.
