32 Using Oracle BPM Worklist
-
Accessing Oracle BPM Worklist in Local Languages and Time Zones
-
Java Code for Enabling Customized Applications in Worklist Application
For information about how to use the APIs exposed by the workflow service, Building a Custom Worklist Client.
For information about troubleshooting human workflow issues, see section "Human Workflow Troubleshooting" of Administering Oracle SOA Suite and Oracle Business Process Management Suite.
32.1 Introduction to Oracle BPM Worklist
Oracle BPM Worklist enables business users to access and act on tasks assigned to them. For example, from a worklist, a loan agent can review loan applications or a manager can approve employee vacation requests.
Oracle BPM Worklist provides different functionality based on the user profile. Standard user profiles include task assignee, supervisor, process owner, reviewer, and administrator. For example, worklist users can update payloads or business data, attach documents or comments, and route tasks to other users, in addition to completing tasks by providing conclusions such as approvals or rejections. Supervisors or group administrators can use the worklist to analyze tasks assigned to a group and route them appropriately.
Users can filter their tasks by creating views or saved searches.
Using Oracle BPM Worklist, task assignees can do the following:
-
Perform authorized actions on tasks in the worklist, acquire and check out shared tasks, define personal ToDo tasks, and define subtasks.
-
Filter tasks in a worklist view based on various criteria.
-
Work with standard work queues, such as high priority tasks, tasks due soon, and so on. Work queues allow users to create a custom view to group a subset of tasks in the worklist, for example, high priority tasks, tasks due in 24 hours, expense approval tasks, and more.
-
Define custom work queues.
-
Gain proxy access to part of another user's worklist.
-
Define custom vacation rules and delegation rules.
-
Enable group owners to define task dispatching rules for shared tasks.
-
Collect a complete workflow history and audit trail.
-
Use digital signatures for tasks.
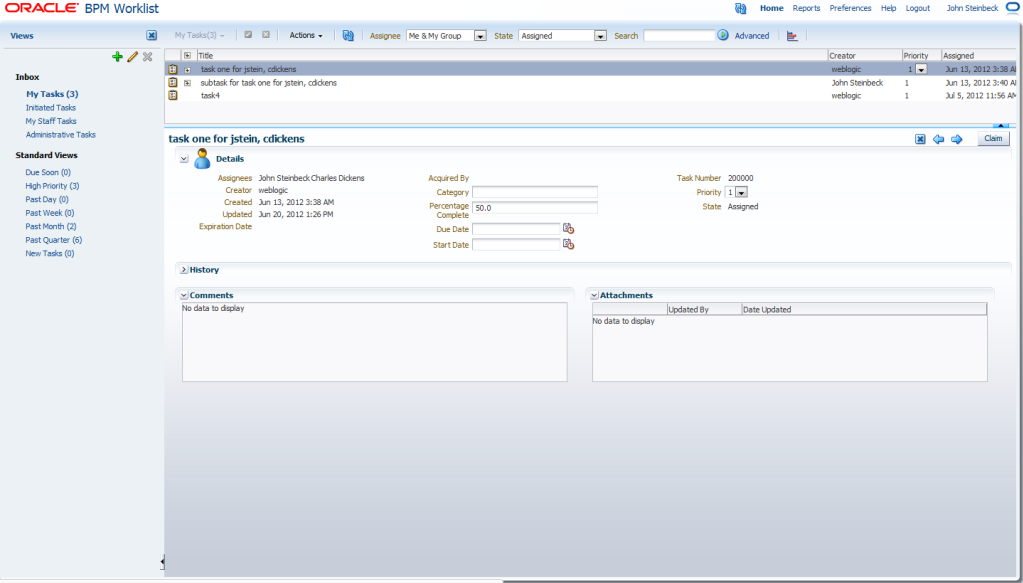
Figure 32-1 shows an illustration of Oracle BPM Worklist.
Figure 32-1 Oracle BPM Worklist—Access Tasks, Forms, Attachments, and Reports
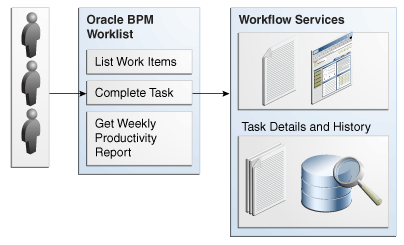
Description of "Figure 32-1 Oracle BPM Worklist—Access Tasks, Forms, Attachments, and Reports"
The worklist is the list of tasks. A task form displays and updates the task details. You can create a task form using ADF task flows in Oracle JDeveloper. See Designing Task Forms for Human Tasks for more information.
You can build clients for workflow services using the APIs exposed by the workflow service. The APIs enable clients to communicate with the workflow service using local and remote EJBs, SOAP, and HTTP.
32.2 Logging In to Oracle BPM Worklist
The following are the different types of users recognized by Oracle BPM Worklist, based on the privileges assigned to the user.
Table 32-1 Worklist User Types
| Type of User | Access |
|---|---|
|
End user (user) |
Acts on tasks assigned to him or his group and has access to system and custom actions, routing rules, and custom views |
|
Supervisor (manager) |
Acts on the tasks, reports, and custom views of his reportees, in addition to his own end-user access |
|
Process owner |
Acts on tasks belonging to the process but assigned to other users, in addition to his own end-user access |
|
Group administrator |
Manages group rules and dynamic assignments, in addition to his own end-user access |
|
Workflow administrator |
Administers tasks that are in an errored state, for example, tasks that must be reassigned or suspended. The workflow administrator can also change application preferences and map attributes, and manage rules for any user or group, in addition to his own end-user access. |
|
Assignee |
Acts on tasks assigned to him, in addition to his own end-user access |
|
Reviewer |
Acts on tasks assigned for review, in addition to his own end-user access |
Note:
Multiple authentication providers (for example, SSO and forms) are not supported.
32.2.1 How to Log In to the Worklist
To log in, you must have installed Oracle SOA Suite and the SOA Server must be running. See Installing and Configuring Oracle SOA Suite and Business Process Management for more information.
Use a supported web browser:
| Browser | Minimum Version |
|---|---|
| Microsoft Edge | 103 |
| Google Chrome | 103 |
| Mozilla Firefox | 102 |
| Apple Safari | 14 |
To log in:
32.2.1.1 Enabling the weblogic User for Logging in to the Worklist
For the weblogic user in Oracle Internet Directory to log in to Oracle BPM Worklist, the Oracle Internet Directory Authenticator must have an Administrators group, and the weblogic user must be a member of that group.
To enable the weblogic user:
32.2.2 What Happens When You Log In to the Worklist
Identity service workflow APIs authenticate and authorize logins using a user name, password, and optionally a realm set, if multiple realms were defined for an organization. See How to Specify the Login Page Realm Label, for information on how administrators can set a preference to change the realm label displayed in the interface, or specify an alternative location for the source of the login page image.
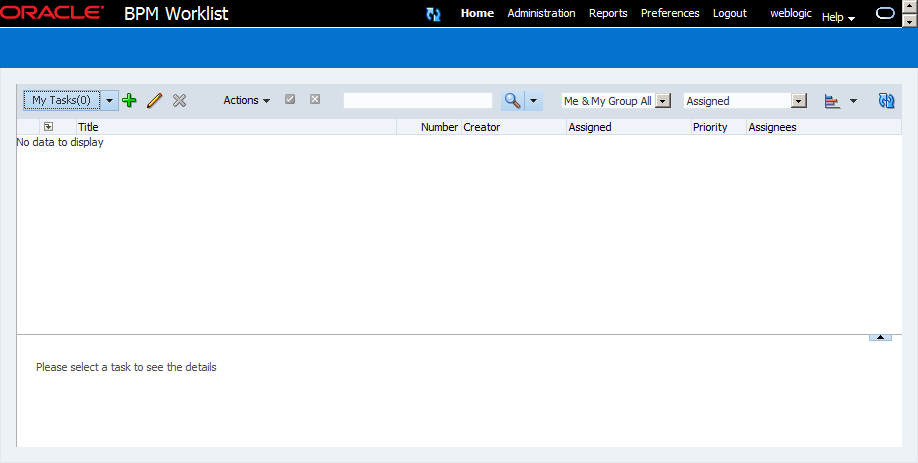
Figure 32-2 shows an example of the Home page.
Figure 32-2 Oracle BPM Worklist—The Home (Task List) Page
Description of "Figure 32-2 Oracle BPM Worklist—The Home (Task List) Page"
This page lists all the tasks and work items assigned to you, depending on your role. For example, all users can access the My Tasks and Initiated Tasks pages. Only supervisors can access the My Staff page, and only Process Workspace administrators can access the Administrative Tasks page.
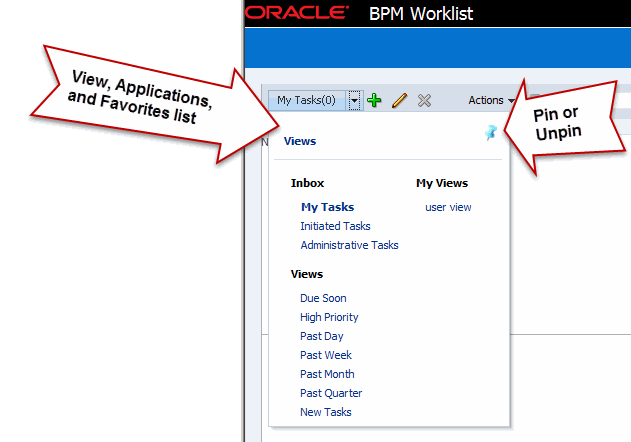
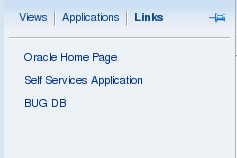
At the far left, as shown in Figure 32-3, is a list of views with My Tasks selected. Expand this list to select:
-
A particular view showing the number of open tasks for each view. Selecting a particular view refreshes the task count to the latest number.
-
A list of applications deployed to Process Workspace
-
Any favorite links or applications you may have specified
To keep this list visible while you work on tasks, click Pin. Then, to hide it, click Unpin
Table 32-2 describes the components of the Home (task list) page.
Table 32-2 Components of the Home (Task List) Page
| Component | Description |
|---|---|
|
Views list |
Inbox, Standard Views, My Views. For more information, see How To Create, Delete, and Customize Worklist Views. The inbox views displayed depend on the role granted to the logged-in user.
See the following for more information:
|
|
Worklist Views |
- |
|
Task Status |
A bar chart shows the status of tasks in the current view. For more information, see How To Customize the Task Status Chart. |
|
Display Filters |
Specify search criteria from the Assignee or State fields. The category filters that are available depend on which tab is selected.
Use Search to enter a keyword, or use Advanced Search. For more information, see How To Filter Tasks. |
|
Actions List |
Select a group action (Claim) or a custom action (for example, Approve or Reject) that was defined for the human task. Claim appears for tasks assigned to a group or multiple users, even if the task is an FYI task; one user must claim the task before it can be worked on. Other possible actions for a task, such as system actions, are displayed on the task details page for a specific task. You can also create ToDo tasks and subtasks here. Note:
|
|
Default Columns |
Title—The title specified when the human task was created. Tasks associated with a purged or archived process instance do not appear. Number—A unique ID number assigned to the task. Creator—The user who created the task. Assigned—The date that the task was assigned. Priority—The priority specified when the human task was created. The highest priority is 1; the lowest is 5. |
|
Task Details |
Task details can be viewed in the lower half of the worklist by selecting the task in the Inbox. You can also view them in the same window or a new window by hiding the task details pane in Edit Inbox Settings. After you complete a task:
For more information, see Acting on Tasks: The Task Details Page. |
Figure 32-2 also shows the Administration, Reports, and Preferences links (upper-right corner). Table 32-3 summarizes the Home, Administration, Reports, and Preferences pages.
Table 32-3 Worklist Main Pages Summary
| Page | Description |
|---|---|
|
Home |
As described in Table 32-2, the logged-in user's list of tasks, details for a selected task, and all the functions needed to start acting on a task are provided. |
|
Administration |
The following administrative functions are available:
|
|
Reports |
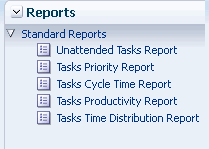
The following reports are available: Unattended Tasks Report, Tasks Priority Report, Tasks Cycle Time Report, Tasks Productivity Report, and Tasks Time Distribution Report. For more information, see How To Create Reports. |
|
Preferences |
Preference settings include:
|
32.2.3 What Happens When You Change a User's Privileges While They are Logged in to Oracle BPM Worklist
If you change a user's privileges in Oracle Enterprise Manager Fusion Middleware Control while the user is logged in to Oracle BPM Worklist, the changes take effect only after a subsequent login by the user. This is true for situations in which there are two active worklist sessions, one in which the user is logged in before the privileges are changed, and one in which the same user logs in after the privileges are changed. In the first case, the changes to the user's privileges do not take effect while the user is logged in. In the second case, when the user logs in to the second instance of the Worklist Application, the changes to the user's privileges do take effect.
32.3 Customizing the Task List Page
You can customize your task list in several ways, including adding worklist views, selecting which columns to display, setting the task details pane to show or hide, and displaying a subset of the tasks based on filter criteria. Resize the task list display area to increase the number of tasks fetched.
Note:
When you deploy SOA composite applications with human tasks to partitions, the tasks created for these composites cannot be filtered using the partition as a parameter inside Oracle BPM Worklist. For example, you can select a task type corresponding to a particular partition (the same task type, but in different partitions), but filtering does not work with the advanced search, custom views, custom rules, and mapped attribute features. For example, assume VacationRequestApp is deployed to partition 1 and partition 2. When the advanced search is used to select tasks corresponding to composites deployed in partition 1, the result does not return the tasks.
32.3.1 How To Filter Tasks
Figure 32-4 shows the filter fields.
Figure 32-4 Filters—Assignee, Status, Search, and Advanced Search
Description of "Figure 32-4 Filters—Assignee, Status, Search, and Advanced Search "
Filters are used to display a subset of tasks, based on the following filter criteria:
-
Assignee
From the Assignee drop-down list, select from the following:
-
Me—Retrieves tasks directly assigned to the logged-in user
-
My Group—Retrieves the following:
-
Tasks that are assigned to groups to which the logged-in user belongs
-
Tasks that are assigned to an application role that the logged-in user is assigned
-
Tasks that are assigned to multiple users, one of which is the logged-in user
-
-
Me & My Group—Retrieves all tasks assigned to the user, whether through direct assignment, or by way of a group, application role, or list of users
-
Me (Previously)—Retrieves tasks that the logged-in user has previously updated or closed
-
Me (Review Only)—Retrieves task for which the logged-in user is a reviewer
From the My Staff Tasks tab, select Reportees.
-
-
State—Select from the following: Any, Assigned, Completed, Suspended (can be resumed later), Withdrawn, Expired, Errored (while processing), Alerted, or Information Requested.
-
Search—Enter a keyword to search task titles, comments, identification keys, and the flex string fields of tasks that qualify for the specified filter criterion.
-
Advanced—Provides additional search filters.
Note:
If a task is assigned separately to multiple reportees, then, when a manager looks at the My Staff Tasks list, the manager sees as many copies of that task as the number of reportees that the task is assigned to.
32.3.1.1 To Filter Tasks Based on Assignee or State
To filter tasks based on assignee or state:
Select options from the Assignee and State lists. The task list is automatically updated based on the filter selections.
32.3.1.2 To Filter Tasks Based on Keyword Search
To filter tasks based on keyword search:
- Enter a keyword to search task titles, comments, identification keys, and the flex string fields of tasks that qualify for the specified filter criterion.
- Press Enter or click Refresh.
32.3.1.3 To Filter Tasks Based on an Advanced Search
To filter tasks based on an advanced search:
Mapped attribute labels can be used in an advanced search if you select task types for which mapped attribute mappings have been defined.
See How To Map Attributes, for more information.
32.3.2 How To Create, Delete, and Customize Worklist Views
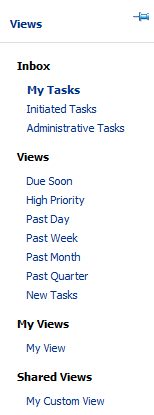
The Views menu, shown in Figure 32-11, displays the following:
-
Inbox—Shows all tasks that result from any filters you may have used. The default shows all tasks.
-
Standard Views—Shows standard views and views that you defined.
-
My Views—Shows views that you have created.
Use Views to create, share, and customize views.
To create a worklist view:
-
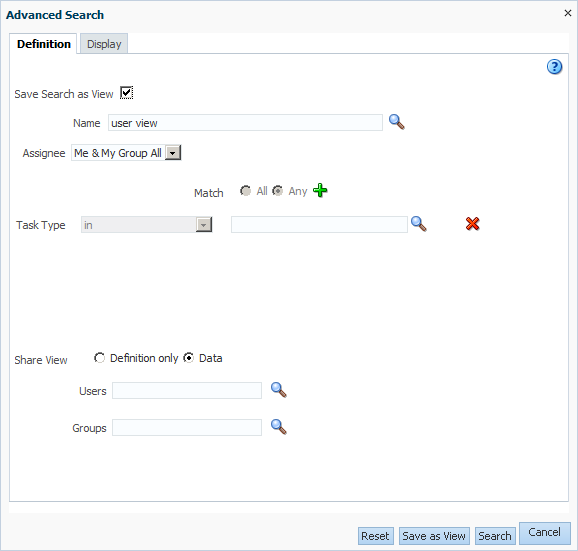
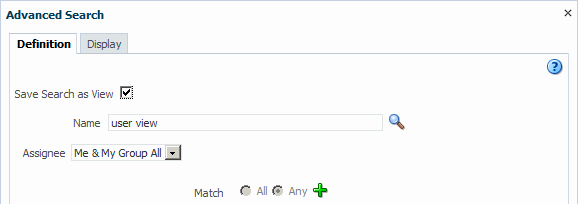
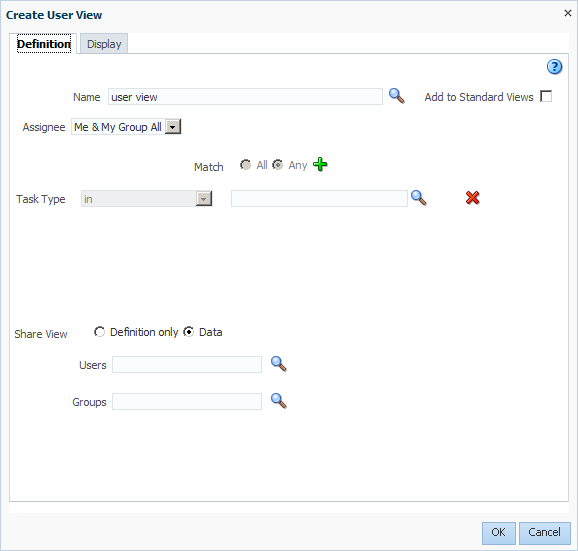
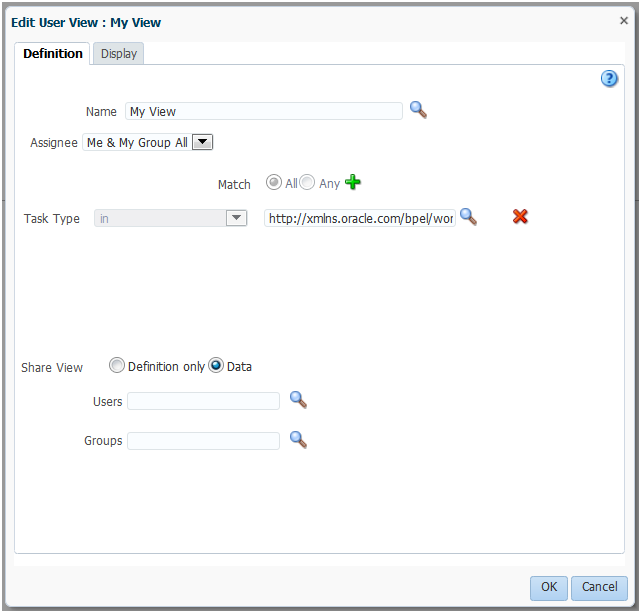
In the Views section, click Add View. The Create User View dialog box appears as shown in figure
-
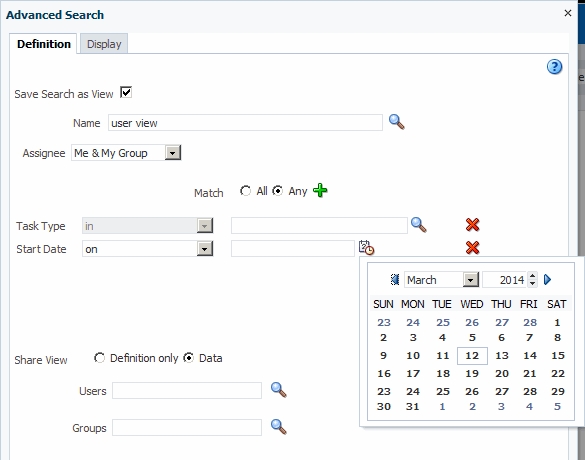
Use the Definition tab of the Create User View dialog box, shown in Figure 32-12, to do the following:
-
Name—Specify a name for your view.
-
Add to Standard Views—This option applies to administrators only. Administrators select this option to create the view as a standard view, which then appears in the Standard Views list for all worklist users.
-
Assignee—Select Me, My Group, Me & My Group, Me (Previously), Me (Review Only), Creator, Reportees, Admin, Owner.
-
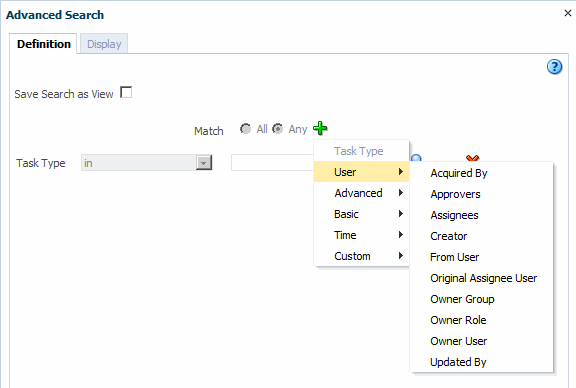
Match—Select All or Any to match the conditions you added.
-
Add Condition (a plus sign)—Select the conditions that apply to your view.
-
Share View—You can grant access to another user to either the definition of this view, in which case the view conditions are applied to the grantee's data, or to the data itself, in which case the grantee can see the grantor's worklist view, including the data. Sharing a view with another user is similar to delegating all tasks that correspond to that view to the other user; that is, the other user can act on your behalf. Shared views are displayed under My Views.
-
Users—Specify the users (grantees) who can share your view.
-
Groups—Specify the groups who can share your view.
-
-
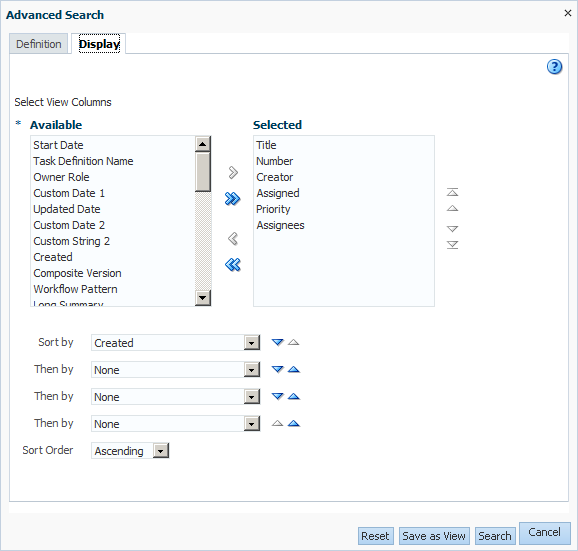
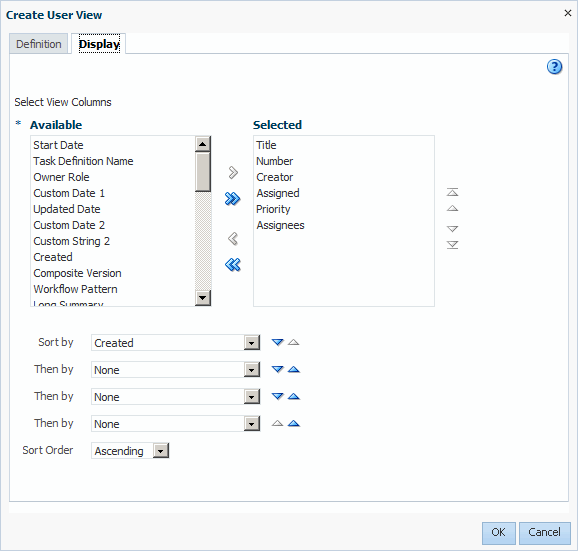
Use the Display tab of the Create User View dialog, shown in Figure 32-13, to customize the fields that appear in the view.
Figure 32-13 Displaying Fields in a Worklist View
Description of "Figure 32-13 Displaying Fields in a Worklist View"-
Select View Columns—Specify which columns you want to display in your task list. They can be standard task attributes or mapped attributes that have been mapped for the specific task type. The default columns are the same as the columns in your inbox.
-
Sort by—Select a column to sort on.
-
Then by—Select a second column to sort on.
-
Then by—Select a third column to sort on.
-
Then by—Select a forth column to sort on.
-
Sort Order—Select ascending or descending order.
-
-
Click OK.
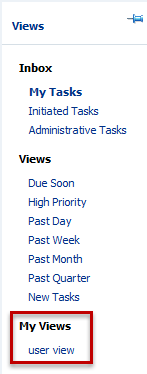
The saved view appears in the Views panel under My Views
To delete a view:
Note:
If an administrator inadvertently deletes the pre-seeded standard views, then those views do not remain permanently deleted. They are recreated when the server restarts.
- In the Views panel, select a view.
- Click the Delete icon.
- The Confirm Delete dialog box prompts you to confirm that you want to delete the view.
- Click Yes. The view is deleted.
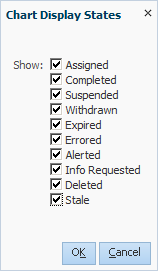
32.3.3 How To Customize the Task Status Chart
The bar chart shows tasks broken down by status, with a count of how many tasks in each status category. The chart applies to the filtered set of tasks within the current view.
To customize the task status chart:
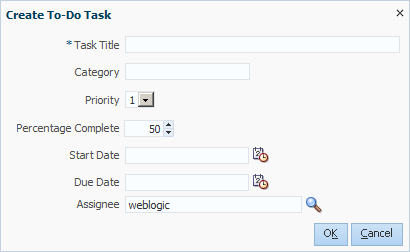
32.3.4 How To Create a ToDo Task
Use the Create ToDo Task dialog, shown in Figure 32-16, to create a top-level ToDo task for yourself or others. This task is not associated with a business task.
To-Do tasks appear in the assignee's Inbox.
You can create ToDo tasks that are children of other ToDo tasks or business tasks. A ToDo task can have only one level of child ToDo tasks. When all child ToDo tasks are 100% complete, the parent ToDo task is also marked as completed. If the parent ToDo task is completed, then child ToDo tasks are at 100% within the workflow system. If the parent is a business task, the child ToDo is not marked as completed. You must set the outcome and complete it. If you explicitly set a ToDo task to 100%, there is no aggregation on the parent task.
ToDo tasks can be reassigned, escalated, and so on, and deleted (logical delete) and purged (physical delete). Reassignment, escalation, and so on of the parent task does not affect the assignment of any child ToDo tasks. The completion percentage of a ToDo task can be reset to less than 100% after it is completed.
Assignment rules (such as vacation rules) are not applied to ToDo tasks. You cannot specify business rules for ToDo tasks.
To create a To-Do task:
32.3.5 How to Create Subtasks in the Worklist Application
A subtask is a child of a parent task. Creating a subtask can be helpful, for example, when a purchase order contains several line items and you need a separate approval process for one of them.
Note:
You cannot create subtasks for ToDo tasks.32.3.5.1 What You May Need to Know About Creating Subtasks
Here are some things to keep in mind when creating subtasks:
-
If the parent is a business task and that task is completed, then the subtasks of that task are withdrawn.
-
If you are using a release of Oracle Business Process Management that is before 11g Release 1 (11.1.1.7.0), then you must re-create the task form for any task for which you are creating a subtask. You may, however, continue to use processes that were deployed in earlier releases.
If you do not re-create the task form, then the Actions list in the task form itself does not provide the option to create a subtask. You can, however, create a subtask by selecting Create Subtask from the Actions list above the worklist.
-
If you are the administrator for the BPMN service engine, be aware that subtasks do not appear in the Oracle Enterprise Manager Fusion Middleware Control.
To create a subtask:
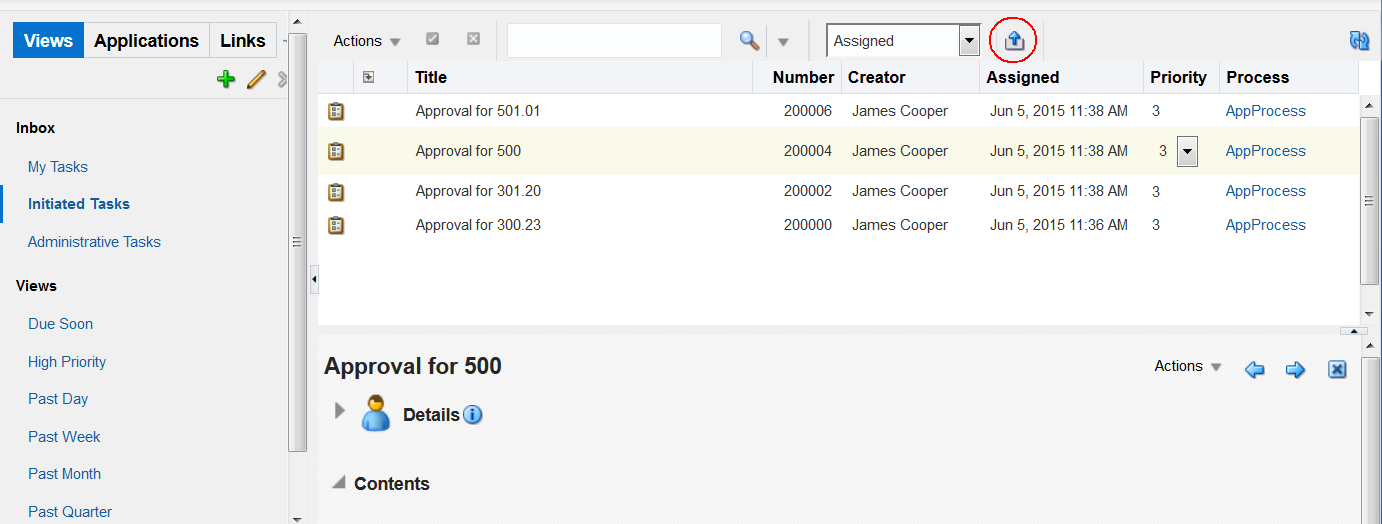
32.4 Exporting Tasks to Microsoft Excel
You can export tasks to Excel based on a selected view.
32.5 Acting on Tasks: The Task Details Page
Any kind of change to the task details page, such as changing a priority or adding a comment or attachment, requires you to save the change before you go on to make any other changes.
Task details can be viewed inline (see the lower section in Figure 32-2) or in the same window or a new window (Modify settings in Edit Inbox Settings.)
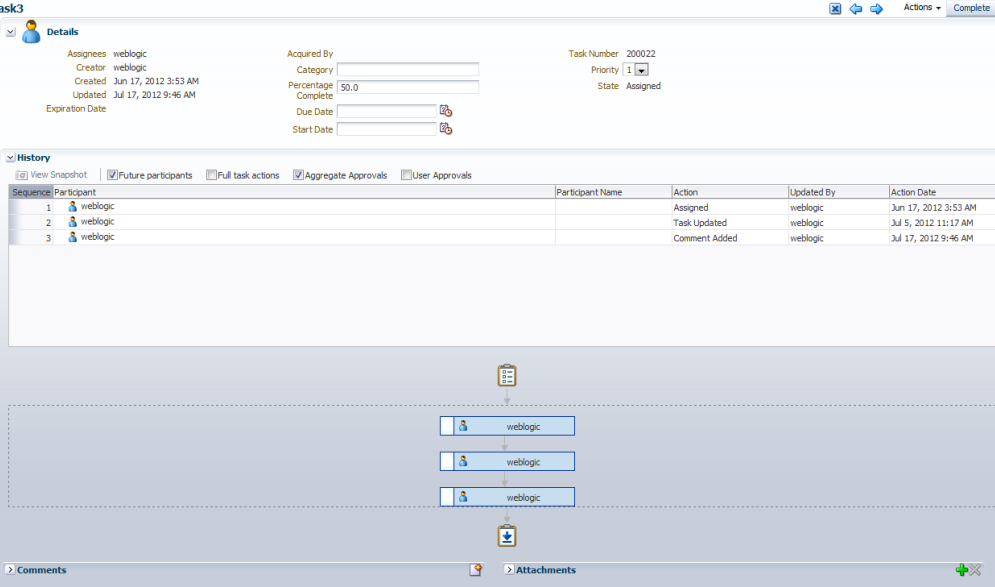
Figure 32-19 shows the task details page.
The task details page has the following components:
-
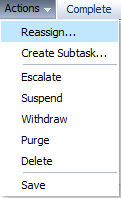
Actions—Lists the system actions that are possible for the task, such as Request Information, Reassign, Renew, Suspend, Escalate, and Save.
-
Action buttons—Displays buttons for custom actions that are defined in the human task, such as setting task outcomes (for example, Resolved and Unresolved for a help desk request or Approve and Reject for a loan request). For the task initiator, manager, or administrator, Withdraw may also appear.
-
Details—Displays task attributes, including the assignee, task creator, task number, state, priority, who acquired the task, and other mapped attributes. It also displays dates related to task creation, last update, and expiration date.
-
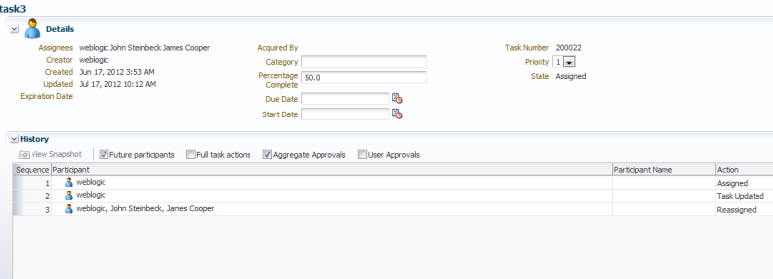
History—Displays the approval sequence and the update history for the task. See Task History, for more information.
Table 32-6 tells what the icons used in the Task Details History section signify.
Table 32-6 Icons for Task Action History
Icon Description 
Indicates an approver in an ad hoc routing scenario.

Indicates that the task has been approved.

Indicates that the participant is an FYI participant—that is, this participant just receives a notification task and the business process does not wait for the participant's response. Participant cannot directly impact the outcome of a task, but in some cases can provide comments or add attachments.

Indicates that a set of people must work in parallel. This pattern is commonly used for voting.

Indicates that the participant belongs to a management chain.

Indicates the simple case in which a participant maps to a user, group, or role.

Indicates that the task is untouched.
-
Comments—Displays comments entered by various users who have participated in the workflow. A newly added comment and the commenter's user name are appended to the existing comments. A trail of comments is maintained throughout the life cycle of the task. To add or delete a comment, you must have permission to update the task.
-
Attachments—Displays documents or reference URLs that are associated with a task. These are typically associated with the workflow as defined in the human task or attached and modified by any of the participants using the worklist. To add or delete an attachment, you must have permission to update the task. When adding file attachments, you can use an absolute path name or browse for a file.
Note:
In an environment with servers clustered for high availability purposes, file uploading is not supported if a failover occurs. If the active server shuts down, then the uploading process is not assumed by the other server and the upload fails.
Comments and attachments are shared between tasks and subtasks. For example, when you create a business task and add comments and attachments, subtasks of this task include the same comments and attachments.
The Task Details page may appear differently depending on the tool used during design time to develop the task form it displays.
A user can view a task when associated with the task as the current assignee (directly or by group membership), the current assignee's manager, the creator, the owner, or a previous actor.
A user's profile determines his group memberships and roles. The roles determine a user's privileges. Apart from the privileges, the exact set of actions a user can perform is also determined by the state of the task, the custom actions, and restricted actions defined for the task flow at design time.
Note:
Certain functions, such as restricted task reassignment, are available only when a single task is selected. If multiple tasks that use restricted reassignment are selected, then the restricted reassignment algorithm is not invoked. In that case, the complete list of users gets returned as though restricted reassignment had not been specified.
The following algorithm is used to determine the actions a user can perform on a task:
-
Get the list of actions a user can perform based on the privileges granted to him.
-
Get the list of actions that can be performed in the current state of the task.
-
Create a combined list of actions that appear on the preceding lists.
-
Remove any action on the combined list that is specified as a restricted action on the task.
The resulting list of actions is displayed in the task list page and the task details page for the user. When a user requests a specific action, such as claim, suspend, or reassign, the workflow service ensures that the requested action is contained in the list determined by the preceding algorithm.
Step 2 in the preceding algorithm deals with many cases. If a task is in a final, completed state (after all approvals in a sequential flow), an expired state, a withdrawn state, or an errored state, then no further update actions are permitted. In any of the these states, the task, task history, and subtasks (parent task in parallel flow) can be viewed. If a task is suspended, then it can only be resumed or withdrawn. A task that is assigned to a group must be claimed before any actions can be performed on it.
Note:
If you act on a task from the task details page, for example, if you approve a task, then any unchanged task details data is saved along with the saved changes to the task. However if you act on a task from the Actions menu, then unchanged task details are not saved.
32.5.1 System Actions
The action bar displays system actions, which are available on all tasks based on the user's privileges. Table 32-7 lists system actions.
Table 32-7 System Task Actions
| Action | Description |
|---|---|
|
Claim |
If a task is assigned to a group or multiple users, then the task must be claimed first. Claim is the only action available in the Task Action list for group or multiuser assignments. After a task is claimed, all applicable actions are listed. |
|
Escalate |
If you are not able to complete a task, you can escalate it and add an optional comment in the Comments area. The task is reassigned to your manager (up one level in a hierarchy). |
|
Pushback |
Use this action to send a task down one level in the workflow to the previous assignee. The pushback action overrides all other actions. For example, if a task is pushed back and then reassigned, after the reassignee approves it, the task goes to the user who performed the pushback. This is the expected behavior. Note:
|
|
Reassign |
If you are a manager, you can delegate a task to reportees. |
|
Release |
If a task is assigned to a group or multiple users, it can be released if the user who claimed the task cannot complete the task. Any of the other assignees can claim and complete the task. |
|
Renew |
If a task is about to expire, you can renew it and add an optional comment in the Comments area. The task expiration date is extended one week. A renewal appears in the task history. The renewal duration for a task can be controlled by an optional parameter. The default value is |
|
Submit Information and Request Information |
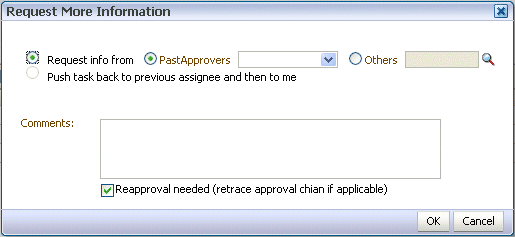
Use these actions if another user requests that you supply more information or to request more information from the task creator or any of the previous assignees. If reapproval is not required, then the task is assigned to the next approver or the next step in the business process. |
|
Suspend and Resume |
If a task is not relevant, you can suspend it. These options are available only to users who have been granted the BPMWorkflowSuspend role. Other users can access the task by selecting Previous in the task filter or by looking up tasks in the Suspended status. A suspension is indefinite. It does not expire until Resume is used to resume working on the task. |
|
Withdraw |
If you are the creator of a task and do not want to continue with it, for example, you want to cancel a vacation request, you can withdraw it and add an optional comment in the Comments area. The business process determines what happens next. You can use the Withdraw action on the home page by using the Creator task filter. |
|
Start/Stop Task |
When the user chooses to start or stop work on the task the time stamp is assigned to all the tasks selected. It is used to calculate the working durations of the task. The user can use Start/Stop Task multiple times on the same task, for example startTask -> stopTask -> startTask -> stopTask -> startTask -> completeTask The total working duration is the sum of all of these time intervals. Start/Stop Task operations are only available for tasks in Assigned or Request Information status. Start/Stop Task is not available for Aggregated Task. |
32.5.2 Task History
The task history maintains an audit trail of the actions performed by the participants in the workflow and a snapshot of the task payload and attachments at various points in the workflow. The short history for a task lists all versions created by the following tasks:
-
Initiate task
-
Re-initiate task
-
Update outcome of task
-
Completion of task
-
Error of task
-
Expiration of task
-
Withdrawal of task
-
Alerting of task to the error assignee
You can include the following actions in the short history list by modifying the shortHistoryActions element.
-
Acquire
-
Ad hoc route
-
Auto release of task
-
Delegate
-
Escalate
-
Information request on task
-
Information submit for task
-
Override routing slip
-
Update outcome and route
-
Push back
-
Reassign
-
Release
-
Renew
-
Resume
-
Skip current assignment
-
Suspend
-
Update
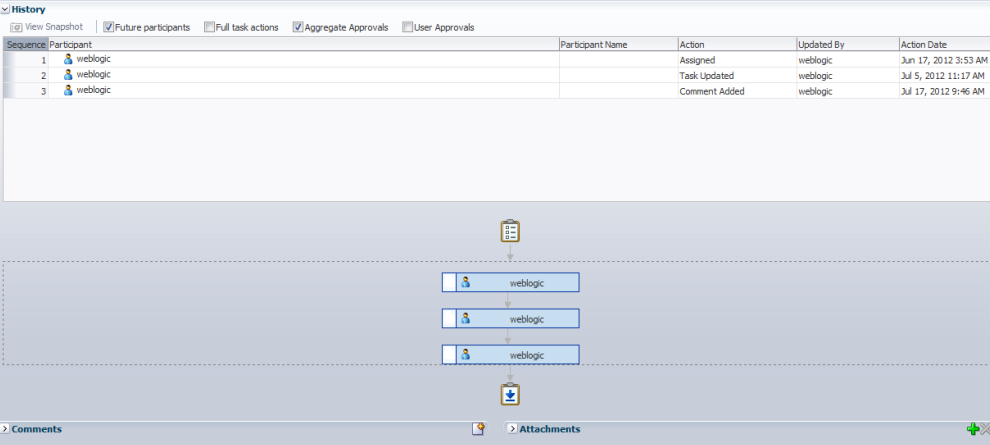
The history provides a graphical view of a task flow, as shown in Figure 32-20.
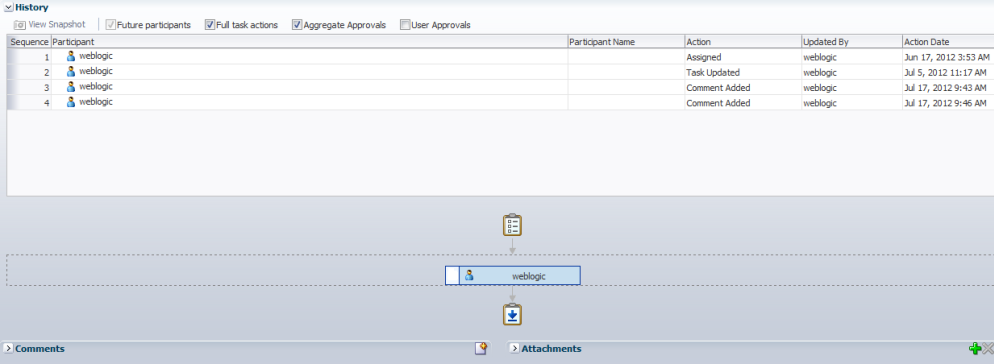
Check Full task actions to see all actions performed, including those that do not make changes to the task, such as adding comments, as shown in Figure 32-21.
Available ways to view the task history include:
-
Take a task snapshot
-
See future approvers
-
See complete task actions
-
Aggregate tasks
Note:
The history of a parent task also displays the history of any subtasks it contains.
32.5.3 How To Act on Tasks
If the human task was designed to permit ad hoc routing, or if no predetermined sequence of approvers was defined, then the task can be routed in an ad hoc fashion in the worklist. For such tasks, a Route button appears on the task details page. From the Route page, you can look up one or more users for routing. When you specify multiple assignees, you can select whether the list of assignees is for simple (group assignment to all users), sequential, or parallel assignment.
Parallel tasks are created when a parallel flow pattern is specified for scenarios such as voting. In this pattern, the parallel tasks have a common parent. The parent task is visible to a user only if the user is an assignee or an owner or creator of the task. The parallel tasks themselves (referred to as subtasks) are visible to whomever the task is assigned, just like any other task. It is possible to view the subtasks from a parent task. In such a scenario, the task details page of the parent task contains a View SubTasks button. The SubTasks page lists the corresponding parallel tasks. In a voting scenario, if any of the assignees updates the payload or comments or attachments, the changes are visible only to the assignee of that task.
A user who can view the parent task (such as the final reviewer of a parallel flow pattern), can navigate to the subtasks and view the updates made to the subtasks by the participants in the parallel flow. The parent task is a container for the subtasks while they are worked on by the assignees. The task owner must not act on or approve the parent task.
The task list does not display the actions for a task. A user has to take action from the task details.
If a human task was set up to require a password, then when you act on it, you must provide the password.
Note:
Any kind of change to the task details page, such as changing a priority or adding a comment, requires you to save the change. If you add an attachment to a task, it is automatically saved.
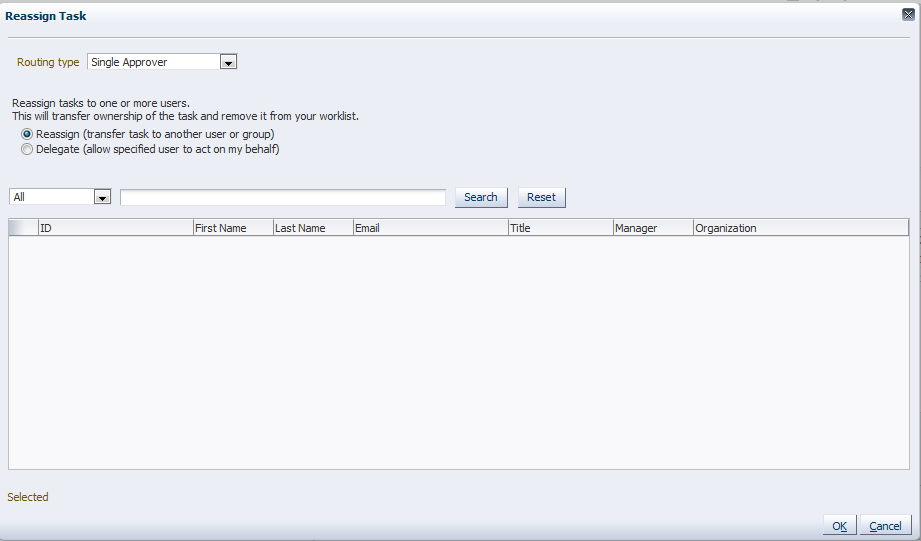
To reassign or delegate a task:
32.5.3.2 To Route a Task
Note:
The task definition must be set to Allow participants to invite other participants before the task can be routed.
To route a task:
32.5.3.3 To Add Comments or Attachments
To add comments or attachments:
Note:
-
If you are the initiator of the task, then your comment is shared with all process participants and not only with task assignees. The option to share with only task participants is not available to you.
-
Comments added to a parent task also appear in any subtasks of that parent.
-
Click Save before you browse for or upload attachments, to ensure that any previous changes to the task details page are saved.
-
When you remove a file or URL attachment, the task is not automatically updated. You must explicitly select Actions > Save. Otherwise, the attachment is not removed, even though it is displayed as removed. This is the expected behavior.
-
If you add a file attachment, you do not need to explicitly select Actions > Save.
-
If you add a URL attachment, you must explicitly select Actions > Save.
-
In an environment with servers clustered for high availability purposes, file uploading is not supported if a failover occurs. If the active server shuts down, then the uploading process is not assumed by the other server and the upload fails.
-
If you are using an ADF connection and you receive a "No Protocol" error when attempting to add an attachment, verify that your
connections.xmlfile is synchronized with the correct WSDL file. Theconnections.xmlfile is located in the directory.adf/META-INF/in your ADF workspace.
32.5.4 How To Act on Tasks That Require a Digital Signature
The worklist supports the signature policy created in the human task:
-
No signature required — Participants can send and act on tasks without providing a signature.
-
Password required — Participants mus tspecify their login passwords.
-
Digital certificate (signature) required —Participants must possess a digital certificate before being able to send and act on tasks. A digital certificate contains the digital signature of the certificate-issuing authority so that anyone can verify that the certificate is real. A digital certificate establishes the participant's credentials. It is issued by a certification authority (CA). It contains your name, a serial number, expiration dates, a copy of the certificate holder's public key (used for encrypting messages and digital signatures), and the digital signature of the certificate-issuing authority so that a recipient can verify that the certificate is real.
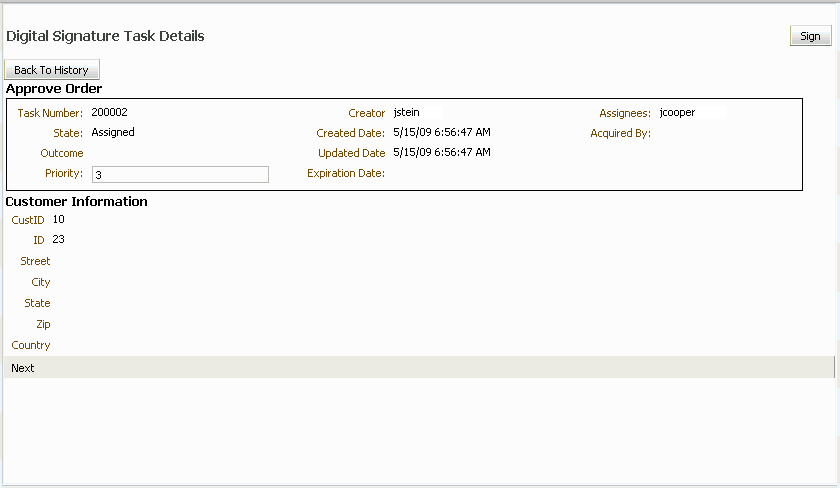
When you act on a task that has a signature policy, the Sign button appears, as shown in Figure 32-33.
Figure 32-33 Digital Signature Task Details
Description of "Figure 32-33 Digital Signature Task Details"
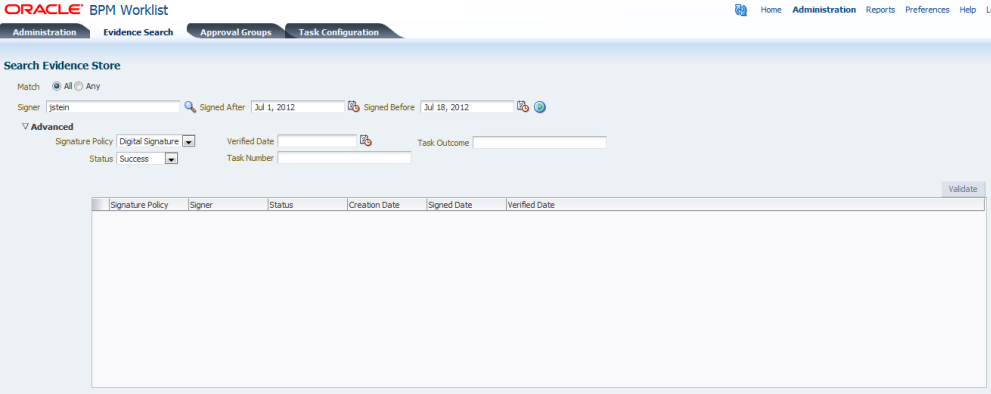
The evidence store service is used for digital signature storage and nonrepudiation of digitally signed human tasks. You can search the evidence store, as shown in Figure 32-34.
See Evidence Store Service and Digital Signatures for more information.
To provide a digital signature:
-
In the upper right corner of Oracle BPM Worklist, click Preferences.
-
Select the Certificates link.
-
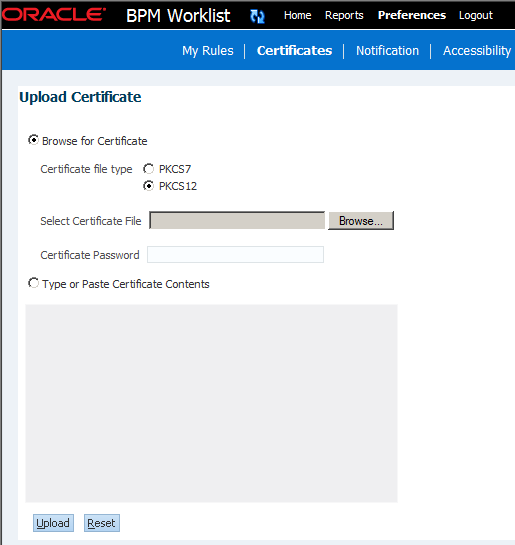
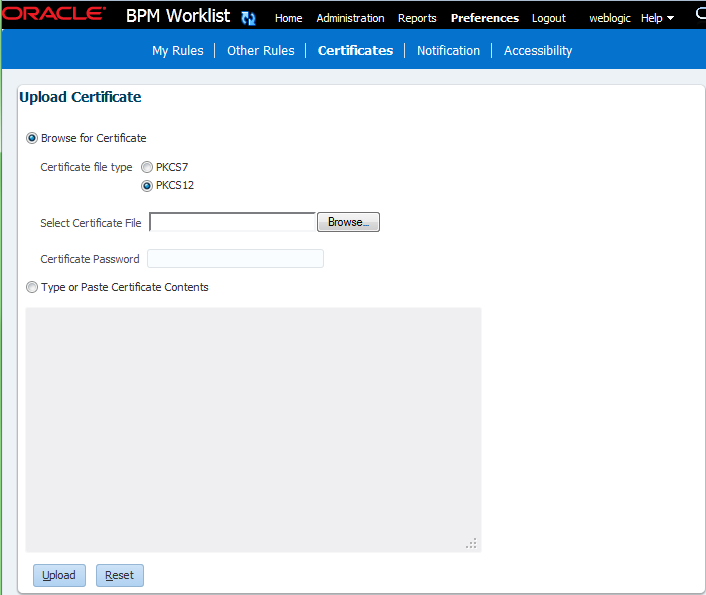
Upload the certificate you want to use to sign your decision, as shown in Figure 32-35.
When signing a task outcome using your certificate, you must upload the entire chain of certificates through Oracle BPM Worklist as a
.P7B(PKCS7 format) file, not just the one certificate issued to you by the certificate issuer. The entire chain can be exported through Internet Explorer. Mozilla Firefox does not let you export the chain as a.P7Bfile. Therefore, you can perform the following steps:-
Export the chain from Mozilla Firefox as a .P12 file (PKCS12 format that also contains your private key).
-
Import the
.P12file in Internet Explorer. -
Export it again from Internet Explorer as a
.P7Bfile. -
Upload it through Oracle BPM Worklist.
Note the following important points when providing your certificate to the system. Otherwise, you cannot use your certificate to sign your decisions on tasks.
-
The PKCS7 file format is a binary certificate format. Select this option if you have a standalone certificate file stored on your disk.
-
The PKCS12 file format is a keystore format. Select this option if you have your certificate stored inside a keystore.
-
If you want to copy and paste the contents of the certificate, select Type or Paste Certificate Contents and paste the BASE64-encoded text into the field. Do not paste a certificate in any other format into this field. Likewise, if you choose to upload a certificate, do not try to upload a BASE64-encoded certificate. Only PKCS12 and PKCS7 formatted files are supported for uploads.
-
-
Return to the task list by clicking the Home link in the upper-right corner of Oracle BPM Worklist.
-
Click a task to approve or reject.
The task details are displayed.
-
Click either Approve or Reject.
Details about the digital signature are displayed.
-
For a task that has a signature policy, click Sign.
The Text Signing Report dialog appears.
-
Select the certificate from the list to use to sign your decision.
-
Enter the master password of the web browser that you are using.
-
Click OK.
The web browser signs the string displayed in the upper half of the Text Signing Request with the certificate you selected and invokes the action (approval or rejection) that you selected. The task status is appropriately updated in the human workflow service.
For more information about how certificates are uploaded and used, see Evidence Store Service and Digital Signatures.
32.6 Approving Tasks
Get an overview of types of actions that can be performed on tasks by various task approvers.
Table 32-8 Task Actions and Approvers
| Task Action | Admin | Owner (+ Owner Group) | Assignee (+ Assignee Manager + Assignee Group + Proxy Assignee) | Creator | Reviewer | Approver |
|---|---|---|---|---|---|---|
|
Acquire (Claim) |
No |
Yes |
Yes |
No |
No |
No |
|
Custom |
No |
YesFoot 1 |
YesFoot 1 |
No |
No |
No |
|
Delegate |
No |
No |
Yes |
No |
No |
No |
|
Delete |
NoFoot 2 |
NoFoot 2 |
YesFoot 2 |
YesFoot 2 |
No |
No |
|
Error |
No |
No |
YesFoot 3 |
No |
No |
No |
|
Escalate |
YesFoot 4 |
YesFoot 4 |
Yes |
No |
No |
No |
|
Info Request |
No |
No |
Yes |
No |
No |
No |
|
Info Submit |
No |
No |
Yes |
No |
No |
No |
|
Override Routing Slip |
Yes |
Yes |
No |
No |
No |
No |
|
Push Back |
No |
No |
Yes |
No |
No |
No |
|
Purge |
YesFoot 2 |
YesFoot 2 |
No |
Yes |
No |
No |
|
Reassign |
YesFoot 5 |
YesFoot 5 |
Yes (No for proxy assignee) |
No |
No |
No |
|
Release |
Yes |
Yes |
Yes |
No |
No |
No |
|
Renew |
No |
Yes |
Yes |
No |
No |
No |
|
Resume |
Yes |
Yes |
Yes |
No |
No |
No |
|
Route |
No |
Yes |
Yes |
No |
No |
No |
|
Skip Current Assignment |
Yes |
Yes |
No |
No |
No |
No |
|
Suspend |
Yes |
Yes |
Yes |
No |
No |
No |
|
Update |
No |
Yes |
Yes |
Yes |
No |
No |
|
Update Attachment |
Yes |
Yes |
Yes |
Yes |
Yes |
No |
|
Update Comment |
Yes |
Yes |
Yes |
Yes |
Yes |
No |
|
View Process History |
Yes |
Yes |
Yes |
Yes |
No |
No |
|
View Sub Tasks |
Yes |
Yes |
Yes |
No |
No |
No |
|
View Task History |
Yes |
Yes |
Yes |
Yes |
Yes |
Yes |
|
Withdraw |
Yes |
Yes |
No |
Yes |
No |
No |
Footnote 1
Not valid for ToDo tasks
Footnote 2
Valid only for ToDo tasks
Footnote 3
Applicable for tasks in alerted states
Footnote 4
Without claim and escalate to current assignee's manager
Footnote 5
Without claim
32.7 Setting a Vacation Period
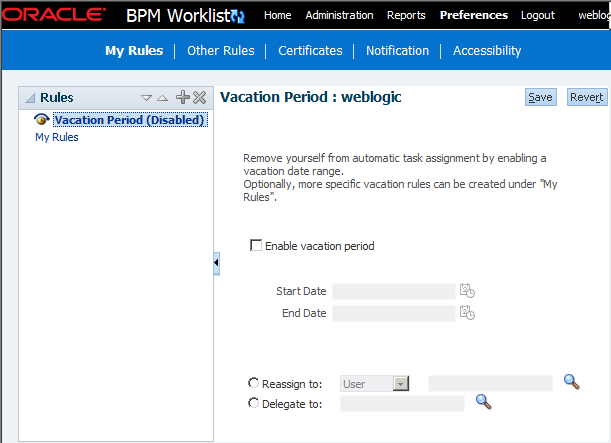
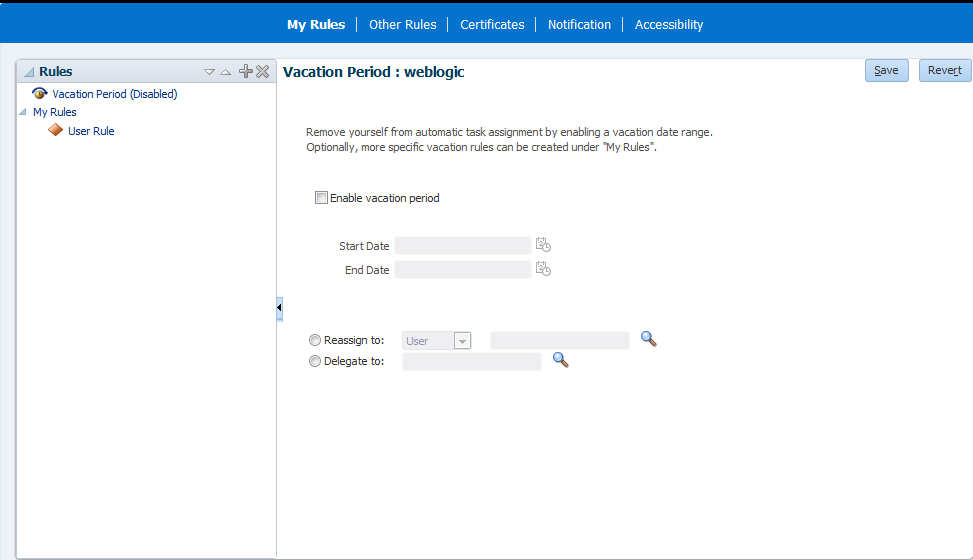
You can set a vacation period so that you are removed from automatic task assignment during the dates you specify you are on vacation.
Vacation rules are not executed for ToDo tasks. See Setting Rules for how to set a vacation rule that is synchronized with the vacation period.
To set a vacation period:
32.8 Setting Rules
Rules act on tasks, either a specific task type or all the tasks assigned to a user or group.
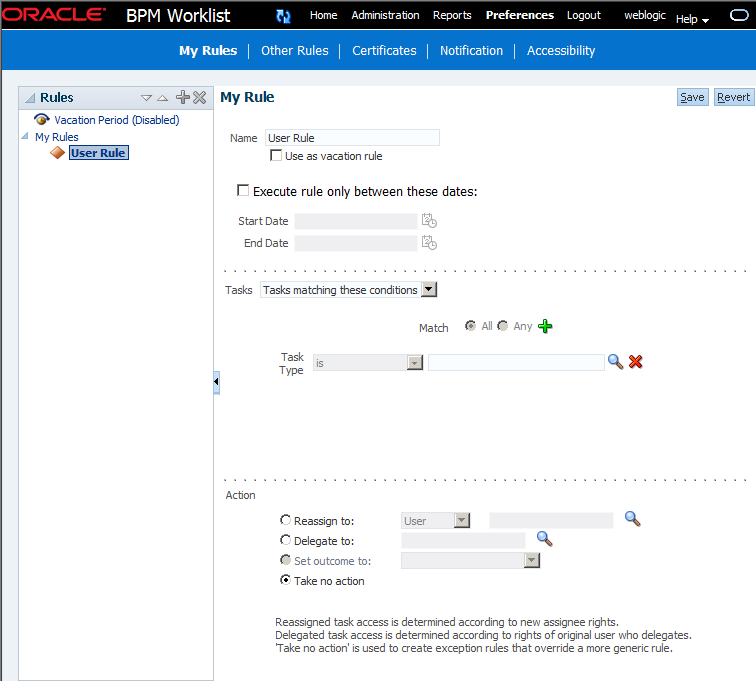
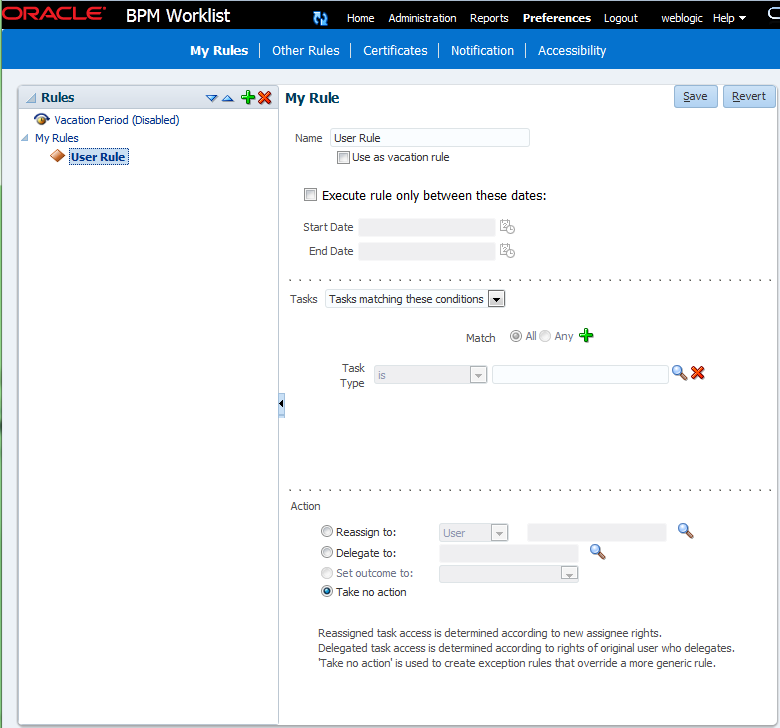
Figure 32-37 shows the Action section where you set rules, including vacation rules (different from the vacation period settings described in Setting a Vacation Period).
A rule cannot always apply in all circumstances in which it is used. For example, if a rule applies to multiple task types, it may not be possible to set the outcome for all tasks, since different tasks can have different outcomes.
Rules are executed in the order in which they are listed. Rules can be reordered by using the up and down buttons in the header, as shown in Figure 32-37.
If a rule meets its filter conditions, then it is executed and no other rules are evaluated. For your rule to execute, you must be the only user assigned to that task. If the task is assigned to multiple users (including you), the rule does not execute.
You cannot specify business rules for ToDo tasks.
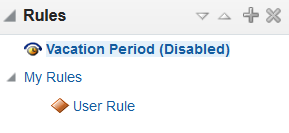
32.8.1 How To Create User Rules
Specify the following when creating a user rule:
-
Rule name.
-
If the rule is a vacation rule. See Setting a Vacation Period for how to set the vacation period that is synchronized with the vacation rule.
-
Which task or task type the rule applies to. If specified as blank or null, then the rule will be skipped. If a task type is specified, then any attributes mapped for that task type can be used in the rule condition. To execute the user rule action for all task types, the task type field must be removed from the rule condition.
-
When the rule applies.
-
Conditions on the rule—These are filters that further define the rule, such as specifying that a rule acts on priority 1 tasks only, or that a rule acts on tasks created by a specific user. The conditions can be based on standard task attributes and any mapped attributes that have been mapped for the specific tasks. See How To Map Attributes for more information.
User rules perform the following actions:
-
Reassign to—Reassigns tasks to specified subordinates or groups you manage.
-
Delegate to—Delegates to any user or group. Any access rights or privileges for completing the task are determined according to the original user who delegated the task. (Any subsequent delegations or reassignments do not change this from the original delegating user.)
-
Set outcome to—Specifies an automatic outcome if the workflow task was designed for those outcomes. For example, accepting or rejecting the task. The rule must be for a specific task type. If a rule is for all task types, then this option is not displayed.
-
Take no action—Prevents other more general rules from applying. For example, to reassign all your tasks to another user while you are on vacation, except for loan requests, for which you want no action taken, then create two rules. The first rule specifies that no action is taken for loan requests; the second rule specifies that all tasks are reassigned to another user. The first rule prevents reassignment for loan requests.
Note:
If user cdickens has a vacation rule set to Reassign to,
Delegate to, or Set outcome to, the vacation rule will not be
triggered if a task is assigned to cdickens through Request Information, Adhoc Route, or Escalate. In these three cases, the task will remain assigned to
cdickens.
To create a user rule:
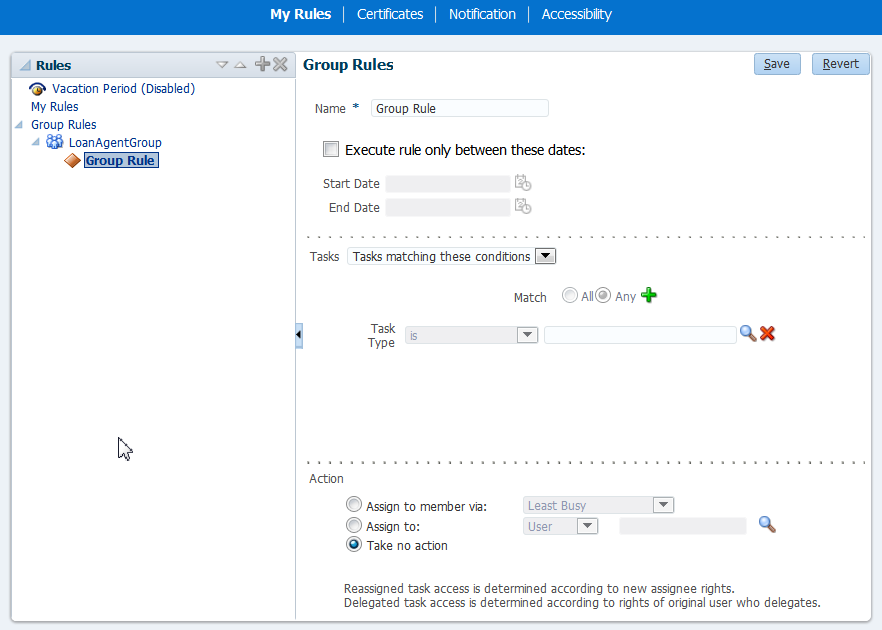
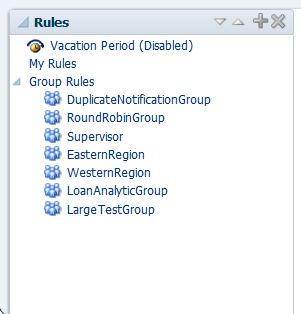
32.8.2 How To Create Group Rules
Creating a group rule is similar to creating a user rule, with the addition of a list of the groups that you (as the logged-in user) manage. Examples of group rules include:
-
Assigning tasks from a particular customer to a member of the group
-
Ensuring an even distribution of task assignments to members of a group by using round-robin assignment
-
Ensuring that high-priority tasks are routed to the least busy member of a group
Group rules do the following actions:
-
Assign to member via—You can specify a criterion to determine which member of the group gets the assignment. This dynamic assignment criterion can include round-robin assignment, assignment to the least busy group member, or assignment to the most productive group member. You can also add your custom functions for allocating tasks to users in a group.
-
Assign to—As with user rules, you can assign tasks to subordinates or groups you directly manage.
-
Take no action—As with user rules, you can create a rule with a condition that prevents a more generic rule from being executed.
To create a group rule:
32.8.3 Assignment Rules for Tasks with Multiple Assignees
If a task has multiple assignees, then assignment rules are not evaluated for the task, and the task is not automatically routed. This is because each of the task's assignees can define assignment rules, which can potentially provide conflicting actions to take on the task. Only tasks that are assigned exclusively to a single user are routed by the assignment rules.
For example, consider the following sequence:
- A rule is created for user
cdickensto reassign all assigned requests to userjstein. - User
jcooperreassigns the allocated tasks tocdickensandcdoyle. - User
cdickensclaims the task, and the task appears in their inbox.
The task is not automatically reassigned to jstein. The task is
routed to jstein, following the assignment rule set for
cdickens, if user jcooper explicitly reassigns
the task only to cdickens instead of reassigning the task to
multiple users (cdickens and cdoyle).
32.8.4 How to Avoid Circular Logic in Reassigned Vacation Rules
When creating vacation rules, ensure that approval tasks are not reassigned in a circular fashion.
For example, jstein is jcooper’s manager, and some
tasks may need to go to jstein for approval. If
jstein creates a vacation rule, ensure that those tasks will
not be reassigned to jcooper.
Alternatively, you can use the Delegate option in vacation rules instead of Reassign. For more information, see How To Create User Rules.
How To Avoid Circular Dependency
In this example, we define two rules for User2, who wants to set a
vacation period and reassign his tasks to someone else. The first rule states that
if the task is not coming from User1, then reassign it to
User1. The second rule states that if the task is coming
from User1, then reassign it to User3.
The task flow is: jcooper to jstein to
wfaulk. The rules are set for jstein.
jstein.
32.9 Using the Worklist Administration Functions
Administrators who are granted the BPMWorkflowAdmin role, can use the worklist Administration Funcations.
Administration functions include the following:
-
Managing other users' or groups' rules
-
Setting the worklist display (application preferences). Application preferences customize the appearance of the worklist, including:
-
The login realm label
-
The resource bundle
-
Where the language locale information is retrieved from
-
The branding logo
-
The branding title
-
The branding skin
-
Any external applications you want to use, for example,
oracle.com, orgoogle.com
-
-
Specifying mapped attributes
An administrator can view and update all tasks assigned to all users. An administrator's Assignee filter displays Admin when the Admin tab is selected.
For information about specifying mapped attributes, see Using Mapped Attributes (Flex Fields)
32.9.1 How To Manage Other Users' or Groups' Rules (as an Administrator)
This function is useful for fixing a problem with a rule. Also, for a user who no longer works for the company, administrators can set up a rule for that user so that all tasks assigned to the user are automatically assigned to another user or group.
To create a rule for another user or group:
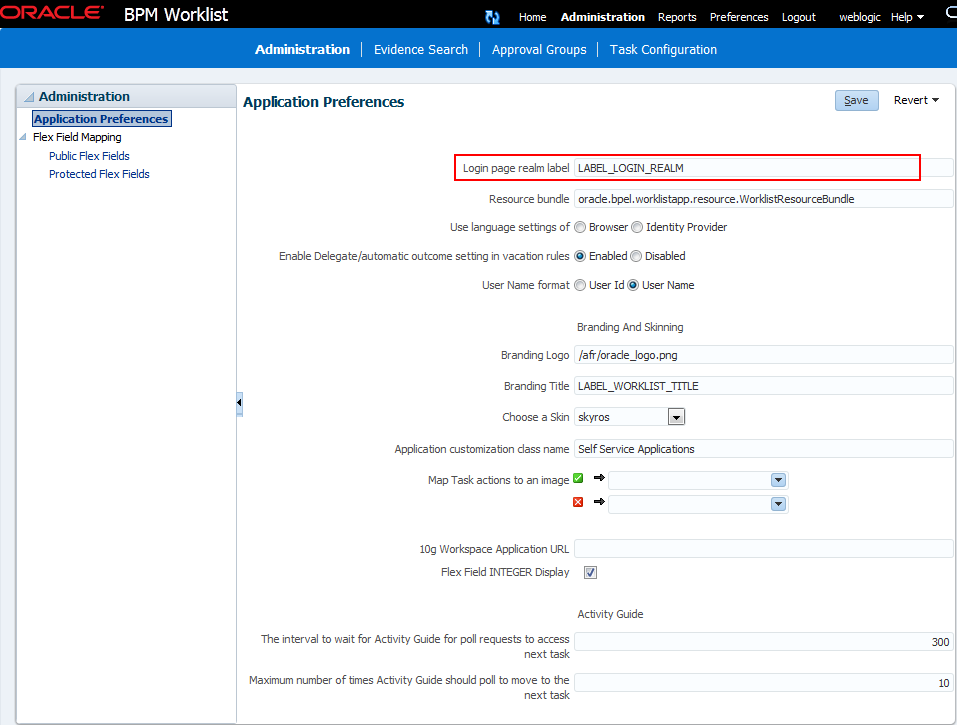
32.9.2 How to Specify the Login Page Realm Label
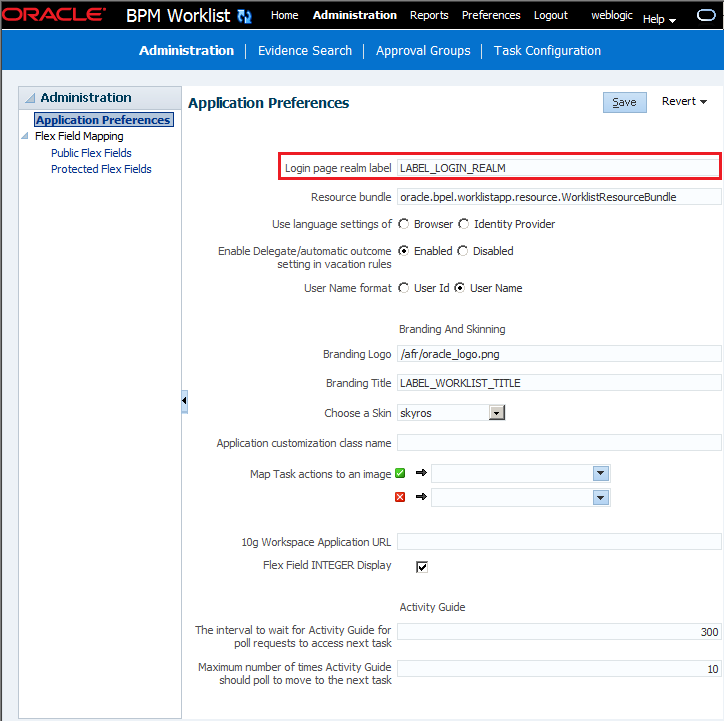
If the identity service is configured with multiple realms, then, when a user logs in to Oracle BPM Worklist, the login page displays a list of realm names. LABEL_LOGIN_REALM specifies the resource bundle key used to look up the label to display these realms. You can change the term realm to fit the user community—terms such as country, company, division, or department may be more appropriate. To change the term realm, customize the resource bundle, specify a resource bundle key for this string, and then set the Login page realm label parameter to point to that resource bundle key.
Figure 32-40 shows the Application Preferences page with the Login page realm label field highlighted. You reach the Application Preferences page by clicking Administration on the global toolbar at the very top of the Worklist Application interface.
Figure 32-40 Specifying the Login Page Realm Label
Description of "Figure 32-40 Specifying the Login Page Realm Label"
32.9.3 How to Specify the Resource Bundle
The resource bundle provides the strings displayed in the Worklist Application. By default, the class path to the resource bundle is:
oracle.bpel.worklistapp.resource.WorklistResourceBundle
Figure 32-41 shows the Application Preferences page with the Resource Bundle field highlighted. You reach the Application Preferences page by clicking Administration on the global toolbar at the very top of the Worklist Application interface.
Figure 32-41 Specifying the Resource Bundle
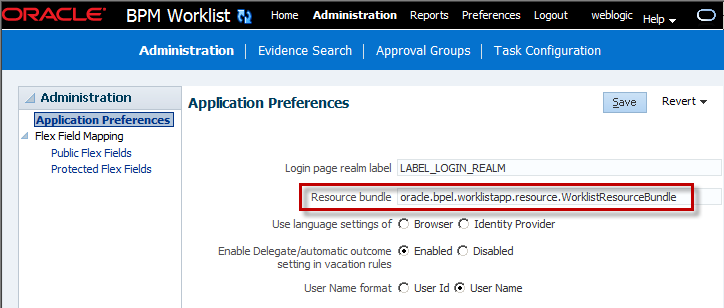
Description of "Figure 32-41 Specifying the Resource Bundle"
As an administrator, you can add or modify strings shown in the application by creating a custom resource bundle. You can then use the Resource Bundle field in the Application Preferences page to specify the class path to your custom resource bundle.
For more information about customizing resource bundles, see Managing and Monitoring Processes with Oracle Business Process Management.
32.9.4 How to Specify the Language Locale Information
From the Application Preferences page, you can specify how the Worklist Application display language is determined. Information about the language locale can be derived from either the user's browser or the identity provider that stores information on worklist users.
Figure 32-42 shows the Applications Preferences page with the Use language settings of options highlighted. You reach the Application Preferences page by clicking Administration on the global toolbar at the very top of the Worklist Application interface.
Figure 32-42 Specifying Language Local Information
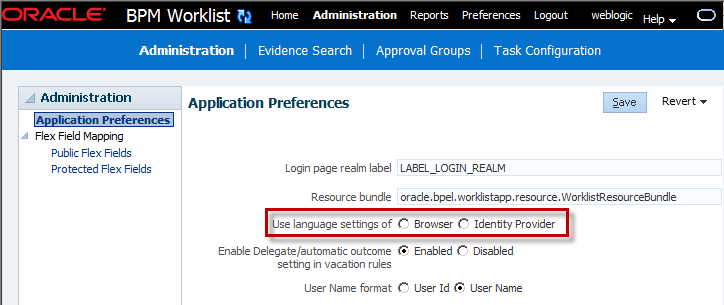
Description of "Figure 32-42 Specifying Language Local Information"
32.9.5 How to Specify User Name Format
From the Application Preferences page, you can specify how the user's name is
displayed on the screen after they have logged in. You can choose to display the
userid, such as jstein, or the user's name, John
Steinbeck.
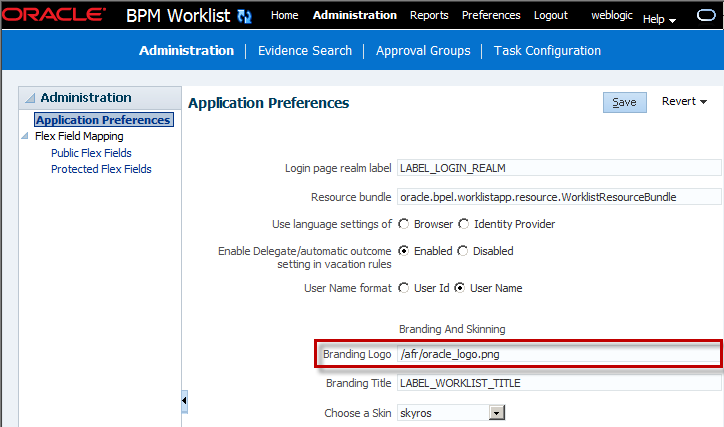
32.9.6 How to Specify a Branding Logo
A branding logo is the image displayed in the top left corner of every page of the Worklist Application. The Oracle logo is the default, and you can change it to one of your choosing.
Note:
The ideal image size is 120px x 40px (length x width) for proper display. Although images with high resolution and size are compressed to fit the branding logo size, smaller images display better.
Figure 32-43 shows the Application Preferences page with the Branding Logo field highlighted. You reach the Application Preferences page by clicking Administration on the global toolbar at the very top of the Worklist Application interface.
To specify the branding logo:
Do one of the following:
-
Refer to an external image-hosting web site. To do this task: In the Branding Logo field, enter the URL of the image.
-
Upload an image to a particular location on the server and, in the Branding Logo field, enter its relative path, for example,
/afr/my_logo.png. -
Refer to an image from the shared library. To do this task: In the Branding Logo field, enter the path of the logo name as found in the shared library, for example,
/my_logo.pngv.
Note:
Customizing the branding logo from either the Worklist Application or Process Workspace changes the logo in both applications. For example, if you change the logo from Worklist, the Workspace logo is changed automatically.
For information about deploying images and JAR files as part of a shared library, see Managing and Monitoring Processes with Oracle Business Process Management.
32.9.7 How to Specify the Branding Title
You can specify the title for your site, changing the default title, BPM Worklist, to one that you choose.
Figure 32-44 shows the Application Preferences field with the Branding Title field highlighted. You reach the Application Preferences page by clicking Administration on the global toolbar at the very top of the Worklist Application interface.
Figure 32-44 Specifying the Branding Title
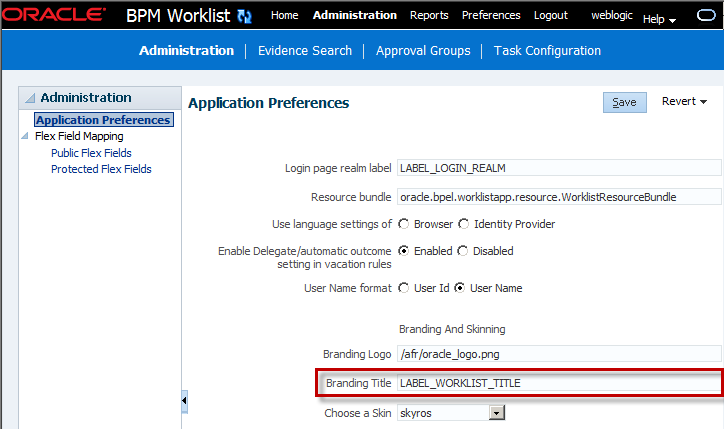
Description of "Figure 32-44 Specifying the Branding Title"
To specify the branding title:
Do one of the following:
-
In the Branding Title field, enter a simple string for your title.
-
In the Branding Title field, enter a label that refers to a key-value pair in the Resource Bundle. In this way, you can internationalize your title, for example, LABEL_WORKLIST_TITLE.
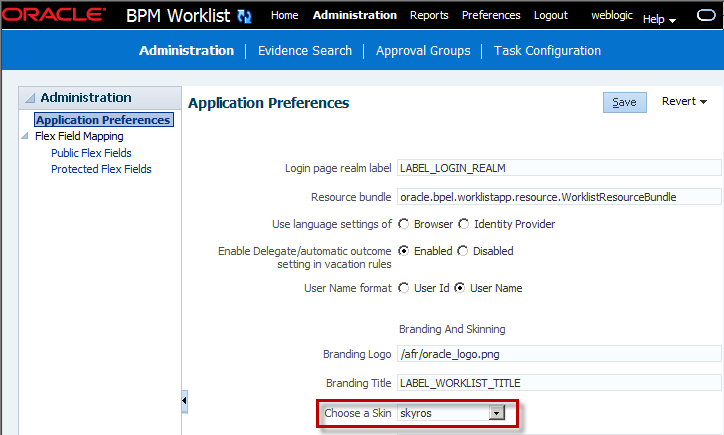
32.9.8 How to Choose a Skin
A skin determines the look and feel of your graphical interface. You specify the skin from the Application Preferences page. You reach the Application Preferences page by clicking Administration on the global toolbar at the very top of the Worklist Application interface.
Figure 32-45 shows the Application Preferences page with the Choose a Skin field highlighted.
32.9.8.1 To Choose A Skin
To choose a skin:
Do one of the following:
-
From the Choose a Skin list, select one of the default ADF skins
-
Upload your own customized skin
.cssfile in a.JARfile and deploy it as a part of shared library. Then, when you restart your application from the console, your custom skin appears in the Choose a Skin list.
32.9.8.2 To Create a JAR File Containing Customized Skins
To create a JAR file containing customized skins:
Note:
Refer to the images in your css file this way:
../adf/oracle/skin/images/example.gif (with the two trailing dots).
This allows the search for the META-INF root to start one directory above the META-INF/skin directory in which the .css file is located.
For information about deploying JAR files as part of a shared library, see Managing and Monitoring Processes with Oracle Business Process Management.
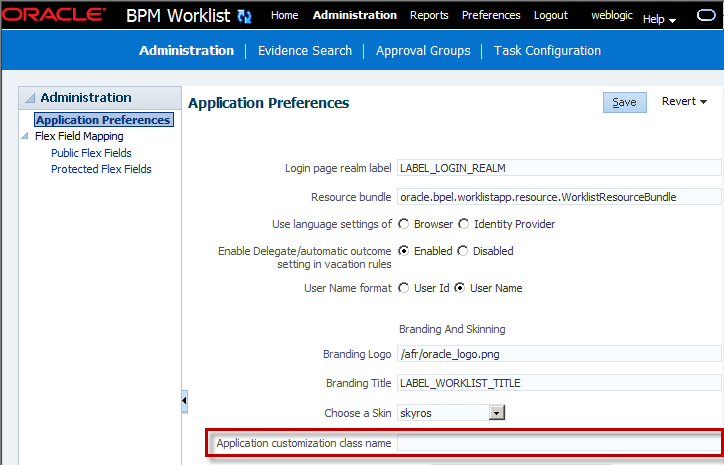
32.9.9 How to Enable Customized Applications and Links
For Process Workspace, you can create customized external applications and links that become available in the External Applications panel. Moreover, in both Process Workspace and the Worklist Application, you can specify the columns that appear in the Task Details pane.
You specify a custom application by using the Application Preferences page. You reach the Application Preferences page by clicking Administration on the global toolbar at the very top of the Worklist Application interface.
To see the Java code for specifying a custom application, see Java Code for Enabling Customized Applications in Worklist Application.
To enable customized applications:
32.9.10 How to Specify an Image for a Task Action
If you are an administrator, then you can specify whether an action is displayed with a red X icon or with a green check mark icon.
To specify an image for a task action:
- Select Administration, then Application Preferences.
- From the lists in the Map task actions to an image field, select the tasks you want to map to either the green check mark icon or the red X icon.
- Click Save.
32.9.11 Specifying Additional Process Workspace Settings
From the Application Preferences page, you can specify additional configuration items. These include:
-
10g Workspace Application URL - specifies the URL for an ALBPM 10g Workspace to view from within Process Workspace.
-
Flex Field INTEGER Display.
-
Activity Guide poll request interval - interval in seconds to wait between polls for the next Activity Guide task.
-
Activity Guide poll retries - maximum number of times the Activity Guide should poll to move to the next task.
-
File types to upload - Specify the extensions of the file types that can be uploaded by a user. You can specify all file type extensions that you need. The file type extensions that you enter in the field must be separated by a comma. For example,
txt,pdf,zipand so on. -
View task details in separate window - Choose the Enable option, if you want the task details to be opened in a separate window.
32.10 Specifying Notification Settings
You can configure the notification settings to control how, when, and where you receive messages in cases when you have access to multiple communication channels (delivery types). Specifically, you can define messaging filters (delivery preferences) that specify the channel to which a message should be delivered, and under what circumstances.
For example, you might want to create filters for messages received from customers with different Service Level Agreements (SLA), specifying to be notified through business phone and SMS channels for customers with a premium SLA and by EMAIL for customers with a nonpremium SLA.
32.10.1 Configuring Alias for Notification Email ID
You can configure an alias for incoming mail notifications. For example, you can configure the sender email ID to be the department name instead of the email ID of the sender.
Configuring Alias for all Tasks
To configure alias for all tasks:
-
Click your user or login name in the top right corner.
-
Select Administration.
-
Scroll to Notification section.
-
Select from the three options:
-
Email "From:" Display Name: Provide an alias to the sender email ID in the field. The text field is limited 90 characters.
-
Submitter: Send notification using Submitter ID.
-
Previous Approver: Send notification using ID of previous approver.
-
-
Click Save.
Configuring Alias for Individual Tasks
When you configure sender’s name for an individual task, it overrides the global sender name configuration. To configure sender’s name for an individual task:
-
Click your user or login name in the top right corner.
-
Select Administration.
-
Click Task Configuration.
-
Select the task that you have created under Tasks to be Configured section on the left panel.
-
Click Notifications option in the main panel.
-
Expand More.
-
Select from the three options:
-
Not Applicable: Not Applicable option is selected by default. If you do not modify, the sender name that is configured at global level is used as display name.
-
Email "From:" Display Name: Provide an alias to the sender email ID in the field. The text field is limited 90 characters.
-
Previous Approver: Send notification using ID of previous approver.
-
-
Click the Save button next to Tasks to be Configured.
Note:
-
If Previous Approver option is selected, display name of previous approver is used. If display name is not available, ID is used. If there is only first approver and no previous approver in the approval chain, the submitter ID is used as alias name.
-
If no alias is given, Previous Approver is selected by default and if there is no previous approver, the submitter name is displayed.
-
If alias is updated but the bpm-services.jar does not have permissions to write to the MBean, alias does not appear in the mail notifications.
32.10.2 Messaging Filter Rules
A messaging filter rule consists of rule conditions and rule actions. A rule condition consists of a rule attribute, an operator, and an associated value. A rule action is the action to be taken if the specified conditions in a rule are true.
32.10.2.1 Data Types
Table 32-9 lists data types supported by messaging filters. Each attribute has an associated data type, and each data type has a set of predefined comparison operators.
Table 32-9 Data Types Supported by Messaging Filters
| Data Type | Comparison Operators |
|---|---|
|
Date |
isEqual, isNotEqual, isGreaterThan, isGreaterThanOrEqual, isLessThan, isLessThanOrEqual, Between, isWeekday, isWeekend |
|
Time |
isEqual, isNotEqual, Between |
|
Number |
isEqual, isNotEqual, Between, isGreaterThan, isGreaterThanOrEqual, isLessThan, isLessThanOrEqual |
|
String |
isEqual, isNotEqual, Contains, NotContains |
Note:
The String data type does not support regular expressions.
32.10.2.2 Attributes
Table 32-10 lists the predefined attributes for messaging filters.
Table 32-10 Predefined Attributes for Messaging Filters
| Attribute | Data Type |
|---|---|
|
Total Cost |
Number |
|
From |
String |
|
Expense Type |
String |
|
To |
String |
|
Application Type |
String |
|
Duration |
Number |
|
Application |
String |
|
Process Type |
String |
|
Status |
String |
|
Subject |
String |
|
Customer Type |
String |
|
Time |
Time |
|
Group Name |
String |
|
Processing Time |
Number |
|
Date |
Date |
|
Due Date |
Date |
|
User |
String |
|
Source |
String |
|
Amount |
Number |
|
Role |
String |
|
Priority |
String |
|
Customer Name |
String |
|
Expiration Date |
Date |
|
Order Type |
String |
|
Organization |
String |
|
Classification |
String |
|
Service Request Type |
String |
32.10.3 Rule Actions
For a given rule, a messaging filter can define the following actions:
-
Send No Messages: Do not send a message to any channel.
-
Send Messages to All Selected Channels: Send a message to all specified channels in the address list.
-
Send to the First Available Channel: Send a message serially to channels in the address list until one successful message is sent. This entails performing a send to the next channel when the current channel returns a failure status. This filter action is not supported for messages sent from the human workflow layer.
32.10.4 Managing Messaging Channels
In Oracle BPM Worklist, messaging channels represent both physical channels, such as business mobile phones, and also email client applications running on desktops. Specifically, Oracle BPM Worklist supports the following messaging channels:
-
EMAIL
-
IM
-
MOBILE
-
SMS
-
WORKLIST
Note the following about message channels:
-
Addresses for messaging channels are fetched from the configured identity store.
-
SMS and MOBILE notifications are sent to the mobile phone number.
-
No special notification is sent when the messaging channel preference is WORKLIST. Instead, log in to Oracle BPM Worklist to view tasks.
-
EMAIL is the default messaging channel preference when a preferred channel has not been selected.
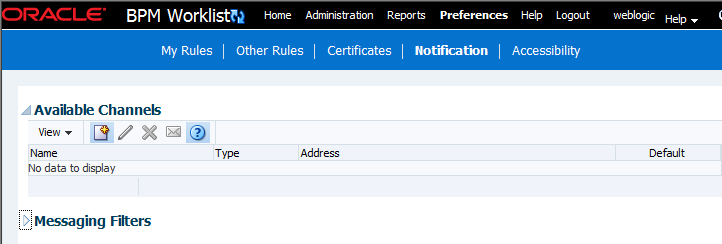
You can use Available Channels to view, create, edit, and delete messaging channels.
32.10.4.1 Viewing Your Messaging Channels
You can display your existing messaging channels.
To view messaging channels:
32.10.4.2 Creating, Editing, and Deleting a Messaging Channel
Oracle BPM Worklist uses an underlying identity store, such as Oracle Internet Directory, to manage messaging channels and addresses. Therefore, you cannot directly create, modify, or delete messaging channels using Oracle BPM Worklist.
To perform these actions, contact the system administrator responsible for managing your organization's identity store.
32.10.5 Managing Messaging Filters
You can use Messaging Filters to define filters that specify the types of notifications you want to receive along with the channels through which to receive these notifications. You can do this through a combination of comparison operators (such as is equal to, is not equal to), attributes that describe the notification type, content, or source, and notification actions, which send the notifications to the first available messaging channels, all messaging channels, or to no channels (effectively blocking the notification).
For example, you can create a messaging filter called Messages from Lise, that retrieves all messages addressed to you from your boss, Lise. Notifications that match all of the filter conditions might first be directed to your business mobile phone, for instance, and then to your business email if the first messaging channel is unavailable.
32.10.5.1 Viewing Messaging Filters
You can display your existing messaging filters.
To view your messaging filters:
32.10.5.2 Creating Messaging Filters
To create a messaging filter:
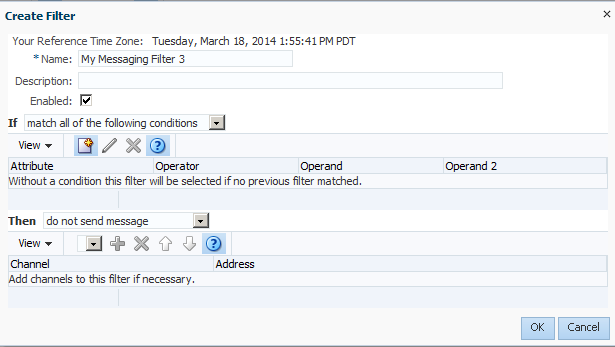
-
Click Create.
The Create Filter dialog box appears, as shown in Figure 32-51.
-
Specify the following information:
-
Name: The name of the messaging filter.
-
Description: An optional description for the messaging filter.
-
Enabled: By default this option is checked. Clear if you do not want this filter used in message handling.
-
-
Select whether notifications must meet all of the conditions or any of the conditions by selecting either the Match all of the following conditions or the Match any of the following conditions options.
-
Click Create.
Define the filter conditions in the Create Condition dialog box, as follows:
-
Select the attribute from the list.
-
Select the operator, such as isEqual, from the list.
-
Type the value of the condition in the Operand field.
-
Click OK to add the condition to the list.
-
Repeat these steps to add more filter conditions. To remove a filter condition, click Delete.
-
-
Select from the following messaging options in the Action section:
-
Do not send messages: Do not send a message to any channel.
-
Send to all selected channels: Send a message to all specified channels in the address list.
-
Send to first available channel: Send a message serially to channels in the address list until one successful message is sent. This entails performing a send to the next channel when the current channel returns a failure status.
-
-
To set the delivery channel, select a channel from the Add Notification Channel list and click Add. To remove a channel, click Delete.
-
Use the up and down arrows to prioritize channels. If available, the top-most channel receives messages meeting the filter criteria if you select Send to the First Available Channel.
-
Click OK.
The messaging filter appears on under Messaging Filters area. The Messaging Filters area enables you to edit or delete the channel.
32.10.5.3 Editing a Messaging Filter
To edit a messaging filter:
- Select the filter from the Messaging Filters area.
- Click Edit.
- Click OK to update the messaging filter. Click Cancel to dismiss the dialog without modifying the filter.
32.11 Using Mapped Attributes (Flex Fields)
Human workflow mapped attributes (formerly referred to as flex fields) store and query use case-specific custom attributes. These custom attributes typically come from the task payload values.
Storing custom attributes in mapped attributes provides the following benefits:
-
They can be displayed as a column in the task listing.
-
They can filter tasks in custom views and advanced searches.
-
They can be used for a keyword-based search.
For example the Requester, PurchaseOrderID, and Amount fields in a purchase order request payload of a task can be stored in the mapped attributes. An approver logging into Oracle BPM Worklist can see these fields as column values in the task list and decide which task to access. The user can define views that filter tasks based on the mapped attributes. For example, a user can create views for purchase order approvals based on different amount ranges. If the user must also retrieve tasks at some point related to a specific requester or a purchase order ID, they can specify this in the keyword field and perform a search to retrieve the relevant tasks.
For the mapped attributes to be populated, an administrator must create mapped attribute mappings, as follows:
-
Specify a label for the mapped attribute to be populated.
-
Map the payload attribute containing the data to the label.
These mappings are valid for a certain task type. Therefore, each task type can have different mapped attribute mappings. After the mapping is complete and any new task is initiated, the value of the payload is promoted to the mapped attribute. Tasks initiated before the mapping do not contain the value in the mapped attribute. Only top-level simple type attributes in the payload can be promoted to a mapped attribute. Complex attributes or simple types nested inside a complex attribute cannot be promoted. It is important to define the payload for a task in the Human Task Editor, keeping in mind which attributes from the payload may must promoted to a mapped attribute. All text and number mapped attributes are automatically included in the keyword-based search.
Essentially, the Human Task Editor is used only when defining the payload for a task. All other operations are performed at runtime.
Directory naming is not available concomitant with the flex file naming convention.
Note:
-
Mapped attributes must be defined before instances of the business process are generated. Only instances generated after mapped attributes are created reflect the correct mapped attributes. Older instances of the business process do not reflect subsequent mapped attribute changes.
-
When you add a new locale, the mapped attribute labels are not automatically translated until you have flushed the cache. You may flush the cache either by restarting the server, or by changing a value in the workflow configuration settings—for example, by changing the
workflowCustomClasspathURLproperty in the workflow configuration to some new value, then changing it back again.
32.11.1 How To Map Attributes
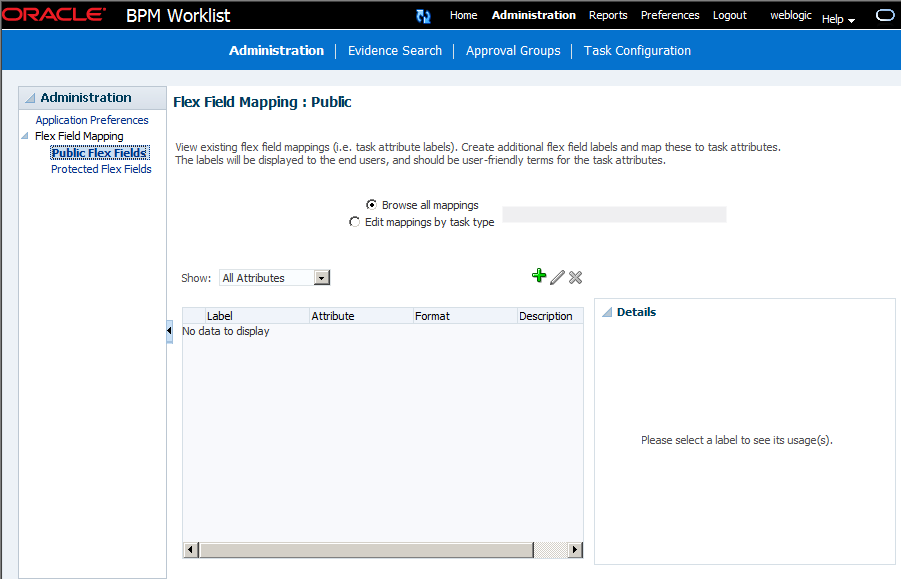
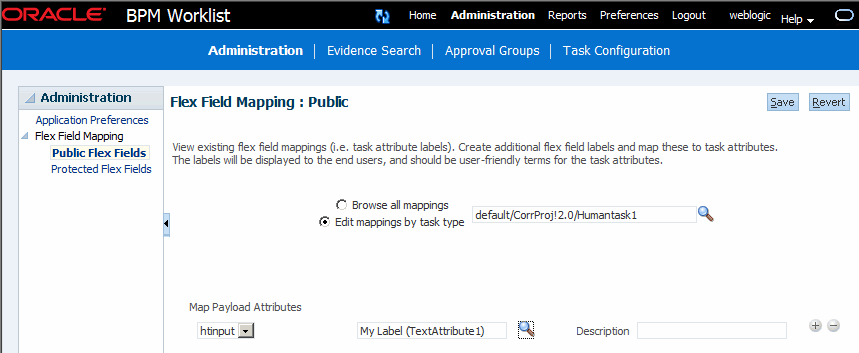
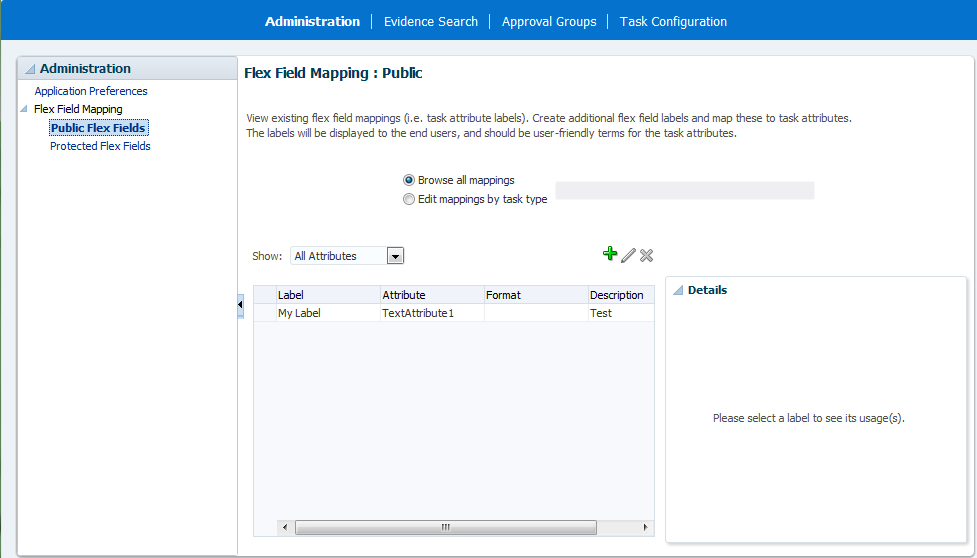
An administrator, or users with special privileges, can use attribute mapping, shown in Figure 32-52, to promote data from the payload to inline mapped attributes. By promoting data to mapped attributes, the data becomes searchable and can be displayed as columns on the task list page.
Administrators can map public mapped attributes. Users who have been granted the workflow.mapping.publicFlexField privilege can map public mapped attributes, and see a Public Flex Fields node on the Administration tab.
32.11.1.1 To Create Labels
To create labels:
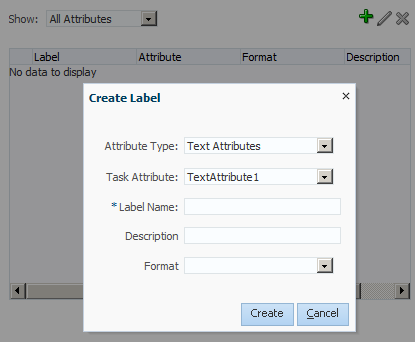
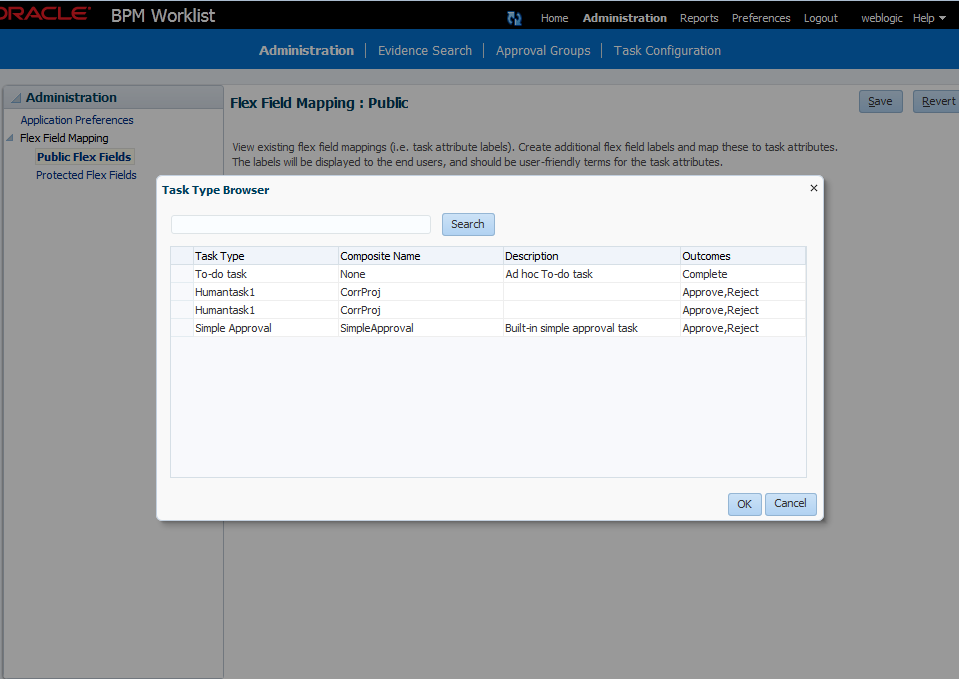
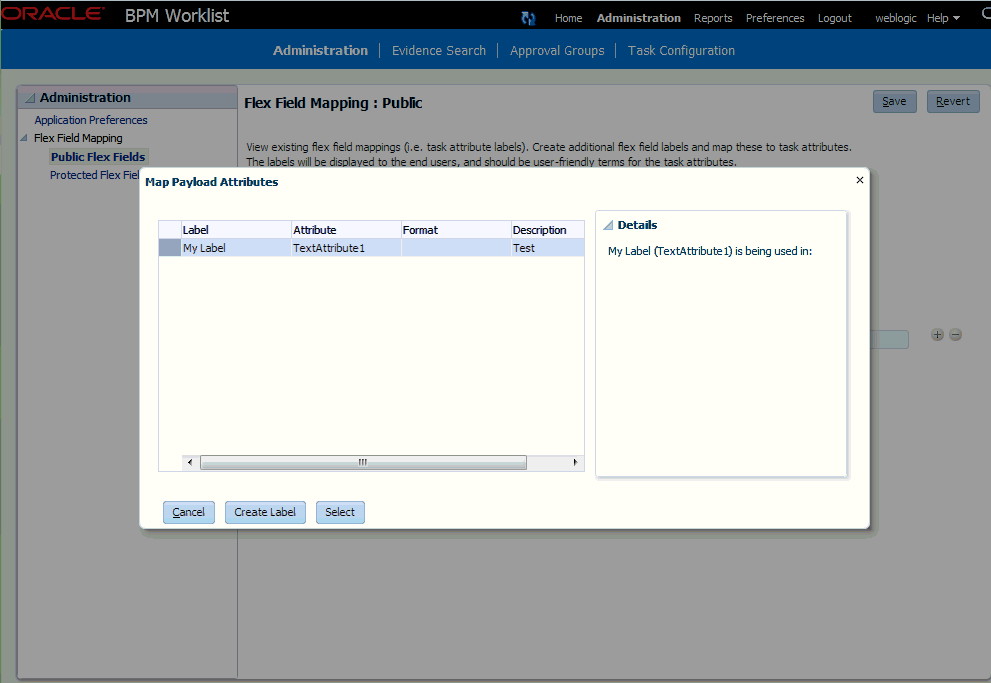
To create a mapped attribute mapping, an administrator first defines a semantic label, which provides a more meaningful display name for the mapped attribute. Click Add to use the Create Label dialog, as shown in Figure 32-53.
As Figure 32-53 shows, labelName is mapped to the task attribute TextAttribute3. The payload attribute is also mapped to the label. In this example, the Text attribute type is associated with labelName. The result is that the value of the Text attribute is stored in the TextAttribute3 column, and labelName is the column label displayed in the user's task list. Labels can be reused for different task types. You can delete a label only if it is not used in any mappings.
A mapped payload attribute can also be displayed as a column in a custom view, and used as a filter condition in both custom views and workflow rules. The display name of the payload attribute is the attribute label that is selected when doing the mapping.
Note the following restrictions:
-
Only simple type payload attributes can be mapped.
-
A mapped attribute (and thus a label) can be used only once per task type.
-
Data type conversion is not supported for the
numberordatedata types. For example, you may not map a payload attribute of typestringto a label of typenumber.
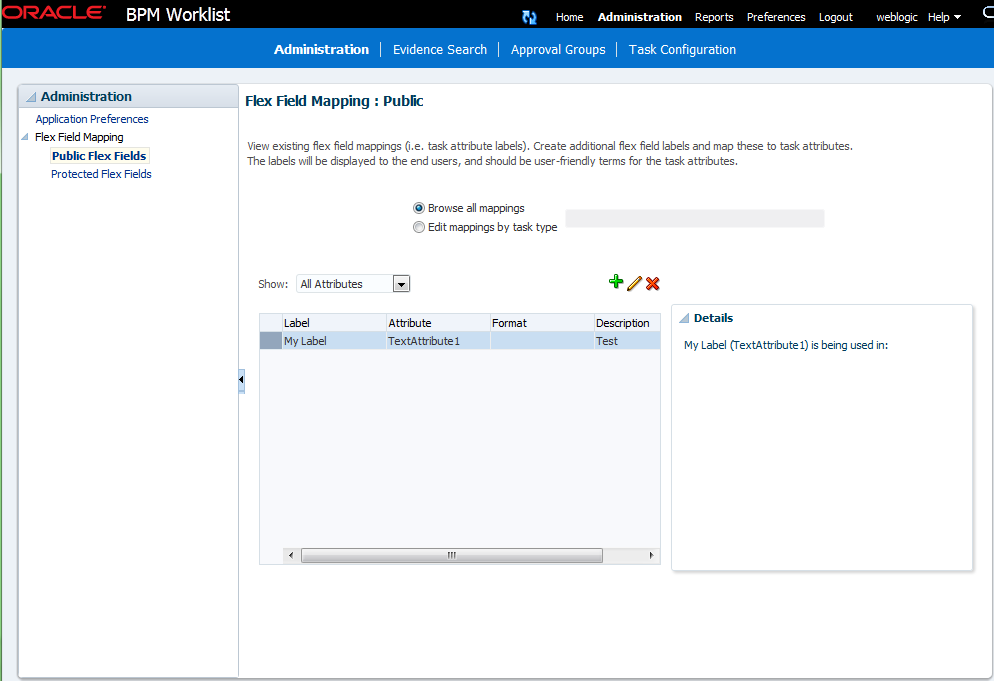
32.11.1.2 To Browse All Mappings
To browse all mappings:
- Click Browse all mappings.
- Select a row in the label table to display all the payload attributes mapped to a particular label.
32.11.2 Custom Mapped Attributes
The following mapped attributes are included in the WorkflowTask.xsd file and are available for your use without restrictions.
Table 32-11 Custom Mapped Attributes
| Attribute | Data Type |
|---|---|
|
customerAttributeString1 |
String |
|
customerAttributeString2 |
String |
|
customerAttributeNumber1 |
Double |
|
customerAttributeNumber2 |
Double |
|
customerAttributeDate1 |
Date |
|
customerAttributeDate2 |
Date |
Use the following Java Architecture for XML Binding (JAXB) methods to set and get these attributes:
task.getCustomerAttributes.getCustomerAttributeString1()
task.getCustomerAttributes.setCustomerAttributeString1("String")
task.getCustomerAttributes.getCustomerAttributeNumber1()
task.getCustomerAttributes.setCustomerAttributeNumber2(9)
task.getCustomerAttributes.setCustomerAttributeDate1()
task.getCustomerAttributes.setCustomerAttributeDate2()
These fields are persisted in the database as customerAttributeString1, customerAttributeString2, customerAttributeNumber1, customerAttributeNumber2, customerAttributeDate1, customerAttributeDate2.
32.12 Creating Worklist Reports
Get an over view of worklist reports and various parameters in the reports.
Table 32-12 lists the worklist reports available for task analysis.
Table 32-12 Worklist Report Types
| Report Name | Description | Input Parameters |
|---|---|---|
|
Unattended Tasks |
Provides an analysis of tasks assigned to users' groups or reportees' groups that have not yet been acquired (the "unattended" tasks). |
|
|
Tasks Priority |
Provides an analysis of the number of tasks assigned to a user, reportees, or their groups, broken down by priority. |
|
|
Tasks Cycle Time |
Provides an analysis of the time taken to complete tasks from assignment to completion based on users' groups or reportees' groups. |
|
|
Tasks Productivity |
Provides an analysis of assigned tasks and completed tasks in a given time period for a user, reportees, or their groups. |
|
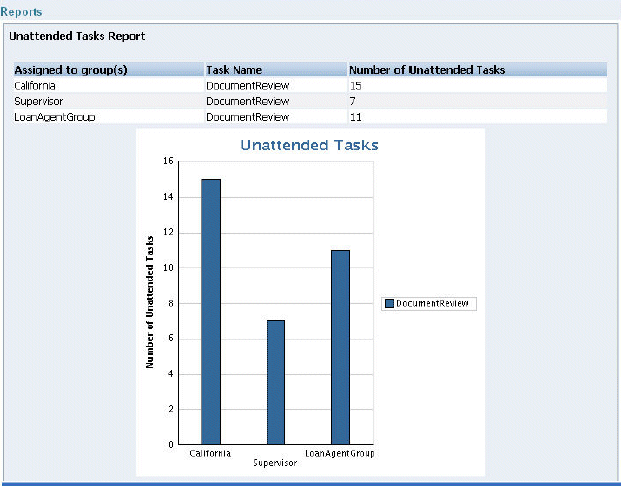
|
Tasks Time Distribution |
Provides the time an assignee takes to perform a task. |
|
32.12.1 How To Create Reports
Reports are available from the Reports link. Report results cannot be saved.
To create a report:
32.12.2 What Happens When You Create Reports
As shown in Figure 32-60, report results (for all report types) are displayed in both a table format and a bar chart format. The input parameters used to run the report are displayed under Report Inputs, in the lower-left corner (may require scrolling to view).
Figure 32-60 Report Display—Table Format, Bar Chart Format, and Report Inputs
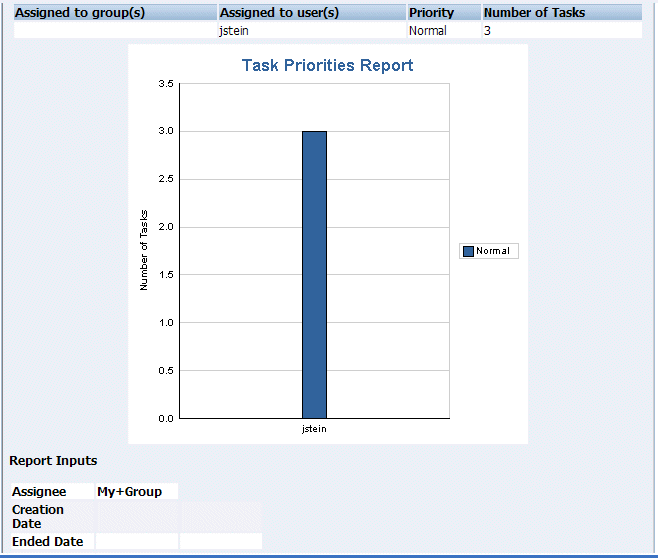
Description of "Figure 32-60 Report Display—Table Format, Bar Chart Format, and Report Inputs"
32.12.2.1 Unattended Tasks Report
Figure 32-61 shows an example of an Unattended Tasks report.
The report shows that the California group has 15 unattended tasks, the Supervisor group has 7 unattended tasks, and the LoanAgentGroup has 11 unattended tasks. The unattended (unclaimed) tasks in this report are all DocumentReview tasks. If multiple types of unattended task exists when a report is run, all task types are included in the report, and the various task types are differentiated by color.
32.12.2.2 Tasks Priority Report
Figure 32-62 shows an example of a Tasks Priority report.
The report shows that the California group, the Supervisor group, and the LoanAgentGroup each have 16 tasks of normal priority. The users rsteven and jcooper have 5 and 22 tasks, respectively, all normal priority. Priorities (highest, high, normal, low, lowest) are distinguished by different colors in the bar chart.
32.12.2.3 Tasks Cycle Time Report
Figure 32-63 shows an example of a Tasks Cycle Time Report.
The report shows that it takes 1 hour and 6 minutes on average to complete DocumentReview tasks, and 1 hour and 28 minutes on average to complete VacationApproval tasks. The bar chart shows the average cycle time in milliseconds.
32.12.2.4 Tasks Productivity Report
Figure 32-64 shows an example of a Tasks Productivity Report.
The report shows the number of tasks assigned to the California, LoanAgentGroup, and Supervisor groups. For individual users, the report shows that jcooper has 22 assigned tasks. In addition to his assigned tasks, jcooper has completed 2 tasks. The report shows that mtwain and rsteven have completed 6 and 11 tasks respectively. In the bar chart, the two task states—assigned and completed—are differentiated by color.
Note:
The Me and Group and Reportees options have been removed from the Productivity Report.
32.13 Accessing Oracle BPM Worklist in Local Languages and Time Zones
A user's preferred worklist language is configured from either the identity store or the browser and preferred time zone is configured from the identity store.
If no preference information is available, then the user's preferred language and time zone are determined by the system defaults. System defaults are based on the server settings for language and time zone.
If the custom resource bundle class in the browser locale is not available and the custom resource bundle class in default server locale is available, then the language is derived from the custom resource bundle class in default server locale.If the custom resource bundle class in the default server locale is also not available, then the language is derived from the custom base class.
If no user language preferences are set, or if they are set to a language not supported by Oracle BPM Worklist, then the Worklist Application defaults to English.
For more information, see the following sections for instructions on how to select Browser or Identity Provider in the worklist interface:
-
How to Specify the Login Page Realm Label for how to select Browser or Identity Provider from the Application Preferences page
32.13.1 Strings in Oracle BPM Worklist
Most strings in the worklist come from the Worklist Application bundle. By default, this is the class
oracle.bpel.services.workflow.resource.WorkflowResourceBundle
However, this can be changed to a custom resource bundle by setting the appropriate application preference (see How to Specify the Resource Bundle) or by providing an updated version of the default bundle class. See the Workflow Customizations sample for details.
For task attribute names, mapped attribute labels, and dynamic assignment function names, the strings come from configuring the resource property file WorkflowLabels.properties. This file exists in the wfresource subdirectory of the services config directory. See Introduction to Human Workflow Services for information on adding entries to this file for dynamic assignment functions and attribute labels.
For custom actions and task titles, the display names come from the message bundle specified in the task configuration file. If no message bundle is specified, then the values specified at design time are used. See Introduction to Human Workflow Services for information on how to specify message bundles so that custom actions and task titles are displayed in the preferred language.
Note:
You cannot use Korean characters in the human task name. In place of Korean characters, Oracle recommends using only letters A-Z, a-z, 0-9, and "_" in the human task name.
32.13.2 How to Change the Preferred Language, Display Names of Users, and Time Zone Settings if the Identity Store is LDAP-Based
If an LDAP-based provider such as Oracle Internet Directory is used, then language settings are changed in the Oracle Internet Directory community. Connect to the embedded LDAP server, where you can change language settings in the Oracle Internet Directory community.
-
Start an LDAP browser (for example, openLdap browser, ldapbrowser, jXplorer, and so on). See the documentation for your browser for instructions.
-
Connect to the LDAP server by providing the hostname, the port number on which the server is running, and the administration user credentials with which to log in.
-
For Embedded LDAP:
-
The default managed server port number is
7001. -
The administration credential username is
cn=admin. -
The administration password credential is accessible from the Oracle WebLogic Server Administration Console by selecting Security > Embedded LDAP for your domain.
For instructions on changing the default password credential, see, "Managing the Embedded LDAP Server" of Administering Security for Oracle WebLogic Server.
-
-
For Oracle Internet Directory:
-
The default port number is
3060. -
The administration username is
cn=orcladmin. -
The administration password is the password for the LDAP server.
-
-
-
To change a user's preferred language, navigate to the user entry, and either add or set the
preferredLanguageattribute. See Table 32-13 for a list of supported languages.You can also determine the language in which user names are displayed. To do this task, navigate to the user entry in the LDAP directory, then add or specify thedisplaynameattribute.Note:
-
The user name that appears in the Assignee column in the worklist does not honor the setting of the
displaynameattribute. -
Display names are taken from LDAP. So even when you change the display name, only the LDAP user name is displayed when you log into workspace.
To change the time zone setting, either add or set the
orclTimeZoneattribute. The format of the time zone string is Continent/Region. You can find the time zone values in the$JAVA_HOME/jre/lib/zidirectory. The directories specify the continent names, for example, Africa, Asia, America, and so on, while the files within the directories specify the regions. Some regions include subregions, for example America/Indiana/Indianapolis.When a user logs in, the worklist pages are rendered in the user's preferred language and time zone.
-
32.13.3 How to Change the Language in Which Tasks Are Displayed
For better performance, only the English language is listed for the LocaleList property in the System MBean Browser in Oracle Enterprise Manager Fusion Middleware Control. If you want to display the task title, category, and subcategory in other languages or add other languages, you must change the required language locale in the System MBean Browser.
Note:
You should add all languages at the very beginning. If you add another language later, then any tasks previously written in other languages no longer appear in the worklist. For example, if the previously specified language was English, and you later added French, then any tasks written before you added French no longer appear in the worklist.
To add or change a language:
-
In Oracle Enterprise Manager Fusion Middleware Control, right-click
soa-infrain the navigator, select Administration, then select System MBean Browser. -
Expand the following in sequence: Application Defined MBeans; then
oracle.as.soainfra.config; then Server: server_name; then WorkflowConfig. -
Click human-workflow.
To change the language:
-
In the Name column, click LocaleList.
-
In the Value field, click the value.
-
In the Name column, click Language.
-
In the Value field, change
ento the language value to use. -
Click Apply.
To add additional languages:
-
Click the Operations tab.
-
In the Name column, click
createLocale. -
In the Value field, enter a value. For better performance, ensure that you include only the languages that you need for task title, category, and subcategory.
-
Click Invoke.
-
32.13.4 How To Change the Language Preferences from a JAZN XML File
In the JAZN XML file, change the portion in bold to set the user's preferred language.
<preferredLanguage>en</preferredLanguage>
Oracle BPM Worklist supports the languages shown in Table 32-13.
Table 32-13 Languages Supported in Oracle BPM Worklist
| Language | Format |
|---|---|
|
English |
(en) |
|
French |
(fr) |
|
German |
(de) |
|
Spanish (International) |
(es) |
|
Italian |
(it) |
|
Portuguese (Brazil) |
(pt-BR) |
|
Japanese |
(ja) |
|
Korean |
(ko) |
|
Chinese (Traditional) |
(zh-TW) |
|
Chinese (Simplified) |
(zh-CN) |
|
Arabic |
(ar) |
|
Czech |
(cs) |
|
Danish |
(da) |
|
Dutch |
(nl) |
|
Finnish |
(fi) |
|
Greek |
(el) |
|
Hebrew |
(he) |
|
Hungarian |
(hu) |
|
Norwegian |
(no) |
|
Polish |
(po) |
|
Portuguese |
(pt) |
|
Romanian |
(ro) |
|
Russian |
(ru) |
|
Slovak |
(sk) |
|
Swedish |
(sv) |
|
Thai |
(th) |
|
Turkish |
(tr) |
|
Canadian French |
(fr-CA) |
32.13.5 What You May Need to Know Setting Display Languages in Worklist
Oracle BPM Worklist can be configured to set the language from the browser or from the identity store (LDAP). There are two levels to this setting: the application level and the user level. If the user preference is set, as LDAP in the user setting, it takes precedence in determining the worklist display language. If you do not set a language in LDAP, worklist follows default language as server locale. However, email notifications always follow the language set in LDAP. If no language is set in LDAP, email notifications follow server locale.
32.13.6 How To Change the Time Zone Used in the Worklist
The following is based on extracting a user's time zone from a JAZN XML file.
To change the time zone:
Change the string in bold to set the user's preferred time zone.
<timeZone>America/Los_Angeles</timeZone>
The format of the time zone string is Continent/Region. You can find the time zone values in the $JAVA_HOME/jre/lib/zi directory. The directories specify the continent names, for example Africa, Asia, America, and so on, while the files within the directories specify the regions. Some regions include sub-regions, for example America/Indiana/Indianapolis.
32.14 Creating Reusable Worklist Regions
Some features available in worklist are exposed as standalone reusable components that can be embedded in any application.
Moreover, these standalone task flows provide many customizations through parameters that enable you to build and customize a worklist application to meet requirements. All of the task flows are bundled in an ADF library that can be included in the embedding application.
32.14.1 How to Create an Application With an Embedded Reusable Worklist Region
The usage of each reusable worklist region is the same with a few exceptions. The following procedure provides the detailed steps to create an application and embed the Task List task flow in the application. Where applicable, notes on how to use other types of reusable worklist regions are provided.
To create an application with an embedded reusable worklist region:
-
Create new Fusion Web Application in Oracle JDeveloper. In this example, the name of the application is TaskListTaskFlowSample. Figure 32-65 provides details.
Figure 32-65 Creation of Application with an Embedded Reusable Worklist Region
Description of "Figure 32-65 Creation of Application with an Embedded Reusable Worklist Region" -
Open the View Controller Project Properties, Libraries and Classpath section, and click Add Library to add the following libraries in the class path:
-
BPM Worklist Components Add this library to add the task flow JAR
adflibTaskListTaskFlow.jarandadflibWorklistComponents.jar, which are required in the project's class path. -
BPM Services
-
WSRP Container
Figure 32-66 provides details.
Figure 32-66 Libraries and Classpath Section
Description of "Figure 32-66 Libraries and Classpath Section" -
-
If your application runs on non-SOA server, you must perform two additional steps.
-
Install the
oracle.soa.workflowshared library.If your server has
oracle.soa.workflow.wcalready installed, you do not need to installoracle.soa.workflow. -
Configure a foreign JNDI on the server.
If you run the Task List task flow in federated mode, you do not need to do this step. See "federatedMode" in section What You May Need to Know About Task List Task Flow for information about how to use the task flow in federated mode.
-
-
Select the View Controller project and choose File > New > Current Project Technologies > Web Tier > JSF Page to create a jspx file (for example,
testSample.jspx).Be sure to select Create as XML document (*.jspx) in the Create JSF Page dialog.
-
Choose
adflibTaskListTaskFlow.jarfrom the Components window. It contains the list of all the Task Flows and Regions. Figure 32-67 provides details. -
Drag and drop one of the task flow Regions to the jspx page, and select Region in the Create menu (for example, taskList-task-flow-definition for Task List Task Flow).
See the following sections for details about the task flow definitions:
-
If you chose flex-fields-task-flow-definition, rules-task-flow-definition, tasklist-reports-task-flow-definition, or taskList-task-flow-definition, pass the task flow parameters in the Edit Task Flow Binding dialog that appears.
-
A new entry is added to the
pagenamePagedef.xmlfile.For example, adding the taskList-task-flow-definition results in the following new entry:
<taskFlow id="taskListtaskflowdefinition1" taskFlowId="/WEB-INF/taskList-task-flow-definition.xml#taskList-task- flow-definition" xmlns="http://xmlns.oracle.com/adf/controller/binding"> <parameters> <parameter id="taskFlowMode" value="MODE_WORKLIST"/> <parameter id="showTaskDetailsPanel" value="true"/> <parameter id="showActionDropdown" value="true"/> <parameter id="showViewFilter" value="true"/> <parameter id="showStatusFilter" value="true"/> <parameter id="showSearchControl" value="true"/> </parameters> </taskFlow> -
Add the shared libraries in the
weblogic-application.xmlfile. If you haveoracle.soa.workflow.wcinstalled on your server, add that library.<library-ref> <library-name>oracle.soa.workflow</library-name> </library-ref>If the generated custom application is a module, use
weblogic.xml.<library-ref> <library-name>oracle.soa.worklist.webapp</library-name> </library-ref>Before deploying the application, see How to Set Up the Deployment Profile.
32.14.2 How to Set Up the Deployment Profile
Before deploying the application, you must edit the deployment profile.
To edit the deployment profile
- Select the View Controller project and choose File > New > General > Deployment Profiles, select WAR File, and click OK.
- Select WEB-INF/lib > Filters, and check
adflibTaskListTaskFlow.jar,adflibWorklistComponents.jarandwsrp-container.jar.
32.14.3 How to Prepare Federated Mode Task Flows For Deployment
If you are using the task flow in federated mode, you must pass the list of federated servers to the task flow. See "federatedMode" in section What You May Need to Know About Task List Task Flow for details.
If the task flow is used in the federated mode, then enable global trust between the federated servers. This is done so that the already authenticated user token is passed to all the federated servers passed.
Do the below steps for all the federated servers and restart all the servers. It is very important that you restart all the servers.
To restart the servers:
- Login to the Oracle Weblogic Server console.
- Select the domain name soainfra under Domain Structures. The domain name may be different if a SOA server is not used.
- Select the Security tab.
- Select the Advanced link (near the bottom Save button).
- Enter a password in the Credential field. (The same password must be given for all the federated servers).
- Click Save.
- Restart the server.
32.14.4 What You May Need to Know About Task List Task Flow
The Task List task flow takes in the parameters to control the display behavior of the embedded region. Figure 32-68 provides details.
Some of the parameters are listed below.
-
federatedMode
-
federatedServers
-
showServerColumn
-
wfCtxID
federatedMode
If this is passed as true, the task list is shown in the federated mode. To run the task flow in federated mode, the list of federated servers must be passed to the task flow. You can pass the federated servers list to the task flow in one of the following two ways.
-
Provide the client configuration file
wf_client_config.xmlin the class path (APP-INF\classes\wf_client_config.xmlat the EAR level, or theWEB-INF\classesof the web application). The client configuration file contains all federated server details. -
Construct a JAXB object, which contains the federated servers list. This JAXB object can be passed to the task flow through the
federatedServersparameter. See "federatedServers" below for information about constructing the JAXB object.
If both the client configuration file (wf_client_config.xml) and the JAXB object were provided to the task flow, the JAXB object takes the precedence.
federatedServers
This parameter is a JAXB object that contains the list of servers if the task flow is run in federated mode. This parameter takes precedence over the client configuration file (wf_client_config.xml) if it were also provided. See the code sample below for details about constructing the JAXB object (WorkflowServicesClientConfigurationType).
Make sure that you set one of the servers as default, as shown in the code sample below. Only one server is required to be designated as the default. Also, verify that the server you designate as the default is excluded from the federated servers list. The relevant code for doing this is in bold in the example.
The default server is used when you have many servers defined in wf_client_config.xml or in the JAXB object, but the workflow client is desired for a single server. There are a few legacy APIs that do not take a server name as a parameter. To support such legacy APIs, your must define a single server as the default server, otherwise any legacy APIs that do not take a server name do not work.
import oracle.bpel.services.workflow.client.config.IdentityPropagationType;
import oracle.bpel.services.workflow.client.config.PolicyReferenceType;
import oracle.bpel.services.workflow.client.config.PolicyReferencesType;
import oracle.bpel.services.workflow.client.config.RemoteClientType;
import oracle.bpel.services.workflow.client.config.ServerType;
import oracle.bpel.services.workflow.client.config.SoapClientType;
import oracle.bpel.services.workflow.client.config.WorkflowServicesClientConfigurationType;

WorkflowServicesClientConfigurationType wscct =
   new WorkflowServicesClientConfigurationType();

List<ServerType> servers = wscct.getServer();

/**** Setting default server in the list ****/

ServerType defalutServer = new ServerType();
servers.add(defalutServer);

defalutServer.setDefault(true);
defalutServer.setExcludeFromFederatedList(true);
defalutServer.setName("default");

RemoteClientType rct = new RemoteClientType();
rct.setServerURL("t3://myhost.us.example.com:7001");
rct.setInitialContextFactory("weblogic.jndi.WLInitialContextFactory");
rct.setParticipateInClientTransaction(false);
defalutServer.setRemoteClient(rct);

SoapClientType sct = new SoapClientType();
PolicyReferencesType prts = new PolicyReferencesType();

PolicyReferenceType prt = new PolicyReferenceType();
prt.setEnabled(true);
prt.setCategory("security");
prt.setUri("oracle/wss10_saml_token_client_policy");
prts.getPolicyReference().add(prt);

IdentityPropagationType ipt = new IdentityPropagationType();
ipt.setMode("dynamic");
ipt.setType("saml");
ipt.setPolicyReferences(prts);

sct.setRootEndPointURL("http://myhost.us.example.com:7001");
sct.setIdentityPropagation(ipt);

defalutServer.setSoapClient(sct);

/****** Setting Federated Server 1 to the list ****/

ServerType server1 = new ServerType();
servers.add(server1);
server1.setName("Human Resource");

RemoteClientType rct1 = new RemoteClientType();
rct1.setServerURL("t3://myhost.us.example.com:7001");
rct1.setInitialContextFactory("weblogic.jndi.WLInitialContextFactory");
rct1.setParticipateInClientTransaction(false);
server1.setRemoteClient(rct1);

SoapClientType sct1 = new SoapClientType();
PolicyReferencesType prts1 = new PolicyReferencesType();

PolicyReferenceType prt1 = new PolicyReferenceType();
prt1.setEnabled(true);
prt1.setCategory("security");
prt1.setUri("oracle/wss10_saml_token_client_policy");
prts1.getPolicyReference().add(prt1);
IdentityPropagationType ipt1 = new IdentityPropagationType();
ipt1.setMode("dynamic");
ipt1.setType("saml");
ipt1.setPolicyReferences(prts1);

sct1.setRootEndPointURL("http://myhost.us.example.com:7001");
sct1.setIdentityPropagation(ipt1);

server1.setSoapClient(sct1);

/****** Setting Federated Server 2 to the list ****/

ServerType server2 = new ServerType();
servers.add(server2);
server2.setName("Financials");

RemoteClientType rct2 = new RemoteClientType();
rct2.setServerURL("t3://myhost.us.example.com:7001");
rct2.setInitialContextFactory("weblogic.jndi.WLInitialContextFactory");
rct2.setParticipateInClientTransaction(false);
server2.setRemoteClient(rct2);

SoapClientType sct2 = new SoapClientType();
PolicyReferencesType prts2 = new PolicyReferencesType();

PolicyReferenceType prt2 = new PolicyReferenceType();
prt2.setEnabled(true);
prt2.setCategory("security");
prt2.setUri("oracle/wss10_saml_token_client_policy");
prts2.getPolicyReference().add(prt2);

IdentityPropagationType ipt2 = new IdentityPropagationType();
ipt2.setMode("dynamic");
ipt2.setType("saml");
ipt2.setPolicyReferences(prts2);

sct2.setRootEndPointURL("http://myhost.us.example.com:7001");
sct2.setIdentityPropagation(ipt2);

server2.setSoapClient(sct2);
showServerColumn
If the task flow is run in federated mode, the server column in the task list is not shown by default. The server column is shown if this parameter is passed as true, otherwise it is not.
wfCtxID
This is a workflow context token string. It is used to create workflow context inside the task flow. If the application is SSO-enabled, or it is secured using ADF security, this parameter is not required, otherwise this is a required parameter. You can get the workflow context ID as shown in the code sample below:
IWorkflowContext wfCtx =  wfSvcClient.getTaskQueryService().authenticate(username,password,realm,null);
wfCtxID = wfCtx.getToken();
32.14.5 What You May Need to Know About Certificates Task Flow
The user can upload the certificate to use to sign a decision, as shown in the following graphic. When signing a task outcome using your certificate, you must upload the entire chain of certificates through Oracle BPM Worklist as a .P7B (PKCS7 format) file, not only the one certificate issued to you by the certificate issuer.
A digital certificate contains the digital signature of the certificate-issuing authority, so that anyone can verify that the certificate is real. A digital certificate establishes the participant's credentials. It is issued by a certification authority (CA). It contains your name, a serial number, expiration dates, a copy of the certificate holder's public key (used for encrypting messages and digital signatures), and the digital signature of the certificate-issuing authority, so that a recipient can verify that the certificate is real.
Certificates task flow does not have any parameters. Figure 32-69 provides details.
32.14.6 What You May Need to Know About the Reports Task Flow
Figure 32-70 shows the unattended tasks report.
The following worklist reports are available for task analysis.
Unattended Tasks
Unattended Tasks provides an analysis of tasks assigned to users' groups or reportees' groups that have not yet been acquired (the "unattended" tasks).
-
Assignee -This option (required) selects tasks assigned to the user's group (My Group), tasks assigned to the reportee's groups (Reportees), tasks where the user is a creator (Creator), or tasks where the user is an owner (Owner).
-
Creation Date - An optional date range
-
Expiration Date - An optional date range
-
Task State - The state (optional) can by Any, Assigned, Expired, or Information Requested.
-
Priority - The priority (optional) can be Any, Highest, High, Normal, Low, or Lowest.
Tasks Priority
Tasks Priority provides an analysis of the number of tasks assigned to a user, reportees, or their groups, broken down by priority.
-
Assignee - Depending on the assignee that you select, this required option includes tasks assigned to the logged-in user (My), tasks assigned to the user and groups that the user belongs to (My & Group), or tasks assigned to groups to which the user's reportees belong (Reportees).
-
Creation Date - An optional date range
-
Ended Date - An optional date range for the end dates of the tasks to be included in the report.
-
Priority - The priority (optional) can be Any, Highest, High, Normal, Low, or Lowest.
Tasks Cycle Time
Tasks Cycle Time provides an analysis of the time taken to complete tasks from assignment to completion based on users' groups or reportees' groups.
-
Assignee - Depending on the assignee that you select, this required option includes your tasks (My) or tasks assigned to groups to which your reportees belong (Reportees).
-
Creation Date - An optional date range
-
Ended Date - An optional date range for the end dates of the tasks to be included in the report.
-
Priority - The priority (optional) can be Any, Highest, High, Normal, Low, or Lowest.
Tasks Productivity
Tasks Productivity provides an analysis of assigned tasks and completed tasks in a given time period for a user, reportees, or their groups.
-
Assignee - Depending on the assignee that the user selects, this required option includes the user's tasks (My & Group) or tasks assigned to groups to which the user's reportees belong (Reportees).
-
Creation Date (range) - An optional creation date range. The default is one week.
-
Task Type - Use the Search (flashlight) icon to select from a list of task titles. All versions of a task are listed on the Select Workflow Task Type page (optional).
Tasks Time Distribution
Tasks Time Distribution provides the time an assignee takes to perform a task.
-
Assignee - Depending on the assignee that the user selects, this required option includes the user's tasks (My & Group) or tasks assigned to groups to which the user's reportees belong (Reportees).
-
From...to (date range) - An optional creation date range. The default is one week.
-
Task Type - Use the Search (flashlight) icon to select from a list of task titles. All versions of a task are listed on the Select Workflow Task Type page (optional).
32.14.7 What You May Need to Know About Application Preferences Task Flow
Application preferences customize the appearance of the worklist. Administrators can specify the following:
-
Login page realm label-If the identity service is configured with multiple realms, then the Oracle BPM Worklist login page displays a list of realm names.
LABEL_LOGIN_REALMspecifies the resource bundle key used to look up the label to display these realms. The term realm can be changed to fit the user community. Terms such as country, company, division, or department may be more appropriate. Administrators can customize the resource bundle, specify a resource key for this string, and then set this parameter to point to the resource key. -
Global branding icon-This is the image displayed in the top left corner of every page of the worklist. (The Oracle logo is the default.) Administrators can provide a
.gif,.png, or.jpgfile for the logo. This file must be in thepublic_htmldirectory. -
Resource bundle-An application resource bundle provides the strings displayed in the worklist. By default, this is the class at
oracle.bpel.worklistapp.resource.WorklistResourceBundle. Figure 32-71 provides details.
32.14.8 What You May Need to Know About Mapped Attributes Task Flow
Human workflow mapped attributes store and query use case-specific custom attributes. These custom attributes typically come from the task payload values. Storing custom attributes in mapped attributes provides the following benefits:
-
They can be displayed as a column in the task listing.
-
They can filter tasks in custom views and advanced searches.
-
They can be used for a keyword-based search.
For example the Requester, PurchaseOrderID, and Amount fields in a purchase order request payload of a task can be stored in the mapped attributes. An approver logging into Oracle BPM Worklist can see these fields as column values in the task list and decide which task to access. The user can define views that filter tasks based on the mapped attributes.
For example, a user can create views for purchase order approvals based on different amount ranges. If the user must also retrieve tasks at some point related to a specific requester or a purchase order ID, they can specify this in the keyword field and perform a search to retrieve the relevant tasks. Figure 32-72 provides details.
32.14.9 What You May Need to Know About Rules Task Flow
Rules act on tasks, either a specific task type, or all the tasks assigned to a user or group. The graphic below shows where you set rules, including vacation rules.
A rule cannot always apply in all circumstances in which it is used. For example, if a rule applies to multiple task types, it may not be possible to set the outcome for all tasks, since different tasks can have different outcomes.
Rules are executed in the order in which they are listed. Rules can be reordered by using the up and down buttons in the header. If a rule meets its filter conditions, then it is executed and no other rules are evaluated. For your rule to execute, you must be the only user assigned to that task. If the task is assigned to multiple users (including you), the rule does not execute.
The showOtherUsersRules parameter takes a boolean value. When it is passed as True other users' rules are displayed, and when it is passed as False other users' rules are not shown. In addition, this user has to have required permission to view other user rules. Figure 32-73 and Figure 32-74 provide details.
32.14.10 What You May Need to Know About Approval Groups Task Flow
Approval groups are either a statically defined or a dynamically generated list of approvers. Approval groups usually are configured by the process owner using the worklist application. Typically, they are used to model subject matter experts outside the transaction's managerial chain of authority, such as human resources or legal counsel, that must act on a task before or after management approval.
Static approval groups are predetermined lists of approvers, while dynamic approval groups generate approver lists at runtime. Dynamic approval groups require:
-
delivery of an implementation according to the dynamic approver list interface by the developer
-
registration of the implementation as a dynamic approval group using the Oracle BPM Worklist's UI by the IT department
-
availability of the class file in a globally well-known directory that is part of the SOA class path
32.14.11 What You May Need to Know About Task Configuration Task Flow
Task Configuration is a web-based application in Worklist Application that enables business users and administrators to review and modify rules that were predefined by the workflow designer. These predefined rules can be changed for a specific customer based on the customer's applicable corporate policies.
For example, suppose that a corporate policy requires two levels of approvals for expense amounts greater than 1000. Suppose further that this policy is changed to require three levels. You can use Task Configuration to change the rule rather than having your IT department modify the rule in the underlying process and then deploy it again. Any change to the rule is applied starting with the next instance, and instances already in progress use the current rule definitions.
Task Configuration enables you to edit the event driven and data-driven rules associated with an approval flow at runtime—that is, when the workflow has already been deployed.
32.15 Java Code for Enabling Customized Applications in Worklist Application
Given below is the Java Code for Enabling Customized Applications in Worklist Application.
How to Enable Customized Applications and Links explained how to specify a custom application by using the Application Preferences page of Worklist Application. The Java code for performing this specification is as follows:
package view.customisationimpl;
import java.util.ArrayList;
import java.util.HashMap;
import java.util.List;
import java.util.Map;

import oracle.bpel.services.workflow.client.IWorkflowServiceClient;
import oracle.bpel.services.workflow.runtimeconfig.IRuntimeConfigService;
import oracle.bpel.services.workflow.runtimeconfig.model.AttributeLabelType;
import oracle.bpel.services.workflow.runtimeconfig.model.AttributeLabelUsageList;
import oracle.bpel.services.workflow.runtimeconfig.model.AttributeLabelUsages;
import oracle.bpel.services.workflow.verification.IWorkflowContext;
import oracle.bpm.ui.customization.CustomLink;
import oracle.bpm.ui.customization.IBPMUICustomizations;

public class WorkspaceCustomisationImpl implements IBPMUICustomizations {
    private static Map displayNameMap = new HashMap();
    public WorkspaceCustomisationImpl() {
        displayNameMap.put("instanceId", "Instance Id");
        displayNameMap.put("protectedTextAttribute1", "Business Status");
    }
    public List<CustomLink> getCustomGlobalLinks() {
        CustomLink globalLink1 =
            new CustomLink("Oracle Home Page", "www.oracle.com", null);
        CustomLink globalLink2 =
            new CustomLink("Self Services Application", "http://global-ebusiness.example.com/",
                           null);
        CustomLink globalLink3 =
            new CustomLink("BUG DB", "https://bug.example.com/", null);
        List<CustomLink> globalLinks = new ArrayList<CustomLink>();
        globalLinks.add(globalLink1);
        globalLinks.add(globalLink2);
        globalLinks.add(globalLink3);
        return globalLinks;
    }
    public String getColumnNames() {
        return "title,taskNumber,instanceId,creator,protectedTextAttribute1";
    }

    private static void initDisplayMap(IWorkflowServiceClient client,
        IWorkflowContext context) {
        // you can use service to load all label namess for text attributes
        if (displayNameMap == null) {
            synchronized (String.class) {
                if (displayNameMap == null) {
                    displayNameMap = new HashMap();
                    try {
                        IRuntimeConfigService service =
                            client.getRuntimeConfigService();
                        AttributeLabelUsageList list =
                            service.getAttributeLabelUsages(context, "Text");
                        List<AttributeLabelUsages> list1 =
                            list.getAttributeLabelUsages();
                        for (AttributeLabelUsages usage : list1) {
                            AttributeLabelType type = usage.getLabel();
                            displayNameMap.put(type.getTaskAttribute(),
                                               type.getLabelName());
                        }
                    } catch (Exception exc) {
                    }
                }
            }
        }
    }

    public String getColumnDisplayName(IWorkflowServiceClient client,
                                       IWorkflowContext context,
                                       java.lang.String colName) {
        initDisplayMap(client, context);
        return (String)displayNameMap.get(colName);
    }
}