9 Oracle JCA Adapter for Database
Introduction to the Oracle Database Adapter
The Oracle Database Adapter enables SOA Composite Applications to communicate with Oracle databases or third-party databases through JDBC.
Functional Overview
This section provides a functional overview of the Oracle Database Adapter. The Oracle Database Adapter enables Oracle SOA Suite and Oracle Fusion Middleware to communicate with database end points. These include Oracle database servers and any relational databases that follow the ANSI SQL standard and which provide JDBC drivers, such as Oracle Cloud Infrastructure database (19c, 18c, 12.1.0.2, and 12.2.0.1) and Oracle Autonomous Transaction Processing (ATP) database (19c, 18c). See Stored Procedure and Function Support for information about patches that may be required to connect to Oracle Database 18c or later.
The principle of the tables and views in the Oracle Database Adapter is to expose to SOA tables and SQL as transparently and non-intrusively as possible. From an integration standpoint, tables and SQL are what relational database products have in common, so a generic solution focused on what is standard has the greatest reach. In exposing databases to SOA, it is also about combining the technologies of SQL and XML, the former an ideal language for querying information, the latter an ideal format for transporting and representing information. While stored procedure support is less standard across databases, Oracle Database Adapter provides support for stored procedures as the guide describes.
The Oracle Database Adapter is a JCA 1.5 connector, which runs on the Oracle WebLogic Server. It relies on an underlying JDBC connector/driver to enact the database communication. In contrast to JDBC, it is non-programmatic. The interaction (series of SELECT, UPDATE, INSERT) is loosely modeled using the Adapter Configuration Wizard. The inputs/outputs are XML, most easily seen as input parameters and result sets converted to XML. These XML inputs and outputs allow the Oracle Database Adapter services to be plugged into Oracle Fusion Middleware.
To access an existing relational schema, you must create an application and a SOA project to use the Adapter Configuration Wizard to perform the following:
-
Import a relational schema (one or more related tables) and map it as an XML schema (XSD).
For more information, see Relational-to-XML Mapping.
-
Abstract SQL operations such as
SELECT,INSERT, andUPDATEas Web services.For more information, see SQL Operations as Web Services.
-
Have database events initiate an Oracle Fusion Middleware process.
Although Oracle Streams Advanced Queuing (Oracle AQ) is an Oracle Database feature, you use the separate, specialized Oracle JCA Adapter for AQ to integrate with Oracle AQ. For more information, see Oracle JCA Adapter for AQ.
For non-relational and legacy systems (with a few exceptions such as DB2 on AS/400), application and mainframe adapters are available. For more information about application and mainframe adapters, see:
For more information on the Oracle Database Adapter, see:
Oracle Database Adapter Integration with Oracle BPEL PM
When the Oracle Database Adapter is used to poll for database events (usually
an INSERT operation on an input table) and initiate a process, it is
called an exposed service. In an Oracle BPEL process, it is a partner link tied
to a Receive activity. The expression inbound (from database into SOA) is
commonly used.
When the Oracle Database Adapter is used to invoke a one-time DML statement,
such as INSERT or SELECT, in a Mediator component or a
SOA composite, it is called a service reference. In an Oracle BPEL process, it is
a partner link tied to an Invoke activity. The expression outbound (from SOA out
to the database) is used.
Design Overview
This section provides an overview of the design of the Oracle Database Adapter. Figure 9-1 shows how the Oracle Database Adapter interacts with the various design-time and deployment artifacts.
Figure 9-1 How the Oracle Database Adapter Works
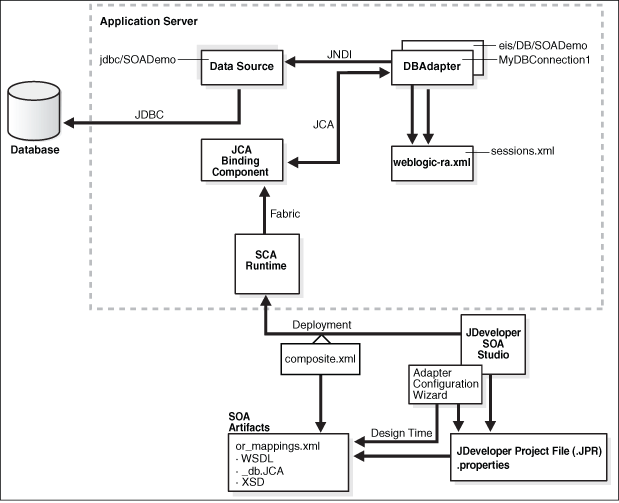
Description of "Figure 9-1 How the Oracle Database Adapter Works"
The Oracle Database Adapter is a JCA 1.5 connector, which is deployed to the application server during installation.
The Oracle Database Adapter consists of multiple instances; each instance represents a connection to a database end point. Different SOA processes may point to the same adapter instance (database), while different service endpoints in a SOA process may point to different adapter instances (databases).
Because each adapter instance points to a single database, there is a one-to-one correspondence from adapter instances to application server data sources. Out of the box there is a single Oracle Database Adapter instance named eis/DB/SOADemo, which points to the data source jdbc/SOADataSource.
The list of adapter instances is stored in a deployment descriptor file, weblogic-ra.xml on Oracle WebLogic Server. (It is inside of DbAdapter.rar, which contains also the Java class files in DBAdapter.jar). Configuring an Oracle Database Adapter instance is more about creating the underlying data source: getting the correct JDBC driver and connection URL.
For more information, see JDBC Driver and Database Connection Configuration.
However weblogic-ra.xml entries occasionally have more than simply the name of the underlying data source. These properties are detailed further under Database Adapter Deployment.
While at runtime you have Oracle Database Adapter instances, at design time you have the Adapter Configuration Wizard (link). You can run it once to generate a single adapter service end point, and then multiple times in edit mode to make incremental changes to each. It generates all the adapter related artifacts required when deploying a SOA composite as Table 9-1 lists.
Table 9-1 Adapter Configuration Wizard Generated SOA Composite Adapter Artifacts
| File | Description |
|---|---|
|
|
This is an abstract WSDL, which defines the service end point in terms of the name of the operations and the input and output XML elements. |
|
|
This contains the XML file schema for these input and output XML elements. Both these files form the interface to the rest of the SOA project. |
|
|
This is an internal file. It is a TopLink specific file, which is used to describe the mapping between a relational schema and the XML schema. It is used at runtime. |
|
|
This contains the internal implementation details of the abstract WSDL. It has two main sections, location and operations. Location is the JNDI name of an adapter instance, that is, |
|
|
This is also an internal file. It is created when tables are imported, and information about them is saved. It is used only at design time. At runtime, the location is used to look up the adapter instance which executes the service. Based on the properties in the |
Complete Walkthrough of the Database Adapter Configuration Wizard
Learn how to define Oracle Database Adapter using the Adapter Configuration Wizard.
This section describes the various Oracle Database Adapter concepts through a use case, which is a complete walkthrough of the Adapter Configuration Wizard. In addition, this use case also describes how by using the Adapter Configuration Wizard, you can import tables from the database, specify relationships spanning multiple tables, generate corresponding XML schema definitions, and create services to expose the necessary SQL or database operations. These services are consumed to define partner links that are used in the BPEL process. You use the Adapter Configuration Wizard to both create and edit adapter services.
This section includes the following topics:
Creating an Application and a SOA Project
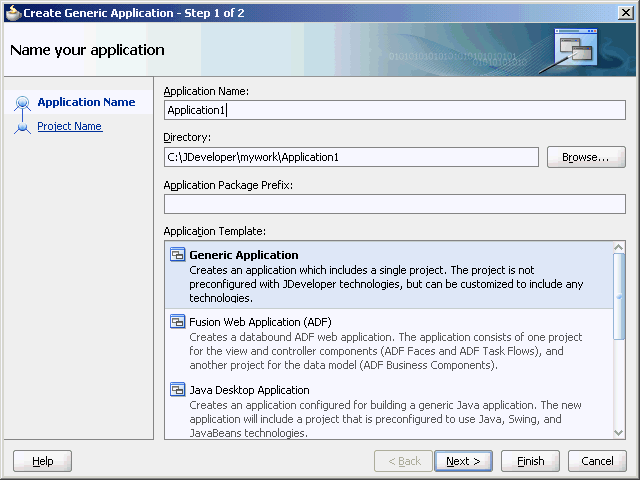
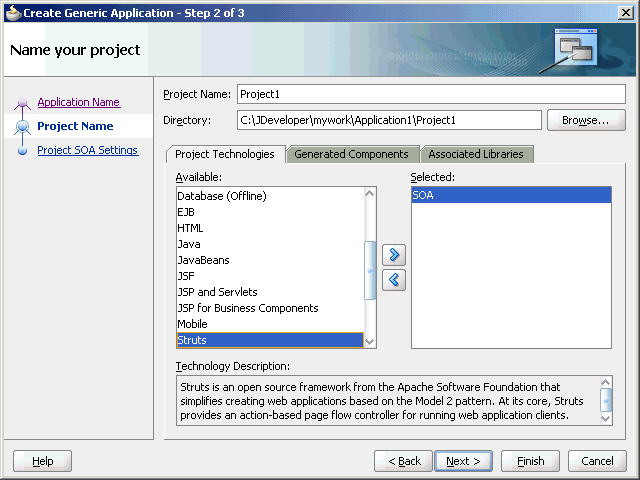
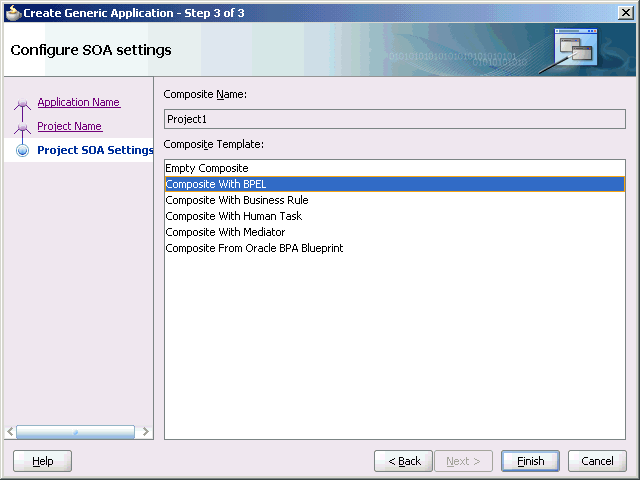
You must create an JDeveloper application to contain the SOA composite. To create an application and a SOA project, perform the following steps:
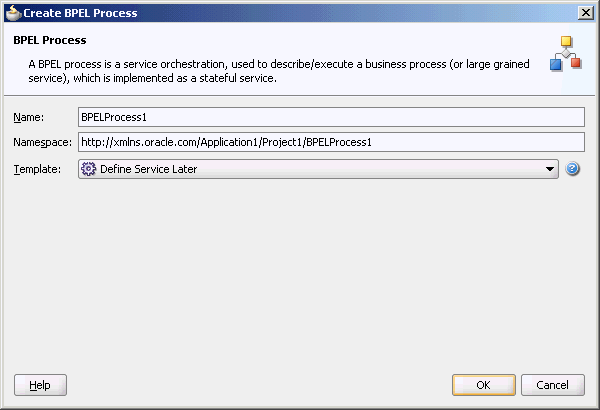
Defining an Oracle Database Adapter
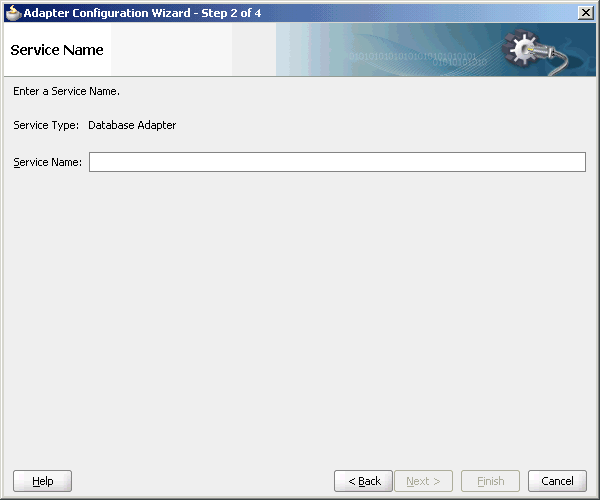
The next step is to define an Oracle Database Adapter service. Perform the following steps to create an Oracle Database Adapter service:
See Connecting to a Database to continue using the Adapter Configuration Wizard.
Connecting to a Database
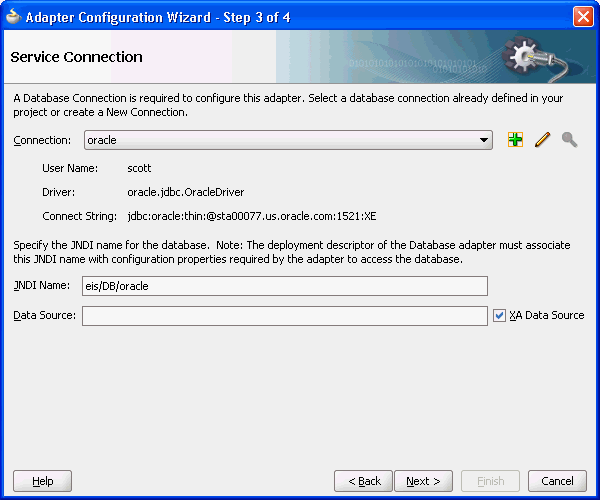
Figure 9-7 shows where you select the database connection that you are using with the service. This is the database from which you import tables to configure the service. You can re-create it here in each new JDeveloper application you create.
You can provide a Java Naming and Directory Interface (JNDI) name to identify the database connection, as the default name that is provided is eis/DB/<ConnectionNameInJDev>.
For more information, see Database Adapter Deployment.
Figure 9-7 The Adapter Configuration Wizard: Service Connection Page
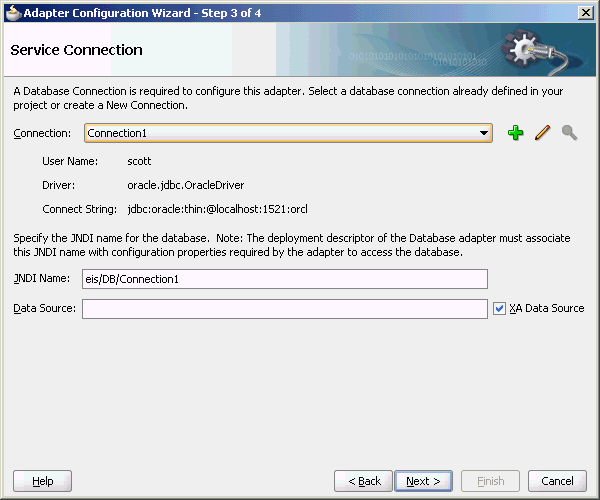
Description of "Figure 9-7 The Adapter Configuration Wizard: Service Connection Page"
Note the following:
-
In production environments, it is recommended that you add the JNDI entry to the adapter deployment descriptor (
weblogic-ra.xml). This way, the Oracle Database Adapter performs better by working in a managed mode.For information about creating a data source and an outbound connection pool, see Adding an Adapter Connection Factory.
-
When you click Next, a connection to the database is attempted. If a connection cannot be made, you cannot proceed to the next window, even if you are editing an existing partner link.
See Selecting the Operation Type to continue using the Adapter Configuration Wizard.
Selecting the Operation Type
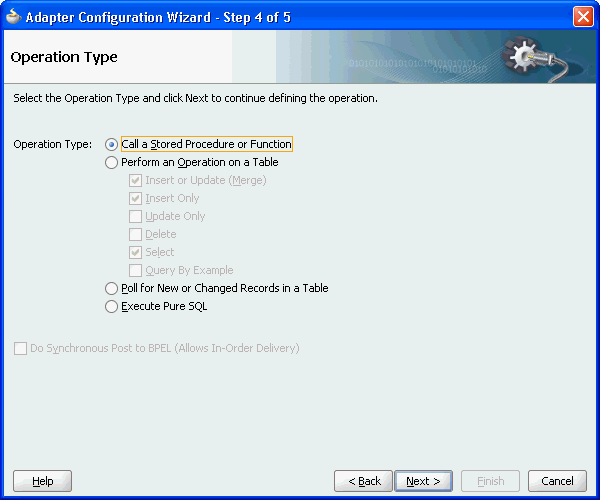
Figure 9-8 shows where you indicate the type of operation you want to configure for this service.
Figure 9-8 The Adapter Configuration Wizard: Operation Type Page

Description of "Figure 9-8 The Adapter Configuration Wizard: Operation Type Page"
The following operation types are available:
-
Call a Stored Procedure or Function
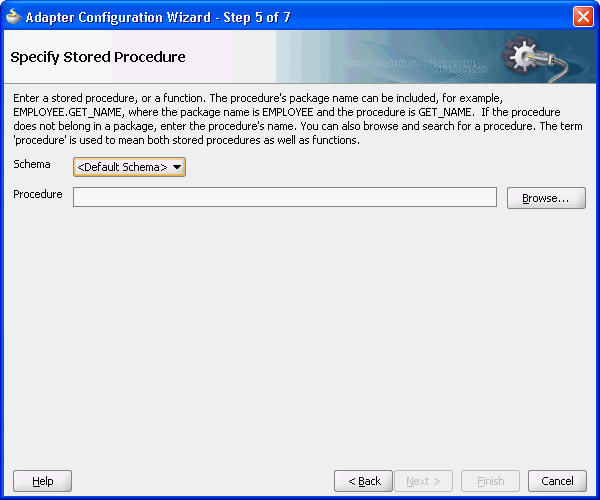
Select this option if you want the service to execute a stored procedure or function. For more information, see Stored Procedure and Function Support.
-
Perform an Operation on a Table
Select this option for outbound operations. You can select Insert or Update, Insert Only, Update Only, Delete, Select, or any combination of the six. These operations loosely translate to SQL
MERGE,INSERT,UPDATE,DELETE, andSELECToperations.For more information, see DML Operations.
Note:
The operation
Update Onlysometimes performs inserts/deletes for child records. That is, an update to Master could involve a new or deleted detail. So if the input to update contains only one detail record, then the other detail records in the table are deleted. -
Poll for New or Changed Records in a Table
Select this option for an inbound operation (that is, an operation that is associated with a Receive activity). This operation type polls a specified table and returns for processing any new rows that are added. You can also specify the polling frequency.
For more information, see Polling Strategies.
The following is a list of polling operations that you can perform after the data is read from the database, as shown in Figure 9-9:
-
Execute Pure SQL
Useful when dealing with arbitrarily complex statements, aggregate queries (result is not row-based), and
XMLTypecolumns. See Pure SQL - XML Type Support to follow this usage of the Adapter Configuration Wizard.Note:
Schema Bound XML tables are not supported.
Otherwise, see Selecting and Importing Tables to continue using the Adapter Configuration Wizard.
Selecting and Importing Tables
Figure 9-10 shows where you select the root database table for your operation. If you are using multiple related tables, then this is the highest-level table (or highest parent table) in the relationship tree.
Figure 9-10 The Adapter Configuration Wizard: Select Table
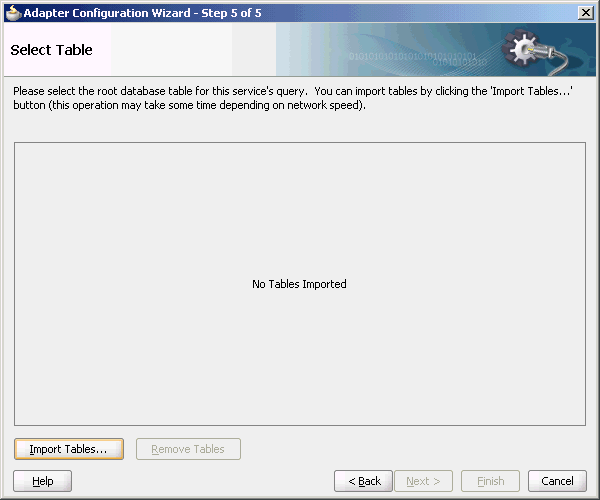
Description of "Figure 9-10 The Adapter Configuration Wizard: Select Table"
Selecting Import Tables launches a sub-wizard, which lets you search for and select multiple tables to import from the database. Removing a table removes (or undoes) any relationships on related tables that remain. If any underlying tables have changed when running this wizard in edit mode, you get a warning showing you what changes have occurred. To reconcile, import the tables again. If you click Import Tables and select multiple tables, then relationships between these tables are inferred based on the foreign key constraints. However if you launch Import Tables once for each table imported, then no relationships are inferred.
Note:
If you reimport a table, you lose any custom relationships you may have defined on that table and any custom WHERE clauses (if the table being imported was the root table).
See Defining Primary Keys to continue using the Adapter Configuration Wizard.
Defining Primary Keys
If any of the tables you have imported do not have primary keys defined on the database, you are prompted to provide a primary key for each one, as shown in Figure 9-11. You must specify a primary key for all imported tables. You can select multiple fields to specify a multipart primary key.
Figure 9-11 The Adapter Configuration Wizard: Define Primary Keys Page
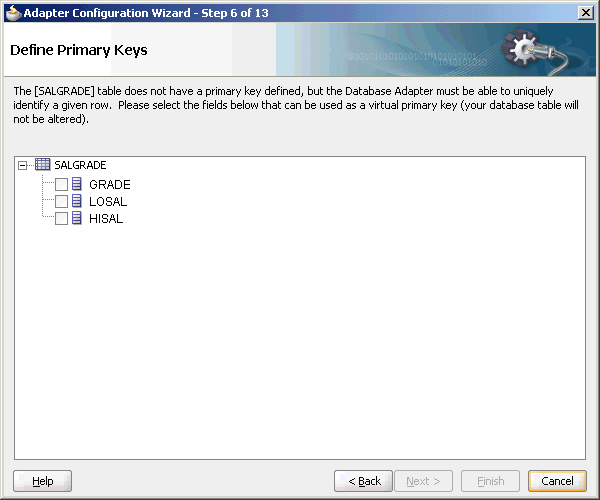
Description of "Figure 9-11 The Adapter Configuration Wizard: Define Primary Keys Page"
The primary key that you specify here is recorded on the offline database table and is not persisted back to the database schema; the database schema is left untouched.
See Creating Relationships to continue using the Adapter Configuration Wizard.
Notes:
-
The Oracle Database Adapter is case sensitive. Therefore, it does not support case insensitivity in a database. In other words, make sure that the case used by the Oracle Database Adapter (for example, for a primary key value) is the same as the case used by the database. Otherwise, errors may occur.
-
Note that the Oracle Database Adapter only supports tables where there is a primary key defined. If primary key constraints have not been defined on a table explicitly, then you must provide one at design time while defining the Oracle Database Adapter by using the Adapter Configuration Wizard. If you do not provide a valid primary key, then the unique constraint is not guaranteed, and this could result in possible loss of messages at runtime. That is, rows with duplicate primary key values are likely to be lost. Also, you should ensure that you primary key is less than 100 bytes.
-
Oracle recommends that you use
varcharinstead ofcharfor primary key columns, otherwise you must set theweblogic-ra.xmlpropertyshouldTrimStringstofalse. The truncation of trailing spaces could cause the primary key to be read incorrectly, making it impossible to update read rows as processed.
Using ROWID as the Primary Key
Oracle Database Adapter ROWID support now allows you to choose the ROWID as the primary key for certain supported operations.
When you import a table with no primary key constraint, you are prompted to select the set of columns that can be used to uniquely identify a row (see Figure 9-12). For an integration scenario this might require more knowledge about the target schema than is had, and can introduce errors. For example, picking a non-unique column here can lead to operations updating multiple unintended rows, or Selects returning the some rows twice and not others.
On an Oracle database you can choose to use the ROWID pseudo column as the primary key, which is less error prone. In some case, it is faster than a regular index as ROWID is the direct physical address.
A ROWID is a pseudo-column on Oracle tables. A pseudo-column is a column that cannot be updated directly by the user, is not a column created by the user, and does not appear in any column meta-data views or is returned from a select * query.
Use of ROWID has certain restrictions. In such cases, the option are grayed out on the user interface and unselectable.
ROWID can only be used for operations which either do not need to uniquely identify a row (Insert, Select) or which only need to identify rows it has already read in the same transaction (most polling operations). Because the physical address has no meaning external to the database and is not part of the row (and the value is stable within a transaction), it cannot be used with operations which must uniquely identify a row using the columns of the row itself (Merge, Delete, Select by primary key).
ROWID can only be used in conjunction with a single table, as relationships between tables require rows to have explicit primary keys.
ROWID support is not applicable to Pure SQL or Stored procedures.
Using Rowid on the Primary Key Page
When you import a table that does not have a primary key set, the wizard displays the primary key page. See Figure 9-12.
Figure 9-12 Defining Primary Key Using Rowid
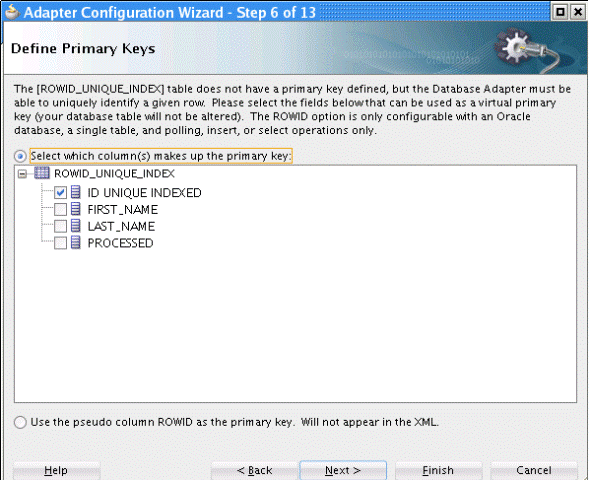
Description of "Figure 9-12 Defining Primary Key Using Rowid"
From this page you can either:
-
Select columns to create a primary key by clicking the radio button Select which columns makes up the primary key
-
Select ROWID as the primary key by clicking the radio button Use the pseudo column ROWID as the primary key
Again, ROWID can only be used with inbound polling, insert, or select operations.
If you choose to select columns to make up the primary key, next to each column appear several possible hints, such as NOT NULL, INDEXED, AUTO INCREMENT and UNIQUE INDEXED.
In the last case, that column's checkbox is automatically selected by default, and you are asked to confirm.
Creating Relationships
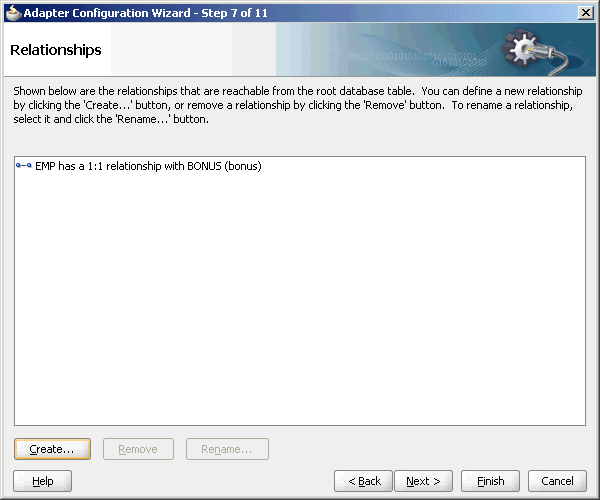
Figure 9-13 shows the relationships defined on the root database table and any other related tables. You can click Create Relationships… to create a relationship between two tables, or click Remove Relationship to remove it. To rename a relationship, click Rename Relationship.
Figure 9-13 The Adapter Configuration Wizard: Relationships Page
Description of "Figure 9-13 The Adapter Configuration Wizard: Relationships Page"
Note the following regarding creating relationships:
-
If foreign key constraints between tables exist on the database, then two relationships are created automatically when you import the tables, a one-to-one (1:1) from the source table (the table containing the foreign key constraints) to the target table, and a one-to-many (1:M) from the target table to the source table.
-
As Figure 9-13 shows, you see only the relationships that are reachable from the root database table. If, after removing a relationship, other relationships are no longer reachable from the root table, then they are not shown in the Relationships window. Consider the following set of relationships:
A --1:1--> B --1:1--> C --1:M--> D --1:1--> E --1:M--> F(1) (2) (3) (4) (5)If you remove relationship 3, then you see only:
A --1:1--> BB --1:1--> CIf you remove relationship 2, then you see only:
A --1:1--> BIf you remove relationship 1, you no longer see any relationships.
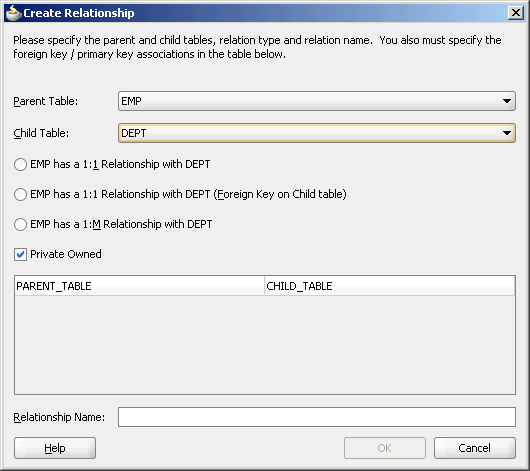
Figure 9-14 shows where you can create a relationship.
Figure 9-14 The Create Relationship Dialog
Description of "Figure 9-14 The Create Relationship Dialog"
To create a relationship:
- Select the parent and child tables.
- Select the mapping type (one-to-many, one-to-one, or one-to-one with the foreign key on the child table).
- Associate the foreign key fields to the primary key fields.
- Optionally name the relationship (a default name is generated).
Note:
Only tables that are reachable from the root table can be selected as a parent.
What Happens When Relationships Are Created or Removed
When tables are initially imported into the Adapter Configuration Wizard, a TopLink direct-to-field mapping corresponding to each field in the database is created. Consider the schemas shown in Figure 9-15 and Figure 9-16:
Immediately after importing these two tables, the following mappings in the Employee descriptor are created:
Employee:
-
id(direct mapping to theIDfield, for example, 151) -
name(direct mapping to theNAMEfield, for example, Stephen King) -
addrId(direct mapping to theADDR_IDfield, for example, 345)
When creating a relationship mapping, the direct-to-field mappings to the foreign key fields are removed and replaced with a single relationship (one-to-one, one-to-many) mapping. Therefore, after creating a one-to-one relationship between Employee and Address called homeAddress, the Employee descriptor appears, as shown in the following example:
Employee:
-
id -
name -
homeAddress(one-to-one mapping to theADDRESStable; this attribute now represents the entireAddress object.)
When a relationship is removed, the direct mappings for the foreign keys are restored.
Different Types of One-to-One Mappings
When relationships are auto created, the one-to-many relationship is from the table without the foreign key. However, you can declare this mapping, which is technically 1-many, as a 1-1. For that, choose 1-1 (foreign key on target).
When Foreign Keys Are Primary Keys
Not all tables imported are in the third normal form (3NF). In rare cases, you may have two or more tables which share the same primary key but no separate foreign key columns exist. It is recommended to create 1-1 (foreign key on target) relationships from the root table to all related tables. The reason is two fold. First, if you were to declare the primary key on the root as a foreign key (1-1, foreign key on source), then that mapping would be removed, so you would not see the primary key in the root record, only in the child record. Second, a foreign key can only point to a single table. Once you declare a column to be part of a foreign key, it is removed, so it cannot be used again in a new relationship. Creating a 1-1 (foreign key on source) on the root table not only makes the primary key column disappear but prevents you from joining the root table to the remaining tables.
Creating the Attribute Filter
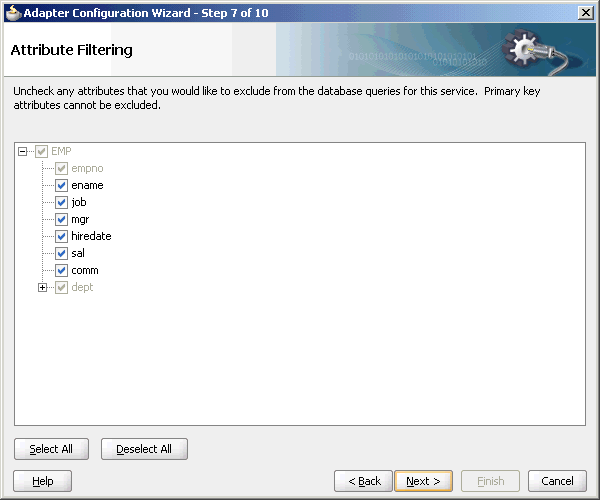
Figure 9-17 shows the attribute filter that is created from the imported table definitions, including any relationships that you may have defined.
Figure 9-17 The Adapter Configuration Wizard: Attribute Filtering Page
Description of "Figure 9-17 The Adapter Configuration Wizard: Attribute Filtering Page"
If your object filter contains self-relationships (for example, the employee-to-employee manager relationship), then you see these as loops in the tree. These loops are not present in the XSD file. This is the descriptor object model, not the XSD file.
In this page, you select those columns that appear in the XML file, whether for input (MERGE, INSERT) or output (SELECT). Columns you are not interested in or which are to be read-only (should not be modified) can be deselected here.
See Defining a WHERE Clause to continue using the Adapter Configuration Wizard.
Defining a WHERE Clause
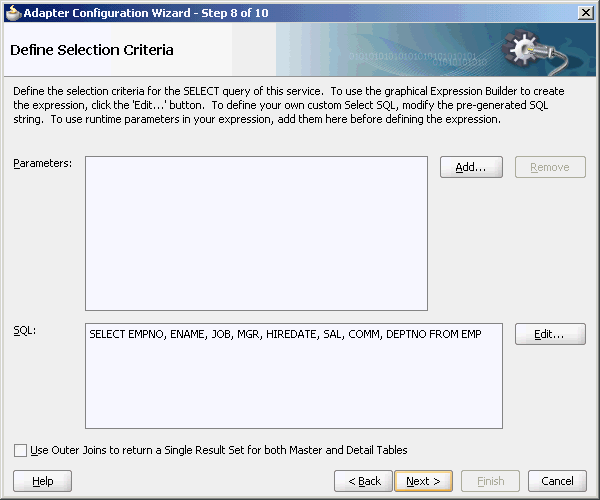
If your service contains a SELECT query (that is, inbound polling services, or outbound services that contain a SELECT), then you can customize the WHERE clause of the SELECT statement.
Note:
When using polling with Sequencing Table/Update an External Sequencing Table, ensure that the name of the table in the SELECT query matches the case of the data in the sequencing table.
Figure 9-18 shows where you define a WHERE clause for an outbound service.
Figure 9-18 The Adapter Configuration Wizard: Define Selection Criteria Page
Description of "Figure 9-18 The Adapter Configuration Wizard: Define Selection Criteria Page"
Note:
The WHERE clause applies to SELECT operations only (that is, polling for new or changed records or performing a SELECT operation on a table). It does not apply to INSERT, UPDATE, and DELETE operations.
The most basic expression in a WHERE clause can be one of the following three cases, depending on what the right-hand side (RHS) is:
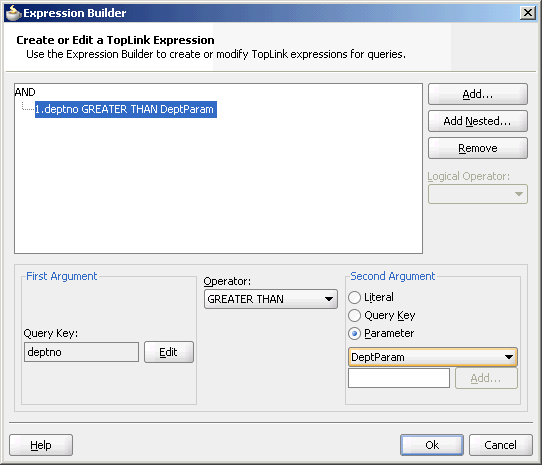
You can create the parameters that you require in the WHERE clause by clicking Add before you move on to build the WHERE clause. To build the WHERE clause, click Edit… to launch the Expression Builder, as shown in Figure 9-19.
To model more complex WHERE clauses (sub selects and functions), and to add ORDER BY clauses, you can edit the SQL procedure manually and click Next. However, this creates maintenance overhead later on, due to hard-coded SQL, and you may lose platform independence.
ORDER BY clause by adding shouldOrderRows and sequencingField properties with the name of the column to the mapping.xml file. if ((this.sequencingField != null) && (shouldOrderRows()))
{
ReadAllQuery raPollingQuery = (ReadAllQuery)this.pollingQuery; raPollingQuery.addOrdering(raPollingQuery.getExpressionBuilder().getField(this.sequencingField).ascending());
}
You can change the columns listed in the FROM clause when the number of columns and the types of each remain unchanged. For more complex changes consider using the Execute Pure SQL option directly where you can type any SQL.
Return Single Result Set
You must select Use Outer Joins to return a Single Result Set for both Master and Detail Tables in the Define Selection Criteria page to use an advanced feature that influences how many total statements TopLink uses when querying against multiple related tables. The safest method is to use the default (1 per table), and this feature attempts 1 total, by outer joining all related tables into a single result set.
See Choosing an After-Read Strategy to continue using the Adapter Configuration Wizard.
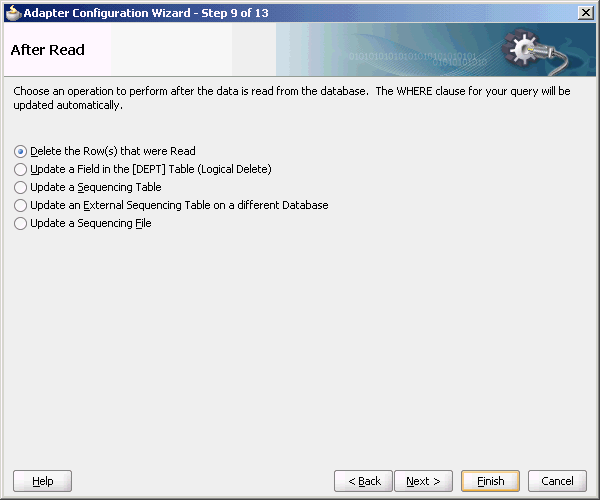
Choosing an After-Read Strategy
If you selected Perform an Operation on a Table, then you can skip ahead to the Specifying Advanced Options..
When configuring an inbound operation, you have the following options about what to do after a row or rows have been read:
Figure 9-20 shows these options.
Figure 9-20 The Adapter Configuration Wizard: After Read Page
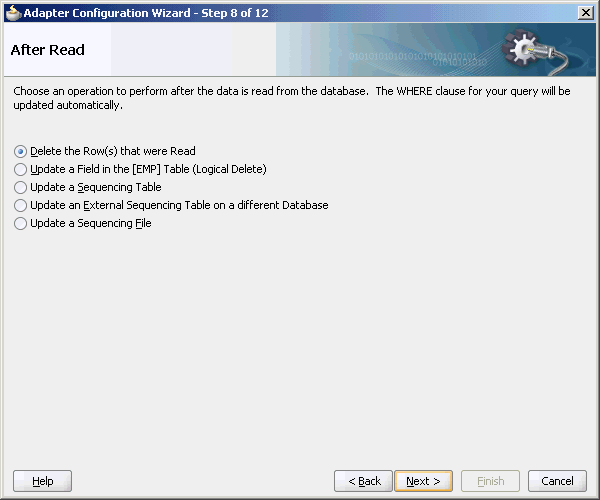
Description of "Figure 9-20 The Adapter Configuration Wizard: After Read Page"
See Polling Strategies to continue using the Adapter Configuration Wizard.
Delete the Rows That Were Read
With this option, the rows are deleted from the database after they have been read and processed by the adapter service.
Update a Field in the Table (Logical Delete)
With this option, you update a field in the root database table to indicate that the rows have been read. The WHERE clause of the query is updated automatically after you complete the configuration, as shown in Figure 9-21.
Figure 9-21 The Adapter Configuration Wizard: Logical Delete Page
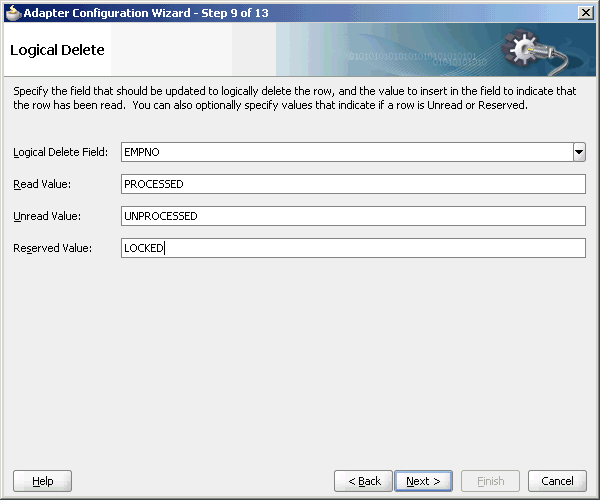
Description of "Figure 9-21 The Adapter Configuration Wizard: Logical Delete Page"
When you use this approach, your database table appears, as shown in Figure 9-22.
Note the following:
-
Rows 150 and 153 have been previously read and processed.
-
At the next polling event, row 152 is read and processed because it contains
UNPROCESSEDin the Status column. Because an explicitUnread Value was provided, row 151 is not read. -
Row 154 has been flagged as
LOCKEDand is not read. You can use this reserved value if your table is used by other processes.
Update a Sequencing Table
With this option, you are keeping track of the last-read rows in a separate sequence table. Figure 9-23 shows the information you provide. The WHERE clause of your query is updated automatically after you complete the configuration.
Figure 9-23 The Adapter Configuration Wizard: Sequencing Table Page
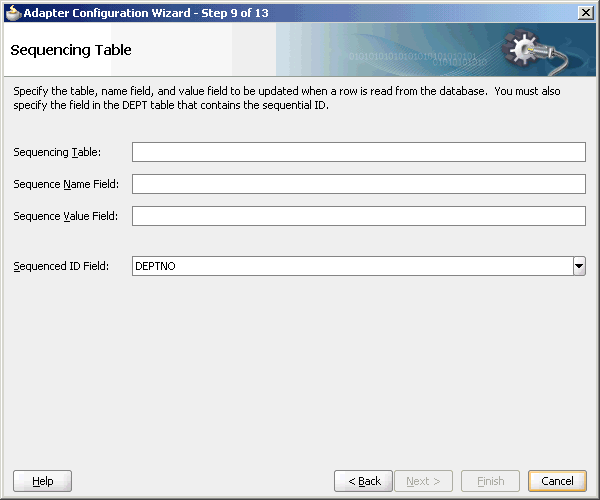
Description of "Figure 9-23 The Adapter Configuration Wizard: Sequencing Table Page"
When you use these settings, your sequence table appears, as shown in Figure 9-24.
Whenever a row is read, this table is updated with the ID that was just read. Then, when the next polling event occurs, it searches for rows that have an ID greater than the last-read ID (154).
Typical columns used are event_id, transaction_id, scn (system change number), id, or last_updated. These columns typically have (monotonically) increasing values, populated from a sequence number or sysdate.
Update an External Sequencing Table on a Different Database
Choose this operation to employ the sequencing table: last updated strategy. Figure 9-25 shows the Adapter Configuration Wizard - External Sequencing Table page in which you specify the details required to perform this operation.
Figure 9-25 The Adapter Configuration Wizard - External Sequencing Table page
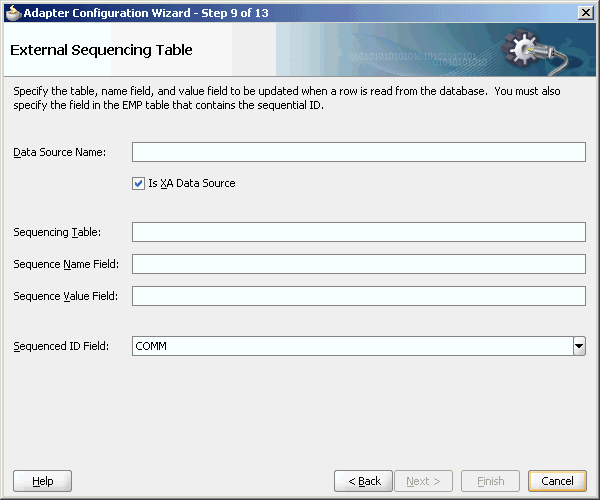
Description of "Figure 9-25 The Adapter Configuration Wizard - External Sequencing Table page"
Update a Sequencing File
Use this option to update a sequencing file. Figure 9-26 shows the Adapter Configuration Wizard - Update a Sequencing File page where you specify the details for performing this operation.
Figure 9-26 Adapter Configuration Wizard - Update a Sequencing File Page
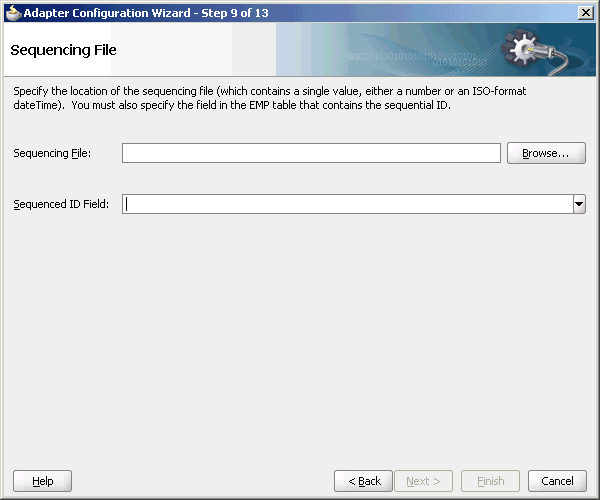
Description of "Figure 9-26 Adapter Configuration Wizard - Update a Sequencing File Page"
Specifying Polling Options
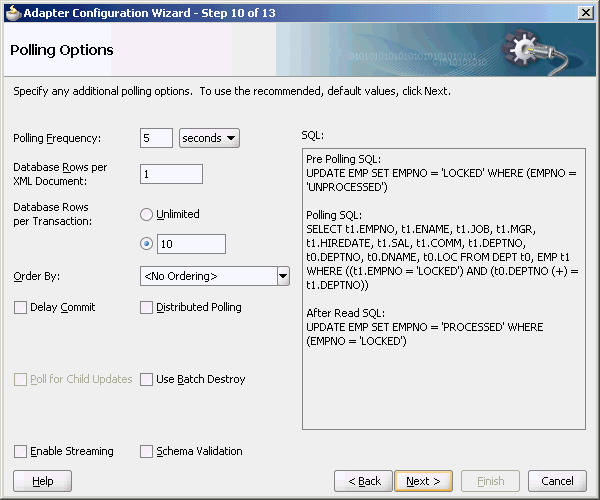
You can specify additional polling options, if any, in this page. Figure 9-27 shows the Adapter Configuration Wizard - Polling Options page.
In this page, you specify details about how to poll the database table for new rows or events.
From the Polling Frequency list, select how frequently to poll for new records or events.
In the Database Rows per XML Document field, specify the number of rows per XML document when sending events to Oracle BPEL PM or Mediator. This is the batch setting between the database adapter and its consumer: Oracle BPEL PM or Mediator.
In the Database Rows per Transaction field, select Unlimited or enter a value to indicate the number of table rows to process during a single transaction.
When polling the database for events, you can order the returned rows by the selected column by using the Order By list. The best practice is to choose <No Ordering>, as message ordering regardless is not guaranteed without extra configuration.
In the SQL field, if the SQL syntax is incorrect, then a message is displayed in red.
For more information about specifying polling options, click Help in the Polling Options page or press F1.
Specifying Advanced Options
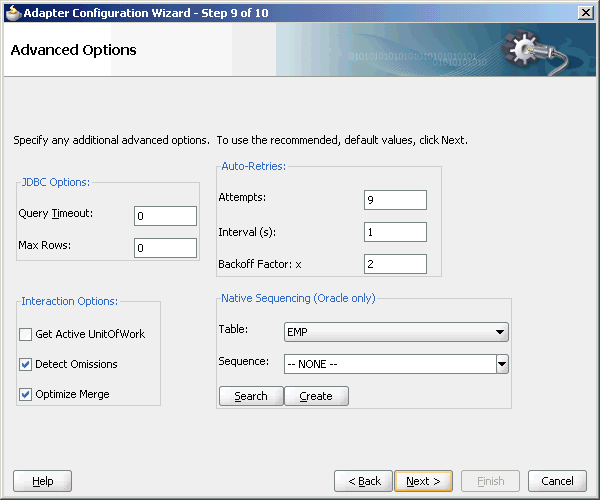
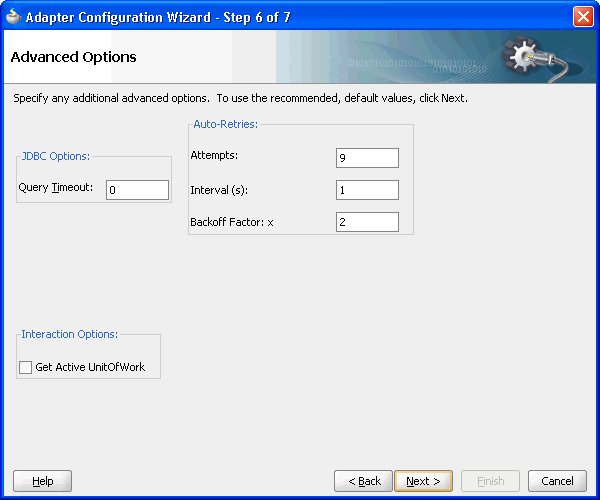
You can specify advanced options, if any. Figure 9-28 shows the Adapter Configuration Wizard - Advanced Options page. In this page, you can specify advanced JDBC and DBAdapter options, configure retries, and configure native sequencing.
You must specify JDBC options in the JDBC Options section. Set low-level JDBC options on calls to the database. The operation you selected determines which options may appear here.
In the Auto-Retries section, specify the value for auto-retry incase of time out. In case of a connection related fault, the Invoke activity can be automatically retried a limited number of times. You can specify the following values in the fields in this section:
-
To retry indefinitely, type
unlimitedin the Attempts field. -
Interval is the delay between retries.
-
Backoff Factor: x allows you to wait for increasing periods of time between retries. 9 attempts with a starting interval of 1 and a back off of 2 leads to retries after 1, 2, 4, 8, 16, 32, 64, 128, and 256 (28) seconds.
In the Interaction Options, specify the interaction options, as follows:
-
GetActiveUnitOfWork. Set
GetActiveUnitOfWorktotruewhen making multiple incremental changes to the same record across multiple invokes in the same SOA instance.GetActiveUnitOfWorkensures that all Database Adapter invokes are within the same JTA transaction, to the same Database instance, and using the same EclipseLink session. For EclipseLink-based operations (excluding stored procedures and pure SQL), all writes are deferred until JTA completion. Note thatGetActiveUnitOfWorkis not supported for stored procedures and pure SQL calls. SettingGetActiveUnitOfWorktotruefor these operations will lead to unknown outcomes. It is also advised that stored procedures and pure SQL calls not be mixed with other operations that participate withActiveUnitOfWork(meaning within the same block of BPEL code stored procedures/pure SQL should not be mixed withActiveUnitOfWorkoperations).By setting
GetActiveUnitOfWorktotrue, if you insert/merge the same object in two invokes, it is written once. Since EclipseLink-based writes are deferred, a select all may not conform to previous invokes that did writes. However, selects by primary key do conform. As writes happen inside the JTA callbacks, there is no way to handle exceptions that occur at that time, and the entire BPEL global transaction will fail if there is any error.GetActiveUnitOfWorkis frequently used to guarantee that operations on two invokes use the same physical SQL connection, since a connection is pinned to the EclipseLink session for the duration of a transaction. However, most application server data sources provide the same guarantee however. WebLogic also has a similar Pinned-To-Thread property and GridLink has XA affinity, which ensures that all writes in an XA transaction happen on the same node in a RAC cluster. Setting this does not resolve lock contention between different SOA instances.If you have multiple operations on related data (such as parent-child), try to have them occur in the same SOA instance or even the same invoke.
GetActiveUnitOfWorkwill not ensure connection reuse if the two invokes are across transaction boundaries. Make sure in BPEL that if the second Database Adapter invoke is within a sub-process, the BPEL propertybpel.config.transactionis set torequiredon the composite level. -
Detect Omissions allows the
MERGEandINSERToperations to ignore empty or missing XML elements in the input payload. For aMERGEoperation, this prevents valid but unspecified values from being overwritten with NULL. ForINSERToperations, they are omitted from theINSERTstatement, allowing default values to take effect. -
Optimize Merge should always be set to true, as it is a general enhancement to
MERGEperformance (using an in query for the primary key existence check).
Native Sequencing (Oracle only) allows you to specify that the primary key are assigned from a sequence on any insert. Click Search and then select a sequence from the Sequence list, or type the name and click Create.
For more information about specifying advanced options, click Help in the Advanced Options page or press F1.
Entering the SQL String for the Pure SQL Operation
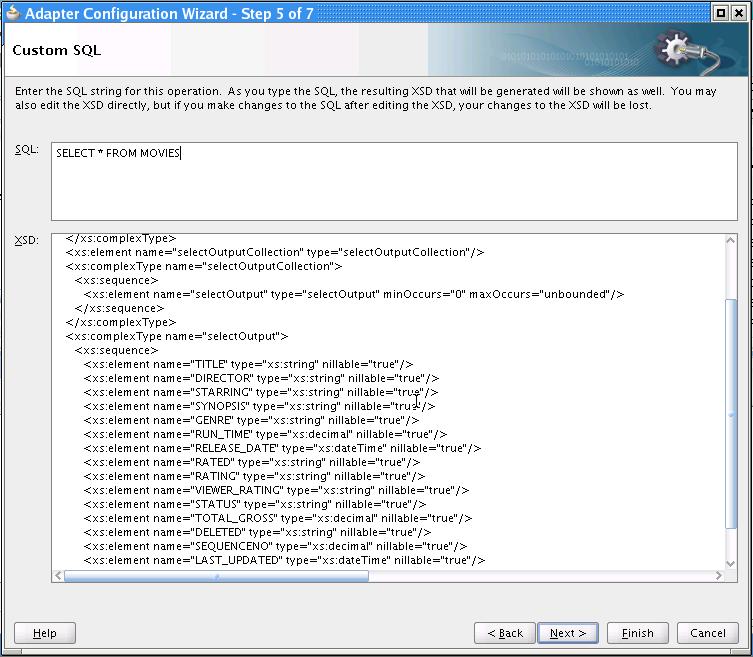
You can enter a SQL string for performing the Execute Pure SQL operation in the Custom SQL page. Figure 9-29 shows the Adapter Configuration Wizard - Custom SQL page.
In the SQL field, enter a custom SQL string. An XSD schema of your SQL input is automatically created in the XSD field.
The XSD field displays the XSD schema of the custom SQL string you entered. You can directly edit the resulting XSD. However, if you make subsequent changes to the SQL string, then your XSD changes are lost.
For more information about entering a SQL string, click Help in the Custom SQL page or press F1.
Oracle Database Adapter Features
This section discusses the Oracle Database Adapter features.
Note:
The Oracle Database Adapter is case sensitive. Therefore, it does not support case insensitivity in a database. In other words, make sure that the case used by the Oracle Database Adapter (for example, for a primary key value) is the same as the case used by the database. Otherwise, errors may occur.
Transaction Support
The Oracle Database Adapter enables transaction support, which, along with the inherent data processing, ensures that each modification has a clearly defined outcome, resulting in either success or failure, thus preventing potential corruption of data, executes independently from other changes, and, once completed, leaves underlying data in the same state until another transaction takes place.
There are two types of transaction support, XA Transaction support and Local Transaction support. XA transaction support allows a transaction to be managed by a transaction manager external to a resource adapter, whereas, a local transaction support allows an application server to manage resources that are local to the resource adapter.
To ensure two Oracle Database Adapter invokes commit or rollback as a unit, you must perform the following:
-
Both Oracle Database Adapter invokes must be configured to participate in global transactions.
-
Both Oracle Database Adapter invokes must participate in the same global transaction.
-
The failure of either invoke must cause the global transaction to roll back.
Note:
You must use a non-XA driver with the SOALocalTxDataSource parameter. Switching to an XA driver breaks product functionality.
Configuring Oracle Database Adapter for Global Transaction Participation
In the deployment descriptor (weblogic-ra.xml file), you must set the xADataSourceName parameter. Additionally, the referenced DataSource must be configured for transaction participation by creating a data source in Oracle WebLogic Server Console.
You must create a data source and choose a XA data sources from the list.
Note:
True Database XA is only certified on Oracle 10.2.0.4 or 11.1.0.7. For earlier versions, you are safer picking a non-XA data source implementation and selecting Emulated Two-phase commit on the next page.
For information about the recommended setting for non-XA and XA data sources used by Oracle JCA Adapters, see Recommended Setting for Data Sources Used by Oracle JCA Adapters.
You cannot edit the data-sources.xml file in the Oracle WebLogic Server. You must create a data source by using the Oracle WebLogic Server Administration Console, as mentioned in Creating a Data Source.
Both Invokes in Same Global Transaction
Once both the Oracle Database Adapter invokes participate in global transactions, to commit or rollback as a unit, they must be participating in the same global transaction. In BPEL, this requires the understanding of where the transaction boundaries are, at what points does a checkpoint have to write to the dehydration store, commit the current global transaction, and start a new one.
The transaction boundaries in a BPEL process occur either before a Receive activity or Wait activity, or before an onMessage or Pick activity. This can also occur when invoking a synchronous child BPEL process, unless the bpel.config.transaction property is set on the partnerlink, as shown in the following code sample.
<property name="bpel.config.transaction">required</property>
Otherwise, the parent process is broken into two transactions and the child process runs in its own transaction.
Failure Must Cause Rollback
Finally, even if both Oracle Database Adapter invokes participate in the same global transaction, the failure of either invoke may not cause the global transaction to rollback.
The only cases where a failure can actually cause a global rollback are:
-
A Oracle Database Adapter operation that inserts/updates multiple tables as part of one invoke fails after having succeeded in some writes but not others. In this case, the Oracle Database Adapter marks the global transaction as rollback only, because the invoke operation was not atomic and a commit could cause data corruption.
-
The invoke retries multiple times in a database down scenario, until the global transaction times out and is rolled back.
-
An explicit
bpelx:rollbackfault is thrown from within the BPEL process.
Using the Same Sessions for Both Invokes
You must set the GetActiveUnitOfWork JCA parameter to true to enable using the same sessions or connections for both the Oracle Database Adapter invokes.
GetActiveUnitOfWork is an advanced JCA property you can set on any DBInteractionSpec. It causes the invoke to register itself with the two-phase commit callbacks, and all writes to the database are performed as part of the two-phase commit. By setting this property on any failure, the transaction is automatically rolled back, as there is no way to handle a fault at this late stage. Similarly, the same underlying TopLink session is used for both invokes, meaning if you merge the same object twice, it is inserted/updated once. All merge invokes that set GetActiveUnitOfWork as true are cumulative.
Transaction/XA Support
To make two Oracle Database Adapter invokes commit or roll back as a unit requires the following: both Oracle Database Adapter invokes must be configured to participate in global transactions, both invokes must participate in the same global transaction, and the failure of either invoke must cause the global transaction to rollback.
Configuring an Oracle Database Adapter for Global Transaction Participation
In the deployment descriptor (weblogic-ra.xml), you must set xADataSourceName. The matching data source entry must be configured for global transaction participation.
True XA: Two-Phase (XA) Versus One-Phase (Emulated) Commit
XA is a two-phase commit protocol, which is more robust than a one-phase commit or emulated protocol. The difference is that with a one-phase protocol, you may very rarely still see message loss or other rollback/commit inconsistency, on the order of one per one thousand generally.
Oracle RAC Configuration
For more information about Oracle RAC configuration, see Real Application Clusters in High Availability Guide.
True XA Configuration with Third-Party Drivers
When configuring true XA for third-party drivers (that is, Microsoft SQL Server 2008, IBM DB2), see if the driver jars contain a class that implements javax.sql.XADataSource.
For data direct drivers, the naming is com.oracle.ias.jdbcx.db2.DB2DataSource or com.oracle.ias.jdbcx.sqlserver.SQLServerDataSource.
Failure Must Cause Rollback
Finally, even if both invokes participate in the same global transaction, the failure of either invoke may not cause the global transaction to roll back.
The only cases where a failure can actually cause a global roll back are:
-
An Oracle Database Adapter operation that inserts/updates multiple tables as part of one invoke fails after having succeeded in some writes but not others. In this case, the adapter marks the global transaction rollback only, as the invoke operation was not atomic and a commit could cause data corruption.
-
The invoke retries multiple times in a database down scenario, until the global transaction times out and is rolled back.
-
An explicit
bpelx:rollbackfault is thrown from within the BPEL process.GetActiveUnitOfWork="true"in WSDL.
Semantics for commit within Stored Procedure
You can follow one of the procedures for commit within Stored Procedure when calling from Database Adapter
Follow either of the three options.
-
Commit within the stored procedure.
-
Create a non-XA datasource.
-
Deselect Supports Global Transaction.
-
Refer to the newly created non-XA datasource from DBAdapter JNDI property. For example DataSourceName and not XADataSourceName.
-
-
If your datasource supports XA, remove the commit from stored procedure. The Weblogic transaction manager manages the transaction boundaries for such scenarios.
-
Use Pragma AUTONOMOUS_TRANSACTION in stored procedure. When you do that the commits within the stored procedure happen outside of the global transaction. For example,
CREATE PROCEDURE MY_STORED_PROC AS PRAGMA AUTONOMOUS_TRANSACTION; BEGIN.
Pure SQL - XML Type Support
Pure SQL Adapter is an option in the Oracle Database Adapter Wizard that allows you to type the SQL string directly and have an XSD/Web service generated automatically. The database tables are introspected dynamically in the Adapter Configuration Wizard to test the SQL and populate the XSD file better (that is, with valid return types.)
The Pure SQL support allows the Oracle Database Adapter to deal with tables/views as entities and for dealing directly with SQL. You can use Pure SQL:
-
for simple data projection style report queries
-
in cases where the result set is not table oriented, such as select count(*)
-
to perform an update or delete all
-
when working with
XMLTypecolumns andxquery -
when using complex SQL, which are not modeled in the Adapter Configuration Wizard expression builder
You can use the Pure SQL Adapter with Oracle XMLTypes. It is a natural fit for inserting XML into XMLType tables and columns, and retrieving XML using xquery selects. Pure SQL is a natural fit for the Oracle Database Adapter that provides a relational-xml mapping that parallels XML DB(XDB) support. So, when using XDB the adapter should be as lightweight and transparent as possible, to let you focus on XDB and XQuery.
If your data is in XML (unstructured/semi-structured) format, and you have no relational schema at all that you can map your data to, then you could use XDB. The conventional Oracle Database Adapter allows you to import an existing relational schema as an XML schema to be used with Web services. XDBs XML shredding algorithm can generate a relational schema from an existing XML schema for persistent storage.
Note:
Use of schema bound XMLTypes requires the oci driver, which is not certified in the 11g release. Therefore, you must use non-schema bound XMLTypes at runtime, though you can use schema bound XMLTypes at design time to import a representative XSD.
For more information, see:
Row Set Support Using a Strongly or Weakly Typed XSD
Currently a REF CURSOR by nature can support any arbitrary result set, so the XSD generated at design time allows this and looks like the XSD as shown in the following example.
Note:
Oracle Database stored procedures return result sets that are referred to as RefCursors, whereas third-party databases result sets that are returned are referred to as RowSets.
Example - Weakly Typed XSD
<refCursorOutputParam>
    <Row>
        <Column name="DEPTNO" sqltype="NUMBER">20</Column>
        ...
    </Row>
</refCursorOutputParam>
However the XML output from this is hard to use. It is very difficult to write an Xpath expression or XSL based on a weakly typed XSD and column names as attribute values instead of element names.
Although a row set can represent any result set, it is possible to assume for some procedures that it has the same structure each time, and hence can be described with a strongly typed XSD. A strongly typed XSD is almost a necessity to transform the result set to another XSD later on. A strongly typed XSD looks like the XSD that is shown in the following example.
Example - Strongly Typed XSD
<refCursorOutputParam>
    <dept>
        <deptno>20</deptno>
        ...
    </dept>
</refCursorOutputParam>
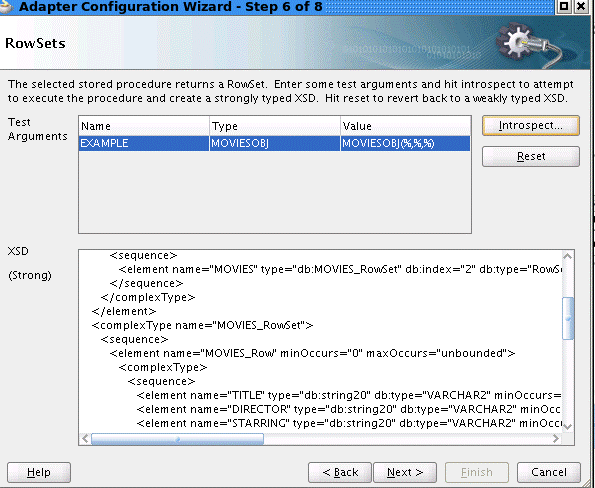
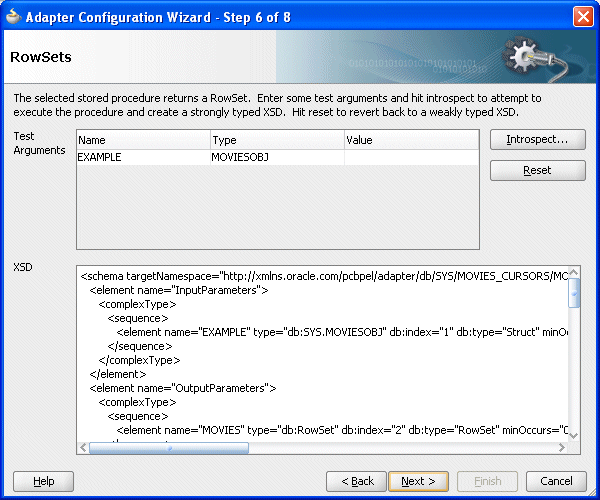
You can use the Adapter Configuration Wizard to create a strongly typed XSD for a row set returned by a stored procedure or function REF CURSOR variable. An Oracle Database function is a special stored procedure that always has one out variable, and can be inlined - for example, inside select statements - and so traditionally does not do updates.
Using this feature, you can select a stored procedure (or stored function), enter its arguments, and perform a test execution to retrieve an actual row set. The Adapter Configuration Wizard then introspects the returned row set and generates a strongly typed XSD. You can enter arguments easily through the wizard. For example, you can enter numbers and strings directly, dates as literals (2009/11/11), and you can even enter structs such as MYOBJ('a', 'b').
Note:
Functions are not supported for IBM DB2 UDB. Only SQL stored procedures are supported.
The Adapter Configuration Wizard row set support using a strongly typed XSD and has the following restrictions:
-
Oracle Database PL/SQL
recordorbooleantypes are not supported. -
Oracle Database PL/SQL
varrayis not supported. -
Oracle Database PL/SQL
%rowtypeis not supported. -
Oracle Database PL/SQL
tabletypes are not supported. -
Oracle Database PL/SQL procedures with
INonlyREF CURSORparameters are not supported.For an Oracle Database PL/SQL procedure with
REF CURSORas anIN/OUTparameter, the Adapter Configuration Wizard ignores theINand generates the strongly typed XSD based on theOUTparameter. -
Referencing an element in the XSD using
refis not supported. -
SQL Server 2008 table valued functions and CLR functions are not supported.
The Oracle Database Adapter supports strongly typed XSD for the following third-party databases:
-
Microsoft SQL Server 2005
-
Microsoft SQL Server 2008
-
IBM DB2 UDB 9.7
The Oracle Database Adapter does not support strongly typed XSD for the following third-party databases:
-
IBM DB2 AS/400
-
MySQL
-
Informix Dynamic Server
-
Sybase 15.0.2
For more information, see:
Proxy Authentication Support
You can connect to your Oracle data store by using Proxy Authentication. On a per-invoke basis, you can set a combination of the following new header properties:
-
jca.db.ProxyUserName: to use theOracleConnection.PROXYTYPE_USER_PASSWORDproxy type, set this property to the proxy user name as ajava.lang.String. -
jca.db.ProxyPassword: to use theOracleConnection.PROXYTYPE_USER_PASSWORDproxy type, set this property to the proxy user password as ajava.lang.String. -
jca.db.ProxyCertificate: to use theOracleConnection.PROXYTYPE_CERTIFICATEproxy type, set this property to abase64Binaryencodedbyte[]array containing a valid certificate.This is a more encrypted way of passing the credentials of the user, who is to be proxied, to the database. The certificate contains the distinguished name encoded in it. One way of generating the certificate is by creating a wallet and then decoding the wallet to get the certificate. The wallet can be created using
runutl mkwallet. It is then necessary to authenticate using the generated certificate. -
jca.db.ProxyDistinguishedName: to use theOracleConnection.PROXYTYPE_DISTINGUISHED_NAMEproxy type, set this property to the proxy distinguished name as ajava.lang.String.This is a global name in lieu of the password of the user being proxied for.
-
jca.db.ProxyRoles: regardless of what proxy type you use, you can optionally set this property to define the roles associated with the proxy user as aString[]array where eachjava.lang.Stringcorresponds to a role name. -
jca.db.ProxyIsThickDriver: if you are using the OCI driver, set this property to a value oftrueto accommodate differences in the JDBC-level API between the thick and thin drivers.
To run the invoke, a proxy connection is obtained from the data source.
For more information, see, Proxy Authentication in Oracle Database JDBC Developer's Guide .
Streaming Large Payload
To enable support to stream payload, you must select the Enable Streaming check box while specifying polling options, as shown in Figure 9-27. When you enable this feature, the payload is streamed to a database instead of getting manipulated in SOA runtime as in a memory DOM. You use this feature while handling large payloads. When you select the Enable Streaming check box, a corresponding Boolean property StreamPayload is appended to the ActivationSpec properties defined in the respective .jca file.
Schema Validation
The SchemaValidation [false/true] property is a new activation specification property that has been added, and this can be configured in a .jca file. When set to true, all XML files produced by the polling Oracle Database Adapter (for Receive activities) is validated against the XSD file. On failure, the XML record is rejected but still marked as processed by the Oracle Database Adapter.
Databases provide structured storage and the XSD file is generated by the Oracle Database Adapter Wizard itself. However, if you edit the auto generated XSD and add your own restrictions, you may want to start validation. For instance, if you import a VARCHAR(50) field, the auto-generated XSD has the max-length 50 restriction. However, if your BPEL process for some reason can only handle values of fixed length 22, it may want to validate the XML file.
High Availability
The Oracle Database Adapter supports high availability in an active-active setup. In an active-active setup, distributed polling techniques can be used for inbound Database Adapters to ensure that the same data is not retrieved more than once. For more information, see Distributed Polling First Best Practice: SELECT FOR UPDATE (SKIP LOCKED). Similar to other adapters, an Oracle Database Adapter can also be configured for singleton behavior within an active-passive setup. This allows a high performance multithreaded inbound Oracle Database Adapter instance running in an active-passive setup, to follow a fan out pattern and invoke multiple composite instances across a cluster. The Oracle Database Adapter also supports the high availability feature when there is a database failure or restart. The DB adapter picks up again without any message loss.
Scalability
The following sections describe best practice for multiple Oracle Database Adapter process instances deployed to multiple Oracle BPEL PM or Mediator nodes, including:
Distributed Polling First Best Practice: SELECT FOR UPDATE (SKIP LOCKED)
The first best practice for multiple Oracle Database Adapter process instances deployed to multiple Oracle BPEL PM or Mediator nodes is to use the Adapter Configuration Wizard to set both the Distributed Polling check box in the Adapter Configuration Wizard and to set MaxTransactionSize.
Increase concurrency by setting the adapter _db.JCA property NumberOfThreads.
On an Oracle database, doing this automatically uses the syntax SELECT FOR UPDATE SKIP LOCKED. With a Microsoft SQLServer database the syntax is WITH (UPDLOCK,READPAST)
With SELECT FOR UPDATE SKIP LOCKED, concurrent threads each try to select and lock the available rows, but the locks are only obtained on fetch. If an about to be fetched row is locked, the next unlocked row are locked and fetched instead. If many threads all execute the same polling query at the same time, they should all relatively quickly obtain a disjoint subset of unprocessed rows.
SKIP LOCKED in Depth
What is unique about skip locks is that each thread 'skips' the locks that other threads have already obtained, enabling each thread to get its own set of locked rows. In other locking strategies, the Select either encounters the first lock and waits or fails immediately. This is what allows the Database Adapter to scale.
That is a broad description of how SKIP LOCKED works, but it is also important to consider how SKIP LOCK works in depth and with respect to the settings of the following properties and the interactions and dependencies on them:
-
NumberOfThreads- The number of concurrent threads.
-
PollingInterval-The interval in seconds at which the Oracle Database Adapter executes the polling statement against the Oracle database.
-
MaxTransactionSize- The number rows to be fetched fromDB to the Database Adapter in one transaction.
-
MaxRaiseSize-The maximum number rows sent from the Database Adapter to BPEL as one message.
-
RowsPerPollingInterval- A limit on the number of records which can be processed in one polling interval.
When a Database Adapter .jca file is deployed, the polling threads are created, based on the NumberOfThreads property. These threads poll independently of each other, starting a transaction and issuing a SELECT FOR UPDATE SKIP LOCK.
A database cursor is then returned for all available rows, and if there are no records matching the SELECT, the thread releases the transaction and sleeps for the duration specified by the PollingInterval property.
Once records appear in the database that match the polling SELECT statement, each thread wakes up after sleeping, starts a transaction, and issues the SELECT FOR UPDATE SKIP LOCK.
At this point, a database cursor is returned but this time there are rows that match the SELECT criteria. Each thread now issues a FETCH for a number of rows defined by the MaxTransactionSize property.
It is the FETCH that locks the rows in the database (SKIP LOCKED) preventing any other FETCH from retrieving those rows. This enables each polling thread to concentrate only on SELECT, FETCH, and process without concern for duplicate processing.
Now that each thread has its own set of rows to work with, the threads loop over the fetched rows and group them based on the MaxRaiseSize property.
Each grouping is delivered to the configured destination and once all rows have been delivered successfully, the transaction is committed.
Each thread then compares how many rows have been delivered to the value specified by the RowsPerPollingInterval property. If the rows delivered are equal to or greater than the RowsPerPollingInterval property value, the thread sleeps. If the number of rows delivered is less than RowsPerPollingInterval, the thread repeats the whole process over again.
Calculating PollingInterval and MaxTransactionSize with respect to Skip Locking is discussed in Configuring PollingInterval_ MaxTransactionSize_ and ActivationInstances in Depth
On a Non-Oracle Database
On a non-Oracle database, SELECT FOR UPDATE safely ensures that the same row cannot be processed multiple times, however you might obtain less scalability than you would otherwise. You should consider either using additionally a partition field or the second best practice, which is essentially multi-threading on a single node with fan-out (see Distributed Polling Second Best Practice: Tuning on a Single Node First).
Note:
A distributed approach ensures that multiple activation instances do not process the same rows.
When configuring this best practice, also consider the following:
Configuring PollingInterval, MaxTransactionSize, and ActivationInstances in Depth
In a distributed scenario, each polling instance tries to balance the load by not attempting to process all unprocessed rows by itself. Thus, at a time, an instance only fetches at most MaxTransactionSize rows.
When using skip locking, if full MaxTransactionSize rows are fetched, the next MaxTransactionSize rows can be immediately fetched continuously.
This is because concurrent threads do no block each other when using skip locking, so there is no danger of one instance fetching all the rows.
However, with skip locking disabled, all threads tries to lock the same rows, and only one succeeds. Consequently, once this thread has processed MaxTransactionSize rows, it pauses until the next polling interval, to allow other threads to also lock and process rows.
Hence, the maximum throughput with distributed polling enabled but using SkipLocking disabled is:
NumberOfThreads x MaxTransactionSize/PollingInterval
Note:
Although you might want to increase MaxTransactionSize, if you increase it to a value that is too high, you might start to see transaction timeouts. Table 9-2 lists safe values for MaxTransactionSize.
For load balancing purposes, it is dangerous to set the MaxTransactionSize too low in a distributed environment with skip locking disabled (where MaxTransactionSize becomes a speed limit). It is best to set the MaxTransactionSize close to the per CPU throughput of the entire business process. This way, load balancing occurs only when you require it.
Table 9-2 MaxTransactionSize and MaxRaiseSize Values
| MaxTransactionSize | MaxRaiseSize | Description |
|---|---|---|
|
10 |
1 |
When using sequential routing. For 10 rows you have 10 individual instances and 10 XML records passing through SOA. |
|
100 |
- |
When using parallel routing. |
|
>= 100 |
|
When using the adapter to stream rows through as fast as possible. |
For load balancing purposes, it is dangerous to set the MaxTransactionSize too low in a distributed environment (where it becomes a speed limit). It is best to set the MaxTransactionSize close to the per CPU throughput of the entire business process. This way, load balancing occurs only when you require it.
If distributed polling is not set, the Adapter tries to process all unprocessed rows in a single polling interval.
Partition Field
In a distributed scenario there are polling instances on multiple servers; however, per server there can be multiple threads configured. You can configure these activation instances to cooperate somewhat by processing separate rows, possibly improving scaling.
To so, simply add the property PartitionField to your db.jca file:
<property name="PartitionField" value="ID"/>
If you set activationInstances to 2, then activation instances 1 and 2 (or 0 and 1) would respectively execute:
SELECT ... WHERE ... AND MOD (ID, 2) = 0 FOR UPDATE SKIP LOCKED
and
SELECT ... WHERE ... AND MOD (ID, 2) = 1 FOR UPDATE SKIP LOCKED
Activation instance 0 still conflicts with other activation instances with this ID on other servers, but at least it does not conflict with other activation instances with ID 1.
Ensure that the partition field is numeric and that applying mod evenly distribute the rows (that is, in this case make sure all the IDs are not either even or odd).
On Oracle Database, you can set the partition field to be rowid by setting db.jca file property PartitionField as follows:
<property name="PartitionField" value="rowid"/>
Then the SQL is in fact converted to:
SELECT ... WHERE ... AND MOD (dbms_rowid.rowid_row_number(rowid), 2) = [0/1] FOR UPDATE SKIP LOCKED
Because Oracle Database skip locking provides scalability, setting a partition field is not recommended. There is a cost of increased database CPU usage with more complex SQL.
activationInstances
T
The adapter framework level property activationInstances (configured in the composite.xml) is interchangeable with NumberOfThreads for distributed scenarios.
Setting activationInstances to 5 and NumberOfThreads to 5 is equal to setting one to 25 and the other to 1. As the extra work instances are created outside of the Database Adapter, they do not cooperate in any way. Hence, in a multi-threaded single node scenario, always configure NumberOfThreads only. Without database level concurrency control through enabling distributed polling, duplicates are read.
Note:
In a distributed cluster scenario configuring NumberOfThreads or activationInstances has the same effect. For a non distributed scenario, you must use NumberOfThreads. Hence it is safe to always use NumberOfThreads and disregard activationInstances.
For more information, see Singleton (Active/Passive) Inbound Endpoint Lifecycle Support Within Adapters.
Indexing and Null Values
Try to index (and/or add explicit constraints on the database for) the primary and all foreign keys to joined tables. If you are using Logical delet polling, try to index the status column. Try to configure a non-null MarkUnreadValue and MarkReadValue.
For optimal performance all operations (excluding INSERT) on the outbound Database Adapter, you should create an index in the database on the column that is selected as the primary key for the Database Adapter.
If you have no indexes at all and prefer to have none, you can proceed with the single node multi-threaded approach (see Distributed Polling Second Best Practice: Tuning on a Single Node First). That way the polling query is executed once, which might be a full table scan, but multiple threads help to exhaust the entire result set until all rows are processed. With a distributed approach, all work must be done while the rows are exclusively locked, which means locked in a timed transaction. In a distributed scenario there are many repeated selects, which can harm performance if each one is doing a full table scan.
Note:
Performance is very slow if MarkUnreadValue is configured as null.
Disabling Skip Locking
Skip locking has been available on Oracle Database since Oracle 8 but it is documented in Oracle 11. You rarely come across an incompatible feature and have to disable it. If that does occur, you can set the Oracle Database Adapter connector property usesSkipLocking to false in the ra.xml file you deploy with your application as shown in the example below.
Example - Configuring usersSkipLocking in ra.xml
<?xml version="1.0" encoding="UTF-8"?>
<connector xmlns="http://java.sun.com/xml/ns/j2ee"
  xmlns:xsi="http://www.w3.org/2001/XMLSchema-instance"
  xsi:schemaLocation="http://java.sun.com/xml/ns/j2ee
  http://java.sun.com/xml/ns/j2ee/connector_1_5.xsd" version="1.5">
...
  <resourceadapter>
        <outbound-resourceadapter>
            <connection-definition>
...
            <config-property>
              <config-property-name>usesSkipLocking</config-property-name>
              <config-property-type>java.lang.Boolean</config-property-type>
                    <config-property-value>false</config-property-value>
            </config-property>
...
            </connection-definition>
...
        </outbound-resourceadapter>
  </resourceadapter>
</connector>
For more information on how to configure connector-level properties, see:
-
Configuring the ra.xml File in the Developing Resource Adapters for Oracle WebLogic Server
. -
Packaging and Deploying Resource Adapters in the Developing Resource Adapters for Oracle WebLogic Server.
Note:
The Database Adapter Configuration Wizard and Database Adapter runtime might add a AND ROWNUM <= ? clause to the SQL statements under the one of the following conditions:
-
usesSkipLockingis set to "false" -
MarkReservedValueis used -
ReturnSingleResultSetis set to "true"
The added AND ROWNUM <= ? limits the number of rowsreturned from the SQL query. However, because of the AND ROWNUM <= ? clause, the returned rows might not be in the order in which the rows are inserted. To prevent the AND ROWNUM <= ? clause from being added to the query, you can add a property to the adapter db.jca file:
<property name="UseRowNumClause" value="false"/>
Without the AND ROWNUM <= ? clause, the returned rows will be in the order in which the rows are inserted.
MarkReservedValue and Skip Locking
If you are using Logical Delete polling and you set MarkReservedValue, skip locking is not used.
Formerly, the best practice for multiple Oracle Database Adapter process instances deployed to multiple Oracle BPEL Process Manager or Oracle Mediator nodes was essentially using LogicalDeletePollingStrategy or DeletePollingStrategy with a unique MarkReservedValue on each polling node, and setting MaxTransactionSize.
However with the introduction of skip locking, that approach has now been superseded. If you were using this approach previously, you can simply remove (in db.jca) or clear (Logical Delete Page of wizard) the MarkReservedValue, and you automatically get skip locking.
The benefits of using skip locking over a reserved value include:
-
Skip locking scales better in a cluster and under load.
-
All work is in one transaction (as opposed to update/reserve, then commit, then select in a new transaction), so the risk of a non-recoverable situation in an HA environments is minimized.
-
No unique
MarkReservedValuemust be specified. For this to work you had to configure a complex variable likeR${weblogic.Name-2}-${IP-2}-${instance}.
SequencingPollingStrategy (Last Read or Last Updated)
This distributed approach works with Delete or Logical Delete based polling strategies.
The work of the sequencing polling based strategies cannot be distributed as records are initially processed in order.
For example, the second row cannot be marked as processed ahead of the first (setting last read ID to 2 means not just that 2 has been processed but 1 also).
However, as the sequencing polling strategies are non-intrusive, requiring no post updates or deletes to the source tables, they are extremely fast.
Use sequencing polling strategies with a single node and with fan-out on a cluster. It is still safe to use in a cluster; however, the select for update is instead applied on accessing the last read ID in the helper table.
Distributed Polling Second Best Practice: Tuning on a Single Node First
The next best practice for multiple Oracle Database Adapter process instances deployed to multiple Oracle BPEL PM or Mediator nodes is to tune on a single node first.
For an Oracle Database Adapter intensive process, such as a database-database integration, performance can be improved by a factor 10 or 100 just by tuning on a single Java Virtual Machine (JVM), scaling |NumberOfThreads|, and setting high values for MaxTransactionSize and MaxRaiseSize.
As Distributed Polling First Best Practice: SELECT FOR UPDATE (SKIP LOCKED) describes, there may be times where it is best to improve performance on a single node, and then optionally do fan-out to multiple nodes in a cluster. Relying on concurrency control features of the database such as locking can be great, but these are often designed more for preserving data integrity than for high performance scalability.
Cases where it may be best to do polling on a single node in the cluster include using the non-intrusive Sequencing Polling strategy, polling large un-indexed tables, or using a non-Oracle back-end database that does not provide high concurrency locks like skip locks.
Note:
Wth the Oracle Database Adapter with polling operation in a clustered environment, you must use the option of distributed polling by selecting the Distributed Polling check box in the Adapter Configuration Wizard.
You can also refer to Singleton (Active/Passive) Inbound Endpoint Lifecycle Support Within Adapters.
Performance Tuning
The Oracle Database Adapter is preconfigured with many performance optimizations. You can, however, make some changes to reduce the number of round trips to the database by implementing performance tuning.
For information about performance tuning, see: Database Adapter Performance and Tuning
detectOmissions Feature
The following are the features of the detectOmission feature:
Available Since
Release 10.1.3
Configurable
Yes
Default Value
Design Time: true, unless explicitly set to false
Use Case
Users can pass incomplete or partial XML to a merge, update, or insert, and see that every column they left unspecified in XML is set to null in the database.
This features enables the DBAdapter merge, insert, or update to differentiate between null value and the absence of a value (omission) in XML documents. On a case by case basis, it determines which information in XML is meaningful and which is not. In this way, XML is seen as a partial representation of a database row, different from a complete representation. The following table lists examples for null values, and values that can be omitted.
Table 9-3 Examples for Null Values
| Element Type | Omission | Null |
|---|---|---|
|
Column |
|
|
|
1-1 |
<!-- dept> … </dept --> |
|
|
1-M |
|
|
Note:
The 1-1 representation <dept /> denotes an empty department object and should not be used. For 1-M, <empCollection /> actually means a collection of 0 elements and is considered a meaningful value.For columns, <director></director> is not considered an omission in cases where it represents an empty string.
A value considered omitted is omitted from UPDATE or INSERT SQL. For an update operation, existing (meaningful) values on the database are not overwritten. For an insert operation, the default value on the database is used, as no explicit value is provided in the SQL string.
A DBAdapter receive is not able to produce XML with omissions, and makes use of xsi:nil="true". If you are unable to produce input XML with xsi:nil="true", or are concerned about the difference between <director /> and <director></director>, then it is best to set DetectOmissions="false" in the JCA file.
When you are expecting an update, you can improve performance, by omitting 1-1 and 1-M relationships. The merge operation can skip considering the detail records completely.
Alternatively, you can map only those columns that you are interested in, and create separate mappings for different invokes. If two updates are to update two different sets of columns, create two separate partnernlinks.
Performance
By default, XML is not used as an input to the Oracle Database Adapter containing omissions. Until an XML with omissions is detected, there is no performance overhead.
Once omissions are detected, a TopLink descriptor event listener is added. This event listener has some overhead, and every modifyRow about to become a SQLUpdate or SQLInsert must be iterated over, to check for omissions. Hence, every column value sent to the database is checked. If the input XML has mostly omissions, then the cost overhead should be more than compensated by sending fewer values to the database.
Incompatible Interactions
DirectSQL="true" and DetectOmissions="true" - DetectOmissions takes precedence. The following are some examples for incompatible interactions:
-
DetectOmissionsMerge -
IgnoreNullsMerge -
OptimizeMerge
Note:
For migrated old BPEL project, you must re-run the Database Adapter Wizard to regenerate the JCA file. When re-run the Database Adapter Wizard, the DetectOmissions and OptimizeMerge options appear in the JCA file with default values as DetectOmissions="false" and OptimizeMerge="false".
OutputCompletedXml Feature
OutputCompletedXml is a feature of the outbound insert activity. The following are some of the features of the OutputCompletedXml feature:
Available Since
Release 10.1.2.0.2
Configurable
OutputCompletedXml appears in the JCA file only when default is true.
Default Value
OutputCompletedXml is true when TopLink sequencing is configured to assign primary keys on insert from a database sequence; otherwise OutputCompletedXml is false.
Issue
You can have primary keys auto-assigned on insert from a database sequence. However, the usefulness of this feature is diminished, because insert/merge have no output message, so there is no way to tell which primary keys were assigned.
Note:
After configuring sequencing (link), run the Adapter Configuration Wizard again so that the insert/merge WSDL operations can be regenerated with an output message, and WSDL property OutputCompletedXml="true".
Performance
An output XML is provided only when the output XML is significantly different, so if TopLink sequencing is not used, this feature is disabled and there is no performance hit. Further, this feature can be explicitly disabled. Likewise, the original input XML is updated and returned; a completely new XML is not built. Additionally, only a shallow update of the XML is performed; if primary keys were assigned to detail records, then these are not reflected in the output XML.
Incompatible Interactions
When DirectSQL="true" and OutputCompletedXml are present, OutputCompletedXml takes precedence.
QueryTimeout for Inbound and Outbound Transactions
You can configure QueryTimeout from the Adapter Configuration Wizard Advanced Options page. This feature exposes the java.sql.Statement level property of the same name. Essentially, QueryTimeout enables you to configure a timeout on the call.
Doing Synchronous Post to BPEL (Allow In-Order Delivery)
In this feature, the entire invocation is in a single thread and global transaction. By default, initiation is asynchronous and the BPEL process is invoked in a separate global transaction. With Oracle Mediator, it is generally a synchronous invoke so this is only specific to an Oracle BPEL process.
To enable this feature, click the Do Synchronous Post to BPEL (Allow In-Order Delivery) option in the Adapter Configuration Wizard Operation page.
Oracle Database Adapter Concepts
Get an overview of Oracle Database Adapter Concepts.
Relational-to-XML Mapping
This section includes the following topics about Relational-to-XML mapping:
For a flat table or schema, the relational-to-XML mapping is easy to see. Each row in the table becomes a complex XML element. The value for each column becomes a text node in the XML element. Both column values and text elements are primitive types.
For example, Table 9-4 shows the structure of the
MOVIES table.
Table 9-4 MOVIES Table Description
| Name | Type |
|---|---|
|
|
NOT NULL |
|
|
|
|
|
|
|
|
|
|
|
|
|
|
|
|
|
|
|
|
|
|
|
|
|
|
|
|
|
|
|
|
|
|
|
|
|
|
|
|
|
|
The corresponding XML schema definition (XSD) is shown in the example below.
Example - XSD for Movies Collection
<?xml version = '1.0' encoding = 'UTF-8'?>
<xs:schema targetNamespace="http://xmlns.oracle.com/
                pcbpel/adapter/db/top
/ReadS1" xmlns="http://xmlns.oracle.com/pcbpel/
adapter/db/top/ReadS1" elementFormDefault=
"qualified" attributeFormDefault="qualified"
xmlns:xs="http://www.w3.org/2001/XMLSchema">
  <xs:element name="MoviesCollection"
              type="MoviesCollection"/>
  <xs:complexType name="MoviesCollection">
     <xs:sequence>
        <xs:element name="Movies" type="Movies"
                           minOccurs="0"
maxOccurs="unbounded"/>
     </xs:sequence>
  </xs:complexType>
  <xs:complexType name="Movies">
     <xs:sequence>
        <xs:element name="title">
           <xs:simpleType>
              <xs:restriction base="xs:string">
                 <xs:maxLength value="50"/>
              </xs:restriction>
           </xs:simpleType>
        </xs:element>
        <xs:element name="director" minOccurs="0"
                           nillable="true">
           <xs:simpleType>
              <xs:restriction base="xs:string">
                 <xs:maxLength value="20"/>
              </xs:restriction>
           </xs:simpleType>
        </xs:element>
        <xs:element name="starring" minOccurs="0"
                              nillable="true">
           <xs:simpleType>
              <xs:restriction base="xs:string">
                 <xs:maxLength value="100"/>
              </xs:restriction>
           </xs:simpleType>
        </xs:element>
        <xs:element name="synopsis" minOccurs="0"
                             nillable="true">
           <xs:simpleType>
              <xs:restriction base="xs:string">
                 <xs:maxLength value="255"/>
              </xs:restriction>
           </xs:simpleType>
        </xs:element>
        <xs:element name="genre" minOccurs="0"
                                  nillable="true">
           <xs:simpleType>
              <xs:restriction base="xs:string">
                 <xs:maxLength value="70"/>
              </xs:restriction>
           </xs:simpleType>
        </xs:element>
        <xs:element name="runTime" type="xs:decimal"
                              minOccurs="0"
                                 nillable="true"/>
        <xs:element name="releaseDate" type="xs:dateTime"
                                 minOccurs="0"
 nillable="true"/>
        <xs:element name="rated" minOccurs="0"
                                   nillable="true">
           <xs:simpleType>
              <xs:restriction base="xs:string">
              </xs:restriction>
           </xs:simpleType>
        </xs:element>
        <xs:element name="rating" minOccurs="0"
                                   nillable="true">
           <xs:simpleType>
              <xs:restriction base="xs:string">
                 <xs:maxLength value="4"/>
              </xs:restriction>
           </xs:simpleType>
        </xs:element>
        <xs:element name="viewerRating" minOccurs="0"
                                   nillable="true">
           <xs:simpleType>
              <xs:restriction base="xs:string">
                 <xs:maxLength value="5"/>
              </xs:restriction>
           </xs:simpleType>
        </xs:element>
        <xs:element name="status" minOccurs="0"
                                    nillable="true">
           <xs:simpleType>
              <xs:restriction base="xs:string">
                 <xs:maxLength value="11"/>
              </xs:restriction>
           </xs:simpleType>
        </xs:element>
        <xs:element name="totalGross"
                        type="xs:decimal" minOccurs="0"
                                 nillable="true"/>
        <xs:element name="deleted" minOccurs="0"
                          nillable="true">
           <xs:simpleType>
              <xs:restriction base="xs:string">
                 <xs:maxLength value="5"/>
              </xs:restriction>
           </xs:simpleType>
        </xs:element>
        <xs:element name="sequenceno" type="xs:decimal"
                 minOccurs="0"
 nillable="true"/>
        <xs:element name="lastUpdated" type="xs:dateTime"
                 minOccurs="0"
 nillable="true"/>
     </xs:sequence>
  </xs:complexType>
</xs:schema>
As the preceding code example shows, MOVIES is not just a single CLOB or XMLTYPE column containing the entire XML string. Rather, it is an XML complexType comprising elements, each of which corresponds to a column in the MOVIES table. For flat tables, the relational-to-XML mapping is straightforward.
Table 9-5 and Table 9-6 show the structure of the EMP and DEPT tables, respectively. These tables are used in the MasterDetail use case. See Use Cases for more information.
Table 9-5 EMP Table Description
| Name | Null? | Type |
|---|---|---|
|
|
NOT NULL |
|
|
|
-- |
|
|
|
-- |
|
|
|
-- |
|
|
|
-- |
|
|
|
-- |
|
|
|
-- |
|
|
|
-- |
|
Table 9-6 DEPT Table Description
| Name | Null? | Type |
|---|---|---|
|
|
NOT NULL |
|
|
|
-- |
|
|
|
-- |
|
As the preceding table definitions show, and as is typical of a normalized relational schema, an employee's department number is not stored in the EMP table. Instead, one of the columns of EMP (DEPTNO) is a foreign key, which equals the primary key (DEPTNO) in DEPT.
However, the XML file equivalent has no similar notion of primary keys and foreign keys. Consequently, in the resulting XML file, the same data is represented in a hierarchy, thereby preserving the relationships by capturing the detail record embedded inside the master.
An XML element can contain elements that are either a primitive type (string, decimal), or a complex type, that is, another XML element. Therefore, an employee element can contain a department element.
The corresponding XML shows how the relationship is materialized, or shown inline. DEPTNO is removed from EMP, and instead you see the DEPT itself.
<EmpCollection>
  <Emp>
    <comm xsi:nil = "true" ></comm>
    <empno >7369.0</empno>
    <ename >SMITH</ename>
    <hiredate >1980-12-17T00:00:00.000-08:00</hiredate>
    <job >CLERK</job>
    <mgr >7902.0</mgr
    <sal >800.0</sal>
    <dept>
      <deptno >20.0</deptno>
      <dname >RESEARCH</dname>
      <loc >DALLAS</loc>
    </dept>
  </Emp>
    ...
</EmpCollection>
Materializing the relationship makes XML human readable and enables the data to be sent as one packet of information. No cycles are allowed in the XML file; therefore, an element cannot contain itself. This is handled automatically by the Oracle Database Adapter.
However, you might see duplication (that is, the same XML detail record appearing more than once under different master records). For example, if a query returned two employees, both of whom work in the same department, then, in the returned XML, you can see the same DEPT record inline in both the EMP records.
Therefore, when you import tables and map them as XML, you must avoid excessive duplication, although the Oracle Database Adapter does not print an element inside itself. The Oracle Database Adapter prints the following:
<Emp>
  <name>Bob</name>
  <spouse>
    <name>June</name>
  </spouse
</Emp>
But not:
<Emp>
  <name>Bob</name>
  <spouse>
    <name>June</name>
    <spouse>
      <name>Bob</name>
      <spouse>
        ...
      </spouse>
    </spouse>
  </spouse>
</Emp>
To avoid duplication, you can do the following:
-
Import fewer tables. If you import only
EMP, thenDEPTdoes not appear. -
Remove the relationship between
EMPandDEPTin the Adapter Configuration Wizard. This removes the relationship, but the foreign key column is put back.
In both these cases, the corresponding XML is as follows:
<EmpCollection>
  <Emp>
    <comm xsi:nil = "true" ></comm>
    <empno >7369.0</empno>
    <ename >SMITH</ename>
    <hiredate >1980-12-17T00:00:00.000-08:00</hiredate>
    <job >CLERK</job>
    <mgr >7902.0</mgr>
    <sal >800.0</sal>
    <deptno >20.0</deptno>
  </Emp>
   ...
</EmpCollection>
Either preceding solution is feasible only if returning foreign key suffices, as distinct from getting back the complete detail record in its entirety.
Relational Types to XML Schema Types
Table 9-7 shows how database data types are converted to XML primitive types when you import tables from a database.
Table 9-7 Mapping Database Data Types to XML Primitive Types
| Database Type | XML Type (Prefixed with xs:) |
|---|---|
|
|
|
|
|
|
|
|
|
|
|
|
|
|
|
|
|
|
|
|
|
|
|
|
|
|
|
|
|
|
Essentially, NUMBER goes to DECIMAL, the most versatile XML data type for numbers, VARCHAR2 and CLOB to string, BLOB to base64Binary (to meet the plain-text requirement), and date types to dateTime.
Any type not mentioned in this discussion defaults to java.lang.String and xs:string.
Time Stamp support is basic, because only the xs:dateTime format is supported. The BFILE type is specifically not supported.
Note:
The user-defined Object, Struct and VARRAY, and REF types are supported in releases 11g and 12.
Because XML is plain text, BLOB and byte values are base 64/MIME encoded so that they can be passed as character data.
Mapping Any Relational Schema to Any XML Schema
The Oracle Database Adapter supports mapping any relational schema on any relational database to an XML schema, although not any XML schema of your choice, because the Adapter Configuration Wizard generates the XML schema with no explicit user control over the layout of the elements.
You can control how you map the schema in both the Adapter Configuration Wizard and later in TopLink Workbench. By pairing the Oracle Database Adapter with a transformation step, you can map any relational schema to any XML schema.
Querying over Multiple Tables
When executing a SQL select statement against multiple related tables there are the following three methods to build the SQL. These ways relate to how to pull in the detail records when the query is against the master record:
-
Twisting the Original Select (TopLink Batch-Attribute Reading)
-
Returning a Single Result Set (TopLink Joined-Attribute Reading)
-
Comparison of the Methods Used for Querying over Multiple Tables
The following sections contain an outline of these three methods and their comparison. When selecting rows from a single table there are no issues different from selecting from multiple tables.
Using Relationship Queries (TopLink Default)
Having selected a Master row, TopLink can always query separately to get all the details belonging to that Master table. These hidden queries (relationship queries) are cached in the TopLink metadata and must be prepared only once.
Consider the SQL statement in following sample scenario:
SELECT DIRECTOR, ..., VIEWER_RATING
       FROM MOVIES
WHERE RATING = 'A';
For each master, the SQL statement is as follows:
SELECT CRITIC, ..., TITLE
       FROM MOVIE_REVIEWS
WHERE (TITLE = ?)
This enables you to bring in all the data with 1 + n query executions, where n is the number of master rows returned by the first query.
This approach is safe but slow, as a large number of round trips to the database are required to pull in all the data.
For configuring using the relationship Queries (TopLink default) approach, you must edit or_mappings.xml outside of JDeveloper. In addition, change the batch-reading elements value to false.
Twisting the Original Select (TopLink Batch-Attribute Reading)
This is a default feature that allows TopLink to alter the original SQL select statement to read all the details in a second select statement, as shown in the following example:
SELECT DIRECTOR, ..., VIEWER_RATING
FROM MOVIES
WHERE RATING = 'A'
SELECT DISTINCT t0.CRITIC, ..., t0.TITLE
FROM MOVIE_REVIEWS t0, MOVIES t1
WHERE ((t1.RATING = 'A') AND (t0.TITLE = t1.TITLE))
By considering the original select statement in pulling in the details, a total of two (1 + 1 = 2) query executions must be performed.
Advantages
Batch attribute reading has the following advantages:
-
All data read in two round trips to database
-
The is a default feature in the 10.1.2.0.2 release
Disadvantages
Batch attribute reading has the following disadvantages:
-
When using
maxTransactionSize(on polling receive) ormaxRows(on invoke select) to limit the number of rows loaded into memory at a time, these settings do not easily carry over to the batch attribute query. It is easier to work with a cursored result when there is only a single result set. (Multiple cursors can be used with difficulty, if the original query has an order by clause). -
TopLinkcan alter a SQL statement, only when it is in a format it can understand. If you use the hybrid SQL approach and set custom SQL for the rootselect, thenTopLinkcannot interpret that SQL to build the batchselect. -
The
DISTINCTclause is used on the batch query, to avoid returning the same detail twice if two masters happen to both point to it. TheDISTINCTclause cannot be used when returning LOBs in the resultset.
Configuration
Configuration is on a per 1-1 or 1-M mapping basis. By default, all such mappings since the 10.1.2.0.2 release have this property set. To configure, edit or_mappings.xml outside JDeveloper and edit the <batch-reading> elements to true (default) or false.
Returning a Single Result Set (TopLink Joined-Attribute Reading)
The detail tables are outer-joined to the original SQL select statement, returning both master and detail in a single result set, as shown in the following example:
SELECT DISTINCT t1.DIRECTOR, ..., t1.VIEWER_RATING, t0.CRITIC, ..., t0.TITLE
FROM MOVIE_REVIEWS t0, MOVIES t1
WHERE ((t1.RATING = 'A') AND (t0.TITLE (+) = t1.TITLE))
This requires one query execution in total.
Advantages
The advantages include the following:
-
In case of using
maxTransactionSizewhile polling, the benefits of dealing with a single cursor can be great. -
When following the hybrid SQL route and entering custom SQL statements, you only have to deal with a single SQL statement, whereas
TopLinknormally uses a series of additional hidden SQL statements to bring in related rows. -
readconsistency: Enables you to read all related rows at the same time, and not at different instances in time for the different tables. -
Performance can be ideal as only a single round trip to the database is required, whereas batch attribute reading requires one for each table queried.
Disadvantages
There are some drawbacks, however, namely the cost of returning duplicate data. For example, consider that you read the Master and Detail tables; Master has 100 columns in each row, and Detail has 2 columns in each row. Each row in the table, Master also, typically has 100 related Detail rows.
With one query in each table, the result sets for the preceding example appears, as shown in the following example:
Master
Column1 column2 ….. column100

Master1 ...

Detail

Detail
Column1 column2
Detail1   ...
Detail2
...
Detail100 ...
In this example, 300 column values are returned as shown:
(columns in master + columns in detail x details per master) =
(           100             +            2                x              100         )  =  300
With one query for all tables, the result set appears, as shown in the following example:
Master                                             Detail

Column1 Column2 ... Column100                      Column1  Column2
Master1    ...                                     Detail1     ...
Master1    ...                                     Detail2     ...
Master1    ...                                     Detail100   ...
When there is one query for all tables, 10,200 column values are returned in a single result set, versus 300 in two result sets, as shown here:
((columns in master + columns in detail) x details per master) =
((          100     +            2     ) x       100         ) =  10,200
This can have a serious drain on network traffic and computation because 97 percent of the data returned is duplicate data. Also, if the master had two related tables detail1 and detail2 and there were 100 each in each master, then the number of column values returned would be over 10 million per master row.
In general, you can use the following simple formula to estimate the relative cost of returning all rows in a single result set:
        (Master columns + Detail1 columns + Detail2 columns + ... ) x
                Detail1s per Master x
                Detail2s per Master x ...
bloat = ___________________________________________________________

       (Master columns + Detail1 columns X Detail1s per Master +
               Detail2 columns X Detail2s per Master + ...)
For 1-1 relationships, this value is always 1, and if in the same example each master had two columns only and the details had 100 columns instead, and each master had only 3 or 4 details each, then the bloat would be
               (2 + 100) x 4        408
bloat =        ____________  = ___________  ~=  1
               (2 + 100 x 4)        402
Another disadvantage is that this setting could distort the meaning of the maxRows setting on an outbound select.
Configuration
To configure, select Use Outer Joins to return a Single Result Set for both Master and Detail Tables on the Adapter Configuration Wizard - Define Selection Criteria page.
Note:
When you create a SQL query such as the following by using the TopLink Expression Builder, the result may not be as expected:
SELECT DISTINCT t1.TABLE1_ID, t1.COLUMN_A FROM TABLE2 t0,
TABLE1 t1 WHERE ((t0.STATUS = 1) AND (t0.TABLE1_ID = t1.
TABLE1_ID))
The expected result for this query is that only rows with Table 1's and their owned Table 2's with status = 1 be returned.
However, what this query actually translates to is "table 1's, where any of its table 2's have status = 1," resulting in the return of table 1's that match the selection criteria, and ALL of the table 2's they own, including those with other statuses, whether or not their statuses =1. The DISTINCT keyword ensures the table 1's are not repeated and the join happens across table 2.
The misunderstanding happens in the way Toplink works. Through the Expression Builder, you can only specify a selection criteria for Table 1 and have no control over the Table 2's they own, this part is automatically done.
However, you can get the expected result by using either of the following two approaches:
1.) Query directly for table 2 using the selection criteria of status = 1, that is, do not go through table 1 and get the table 2's they own.
2.) Use direct (custom SQL), as shown in the following example:
SELECT TABLE1.TABLE1_ID, TABLE1.COLUMN_A, TABLE2.STATUS
FROM TABLE2, TABLE1 WHERE TABLE2.STATUS=1 AND TABLE1.
TABLE1_ID = TABLE2.TABLE1_ID
Comparison of the Methods Used for Querying over Multiple Tables
Superficially, returning a single result set looks best (1 query), followed by batch attribute reading (altering the select statement: 2 queries), and finally by default relationship reading (n + 1 queries). However, there are several pitfalls to both of the more advanced options.
Altering User-Defined SQL
If you specify custom/hybrid SQL, the TopLink cannot alter that SQL string to build the details select. For this reason, you must avoid using hybrid SQL and build selects using the wizards' visual expression builder as often as possible.
Show Me the SQL
The additional queries executed by TopLink in both, the default and the batch attribute reading cases can be somewhat of a mystery to users. For this reason, the raw SQL shown to users in the Adapter Configuration Wizard assumes returning a single result set, to make things clearer and also to improve manageability.
Returning Too Many Rows At Once
Databases can store vast quantities of information, and a common pitfall of select statements which return too much information at once. On a Database Adapter receive, a maxTransactionSize property can be set to limit the number of rows which are read from a cursored result set and processed in memory at a time. A similar max-rows setting exists for one-time invoke select statements. However, this setting is very risky.
SQL Operations as Web Services
After mapping a relational schema as XML, you must also map basic SQL operations as Web services. Some operations translate directly to the SQL equivalent, while others are more complex.
This section includes the following topics:
DML Operations
Data manipulation language (DML) operations align with basic SQL INSERT, UPDATE, and SELECT operations. SQL INSERT, UPDATE, DELETE, and SELECT are all mapped to Web service operations of the same name. The MERGE is either an INSERT or UPDATE, based on the results of an existence check. A distinction is made between the data manipulation operations—called outbound writes—and the SELECT operations—called outbound reads. The connection between the Web service and the SQL for merge (the default for outbound write) and queryByExample are not as obvious as for basic SQL INSERT, UPDATE, and SELECT.
This section includes the following topics:
Merge
Merge first reads the corresponding records in the database, calculates any changes, and then performs a minimal update. INSERT, UPDATE, and MERGE make the most sense when you are thinking about a single row and a single table. However, your XML can contain complex types and map to multiple rows on multiple tables. Imagine a DEPT with many EMPS, each with an ADDRESS. In this case, you must calculate which of possibly many rows have changed and which to insert, update, or delete. If a specific row did not change or only one field changed, then the DML calls is minimal.
querybyExample
Unlike the SELECT operation, queryByExample does not require a selection criteria to be specified at design time. Instead, for each invoke, a selection criteria is inferred from an exemplary input XML record.
For instance, if the output xmlRecord is an employee record, and the input is a sample xmlRecord with lastName = "Smith", then on execution, all employees with a last name of Smith are returned.
A subset of queryByExample is to query by primary key, which can be implemented by passing in sample XML records where only the primary key attributes are set.
Use queryByExample when you do not want to create a query using the visual query builder and want the flexibility of allowing the input record to share the same XML schema as the output records.
The queryByExample operation is slightly less performant because a new SELECT must be prepared for each execution. This is because the attributes that are set in the example XML record can vary each time, and therefore the selection criteria vary.
Input xmlRecord:
<Employee>
      <id/>
      <lastName>Smith</lastName>
</Employee>
Output xmlRecord:
<EmployeeCollection>
      <Employee>
         <id>5</id>
         <lastName>Smith</lastName>
         ....
      </Employee>
      <Employee>
         <id>456</id>
         <lastName>Smith</lastName>
         ....
      </Employee>
</EmployeeCollection>
Restriction:
-
When using
queryByExamplethe query is dynamically generated each time the database adapter is invoked as each time the query might be different unlike the regular select query, where the query is cached. -
The
queryByExamplefeature does not allow the user to set a limit on the maximum number of rows to return the results. This results in the return of a large number of rows. This in turn increases the memory requirement to process the rows.
Polling Strategies
The inbound receive enables you to listen to and detect events and changes in the database, which in turn can be the initiators of a business process. This is not a one-time action, but rather an activation. A polling thread is started, which polls a database table for new rows or events.
Whenever a new row is inserted into the MOVIES table, the polling operation raises it to the SCA runtime. The strategy is to poll every record once. The initial SELECT has to be repeated over time, to receive the rows that exist at the start and all new rows as they are inserted over time. However, a new row once read is not likely to be deleted, and therefore can possibly be read repeatedly with each polling.
The various ways to poll for events, called polling strategies, also known as after-read strategies or publish strategies, range from simple and intrusive to sophisticated and non-intrusive. Each strategy employs a different solution for the problem of what to do after reading a row or event so it is not picked up again in the next polling interval. The simplest (and most intrusive) solution is to delete the row so that you do not query it again.
This section discusses the following polling operations that you can perform after the data is read from the database. This section also discusses the strategies and factors to help you determine which strategy to employ for a particular situation:
Delete the Row(s) that were Read
Choose this operation to employ the physical delete polling strategy. This operation polls the database table for records and deletes them after processing. Use this strategy to capture events related to INSERT operations and cannot capture database events related to DELETE and UPDATE operations on the parent table. This strategy cannot be used to poll child table events. This strategy allows multiple adapter instances to go against the same source table. There is zero data replication.
Preconditions: You must have deletion privileges on the parent and associated child tables to use the delete polling strategy. Table 9-8 describes the requirements for using the delete polling strategy.
Table 9-8 Delete Polling Strategy Preconditions
| Requirements Met | Conflicts With |
|---|---|
|
Poll for inserts |
No delete on source |
|
Shallow delete |
No updates on source |
|
Cascading delete |
Poll for updates |
|
Minimal SQL |
Poll for deletes |
|
Zero data replication |
Poll for child updates |
|
Default |
-- |
|
Allows raw SQL |
-- |
|
Concurrent polling |
-- |
Note:
In Shallow delete and Cascading delete, the delete operation can be configured to delete the top-level row, to cascade all, or to cascade on a case-by-case basis.
Concurrent polling can be configured for both delete and logical delete polling strategies.
Configuration: You can configure the delete polling strategy to delete the top-level row, to cascade all, or to cascade on a case-by-case basis. This strategy enables deleting only the parent rows and not the child rows, cascaded deletes, and optional cascaded deletes, determined on a case-by-case basis. You can configure the polling interval for performing an event publish at design time.
Delete Cascade Policy: The optional advanced configuration is to specify the cascade policy of the DELETE operation. For instance, after polling for an employee with an address and many phone numbers, the phone numbers are deleted because they are privately owned (default for one-to-many), but not the address (default for one-to-one). This can be altered by configuring or_mappings.xml, as in the following example:
<database-mapping>
   <attribute-name>orders</attribute-name>
   <reference-class>taxonomy.Order</reference-class>
   <is-private-owned>true</is-private-owned>
You can also configure the activation itself to delete only the top level (master row) or to delete everything.
Note:
A PrivateOwned annotation is used to specify a relationship is privately owned. A privately owned relationship means the target object is a dependent part of the source object and is not referenced by any other object and cannot exist on its own. Private ownership causes operations to be cascaded across the relationship, including these: deletion, insertion, refreshing, locking (when locking is cascaded).
PrivateOwned also ensures that private objects removed from collections are deleted and object added are inserted.
A receive operation appears in an inbound JCA as follows:
Example - Receive Operation Inbound JCA
<connection-factory location="eis/DB/Connection1"
            UIConnectionName="Connection1" adapterRef=""/>
  <endpoint-activation portType="dd_ptt" operation="receive">
    <activation-spec className="oracle.tip.adapter.db.
                      DBActivationSpec">
      <property name="DescriptorName" value="dd.Emp"/>
      <property name="QueryName" value="ddSelect"/>
      <property name="MappingsMetaDataURL" value="dd-or-mappings.xml"/>
      <property name="PollingStrategy"
                         value="LogicalDeletePollingStrategy"/>
      <property name="MarkReadColumn" value="STATUS"/>
      <property name="MarkReadValue" value="PROCESSED"/>
      <property name="MarkReservedValue" value="RESERVED-1"/>
      <property name="MarkUnreadValue" value="UNPROCESSED"/>
      <property name="PollingInterval" value="5"/>
      <property name="MaxRaiseSize" value="1"/>
      <property name="MaxTransactionSize" value="10"/>
      <property name="ReturnSingleResultSet" value="false"/>
    </activation-spec>
  </endpoint-activation>
</adapter-config>
Update a Field in the [Table_Name] Table (Logical Delete)
Choose this operation to employ the logical delete polling strategy. This strategy involves updating a special field on each row processed and updating the WHERE clause at runtime to filter out processed rows.
It mimics logical delete, wherein applications rows are rarely deleted but instead a status column isDeleted is set to true. The status column and the read value must be provided, but the modified WHERE clause and the post-read update are handled automatically by the Oracle Database Adapter.
Preconditions: You must have the logical delete privilege or a one-time alter schema (add column) privilege on the source table. Table 9-9 describes the requirements for using the logical delete polling strategy.
Table 9-9 Logical Delete Polling Strategy Preconditions
| Requirements Met | Conflicts With |
|---|---|
|
Poll for inserts |
No updates on source |
|
No delete on source |
Poll for deletes |
|
Minimal SQL |
-- |
|
Zero data replication |
-- |
|
Minimal configuration |
-- |
|
Allows raw SQL |
-- |
|
Poll for updates |
-- |
|
Poll for child updates |
-- |
|
Concurrent polling |
-- |
Note:
The requirements of the following are met, as follows:
-
Poll for updates: By adding a trigger
-
Poll for child updates: By adding a trigger
-
Concurrent polling: By specifying additional mark unread and reserved values.
Configuration: The logical delete polling strategy requires minimal configuration. You must specify the mark read column and the value that indicates a processed record.
A receive operation appears in an inbound WSDL as follows:
<operation name="receive">
   <jca:operation
      ActivationSpec="oracle.tip.adapter.db.DBActivationSpec"
         …
      PollingStrategyName="LogicalDeletePollingStrategy"
      MarkReadField="STATUS"
      MarkReadValue="PROCESSED"
Given the configuration for logical delete, the Oracle Database Adapter appends the following WHERE clause to every polling query:
AND (STATUS IS NULL) OR (STATUS <> 'PROCESSED')
Database Configuration: A status column on the table being polled must exist. If it does not exist already, you can add one to an existing table.
Support for Polling for Updates: Given that rows are not deleted with each read, it is possible to repetitively read a row multiple times. You must add a trigger to reset the mark read field whenever a record is changed, as follows:
create trigger Employee_modified
before update on Employee
for each row
begin
   :new.STATUS := 'MODIFIED';
end;
Support for Concurrent Access Polling: Just as a single instance should never process an event more than once, the same applies to a collection of instances. Therefore, before processing a record, an instance must reserve that record with a unique value. Again, the status column can be used:
<operation name="receive">
   <jca:operation
      ActivationSpec="oracle.tip.adapter.db.DBActivationSpec"
         …
      PollingStrategyName="LogicalDeletePollingStrategy"
      MarkReadField="STATUS"
      MarkUnreadValue="UNPROCESSED"
      MarkReservedValue="RESERVED${IP-2}-${weblogic.Name-1}-${instance}"
      MarkReadValue="PROCESSED"
The polling query instead appears, as shown in the following example:
Update EMPLOYE set STATUS = 'RESERVED65-1-1' where (CRITERIA) AND (STATUS = 'UNPROCESSED');

Select … from EMPLOYEE where (CRITERIA) AND (STATUS = 'RESERVED65-1-1');
The after-read UPDATE is faster because it can update all:
Update EMPLOYEE set STATUS = 'PROCESSED' where (CRITERIA) AND (STATUS = 'RESERVED65-1-1');
Update a Sequencing Table
Choose this operation to employ the sequencing table: last-read Id strategy. This polling strategy involves using a helper table to remember a sequence value. The source table is not modified; instead, rows that have been read in a separate helper table are recorded. A sequence value of 1000, for example, means that every record with a sequence less than that value have been processed. Because many tables have some counter field that is always increasing and maintained by triggers or the application, this strategy can often be used for noninvasive polling. No field on the processed row must be modified by the Oracle Database Adapter.
Native sequencing with a pre-allocation size of 1 can ensure that rows are inserted with primary keys that are always increasing over time.
This strategy is also called a nondestructive delete because no updates are made to the source rows, and you can use a sequencing strategy such as the sequence field to order the rows in a sequence for processing.
When the rows are ordered in a line, the Oracle Database Adapter knows which rows are processed and which are not with a single unit of information.
Preconditions: You must have a sequencing table or create table privilege on the source schema. The source table has a column that is monotonically increasing with every INSERT (an Oracle native sequenced primary key) or UPDATE (the last-modified timestamp). Table 9-10 describes the requirements for using the sequencing polling strategy.
Table 9-10 Sequencing Polling Strategy Preconditions
| Requirements Met | Conflicts With |
|---|---|
|
Poll for inserts |
Poll for deletes |
|
Poll for updates |
Allows raw SQL |
|
No delete on source |
Concurrent polling |
|
No updates on source |
-- |
|
One extra SQL select |
-- |
|
Zero data replication |
-- |
|
Moderate configuration |
-- |
|
Poll for child updates |
-- |
Configuration: A separate helper table must be defined. On the source table, you must specify which column is ever increasing.
Example - Specifying Sequencing
CREATE TABLE Employee (
    PersonID int,
    LastName varchar(255),
    FirstName varchar(255),
    Address varchar(255),
    Modified_Date DATE default sysdate,
   );
Given
this table, the following Database Adapter configuration will be created by the JDeveloper
Database Adapter Wizard for a helper table SEQUENCING_HELPER:
<adapter-config name="ReadS" adapter="Database Adapter"
xmlns="http://platform.integration.oracle/blocks/adapter/fw/metadata">
    <connection-factory location="eis/DB/DBConnection1"
UIConnectionName="DBConnection1" adapterRef=""/>
  <endpoint-activation portType="ReadS_ptt" operation="receive">
    <activation-spec className="oracle.tip.adapter.db.DBActivationSpec">
      <property name="DescriptorName" value="ReadS.PerfMasterIn"/>
      <property name="QueryName" value="ReadSSelect"/>
      <property name="MappingsMetaDataURL" value="ReadS-or-mappings.xml"/>
      <property name="PollingStrategy" value="SequencingPollingStrategy"/>
      <property name="SequencingTable" value="SEQUENCING_HELPER"/>
      <property name="SequencingColumn" value="MODIFIED_DATE"/>
      <property name="SequencingTableKeyColumn" value="TABLE_NAME"/>
      <property name="SequencingTableValueColumn" value="LAST_READ_DATE"/>
      <property name="SequencingTableKey" value="EMPLOYEE"/>
      <property name="PollingInterval" value="60"/>
      <property name="MaxRaiseSize" value="1"/>
      <property name="MaxTransactionSize" value="10"/>
      <property name="ReturnSingleResultSet" value="false"/>
    </activation-spec>
  </endpoint-activation>
</adapter-config>
SequencingTablespecifies the helper table name that will be used for sequencing. Here we assume the helper table name isSEQUENCING_HELPER(see details about this table below).SequencingColumnspecifies the column in the source table that increments monotonically with every insert or update. Here the column name isMODIFIED_DATE.SequencingTableKeyColumnis a column in the helper table that stores the source table name.SequencingTableValueColumnis a column in the helper table that stores the row value in the monotonically increasing column of the last processed record in the source table.SequencingTableKeyis the name of the source table. Here the source table name isEMPLOYEE.
Database Configuration:
- Pre-Polling SQL:
SELECT LAST_READ_DATE FROM SEQUENCING_HELPER WHERE (TABLE_NAME = 'EMPLOYEE') - Polling
SQL:
SELECT PersonID, LastName, FirstName, Address, MODIFIED_DATE FROM EMPLOYEE WHERE ((MODIFIED_DATE > #LAST_READ_DATE) AND (MODIFIED_DATE < SYSDATE)) ORDER BY MODIFIED_DATE ASC - After Read SQL:
UPDATE SEQUENCING_HELPER SET LAST_READ_DATE = #LAST_READ_DATE WHERE (TABLE_NAME = 'EMPLOYEE')
DBActivationSpec specified in the
preceding example, the CREATE TABLE command looks as follows:
CREATE TABLE SEQUENCING_HELPER
(
TABLE_NAME VARCHAR2(32) NOT NULL,
LAST_READ_DATE DATE
)
;
Polling for Updates: In the preceding example, the polling is for new objects or updates, because every time an object is changed, the modified time is updated.
A sample trigger to set the modified time on every insert or update is as follows:
create trigger Employee_modified
before insert or update on Employee
for each row
begin
  :new.modified_date := sysdate;
end;
Using a Sequence Number: A sequence number can be used for either insert or update polling. Native sequencing returns monotonically increasing primary keys, when an increment by 1 is used. You can also use the sequence number of a materialized view log.
Update an External Sequencing Table on a Different Database
Choose this operation to employ the sequencing table: last updated strategy. This polling strategy involves using a helper table to remember a last_updated value. A last_updated value of 2005-01-01 12:45:01 000, for example, means that every record last updated at that time or earlier have been processed.
Because many tables have rows with a last_updated or creation_time column maintained by triggers or the application, this strategy can often be used for noninvasive polling. Fields on the processed row never require modification by the Oracle Database Adapter.
This strategy is also called a nondestructive delete because no updates are made to the source rows, and you can use a sequencing strategy such as the last_updated field to order the rows in a sequence for processing. When the rows are ordered in a line, the Oracle Database Adapter knows which rows are processed and which are not with a single unit of information.
See Update a Sequencing Table for information about preconditions and configuration.
Update a Sequencing File
This strategy works similarly to Update an External Sequencing Table on a Different Database. The only difference is that the control information is stored in a file instead of a table.
Control Table Strategy
Choose this operation to employ the control table polling strategy. This polling strategy involves using a control table to store the primary key of every row that has yet to be processed. With a natural join between the control table and the source table (by primary key), polling against the control table is practically the same as polling against the source table directly. However, an extra layer of indirection allows the following:
-
Destructive polling strategies such as the delete polling strategy can be applied to rows in the control table alone while shielding any rows in the source table.
-
Only rows that are meant to be processed have their primary key appear in the control table. You can use information that is not in the rows themselves to control which rows to process (a good
WHEREclause may not be enough). -
The entire row is not copied to a control table, and any structure under the source table, such as detail rows, can also be raised without copying.
Streams and materialized view logs make excellent control tables.
Preconditions: You must have the create/alter triggers privilege on the source table. Table 9-11 describes the requirements for using the control table polling strategy.
Table 9-11 Control Table Polling Strategy Preconditions
| Requirements Met | Conflicts With |
|---|---|
|
Poll for inserts |
Advanced configuration: the native XML from the database has control header, and triggers are required. |
|
Poll for updates |
-- |
|
Poll for deletes |
-- |
|
Poll for child updates |
Minimal data replication (primary keys are stored in control table) |
|
No delete on source |
-- |
|
No updates on source |
-- |
|
No extra SQL selects |
-- |
|
Concurrent polling |
-- |
|
Allows raw SQL |
-- |
|
Auditing |
-- |
Using triggers, whenever a row is modified, an entry is added to a control table, containing the name of the master table, and the primary keys. At design time, the control table is defined to be the root table, with a one-to-one mapping to the master table, based on the matching primary keys. The control table can contain extra control information, such as a time stamp, and operation type (INSERT, UPDATE, and so on).
The delete polling strategy is useful with this setup. It is important to keep the control table small, and if the option shouldDeleteDetailRows="false" is used, then only the control rows are deleted, giving you a nondestructive delete (the DELETE is not cascaded to the real tables).
It is possible to reuse the same control table for multiple master tables. In TopLink, you can map the same table to multiple descriptors by mapping the control table as one abstract class with multiple children. Each child has a unique one-to-one mapping to a different master table. The advantage of this approach is that you can specify for each child a class indicator field and value so that you do not require an explicit WHERE clause for each polling query.
The following are sample triggers for polling for changes both to a department table and any of its child employee rows:
CREATE OR REPLACE TRIGGER EVENT_ON_DEPT
   AFTER INSERT OR UPDATE ON DEPARTMENT
   REFERENCING NEW AS newRow
   FOR EACH ROW
   DECLARE X NUMBER;
BEGIN
   SELECT COUNT(*) INTO X FROM DEPT_CONTROL WHERE (DEPTNO = :newRow.DEPTNO);
   IF X = 0 then
   insert into DEPT_CONTROL values (:newRow. DEPTNO);
   END IF;
END;
CREATE OR REPLACE TRIGGER EVENT_ON_EMPLOYEE
   AFTER INSERT OR UPDATE ON EMPLOYEE
   REFERENCING OLD AS oldRow NEW AS newRow
   FOR EACH ROW
   DECLARE X NUMBER;
BEGIN
   SELECT COUNT(*) INTO X FROM DEPT_CONTROL WHERE (DEPTNO = :newRow.DEPTNO);
   IF X = 0 then
   INSERT INTO DEPT_CONTROL VALUES (:newRow.DEPTNO);
   END IF;
   IF (:oldRow.DEPTNO <> :newRow.DEPTNO) THEN
      SELECT COUNT(*) INTO X FROM DEPT_CONTROL WHERE (DEPTNO = :oldRow.DEPTNO);
      IF (X = 0) THEN
         INSERT INTO DEPT_CONTROL VALUES (:oldRow.DEPTNO);
      END IF;
   END IF;
END;
Database Adapter Deployment
The Oracle Database Adapter comes deployed to the application server by the install. It contains a single adapter instance entry eis/DB/SOADemo, which points to the data source jdbc/SOADataSource. The connection information to the database is inside the data source definition.
When deploying a SOA project that uses the OracleAS Adapter for Databases, you might have to add a new adapter instance and restart the
application server first. This could be because you want to point to a database other than the
one referred in jdbc/SOADataSource, or because you chose a name for the
adapter instance that does not yet exist. For instance, if you create a connection in JDeveloper named Connection1, then by default the
DB Adapter service points to eis/DB/Connection1, as shown in Figure 9-7.
You can also check which adapter instance the service is pointing to by looking at the db.jca file, as shown in the following code snippet:
<connection-factory location="eis/DB/Connection1" UIConnectionName="Connection1"
adapterRef="" />
In this example, location is the JNDI name of the adapter instance
at runtime, and UIConnectionName is the name of the connection used in JDeveloper.
- Using the Oracle WebLogic Server Administration Console, as
described in Adding an Adapter
Connection Factory.
The following screenshots show how to edit Database Adapter properties using the Oracle WebLogic Server Administration Console:
- On the Outbound Connection Pools tab, expand
javax.resource.cci.ConnectionFactoryand click an instance to navigate to the Database Adapter properties.Figure 9-30 The Outbound Connection Pools Tab in the Oracle WebLogic Administration Console
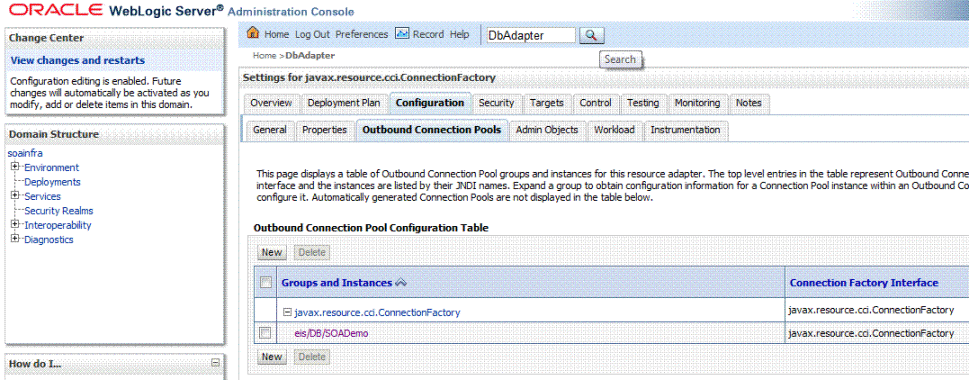
Description of "Figure 9-30 The Outbound Connection Pools Tab in the Oracle WebLogic Administration Console" - Edit the properties listed in the Outbound Connection Properties table as
needed.
Note:
When setting theSequencePreallocationSizeproperty for the Database Adapter outbound connection pool, it must be set to the same value as the sequence created at the database level (for example,ALTER SEQUENCE MYSEQUENCE INCREMENT BY 50). The Oracle WebLogic Server documentation describes how to administer the console.Figure 9-31 Database Adapter Properties in the Oracle WebLogic Administration Console
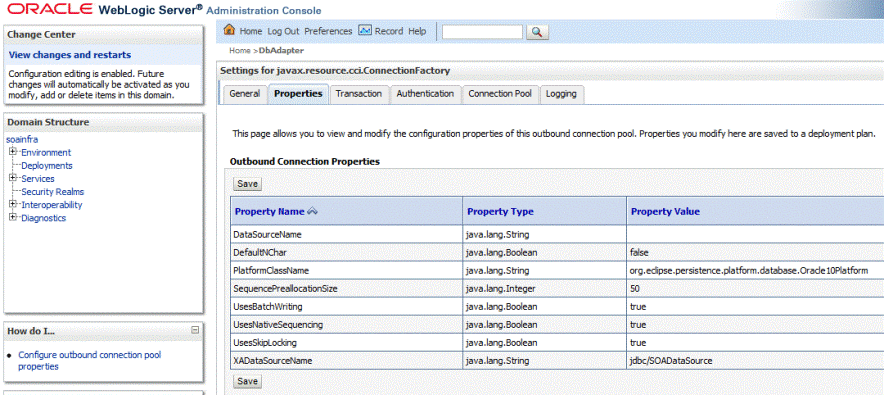
Description of "Figure 9-31 Database Adapter Properties in the Oracle WebLogic Administration Console"
- On the Outbound Connection Pools tab, expand
- By directly editing the
weblogic-ra.xmlfile:-
Search
fmwhome/ forDbAdapter.rar. -
Unzip the file.
-
Edit
META-INF/weblogic-ra.xml(and possiblyra.xml.) -
Jar the file again.
-
Restart the application server.
-
The following example is a sample adapter instance in weblogic-ra.xml.
Example - Sample Adapter Instance in weblogic-ra.xml
<connection-instance>
  <jndi-name>eis/DB/SOADemo</jndi-name>
    <connection-properties>
       <properties>
          <property>
            <name>xADataSourceName</name>
            <value>jdbc/SOADataSource</value>
              </property>
              <property>
                <name>dataSourceName</name>
                <value> </value>
              </property>
              <property>
                <name>platformClassName</name>
                <value>Oracle10Platform</value>
              </property>
           </properties>
        </connection-properties>
</connection-instance>
jndi-name, which must match the location attribute in thedb.jcafile, and is the name of the adapter instance.xADataSourceName, which is the name of the underlying data source (which has the connection information).dataSourceNameplatformClassName, which indicates which SQL to generate. For information about this property, see Table 9-12.
Most Common Mistakes
The following are the two most common mistakes with deployment:
-
Not creating an adapter instance entry that matches the location attribute in your
db.jcafile (or not creating one at all.) -
Setting the location attribute in the
db.jcafile to the name of the data source directly. -
Not changing
platformClassNamewhen connecting to a database other than Oracle.
For the latter, there is a level of indirection in that you give the name of the
adapter instance (eis/DB/...), which itself points to the data source pool
(jdbc/...). It is a common mistake to miss this indirection and give the
name jdbc/... directly in the location attribute.
Data Source Configuration
For the relevant Data Source configuration for your application server, see JDBC Driver and Database Connection Configuration. When configuring an Oracle data source, ensure that you use the thin XA option.
Note:
Database Adapter goes into Prepared State if server is restarted before data source is loaded. To reload data source and move the adapter to Active State, manually restart the Database Adapter.Additional Adapter Instance Properties
This section briefly describes additional properties in the Database Adapter instance beyond xADataSourceName, dataSourceName, and platformClassName.
When adding a property to weblogic-ra.xml, you must ensure that the property is also declared in ra.xml (also in DbAdapter.rar). For example, the following is a code snippet of the ra.xml file for the property xADataSourceName in weblogic-ra.xml:
<config-property>
<config-property-name>xADataSourceName </config-property-name>
<config-property-type>java.lang.String</config-property-type>
<config-property-value></config-property-value>
</config-property>
For information about the Oracle Database Adapter
instance properties, see Oracle Database Adapter Properties. The following
additional Oracle Database properties are listed in the TopLink Database Login Object
(oracle.toplink.sessions.DatabaseLogin).
| Property Name | Type |
|---|---|
|
|
Boolean |
|
|
Boolean |
|
|
Boolean |
|
|
Boolean |
|
|
Boolean |
|
|
String |
|
|
Boolean |
|
|
Integer |
|
|
String |
|
|
Boolean |
|
|
Boolean |
|
|
String |
|
Note: If a sequence is created at the database level (for example,
|
Integer |
|
|
String |
|
|
Boolean |
See TopLink API reference information on DBConnectionFactory
JavaDoc and DatabaseLogin JavaDoc at http://download.oracle.com/docs/cd/B10464_02/web.904/b10491/index.html.
Deployment with Third-Party Databases
Table 9-12 lists databases and their advanced properties, which are database platform variables.
Set the platformClassName name to a listed variable. Setting platformClassName is mandatory if you are using an advanced database.features that are not uniform across databases, such as native sequencing or stored procedures.
As an example, to execute a stored procedure on DB2 versus SQL Server, the DbAdapter must generate and send different SQL. Use this example for use with the SQLServer Platform:
execute <procedure> @<arg1>=? ...when using the DB2 Platform:
call <procedure>(?, ...)The platformClassName setting indicates which SQL to generate. Since most databases offer non-uniform features (that is, variants on the ANSI SQL 92 language specification), it is safest to configure platformClassName accurately.The default value is Oracle10Platform, and should be changed to the appropriate variable if you are connecting to a different database vendor.
Note:
Providing the qualified class name with package is not necessary if it starts with org.eclipse.persistence.platform.database
Table 9-12 Database Platform Names
| Database | PlatformClassName |
|---|---|
|
Oracle10+ (including 11g) |
|
|
Oracle9+ (optional) |
|
|
DB2 |
|
|
DB2 on AS400e |
|
|
Informix |
|
|
SQLServer |
|
|
MySQL |
|
|
Derby |
|
|
DB2 for z/OS |
|
|
Any other database |
|
JDBC Driver and Database Connection Configuration
Only major databases and versions are certified. Working with other databases should be feasible when they provide a working JDBC driver, and you rely on core ANSI SQL relational features, such as Create, Read, Update, and Delete (CRUD) operations on tables and views. Issues tend to be more prevalent due to the fact that not all JDBC drivers implement database metadata introspection the same way. However, it should be possible to import matching tables on a certified database and then point to the uncertified database at runtime.
Creating a Database Connection Using a Native or Bundled Oracle WebLogic Server JDBC Driver
To create a database connection when using a native or bundled Oracle WebLogic Server JDBC driver:
Creating a Database Connection Using a Third-Party JDBC Driver
To create a database connection when using a third-party JDBC driver:
Summary of Third-Party JDBC Driver and Database Connection Information
Table 9-13 summarizes the connection information for common third-party databases.
Note that driver files for Oracle, IBM DB2, Informix, Sybase, SQLServer, MySQL and Derby are bundled with the SOA Install.
Oracle has certified these WebLogic Server drivers (Oracle drivers) for these databases. For other Databases, including DB2/AS400, DB2/ZOS and ProgressDB, you must obtain the appropriate native drivers.
For information about PlatformClassName, see Table 9-12 (Database Platform Names).
For more information, see:
Table 9-13 Database Driver Selection (from WebLogic Remote Console)
| Database | JDBC Driver |
|---|---|
|
Microsoft SQL Server |
|
|
Sybase |
|
|
Informix |
|
|
IBM DB2 |
|
|
MySQL |
MySQL's Driver (Type 4) Versions: using |
|
Derby |
Derby's Driver(Type 4 XA) |
|
DB2/AS400 |
Download driver NOTE: Choose |
|
DB2/ ZOS |
Download driver NOTE: Choose |
|
ProgressDb |
Copy drivers NOTE: Choose |
Using a Microsoft SQL Server
You must note the following when connecting to a SQL Server database:
To enable XA transaction:
-
Copy all jll files from
<install_dir>/oracle_common/modules/datadirecttoProgram Files\Microsoft SQL Server\MSSQL11.MSSQLSERVER\MSSQL\Binnof your MSSQL installation. -
Copy instjdbc.sql from
<Install_dir>/oracle_common/modules/datadirectto MSSQL installation machine, for example to the c directory (c:/). -
Copy the DLL you require, based on your operating system to the SQL Server Bin directory and rename to
sqljdbc.dll. That is,-
sqljdbc.dll- for 32 bit OS -
64sqljdbc.dll- for 64 bit OS Itanium based -
x64sqljdbc.dll- for 64 bit OS Intel based
-
-
Run the following command from the SQL command line. The command should complete without errors.
sqlcmd -Usa -Pwelcome1! -Slocalhost -iC:\instjdbc.sql
-
Restart SQL server services.
Note that for an XA transaction to run successfully, you must also do the following:
- Proceed to run -> dcomcnfg
- Then, proceed to component servies->Mycomp->DTC->LocalDTC->Properties ( and right-click Properties.)
- Then, proceed to Security-> and Select Enable xa transaction
- Finally, restart all related services (
trxn,sqlserver)
Using a SQLSERVER Weblogic JDBC Driver
URL: jdbc:weblogic:sqlserver://<host>:<port>
Driver Class: weblogic.jdbcx.sqlserver.SQLServerDataSource
Driver Jar: wlsqlserver.jar is bundled with the WebLogic Server and is provided with your installation.
Its location is /<install_dir>/oracle_common/modules/datadirect
Using an Informix Database
This section includes the following topics:
Using an Informix JDBC Driver
URL: jdbc:weblogic:informix://<host>:<port>;informixServer=<server_name>;databaseName=<db_name>
Driver Class: weblogic.jdbcx.informix.InformixDataSource
Driver Jar: wlinformix.jar is bundled in Server. and is provided with installation. Its location is /<install_dir>/oracle_common/modules/datadirect
For information about the Informix JDBC driver, refer to the following link:
Using an IBM DB2 Database
This section includes the following topics:
IBM DB2 Driver
URL: jdbc:weblogic:db2://<host>:<port>Driver Class: weblogic.jdbcx.db2.DB2DataSourceDriver Jar : wldb2.jar is bundled in Server. Provided with Install. Location- /<install_dir>/oracle_common/modules/datadirect
For information about DataDirect driver, refer to the following link:
JT400 Driver (AS400 DB2)
URL: jdbc:as400://hostname;translate binary=true
Driver Class: com.ibm.as400.access.AS400JDBCDriver/
com.ibm.as400.access.AS400JDBCXADataSource
Driver Jar: jt400.jar/jt400Native.jar
For correct character set translation, use translate binary=true.
Using a MySQL Database
Use the following information:
URL: jdbc:mysql://hostname:3306/dbname
Driver Class: com.mysql.jdbc.Driver / com.mysql.jdbc.jdbc2.optional.MysqlXADataSource
Driver Jar: mysql-connector-java-<version_number>-bin.jar
Using a Derby Database
Use the following information:
URL: jdbc:derby://<host>:<port><location of schema>
Driver Class: org.apache.derby.jdbc.ClientXADataSource
Driver Jar: Derby.jar, derbyclient.jar
Location of JDBC Driver JAR Files and Setting the Class Path
This section describes the location of JDBC JAR files and setting the class path at runtime and design time.
Run Time
For both Windows and Linux, you must perform the following steps:
- Drop the vendor-specific driver JAR files to the
user_projects/domains/soainfra/libdirectory. - Drop the vendor-specific driver JAR files to the
<Weblogic_Home>/server/lib. - Edit the classpath to include the vendor-specific jar file in
<Weblogic_HOME>/common/bin/commEnv.sh
Design Time
For both Windows and Linux, drop the JDBC JAR to the Oracle/Middleware/jdeveloper/jdev/lib/patches directory.
Stored Procedure and Function Support
Learn how the Oracle Database Adapter supports the use of stored procedures and functions.
Note:
If you are connecting to Oracle Database 18c or later, wrapper generation for user-defined data types used as IN /OUT parameters in a stored procedure is not supported. To bypass the wrapper generation so that you can connect to Oracle Database 18c or later, you must install the following 14c (14.1.2.0.0) patches:- JDeveloper: 31026461 and 30922431
- SOA Suite (run time): 30922431
Sign in to My Oracle Support and search for the patch numbers to locate and download the patches.
After applying the patches, the following PL/SQL data types for IN/OUT parameters are not supported: Boolean, nested Table, nested Record. For more information, see Support for PL/SQL Boolean, PL/SQL Record, and PL/SQL Table Types.
Design Time: Using the Adapter Configuration Wizard
The Adapter Configuration Wizard – Stored Procedures is used to generate an adapter service WSDL and the necessary XSD. The adapter service WSDL encapsulates the underlying stored procedure or function as a Web service with a WSIF JCA binding. The XSD file describes the procedure or function, including all the parameters and their types. This XSD provides the definition used to create instance XML that is submitted to the Oracle Database Adapter at run time.
This section includes the following topics:
Using Top-Level Standalone APIs
This section describes how to use the Adapter Configuration Wizard with APIs that are not defined in PL/SQL packages. You use the Adapter Configuration Wizard – Stored Procedures to select a procedure or function and generate the XSD file. See Use Cases if you are not familiar with how to start the Adapter Configuration Wizard.
The following are the steps to select a stored procedure or function by using the Adapter Configuration Wizard:
Using Packaged APIs and Overloading
Using APIs defined in packages is similar to using standalone APIs. The only difference is that you can expand the package name to see a list of all the APIs defined within the package, as shown in Figure 9-41.
APIs that have the same name but different parameters are called overloaded APIs. As shown in Figure 9-41, the package called PACKAGE has two overloaded procedures called OVERLOAD.
Figure 9-41 A Package with Two Overloaded Procedures
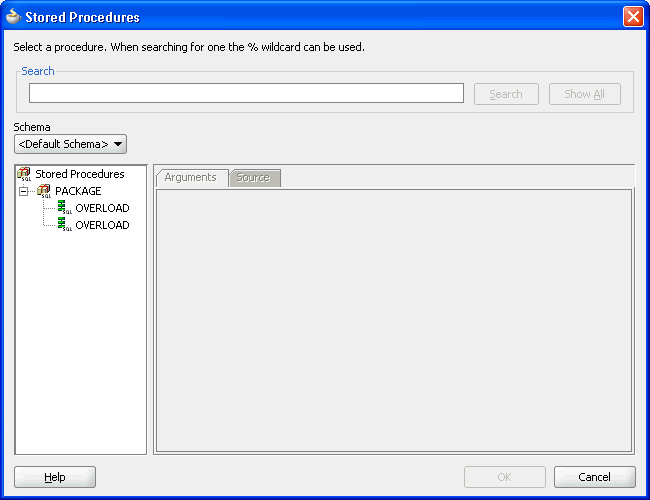
Description of "Figure 9-41 A Package with Two Overloaded Procedures"
As Figure 9-42 shows, the code for the entire PL/SQL package is displayed, regardless of which API from the package is selected when you view the Source tab. Text that matches the name of the procedure is highlighted.
Figure 9-42 Viewing the Source Code of an Overloaded Procedure
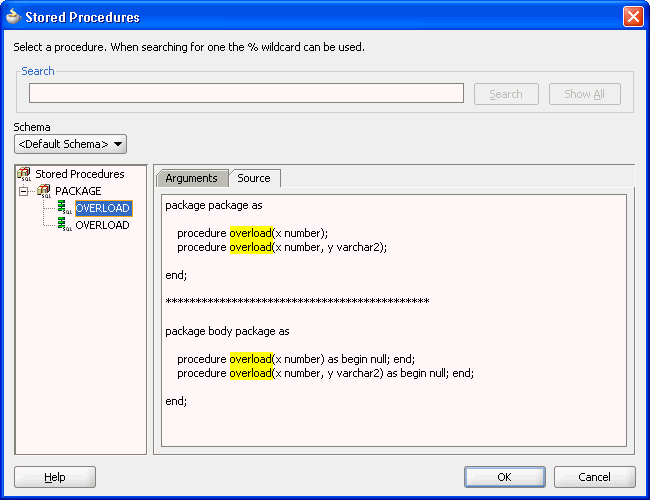
Description of "Figure 9-42 Viewing the Source Code of an Overloaded Procedure"
After you select a procedure or function and click OK, information about the API is displayed, as shown in Figure 9-43. The schema, procedure name, and a list of arguments are displayed. Note how the procedure name is qualified with the name of the package (PACKAGE.OVERLOAD). Click Back or Browse to make revisions, or Next. Enter values for any of the advanced options. Click Next followed by Finish to conclude.
Figure 9-43 Viewing Procedure or Function Details in the Adapter Configuration Wizard
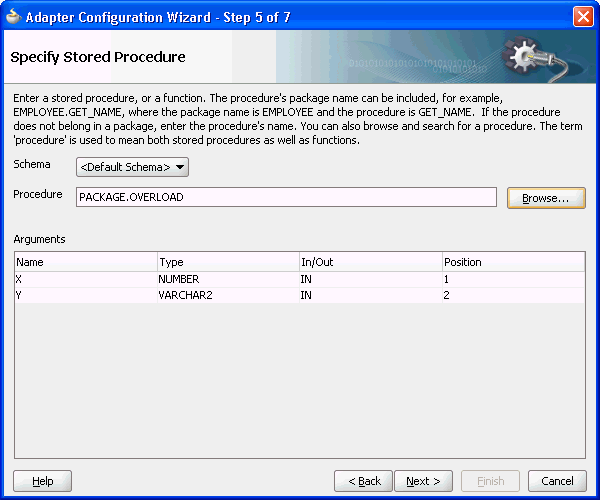
Description of "Figure 9-43 Viewing Procedure or Function Details in the Adapter Configuration Wizard"
When you have finished using the Adapter Configuration Wizard, the following files are added to the existing project:
-
Overload.wsdl,Overload_db.jca -
SCOTT_PACKAGE_OVERLOAD_2.xsd.The
_2appended after the name of the procedure in the XSD filename differentiates the overloaded APIs. Numeric indexes are used to differentiate between overloaded APIs.
Supported Third-Party Databases
For stored procedures, the following databases are supported: Oracle, DB2, Informix Dynamic Server, MySQL, Microsoft SQL Server, and Sybase Adaptive Server Enterprise. Contact support for specific versions that have been certified. If your particular version is more recent than one mentioned here it is probably supported.
For more information on Oracle JCA Adapters support for third-party JDBC drivers and databases, see JDBC Driver and Database Connection Configuration.
This section includes the following topics:
Terms Used
ProductName
This is the name of the database.
| Database Name | Supported Database |
|---|---|
|
IBM DB2 |
IBM DB2 v 10.1 |
|
Microsoft SQL Server |
SQLServer 2012 |
|
MySQL |
MySQL v5.6* |
DriverClassName
This is the name of the JDBC Driver Class.
| Database Name | JDBC Driver |
|---|---|
|
IBM DB2 |
|
|
Microsoft SQL Server |
|
|
MySQL |
|
ConnectionString
This is the JDBC Connection URL.
| Database Name | Connection String |
|---|---|
|
IBM DB2 |
j |
|
Microsoft SQL Server |
|
|
MySQL |
|
Username
This is the database user name.
Password
This is the password associated with the user name.
ProcedureName
This is the name of the stored procedure or the function.
ServiceName
This is the service name for the desired operation.
DatabaseConnection
This is the JNDI name of the connection. For example, eis/DB/<DatabaseConnection>.
Destination
This is the destination directory for the generated files. For example, C:\Temp.
Parameters
The parameters of the stored procedure (for versions of MySQL before 5.2.6 only.)
QueryTimeout
The JDBC query timeout value (in seconds.) The QueryTimeout property specifies the maximum number of seconds that the JDBC driver should wait for the specified stored procedure or function to execute. When the threshold is exceeded, SQLException is thrown. If the value is zero, then the driver waits indefinitely.
Important Notes
The Adapter Configuration Wizard supports Oracle Database, IBM DB2, AS/400, DB2/ZOS, Microsoft SQL Server, Sybase 15.7, Informix 11.7+, Progress Db 10, and MySQL v5.6 or higher.
This section includes the following topics:
Microsoft SQL Server
Table 9-14 lists the supported data types for SQL Server stored procedures and functions.
Table 9-14 Data Types for SQL Server Stored Procedures and Functions
| SQL Data Type | XML Schema Type |
|---|---|
|
|
|
|
|
|
|
|
|
|
|
|
|
|
|
|
|
|
|
|
|
|
|
|
|
|
|
|
|
|
DB2 Data Types
Table 9-15 lists the supported data types for DB2 SQL stored procedures:
Table 9-15 Data Types for DB2 SQL Stored Procedures
| SQL Data Type | XML Schema Type |
|---|---|
|
|
|
|
|
|
|
|
|
|
|
|
|
|
|
|
|
|
|
|
|
|
|
|
|
|
|
The names of other data types are also supported implicitly. For example, NUMERIC is equivalent to DECIMAL (as is DEC and NUM as well.)
IBM DB2 supports structured data types (user-defined). However, there is no support for these types in the JDBC drivers. Consequently, a structured data type may not be used as the data type of a parameter in a stored procedure. IBM DB2 also supports user-defined functions. The adapter, however, does not support these functions.
In the Adapter Configuration Wizard, stored procedures are grouped by database user. A schema in IBM DB2 is equivalent to a schema in Oracle. Both represent the name of a database user.
For IBM DB2, <Default Schema> refers to the current database user.
Click <Default Schema> to select a different database user. The stored procedures in the Browse page are those that the database user created in the database specified as <database> in the JDBC Connection URL.
The Adapter Configuration Wizard does not support changing to a different database.
Select the stored procedure in the Stored Procedures dialog, as shown in Figure 9-44. The arguments are shown in the Arguments tab. Click Search to find database stored procedures that the user created in the specified database. For example, 'd%' or 'D%' would both find the DEMO stored procedure. Clicking Show All reveals all of the procedures that the current user created in the specified database.
You can view the source code of the stored procedure by clicking the Source tab, as shown in Figure 9-45.
Figure 9-45 The Source Code of the Stored Procedure
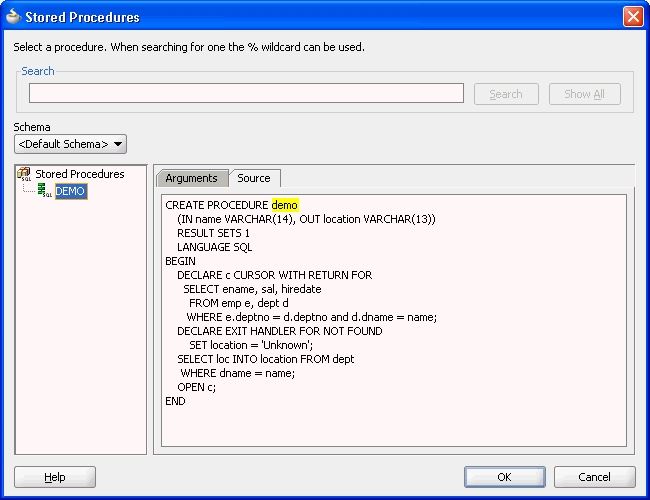
Description of "Figure 9-45 The Source Code of the Stored Procedure"
IBM DB2 AS/400
Table 9-16 lists the supported data types for IBM DB2 AS/400 stored procedures:
Table 9-16 Data Types for IBM DB2 AS/400 Stored Procedures
| SQL Data Type | XML Schema Type |
|---|---|
|
|
|
|
|
|
|
|
|
|
|
|
|
|
|
|
|
|
|
|
|
|
|
|
|
|
|
Distinct types are also supported for data types that are created using the CREATE DISTINCT TYPE statement. These data types work in the same way as they do in IBM DB2.
The IBM DB2 AS/400 implementation is based on queries from catalog tables in the QSYS2 schema. The adapter tries to determine whether the QSYS2.SCHEMATA table exists. If it does, then the Adapter Configuration Wizard queries tables in the QSYS2 schema. Therefore, if your IBM DB2 AS/400 database supports the QSYS2 schema, then the Adapter Configuration Wizard and the adapter run time should both work.
The Adapter Configuration Wizard checks the SYSCAT schema first, and then the QSYS2 schema. The adapter does not support the catalog tables in the SYSIBM schema.
Creating Database Connections
Database connections must be created in JDeveloper to access catalog tables necessary for the Adapter Configuration Wizard to work.
The following are the steps to create a database connection by using JDeveloper:
-
Select Database Navigator from View.
-
Right-click the application name, then click New followed by Connections. Select Database Connection.
The Create Database Connection page is displayed, as shown in Figure 9-46.
Figure 9-46 The Create Database Connection
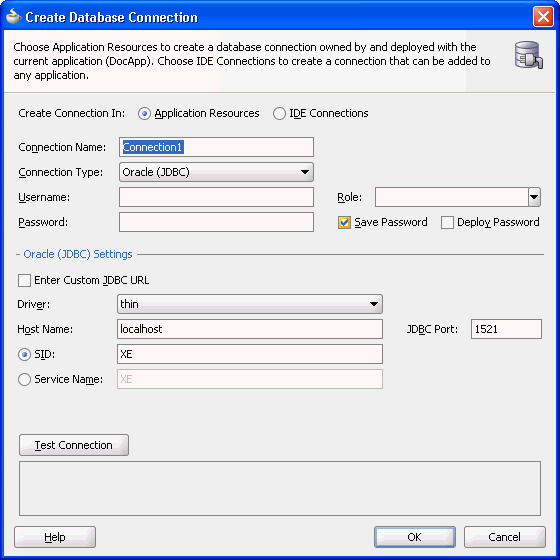
Description of "Figure 9-46 The Create Database Connection" -
Enter a connection name in the Connection Name field. For example,
sqlserver. -
Select Generic JDBC as the Connection Type from the Connection Type list.
-
Enter your Username, Password, and role information.
-
Click New for Driver Class. The Register JDBC Driver dialog is displayed, as shown in Figure 9-47.
Figure 9-47 The Register JDBC Driver Dialog

Description of "Figure 9-47 The Register JDBC Driver Dialog" -
Enter the Driver Class (for example,
com.microsoft.sqlserver.jdbc.SQLServerDriver). -
Create a library or edit an existing one by using the following steps:
-
Click Browse in the Register JDBC Driver dialog.
-
Click New in the Select Library dialog.
The Select Library dialog is displayed, as shown in Figure 9-48.
-
Select an existing library or click New to create one.
The Create Library dialog is displayed.
-
Enter a library name, for example,
SQL Server JDBC. -
Click Add Entry to add JDBC jar files to the class path.
-
Click OK twice to exit the Create Library windows.
-
Click OK to exit the Register JDBC Driver window.
-
-
Enter your connection string name for JDBC URL.
-
Click Test Connection.
-
If the connection is successful, then a screen, as shown in Figure 9-49 is displayed.
Figure 9-49 The Create Database Connection Dialog
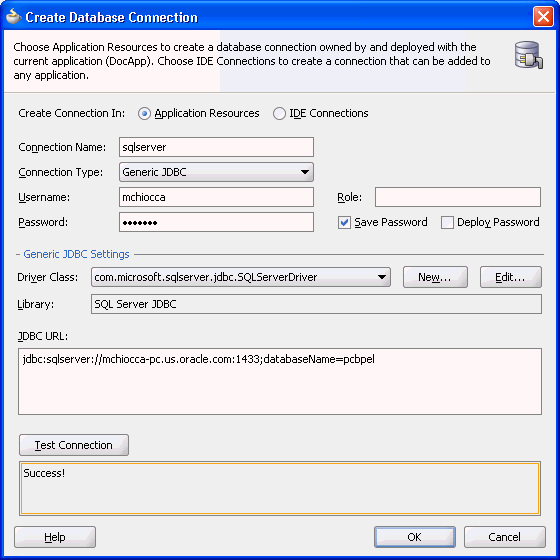
Description of "Figure 9-49 The Create Database Connection Dialog" -
Click OK followed by Finish.
Design Time: Artifact Generation
The Adapter Configuration Wizard – Stored Procedures is capable of creating a WSDL file and a valid XSD file that describes the signature of a stored procedure or function. The following sections describe the relevant structure and content of both the WSDL and the XSD files, and their relationship with each other.
This section includes the following topics:
The WSDL–XSD Relationship
In the paragraphs that follow, the operation name, Factorial, and procedure name, Factorial, are taken from an example cited previously (see Figure 9-38). The generated WSDL imports the XSD file.
<types>
  <schema xmlns="http://www.w3.org/2001/XMLSchema">
    <import namespace="http://xmlns.oracle.com/pcbpel/adapter/db/SCOTT/FACTORIAL/"
      schemaLocation="xsd/SCOTT_FACTORIAL.xsd"/>
  </schema>
</types>
The namespace is derived from the schema, package, and procedure name, and appears as the targetNamespace in the generated XSD.
A root element called InputParameters is created in the XSD file for specifying elements that correspond to the IN and IN/OUT parameters of the stored procedure. Another root element called OutputParameters is also created in the XSD file for specifying elements only if there are any IN/OUT or OUT parameters. IN/OUT parameters appear in both root elements.
These root elements are represented in the XSD file as an unnamed complexType definition whose sequence includes one element for each parameter. If there are no IN or IN/OUT parameters, then the InputParameters root element is still created; however, complexType is empty. A comment in the XSD file indicates that there are no such parameters. An example of a root elements follows.
<element name="InputParameters"
  <complexType>
    <sequence>
      <element …>
       …
    </sequence>
  </complexType>
</element>
The WSDL defines message types whose parts are defined in terms of these two root elements.
<message name="args_in_msg"
  <part name="InputParameters" element="InputParameters"/>
</message>
<message name="args_out_msg"
  <part name="OutputParameters" element="OutputParameters"/>
</message>
The db namespace is equal to the targetNamespace of the generated XSD. The args_in_msg message type always appears in the WSDL while args_out_msg is included only if the OutputParameters root element is generated in the XSD file.
An operation is defined in the WSDL whose name is identical to the adapter service and whose input and output messages are defined in terms of these two message types.
<portType name="Factorial_ptt">
  <operation name="Factorial">
    <input message="tns:args_in_msg"/>
    <output message="tns:args_out_msg"/>
  </operation>
</portType>
The input message always appears while the output message depends on the existence of the OutputParameters root element in the XSD file. The tns namespace is derived from the operation name and is defined in the WSDL as
xmlns:tns="http://xmlns.oracle.com/pcbpel/adapter/db/Factorial/"
The root elements in the XSD file define the structure of the parts used in the messages that are passed into and sent out of the Web service encapsulated by the WSDL.
The input message in the WSDL corresponds to the InputParameters root element from the XSD file. The instance XML supplies values for the IN and IN/OUT parameters of the stored procedure. The output message corresponds to the OutputParameters root element. This is the XML file that gets generated after the stored procedure has executed. It holds the values of any IN/OUT and OUT parameters.
JCA File
The JCA file provides adapter configuration information for the service. A connection factory is specified so that the adapter run time can connect to the database, as shown in the following example. Non-managed connection properties should not be specified directly in the JCA file. Instead you should create a connection factory on the application server, and refer to it by name in the JCA file (<connection-factory location).
<connection-factory location="eis/DB/oracle" UIConnectionName="oracle"
adapterRef="">
</connection-factory>
The JNDI name, eis/DB/oracle, was earlier specified as the service connection in the Adapter Configuration Wizard.
End point properties for the interaction are also specified. The name of the schema, package, and procedure are specified, as shown in the following example. The operation name ties the JCA file back to the service WSDL.
<connection-factory location="eis/db/oracle" UIConnectionName="oracle"
adapterRef=""/>
<endpoint-interaction portType="Factorial_ptt" operation="Factorial">
  <interaction-spec
    className="oracle.tip.adapter.db.DBStoredProcedureInteractionSpec">
      <property name="ProcedureName" value="FACTORIAL"/>
      <property name="GetActiveUnitOfWork="false"/>
  </interaction-spec>
  </output>
</endpoint-interaction>
Note the operation name and procedure name. If an explicit schema had been chosen or if the procedure had been defined in a package, then values for these properties would also be listed here.
Note:
Non-managed connection details are not created in the DBAdapter.jca files when you start JDeveloper in the normal mode. However, non-managed connection details are created in the DBAdapter .jca files when you start JDeveloper in the preview mode.
Oracle Data Types
Many primitive data types have well-defined mappings and therefore are supported by both the design-time and runtime components. In addition, you can use user-defined types such as VARRAY, nested tables, and OBJECT.
Table 9-17 lists the supported data types for Oracle stored procedures and functions.
Table 9-17 Data Types for Oracle Stored Procedures and Functions
| SQL or PL/SQL Type | XML Schema Type |
|---|---|
|
|
|
|
|
|
|
|
|
|
|
|
|
|
|
|
|
|
|
|
|
Generated XSD Attributes
Table 9-18 lists the attributes used in the generated XSDs.
Table 9-18 Generated XSD Attributes
| Attribute | Example | Purpose |
|---|---|---|
|
|
|
Name of an element |
|
|
|
XML schema type |
|
|
|
SQL or PL/SQL type |
|
|
|
Position of a parameter |
|
|
|
Has a default clause |
|
|
|
Minimum occurrences |
|
|
|
Maximum occurrences |
|
|
|
Permits null values |
The db namespace is used to distinguish attributes used during run time from standard XML schema attributes. The db:type attribute is used to indicate what the database type is so that a suitable JDBC type mapping can be obtained at run time. The db:index attribute is used as an optimization by both the design-time and runtime components to ensure that the parameters are arranged in the proper order. Parameter indexes begin at 1 for procedures and 0 for functions. The return value of a function is represented as an OutputParameter element whose name is the name of the function and whose db:index is 0. The db:default attribute is used to indicate whether or not a parameter has a default clause.
The minOccurs value is set to 0 to allow for an IN parameter to be removed from the XML file. This is useful when a parameter has a default clause defining a value for the parameter (for example, X IN INTEGER DEFAULT 0). At run time, if no element is specified for the parameter in the XML file, the parameter is omitted from the invocation of the stored procedure, thus allowing the default value to be used. Each parameter can appear at most once in the invocation of a stored procedure or function. Therefore, maxOccurs, whose default value is always 1, is always omitted from elements representing parameters.
The nillable attribute is always set to true to allow the corresponding element in the instance XML to have a null value (for example, <X/> or <X></X>). In some cases, however, to pass an element such as this element, which does have a null value, you must state this explicitly (for example, <X xsi:nil="true"/>). The namespace, xsi, used for the nillable attribute, must be declared explicitly in the instance XML (for example, xmlns:xsi="http://www.w3.org/2001/XMLSchema-instance").
User-Defined Types
The Adapter Configuration Wizard can also generate valid definitions for user-defined types such as collections (VARRAY and nested tables) and OBJECT. These are created as complexType definitions in the XSD file.
For VARRAY, the complexType definition defines a single element in its sequence, called name_ITEM, where name is the name of the VARRAY element. All array elements in the XML file are so named. Given the following VARRAY type definition,
SQL> CREATE TYPE FOO AS VARRAY (5) OF VARCHAR2 (10);
and a VARRAY element, X, whose type is FOO, the following complexType is generated:
<complexType name="FOO">
  <sequence>
    <element name="X_ITEM" db:type="VARCHAR2"
               minOccurs="0" maxOccurs="5"
nillable="true"/>
      <simpleType>
        <restriction base="string">
          <maxLength value="10"/>
        </restriction>
      </simpleType>
  </sequence>
</complexType>
The minOccurs value is 0 to allow for an empty collection. The maxOccurs value is set to the maximum number of items that the collection can hold. The db:index attribute is not used. Having nillable set to true allows individual items in the VARRAY to be null.
Note the use of the restriction specified on the element of the VARRAY, FOO. This is used on types such as CHAR and VARCHAR2, whose length is known from the declaration of the VARRAY (or nested table). It specifies the type and maximum length of the element. An element value that exceeds the specified length causes the instance XML to fail during schema validation.
The attribute values of a parameter declared to be of type FOO look as follows in the generated XSD:
<element name="X" type="db:FOO" db:type="Array" db:index="1"
          minOccurs="0"
nillable="true"/>
The type and db:type values indicate that the parameter is represented as an array defined by the complexType called FOO in the XSD file. The value for db:index is whatever the position of that parameter is in the stored procedure.
A nested table is treated almost identically to a VARRAY. The following nested table type definition,
SQL> CREATE TYPE FOO AS TABLE OF VARCHAR2 (10);
is also generated as a complexType with a single element in its sequence, called name_ITEM. The element has the same attributes as in the VARRAY example, except that the maxOccurs value is unbounded because nested tables can be of arbitrary size.
<complexType name="FOO">
  <sequence>
    <element name="X_ITEM" … maxOccurs="unbounded" nillable="true">
      …
    </element>
  </sequence>
</complexType>
An identical restriction is generated for the X_ITEM element in the VARRAY. The attributes of a parameter, X, declared to be of this type, are the same as in the VARRAY example.
collections (Varray and nested table) are not supported if they are defined inside of a PL/SQL package specification. For example:
SQL> create package pkg as
   >   type vary is varray(10) of number;
   >   type ntbl is table of varchar2(100;
   >   procedure test(v in vary, n in ntbl);
   > end;
   > /
If a user selects the test procedure in the Adapter Configuration Wizard for stored procedures, an error occurs stating that the types are not supported. However, if the vary and ntbl type definitions were defined at the root level, outside of the package, then choosing the test procedure works without issue. The supported way to use collection types (Varray and nested table) is shown in the following example:
SQL> create type vary as varray(10) of number;
SQL> create type ntbl as table of varchar2(10);
SQL> create package pkg as
   >   procedure test(v in vary, n in ntbl);
   > end;
   /
An OBJECT definition is also generated as a complexType. Its sequence holds one element for each attribute in the OBJECT.
The following OBJECT,
SQL> CREATE TYPE FOO AS OBJECT (X VARCHAR2 (10), Y NUMBER);
is represented as a complexType definition called FOO with two sequence elements.
<complexType name="FOO">
  <sequence>
    <element name="X" db:type="VARCHAR2" minOccurs="0"
                             nillable="true"/>
      <simpleType>
        <restriction base="string">
          <maxLength value="10"/>
        </restriction>
      </simpleType>
    <element name="Y" type="decimal" db:type="NUMBER"
                    minOccurs="0"
nillable="true"/>
  </sequence>
</complexType>
The minOccurs value is 0 to allow for the element to be removed from the XML file. This causes the value of the corresponding attribute in the OBJECT to be set to null at run time. The nillable value is true to allow empty elements to appear in the XML file, annotated with the xsi:nil attribute, to indicate that the value of the element is null. Again, the db:index attribute is not used.
Note the use of a restriction on the VARCHAR2 attribute. The length is known from the declaration of the attribute in the OBJECT.
Complex User-Defined Types
User-defined types can be defined in arbitrarily complex ways. An OBJECT can contain attributes whose types are defined as any of the user-defined types mentioned in the preceding section. The type of an attribute in an OBJECT can be another OBJECT, VARRAY, or a nested table, and so on. The base type of a VARRAY or a nested table can also be an OBJECT. Allowing the base type of a collection to be another collection supports multidimensional collections.
Object Type Inheritance
The Adapter Configuration Wizard is capable of generating a valid XSD for parameters whose types are defined using OBJECT-type inheritance. Given the following type hierarchy,
SQL> CREATE TYPE A AS OBJECT (A1 NUMBER, A2 VARCHAR2 (10)) NOT FINAL;
SQL> CREATE TYPE B UNDER A (B1 VARCHAR2 (10));
and a procedure containing a parameter, X, whose type is B,
SQL> CREATE PROCEDURE P (X IN B) AS BEGIN … END;
the Adapter Configuration Wizard generates an InputParameters element for parameter X as
<element name="X" type="db:B" db:index="1" db:type="Struct"
     minOccurs="0"
nillable="true"/>
where the definition of OBJECT type B in the XSD file is generated as the following complexType.
<complexType name="B">
  <sequence>
    <element name="A1" type="decimal" db:type="NUMBER" minOccurs="0"
nillable="true"/>
    <element name="A2" db:type="VARCHAR2" minOccurs="0"  nillable="true">
      ...
    </element>
    <element name="B1" db:type="VARCHAR2" minOccurs="0"  nillable="true">
      ...
    </element>
  </sequence>
</complexType>
Restrictions on the maximum length of attributes A2 and B1 are added appropriately. Notice how the OBJECT type hierarchy is flattened into a single sequence of elements that corresponds to all of the attributes in the entire hierarchy.
Object References
The Adapter Configuration Wizard can also generate a valid XSD for parameters that are references to OBJECT types (for example, object references) or are user-defined types that contain an object reference somewhere in their definition. In this example,
SQL> CREATE TYPE FOO AS OBJECT (…);
SQL> CREATE TYPE BAR AS OBJECT (F REF FOO, …);
SQL> CREATE PROCEDURE PROC (X OUT BAR, Y OUT REF FOO) AS BEGIN … END;
the Adapter Configuration Wizard generates complexType definitions for FOO and BAR as indicated, except that for BAR, the element for the attribute, F, is generated as
<element name="F" type="db:FOO" db:type="Ref" minOccurs="0" nillable="true"/>
where the type and db:type attribute values indicate that F is a reference to the OBJECT type FOO.
For a procedure PROC, the following elements are generated in the OutputParameters root element of the XSD file:
<element name="X" type="db:BAR" db:index="1" db:type="Struct" minOccurs="0"
nillable="true"/>
<element name="Y" type="db:FOO" db:index="2" db:type="Ref" minOccurs="0"
nillable="true"/>
For Y, note the value of the db:type attribute, Ref. with the type attribute, the element definition indicates that Y is a reference to FOO.
There is a restriction on the use of object references that limits their parameter mode to OUT only. Passing an IN or IN/OUT parameter into an API that is either directly a REF or, if the type of the parameter is user-defined, contains a REF somewhere in the definition of that type, is not permitted.
Referencing Types in Other Schemas
You can refer to types defined in other schemas if the necessary privileges to access them have been granted. For example, suppose type OBJ was declared in SCHEMA1:
SQL> CREATE TYPE OBJ AS OBJECT (…);
The type of a parameter in a stored procedure declared in SCHEMA2 can be type OBJ from SCHEMA1:
CREATE PROCEDURE PROC (O IN SCHEMA1.OBJ) AS BEGIN … END;
This is possible only if SCHEMA1 granted permission to SCHEMA2 to access type OBJ:
SQL> GRANT EXECUTE ON OBJ TO SCHEMA2;
If the required privileges are not granted, an error occurs when trying to create procedure PROC in SCHEMA2:
PLS-00201: identifier "SCHEMA1.OBJ" must be declared
Because the privileges have not been granted, type OBJ from SCHEMA1 is not visible to SCHEMA2; therefore, SCHEMA2 cannot refer to it in the declaration of parameter O.
XSD Pruning Optimization
Some user-defined object types can have a very large number of attributes. These attributes can also be defined in terms of other object types that also have many attributes. In short, one object type can become quite large depending on the depth and complexity of its definition.
Depending on the situation, many attributes of a large object type may not even be necessary. It is sometimes desirable to omit these attributes from the object's schema definition. This can be done by physically removing the unwanted XSD elements from the definition of the object type.
See the following example where a stored procedure has a parameter whose type is a complex user-defined type:
SQL> CREATE TYPE OBJ AS OBJECT (A, NUMBER, B <SqlType>, C <SqlType>, ...);
SQL> CREATE PROCEDURE PROC (O OBJ) AS BEGIN ... END;
The InputParameters root element contains a single element for the parameter, O from the API's signature. A complexType definition is to be added to the generated XSD for the object type, as shown in the following code snippet:
<complexType name="OBJ">
  <sequence>
    <element name="A" type="decimal" db:type="NUMBER" minOccurs="0"
nillable="true"/>
    <element name="B" .../>
    <element name="C" .../>
    ...
  </sequence>
</complexType>
If attributes B and C are not required, then their element in the complexType definition of OBJ can be removed regardless of its type. Values are not required for these attributes in the instance XML. If parameter O had been an output parameter, then elements corresponding with the pruned attributes are also omitted in the generated XML.
Suppose that the type of parameter A was also a user-defined object type and that the definition of OBJ changed accordingly, as shown in the following example:
SQL> CREATE TYPE FOO AS OBJECT (X NUMBER, Y NUMBER, Z NUMBER);
SQL> CREATE TYPE OBJ AS OBJECT (A FOO, B <SqlType>, C <SqlType, ...);
In such a case, the API remains unchanged. Elements corresponding to unwanted attributes in the definition of FOO can also be removed regardless of their type. So, for example, if Y is not required, then its element in the complexType definition of FOO can be removed in the XSD file.
Pruning the XSD file in this fashion improves the runtime performance of the adapter and can significantly reduce memory consumption, as well.
Note:
Only attributes in user-defined object types can be pruned. You cannot prune (remove) a parameter of the stored procedure by removing its element from the InputParameters root element. This can result in an error at run time unless the parameter has a default clause.
Run Time: Before Stored Procedure Invocation
This section discusses important considerations of stored procedure support and a brief overview of some important details regarding what happens before the invocation of a stored procedure or function.
This section includes the following topics:
Value Binding
Consider the extraction of values from the XML file and how the run time works given those values. The possible cases for data in the XML file corresponding to the value of a parameter whose type is a supported primitive data type are as follows:
-
The value of an element is specified (for example,
<X>100</X>, here X=100.) -
The value of an element is not specified (for example,
<X/>, here X=null.) -
The value is explicitly specified as null (for example,
<X xsi:nil="true"/>, here X=null.) -
The element is not specified in the XML file at all (for example,
X = <default value>).
Note:
There is one notable difference that distinguishes Microsoft SQL Server from IBM DB2, MySQL, and AS/400. SQL Server supports parameters that can include a default value in the definition of a stored procedure. Because IBM DB2, MySQL, and AS/400 do not support parameter defaults, every parameter must be represented as an element in the instance XML.
In the first case, the value is taken from the XML file as is and is converted to the appropriate object according to its type. That object is then bound to its corresponding parameter during preparation of the stored procedure invocation.
In the second and third cases, the actual value extracted from the XML file is null. The type converter accepts null and returns it without any conversion. The null value is bound to its corresponding parameter regardless of its type. Essentially, this is equal to passing null for parameter X.
The fourth case has two possibilities. The parameter either has a default clause or it does not. If the parameter has a default clause, then the parameter can be excluded from the invocation of the stored procedure. This allows the default value to be used for the parameter. If the parameter is included, then the value of the parameter is used, instead. If the parameter does not have a default clause, then the parameter must be included in the invocation of the procedure. Elements for all parameters of a function must be specified. If an element in the instance XML is missing, then the function is invoked with fewer arguments than is expected.
A null value is bound to the parameter by default:
SQL> CREATE PROCEDURE PROC (X IN INTEGER DEFAULT 0) AS BEGIN … END;
Here, no value is bound to the parameter. In fact, the parameter can be excluded from the invocation of the stored procedure. This allows the value of 0 to default for parameter X.
To summarize, the following PL/SQL is executed in each of these three cases:
-
"BEGIN PROC (X=>?); END;" - X = 100 -
"BEGIN PROC (X=>?); END;" - X = null -
There are two possibilities:
-
-
"BEGIN PROC (); END;" - X = 0(Xhas a default clause) -
"BEGIN PROC (X=>?); END;" - X = null(Xdoes not have a default clause)
-
With the exception of default clause handling, these general semantics also apply to item values of a collection or attribute values of an OBJECT whose types are a supported primitive data types. The semantics of <X/> when the type is user-defined are, however, quite different.
For a collection, whether it is a VARRAY or a nested table, the following behavior can be expected, given a type definition such as
SQL> CREATE TYPE ARRAY AS VARRAY (5) OF VARCHAR2 (10);
and XML for a parameter, X, which has type ARRAY, that appears as follows:
<X>
    <X_ITEM xsi:nil="true"/>
    <X_ITEM>Hello</X_ITEM>
    <X_ITEM xsi:nil="true"/>
    <X_ITEM>World</X_ITEM>
</X>
The first and third elements of the VARRAY are set to null. The second and fourth are assigned their respective values. No fifth element is specified in the XML file; therefore, the VARRAY instance has only four elements.
Assume an OBJECT definition such as
SQL> CREATE TYPE OBJ AS OBJECT (A INTEGER, B INTEGER, C INTEGER);
and XML for a parameter, X, which has type OBJ, that appears as
<X>
    <A>100</A>
    <C xsi:nil="true"/>
</X>
The value 100 is assigned to attribute A, and null is assigned to attributes B and C. Because there is no element in the instance XML for attribute B, a null value is assigned.
The second case, <X/>, behaves differently if the type of X is user-defined. Rather than assigning null to X, an initialized instance of the user-defined type is created and bound instead.
In the preceding VARRAY example, if <X/> or <X></X> is specified, then the value bound to X is an empty instance of the VARRAY. In PL/SQL, this is equivalent to calling the type constructor and assigning the value to X. For example,
X := ARRAY();
Similarly, in the preceding OBJECT example, an initialized instance of OBJ, whose attribute values have all been null assigned, is bound to X. Similar to the VARRAY case, this is equivalent to calling the type constructor. For example,
X := OBJ(NULL, NULL, NULL);
To specifically assign a null value to X when the type of X is user-defined, add the xsi:nil attribute to the element in the XML file, as in
<X xsi:nil="true"/>
Data Type Conversions
This section describes the conversion of data types such as CLOB, DATE, TIMESTAMP, and binary data types including RAW, LONG RAW and BLOB, and similar data types supported by third-party databases.
Microsoft SQL Server, IBM DB2, AS/400, and MySQL support binding various forms of binary and date data types to parameters of a stored procedure, as summarized in Table 9-19.
Table 9-19 Third-Party Database: Binding Binary and Date Values to Parameters of a Stored Procedure
| XML Schema Type | IBM DB2 Data Type | AS/400 Data Type | Microsoft SQL Server Data Type | MySQL Data Type |
|---|---|---|---|---|
|
|
|
|
|
|
|
|
|
|
|
|
For a CLOB parameter, if the length of the CLOB parameter is less than 4 kilobytes, then the text extracted from the XML file is bound to the parameter as a String type with no further processing. If the length of the CLOB parameter is greater than 4 kilobytes or if the mode of the parameter is IN/OUT then a temporary CLOB parameter is created. The XML file data is then written to the temporary CLOB before the CLOB is bound to its corresponding parameter. The temporary CLOB parameter is freed when the interaction completes. For other character types, such as CHAR and VARCHAR2, the data is simply extracted and bound as necessary. It is possible to bind an XML document to a CLOB parameter (or VARCHAR2 if it is large enough). However, appropriate substitutions for <, >, and so on, must first be made (for example, < for < and > for >).
A few data types require special processing before their values are bound to their corresponding parameters. These include data types represented by the XML Schema types base64Binary and dateTime.
The XML schema type, dateTime, represents TIME, DATE, and TIMESTAMP. The XML values for these data types must adhere to the XML schema representation for dateTime. Therefore, a simple DATE string, 01-JAN-05, is invalid. XML schema defines dateTime as YYYY-MM-DDTHH:mm:ss. Therefore, the correct DATE value is 2005-01-01T00:00:00. Values for these parameters must be specified using this format in the instance XML.
Data for binary data types must be represented in a human readable manner. The chosen XML schema representation for binary data is base64Binary. The type converter uses the javax.mail.internet.MimeUtility encode and decode APIs to process binary data. The encode API must be used to encode all binary data into base64Binary form so that it can be used in an XML file. The type converter uses the decode API to decode the XML data into a byte array. The decode API is used to convert the base64Binary data into a byte array.
For a BLOB parameter, if the length of a byte array containing the decoded value is less than 2 kilobytes, then the byte array is bound to its parameter with no further processing. If the length of the byte array is greater than 2 kilobytes or if the mode of the parameter is IN/OUT, then a temporary BLOB is created. The byte array is then written to the BLOB before it is bound to its corresponding parameter. The temporary BLOB is freed when the interaction completes. For other binary data types, such as RAW and LONG RAW, the base64Binary data is decoded into a byte array and bound as necessary.
Conversions for the remaining data types are straightforward and require no additional information.
Run Time: After Stored Procedure Invocation
After the procedure (or function) executes, the values for any IN/OUT and OUT parameters are retrieved. These correspond to the values of the elements in the OutputParameters root element in the generated XSD.
This section includes the following topics:
Data Type Conversions
Conversions of data retrieved are straightforward. However, CLOB (and other character data), RAW, LONG RAW, and BLOB conversions, and conversions for similar data types supported by third-party databases, require special attention.
When a CLOB is retrieved, the entire contents of that CLOB are written to the corresponding element in the generated XML. Standard DOM APIs are used to construct the XML file. Hence, character data, for types such as CLOB, CHAR, and VARCHAR2, is messaged as needed to make any required substitutions so that the value is valid and can be placed in the XML file for subsequent processing. Therefore, substitutions for <and>, for example, in an XML document stored in a CLOB are made so that the value placed in the element within the generated XML for the associated parameter is valid.
Raw data, such as for RAW and LONG RAW data types, is retrieved as a byte array. For BLOBs, the BLOB is first retrieved, and then its contents are obtained, also as a byte array. The byte array is then encoded using the javax.mail.internet.MimeUtility encode API into base64Binary form. The encoded value is then placed in its entirety in the XML file for the corresponding element. The MimeUtility decode API must be used to decode this value back into a byte array.
Conversions for the remaining data types are straightforward and require no additional information.
Null Values
Elements whose values are null appear as empty elements in the generated XML and are annotated with the xsi:nil attribute. Thus, the xsi namespace is declared in the XML file that is generated. Generated XML for a procedure PROC, which has a single OUT parameter, X, whose value is null, looks as follows:
<OutputParameters … xmlns:xsi="http://www.w3.org/2001/XMLSchema-instance">
    <X xsi:nil="true"/>
</OutputParameters>
XML elements for parameters of any type (including user-defined types) appear this way if their value is null.
Function Return Values
The return value of a function is treated as an OUT parameter at position 0 whose name is the name of the function itself. For example,
CREATE FUNCTION FACTORIAL (X IN INTEGER) RETURN INTEGER AS
BEGIN
    IF (X <= 0) THEN RETURN 1;
    ELSE RETURN FACTORIAL (X - 1);
    END IF;
END;
An invocation of this function with a value of 5, for example, results in a value of 120 and appears as <FACTORIAL>120</FACTORIAL> in the OutputParameters root element in the generated XML.
Run Time: Common Third-Party Database Functionality
The common third-party database functionality at run time includes the following:
Processing ResultSets
All third-party databases share the same functionality for handling ResultSets. The following is a SQL Server example of an API that returns a ResultSet:
 1> create procedure foo ... as select ... from ...;
 2> go
A RowSet defined in the generated XSD represents a ResultSet. A RowSet consists of zero or more rows, each having one or more columns. A row corresponds with a row returned by the query. A column corresponds with a column item in the query. The generated XML for the API shown in the preceding example after it executes is shown in the following example:
<RowSet>
  <Row>
    <Column name="<column name>" sqltype="<sql datatype">value</Column>
    ...
  </Row>
    ...
</RowSet>
…
The name attribute stores the name of the column appearing in the query while the sqltype attribute stores the SQL datatype of that column, for example INT. The value is whatever the value is for that column.
It is possible for an API to return multiple ResultSets. In such cases, there is one RowSet for each ResultSet in the generated XML. All RowSets always appear first in the generated XML.
Returning an INTEGER Status Value
Some databases support returning an INTEGER status value using a RETURN statement in a stored procedure. Microsoft SQL Server and AS/400 both support this feature. In both cases, the Adapter Configuration Wizard cannot determine whether a stored procedure returns a status value. Therefore, you must specify that the stored procedure is returning a value. You can use a check box to make this indication.
After choosing a stored procedure in the Stored Procedures dialog, the Specify Stored Procedure page appears, as shown in Figure 9-50. The check box appears at the bottom of the page. Select the box to indicate that the procedure contains a RETURN statement. You can view the source code of the procedure to determine whether a RETURN statement exists.
The check box appears only for stored procedures on databases that support this feature. The check box is not displayed for functions. The value returned by the stored procedure appears as an element in the OutputParameters root element in the generated XSD. The name of the element is the name of the stored procedure. The value of a return statement is lost after the execution of the stored procedure if the check box is not selected.
Figure 9-50 The Specify Stored Procedure Page
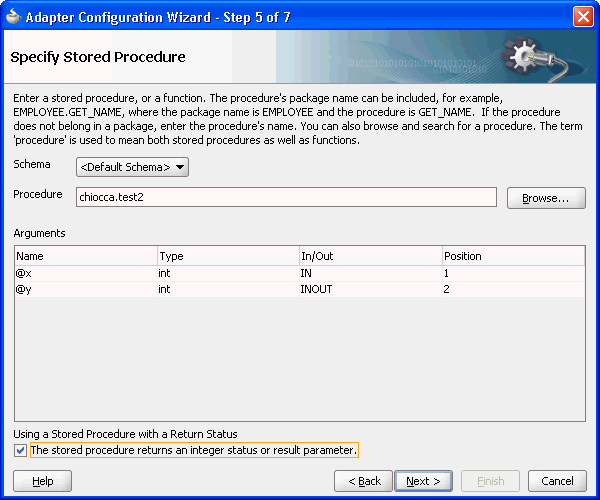
Description of "Figure 9-50 The Specify Stored Procedure Page"
Advanced Topics
This section discusses scenarios for types that are not supported directly using the stored procedure functionality that the Oracle Database Adapter provides. The following sections describe workarounds that address the have to use these data types:
Row Set Support Using a Strongly Typed XSD
Currently a REF CURSOR by nature can support any arbitrary result set, so the XSD generated at design time is weakly typed.
However the XML output from this is hard to use. It is very difficult to write an Xpath expression or XSL based on a weakly typed XSD and column names as attribute values instead of element names.
Although a row set can represent any result set, it is possible to assume for some procedures that it has the same structure each time, and hence can be described with a strongly typed XSD. A strongly typed XSD is almost a necessity to transform the result set to another XSD later on. You can use the Adapter Configuration Wizard to generate a strongly typed XSD for a REF CURSOR.
If a weakly typed XSD is sufficient for your use case, see Row Set Support Using a Weakly Typed XSD.
This section includes the following topics:
For more information, see Row Set Support Using a Strongly or Weakly Typed XSD.
Design Time
If the stored procedure or function you select contains an output parameter of type RowSet, you can define a strongly typed XSD for this ref cursor as follows:
-
Using the Adapter Configuration Wizard, select a stored procedure or function that contains an output parameter of type
RowSet.See steps 1 through 8 in Using Top-Level Standalone APIs.
-
Click Next. The RowSets page is displayed, as shown in Figure 9-51.
By default, the Adapter Configuration Wizard generates a weakly typed XSD for this ref cursor shown in the XSD text field. The following example shows this default, weakly typed XSD.
Example - Default Weakly Typed XSD
<schema targetNamespace="http://xmlns.oracle.com/pcbpel/adapter/db/SYS/MOVIES_ CURSORS/MOVIES_QUERY/" xmlns="http://www.w3.org/2001/XMLSchema" xmlns:db="http://xmlns.oracle.com/pcbpel/adapter/db/SYS/MOVIES_CURSORS/MOVIES_QUERY/" elementFormDefault="qualified"> <element name="InputParameters"> <complexType> <sequence> <element name="EXAMPLE" type="db:SYS.MOVIESOBJ" db:index="1" db:type="Struct" minOccurs="0" nillable="true"/> </sequence> </complexType> </element> <element name="OutputParameters"> <complexType> <sequence> <element name="MOVIES" type="db:RowSet" db:index="2" db:type="RowSet" minOccurs="0" nillable="true"/> </sequence> </complexType> </element> <complexType name="RowSet"> <sequence> <element name="Row" minOccurs="0" maxOccurs="unbounded"> <complexType> <sequence> <element name="Column" maxOccurs="unbounded" nillable="true"> <complexType> <simpleContent> <extension base="string"> <attribute name="name" type="string" use="required"/> <attribute name="sqltype" type="string" use="required"/> </extension> </simpleContent> </complexType> </element> </sequence> </complexType> </element> </sequence> </complexType> <complexType name="SYS.MOVIESOBJ"> <sequence> <element name="TITLE" db:type="VARCHAR2" minOccurs="0" nillable="true"> <simpleType> <restriction base="string"> <maxLength value="30"/> </restriction> </simpleType> </element> <element name="DIRECTOR" db:type="VARCHAR2" minOccurs="0" nillable="true"> <simpleType> <restriction base="string"> <maxLength value="30"/> </restriction> </simpleType> </element> <element name="STARRING" db:type="VARCHAR2" minOccurs="0" nillable="true"> <simpleType> <restriction base="string"> <maxLength value="30"/> </restriction> </simpleType> </element> </sequence> </complexType> </schema> -
For each of the stored procedure or function arguments:
-
Double-click in the Value column.
-
Enter a value for the argument.
Enter numbers and strings directly, dates as literals (for example, 2009/11/11), and structs as say
MYOBJ('a', 'b'). -
Press Enter.
Note:
You must choose values that are valid for the argument type and that exist in the database.
Oracle recommends that you specify a value for all arguments to ensure that the correct stored procedure or function signature is executed.
-
-
Click Introspect.
The Adapter Configuration Wizard executes the stored procedure or function using the arguments you specify:
-
If the stored procedure or function returns a row set with at least 1 row, the RowSets page is updated to display a strongly typed XSD in the XSD text field. The following example shows the strongly typed XSD that replaces the default, weakly typed XSD that the previous example shows.
Figure 9-52 RowSets Page: Successful Introspection
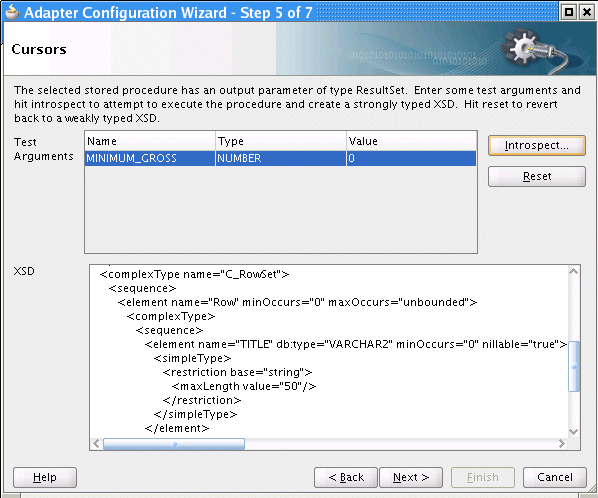
Description of "Figure 9-52 RowSets Page: Successful Introspection"Example - Strongly Typed XSD
<schema targetNamespace="http://xmlns.oracle.com/pcbpel/adapter/db/SYS/MOVIES_
CURSORS/MOVIES_QUERY/" xmlns="http://www.w3.org/2001/XMLSchema"
xmlns:db="http://xmlns.oracle.com/pcbpel/adapter/db/SYS/MOVIES_CURSORS/MOVIES_
QUERY/" elementFormDefault="qualified">
   <element name="InputParameters">
      <complexType>
         <sequence>
            <element name="EXAMPLE" type="db:SYS.MOVIESOBJ" db:index="1"
db:type="Struct" minOccurs="0" nillable="true"/>
         </sequence>
      </complexType>
   </element>
   <element name="OutputParameters">
      <complexType>
         <sequence>
            <element name="MOVIES" type="db:MOVIES_RowSet" db:index="2"
db:type="RowSet" minOccurs="0" nillable="true"/>
         </sequence>
      </complexType>
   </element>
   <complexType name="MOVIES_RowSet">
      <sequence>
         <element name="MOVIES_Row" minOccurs="0" maxOccurs="unbounded">
            <complexType>
               <sequence>
                  <element name="TITLE" db:type="VARCHAR2" minOccurs="0"
nillable="true">
                     <simpleType>
                        <restriction base="string">
                           <maxLength value="50"/>
                        </restriction>
                     </simpleType>
                  </element>
                  <element name="DIRECTOR" db:type="VARCHAR2" minOccurs="0"
nillable="true">
                     <simpleType>
                        <restriction base="string">
                           <maxLength value="20"/>
                        </restriction>
                     </simpleType>
                  </element>
                  <element name="STARRING" db:type="VARCHAR2" minOccurs="0"
nillable="true">
                     <simpleType>
                        <restriction base="string">
                           <maxLength value="100"/>
                        </restriction>
                     </simpleType>
                  </element>
                  <element name="SYNOPSIS" db:type="VARCHAR2" minOccurs="0"
nillable="true">
                     <simpleType>
                        <restriction base="string">
                           <maxLength value="255"/>
                        </restriction>
                     </simpleType>
                  </element>
                  <element name="GENRE" db:type="VARCHAR2" minOccurs="0"
nillable="true">
                     <simpleType>
                        <restriction base="string">
                           <maxLength value="70"/>
                        </restriction>
                     </simpleType>
                  </element>
                  <element name="RUN_TIME" type="decimal" db:type="NUMBER"
minOccurs="0" nillable="true"/>
                  <element name="RELEASE_DATE" type="dateTime" db:type="DATE"
minOccurs="0" nillable="true"/>
                  <element name="RATED" db:type="VARCHAR2" minOccurs="0"
nillable="true">
                     <simpleType>
                        <restriction base="string">
                           <maxLength value="6"/>
                        </restriction>
                     </simpleType>
                  </element>
                  <element name="RATING" db:type="VARCHAR2" minOccurs="0"
nillable="true">
                     <simpleType>
                        <restriction base="string">
                           <maxLength value="4"/>
                        </restriction>
                     </simpleType>
                  </element>
                  <element name="VIEWER_RATING" db:type="VARCHAR2" minOccurs="0"
nillable="true">
                     <simpleType>
                        <restriction base="string">
                           <maxLength value="5"/>
                        </restriction>
                     </simpleType>
                  </element>
                  <element name="STATUS" db:type="VARCHAR2" minOccurs="0"
nillable="true">
                     <simpleType>
                        <restriction base="string">
                           <maxLength value="11"/>
                        </restriction>
                     </simpleType>
                  </element>
                  <element name="TOTAL_GROSS" type="decimal" db:type="NUMBER"
minOccurs="0" nillable="true"/>
                  <element name="DELETED" db:type="VARCHAR2" minOccurs="0"
nillable="true">
                     <simpleType>
                        <restriction base="string">
                           <maxLength value="5"/>
                        </restriction>
                     </simpleType>
                  </element>
                  <element name="SEQUENCENO" type="decimal" db:type="NUMBER"
minOccurs="0" nillable="true"/>
                  <element name="LAST_UPDATED" type="dateTime" db:type="DATE"
minOccurs="0" nillable="true"/>
                  <element name="POLLING_STRATEGY" db:type="VARCHAR2"
minOccurs="0" nillable="true">
                     <simpleType>
                        <restriction base="string">
                           <maxLength value="30"/>
                        </restriction>
                     </simpleType>
                  </element>
               </sequence>
            </complexType>
         </element>
      </sequence>
   </complexType>
   <complexType name="SYS.MOVIESOBJ">
      <sequence>
         <element name="TITLE" db:type="VARCHAR2" minOccurs="0" nillable="true">
            <simpleType>
               <restriction base="string">
                  <maxLength value="30"/>
               </restriction>
            </simpleType>
         </element>
         <element name="DIRECTOR" db:type="VARCHAR2" minOccurs="0"
nillable="true">
            <simpleType>
               <restriction base="string">
                  <maxLength value="30"/>
               </restriction>
            </simpleType>
         </element>
         <element name="STARRING" db:type="VARCHAR2" minOccurs="0"
nillable="true">
            <simpleType>
               <restriction base="string">
                  <maxLength value="30"/>
               </restriction>
            </simpleType>
         </element>
      </sequence>
   </complexType>
</schema>
Proceed to step 5.
-
If no rows are returned, the Introspection Failed dialog is displayed, as shown in Figure 9-53.
The Adapter Configuration Wizard generates a weakly typed XSD and displays it in the XSD text field by default, overwriting any edits you may have made to a previous version of the XSD.
Go back to step 3 and enter test argument values that returns a row set with at least 1 row.
-
If the stored procedure or function throws an exception, the Introspection Error dialog is displayed, as shown in Figure 9-54.
The Adapter Configuration Wizard generates a weakly typed XSD and displays it in the XSD text field by default, overwriting any edits you may have made to a previous version of the XSD.
Go back to step 3 and enter test argument values that returns a row set with at least 1 row.
-
-
Optionally, fine tune the strongly typed XSD by manually editing the schema shown in the XSD text filed.
-
Proceed to step 10 in Using Top-Level Standalone APIs.
Run Time
Suppose you have the following package:
CREATE PACKAGE PKG AS
       TYPE REF_CURSOR IS REF CURSOR;
       PROCEDURE TEST(C OUT REF_CURSOR);
END;

CREATE PACKAGE BODY PKG AS
       ROCEDURE TEST(C OUT REF_CURSOR) AS
       BEGIN
           OPEN C FOR SELECT DEPTNO, DNAME FROM DEPT;
       END;
END;
After using the Adapter Configuration Wizard to define a strongly typed XSD, after the procedure executes, the following XML is generated for parameter, C:
<C>
    <C_Row>
        <DEPTNO>10</DEPTNO>
        <DNAME>ACCOUNTING</DNAME>
    </C_Row>
    <C_Row>
        <DEPTNO>11</DEPTNO>
        <DNAME>DEVELOPMENT</DNAME>
    </C_Row>
    …
</C>
Using the Oracle Database Adapter, at run time, it does not matter if the XSD describing the strongly typed ref cursor is inline or imported.
The strongly typed XSD is applied by the SOA runtime and is visible in the Oracle Enterprise Manager Console, where appropriate. For example, Figure 9-55 shows the audit trail for an invoke that returns a ref cursor payload using a strongly typed XSD.
Figure 9-55 Audit Trail for Stongly Typed Payload
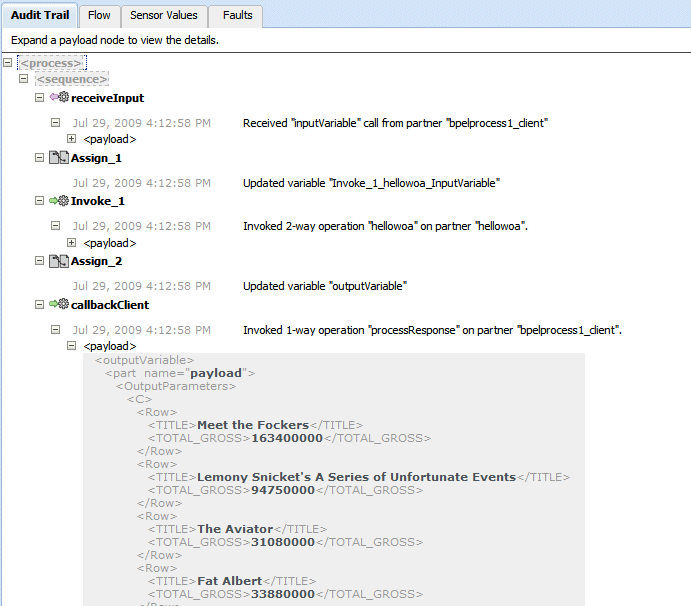
Description of "Figure 9-55 Audit Trail for Stongly Typed Payload"
Row Set Support Using a Weakly Typed XSD
Currently a REF CURSOR by nature can support any arbitrary result set, so the XSD generated at design time is weakly typed. By default, the Adapter Configuration Wizard generates a weakly typed XSD for a REF CURSOR.
However the XML output from this is hard to use. It is very difficult to write an Xpath expression or XSL based on a weakly typed XSD and column names as attribute values instead of element names.
Although a row set can represent any result set, it is possible to assume for some procedures that it has the same structure each time, and hence can be described with a strongly typed XSD. A strongly typed XSD is almost a necessity to transform the result set to another XSD later on.
If a strongly typed XSD is better suited to your use case, see Row Set Support Using a Strongly Typed XSD.
This section includes the following topics:
For more information, see Row Set Support Using a Strongly or Weakly Typed XSD.
Design Time
If the stored procedure or function you select contains an output parameter of type ResultSet, you can define a weakly typed XSD for this ref cursor as follows:
Run Time
Suppose you have the following package:
CREATE PACKAGE PKG AS
       TYPE REF_CURSOR IS REF CURSOR;
       PROCEDURE TEST(C OUT REF_CURSOR);
END;

CREATE PACKAGE BODY PKG AS
       ROCEDURE TEST(C OUT REF_CURSOR) AS
       BEGIN
           OPEN C FOR SELECT DEPTNO, DNAME FROM DEPT;
       END;
END;
The REF_CURSOR is a weakly typed cursor variable because the query is not specified. After the procedure executes, the following XML is generated for parameter, C:
<C>
    <Row>
        <Column name="DEPTNO" sqltype="NUMBER">10</Column>
        <Column name="DNAME" sqltype="VARCHAR2">ACCOUNTING</Column>
    </Row>
    <Row>
        <Column name="DEPTNO" sqltype="NUMBER">20</Column>
        <Column name="DNAME" sqltype="VARCHAR2">RESEARCH</Column>
    </Row>
    …
</C>
There is a total of four rows, each consisting of two columns, DEPTNO and DNAME.
Ref cursors are represented by Java ResultSets. It is not possible to create a ResultSet programmatically by using APIs provided by the JDBC driver. Therefore, ref cursors may not be passed IN to a stored procedure. They can only be passed as IN/OUT and OUT parameters with one caveat. An IN/OUT ref cursor is treated strictly as an OUT parameter. Because no IN value can be provided for an IN/OUT parameter, a null is bound to that parameter when invoking the stored procedure.
Support for PL/SQL Boolean, PL/SQL Record, and PL/SQL Table Types
The Adapter Configuration Wizard provides a mechanism that detects when PL/SQL Boolean, Record, and Table types are used and then invokes Oracle JPublisher to generate the necessary wrappers automatically. Oracle JPublisher generates two SQL files, one to create schema objects, and another to drop them. The SQL that creates the schema objects is automatically executed from within the Adapter Configuration Wizard to create the schema objects in the database schema before the XSD file is generated. For example, suppose the following package specification is declared:
CREATE PACKAGE PKG AS
  TYPE REC IS RECORD (X NUMBER, Y VARCHAR2 (10));
  TYPE TBL IS TABLE OF NUMBER INDEX BY PLS_INTEGER;
  PROCEDURE PLSQL (R REC, T TBL, B BOOLEAN);
END;
Figure 9-57 shows the step in the Adapter Configuration Wizard that is displayed when PROC procedure from PKG package is selected.
Figure 9-57 Specifying a Stored Procedure in the Adapter Configuration Wizard
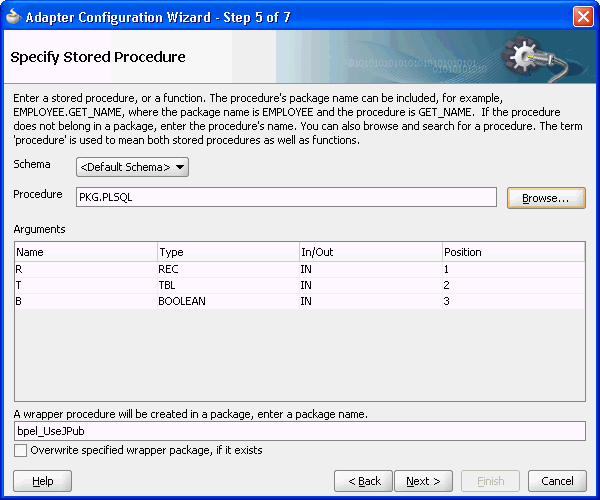
Description of "Figure 9-57 Specifying a Stored Procedure in the Adapter Configuration Wizard"
Note:
If you are connecting to Oracle Database 18c or later, wrapper generation for user-defined data types used as IN /OUT parameters in a stored procedure is not supported. To bypass the wrapper generation so that you can connect to Oracle Database 18c or later, you must install the following 14c (14.1.2.0.0) patches:- JDeveloper: 31026461 and 30922431
- SOA Suite (run time): 30922431
Sign in to My Oracle Support and search for the patch numbers to locate and download the patches.
After applying the patches, the wizard will not show the wrapper section in the screenshot above. The wrapper bypass means that the following data types are not supported:
-
PL/SQL Boolean data type for IN/OUT parameters in the stored procedure. If included, you will receive the following error message and the database connection will fail:
This procedure contains PL/SQL
              BOOLEAN data type IN/OUT Parameters that are not supported in selected
              database.
To connect to Oracle Database 18c or later, you can write a wrapper procedure to convert the Boolean data type to integer.
-
Nested PL/SQL Record and Table data types in the stored procedure. If included, you will receive the following informational message and will still be allowed to create the database connection:
The procedure contains PL/SQL types. In case if the
              procedure has Nested PL/SQL types, please consider writing a wrapper procedure. Nested
              PL/SQL types are not supported.
You can modify your stored procedure to use alternatives to these data types. Otherwise, continue to create the database connection.
As Figure 9-57 shows, the original procedure name is fully qualified, PKG.PLSQL. The type of parameter, R, is the name of the RECORD. The type of T is the name of the TABLE. The type of B is Boolean. The name of the wrapper package that is generated is derived from the service name, bpel_ServiceName (for example, bpel_UseJPub). This is the name of the generated package that contains the wrapper procedure. You can use the check box to force the Adapter Configuration Wizard to overwrite an existing package when the schema objects are created.
Clicking Next twice reveals the Finish page of the Adapter Configuration Wizard, as shown in Figure 9-58.
Figure 9-58 Defining a Database Adapter Service: Finish Page
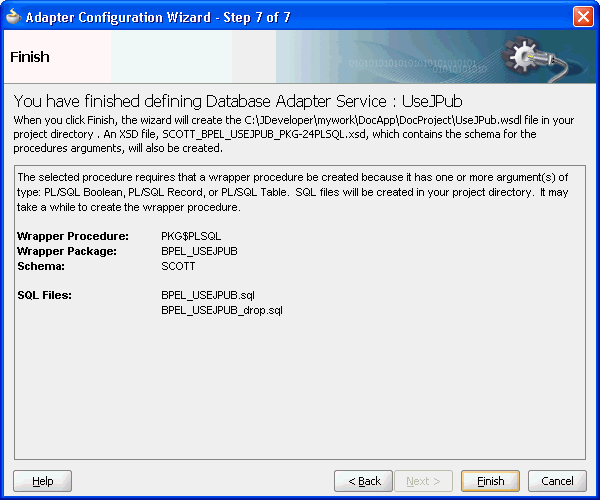
Description of "Figure 9-58 Defining a Database Adapter Service: Finish Page"
The contents of this page describe what the Adapter Configuration Wizard has detected and what actions are performed when you click Finish. The page includes the following information:
-
The name of the generated WSDL is
UseJPub.wsdl. -
The name of the JCA file is
UseJPub_db.jca. -
Two SQL scripts are created and added to the BPEL process project:
-
BPEL_USEJPUB.sql– Creates the schema objects. -
BPEL_USEJPUB_drop.sql– Drops the schema objects.
-
-
The name of the generated XSD is
SCOTT_USEJPUB_PKG-24PLSQL.xsd.
When you click Finish, Oracle JPublisher is invoked to generate the SQL files and load the schema objects into the database. If you selected a database prior to Oracle Database 18c, the process of generating wrappers may take quite some time to complete. Processing times for wrappers that are generated in the same package usually require less time after an initial wrapper has been generated for another procedure within the same package.
Note:
You must execute BPEL_XXXX_drop.sql when re-creating an Oracle Database Adapter. This is likely due to the JPublisher functionality, which uses a cache when generating wrappers.
If you selected a database prior to Oracle Database 18c, the wrapper generated the following user-defined types to replace the PL/SQL types from the original procedure:
SQL> CREATE TYPE PKG_REC AS OBJECT (X NUMBER, Y VARCHAR2 (10));
SQL> CREATE TYPE PKG_TBL AS TABLE OF NUMBER;
The naming convention for these types is OriginalPackageName_OriginalTypeName. Boolean is replaced by INTEGER in the wrapper procedure.
Acceptable values for the original Boolean parameter, now that it is an INTEGER are 0 for FALSE and any nonzero INTEGER value for TRUE. Any value other than 1 is considered false. The generated wrapper procedure uses APIs from the SYS.SQLJUTL package to convert from INTEGER to Boolean and vice-versa.
A new wrapper package called BPEL_USEJPUB is created that contains the wrapper for procedure PLSQL, called PKG$PPLSQL, and conversion APIs that convert from the PL/SQL types to the user-defined types and vice-versa. If the original procedure is a root-level procedure, then the name of the generated wrapper procedure is TOPLEVEL$OriginalProcedureName.
The generated XSD represents the signature of wrapper procedure PKG$PLSQL and not the original procedure. The name of the XSD file is URL-encoded, which replaces $ with -24.
Note the naming conventions for the generated artifacts:
-
The service name is used in the names of the WSDL and SQL files. It is also used as the name of the wrapper package.
-
The name of the generated XSD is derived from the schema name, service name, and the original package and procedure names.
-
The name of a SQL object or collection data types are derived from the original package name and the name of its corresponding PL/SQL type.
-
The name of the wrapper procedure is derived from the original package and procedure names.
TOPLEVEL$is used for root-level procedures.
Note:
Before you use the adapter configuration, examine the JCA file and compare it with the generated SQL script. Ensure that the parameters in the JCA file have the values in the generated SQL file. For example, the parameters should have values like, <property name="PackageName" value="BEPL_USEJPUB"/>
<property name="ProcedureName" value="PKG$PLSQL"/>The name of the generated wrapper package is limited to 30 characters. The name of the wrapper procedure is limited to 29 characters. If the names generated by Oracle JPublisher are longer than these limits, then they are truncated.
When the PartnerLink that corresponds with the service associated with the procedure is invoked, then the generated wrapper procedure is executed instead of the original procedure.
Default Clauses in Wrapper Procedures
If a procedure contains a special type that requires a wrapper to be generated, then the default clauses on any of the parameters are not carried over to the wrapper. For example, consider
SQL> CREATE PROCEDURE NEEDSWRAPPER (
        >     B BOOLEAN DEFAULT TRUE, N NUMBER DEFAULT 0) IS BEGIN … END;
Assuming that this is a root-level procedure, the signature of the generated wrapper procedure is
TOPLEVEL$NEEDSWRAPPER (B INTEGER, N NUMBER)
The Boolean type has been replaced by INTEGER. The default clauses on both parameters are missing in the generated wrapper. Parameters of generated wrapper procedures never have a default clause even if they did in the original procedure.
In this example, if an element for either parameter is not specified in the instance XML, then an error occurs stating that an incorrect number of arguments have been provided. The default value of the parameter that is specified in the original procedure is not used.
To address this situation, the generated SQL file that creates the wrapper must be edited, restoring the default clauses to the parameters of the wrapper procedure. The wrapper and any additional schema objects must then be reloaded into the database schema. After editing the SQL file, the signature of the wrapper procedure is as follows:
TOPLEVEL$NEEDSWRAPPER (B INTEGER DEFAULT 1, N NUMBER DEFAULT 0)
For Boolean parameters, the default value for true is 1, and the default value for false is 0.
As a final step, the XSD file generated for the wrapper must be edited. A special attribute must be added to elements representing parameters that now have default clauses. Add db:default="true" to each element representing a parameter that now has a default clause. For example,
<element name="B" … db:default="true" …/>
<element name="N" … db:default="true" …/>
This attribute is used at run time to indicate that if the element is missing from the instance XML, then the corresponding parameter must be omitted from the procedure call. The remaining attributes of these elements remain exactly the same.
Oracle Database Adapter Use Cases
This section describes Oracle Database Adapter use cases.
Use Cases for Oracle Database Adapter - Stored Procedures
This section includes the following use cases:
Table 9-20 shows the Oracle Database Adapter stored procedure samples that are provided with BPEL Process Manager and Mediator.
Table 9-20 Oracle Database Adapter Use Cases - Stored Procedures
| Tutorial Name | Description |
|---|---|
|
|
Illustrates a workaround for using
PL/SQL |
|
|
Illustrates how to use a
|
|
|
Illustrates a workaround for using
a |
See Table 9-4 for the structure of the
MOVIES table, which is used for many of the use cases.
Creating and Configuring a Stored Procedure in JDeveloper BPEL Designer
This use case describes how to integrate a stored procedure into BPEL Process Manager with JDeveloper BPEL Designer.
This use case includes of the following sections:
Prerequisites
To perform this use case, you must define the following stored procedure in the
SCOTT schema:
SQL> CREATE PROCEDURE hello (name IN VARCHAR2, greeting OUT VARCHAR2) AS
  2  BEGIN
  3     greeting := 'Hello ' || name;
  4  END;
  5/
Creating an Application and a SOA Composite
You must create a JDeveloper application to contain the SOA composite. To create an application and a project for the use case, perform the following steps:
Creating the Outbound Oracle Database Adapter Service
To create an outbound Oracle Database Adapter service, perform the following steps:
-
Drag and drop Database Adapter from the Component Palette to the External References swim lane.
The Adapter Configuration Wizard Welcome page is displayed.
-
Enter
Helloin the Service Name field. -
Click Next.
The Service Connection page is displayed.
Note:
Ensure that you have configured the JNDI name in the
weblogic-ra.xmlfile before deploying this application.For more information, refer to Creating a Data Source and Recommended Setting for Data Sources Used by Oracle JCA Adapters.
-
Click the Create a New Database Connection icon.
The Create Database Connection dialog is displayed.
-
Enter the following details in the Create Database Connection dialog:
-
Enter a connection name in the Connection Name field. For example,
Myconnection. -
Select Oracle (JDBC) for Connection Type.
-
Enter the user name and password as
scott/tiger. -
Enter the host name in the Host Name field and the JDBC port in the JDBC Port field.
-
Select SID and enter the SID name. Alternatively, select Service Name and enter the service name.
-
Click Test Connection. A success message is displayed in the Status pane.
-
Click OK.
The Connection field is populated with the
Myconnectionconnection and the JNDI field is populated witheis/DB/MyConnection. -
-
Click Next.
The Operation Type page is displayed.
-
Select Call a Stored Procedure or Function, and then click Next.
The Specify Stored Procedure page is displayed.
-
Click Browse. Select
Helloin the Stored Procedures pane.The Arguments tab displays the parameters of the stored procedure and the Source tab displays the source code of the stored procedure.
-
Click OK.
The Specify Stored Procedure page is displayed. The Procedure field is populated with the
Hellostored procedure and the arguments for theHellostored procedure are also displayed. -
Click Next.
The Advanced Options page is displayed.
-
Specify any additional advanced options, and then click Next.
The Adapter Configuration Wizard - Finish page is displayed.
-
Click Finish.
The Create Partner Link dialog box is displayed. The name of the partner link is
Hello, which is the same as the service name. The outbound Oracle Database Adapter is now configured and theGreetBPEL process is displayed.
Change the Message Part of the Request Message
When the payload of the request matches the InputParameters, then all of the IN parameters is included in the request. The only IN parameter in this example is name.
To change the message part for the GreetRequestMessage message,
perform the following steps:
Change the Message Part of the Response Message
When the payload of the response matches the OutputParameters, then
all of the OUT parameters are included in the response. The only
OUT parameter in this example is greeting.
The steps for the GreetResponseMessage message part are the same as
that of GreetRequestMessage with the following exceptions:
- Expand the GreetResponseMessage message type, and then select payload.
- Expand SCOTT_HELLO.xsd in the Type Chooser dialog and select OutputParameters.
- Select OutputParameters.
Add a Assign Activity for the Input Variable
To add an Assign activity for the input variable, perform the following steps:
Add an Assign Activity for the Output Variable
In the second assign activity, you assign a value to the output parameter.
The steps for assigning a value to the output parameter are the same as assigning value to the input parameter with the following exceptions:
Deploying with JDeveloper
You must deploy the application profile for the SOA project and the application you created in the preceding steps. To deploy the application profile using JDeveloper, perform the following steps:
- Create an application server connection. For more information, see Creating an Application Server Connection for Oracle JCA Adapters.
- Deploy the application. For more information, see Deploying Oracle JCA Adapter Applications from JDeveloper.
Creating a DataSource in Oracle WebLogic Server Administration Console
Before you can test the HelloProject you must create a
data source using the Oracle WebLogic Server Administration Console. Perform the following steps:
File To Stored Procedure Use Case
This use case illustrates the execution of an Oracle stored procedure. The input to the stored procedure is obtained by reading a file using the File Adapter. The stored procedure executes, populating a table with the data from its input parameter.
This use case includes the following topics:
Prerequisites
To perform the file to stored procedure use case, you must first create the following file:
customers.sql
Then, run customers.sql to define the schema objects and
stored procedure in the SCOTT/TIGER schema before modeling the BPEL
Composite using JDeveloper.
Contents of
customers.sql
CONNECT scott/tiger
DROP TYPE collection;
DROP TYPE customer;
DROP TYPE address;
DROP TABLE customers;
DROP PROCEDURE add_customers;
CREATE TYPE address AS OBJECT
(
  street VARCHAR2(20),
  city   VARCHAR2(15),
  state  CHAR(2),
  zip    CHAR(5)
);
/
show errors;
CREATE TYPE customer AS OBJECT
(
  fname VARCHAR2(10),
  lname VARCHAR2(10),
  loc   address,
  email VARCHAR2(25),
  phone VARCHAR2(15)
);
/
show errors;
CREATE TYPE collection AS TABLE OF customer;
/
show errors;
CREATE TABLE customers
(
  name  VARCHAR2(25),
  loc   VARCHAR2(45),
  email VARCHAR2(25),
  phone VARCHAR2(15)
);
CREATE PROCEDURE add_customers(c IN collection) AS
BEGIN
  FOR i IN c.FIRST .. c.LAST LOOP
    INSERT INTO customers VALUES (
      c(i).lname || ', ' || c(i).fname,
      c(i).loc.street || ', ' || c(i).loc.city || ', ' || c(i).loc.state || ' ' || c(i).loc.zip,
      c(i).email,
      c(i).phone
    );
  END LOOP;
END;
/
show errors;
Creating an Application and a SOA Project
You must create an JDeveloper application to contain the SOA composite. To create an application and a SOA project, perform the following steps:
Creating the Outbound Oracle Database Adapter Service
To create an outbound Oracle Database Adapter service, perform the following steps:
-
Drag and drop Database Adapter from the Service Adapters list to the Exposed Services swim lane. The Adapter Configuration Wizard Welcome page is displayed.
-
Enter
File2SPServicein the Service Name field. -
Click Next.
The Service Connection page is displayed.
-
Click the Create a New Database Connection icon.
The Create Database Connection dialog is displayed.
-
Enter the following details in the Create Database Connection dialog:
-
Enter a connection name in the Connection Name field. For example,
MyConnection. -
Select Oracle (JDBC) for Connection Type.
-
Enter the user name and password as
scott/tiger. -
Enter the host name in the Host Name field and the JDBC port in the JDBC Port field.
-
Select SID and enter the SID name. Alternatively, select Service Name and enter the service name.
-
Click Test Connection. A success message is displayed in the Status pane.
-
Click OK.
The Connection field is populated with the
MyConnectionconnection and the JNDI field is populated witheis/DB/MyConnection. -
-
Click Next.
The Adapter Interface page is displayed.
-
In the Adapter Interface page, select Define from operation and schema (specified later), and then click Next.
The Operation Type page is displayed.
-
Select Call a Stored Procedure or Function, as shown in Figure 9-66, and click Next.
The Specify Stored Procedure page is displayed.
Figure 9-66 The Adapter Configuration Wizard - Operation Type Page
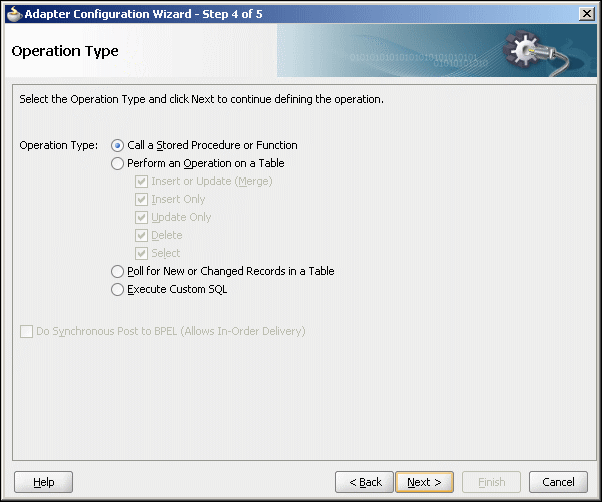
Description of "Figure 9-66 The Adapter Configuration Wizard - Operation Type Page" -
Click Browse. Select
ADD_CUSTOMERSin the Stored Procedures pane.The
Argumentstab displays the parameters of the stored procedure and theSourcetab displays the source code of the stored procedure. -
Click OK.
The Specify Stored Procedure page is displayed.
The
Procedurefield is populated with theADD_CUSTOMERSstored procedure and the arguments for theADD_CUSTOMERSstored procedure are also displayed. -
Click Next.
The Advanced Options page is displayed.
-
Specify any additional options, and then click Next.
The Finish page is displayed.
-
Click Finish.
The Create Partner Link dialog is displayed.
The name of the partner link is
File2SPService, which is the same as the service name. The outbound Oracle Database Adapter is now configured and theFile2SPBPEL process is displayed.
Creating an Invoke Activity
You must complete the BPEL process by creating an Invoke activity. This creates the input variables.
To create an Invoke activity, perform the following steps:
Creating the Inbound File Adapter Service
To create an inbound File adapter service, which reads input XML from a file directory, perform the following steps:
Adding a Receive Activity
The File Adapter Service provides input to the Receive Activity, which then initiates the rest of the BPEL Process.
To add a Receive activity, perform the following steps:
Adding an Assign Activity
Next, you must assign a value to the input parameter.
To add an Assign activity, perform the following steps:
Wiring Services and Activities
You must assemble or wire the three components that you have created: Inbound adapter service, BPEL process, Outbound adapter reference.
To wire components, perform the following steps:
- Drag the small triangle in
ReadCustomerin the Exposed Services area to the drop zone that appears as a green triangle in the BPEL process in the Components area. - Drag the small triangle in the BPEL process in the
Components area to the drop zone that appears as a
green triangle in
File2SPServicein the External References area. - Click File, then select Save All.
Deploying with JDeveloper
You must deploy the application profile for the SOA project and the application you created in the preceding steps. To deploy the application profile using JDeveloper, perform the following steps:
- Create an application server connection. For more information, see Creating an Application Server Connection for Oracle JCA Adapters.
- Deploy the application. For more information, see Deploying Oracle JCA Adapter Applications from JDeveloper.
Creating a Data Source
Before you can test the File2SPProject you must create a data
source using the Oracle WebLogic Server Administration Console. Perform the following steps:
Adding a Connection-Instance
The Database Adapter needs an instance entry, which points to a data source.
To add a connection instance, perform the following steps:
Testing Using the File Adapter Service and SQL*Plus
You must test the BPEL process by providing input file for the File Adapter. The results of the BPEL process are seen using a simple query from a table.
Create a file named customers.xml with the following
content:
<InputParameters xmlns="http://xmlns.oracle.com/pcbpel/adapter/db/SCOTT/ADD_CUSTOMERS/">
  <C>
    <C_ITEM>
      <FNAME>John</FNAME>
      <LNAME>Doe</LNAME>
      <LOC>
        <STREET>123 Main Street</STREET>
        <CITY>Anytown</CITY>
        <STATE>CA</STATE>
        <ZIP>12345</ZIP>
      </LOC>
      <EMAIL>john.smith@gmail.com</EMAIL>
      <PHONE>567-123-9876</PHONE>
    </C_ITEM>
    <C_ITEM>
      <FNAME>Jane</FNAME>
      <LNAME>Doe</LNAME>
      <LOC>
        <STREET>987 Sunset Blvd</STREET>
        <CITY>Sometown</CITY>
        <STATE>CA</STATE>
        <ZIP>34567</ZIP>
      </LOC>
      <EMAIL>JaneDoe@yahoo.com</EMAIL>
      <PHONE>567-123-9876</PHONE>
    </C_ITEM>
  </C>
</InputParameters>
To test the BPEL process that you created, perform the following steps:
Database Adapter/Coherence Integration
There is a performance improvement when the Database Adapter is used with Coherence Cache on an Exalogic system. The feature that provides this improvement is called Database Adapter/Coherence Integration
There are two specific use cases where there is an advantage to using the Database Adapter with Coherence Cache on an Exalogic system. Specifically, performance can be improved when performing the following operations:
-
Insert/Update to a database
-
Select by primary key
Inserts/Updates to a Database
Inserts and updates to a database using the Database Adapter and Coherence cache are improved through the internal use of an intermediary Coherence data source, called a Coherence Cache, basically an in-memory database.
In the typical case, you perform insert/delete/update operations directly on the database. To improve performance, these operations can first be performed on this Coherence-fronting in-memory database, called a write-behind map, which enables read-write operations using the Cache.
Note:
When using the Database Adapter for outbound inserts with Coherence write-behind make sure the Database table has an index on the primary key column.
Using such a Coherence map improves the latency of BPEL/OSB processes performing insert/delete/update operations, as these processes can return immediately to the caller without a trip to the database; the actual and intensive work of updating the database is done instead by the Coherence Cache intermediary.
You can use Coherence in this manner when processing large batches of records, which makes record updating more convenient and efficient.
Note:
Database Adapter use cases that do not leverage Coherence Cache include the following operations: inbound polling, pure SQL invokes, stored procedure calls, and general Selects that return multiple rows.
Select Optimization
The second use case that Database Adapter/Coherence Integration improves is query performance, specifically in optimizing Select statement use cases. Database Adapter/Coherence Integration provides benefits to the query performance by caching data that might be accessed frequently by many different process instances.
When select optimization is used, to optimize queries, the Database Adapter/Coherence Integration uses a read-only Coherence Cache (also called an L2-read cache), which the Database Adapter checks first for a cache hit before proceeding to the database. In other words, queries are optimized by checking to see if the data being queried against is in the Coherence Cache first; if not found there, the database is checked for the same data.
When a Coherence miss occurs, the data is read from the database and loaded into the Coherence Cache. The presumption is that checking the Coherence Cache is faster than executing a query on the database, as the ratio of cache visits to cache misses is typically high.
Queries that Do Not Benefit from Coherence Database Adapter Integration
Not all queries can benefit from cache visits and hence Coherence Database Adapter Integration.There is no indication if there was a Coherence cache hit on all records that meet a specified query criterion, or if there are additional database records that could have been hit but which were not in cache.
For this reason, the query optimization feature includes a new kind of Database Adapter operation, which is a Select by Primary Key. Unlike the existing Select and queryByExample operations, when using Select by Primary Key you can only return a single row. With the primary key selected to return a single row, you are in effect requesting more specific records to be returned from the Coherence Cache, thus improving the performance of the feature against the Cache.
Database Adapter/Coherence Integration Architecture
You can choose whether to use Database Adapter/Coherence integration by choosing none, read, or read-write in the Operation Type screen of the Database Adapter Wizard. However, it is useful to be informed abpit the architecture of the Database Adapter/Coherence integration:
-
For information about EclipseLink, see Oracle TopLink.
-
For information about Coherence, see Oracle Coherence.
Using Coherence Database Adapter Integration with WebLogic Server 10.3.5
You must perform the following steps to use the Coherence Database Adapter with WebLogic Server 10.3.5.
Current Design of the Database Adapter (No Coherence Cache)
With the current design of the Database Adapter, the Adapter performs selects and inserts to the EclipseLink layer, which directly communicates with the data sources without the Coherence Cache.
When you choose none in the Cache Usage dropdown on the Operations Type screen in the Database Configuration Wizard, you indicate you do not want to use cache.
Read-Write Coherence Cache Database Adapter Integration
You can choose to use read-write cache by choosing read-write from the Cache-Usage dropdown of the Operation Type screen of the Database Adapter Wizard
Eclipselink is in two layers, with Coherence Cache (a Coherence Cache Store) between the two layers. There is actually only one Eclipselink project, but two copies of that project.
-
The top copy of Eclipselink redirects all insert/select queries from the data store to Coherence Cache.
-
The bottom copy of Eclipselink handles requests by Coherence Cache to load a particular record by ID from the database, or to store a particular record to the database.
A Select you execute in the read-write scenario might not uniquely identify the rows to retrieve.
Such a case could be a SELECT * or SELECT where total gross > ?
The write-behind Coherence Cache can only receive requests to load a record by ID. Thus, in either of these cases, if all queries were directed to Coherence Cache, no results would be returned. In this case, the query proceeds to the data source directly, and then the Coherence Cache is updated.
Read Coherence Cache Database Adapter Integration
You can choose to use read cache by choosing read from the Cache Usage dropdown on the Operation Type screen of the Database Adapter Wizard.
With Read Cache, when the Database Adapter inserts a record to the Database or selects a record from the database, the Coherence Cache is updated. Any query that identifies a row (that is, by specifying primary key) first checks the Coherence cache, possibly saving a trip to the database.) As the Coherence Cache is distributed and can be simply thought of as a hash map, selecting by a specific primary key enables faster lookups through the Coherence Cache Map.
Enabling No Cache Using the Operations Type Screen
Figure 9-75 shows the No Caching option as it appears on the Operations type screen of the Database Adapter Wizard, with none selected.
Figure 9-75 The Database Adapter Configuration Wizard Operation Type Screen, with No Caching Selected
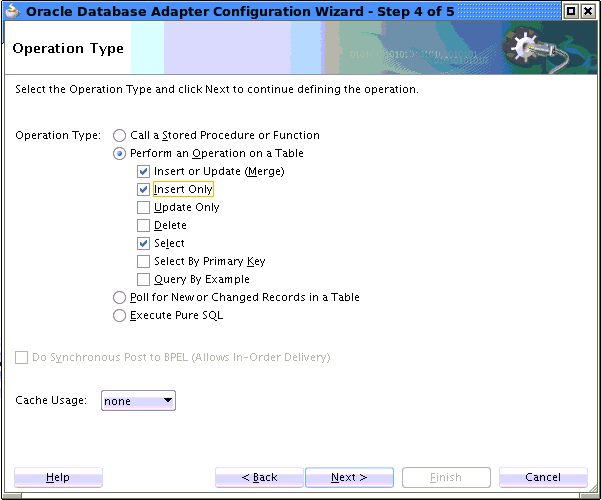
Description of "Figure 9-75 The Database Adapter Configuration Wizard Operation Type Screen, with No Caching Selected "
All outbound operations are enabled on this screen with the none option selected. Once you select this option, and choose Next or Finish, none of the selected operations contain the property CacheUsage. This absence of a property is equivalent to the JCA activation property CacheUsage being equal to the value none.
The following options are the only operations pre-selected when you choose the none option as the cache usage:
-
Merge -
Insert Only -
Select
Enabling Read-Write Caching Using the Operation Type Screen
You can choose to enable read-write caching through the Operation Type screen. See Figure 9-76. Once you select this option and press Next or Finish, the JCA property CacheUsage value is set to read-write.
Figure 9-76 Enabling Read-Write Caching Using the Operation Type Screen
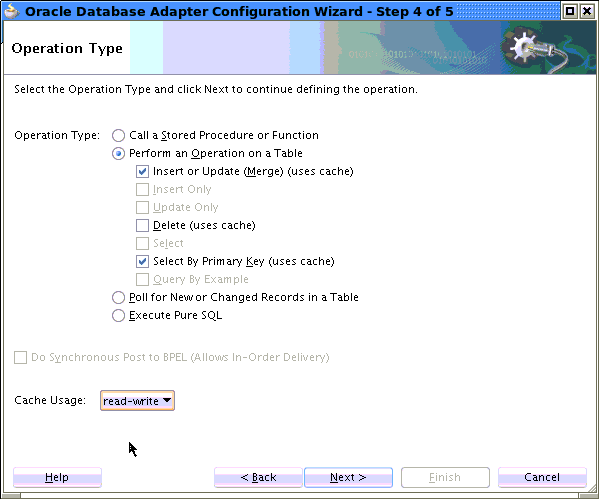
Description of "Figure 9-76 Enabling Read-Write Caching Using the Operation Type Screen"
Refer to the following list of operations to understand how they are used on this screen when you choose the read-write option from the Cache Usage dropdown:
-
Insert or Update (Merge)are enabled and have the stringuses cacheappended to their label. -
Insert onlyis disabled, as the underlying cache store always performs a merge. -
Update Onlyis disabled, as the underlying cache store always performs a merge. -
Deleteis selectable but not pre-selected and has the stringuses cacheappended to it when it is selected. -
Selectis disabled, as this query is converted into a Coherence filter executed on a Coherence map. -
Query by Exampleis disabled, as the Database Adapter/Coherence Integration query is converted into a Coherence filter executed on a Coherence map. -
Select by Primary Keyhas the stringuses cacheappended to the label.
Enabling Read Caching Using the Operation Type Screen
You can enable read caching using the Cache Usage option on the Operation Type screen. See Figure 9-77. Once you select this option on the screen and press Next or Finish, the JCA property CacheUsage value is set to read.
Figure 9-77 Enabling Read-Write Caching Using the Operation Type Screen
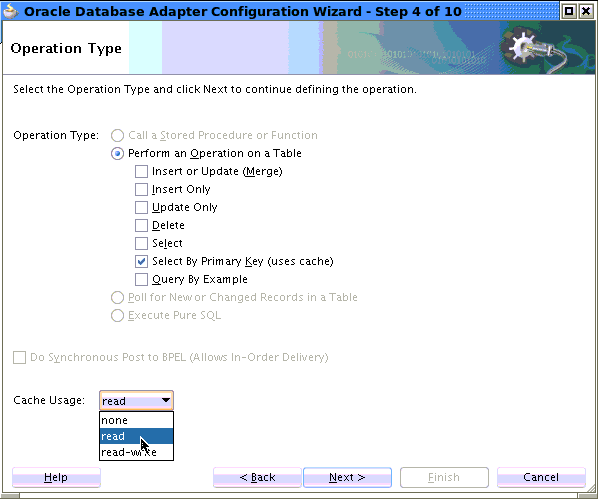
Description of "Figure 9-77 Enabling Read-Write Caching Using the Operation Type Screen"
For the read cache option, only the Select by Primary Key operation is pre-selected. Select by Primary Key is the only operation that can be meaningfully executed by the Coherence Database Adapter Integration feature through the cache, although other operations can update cache. Because read cache is not intrusive on the cache, any of the operations on the Operation Type on this screen are disabled.
Select and Query By Example are not disabled, although they do not directly update the cache. The Database Adapter/Coherence Integration feature executes the Select against the database, but updates the Coherence Cache with any rows that are returned.
The general operation of read caching is that if any objects returned exist in the Coherence Cache, the objects in the cache are returned, rather than the Database Adapter/Coherence Integration feature building a new copy from the result set.
This operation improves performance where the master database record has several details; a query on the details does not have to be executed again.
A query behaves the same as a Select. This is true, for example with XML data where the primary key is set (and it does not get a cache hit).
XA Transactions, Read-Write and Read Operations with Coherence/Database Adapter Integration
When using Database Adapter/Coherence Integration, you cannot use XA transactions with read-write operations. This is because the Database Adapter, with Coherence Integration, performs inserts to the Coherence Cache and subsequently to the database, a sequence which breaks the XA transaction contract.
However, you can use XA transactions with read operations using Database Adapter/Coherence Integration.
Database transactions using the Database Adapter that do not use Database Adapter/Coherence Integration can still use the XA transaction model.
Coherence Cache Lifecycle and Configuration
When you deploy a Database Adapter containing a composite application with cacheUsage "read" or "read-write", a dedicated Coherence cache is created. Its name will be DbAdapter/WriteBehindCache/<serviceName>/<tableName> for read-write cache or DbAdapter/L2Cache/<serviceName>/<tableName> for read cache.
This cache name is stored in a property in or-mappings.xml:
<properties>
<property name="eclipselink.coherence.cache.name">
<value>DBAdapter/WriteBehindCache/insertReference.Movies</value>
</property>
</properties>
Two Cache configuration templates are defined in soa-coherence-cache-config.xml, which resides in fabric-runtime.jar. One template is for all cache names beginning with DbAdapter/WriteBehindCache/ (read-write) and another for those starting with DbAdapter/L2Cache (read).
You can edit these definitions or change the cache name within or-mappings.xml and create new definitions. The following example shows two templates as defined in soa-coherence-cache-config.xml:
Example - soa-coherence-cache-conifg.xml Templates
<cache-mapping>
 <cache-name>DBAdapter/WriteBehindCache/*</cache-name>
   <scheme-name>db-adapter-write-behind-cache</scheme-name>
</cache-mapping>
<cache-mapping>
  <cache-name>DBAdapter/L2Cache/*</cache-name>
  <scheme-name>db-adapter-l2-cache</scheme-name>
</cache-mapping>

<distributed-scheme>
<scheme-name>db-adapter-write-behind-cache</scheme-name>
<backup-count-after-write-behind>0</backup-count-after-write-behind>
<!-- for DbAdapter must be true on SOA nodes and false on dedicated Coherence nodes.-->
<local-storage>true</local-storage>
<thread-count>1</thread-count>
<task-hung-threshold>20000</task-hung-threshold>
<backing-map-scheme>
<read-write-backing-map-scheme>

<internal-cache-scheme>
<local-scheme>
<eviction-policy>HYBRID</eviction-policy>
<high-units>10000</high-units>
<low-units></low-units>
<unit-calculator>FIXED</unit-calculator>
<expiry-delay>120s</expiry-delay>
</local-scheme>
</internal-cache-scheme>
<cachestore-scheme>
<class-scheme>
<class-name>oracle.tip.adapter.db.toplinkext.coherence.DBAdapterCacheStore</class-name>
<init-params>
<init-param>
<param-type>java.lang.String</param-type>
<param-value>{cache-name}</param-value>
</init-param>
</init-params>
</class-scheme>
</cachestore-scheme>
<write-delay>5s</write-delay>
<write-batch-factor>0.1</write-batch-factor>
<write-requeue-threshold>1000</write-requeue-threshold>
</read-write-backing-map-scheme>
</backing-map-scheme>
<autostart>false</autostart>
</distributed-scheme>

<distributed-scheme>
<scheme-name>db-adapter-l2-cache</scheme-name>
<!-- for DbAdapter must be true on SOA nodes and false on dedicated Coherence nodes.-->
<local-storage>true</local-storage>
<thread-count>4</thread-count>
<task-hung-threshold>500</task-hung-threshold>
<backing-map-scheme>
<local-scheme>
<eviction-policy>HYBRID</eviction-policy>
<high-units>1000</high-units>
<low-units>1000</low-units>
<unit-calculator>FIXED</unit-calculator>
<expiry-delay>120s</expiry-delay>
</local-scheme>

</backing-map-scheme>
<autostart>true</autostart>
</distributed-scheme>
</caching-schemes>
If you are defining your own definition, you must set local-storage true.
The lifecycle of objects is different with a CacheUsage-enabled project. First, the EclipseLink project (or-mappings.xml) associated with a composite application is only loaded once, even if the same composite is redeployed with an updated or-mappings.xml file. Normally, each redeployment of a composite is a clean redeploy of all artifacts.
Secondly, a Coherence cache is not destroyed on undeploying a CacheUsage composite. This must be done manually. This means that you can redeploy a composite and the underlying Coherence cache will still be there, with the contents it had before the redeployment. As distinct from other Database Adapter use cases, you can thus have multiple Database Adapter references, across one or multiple composites, connecting to the same Coherence-named cache.
Thus, the lifecycle of the EclipseLink project (or-mappings.xml) and Coherence cache is per WebLogic Application server restart instead of per composite revision/deployment.
Finally, the Database Adapter uses byte-code generation rather than real Java classes to represent the objects being inserted into the data store. This makes it difficult to connect directly to the same Coherence NamedCache programatically, outside the Database Adapter. This is because the class definitions are not easily available for deserialization. As mentioned, however, multiple Database Adapter references with similar or-mappings.xml projects can share the same Coherence cache.
Query by Example
Query-by-example enables you to specify query selection criteria in the form of a sample object instance that you populate with only the attributes you want to use for the query. EclipseLink support for query-by-example includes a query-by-example policy that a user can modify. The Eclipse link user can edit the policy to modify query-by-example default behavior.
The Database Adapter provides, in essence, an implementation or encapsulaion of a Query by Example policy by providing a basic set of Query By Example operators,. These include the following types of operators:
-
Use LIKE or other operations to compare attributes. By default, query-by-example allows only EQUALS.
-
Modify the set of values query-by-example ignores (the IGNORE set). The default ignored values are zero (0), empty strings, and FALSE
-
Force query-by-example to consider attribute values, even if the value is in the IGNORE set.
-
Use isNull or notNull for attribute values. (But refer to Constraints on Use).
The Database Adapter provides this facility by adding additional operation and values to the existing operations and values available through the Advanced Operations screen of the Database Adapter Configuration Wizard.
When you select the Query by Example option in the Database Adapter Configuration Wizard, you have the option to use additional queries, or to combine those queries with other queries you have created.
Note:
QueryByExample does not support use of multiple table. It is better to use PureSQL over Query-by-example for related tables.
Figure 9-78 Database Adapter Configuration Wizard Operation Type Screen Showing Query By Example Chosen

Description of "Figure 9-78 Database Adapter Configuration Wizard Operation Type Screen Showing Query By Example Chosen"
Within the following types of queries, which are db.jca.properties added to DBReadinteractionSpec, you can use the following queries as indicated:
-
QueryByExampleTextOperator -
QueryByExampleNumericOperator -
QuerybyExampleDateOperator
Each one of these types of queries can be set to one of the following Query By Example values:
-
equal -
notEqual -
equalsIgnoreCase -
lessThan -
lessThanEqual -
greaterThan -
greaterThanEqual -
like -
likeIgnoreCase -
containsAllKeyWords -
containsAnyKeyWords -
containsSubstring -
containsSubstringIgnoringCase
In the JDeveloper UI, you can choose any of these queries and the operation they can perform. There is a drop down list of comparison operations for each of these operators on the Advanced Operations screen. See Figure 9-79.
Figure 9-79 Database Adapter Configuration Wizard Advanced Operations Screen Showing Query By Example Comparison Operator lessThan Specified
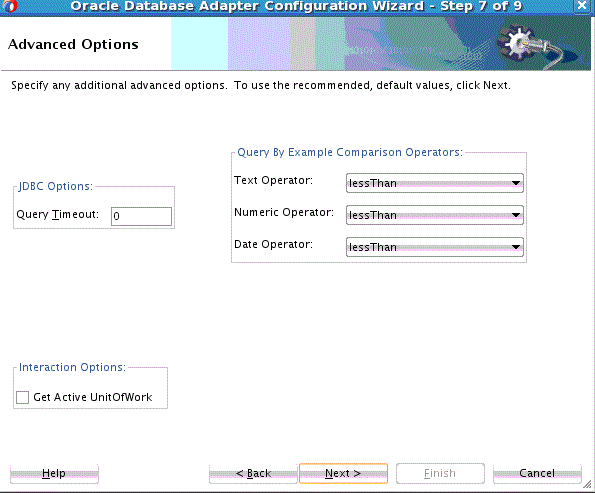
Description of "Figure 9-79 Database Adapter Configuration Wizard Advanced Operations Screen Showing Query By Example Comparison Operator lessThan Specified"
Note that some combinations, such as likeIgnoreCase for Numeric values, do not make sense, but no restriction is imposed on your use.
You can pick any single parameter operator which can be found in org.eclipse.persistence.expressions.Expression, not just the ones listed. To set one of these operators you can edit the JCA file directly.
Choosing "equal" is the same as the default, so that value will not appear in the JCA file when you select finish. Older projects which do not have these properties will have them added automatically.
Combining Query by Example with a Regular Query
You can combine your use of the JDev expression builder with Query by Example. For example, if your query performs a WHERE some_column IS NOT NULL operation you can model this first operation with a regular Select, and also choose the Query by Example operation. In your JCA file, copy the QueryName property from the Select operation to the Query by Example operation, that is:
<property name="IsQueryByExample" value="true"/>
<property name="QueryName" value="dbReferenceSelect"/>
Note you do no need to copy operations to the activation file, unlike with a Query by Example operation
Constraints on Use
If your example record has the following:
<someOtherColumn>someOtherValue</someOtherColumn>
the SQL produced will be the following:
WHERE some_column IS NOT NULL AND some_other_column = 'someOtherValue'
You can only use this if there are no input parameters to the regular Select statement.
There is currently no support for a QueryByExample policy where certain columns in the example object can have nulls which are significant.
Thus null attributes are ignored, but EclipseLink support allows generation of IS NULL and IS NOT NULL through a combination of two other APIs. Neither of these APIs are exposed, but you can use these statements by combining them with a regular query. There is also no API to always exclude certain columns, even if they have significant (that is, not null) values. It is better to create an explicit query.
Modifying the or-mappings.xml File for UTF16 Character Data Insertions
The Database Adapter uses the UTF-16 format to represent a string. When the Database Adapter is used to insert data into a database which uses non AL16UTF16 character set, for example WE8DE, automatic character conversion causes wrong data to be inserted into the database. The solution is to modify the JDeveloper Adapter Configuration Wizard generated -or-mappings.xml file. One restriction is that the Oracle database version you are using has to be Oracle 9 database or above.
To accomplish the indicated solution:
-
Locate the -or-mappings.xml file in the project's file system and open it with an editor (by default you cannot alter the file using JDeveloper.)
-
Locate the
<attribute-name>field name</attribute-name>for the database field which will contain UTF16 characters. -
Replace the attribute
<attribute-classification>java.lang.String</attribute-classification>
with
<attribute-classification>org.eclipse.persistence.platform.database.oracle. NString</attribute-classification>
-
Save and redeploy the project.
Because the -or-mappings.xml file is generated automatically by the Database Adapter Configuration Wizard, you must repeat these steps when you run the Database Adapter Configuration Wizard.
