33 Managing Federation Schemes and Policies
If you want to enable Oracle Access Management Access Manager to work with federation providers, you define one or more authentication schemes. The defined schemes authenticate users that request access to resources protected by Access Manager.
The following topics introduce authentication schemes and policies that you can configure for Oracle Access Management Identity Federation:
Use of Identity Federation and Access Manager Together
The use of federation features in Access Manager varies depending on the release.
When you integrate with Identity Federation:
-
11g Release 1 (11.1.1) sites, and those upgrading from 11g Release 1 (11.1.1) to 11g Release 2 (11.1.2), can use the integration.
See Integrating Access Manager 11gR2 with Identity Federation 11gR1 in the Oracle Fusion Middleware Integration Guide for Oracle Identity Management Suite.
-
Sites with new 11g Release 2 (11.1.2) installations can leverage federation features using the Oracle Access Management Console.
See Deploying Identity Federation with Oracle Access Management.
Using Authentication Schemes and Modules for Identity Federation
The following topics describe how to use authentication schemes and modules for Identity Federation:
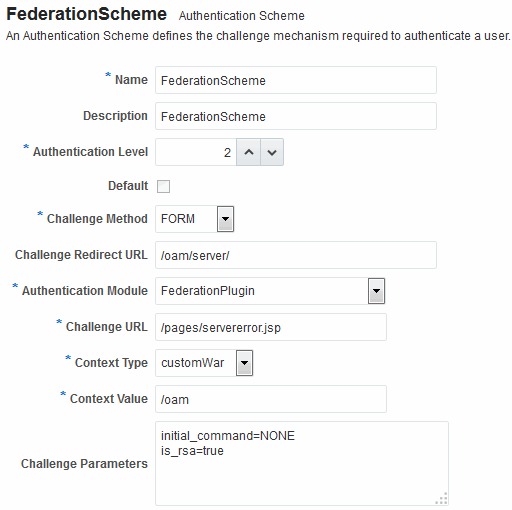
About the FederationScheme Authentication Scheme
FederationScheme is a general-purpose scheme for use with Identity Federation 11g Release 2 (11.1.2.2).
Figure 33-1 shows the Access Console page for FederationScheme:.
Table 33-1 describes the FederationScheme.
Table 33-1 FederationScheme Element Definitions
| Element | Description |
|---|---|
|
Name |
This is the scheme name. |
|
Description |
This is a brief description of the scheme. |
|
Authentication Level |
This is the trust level of the authentication scheme. |
|
Default |
This is a non-editable box that is checked when the Set as Default button is clicked. |
|
Challenge Method |
You may select a challenge method from those available in the drop-down box. |
|
Challenge Redirect URL |
This is the URL of another server to which user requests must be redirected for processing. |
|
Authentication Module |
This is the authentication module to use with the scheme. |
|
Challenge URL |
This is the URL to which the credential collector will redirect for credential collection. Not used by the federation plug-in. |
|
Context Type |
This element is used to build the final URL for the credential collector. |
|
Context Value |
This element is used to build the final URL for the credential collector. The value depends on the context type. |
|
Challenge Parameters |
This is the list of parameters, if any, to use with the challenge. |
Table 22-23 lists the specifications for FederationScheme.
About the FederationMTScheme
The FederationMTScheme authentication scheme is a scheme that is designed for use in multi-tenancy environments.
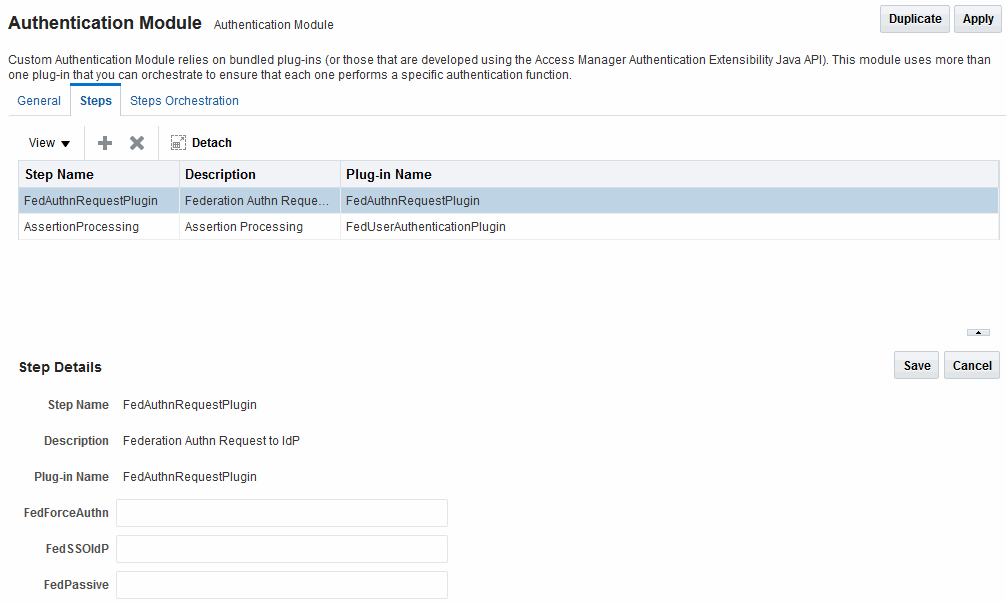
About the FederationPlugin Authentication Module
The FederationPlugin provides a custom authentication module.
Figure 33-2 displays the module's Console page.
Table 33-2 describes the attributes that you need to configure the FederationPlugin.
Table 33-2 FederationPlugin Steps
| Element | Description |
|---|---|
|
Step Name |
This is the name of the step within the module. |
|
Description |
This element contains a brief description of the step. |
|
Plugin Name |
This element specifies the plugin associated with the step. |
The value of FedSSOIdP is the IDP to be picked up by the authentication plugin.
Orchestration enables you to specify the order of the steps within the plugin, and what to do if each of those steps succeeds or fails.
Figure 33-3 illustrates the orchestration of the FederationPlugin.
See Table 22-13 for a similar orchestration.
Figure 33-3 FederationPlugin Orchestration

Description of "Figure 33-3 FederationPlugin Orchestration"
Table 33-3 describes the attributes for the orchestration of the FederationPlugin.
Table 33-3 Orchestration of FederationPlugin
| Element | Description |
|---|---|
|
Name |
This is the step name. The steps appear in this column in order of execution, which can be modified with the Initial Step drop-down. |
|
Description |
This is a brief description of the step. |
|
On Success |
This is the action to take upon successful completion of the step, such as execution of next step in the orchestration. |
|
On Error |
This is the action to take upon error, such as taking the specified failure action. |
|
On Failure |
This is the action to take upon step failure. |
Managing Authentication with Identity Federation in 11g Release 2
When you manage authentication with Identity Federation in 11g Release 2, you work with the FerationScheme and the FederationPlugin plug-in, a custom authentication module.
The following topics introduce authentication with Identity Federation in 11g Release 2:
Viewing or Modifying FederationScheme
You can view or modify FederationScheme authentication scheme.
To view or modify FederationScheme:
Viewing or Modifying FederationPlugin
You can view or modify FederationPlugin authentication plug-in.
To view or modify FederationPlugin:
Adding an Authentication Policy with FederationScheme
FederationScheme to associate a resource that is protected by this policy.To add an authentication policy with FederationScheme to associate a resource that is protected by this policy:
-
In the Oracle Access Management Console, click Application Security at the top of the window.
-
In the Application Security console, click Application Domains in the Access Manager section.
-
Search for and open the target application domain.
-
In the application domain configuration page, click the Authentication Policies tab.
-
Click Create and enter the following General Policy Details.
-
Name
-
Authentication Scheme
-
-
Add these Global Policy Elements and Specifications:
-
Description (optional)
-
Success URL
-
Failure URL
-
-
To add resources:
-
Click the Resources tab on the Authentication Policy page.
-
Click the Add button on the tab.
-
Choose a URL from the list.
-
Repeat these steps as needed to add more resources.
-
-
Click Apply to save changes and close the confirmation window.
-
Responses:
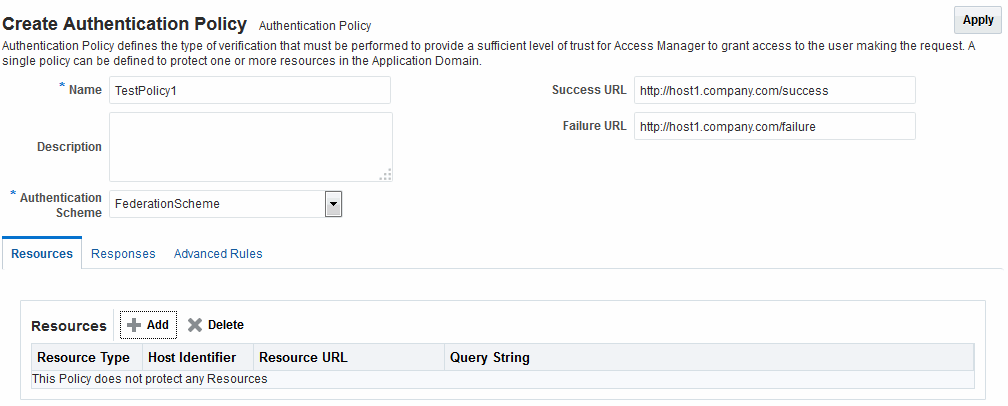
Figure 33-4 shows the console page to define the authentication policy and associate the policy to the resources.
Figure 33-4 Setting Up the Authentication Policy with FederationScheme
Description of "Figure 33-4 Setting Up the Authentication Policy with FederationScheme"
Using Authentication Schemes and Modules for Oracle Identity Federation
An authentication scheme is a named component that defines the challenge mechanism required to authenticate a user. Each authentication scheme must also include a defined authentication module.
The following topics describe the authentication schemes and modules that are available for use with the Oracle Identity Federation server in Oracle Fusion Middleware Release 11g R1 (11.1.1).
See Using Authentication Schemes and Modules for Identity Federation about any schemes that are used for Identity Federation in 11g Release 2 (11.1.2.3).
See Managing Authentication Schemes for additional information about schemes.
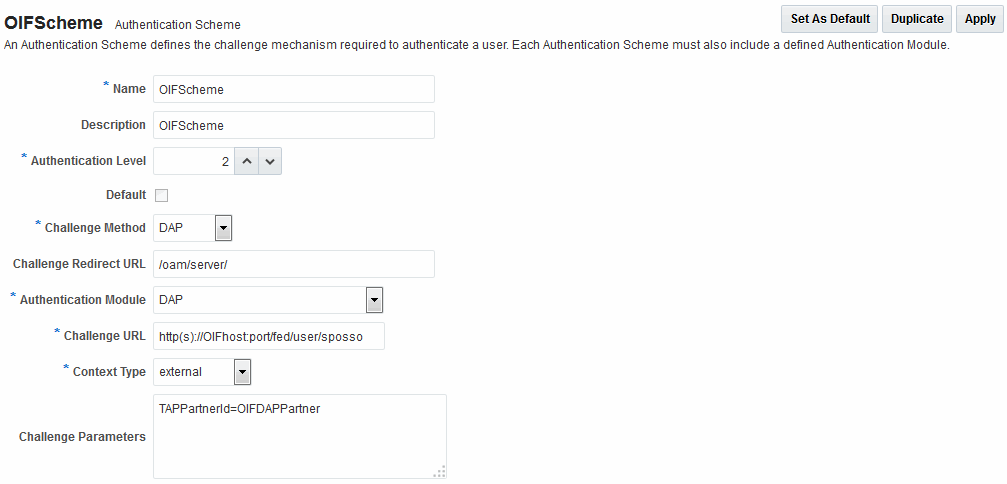
About Scheme OIFScheme
OIFScheme and OIFMTScheme are used for integration with Oracle Identity Federation 11g Release 1 (11.1.1).
See Using Authentication Schemes and Modules for Identity Federation for the schemes available with Identity Federation 11g Release 2 (11.1.2.3).
Table 33-4 describes the scheme OIFScheme.
Table 33-4 OIFScheme Definition
| Element | Description |
|---|---|
|
Name |
This is the scheme name. |
|
Description |
This is a brief description of the scheme. |
|
Authentication Level |
This is the trust level of the authentication scheme. |
|
Default |
This is a non-editable box that is checked when the Set as Default button is clicked. |
|
Challenge Method |
Use to select a challenge method from those available in the drop-down box. |
|
Challenge Redirect URL |
This is the URL of another server to which user requests must be redirected for processing. |
|
Authentication Module |
This is the authentication module to use with the scheme. |
|
Challenge URL |
This is the URL the credential collector will redirect to for credential collection. |
|
Context Type |
Use this element to build the final URL for the credential collector. |
|
Challenge Parameters |
This is the list of parameters, if any, to use with the challenge. |
Table 22-23 for OIFScheme specifications.
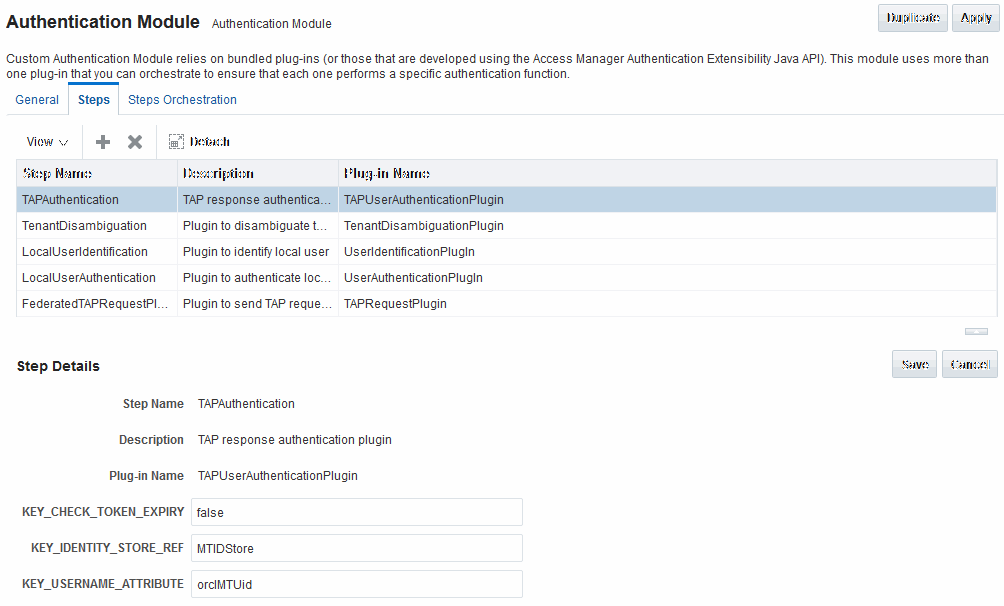
About the OIFMTLDAPPlugin Authentication Module
The OIFMTLDAPPlugin module authenticates federated tenants through Identity Federation and non-federated tenants with the identity store associated with Access Manager.
Table 33-5 lists the steps for OIFMTLDAPPlugin.
Table 33-5 IFMTLDAPPlugin Steps
| Element | Description |
|---|---|
|
Step Name |
This is the name of the step within the module. |
|
Description |
This element contains a brief description of this step. |
|
Plugin Name |
This element specifies the plugin associated with this step. |
|
Plugin Parameters |
This element lists the parameters, if any, needed for plugin execution. The parameter list varies with the plugin. |
Managing Authentication with Oracle Identity Federation Release 11gR1
When you manage authentication with Oracle Identity Federation Release 11gR1, you work with OIFScheme and OIFMTLDAPPlugin, a custom authentication module for Identity Federation 11g Release 1 (11.1.1).
The following topics explain how to manage authentication with Oracle Identity Federation Release 11gR1:
Viewing or Modifying the OIFScheme Authentication Scheme
You can search for the OIFScheme Authentication Scheme and modify the Scheme details as desired.
To view or modify the Authentication Scheme:
Viewing or Modifying the OIFMTLDAPPlugin Authentication
You can search for the OIFMTLDAPPlugin Authentication and modify module details as desired.
To view or modify the OIFMTLDAPPlugin Authentication:
Adding an Authentication Policy with OIFScheme
The procedure for this task is the same as described in the following topics:
See "Adding an Authentication Policy with FederationScheme".
Managing Access Manager Policies for Use with Identity Federation
The following topics explain how to use policy responses in Access Manager in the context of federation policies:
About Policy Responses with Assertion Attributes for Identity Federation
A policy can optionally include one or more authentication responses, or authorization responses, or both. You can configure the use of assertion attributes when setting up Access Manager policy responses with Identity Federation.
You use assertion attributes as follows:
-
Authorization policy conditions
-
Response attributes as HTTP headers
-
Response attributes for identity context
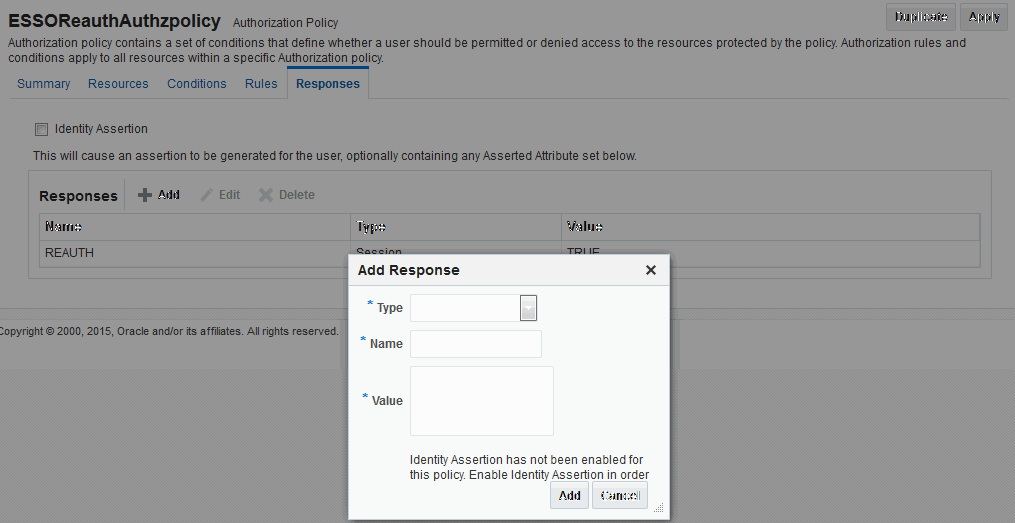
Figure 33-7 shows the Response configuration tab for an authorization policy:
Figure 33-7 Authorization Policy Response Tab
Description of "Figure 33-7 Authorization Policy Response Tab"
Table 33-6 describes the elements for a policy response.
Table 33-6 Policy Response Elements
| Element | Description |
|---|---|
|
Name |
This is a unique name to distinguish this response from other responses that use the same mechanism (type). |
|
Type |
This is the mechanism used to convey the response form of the action to be taken with the value string. Select Assertion Attribute. |
|
Value |
This is the response expression, set as a variable. To provide the federation data as response attributes in the authentication or authorization policy, the values can reference:
|
Defining Policy Responses with Assertion Attributes for Identity Federation
You can use the Oracle Access Management Console to configure policy responses with assertion attributes.
Background on Conditions and Responses for Identity Federation
Identity Federation conditions and responses must be specified separately because they are used for different tasks.
For example, if the identity provider sends a role assertion and the service provider wanted to only allow people who had a role of sales to gain access to the resource, you add a condition as follows:
-
The Condition Namespace is "Session".
-
The Name is "fed.attr.role".
-
The Operator is set to EQUALS.
-
Value is "sales".
A condition is used to control access to a resource within Access Manager.
Note:
-
Replace the role in this example to the actual SAML asserted attribute.
-
If you want to use the standard SAML NameID value as the condition, then the value is "attr.fed.nameidvalue".
A response, on the other hand, enables you to pass an asserted attribute to the application.For example, if you wanted to pass the asserted attribute role to a back-end application in an HTTP header, you would:
-
Go to the Response tab.
-
Add a Header, name
Role(this is the name of the HTTP header). -
The value would be
$session.attr.fed.attr.role.
Then replace the role in this example to correspond to the SAML asserted attribute.
Viewing or Configuring Responses with Assertion Attributes
To view or configure responses with assertion attributes:
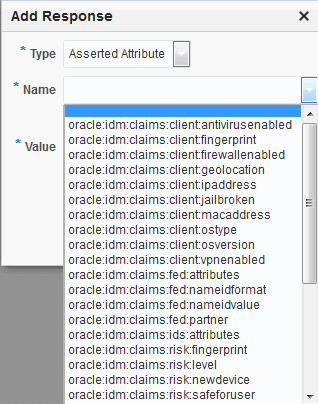
Figure 33-8 shows an example of federation response attribute configuration.
Figure 33-8 Adding a Federation Response Attribute to an AuthZ Policy
Description of "Figure 33-8 Adding a Federation Response Attribute to an AuthZ Policy"
Testing Identity Federation Configuration
After performing the procedure that is described in the previous topic, you have completed all the steps to configure federation in SP mode.
To recap, these steps are:
- Enabling the Identity Federation service using Oracle Access Management Console.
- Creating an IdP partner or using an existing IdP partner.
- Ensuring that IdP setup including SAML attributes, global logout, and nameID format are configured.
- Configuring an authentication/authorization policy that uses
FederationSchemewith federation response attributes; and - Protecting a resource with this policy.
To test this configuration, access the resource that is protected by the authentication policy and verify that access is granted or denied according to the policy.
Test SP Module
Identity Federation provides a Test SP module that enables you to Test Federation SSO with an IdP Partner and view the result of the Federation SSO operation as well as the assertion sent by the Identity Provider.
Accessing the Test SP Module and Performing a Federation SSO Operation
You can access the Test SP module and perform a federation SSO operation with an IdP partner.
Troubleshooting Errors During Federation Configuration After an Upgrade
IAM Suite is the OOTB Application Domain created when OAM 11.1.2 is installed. This Application Domain can be renamed after installation but when upgrading OAM to 11.1.2.2.0, it must be renamed back to IAM Suite otherwise the upgrade operation will fail with the following error seen in the WLS admin logs.
java.lang.NullPointerException
at
oracle.security.am.common.policy.tools.upgrade.r2ps2.bootstrap.FedR2PS2Bootstr
apHandler.createFedAuthnResource(FedR2PS2BootstrapHandler.java:505)
at
oracle.security.am.common.policy.tools.upgrade.r2ps2.bootstrap.FedR2PS2Bootstr
apHandler.doBootstrap(FedR2PS2BootstrapHandler.java:151)
at
oracle.security.am.common.policy.tools.upgrade.r2ps2.bootstrap.R2PS2BootstrapH
elper.doBootstrap(R2PS2BootstrapHelper.java:70)
at
oracle.security.am.common.policy.tools.PolicyComponentLifecycle.initialize(Pol
.
icyComponentLifecycle.java:99)
If the IAM Suite Application Domain has been renamed after installation, it is required to rename it back to its original IAM Suite name prior to beginning the upgrade process. After the upgrade process is complete, the name can be changed back to a custom name.
Using the Default Identity Provisioning Plug-in
11g Release 2 (11.1.2.3) features a plug-in that you can optionally use to provision a missing identity during a federated SSO operation.
The following topics describe how to use a provisioning plug-in:
Why Use a Provisioning Plug-in?
When a federated SSO transaction is initiated, the processing flows as follows:
-
The IdP authenticates a user and sends an assertion to Oracle Access Management Identity Federation.
-
Acting as SP, Identity Federation maps the user to the local identity store.
-
If the user does not exist in the local store, the mapping fails.
Resolving this issue requires you to provision the user so the transaction can continue.
About the Default Provisioning Plug-in
To handle the identity mapping failure, Identity Federation supports the ability to set up a plug-in, known as the default provisioning plug-in, to provision the missing user in the identity store and enable the federated single sign-on to proceed.
The user is provisioned in the identity store associated with the IdP partner. You can specify a list of attributes to use in provisioning the plug-in, as explained in the next section.
Using the Default Provisioning Plug-in
You can enable this default provisioning plug-in from the plug-in configuration interface.
To use the default provisioning plug-in:
Switching to a Custom Provisioning Plug-in
A custom provisioning plug-in is also available with Identity Federation.
To switch from the default plug-in to the custom plug-in, follow the guidelines in Developing a Custom User Provisioning Plug-in chapter of the Developing Applications with Oracle Access Management.
When you use the custom plug-in, set the plug-in name with the WLST command:
putStringProperty("/fedserverconfig/userprovisioningplugin","CustomPlugin")Configuring the Identity Provider Discovery Service
Identity provider discovery is a service that selects an identity provider (possibly through interaction with the user) to use during SSO.
While Identity Federation does not provide an identity provider discovery service, it provides support for using such a service to select an IdP, if one is not passed in the authentication request to the SP during SP-initiated SSO.
See the following specifications about IdP discovery at:
http://docs.oasis-open.org/security/saml/Post2.0/sstc-saml-idp-discovery-cs-01.pdf
When acting as a service provider, Identity Federation can be configured so that if an SSO operation is initiated without the provider ID of the partner IdP, the user is redirected to an IdP discovery service to select the identity provider with which to perform SSO.
After the user selects an identity provider, the custom page resubmits the SSO request with the chosen IdP to Identity Federation.
See the following topics for details:
Configuring the Bundled IdP Discovery Service
Identity Federation provides a simple Identity Provider Discovery Service that can be used to determine the Federation IdP Partner to be used at runtime during a Federation SSO operation.
To configure the bundled IdP discovery service:
Configuring Identity Federation with a Custom IdP Discovery Service
You can configure Identity Federation to interact with a custom IdP Discovery Service that is deployed remotely.
To configure Identity Federation with a custom IdP Discovery Service:
At runtime, Identity Federation redirects to the IdP Discovery Service page with the following parameters:
-
return: This is the URL to which the page should send the new request containing the chosen IdP provider ID to Identity Federation. -
returnIDParam: This is the name of the parameter to use to specify the chosen IdP provider ID in the request sent to Identity Federation.
The discovery service receives the values of these parameters, displays a list of IdPs, and then sends a new request to Identity Federation specifying the chosen IdP Provider ID.
Note:
CMake sure that the URL query parameter values are correctly URL-encoded.
Example of an IdP Discovery Service Page
The following example represents an IdP discovery service page that enable a user to select an identity provider (from the list of provider IDs: http://idp1.com, http://idp2.com, http://idp3.com), and submit the chosen provider ID to Identity Federation to continue the SSO flow.
<%@ page buffer="5kb" autoFlush="true" session="false"%>
<%@ page language="java" import="java.util.*, java.net.*"%>

<%
// Set the Expires and Cache Control Headers
response.setHeader("Cache-Control", "no-cache");
response.setHeader("Pragma", "no-cache");
response.setHeader("Expires", "Thu, 29 Oct 1969 17:04:19 GMT");

// Set request and response type
request.setCharacterEncoding("UTF-8");
response.setContentType("text/html; charset=UTF-8");
String submitURL = request.getParameter("return");
String returnIDParam = request.getParameter("returnIDParam");

List idps = new ArrayList();
idps.add("http://idp1.com");
idps.add("http://idp2.com");
idps.add("http://idp3.com");

%>

<html>
  <title>
  Select an Identity Provider
  </title>
<body bgcolor="#FFFFFF"><form  method="POST" action="<%=submitURL%>" id="PageForm" name="PageForm" autocomplete="off">
    <center>
                <table cellspacing="2" cellpadding="5" border="0" width="500">
                    <tr><td colspan="2" align="center">
                         Select an Identity Provider
                    </td></tr>
                    </tr>
                    <tr>
                        <td align="right">Provider ID</td>
                        <td>
                           <select size="1" name="<%=returnIDParam%>">
<%
Iterator idpIT = idps.iterator();
while(idpIT.hasNext())
{
        String idp = (String)idpIT.next();
%>
                                <option value="<%=(idp)%>"><%=idp%></option>
<%
}
%>

                           </select>
                         </td>
                    </tr>
                    <tr>
                         <td colspan="2" align="center">
                            <input type="submit" value="Continue"/>
                         </td>
                    </tr>
                </table>
      </center>
     </form>
    </body>
</html>Integrating OAM Identity Provider With Microsoft Office 365 Service Provider
The following topics describe how to administer OAM Identity Federation 12c (12.2.1.4) as an IdP for integration with Microsoft Office 365 when the latter is configured as an SP leveraging the SAML 2.0 standard. After the integration implementation, you can use an account in the Identity Repository to access all web clients (including Office rich client apps connecting to SharePoint Online) and email-rich clients that use basic authentication and a supported Exchange access method such as IMAP, POP, Active Sync or MAPI. (The Enhanced Client Protocol end point is required to be deployed).
The deployment assumes that:
- OAM 12c (12.2.1.4) has been installed and configured using SSL.
- An account has been created using the Oracle Access Management Console that defines the Administrator role for Office 365.
- Windows PowerShell 2.0 and Microsoft Online Services Module have been installed.
- An available domain name can be used as the federated domain in Office 365. Generally, this domain needs to be purchased.
Note:
For non Web-based client integration:
-
The OAM IdP endpoint must be accessible from the public network.
-
A trusted SSL certificate issued by a well known entity must be used.
The following topics provide configuration details:
Configuring Microsoft Office 365 for OAM Integration
To configure Microsoft Office 365 for OAM integration:
Configuring OAM for Microsoft Office 365 Integration
The following topics describe how to configure OAM for integration with Microsoft Office 365:
See Identity Federation WLST Commandsfor details on how to use the WLST commands.
Additional Configurations for Non-Web Clients
Perform these additional configurations if using non-Web clients. These steps will not impact Web-based integration.
-
Use the setSPPartnerAlternateScheme WLST command to set an alternative Authentication Scheme for the Service Provider partner to handle HTTP Basic authentication. For example:
setSPPartnerAlternateScheme(<partner>, "true",
  httpHeaderName="X-MS-Client-Application", httpHeaderExpression=".*
  Microsoft.Exchange..*", authnScheme="BasicScheme or BasicSessionlessScheme")
The values of httpHeaderName and httpHeaderExpression can be determined from the HTTP request sent from Office365 to OAM. If you want to use other values, use rich clients to connect the email account and capture the HTTP request on OAM server side.
Note:
It is recommended to use BasicSessionlessScheme because Office 365 only validates user credentials to get an assertion.
-
Use the updatePartnerProperty WLST command to update the configuration to send certificates in XML signatures.
updatePartnerProperty(<partner>,"sp","includecertinsignature","true","boolean")
For Basic Authentication, you may need re-authentication even after the Request is already authenticated.
Automating SAML Certificate or Key or Metadata Rotation
- Automatically retrieve new partner certificates and metadata on a scheduled basis (for example, every 80 days) by accessing a REST endpoint provided by the customer
- Seamlessly rotate the new credentials across all dependent systems and applications without downtime
- Remove the need for manual collection and implementation by administrators
- Allow regular, proactive security rotation per their internal security protocols (for example, 90 day mandatory rotation)
- Send notifications when new credentials are implemented or errors occur
- Provide detailed logging for audit and troubleshooting
- Offer manual rotation initiation as needed
IDP Certification Rotation
- Generate new certificate in
OAMKeystore.
$JDK_HOME/bin/keytool -genkeypair -alias samlsigning -keyalg RSA -keysize 2048-sigalg sha1withrsa -dname cn="ACME SAML Signing" -validity 1000 -keystore $DOMAIN_HOME/config/fmwconfig/.oamkeystore -storetype JCEKS $JDK_HOME/bin/keytool -genkeypair -alias samlencryption -keyalg RSA -keysize 2048 -sigalg sha1withrsa -dname cn="ACME SAML Encryption" -validity 1000-keystore $DOMAIN_HOME/config/fmwconfig/.oamkeystore -storetype JCEKS - Add alias mapping to the fed global config file.
- Encrypt the password to be stored in the config file. There are two
ways to do this:
- WLST
command1
wls:/base_domain/serverConfig/> encryptSensitiveData("<password to encrypt>")
- WLST
command2
wls:/base_domain/custom/> on = ObjectName("com.oracle.oam:name=OamWLST,type=oam.wlst,Application=oam_admin")
wls:/base_domain/custom/> sign = ["java.lang.String"]
wls:/base_domain/custom/> params = ["<password to encrypt>"]
wls:/base_domain/custom/> password = mbs.invoke(on,"encryptSensitiveData", params, sign)
wls:/base_domain/custom/> print "PASSWORD:" + password
- Invoke the above MBean from EM console (may not be automatized)
- WLST
command1
- Fetch the existing alias
mapping.
GET iam/admin/config/api/v1/config?path=DeployedComponent/Server/NGAMServer/Profile/STS/keystoreaccesstemplates Sample GET Output <Configuration xmlns:xsd="http://www.w3.org/2001/XMLSchema" xsd:schemaLocation="http://higgins.eclipse.org/sts/Configuration Configuration.xsd" Path="DeployedComponent/Server/NGAMServer/Profile/STS/keystoreaccesstemplates"> <Setting Name="keystoreaccesstemplates" Type="htf:map"> <Setting Name="osts_encryption" Type="htf:map"> <Setting Name="aliasname" Type="xsd:string">stsprivatekeyalias</Setting> <Setting Name="password" Type="xsd:string">BC92143973B82D39E7D1E778ADB6A20822C0B0536303F7057CEE0B77D1BFD546</Setting> </Setting> <Setting Name="osts_encryption_sha256" Type="htf:map"> <Setting Name="aliasname" Type="xsd:string">stsprivatekeyalias_existing_alias</Setting> <Setting Name="password" Type="xsd:string">E26A916B62E2361265145D90157D3992A20BF0D4EE2E52BD3A1EAD4CD9F633E7</Setting> </Setting> <Setting Name="osts_signing" Type="htf:map"> <Setting Name="aliasname" Type="xsd:string">stsprivatekeyalias</Setting> <Setting Name="password" Type="xsd:string">BC92143973B82D39E7D1E778ADB6A20822C0B0536303F7057CEE0B77D1BFD546</Setting> </Setting> <Setting Name="osts_signing_sha256" Type="htf:map"> <Setting Name="aliasname" Type="xsd:string">stsprivatekeyalias__existing_alias</Setting> <Setting Name="password" Type="xsd:string">E26A916B62E2361265145D90157D3992A20BF0D4EE2E52BD3A1EAD4CD9F633E7</Setting> </Setting> </Setting> </Configuration> - Update the new alias
mapping.
PUT iam/admin/config/api/v1/config
  <Setting Name="keystoreaccesstemplates" Type="htf:map" Path="DeployedComponent/Server/NGAMServer/Profile/STS/keystoreaccesstemplates">
        <Setting Name="osts_encryption" Type="htf:map">
            <Setting Name="aliasname" Type="xsd:string">stsprivatekeyalias</Setting>
            <Setting Name="password" Type="xsd:string">BC92143973B82D39E7D1E778ADB6A20822C0B0536303F7057CEE0B77D1BFD546</Setting>
        </Setting>
        <Setting Name="osts_encryption_sha256" Type="htf:map">
            <Setting Name="aliasname" Type="xsd:string">stsprivatekeyalias_new_alias</Setting>
            <Setting Name="password" Type="xsd:string">E26A916B62E2361265145D90157D3992A20BF0D4EE2E52BD3A1EAD4CD9F633E7</Setting>
        </Setting>
        <Setting Name="osts_signing" Type="htf:map">
            <Setting Name="aliasname" Type="xsd:string">stsprivatekeyalias</Setting>
            <Setting Name="password" Type="xsd:string">BC92143973B82D39E7D1E778ADB6A20822C0B0536303F7057CEE0B77D1BFD546</Setting>
        </Setting>
        <Setting Name="osts_signing_sha256" Type="htf:map">
            <Setting Name="aliasname" Type="xsd:string">stsprivatekeyalias_new_alias</Setting>
            <Setting Name="password" Type="xsd:string">E26A916B62E2361265145D90157D3992A20BF0D4EE2E52BD3A1EAD4CD9F633E7</Setting>
        </Setting>
        <Setting Name="samlencyrption-rotation" Type="htf:map">
            <Setting Name="aliasname" Type="xsd:string">samlencryption-rotation</Setting>
            <Setting Name="password" Type="xsd:string">"Password Obtained using above WLST command"</Setting>
        </Setting>
        <Setting Name="samlsigning-rotation" Type="htf:map">
            <Setting Name="aliasname" Type="xsd:string">samlsigning-rotation</Setting>
            <Setting Name="password" Type="xsd:string">"Password Obtained using above WLST command"</Setting>
        </Setting>
    </Setting>
- Encrypt the password to be stored in the config file. There are two
ways to do this:
Note:
If a PUT operation is executed with an incorrect payload, data may be lost. Always perform the PUT operation by appending the result of the GET operation. Ensure the password is in encrypted format, as the config API stores the input exactly as provided.- Automatically read IDP metadata
periodically.
GET http://oam-runtime-host:oam-runtime-port/oamfed/idp/metadata?signid=<samlsigning-rotation&encid=samlencyrption-rotation - Upload or Import new IDP metadata at SP partner
side.
updatePartnerMetadata(<partnerName>,<partnerType>,<metadataFile>) - Update the partner config
file.
POST /oam/services/rest/v1/fed/partners/sp/<partnerName/ID>
{
  "signing": <signing-cert>,
  "encryption": <encryption-cert>
}
This step completes the rollover. Newly introduced redundant config can be deleted with this API call resulting in a cleaner OAM config file.
Optionally, the IDP admin can update the global config file once all partners have been updated.
SP Certificate Rotation
Note:
APIs are same as mentioned in the 'IDP Certification Rotation' section.- Generate new certificate in
OAMKeystore.
$JDK_HOME/bin/keytool -genkeypair -alias samlsigning -keyalg RSA -keysize 2048-sigalg sha1withrsa -dname cn="ACME SAML Signing" -validity 1000 -keystore $DOMAIN_HOME/config/fmwconfig/.oamkeystore -storetype JCEKS $JDK_HOME/bin/keytool -genkeypair -alias samlencryption -keyalg RSA -keysize 2048 -sigalg sha1withrsa -dname cn="ACME SAML Encryption" -validity 1000-keystore $DOMAIN_HOME/config/fmwconfig/.oamkeystore -storetype JCEKS - Add alias mapping to the fed global config file.
- Encrypt the password to be stored in the config file. There are two
ways to do this:
- WLST Command
1
wls:/base_domain/serverConfig/> encryptSensitiveData("<password to encrypt>") - WLST Command
2
wls:/base_domain/custom/> on = ObjectName("com.oracle.oam:name=OamWLST,type=oam.wlst,Application=oam_admin") wls:/base_domain/custom/> sign = ["java.lang.String"] wls:/base_domain/custom/> params = ["<password to encrypt>"] wls:/base_domain/custom/> password = mbs.invoke(on,"encryptSensitiveData", params, sign) wls:/base_domain/custom/> print "PASSWORD:" + password - Invoke the above MBean from the EM console (may not be automatized).
- WLST Command
1
- Fetch the existing alias
mapping.
GET iam/admin/config/api/v1/config?path=DeployedComponent/Server/NGAMServer/Profile/STS/keystoreaccesstemplates Sample GET Output <Configuration xmlns:xsd="http://www.w3.org/2001/XMLSchema" xsd:schemaLocation="http://higgins.eclipse.org/sts/Configuration Configuration.xsd" Path="DeployedComponent/Server/NGAMServer/Profile/STS/keystoreaccesstemplates"> <Setting Name="keystoreaccesstemplates" Type="htf:map"> <Setting Name="osts_encryption" Type="htf:map"> <Setting Name="aliasname" Type="xsd:string">stsprivatekeyalias</Setting> <Setting Name="password" Type="xsd:string">BC92143973B82D39E7D1E778ADB6A20822C0B0536303F7057CEE0B77D1BFD546</Setting> </Setting> <Setting Name="osts_encryption_sha256" Type="htf:map"> <Setting Name="aliasname" Type="xsd:string">stsprivatekeyalias_sha256</Setting> <Setting Name="password" Type="xsd:string">E26A916B62E2361265145D90157D3992A20BF0D4EE2E52BD3A1EAD4CD9F633E7</Setting> </Setting> <Setting Name="osts_signing" Type="htf:map"> <Setting Name="aliasname" Type="xsd:string">stsprivatekeyalias</Setting> <Setting Name="password" Type="xsd:string">BC92143973B82D39E7D1E778ADB6A20822C0B0536303F7057CEE0B77D1BFD546</Setting> </Setting> <Setting Name="osts_signing_sha256" Type="htf:map"> <Setting Name="aliasname" Type="xsd:string">stsprivatekeyalias_sha256</Setting> <Setting Name="password" Type="xsd:string">E26A916B62E2361265145D90157D3992A20BF0D4EE2E52BD3A1EAD4CD9F633E7</Setting> </Setting> </Setting> </Configuration> - Update the new alias
mapping.
PUT iam/admin/config/api/v1/config
  <Setting Name="keystoreaccesstemplates" Type="htf:map" Path="DeployedComponent/Server/NGAMServer/Profile/STS/keystoreaccesstemplates">
        <Setting Name="osts_encryption" Type="htf:map">
            <Setting Name="aliasname" Type="xsd:string">stsprivatekeyalias</Setting>
            <Setting Name="password" Type="xsd:string">BC92143973B82D39E7D1E778ADB6A20822C0B0536303F7057CEE0B77D1BFD546</Setting>
        </Setting>
        <Setting Name="osts_encryption_sha256" Type="htf:map">
            <Setting Name="aliasname" Type="xsd:string">stsprivatekeyalias_sha256</Setting>
            <Setting Name="password" Type="xsd:string">E26A916B62E2361265145D90157D3992A20BF0D4EE2E52BD3A1EAD4CD9F633E7</Setting>
        </Setting>
        <Setting Name="osts_signing" Type="htf:map">
            <Setting Name="aliasname" Type="xsd:string">stsprivatekeyalias</Setting>
            <Setting Name="password" Type="xsd:string">BC92143973B82D39E7D1E778ADB6A20822C0B0536303F7057CEE0B77D1BFD546</Setting>
        </Setting>
        <Setting Name="osts_signing_sha256" Type="htf:map">
            <Setting Name="aliasname" Type="xsd:string">stsprivatekeyalias_sha256</Setting>
            <Setting Name="password" Type="xsd:string">E26A916B62E2361265145D90157D3992A20BF0D4EE2E52BD3A1EAD4CD9F633E7</Setting>
        </Setting>
        <Setting Name="samlencyrption-rotation" Type="htf:map">
            <Setting Name="aliasname" Type="xsd:string">samlencryption-rotation</Setting>
            <Setting Name="password" Type="xsd:string">"Password Obtained using above WLST command"</Setting>
        </Setting>
        <Setting Name="samlsigning-rotation" Type="htf:map">
            <Setting Name="aliasname" Type="xsd:string">samlsigning-rotation</Setting>
            <Setting Name="password" Type="xsd:string">"Password Obtained using above WLST command"</Setting>
        </Setting>
    </Setting>
- Encrypt the password to be stored in the config file. There are two
ways to do this:
Note:
If a PUT operation is executed with an incorrect payload, data may be lost. Always perform the PUT operation by appending the result of the GET operation. Ensure the password is in encrypted format, as the config API stores the input exactly as provided.- Automatically read SP metadata
periodically.
GET http://oam-runtime-host:oam-runtime-port/oamfed/sp/metadata?signid=<samlsigning-rotation&encid=samlencyrption-rotation - Upload or Import new IDP metadata at SP partner
side.
updatePartnerMetadata(<partnerName>,<partnerType>,<metadataFile>) - Update the partner config
file.
POST /oam/services/rest/v1/fed/partners/idp/<partnerName/ID>
{
  "signing": <signing-cert>,
  "encryption": <encryption-cert>
}
This step completes the rollover. Newly introduced redundant config can be deleted with this API call resulting in a cleaner OAM config file.
Optionally, the SP admin can update the global config file once all partners have been updated.
