Create pipelines

Learn to create a data replication process using pipelines and recipes.

About pipelines

A pipeline is an instance of a recipe. It enables you to select your source connection, the type of replication action(s) to apply, and the target connection. After a pipeline starts, you can observe the replication process in real time.

If you're familiar with Oracle GoldenGate Extract and Replicats, then pipelines are an abstraction of the Oracle GoldenGate replication process. When you start a pipeline, GoldenGate Studio:
  • Check source and target database
  • Extract Source Database
  • Load Target Database
  • Create GoldenGate credentials (Online migration only)
  • Create and run Extract (Capture) (Online migration only)
  • Create and run Replicat (Apply) (Online migration only)

These steps can be observed during the pipeline's Initialization phase on the Pipeline Details page.

You can view pipelines on the Home page, as well as the Pipelines page. Before you create a pipeline, ensure that you have source and target connections created, and existing target databases/schemas are ORDS and REST API enabled.

Create a pipeline

Learn to create a pipeline by following a recipe.

Watch this short video to learn how to create a pipeline.

Tip:

Ensure that you have a source and target connection before creating a pipeline.
To create a pipeline:
  1. From the GoldenGate Studio Home page, click Create pipeline.

    You can also select Pipelines from the navigation menu, and then click Create pipeline on the Pipelines page.

  2. The Create Pipeline process consists of six pages. On the Recipe page, select a recipe, and then click Next.
  3. On the Overview page, complete the following fields, and then click Next:
    1. Enter a Name for the pipeline.
    2. Optionally, enter a Description.
    3. For Migration Type, select an Offline or Online migration.
  4. On the Connections page, select your source and target connections from their respective dropdowns, and then click Next.
  5. Validate your source, and then click Next.
  6. Validate your target, and then click Next.
  7. Review a summary of the pipeline details, and then click Save & configure.
After your pipeline is created, you're brought to the Pipeline Configuration screen. Learn to configure a pipeline.

Configure a pipeline

After you create a pipeline, you're brought to its Configuration screen. If you're revisiting a pipeline after you created it, you can select the pipeline from the Pipelines page to view its details, and then click Configuration to return to the Configuration screen.
You must have a pipeline created before you can configure it.
To configure a pipeline:
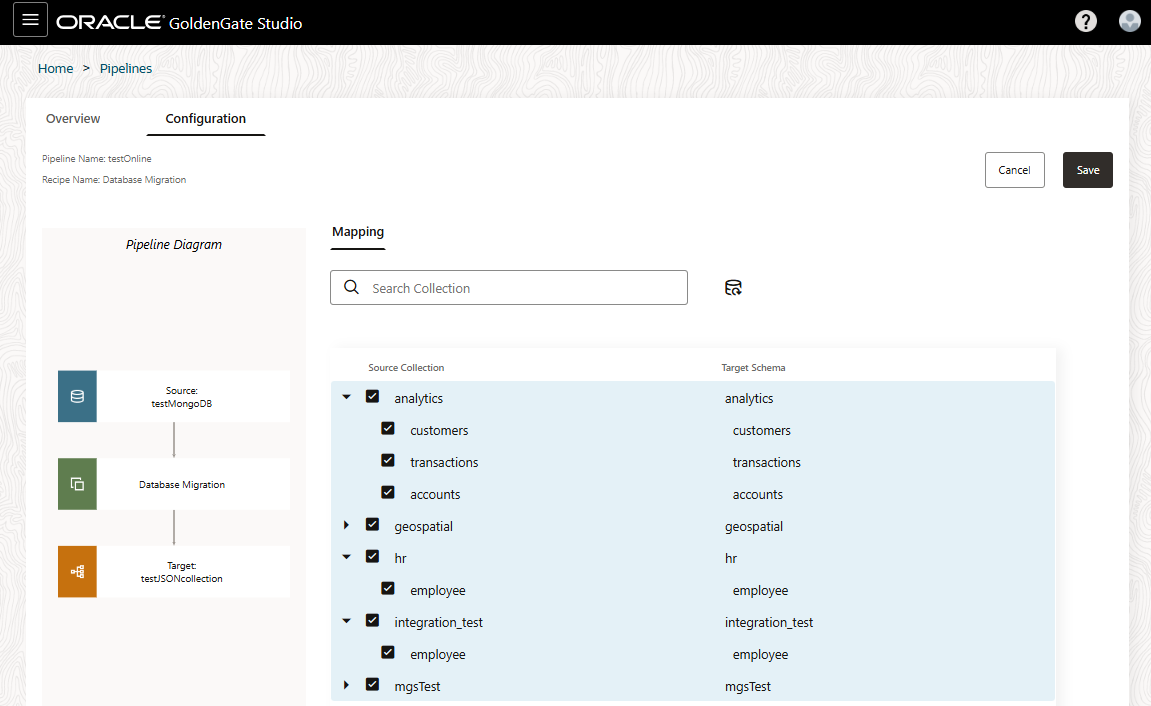
  1. Under Mapping, you can review and select the source database collections to replicate.

    The image shows the pipeline mapping screen where you can edit the database/schema or collection/table names and include or exclude schemas and tables to replicate to the target database.

    You can:

    • Include a MongoDB database and all its collections. This also ensures that any collections/tables added to the database in the future are also implicitly included and replicated.
    • Include a database/schema but not all its collection/tables. Collections/Tables not included will not be replicated, however, future collections/tables added to the database/schema are implicitly included and replicated to the target.
    • Exclude the database/schema but include its collection/tables. Any collection/tables added to the database/schema in the future are not included.
    • Exclude an entire database/schema and all its collections/tables.
  2. Click Save to save your configuration settings.
  3. After configuring your pipeline, click Start to run it.
    You can review the initialization procedure, the status and progress of each step in the replication process, and how much time it takes for each step to complete.
  4. For online migration, after the initialization completes, you're brought to the Runtime view where you can monitor data capture operations as they are replicated from the source database to the target. For offline migration, the pipeline finishes when initialization completes.
For online migration, the pipeline runs continually until it's manually stopped. For offline migration, the pipeline is considered complete once the migration process finishes.

Next steps

After your pipeline is created, configured, and running, learn to manage pipelines.