Set Up Bidirectional Replication for Oracle GoldenGate Microservices Architecture
This quickstart demonstrates an active-active bidirectional replication between two pluggable databases over a single multitenant container Oracle database instance.

An active-active bidirectional replication implies that both data sources and targets (PDBs in this case), have the potential to send updates to each other. There are two data sources with identical sets of data that can be changed by application users on either side. Oracle GoldenGate replicates transactional data changes from each database to the other to keep both sets of data current.
The following diagram depicts the bidirectional replication workflow shown in this quickstart:

Note:
This quickstart uses a single multitenant container database with two PDBs to demonstrate bidirectional replication between two PDBs. However, in most real-life scenarios, bidirectional data replication happens across different multitenant container databases or different database instances.Process Names in the Bidirectional Data Replication Environment
| Container Database (CDB$ROOT) Process Names | Pluggable Database (DBEAST) Process Names | Pluggable Database (DBWEST) Process Name |
|---|---|---|
|
|
|
Considerations for Configuring a Bidirectional Replication
To maintain data integrity and avoid conflicts, you need to configure the Extract and Replicat processes to prevent data looping and conflict using certain parameters and the automatic conflict detection and resolution (ACDR) feature.
Ideally, all situations that could lead to potential conflicts in a bidirectional or multidirectional replication must be avoided. However, if conflicts occur, Oracle GoldenGate provides the automatic conflict detection and resoution (ACDR) feature to handle them.
-
At the PDB level:
The Automatic Conflict Detection and Resolution feature (ACDR) available with Oracle database, allows you to manage conflict detection and resolution using the
DBMS_GOLDENGATE_ADMpackage, using theADD_AUTO_CDRprocedure. You need to enable this package at the database level on both PDBs in this case. See Enable ACDR . -
Oracle GoldenGate Extract parameter settings
-
LOGALLSUPCOLS: This parameter controls writing of supplementally logged columns specified usingADD TRANDATAand the columns enabled for Conflict Detection and Resolution (CDR) in Oracle GoldenGate. This parameter is set by default for Extract. -
UPDATERECORDFORMAT: This parameter is set by default for integrated Extract, so don't need to set it in the parameter file. Its function is to combine the before and after images of anUPDATEoperation into a single record in the trail. TheCOMPACToption generates one trail record that contains the before and after images of anUPDATE, where the before image includes all the columns that are available in the transaction record, but the after image is limited to the primary key columns and the columns that were modified in theUPDATE. -
EXCLUDETAGoption ensures that there is not looping of data. Looping of data happens when a database sends updates to the second database and the second database assumes those updates to be a new changes, and tries to replicate this update back to the source database itself. These parameter settings are done when configuring the Extract parameter file, as shown in Step 3: Add Extracts of this document.
-
-
Oracle GoldenGate Replicat parameter settings:
ACDR works with integrated Replicat or parallel integrated Replicat. See the Replicat parameter file in the Step 4: Add Replicat section of this document to know more.
Set the Required Privileges for Oracle Multitenant Database
In Oracle database, you need to enable replication for Oracle GoldenGate and assign privileges to the database user at the CDB level and the pluggable database (PDB) level.
The database is in ARCHIVELOG mode and FORCE
LOGGING and Supplemental Logging is enabled. For the container database, assign
the following privileges to the common user (cdb$root):
## CGGNORTH DATABASE SETUP AT CDB LEVEL
ALTER SESSION SET CONTAINER=cdb$root;
ALTER SYSTEM SET ENABLE_GOLDENGATE_REPLICATION=TRUE;
ALTER SYSTEM SET STREAMS_POOL_SIZE=2G;
ALTER DATABASE FORCE LOGGING;
ALTER DATABASE ADD SUPPLEMENTAL LOG DATA;
CREATE USER c##ggadmin IDENTIFIED BY PASSWORD CONTAINER=ALL DEFAULT TABLESPACE GG_DATA TEMPORARY TABLESPACE TEMP;
GRANT CONNECT, RESOURCE, DBA TO c##ggadmin CONTAINER=ALL;
GRANT CREATE SESSION TO c##ggadmin CONTAINER=ALL;
EXEC DBMS_GOLDENGATE_AUTH.GRANT_ADMIN_PRIVILEGE('c##ggadmin',CONTAINER=>'ALL');
ALTER SESSION SET CONTAINER=dbeast;
CREATE USER ggadmin IDENTIFIED BY PASSWORD CONTAINER=CURRENT;
GRANT CONNECT, RESOURCE, DBA TO GGADMIN CONTAINER=CURRENT;
GRANT CREATE SESSION TO ggadmin CONTAINER=CURRENT;
EXEC DBMS_GOLDENGATE_AUTH.GRANT_ADMIN_PRIVILEGE('ggadmin');
DBWESTALTER SESSION SET CONTAINER=dbwest;
CREATE USER ggadmin IDENTIFIED BY PASSWORD CONTAINER=CURRENT;
GRANT CONNECT, RESOURCE, DBA TO ggadmin CONTAINER=CURRENT;
GRANT CREATE SESSION TO ggadmin CONTAINER=CURRENT;
EXEC DBMS_GOLDENGATE_AUTH.GRANT_ADMIN_PRIVILEGE('ggadmin');
Note:
GrantingDBA role is not
mandatory for every user. Privileges should be granted depending on the actions that the
user needs to perform on the database. For example, to grant DML operation privileges to
insert, update, and delete transactions to ggadmin, use the GRANT
ANY INSERT/UPDATE/DELETE privileges and to further allow users to work with
tables and indexes as part of DML operations, use the GRANT CREATE/DROP/ALTER ANY
TABLE/INDEX privileges. In this quickstart, the assumption is that the database
user is a database administrator. See Grant User Privileges for Oracle Database 21c and Lower and Configure a Multitenant Container Database to know more about specific privilege requirements.
Enable ACDR
DBEAST:EXEC DBMS_GOLDENGATE_ADM.ADD_AUTO_CDR('hr', 'employees', RECORD_CONFLICTS=>TRUE);PL/SQL procedure successfully completed.DBWEST and run the same
command:EXEC DBMS_GOLDENGATE_ADM.ADD_AUTO_CDR('hr', 'employees');This enables the ACDR package on both PDBs.
You can check if ACDR has been enabled for the PDBs by checking for invisible columns that are added to manage ACDR at the column level. Run the following commands to test this:
ALL_GG_AUTO_CDR_TABLES to list down the columns
used for ACDR in the
PDBs:SELECT table_owner, table_name, tombstone_table, row_resolution_column, FROM all_gg_auto_cdr_tables;
TABLE_OWNER
--------------------------------------------------------------------------------
TABLE_NAME
--------------------------------------------------------------------------------
TOMBSTONE_TABLE
--------------------------------------------------------------------------------
ROW_RESOLUTION_COLUMN
--------------------------------------------------------------------------------
HR
EMPLOYEES
DT$_EMPLOYEES
CDRTS$ROW
-
DT$_EMPLOYEES: This is the tombstone table used for locking any delete transactions. -
CDRTS$ROW: This is the row resolution column. When there is a conflict, this column which contains the timestamp for the transaction, is used to decide the record that would be applied in a row. This implies that the record with the latest timestamp would be used to apply changes in the row.
These columns are appended to schema.table on both
PDBs, DBEAST and DBWEST.
After you have enabled ACDR, you'll need to edit the Replicat parameter file
to include the invisible columns. Add the MAPINVISIBLECOLUMNS parameter in
the Replicat parameter file, to allow Replicat to include target columns with default column
mapping. This is explained in detail when configuring the Replicat parameter file in
Step 4: Add Replicat section.
-
Log in to the Administration Service web interface.
-
From the Administration Service Overview page, click the Action button next to the Extract process, exte.
-
Click Start.

The green check mark would appear next to the process indicating that the processes started successfully.
Similarly, start the other Extract and Replicat processes on both PDBs.
Set Up Bidirectional Replication for Oracle GoldenGate Microservices Architecture
Configure the Replication Process from Oracle GoldenGate MA Web Interface
Using the following steps, you'll be able to configure data capture (Extract) and apply (Replicat) processes. You'll also be able to test if the replication has started.
The DISTPATH process is not used for this configuration.
Step 1: Add Database Credentials from the Administration Service
In this section, you'll add the database credentials to connect to the source and target databases using EZConnect.
-
Keep your database user credentials, which created in the previous session, ready. You'll use them to connect Oracle GoldenGate to the database server.
-
Open the Service Manager login page in a web browser and log in to the Service Manager with your Oracle GoldenGate administrator user credentials. If logging in for the first time, you have to log in with the administrator account user credentials, created when adding your deployment with Oracle GoldenGate Configuration Assistant wizard.
-
From the Service Manager Overview page, click the port number for the Administration Service of the deployment.
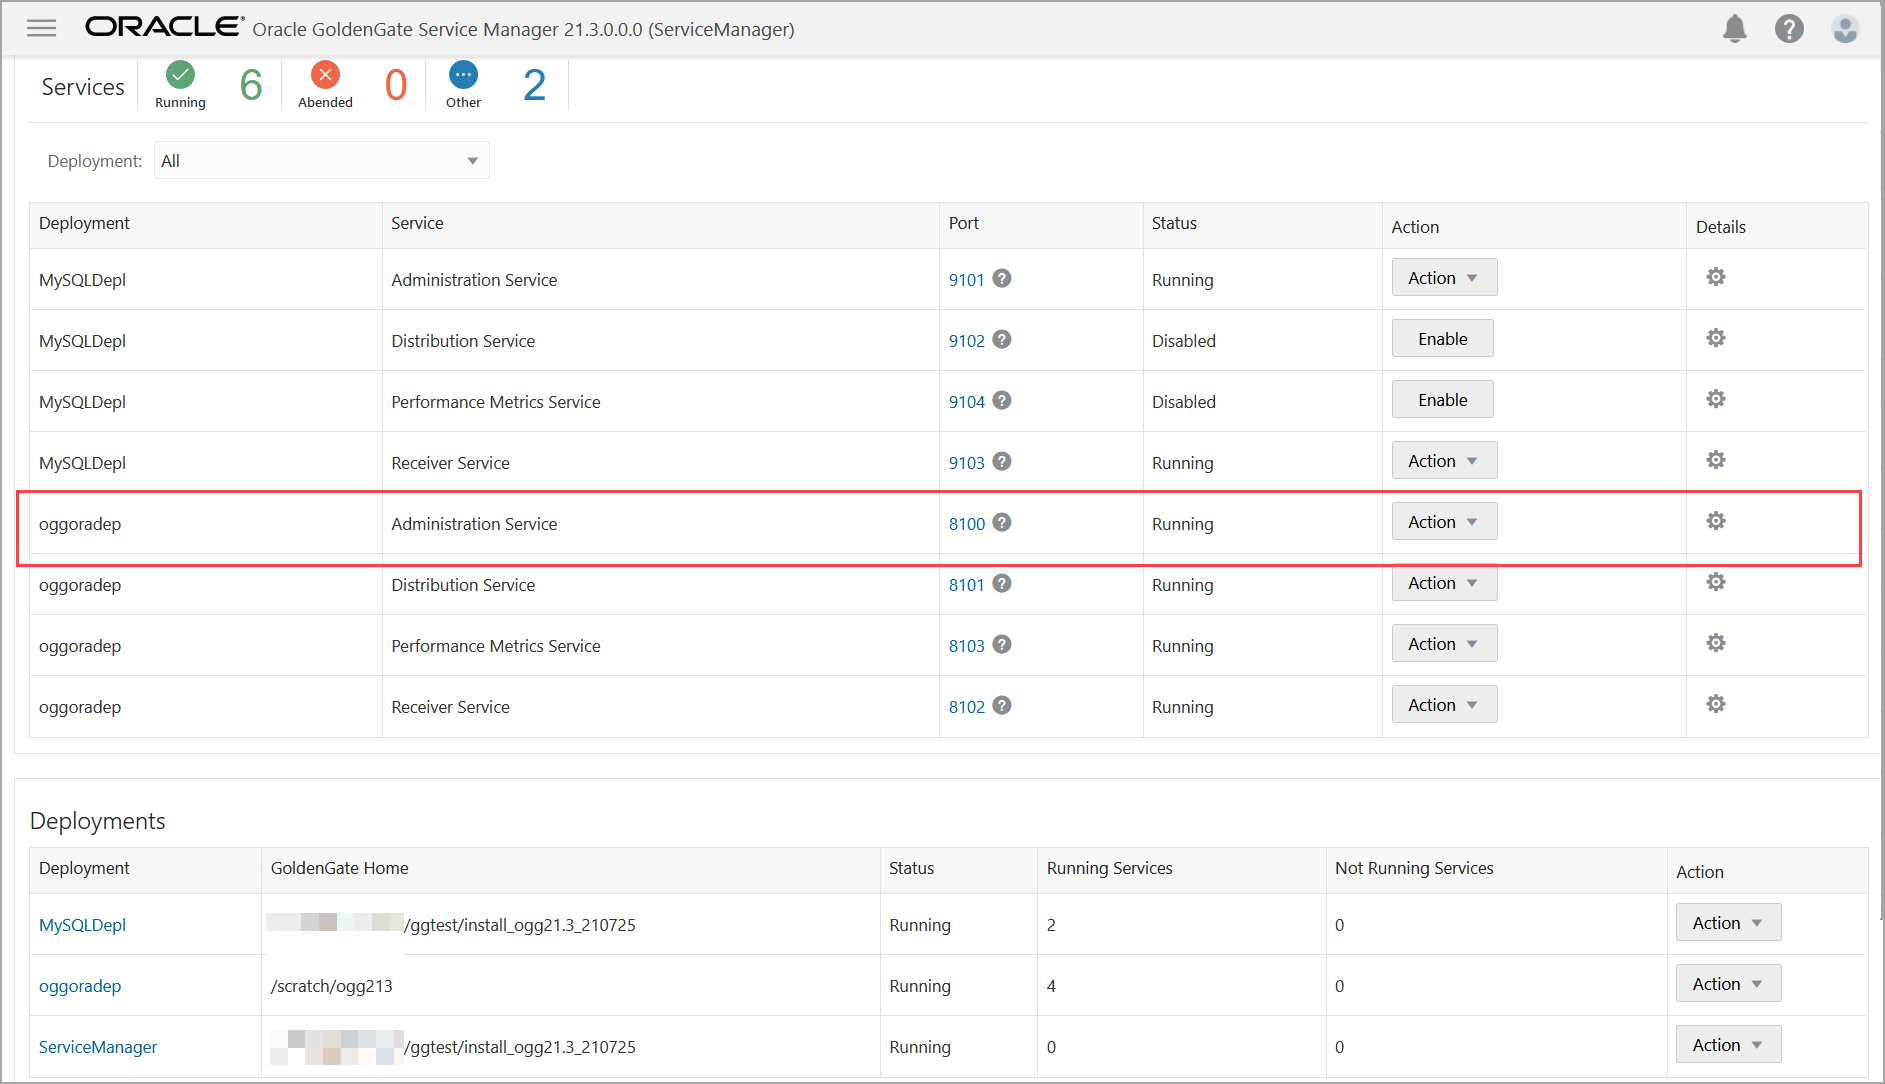
This opens the Administration Service login page.
-
Log in to the Administration Service using the same credentials, which you used to log in to the Service Manager. The Administration Service Overview page is displayed.
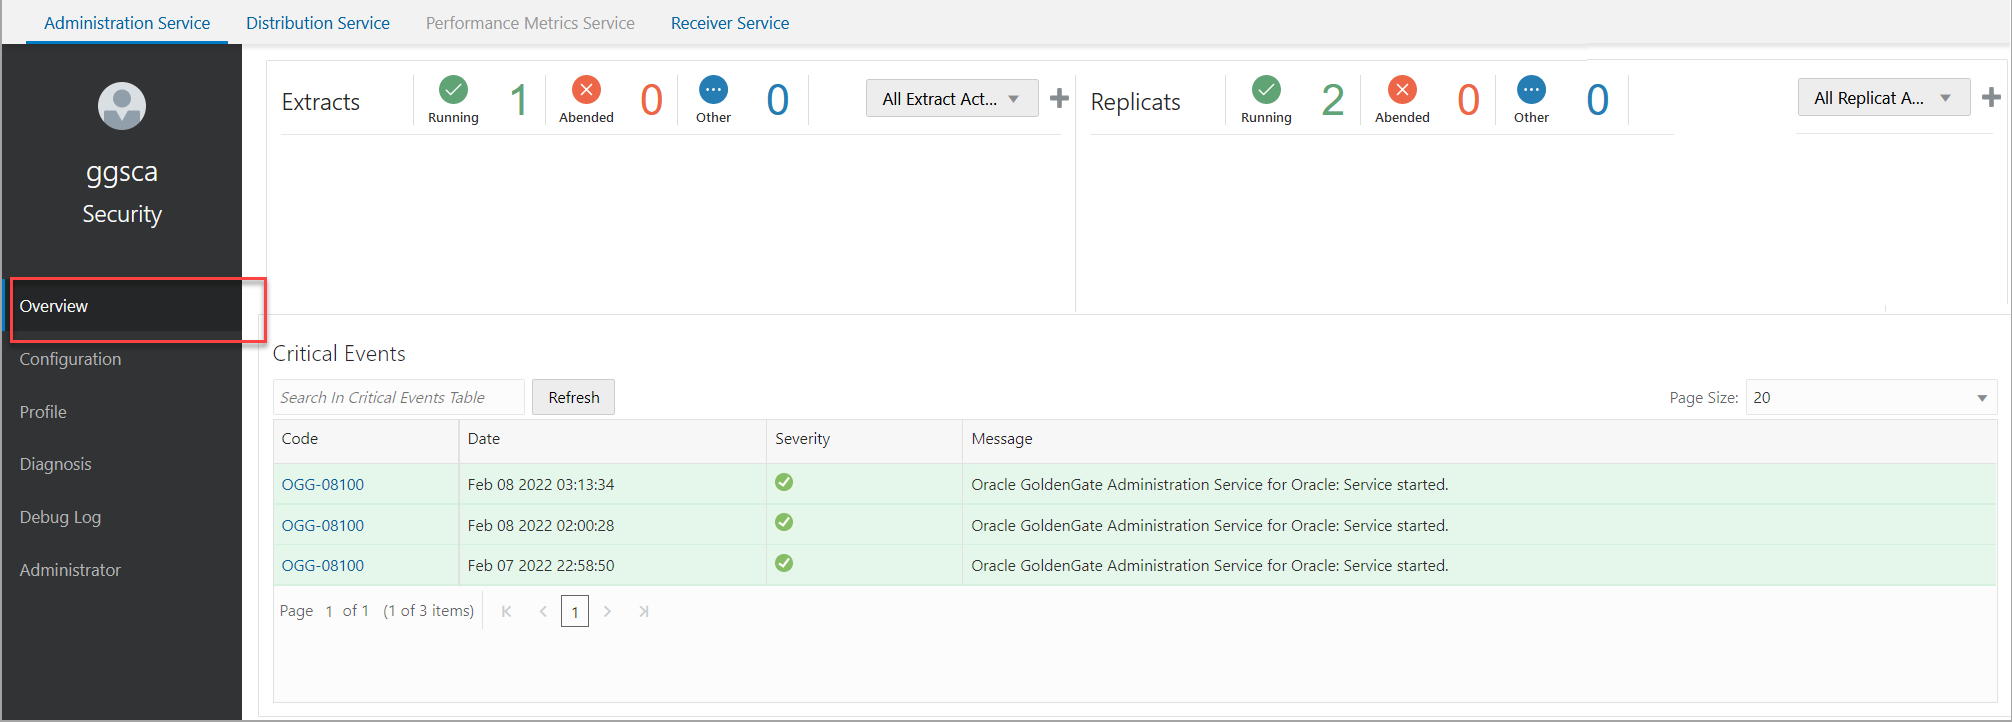
-
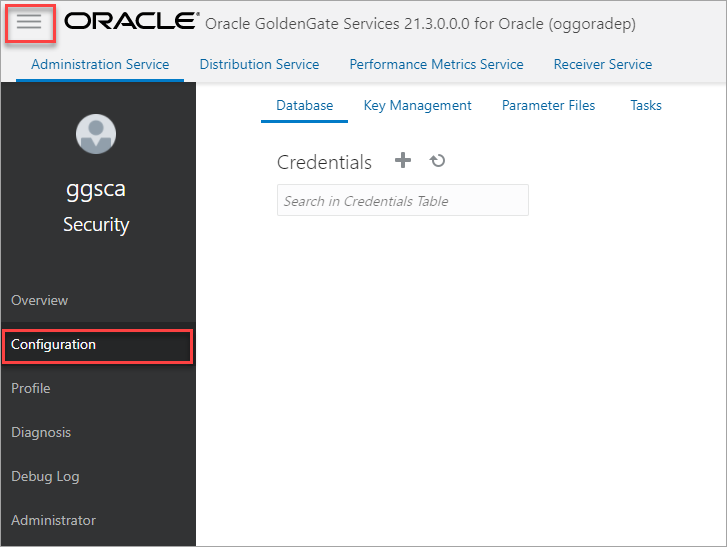
Click the Application Navigation icon to open the left-navigation pane and click Configuration to open the Database tab of the Configuration page.
-
Click the plus (+) sign in the Credentials section to begin adding database user credentials.
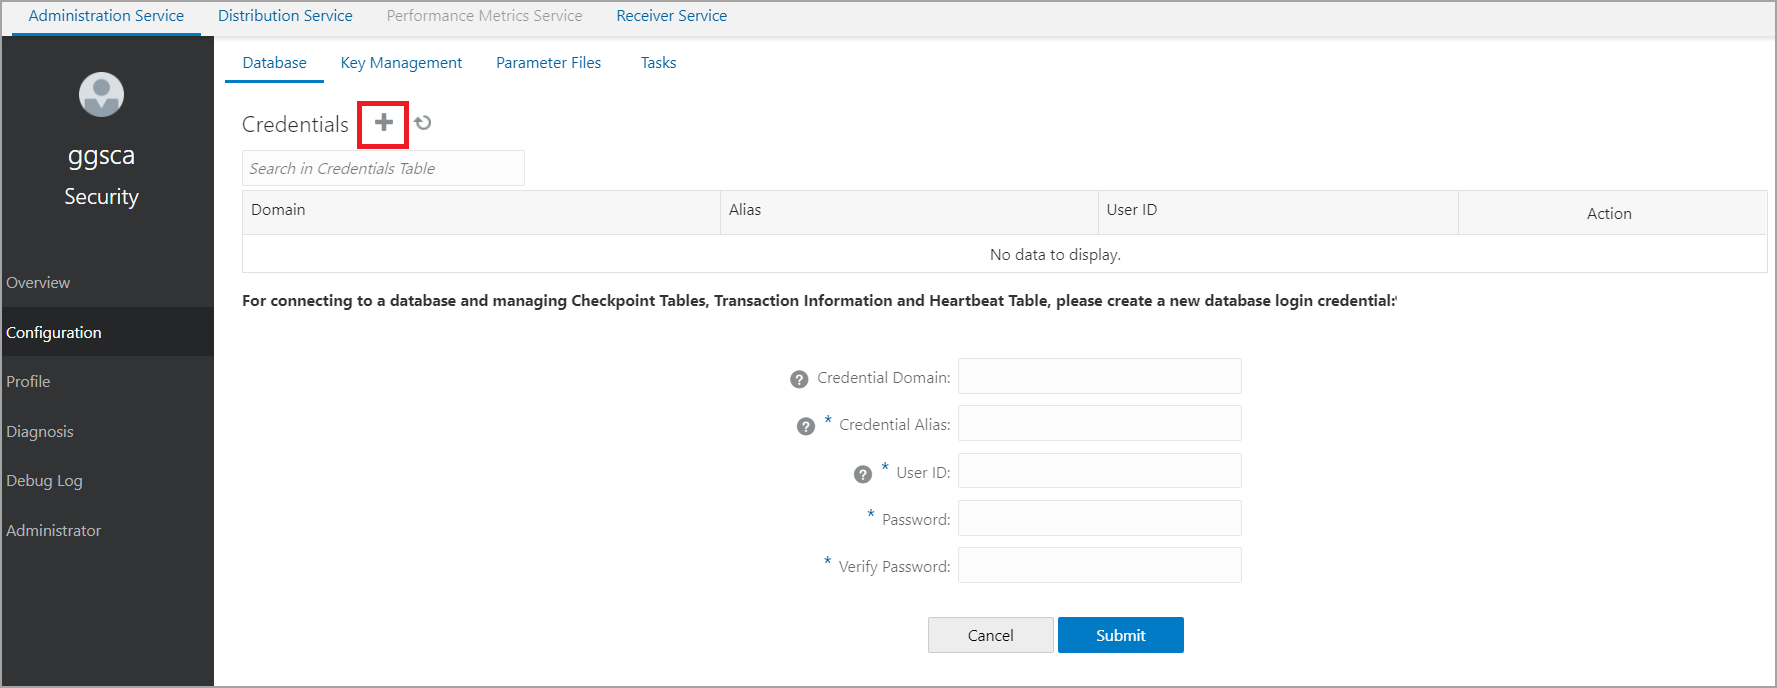
-
You need to add connections for container database (CDB) and pluggable databases (PDBs). Each CDB is used to capture (Extract) from the source database and PDB for delivery (Replicat).
Use the EZconnect syntax to configure the database connection. You need the username, password, hostname, port number, and service name connection information to use the EZConnect syntax.
Here's the syntax that you need to specify in the User ID field:
username@hostname:port/service_nameHere's an example for setting the User ID with EZConnect:
c##ggadmin@dc.example.com:1521/DBWEST.example.com -
Click on the blue icon in the Actions column to connect to the database. The icon turns blue when the connection is successful.
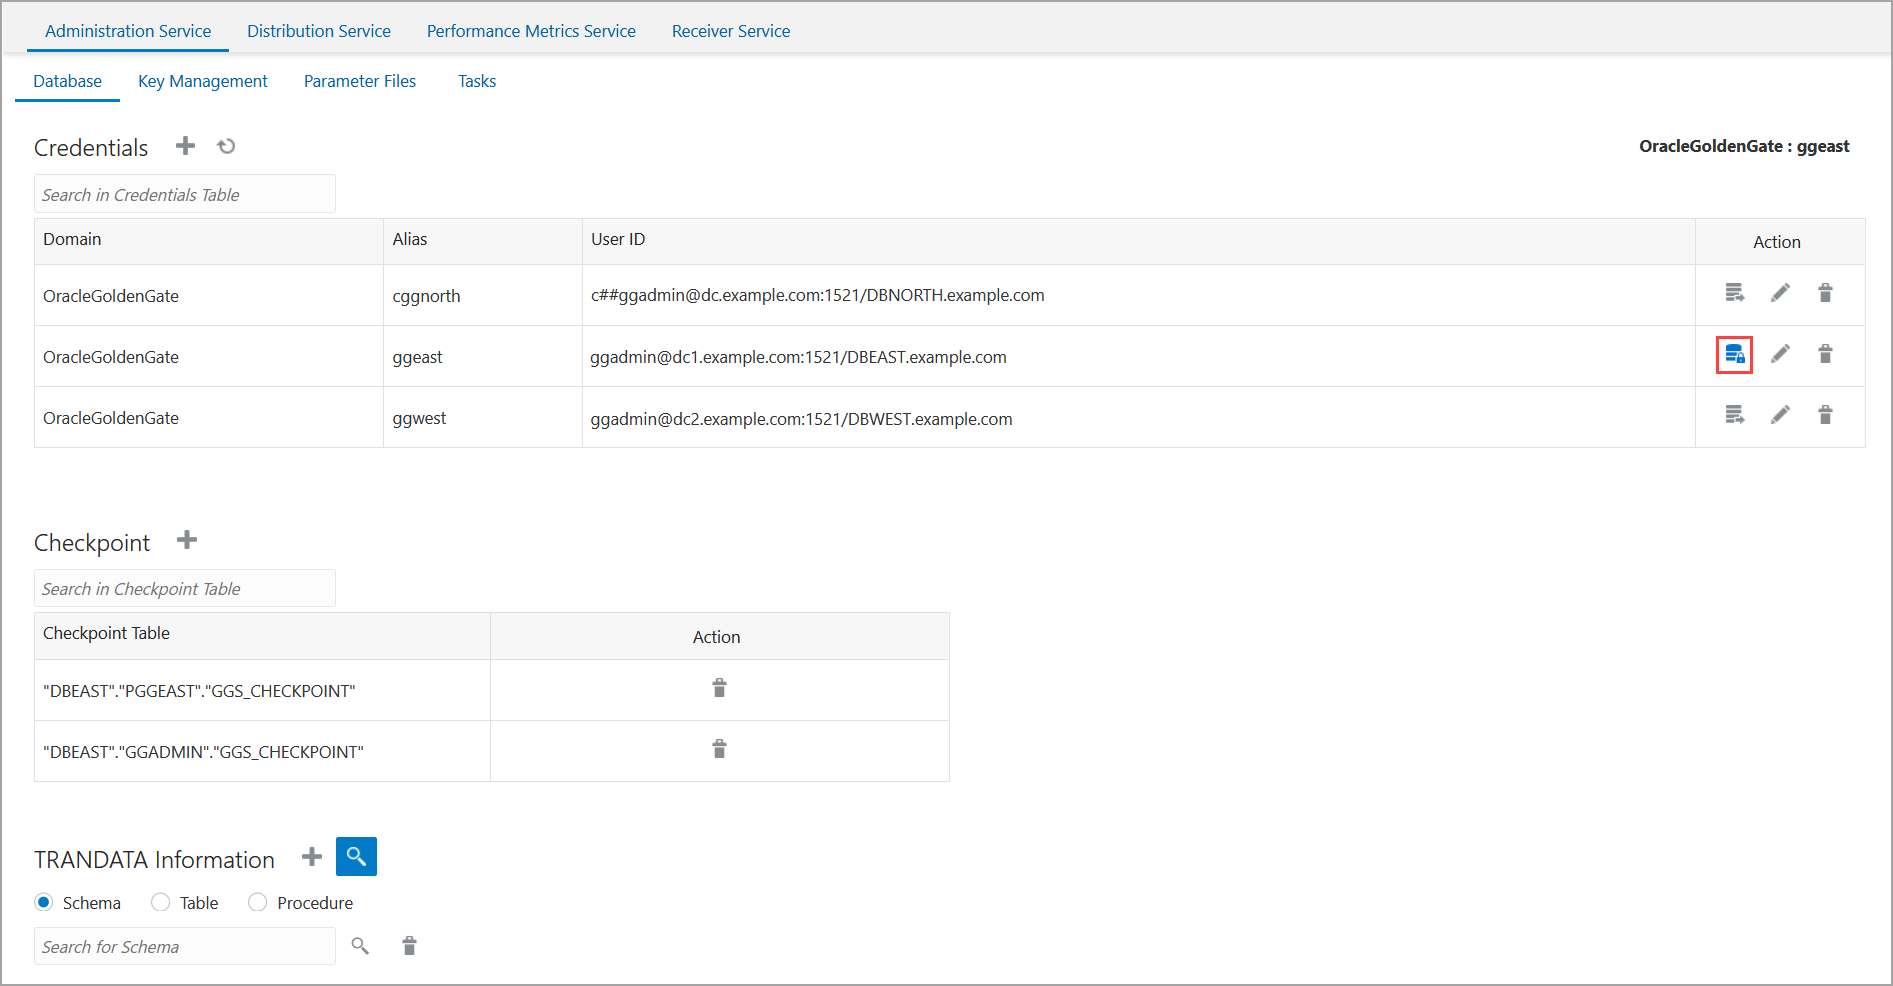
After connecting to the database, the sections to add checkpoint table, TRANDATA, and heartbeat table are displayed.
Step 2: Add Heartbeat, and Checkpoint Tables
Add the heartbeat tables for the PDBs to monitor any possible lags.
Add a checkpoint table for the target database to ensure that if there is a failure, then the Extract and Replicat processes can restart from the point of failure.
Note:
You don't need to add TRANDATA as this is internally done with the PL/SQL call ofADD_AUTO_CDR. You might want to check that supplemental logging is
enabled for the tables.
-
Use the TRANDATA Information section to check if supplemental logging has been enabled for the tables set up for capture.
You can search for the schema for which you added the trandata, using the magnifier glass search icon. This will display the trandata information. The following image shows the trandata information for the
HRschema in the pluggable databaseDBEAST.
See Configure Logging Properties to learn the steps for configuring the logging properties at the Schema, Table or Procedure level.
-
To set up the checkpoint table for Replicat, you need to connect to the target database credentials (ggwest) from the Credentials section.
-
Click the plus sign (+) to add the checkpoint table for the PDBs.
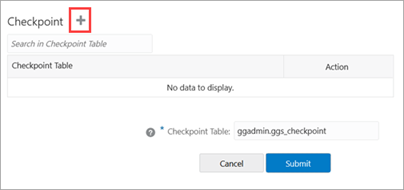
Click Submit. The checkpoint table is added.

Also see the Before Adding Extract and Replicat Processes section, for details on creating heartbeat tables.
-
Add another checkpoint table for the second Replicat,
reps, by repeating the steps 3 and 4. -
Add the heartbeat tables for both source and target endpoints by connecting to ggeast and ggwest database credential aliases.
For bidirectional, active/active replication, the heartbeat table should be in the same schema for the outgoing Extracts and incoming Replicats at each site. For example, see the following use case:
Site A Site B
EAB–------------->RABRBA–------------->EBAIn this example,
EABandRBAheartbeat tables must use the same schema. However,EABandRABcan use different schemas.Add the heartbeat table by clicking the plus sign.
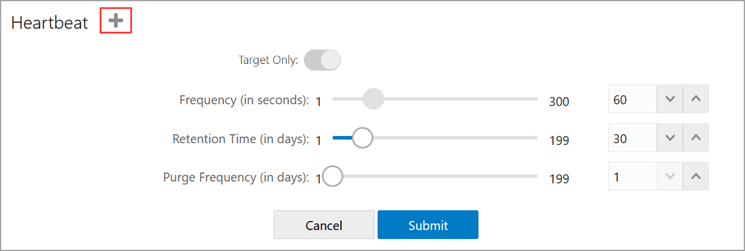
-
Click Submit after adjusting the heartbeat options.
Step 3: Add Extracts
In this section, you will add two extracts, exte and
extw. The Extract process captures data from the source database
and writes it to a trail file. The trail file for exte is
ea
and for extw is ew.
-
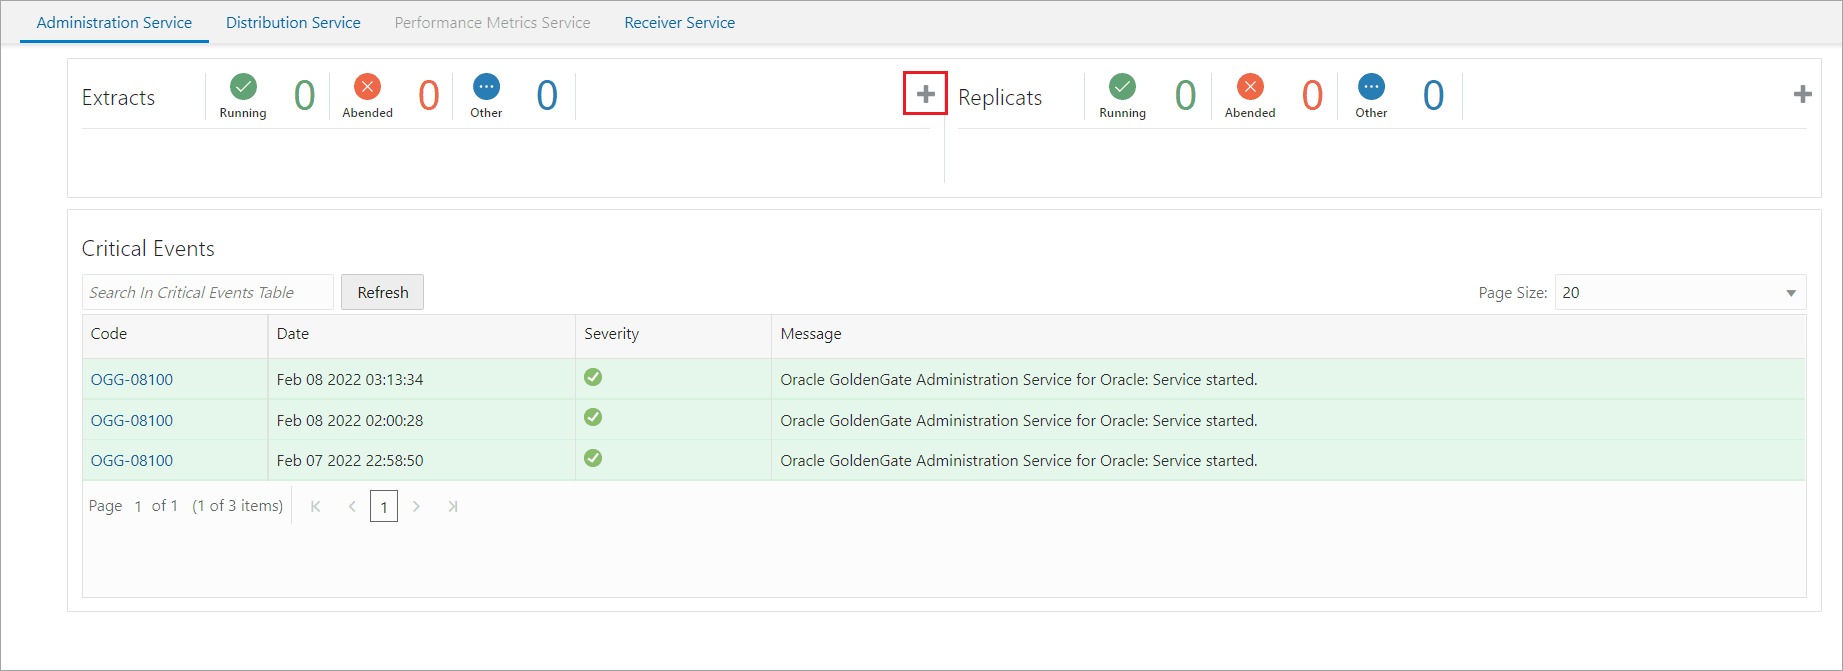
Click the Overview option from the left-navigation pane of the Administration Service and click the plus sign (+) from the Extract section.
-
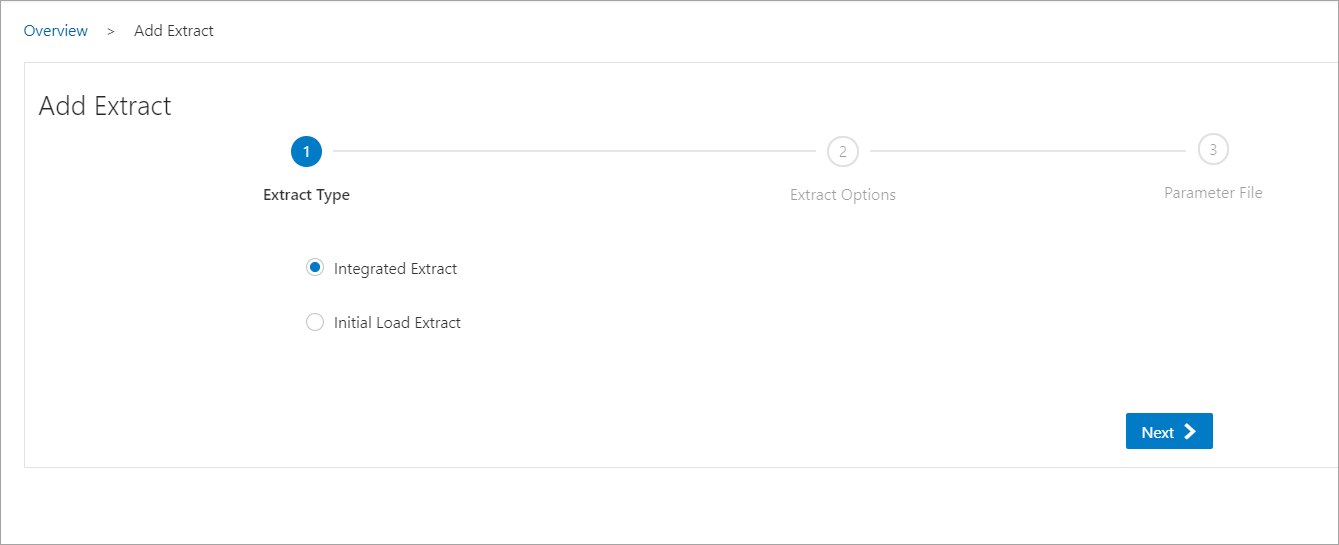
From Add Extract wizard, select Integrated Extract.
-
Click Next and specify the Extract options in the Extract Options screen. See the detailed steps to add an Extract from the Add a Primary Extract section.
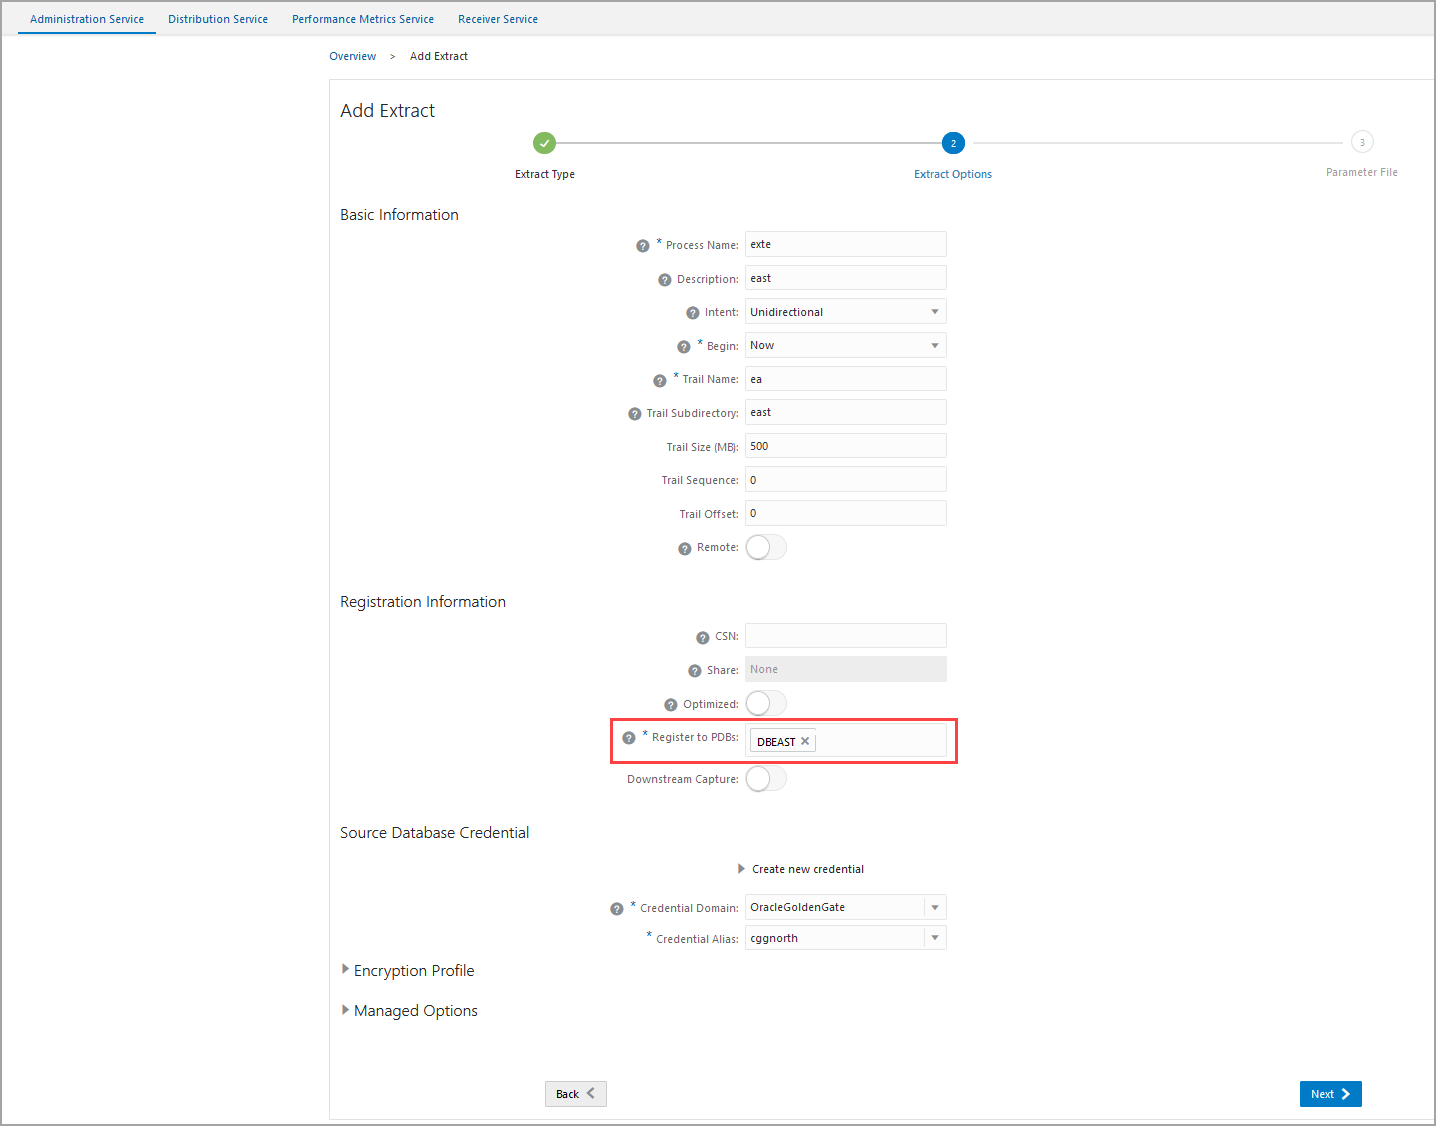
If you are creating the Extract for a pluggable database, then you'll see option Register to PDBs as soon as you enter the credentials domain and alias. Select the PDB in the container database that you want to use for replication.
-
After you enter the options for the Extract (
exte), click Next. The next screen displays the Extract parameter file to help you review the Extract settings.Here's the Extract parameter file for the Extract exte:EXTRACT exte USERIDALIAS cggnorth DOMAIN OracleGoldenGate EXTTRAIL east/ea SOURCECATALOG DBEAST TRANLOGOPTIONS EXCLUDETAG 00 DDL INCLUDE MAPPED OBJNAME hr.* DDLOPTIONS REPORT TABLE DBEAST.hr.*;Review these settings and update the Extract configuration as needed.
For multitenant databases, you need to add entries for Extract to capture from multiple pluggable databases to a single trail. In the parameter file, source objects must be specified in
TABLEstatements with the fully qualified three-part names in the format ofcontainer.schema.objector using theSOURCECATALOGparameter with two-part namesschema.object.Click Create and Run to start your Extract.
extw:
-
Navigate back to the Overview page using the Application Navigation pane.
-
From Add Extract wizard, select Integrated Extract.
-
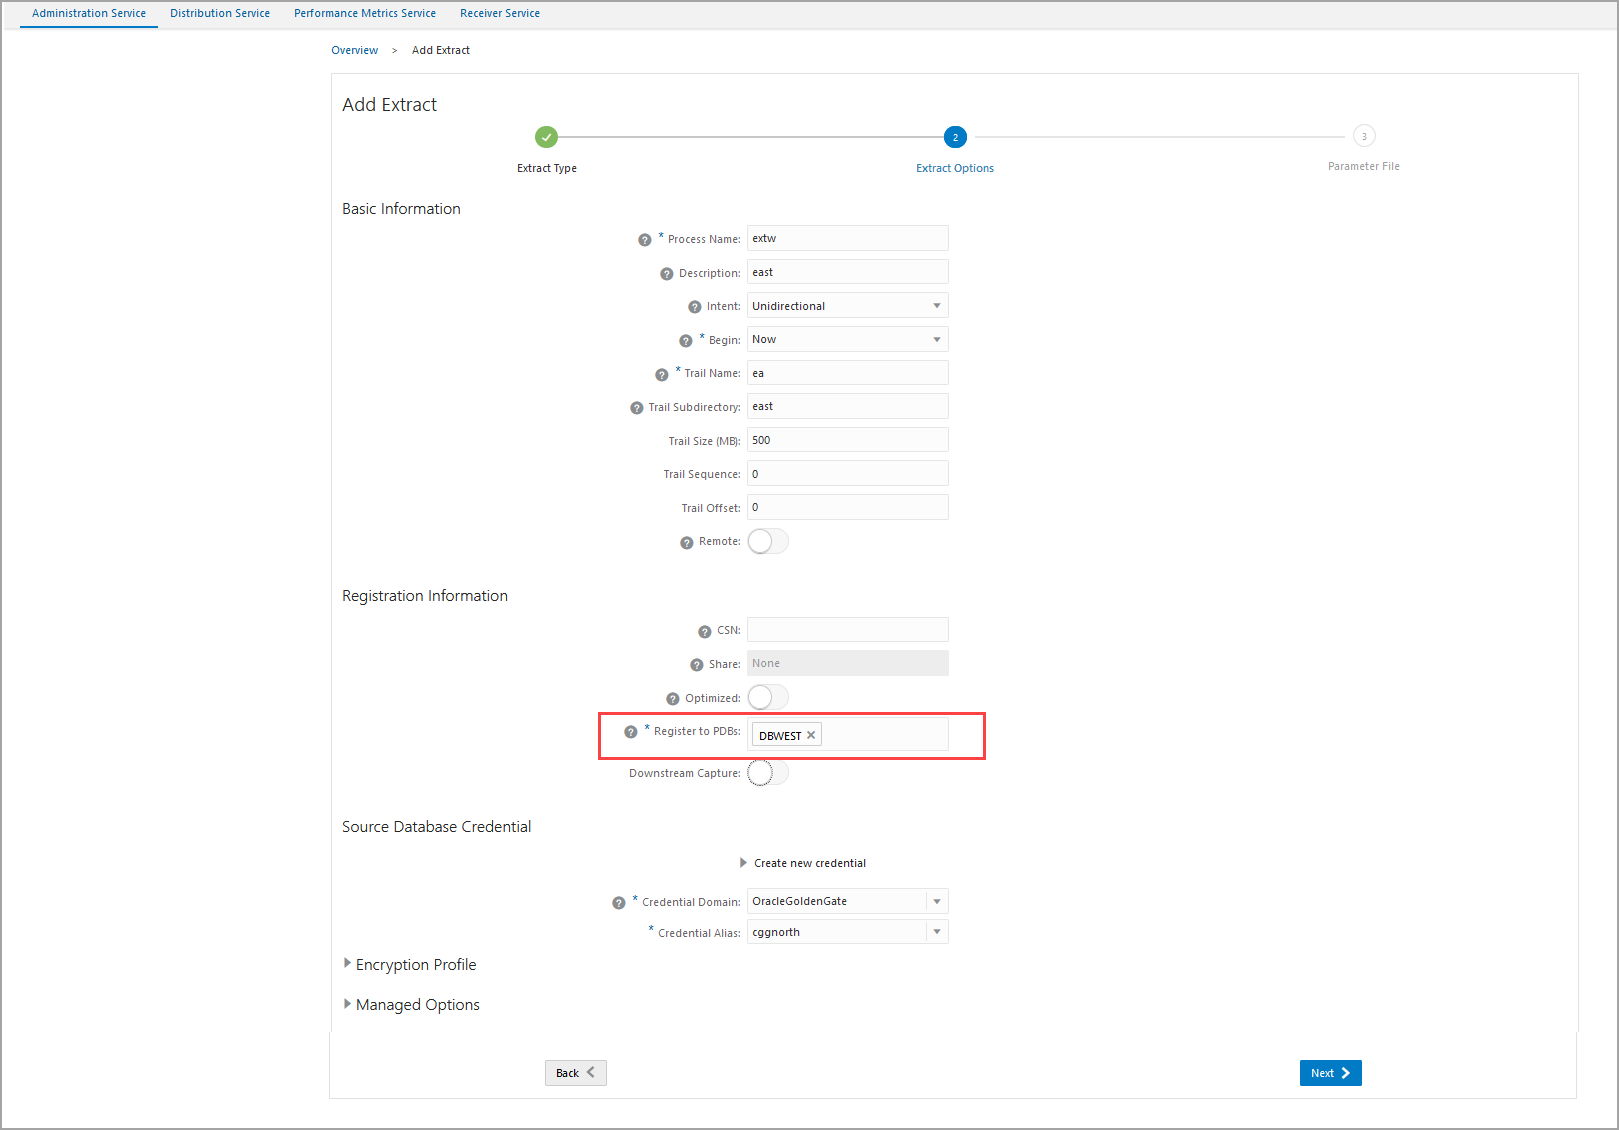
Click Next and specify the Extract options in the Extract Options screen.
-
Select the PDB as
DBWESTin the container database that you want to use for replication. -
After you enter the options for the Extract, click Next. The next screen displays the Extract parameter file to help you review the Extract settings.
-
Enter the options for Extract parameter:
EXTRACT extw
USERIDALIAS cggnorth DOMAIN OracleGoldenGate
EXTTRAIL west/ew
SOURCECATALOG DBWEST
TRANLOGOPTIONS EXCLUDETAG 00
DDL INCLUDE MAPPED OBJNAME hr.*
DDLOPTIONS REPORT
TABLE DBWEST.hr.*;
Review these settings and update the Extract configuration as needed.
- Click Create and Run to start your Extract.
Step 4: Add a Replicat
In this section, you will add Replicats repe and repw. The
Replicat process delivers the change data from the trail file (ea)
created by the Extract, to the target database. Replicat reads the trail file on the target
database, reconstructs the DML or DDL operations, and applies them to the target database.
-
Before you Add a Replicat, make sure that you added your checkpoint table for the target database (
DBWEST) by connecting to the ggwest database credentials. -
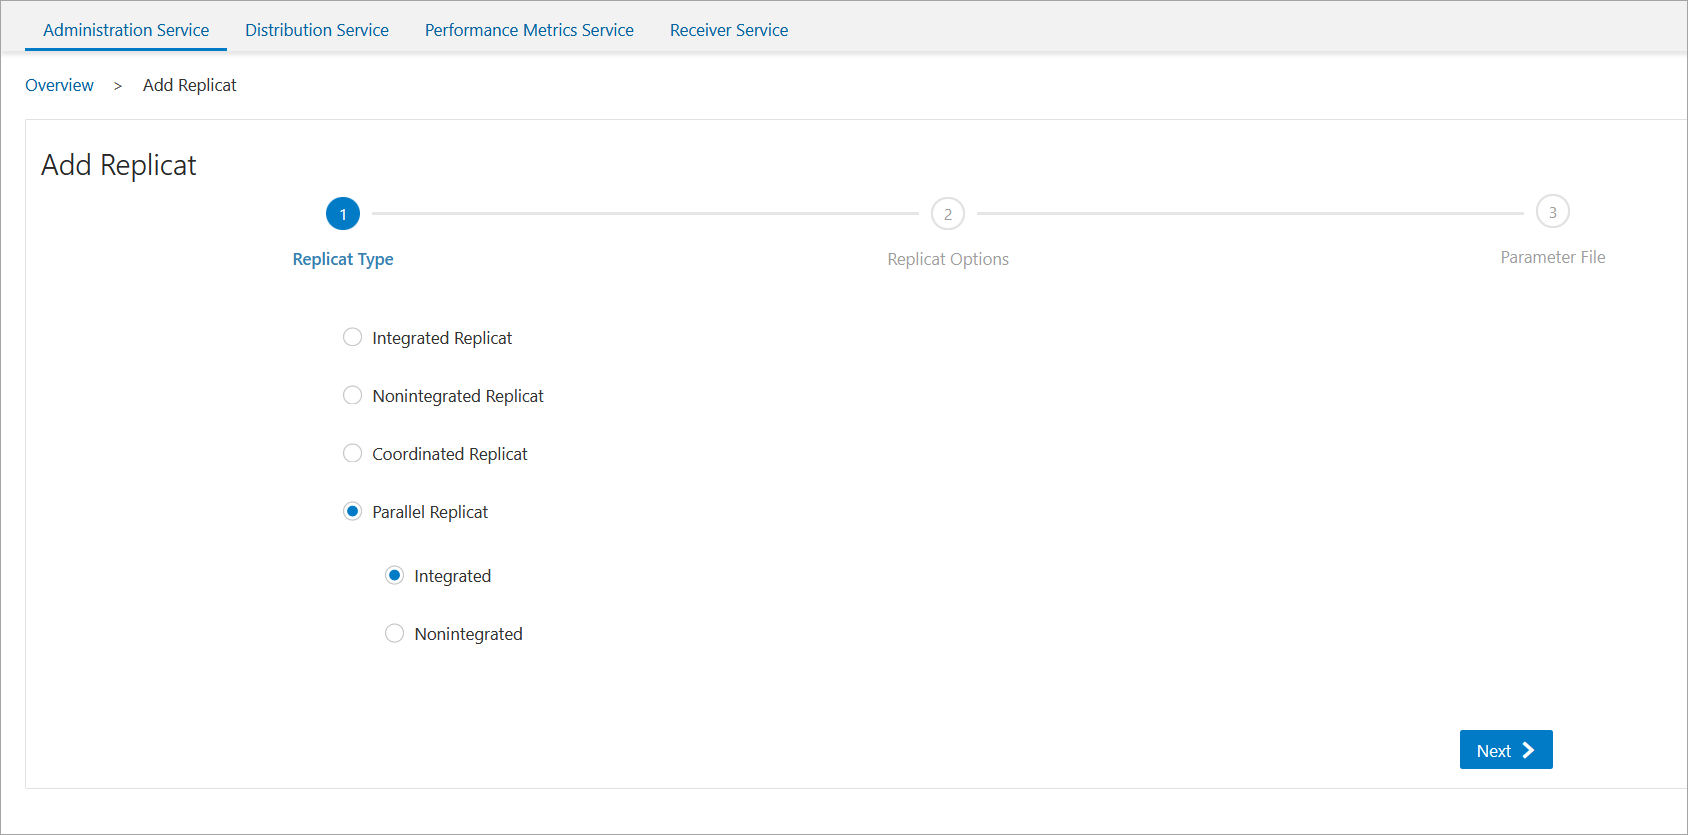
Select a Replicat type to deliver data to the target database. Follow the wizard to complete adding a Replicat.
-
Select the Parallel Integrated Replicat option in the Replicat Options screen.
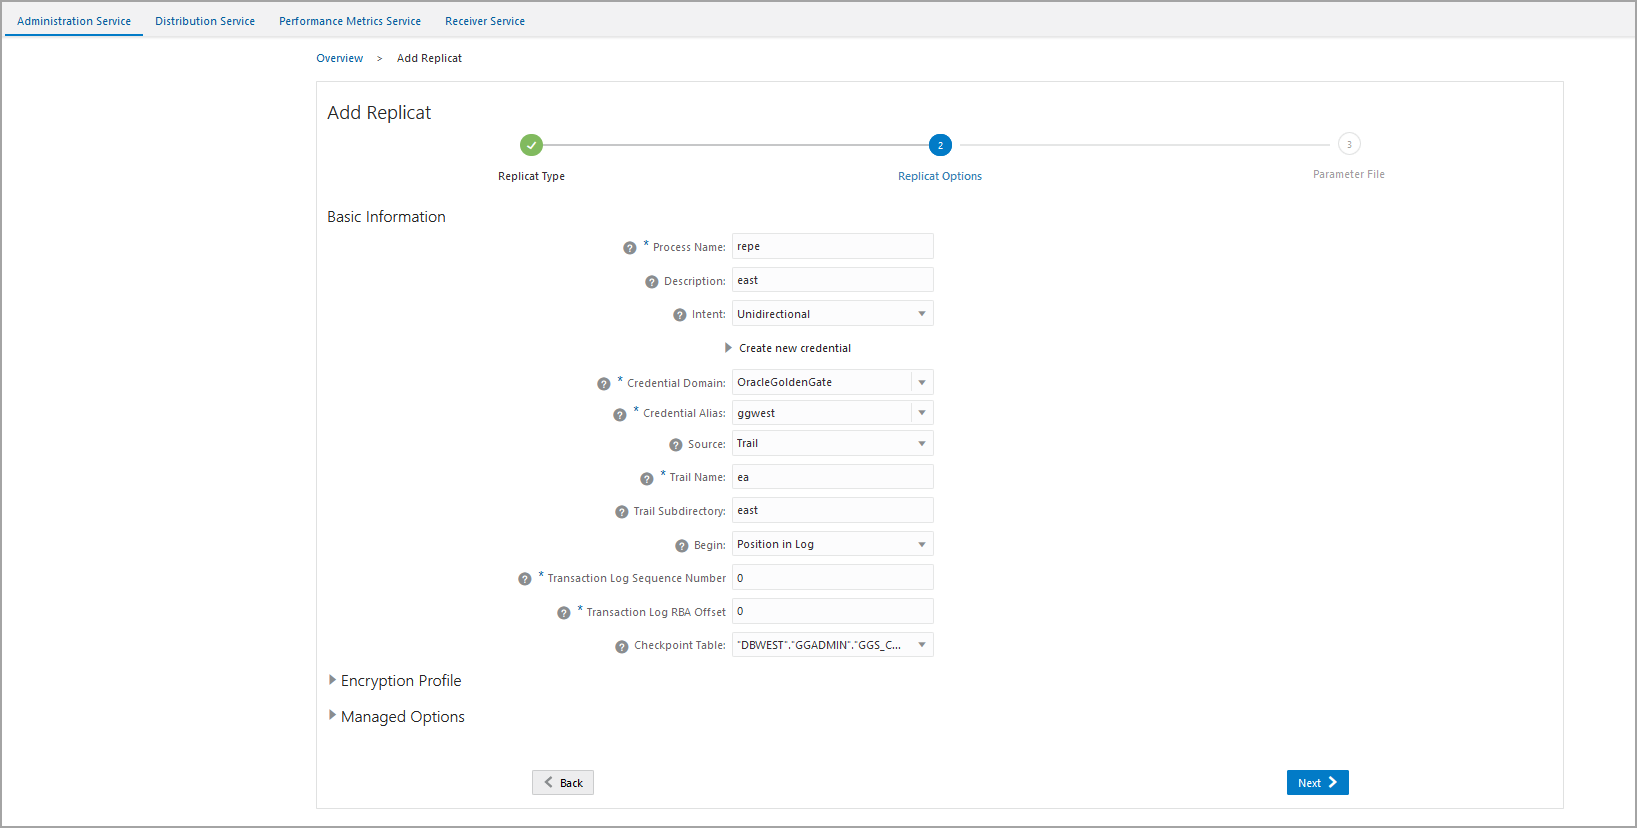
- Click Next to view the Replicat Parameter
File screen. All the parameters that you have specified are available for
review here.
For multitenant container databases, Replicat can only apply to one pluggable database. To specify the correct one, use a SQL*Net connect string for the database user that you specify with the
USERIDorUSERIDALIASparameter. For example:ggadmin@DBWEST.In the parameter file, specify only the
schema.objectin theTARGETportion of theMAPstatements. In theMAPportion, identify source objects captured from more than one pluggable database with their three-part names or use theSOURCECATALOGparameter with two-part names.In case of integrated parallel Replicat,
MAPINVISIBLECOLUMNSparameter is set by default. You don't need to set it in the Replicat parameter file explicitely.Here's a sample of the Replicat Parameter File:
REPLICAT repe
USERIDALIAS ggwest DOMAIN OracleGoldenGate
DDLOPTIONS REPORT
SOURCECATALOG DBEAST
MAP hr.*, TARGET hr.*;
-
Repeat steps 1 and 2 from the steps to add the first Replicat (
repe). -
In the Replicat options screen, enter the following details:
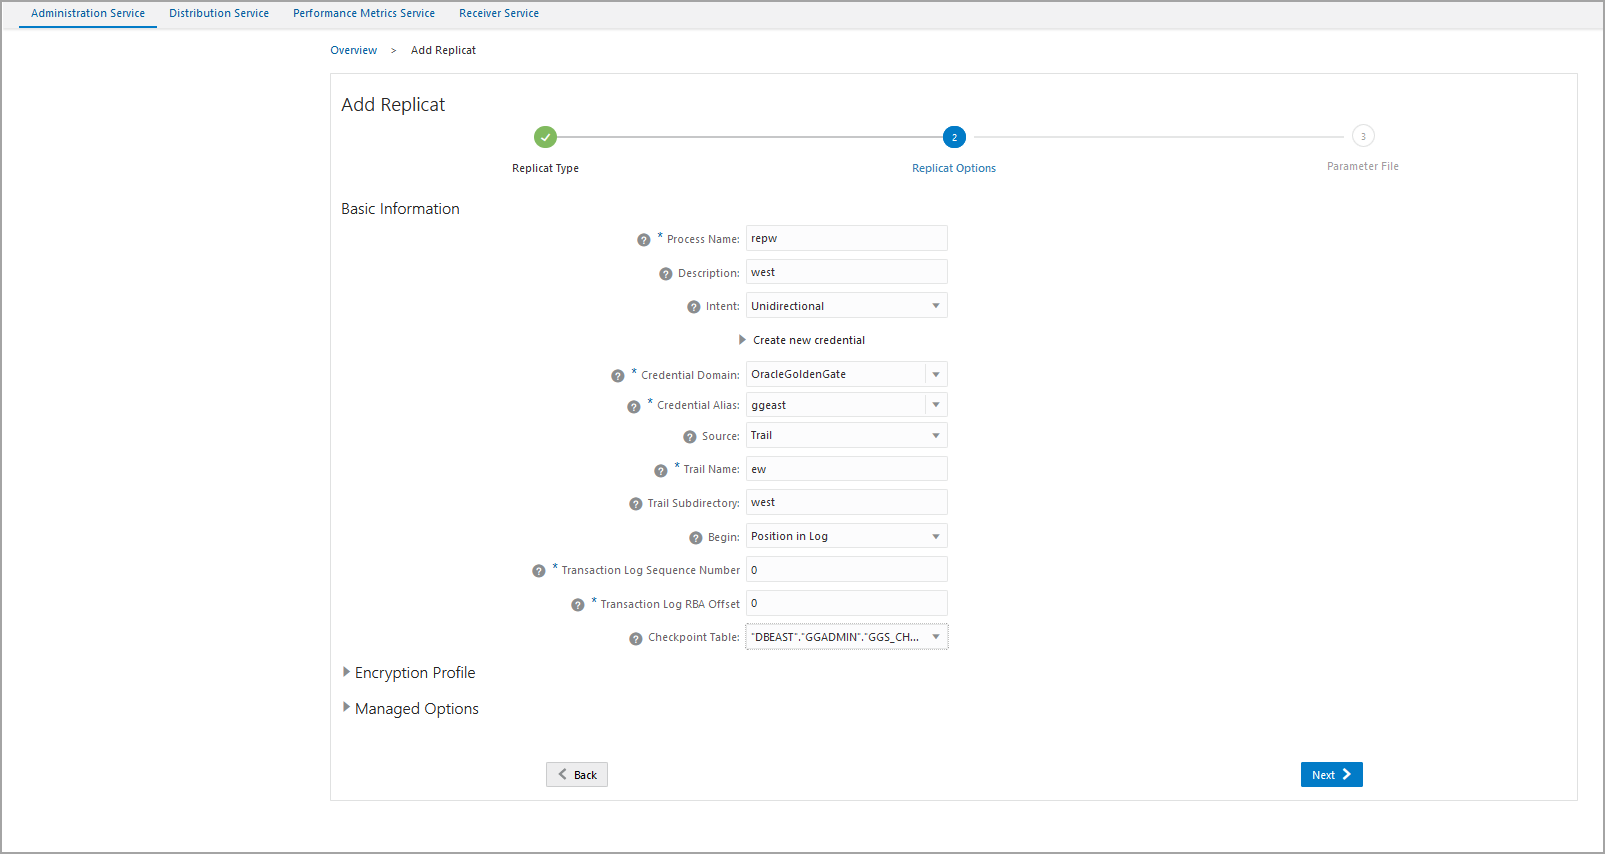 Apart from entering the other options, make sure you enter the following details:
-
Specify the trail name as
ewand the trail file subdirectory as west. -
Select the checkpoint table as
DBWEST.ggs_checkpoint. -
Click Next.
-
Change or modify the Replicat parameter file, as follows:
REPLICAT repw
USERIDALIAS ggeast DOMAIN OracleGoldenGate
SOURCECATALOG DBWEST
DDL INCLUDE ALL
DDLOPTIONS REPORT
MAPEXCLUDE ggadmin.ggs_checkpoint*
MAPINVISIBLECOLUMNS
MAP hr.*, TARGET hr.*;
-
After the Replicat starts successfully, you can see the Extract and Replicat processes in running state on the Administration Service Overview page.
Test and Monitor Transactions
The following screen shows that records were captured by the
exte Extract from the hr.employees table on
DBEAST.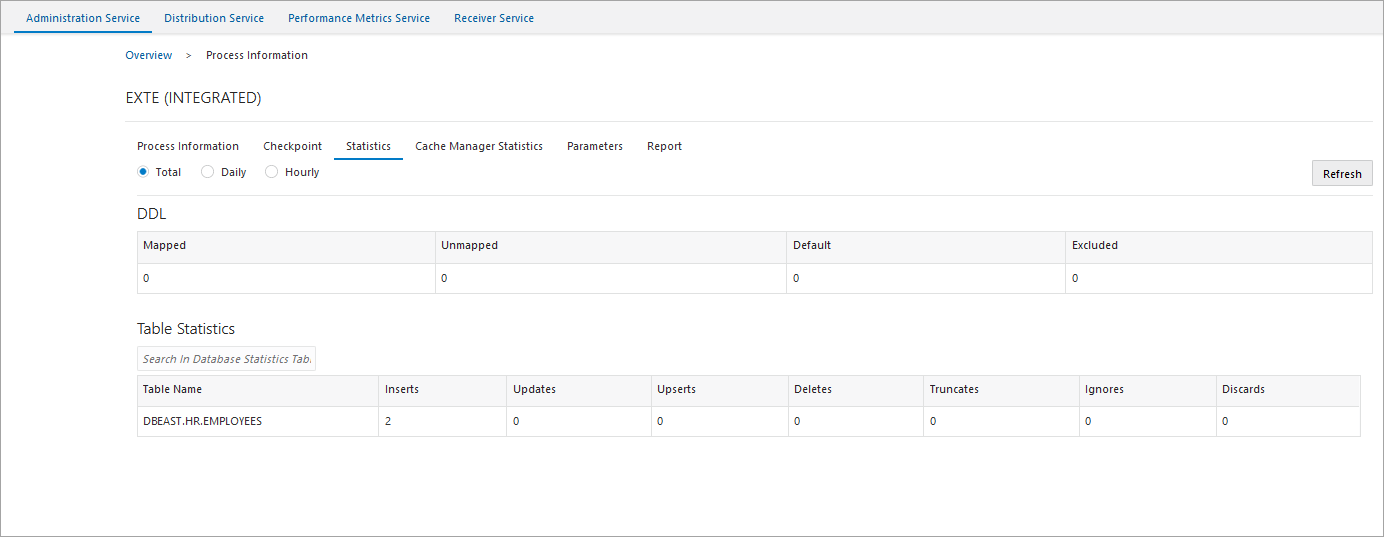
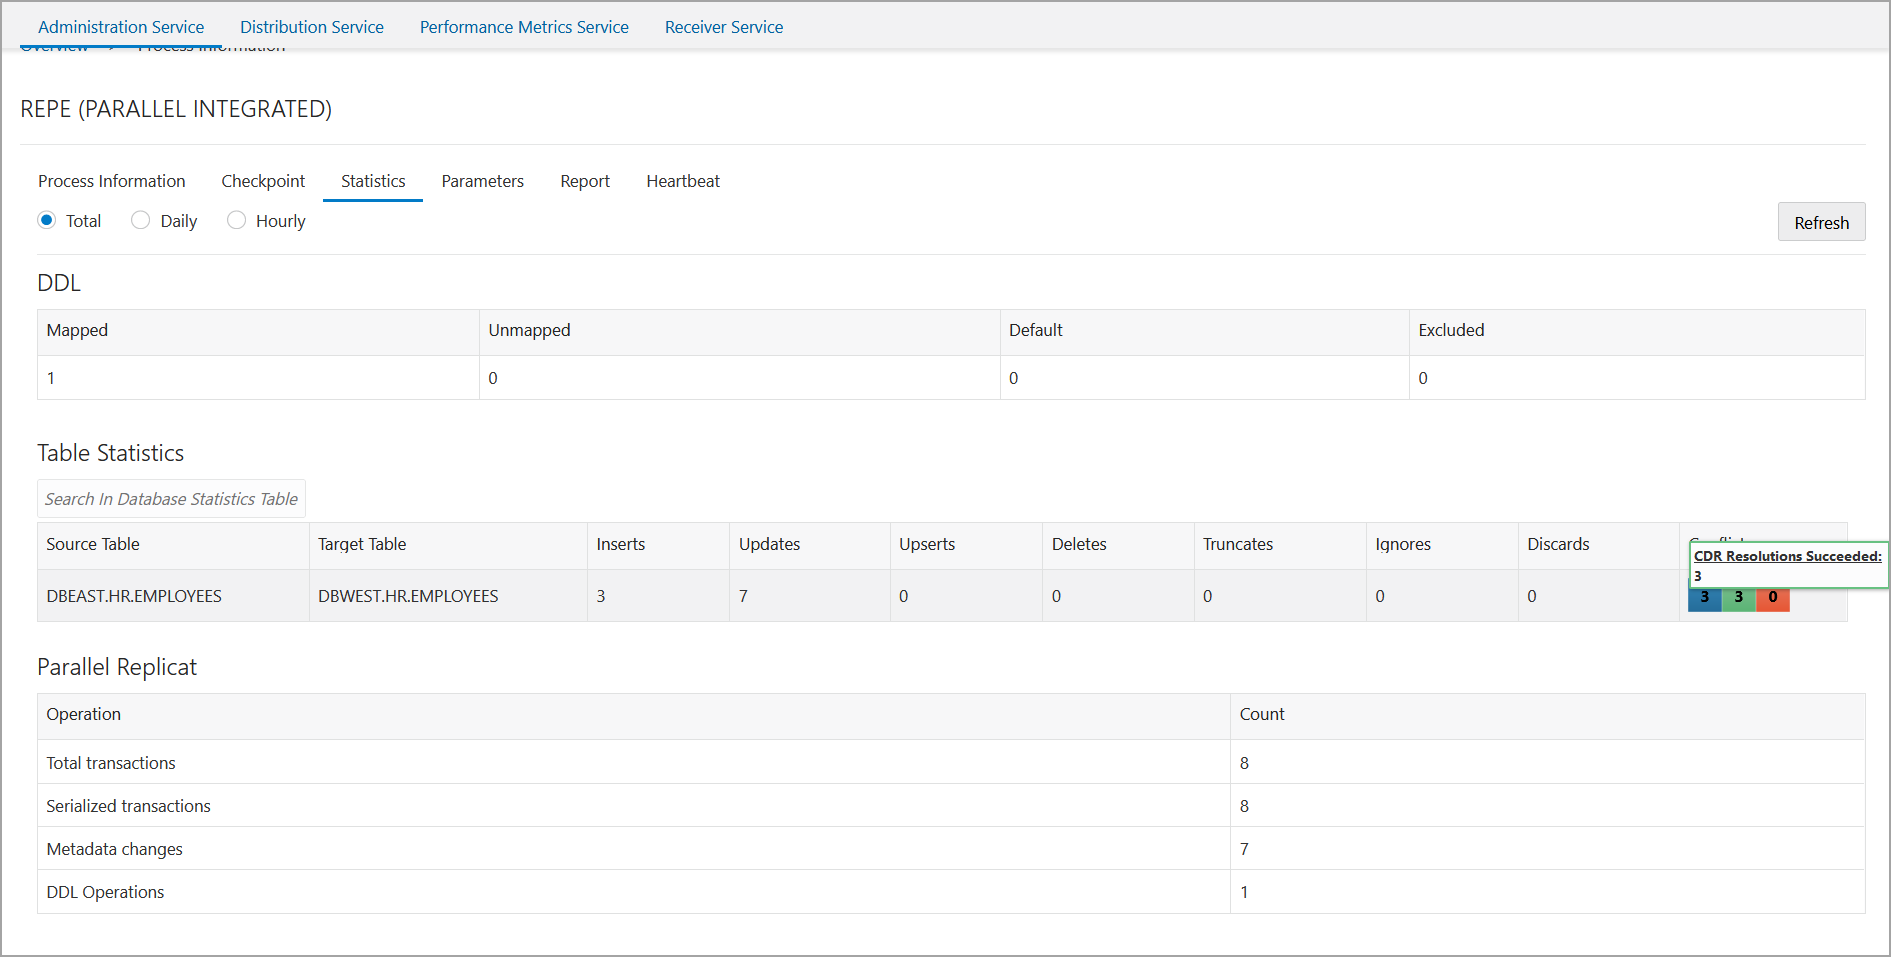
Check that the same is updated on the Replicat (repe)
as well: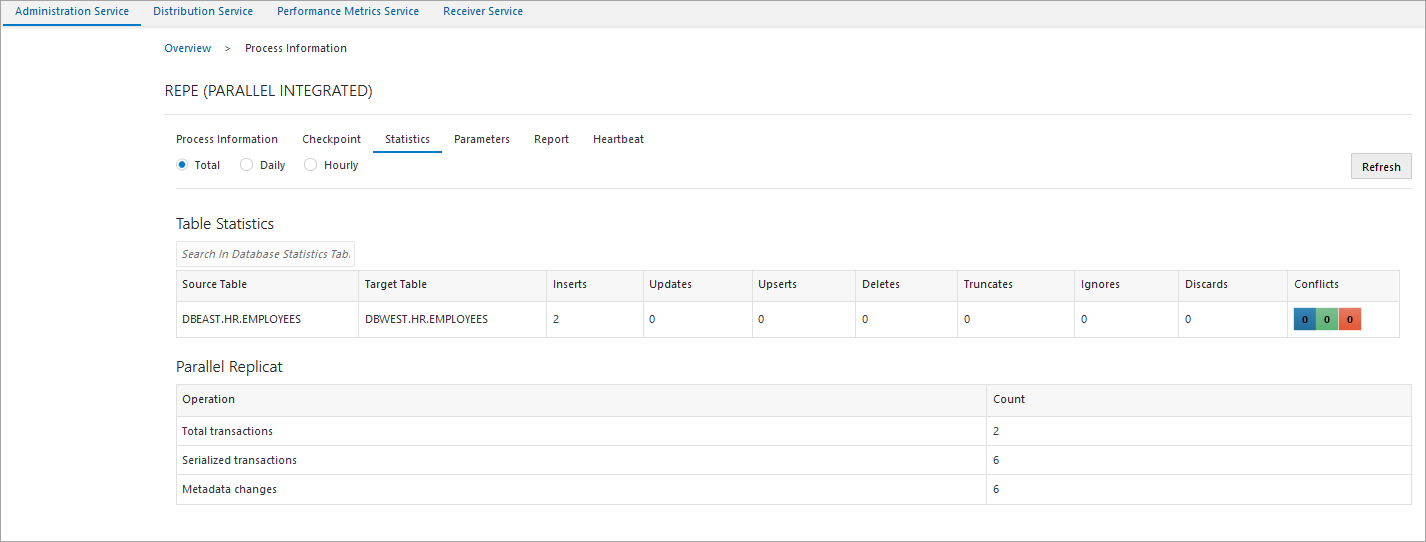
The 2 records in the hr.employees table are replicated to the
endpoint (DBWEST).
Let's see the Extract (extw) on
DBWEST. 
Notice that the value of inserted records is 5. Out of these 5 records,
2 were replicated by repe into hr.employees on
DBWEST. 3 new records were then inserted into
hr.employees on DBWEST.
When these 3 records are inserted in the hr.employees table
in the PDB DBWEST, then only the updated records should be replicated in
DBEAST. The following screen shows that only the updated records are
added to DBEAST.
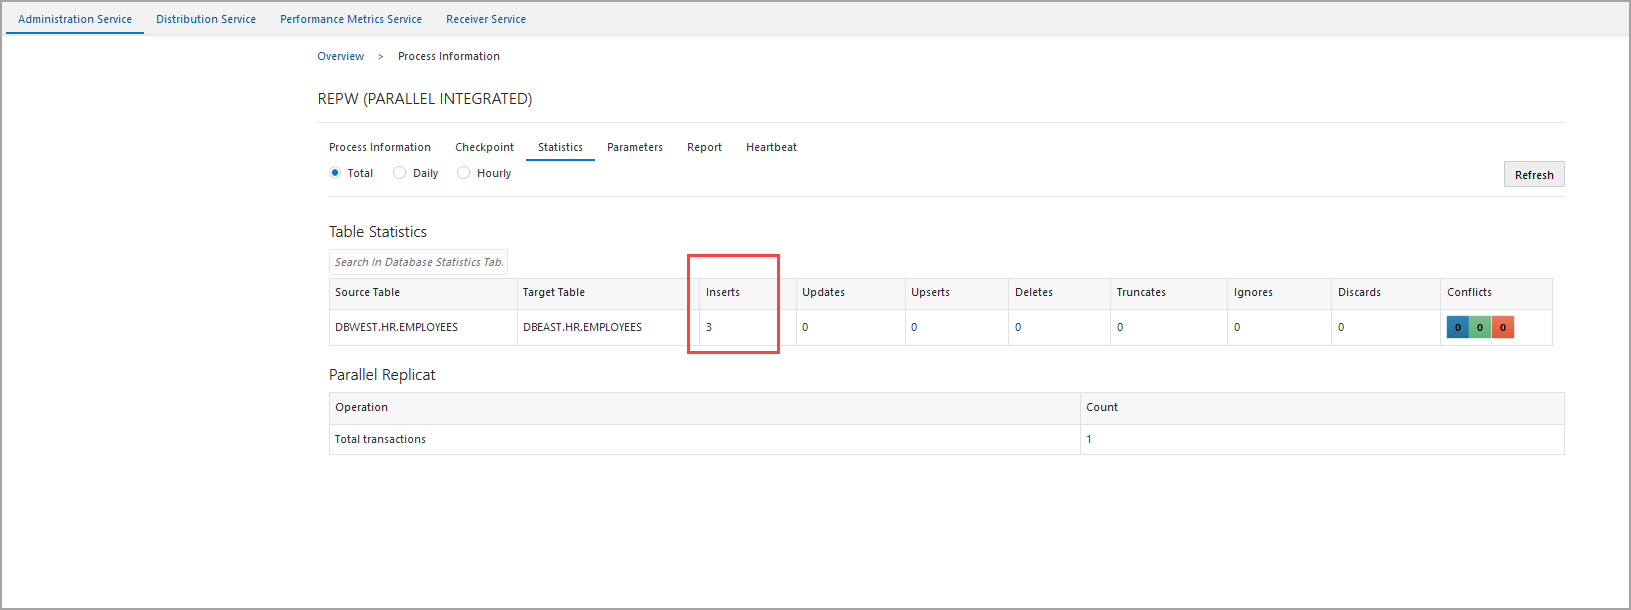
As shown in this figure, there are 3 INSERTS, indicating that there was no duplication of records.
This is one way of implementing an active-active bidirectional replication in Oracle GoldenGate MA.
Test Automatic Conflict Detection and Resolution
In this section, the latest timestamp of a record is checked to check if ACDR is able to resolve the conflict in records. To check automatic resolution of conflicts, let's create the following records.
Transaction in DBEAST:
In the
following example, UPDATE transactions have been run simulateneously on
DBEAST and DBWEST and with ACDR, the conflict is
detected and resolved.
DBEAST:
UPDATE hr.employees set LAST_NAME='Simmonds', EMAIL='HSIMMONDS' where EMPLOYEE_ID=204;UPDATE hr.employees set SALARY='15000' where EMPLOYEE_ID=203;DBWEST for the same
rows, as shown in the following
example:UPDATE hr.employees set LAST_NAME='Symmonds', EMAIL='HSYMMONDS' where EMPLOYEE_ID=204;UPDATE hr.employees set SALARY='25000' where EMPLOYEE_ID=203;To check which of these entries was the winner or the entry that was finally applied, and to know the criteria used to apply that entry, use the following options:
Use DBA_APPLY_ERROR_MESSAGES view
DBEAST, run the following
query:select OBJECT_NAME, CONFLICT_TYPE,APPLIED_STATE,CONFLICT_INFO from DBA_APPLY_ERROR_MESSAGES;The output for this query displays the following: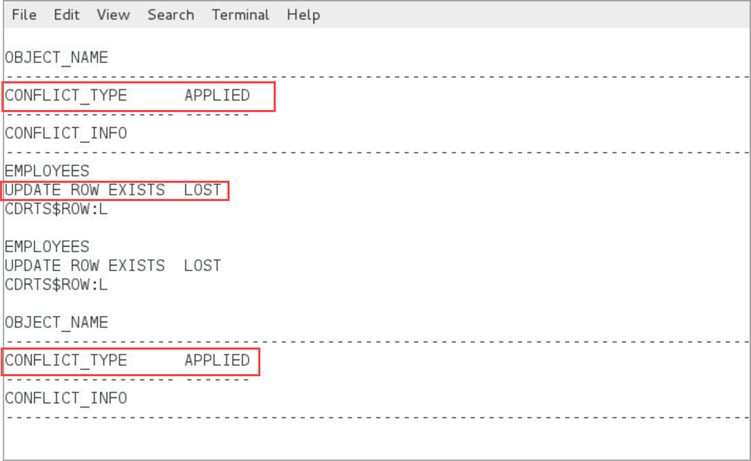
Run the same query on DBWEST also.
CDRTS$ROW visible by running the following
command:ALTER TABLE hr.employees modify CDRTS$ROW visible;DBEAST or
DBWEST:SELECT * from hr.employees WHERE employee_id=204The output shows as follows:
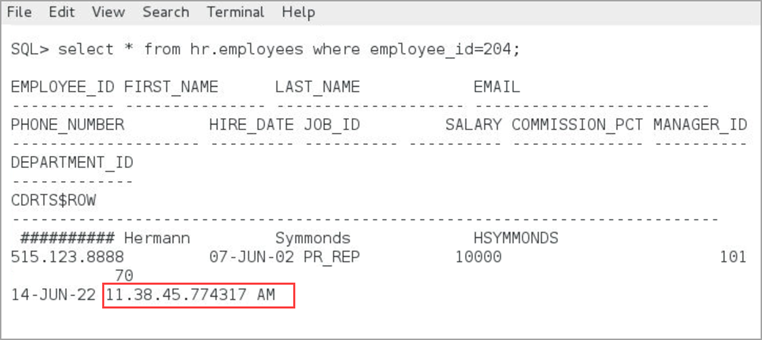
You can note the timestamp for this transaction: 11.38.45.774317 AM.
Now, let's check the timestamp on
DBWEST:

As the conflict is resolved, the timestamp shows the same data on both PDBs.
STATS REPLICAT repe, REPORTCDRThe output for this command displays the following:
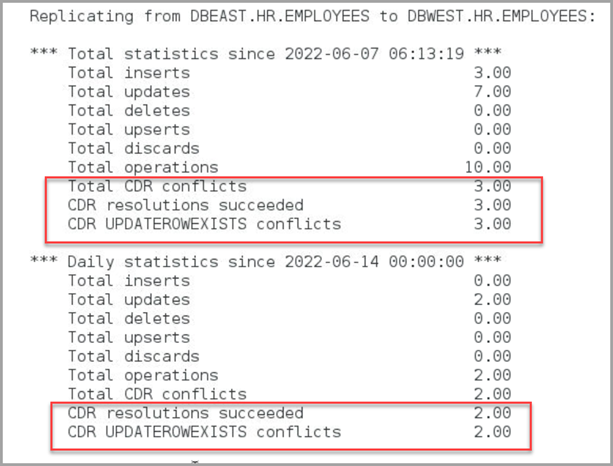
As shown in this statistical report, there were 3 conflicts and 2
of them were resolved. The UPDATEROWEXISTS conflict type is used for
resolution.
You can also see this report from the web interface: