1 About the Repository Creation Utility
The following topics introduce you to the concepts and features that you should be familiar with before you use RCU:
Verifying RCU System and Database Requirements
Use the certification and system requirements documents to find important information about supported platforms for RCU, certified databases, and database configuration information.
Read this information carefully before you obtain and run RCU.
RCU Supported Platforms
Use the system requirements document to review the supported platforms on which you can run RCU.
To know the platforms on which you can run RCU, see Oracle Fusion Middleware System Requirements and Specifications document.
Finding a Certified Database
If you do not have a database where you can install schemas, you must install and configure a certified database.
For a list of certified databases that can be used with RCU, see System Requirements and Supported Platforms for Oracle Fusion Middleware certification document for your release, located on the Oracle Fusion Middleware Supported System Configurations page.
Database Requirements for RCU
Ensure to review the general and component-specific database requirements that must be met before you run RCU.
Not all schemas are supported on all databases. So, before you begin using RCU, see the System Requirements and Supported Platforms for Oracle Fusion Middleware document in Oracle Fusion Middleware Supported System Configurations page. In the certification information, you can see that MySQL database is supported for Oracle Data Integrator and Oracle GoldenGate Studio Fusion Middleware components only.
Make sure you have read the information in this section carefully so that you configure a certified database that supports the schemas that you need for your Fusion Middleware components.
Preparing for Schema Creation
Before you create your schemas, ensure that you understand the concepts regarding schema creation and organization.
About System Load and Product Load
Schema creation in RCU is performed in multiple phases; each phase requires a different level of access to your database.
-
System Load Phase
During the system load phase, RCU creates the necessary tablespaces and schemas. If it is not already present, RCU also creates the
schema_version_registry. One entry for each component is created inschema_version_registry, and the entry will have the appropriate access and status set to LOADED in theschema_version_registrytable.User with SYS or SYSDBA privileges must perform these actions; authentication credentials must be provided on the Database Connection Details screen when running RCU.
If you do not have the necessary privileges, you can select the Prepare Scripts for System Load on the Create Repository screen. This option generates a SQL script that contains the same SQL statements and blocks that would have been called if RCU were to execute the actions for the selected components. After the script is generated, a user with the necessary SYS or SYSDBA privileges can execute the script to complete the system load phase.
After the system load phase is complete, any user with the privileges described in Granting Permissions to Users for Querying System Load Objects can then run RCU again to complete the schema creation by performing the product load phase.
Note:
If you need to generate the script for system load, you can only create schemas on Oracle and Oracle EBR databases; the system load script is not supported on any other database.
If you are performing the system load with full SYS or SYSDBA privileges, then you can create the schemas on any certified database.
-
Product Load Phase
During the product load phase, RCU creates procedures, functions, tables, indexes, and other objects within schemas and runs any action that does not require DBA access. Any non-DBA user or the REGISTRYOWNER user can be used for this step.
Before performing the product load phase, the user must be granted the following:
grant REGISTRYACCESS to user;
grant STBROLE to user;
After the product load phase is complete, status is changed to VALID, if there is no post -product load for that component.
-
Optional Post-Product Load Phase
This step is only needed for components that generate the
script_postDataLoad.sqlscript that requires DBA privileges during the system load phase. After the product load phase is complete, someone with SYS or SYSDBA privileges should execute thescript_postDataLoad.sqlscript.This step is required for the following components:
-
Audit Services (
IAU) -
Oracle Enterprise Scheduler (
ESS)
-
Note:
The Repository Creation Utility fails to load schemas forSOAINFRA when you run schemas on an Oracle hardened database.
See SOAINFRA Schema Creation Fails on a Hardened Database.
Granting Permissions to Users for Querying System Load Objects
If you want to give a user with limited privileges the ability to query the system load objects, you must grant the user certain permissions before they can query the system load.
Note:
This user will be used for connecting to the system for queries, but the generated scripts from the system load phase must be run by someone with DBA privileges.
grant select_catalog_role to user;
grant select any dictionary to user;
grant create session to user;
grant select on schema_version_registry to user;
Note:
You may encounter a Table or view does not exist error message when you execute the last command; this can be ignored.
After you perform the system load, grant the following permission to the same user in order for them to perform data load:
grant REGISTRYACCESS to user;
grant STBROLE to user;
About Custom Prefixes
Use custom prefixes to organize and group schemas in your database.
The prefix is prepended to and separated from the schema name with an underscore (_) character, as shown below:
prefix_schemaname
Prefixes:
-
Can only contain alpha-numeric characters; no spaces or other special characters.
-
Must begin with a letter.
-
Must not be longer than 12 characters.
Note:
The total length of the prefixed schema name (your custom prefix plus the component schema name) must not be longer than 30 characters.
The default prefix used by RCU is DEV; if DEV has already been used, then RCU defaults to DEV1, then DEV2, and so on. Prefixes are used to create and organize logical groups of schemas. For example, you may want to create a test version of the Metadata Services (schema name MDS) called TEST_MDS; then, when you are ready for your production version, you can create a second version of the schema called PROD_MDS. Both TEST_MDS and PROD_MDS may reside on the same or separate databases.
You are only allowed to use a prefix once per schema within a single database. For example, if you have a version of the Metadata Services schema called DEV_MDS, then you cannot use the DEV prefix again to create another version of the Metadata Services schema (for example, DEV_MDS2).
If you want to create another version of the schema using the same prefix, you must first drop the existing schema and then create the schema again.
The mapping between the prefixes and schemas is maintained in schema_version_registry.
About the Service Table Schema
The Service Table schema is a special schema that is automatically created once per prefix. The service table stores basic schema configuration information (for example, schema prefixes and passwords) that can then be accessed and used by other Oracle Fusion Middleware components during domain creation.
For example, the Configuration Wizard has screens which you can configure to use the data that is stored in the service table when RCU was run. After you provide the service table schema credentials, the data from the service table is used to populate the fields on the screen, thus saving you the need to manually populate that data yourself.
Once created, service tables are used to wire Oracle Fusion Middleware components together. For more information about wiring various components together, see Wiring Components to Work Together in Administering Oracle Fusion Middleware.
Planning Your Schema Creation
Before you run RCU, make sure that you understand how schemas can be grouped together and distributed depending on your specific environment.
For more information, the following examples are provided:
Organizing Schemas on a Single Database for a Single Domain
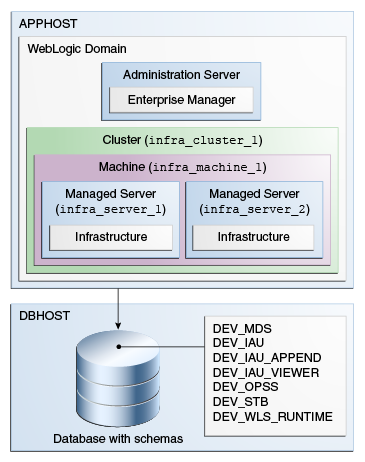
This example shows a set of schemas in a single database being used by a single WebLogic domain.
This is the simple scenario in which all schemas using the DEV prefix are grouped together and used by a single WebLogic domain.
Figure 1-1 Schemas on a Single Database for a Single Domain

Description of "Figure 1-1 Schemas on a Single Database for a Single Domain"
Organizing Schemas on Multiple Databases for a Single Domain
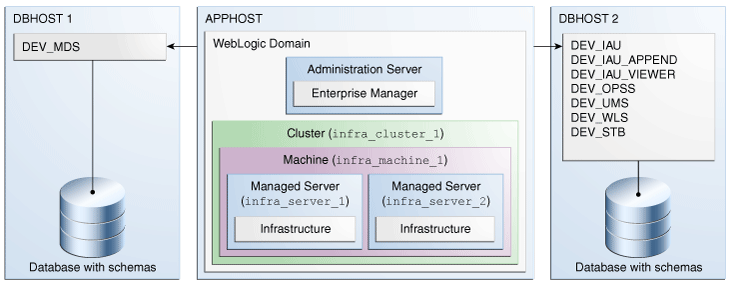
This example shows a single set of schemas that are distributed on multiple databases being used by a single WebLogic domain.
Figure 1-2 Schemas on Multiple Databases for a Single Domain

Description of "Figure 1-2 Schemas on Multiple Databases for a Single Domain"
You can use the same schema prefix (in this case, DEV) can be used to group these related schemas together, even across multiple databases.
Organizing Schemas on a Single Database for Multiple Domains
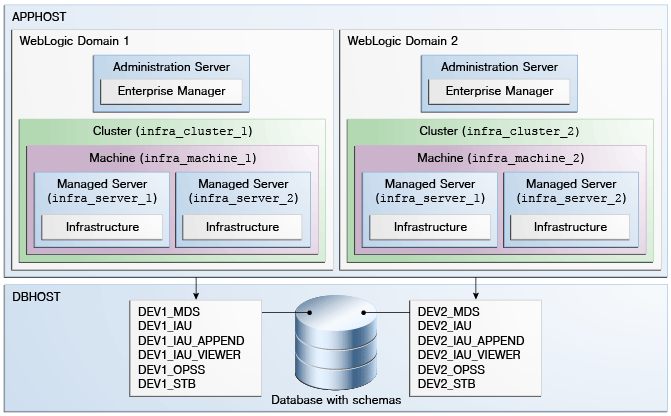
This example shows how schemas on a single database should be grouped for multiple domains.
Figure 1-3 Schemas on a Single Database for Multiple Domains

Description of "Figure 1-3 Schemas on a Single Database for Multiple Domains"
In this example, the prefixes are grouped together by using DEV1 for one set of schemas (used by WebLogic Domain 1), and DEV2 for the second set (used by WebLogic Domain 2).
It is not possible to share a single set of schemas across multiple domains; each domain must have its own set of schemas.
Organizing Schemas on Multiple Databases for Multiple Domains
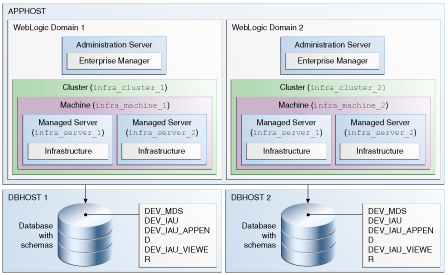
This example shows how to organize schemas on multiple databases for use with multiple WebLogic domains.
Figure 1-4 Schemas on Multiple Databases for Multiple Domains

Description of "Figure 1-4 Schemas on Multiple Databases for Multiple Domains"
In this scenario, it is possible to have separate domains on the same host that use schemas with the same name and prefix (DEV), since the schemas are located on different databases.
Integrating Components Using Declarative XML
RCU provides extensibility with XML DTDs. Using these DTDs, component owners can integrate their components and prerequisites with RCU by providing a configuration file that adheres to the provided DTD.
For more information about integrating various components, see Extending Repository Creation Utility to Configure Custom Application Repositories.
Prerequisites for Schema Creation on an Autonomous Transaction Processing Database
Before you create schemas on an Autonomous Transaction Processing
database (both Autonomous Transaction Processing - Dedicated and Autonomous Transaction Processing-Shared), you must modify the wallet settings and
set the environment variables, and apply patches on ORACLE
HOME.
Settings to connect to an Autonomous Transaction Processing Database
To connect to an Autonomous Transaction Processing database (both Autonomous Transaction Processing - Dedicated and Autonomous Transaction Processing-Shared), modify the wallet settings and set the environment variables as described in this section.
Note:
For Oracle Internet Directory, to connect to an Autonomous database, see Settings to connect to an Autonomous Transaction Processing Database for Oracle Internet Directory.-
Download the wallet for the Autonomous Transaction Processing database, and unzip the wallet to the
/users/test/wallet_dbname/directory.Note:
/users/test/wallet_dbname/directory is an example of wallet location. You can download the wallet to the desired location.You must ensure that the wallet contains keystore for JDBC connection.
-
In the wallet, modify the wallet location in the
sqlnet.orafile as follows:WALLET_LOCATION = (SOURCE=(METHOD=FILE)(METHOD_DATA=(DIRECTORY="/users/test/wallet_dbname/")))Note:
If you downloaded the wallet to a different location, change the directory location to your wallet location.
-
In the wallet, add the following command at the end of the
ojdbc.propertiesfile:SSL_SERVER_DN_MATCH=yes
-
Before starting RCU, run the following commands:
export RCU_SSL_MODE=trueexport TNS_ADMIN=/users/test/wallet_dbname/Note:
In the command to export TNS_ADMIN, change
/users/test/wallet_dbname/directory to your wallet location.
Settings to connect to an Autonomous Transaction Processing Database for Oracle Internet Directory
To connect to Autonomous Transaction Processing database (both Autonomous Transaction Processing - Dedicated and Autonomous Transaction Processing-Shared), for Oracle Internet Directory, modify the wallet settings and set the environment variables as described in this section.
-
Download the wallet for the Autonomous Transaction Processing database to the
<$ORACLE_HOME>/network/admindirectory.You must change
$ORACLE_HOMEto your Oracle Home location. For example,/users/test/network/admin.You must ensure that the wallet contains keystore for JDBC connection.
-
In the wallet, modify the wallet location in the
sqlnet.orafile as follows:WALLET_LOCATION = (SOURCE=(METHOD=FILE)(METHOD_DATA=(DIRECTORY="<$ORACLE_HOME>/network/admin")))You must change
$ORACLE_HOMEto your Oracle Home location. For example,/users/test/network/admin. -
In the wallet, add the following command at the end of the
ojdbc.propertiesfile:SSL_SERVER_DN_MATCH=yes
-
Before starting RCU, run the following commands:
export RCU_SSL_MODE=trueexport TNS_ADMIN=<$ORACLE_HOME>/network/adminYou must change
$ORACLE_HOMEto your Oracle Home location. For example,/users/test/network/admin.
Applying Patches on Oracle Home
You must apply the required patches on the existing ORACLE
HOME, before creating schemas using the Repository Creation Utility
screens.
Be sure to check My Oracle Support for the latest patches, if any, for your product. You can search for patches by patch ID or number, or by product or family.
- Sign in to My Oracle Support at: https://support.oracle.com.
- Click the Patches and Updates tab. The Patches and
Updates page opens and displays the Patch Search region. You have the
following options:
- In the Patch ID or Number is field, enter the number of the patch you want. (This number is the same as the primary bug number fixed by the patch.) This option is useful if you already know the patch number.
- To find a patch by product name, release, and platform, click the Product or Family link to enter one or more search criteria.
- Click Search to execute your query. The Patch Search Results page opens.
- Click the patch ID number. The system displays details about the patch. In addition, you can view the Read Me file before downloading the patch.
- Click Download. Follow the instructions in the patch Read Me to install the patch.
Using RCU with Java Access Bridge (Windows Only)
Java Access Bridge enables assistive technologies, such as JAWS screen reader, to read Java applications that run on the Windows platform.
Assistive technologies can read Java-based interfaces, such as Oracle Universal Installer and Oracle Enterprise Manager.
For more information, see the following topics: