Using the Function Diary
Note:
When the Include Inquiry in Non Deduct Inventory Calculation OPERA Control is active, non-deduct calculations will include status code configured as non-deduct and inquiry for the Room Status Type.Note:
Note:
When the Activate the Sell Message Functionality OPERA Control active, date-driven sell messages are displayed at the top of page. Click X to close or click Sell Messages to toggle the Sell Message panel.![]() Guest (inventory) rooms with the option
set to be a meeting room (event space) also appear in the Function
Diary. For more information, see: Configuring Rooms.
Guest (inventory) rooms with the option
set to be a meeting room (event space) also appear in the Function
Diary. For more information, see: Configuring Rooms.
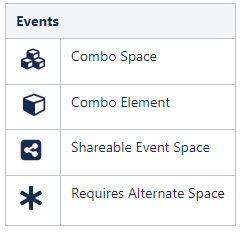
For each function space the following icons indicate the properties of the space:

A function space that is out of order or out of service for
a period is indicated by ![]() in the chart for
the respective dates.
in the chart for
the respective dates.
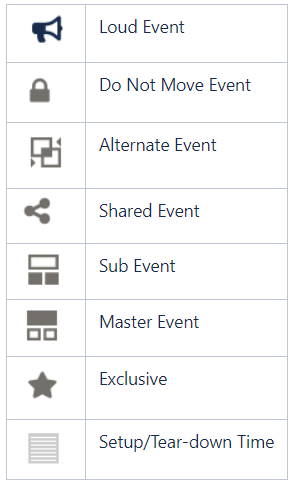
For each event, the following icons indicate the properties of the event:

- Viewing the Function Diary
- Viewing Room Availability and Sales Allowances
- Viewing Calendar Events
- Viewing Function (Event) Space Information
- Changing Event Label Display
- Viewing and Managing Block and Event Information
- Viewing Sales Allowance Availability
- Creating an Event for an Existing Block
- Using Quick Events
Related Topics
Parent topic: Events
Viewing the Function Diary
-
From the OPERA Cloud menu, select Bookings, select Events, and then select Function Diary.
-
Select the Property, Start Date, and Number of Days in View.
-
Click Advanced Property Search to enter property search criteria from a hub location. You can search for properties by Country/Region, Marketing Region, Marketing City, and Property Type.
-
Default Hint Box Values: Select the values to display in the Hint Box when you hover over an event. Your selection is retained.
-
Include Hidden: Select check box to show function spaces configured not to appear in the Function Diary.
-
Show Rooms: Select check box to display the guest room availability for each date.
-
Show Only Available Spaces
 : Select check
box to display function spaces with no event bookings in
non-deducted status.
-
Parent topic: Using the Function Diary
Viewing Room Availability and Sales Allowances
To view a summary of property availability above the Function Diary click Show Rooms. The availability panel displays a summary of deduct and non-deduct blocks and the Maximum Available rooms per date. Click a Maximum Available figure to launch Property Availability for the selected date. When the Sales Allowance OPERA Control is active, you can view a summary of the Sales Allowance availability. The availability panel displays a summary of Sales Allowance and Available Sales Allowance per date. When searching for multiple properties, click + to expand and view the Available Rooms, Sales Allowance and Available Sales Allowance for each property.
Parent topic: Using the Function Diary
Viewing Calendar Events
To view a summary of property availability at the top of the Function Diary, select a multi day view then click Show Rooms. The Room Availability panel displays a summary of deduct and non-deduct blocks and the Maximum Available rooms. In multi-property operations, you can display availability for all properties associated with a hub location. Click + to expand the details.
The Function Diary displays a color line above the date/day with special events set up from the property calendar.
Click Day Details to open the panel showing details about special events occurring on the date.
-
Rate Protect
 . This
indicates that no other groups should be booked using rates lower
than those assigned to the block that is identified as rate protect.
-
Non Compete
 . This
indicates that no competing accounts (accounts with the designated
NC Industry code) should be booked at the same time as this block.
Parent topic: Using the Function Diary
Viewing Function (Event) Space Information
To view the details of a function space, click the Function Space name on the far left side of the chart.
-
Overview: Displays details of the space, the setup styles, and capacities supported per style.
-
Image Gallery: Displays images of the function space.
-
Rate Details: Displays the function space pricing information.
-
Dimensions: Displays the room dimensions in imperial and metric measurements.
Parent topic: Using the Function Diary
Changing Event Label Display
By default, each event displays the Booking Name as the event label that appears in the chart.
-
Booking Name: Displays the business block name to which the event is linked.
-
Event Type: Displays the type of event that it is.
-
Set Up Style: Displays the style of setup to be used for the event.
-
Attendees: Displays the number of attendees for the event.
-
Attendees and Setup Style: Displays the number of attendees and the setup style for the event.
-
Event Name: Displays the name of the event.
-
Block: Displays the events for selected Block and filters to show only the function spaces booked for the events within that Block. Select the Show all Events in selected Spaces check box to view all the events in only those spaces.
-
From the Function Diary, click Modify Search Criteria to open the Search panel.
-
Select an option from the Event Label list.
-
Click Search.
Parent topic: Using the Function Diary
Viewing and Managing Block and Event Information
To view the details of an event, the related block, and linked profiles, double click the event in the chart.
-
The Event Information panel opens.
- Sub events are available in the sub-events tab.
-
Use the actions available to manage the event. For more information, see Events.
-
Click the Block Name to launch Block Presentation is a new browser session. For more information, see Managing Blocks.
Parent topic: Using the Function Diary
Viewing Sales Allowance Availability
To view a summary of Sales Allowance availability, click Show Rooms. The availability panel displays a summary of Sales Allowance and Available Sales Allowance per date. When searching for multiple properties, click + to expand Sales Allowance and Available Sales Allowance to view the details for each property. (Available when the Sales Allowance OPERA Control is active).
Parent topic: Using the Function Diary
Creating an Event for an Existing Block
-
From the OPERA Cloud menu, select Bookings, select Events, and select Function Diary.
-
Enter search criteria and click Search.
-
View: Select Day
-
Select the function space in the Function Diary, then click the Start time and then click the End time , then select Event using existing Block from the Create prompt.
-
Alternatively, click I Want to . . ., (create) Event using existing Block without selecting a function space or times.
-
-
Enter block search criteria, then click Search.
-
Select the block in the search result. then click Select.
-
-
Complete the event detail. For more information, see Creating Events.
-
Select from the following actions:
-
Select Alternate Space: Select an alternate space for the event. For more information, see Managing Alternate Space Events.
-
Save and Copy Event: Saves your new event and copies (clones) the event as a new event. For more information, see Copying Events to Other Dates or Other Block.
-
Save and Create Another Event: Saves your new event and takes you into the creation process for the next event. For more information, see Creating Events
-
Save and Create Sub Event: Saves your new event and takes you into the creation process for a sub event. For more information, see Managing Sub Events
-
Save and Manage Event: Saves your new event and takes you to the Event Presentation screen where you can continue to manage the event, for example, by adding notes or resources.
-
Save: Saves your new event.
-
Related Topics
Parent topic: Using the Function Diary
Using Quick Events
Prerequisites for Using Quick Events
![]()
Note:
Your assigned role(s) must be granted New/Edit Block and New/Edit Catering Events tasks to use Quick Events.Creating Quick Events
-
From the OPERA Cloud menu, select Bookings, select Events, and select Function Diary.
-
Enter search criteria and click Search.
-
Select the day to view.
-
Select the Function Space in the Function Diary, click the Start time, click the End time, and then select Quick Event from the Create prompt.
-
Alternatively, click I Want To . . . and create a Quick Event without selecting a function space or times.
-
-
Complete the Quick Event details:
-
Block Details:
-
Account: Click to search and select a sales account to link to the block. The Quick Profile Search screen is displayed where you can search for a Company, Travel Agent, and related Contact Profiles to associate with the Block. Or, you can select I Want To . . . and create a new profile. For more information, see: Creating a Sales Account Profile.
-
Contact: Click to search and select a contact to link to the block.
-
End Date: Enter or select an end date.
-
Block Name: Enter a name for the block.
-
Block Code: Enter a block code. The Block code must be unique when the Unique Block Code OPERA Control is active. The Block Code format is determined by the Block Code Generation Pattern OPERA Control.
-
Click Get Default Block Code to generate a block code.
-
-
Market: Select a market code from the list; used for statistical purposes. Field will default based on the Quick Event Market Code
-
Source: Select a source code from the list; used for statistical purposes. Field will default based on the Quick Event Source Code OPERA Control.
-
-
Event Details: For more information, see: Creating Events from Manage Block.
-
Select from the following actions:
-
Select Alternate Space: Select an alternate space for the event. For more information, see: Managing Alternate Space Events.
-
Save and Create Another Event. Saves your new event and takes you into the creation process for the next event.
-
Save and Create Sub Event: Saves your new event and takes you into the creation process for a sub event. For more information, see: Managing Sub Events.
-
Save and Manage Event: Saves your new event and takes you to the Event Presentation screen where you can continue to manage the event, for example, by adding notes or resources.
-
Save: Saves your new event.
-
-
Related Topics
Parent topic: Using the Function Diary