1.1.2.1 Onboarding Enrichment - Basic Information

This topic describes about the personal information captured in the Initiation stage, the relationship managers can add important dates, supporting documents, and photos of the customer in the Basic Info screen.

Note:

The fields marked as Required are mandatory.

Following additional data segments other than the ones captured in Initiation stage, are available in Enrichment - Basic Details screen.

Table 1-32 Data Segment - Description

Sl.No Data Segment Name Mandatory / Optional / Conditional Description
1 Visa Details Optional Data Segment to capture visa details of a the party.
2 Dates Optional Data Segment to capture important dates of the party such as anniversary etc.
5 Supporting Documents Optional Data Segment to capture supporting documents such as copy of address proof documents etc.

  1. Click Acquire and Edit in the Free Tasks screen for the application for which Onboarding Enrichment stage has to be acted upon.
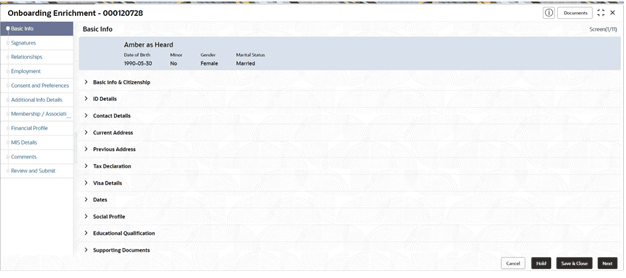
    The Onboarding Enrichment - Basic Info screen displays.

    Figure 1-31 Enrichment- Basic - Info


    The following details that are captured in the Initiation stage will be populated in this screen:
    • Basic info and Citizenship
    • ID Details
    • Contact Details
    • Current Address
    • Previous Address
    • Tax Declaration
    • Social Profile
    • Educational Qualification

    Note:

    For information on Basic info and Citizenship, Contact Details, Current Address, Previous Address, ID Details, Tax Declaration, Educational Qualification and Social profile section, refer to the Onboarding Initiation sub-section.

    As apart of basic information, the system checks the duplicate customers. For more information, refer to the Duplication Check (De-dupe Check).

  2. On the Basic Info screen, click Visa Details segment to add the details of the visa.

    Figure 1-32 Enrichment - Basic Info - Visa Details


  3. On the Visa Details segment, specify the details. For more information on fields, refer to the field description table.

    Table 1-33 Visa Details - Field Description

    Field Description
    Country Of Visa Country of visa as per visa information of the party.

    Common Core Maintenance: cmc country maintenance

    Class/Type Of Visa The specific type of visa held by the party (e.g., Tourist, Student, Work, etc.).

    Entity Code: VIS

    Visa Number The unique identification number assigned to the party’s visa.
    Port Of Issue The location or port where the party’s visa was issued.
    Visa Issue Date The date when the party’s visa was issued.
    Visa Expiry Date The date when the party’s visa will expire.
    Remarks Additional notes or comments about the party’s visa status or related information

    Note:

    • The list of drop-down values is configurable through Entity Maintenance. For details on Entity Code Maintenance and the available values corresponding to each Entity Code, refer to the Oracle Banking Party Configurations User Guide.
    • For details on Common Core Maintenance, refer to the Common Core User Guide.
  4. On the Basic Info screen, click Dates segment to add important dates of the customer.
    The Dates screen displays.

    Figure 1-33 Enrichment – Basic Info – Dates


  5. Specify the details on the Dates screen.
    For more information on fields, refer to the field description table.

    Table 1-34 Dates - Field Description

    Field Description
    Date Type The type of significant date for the party (e.g., Anniversary, Birthdate).

    Entity Code: ECD

    Date The specific date related to the important date type (e.g., the anniversary date, birthday, etc.).

    Note:

    Refer to the Oracle Banking Party Configurations User Guide for entity maintenance.
  6. Click and expand the Supporting documents section to add the supporting documents.
    The Supporting Documents screen displays.

    Figure 1-34 Enrichment – Basic Info – Documents


  7. Click Add in the Supporting documents section.
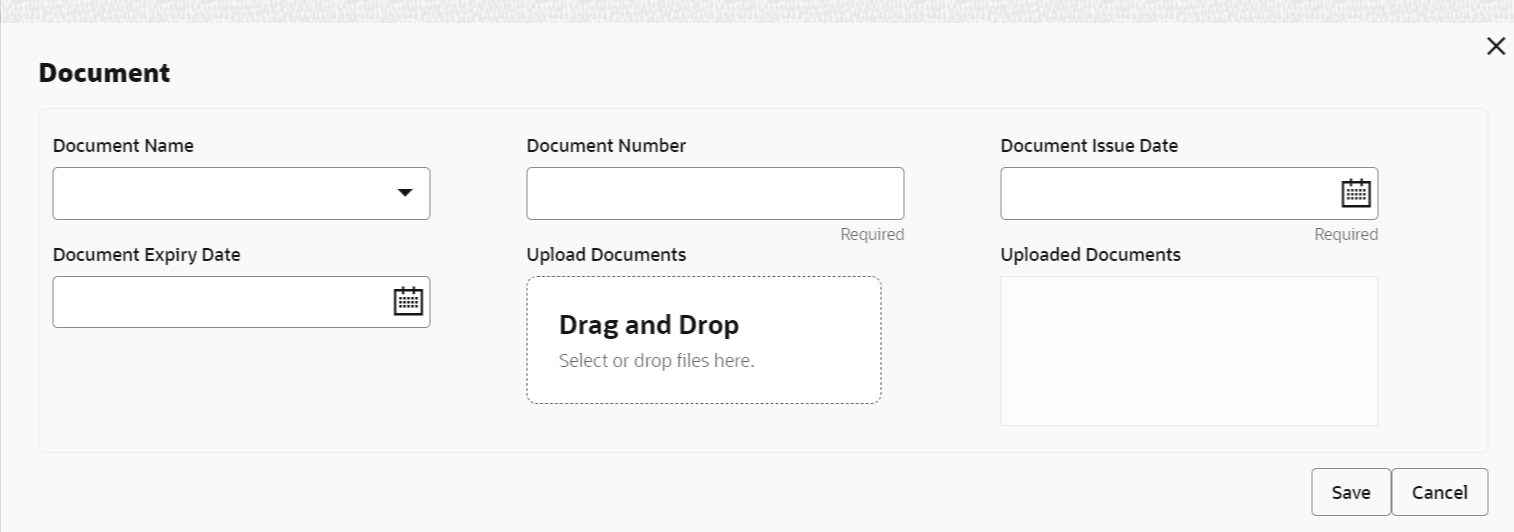
    The Add Document screen display

    Figure 1-35 Enrichment – Add Documents


  8. On the Add Document screen, specify the details.
    For more information on fields, refer to the field description table.

    Table 1-35 Add Document - Field Description

    Field Description
    Document Name Select the document name from the drop-down list. The available options are:
    • Aadhar
    • Voter Id
    • Pan Card
    • Driving License
    • Passport

    Note:

    The list of values can be configured through Entity Maintenance.
    Document Number Specify the document number.
    Document Issue Date Click the calendar icon, and select the issue date of the document.
    Document Expiry Date Click the calendar icon, and select the expiry date of the document.
    Upload Documents

    Click Add icon icon and select the document to be uploaded or drag and drop the documents.

    Uploaded Documents Displays the uploaded documents.

    Note:

    Refer to the Oracle Banking Party Configurations User Guide for entity maintenance.
  9. Click Save to save the details.
    The document details are added and listed in the Supporting Documents segment.

    Note:

    You can also select the required item from the list and click Edit/Delete to modify/delete the added document details.
  10. The system will check for duplicate customers. For more information, refer to the Duplication Check (De-dupe Check).
  11. Click Next to move to the Onboarding Enrichment - Signatures screen.