2 User
Users with access to the banking system perform various tasks, access specific functions, and manage banking operations based on their assigned roles and permissions. This topic describes the maintenance of the user and their access.
Controlled access to the system determines the robustness of security in banking software. Only authorized users can access the system with the help of a unique Login ID and password.
- Login Details
- Status Details
- Personal Details
- Role and Branch Details
- User Access to Applications
- Customer Access Groups
This topic contains the following subtopics:
- Create User
User creation is a process by which administrators add or delete authorized system users. The Create User screen allows the administrator to create the user and assign their activities. This topic provides systematic instructions to create a new user. - View User
View user displays the list of users in the system. Each user record allows you to view, amend, copy, authorize, and delete the user. This topic provides the systematic instructions to view the list of users and perform specific actions on a user record. - Bulk Upload - Users
This topics describes the information to create the sms users in bulk. - Clear User
Clear user clears the temporary data and settings associated with the user's current session in the system. The user is logged out of the system. This topic provides systematic instructions to clear a user's session. - Unlock User
Unlock a user's account that is locked. For example, a user account is locked due to multiple failed login attempts. This topic provides the systematic instructions to unlock the user.
2.1 Create User
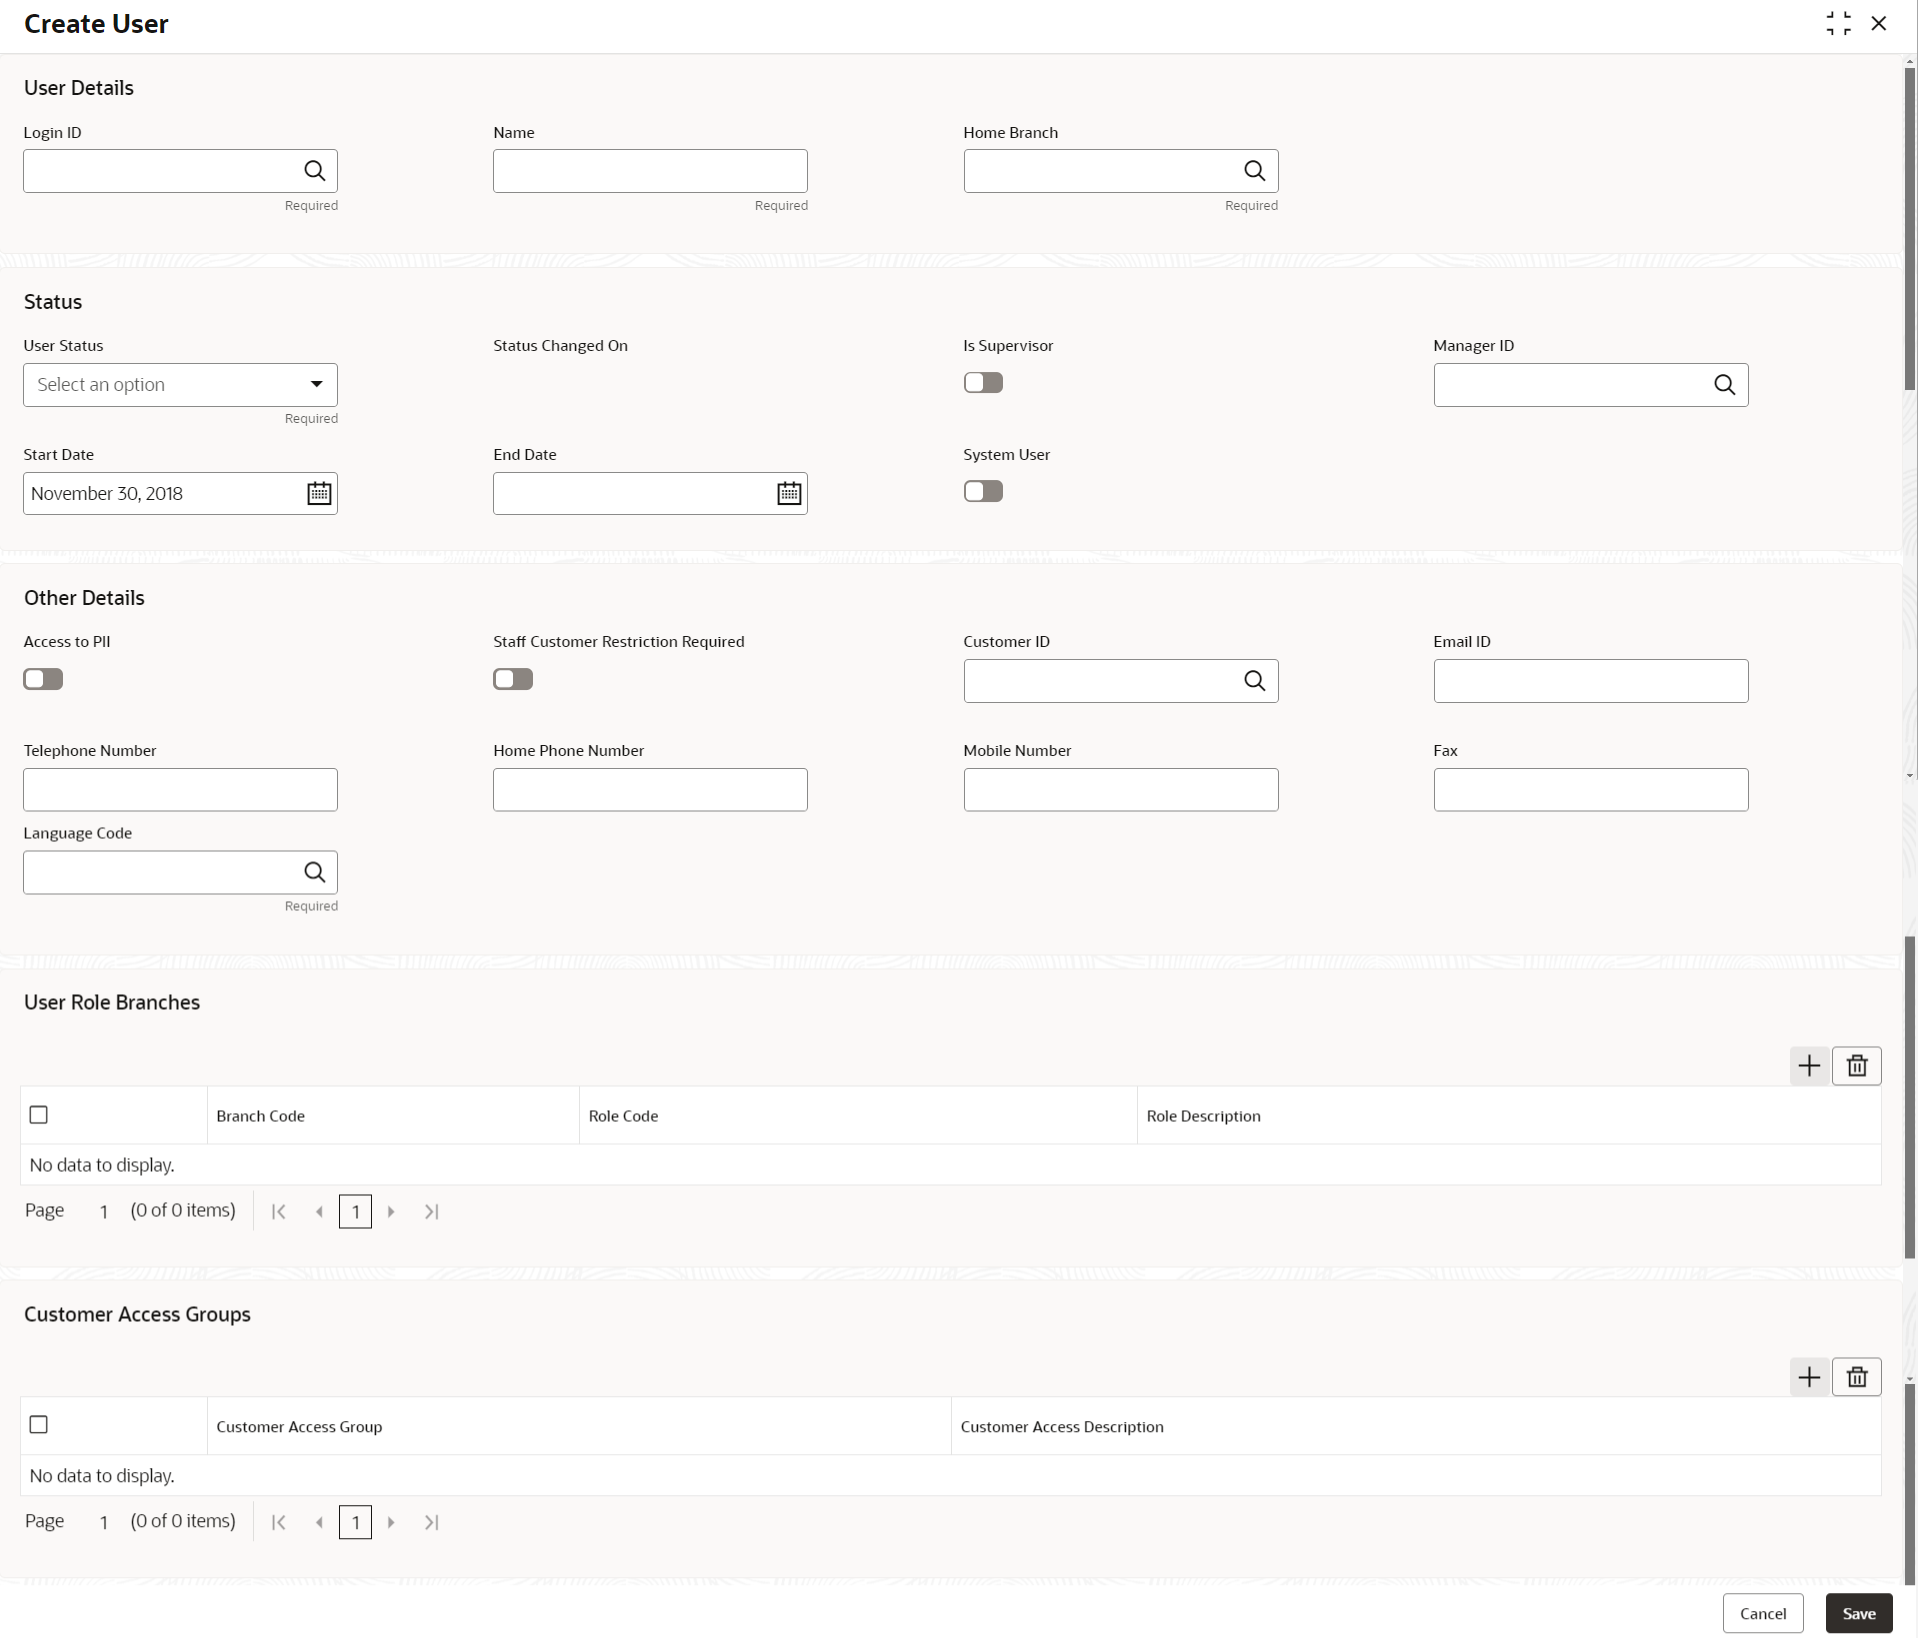
User creation is a process by which administrators add or delete authorized system users. The Create User screen allows the administrator to create the user and assign their activities. This topic provides systematic instructions to create a new user.
Note:
The fields marked as Required are mandatory.- Click Security Management, and under Security Management, click User.
- Under User, click Create User. The Create User page displays.
- Specify the fields in the User Details section.
Table 2-1 User Details - Field Description
Field Description Login ID Specify the unique identification for a user who can use the ID to log in and access the application. The Login ID is unique across all branches. Login ID can have a maximum length of 320 characters. It can contain alphanumeric characters with only capital letters, the Hyphen, @, dot, and Underscore characters. The login ID applies across the domain as a checker or maker ID. For example, JOE_SMITH. Note:
You can configure the minimum length of the Login ID in the Common Core.Name Specify the name of the user. The user name can contain less than or equal to 100 characters. For example, Joe Smith. Home Branch Select the user's home branch from the list of values. The home branch is the default branch of the user when he logs into the system. Note:
The branch configurations are defined in the common core. For more information, see External Branch Parameters in the Common Core User Guide. - Specify the fields in the Status section described in
the following table.
Table 2-2 Status - Field Description
Field Description User Status Select the state of the user account from the list of values. - Enable - Select this state for active users.
- Disable - Select this state for inactive users. Inactive users cannot log in to the system.
Status Changed On Displays the date when the new user is created. Displays the date when any changes to the user's status is made by the user maintenance batch. The user maintenance batch disables the user when the user validity expires. The field is auto-populated by the system. Is Supervisor Turn this option On to specify the user as a manager. By default, this option is disabled. Manager ID Specify the User ID of the user's manager. Start Date Specify the start date when the user is enabled. Before this date, the user is inactive and cannot log in to the system. End Date Specify the end date when the user validity expires. The user cannot log in to the system after the end date. System User Turn this option On to specify that the user is internal. Internal users can be configured to run batch processes. - Specify the fields in the Other Details section
described in the following table.
Table 2-3 Other Details - Field Description
Field Description Access to PII Turn this option On to allow the user to access the Personal Identifiable Information of entities in the banking system. By default, this option is disabled and all personal customer information is masked. For example, if a user has the PII flag enabled, then the user can view the personal information of the customer in the party system. Staff Customer Restriction Required Turn this option On to indicate that this user is restricted from accessing records of other staff customer data. Users with restricted access cannot view or modify the account details of other staff members and cannot perform transactions on their accounts. By default, this option is disabled.Note:
If staff customer restrictions are enabled in the respective domains or modules like Accounts, Loans, Deposits, and others then these users are restricted from accessing other staff customer records.Customer ID Specify the Customer ID of the user from the list of values. This is required if the Staff Customer Restriction Required flag is enabled. Note:
External Customers are configured in the Common Core. For more information, see External Customer in Common Core User Guide.Email ID Specify the Email ID of the user. For example, joe.good@xyz.com. Telephone Number Specify the user's telephone contact number. Prefix the country code to the telephone number. For example, +15555555555. Home Phone Number Specify the user's home contact number. Prefix the country code to the telephone number. For example, +15555555555. Mobile Number Specify the user's mobile number. Prefix the country code to the mobile number. For example, +14545454545. Fax Specify the user's fax number. Prefix the country code to the Fax number. For example, +12342342322. Language Code Specify the language code of the user's preferred language from the list of values. The user interface of the application is presented in the preferred language. Note:
Language codes are defined in the common core configuration. For more information, see Language Code in the Common Core User Guide. - Specify the user's role-branch combination in the User Role
Branches section.Access to the user is allocated based on the role of the user in a branch. For example, a user can be assigned the BANK_TELLER role in the branch B01 and the ACCOUNT_OFFICER role in the branch B02.
- Click + in the User Role
Branches section.A new blank row displays.
- Specify the column values described in the following table.
Table 2-4 User Role Branches - Column Description
Field Description Branch Code Specify the branch code to allocate access permissions for the user from the list of values. Note:
Branch configurations are performed in the common core. For more information, see External Branch Parameters in the Common Core User Guide.Role Code Select the role code to allocate access permissions for this user from the list of values. The Role screen specifies the role code that maps functional activity codes to access permissions during role creation. Note:
For more information on roles, see Role.Role Description Displays the description about the role, based on the selected role code.
- Click + in the User Role
Branches section.
- Specify the customer segments or groups the user can interact with the Customer Access Groups section.
- Click + in the Customer Access Groups section.A new blank row displays.
- Specify the column values described in the following table.
Table 2-5 Customer Access Groups - Column Description
Field Description Customer Access Group Specify the customer access groups from the list of values the user can access subject to such restrictions at the product processor level. Customer Access Groups are organized based on criteria such as customer segments, account types, product holdings, geographical regions, and additional factors that define customer relationships and profiles. For example, high net-worth individuals. Note:
The actual access to the Customer Access Groups is based on the access restrictions implemented by the respective domains like Accounts, Deposits and others. This field can be used by the domains as an indicator to provide or deny access to the specified customer access groups.Note:
Customer Access Groups are configured in the Common Core. For more information, see Customer Access Group in the Common Core User Guide.Customer Access Description Displays additional information of the selected customer access group. - Repeat the above steps to add more Customer Access Groups.
- Click + in the Customer Access Groups section.
- Click Save.The Save dialog displays.
- Provide appropriate maker remarks about the user.
- Click Confirm.The new User is created.
Note:
At this point, the status of the User is Unauthorized. After approval, the status changes to Authorized, and the User is available in the system. - Approve the User.To approve or reject the User, see View Role.
Note:
As a maker of the Role, you cannot approve it. It has to be approved by another user with appropriate permissions.
Parent topic: User
2.2 View User
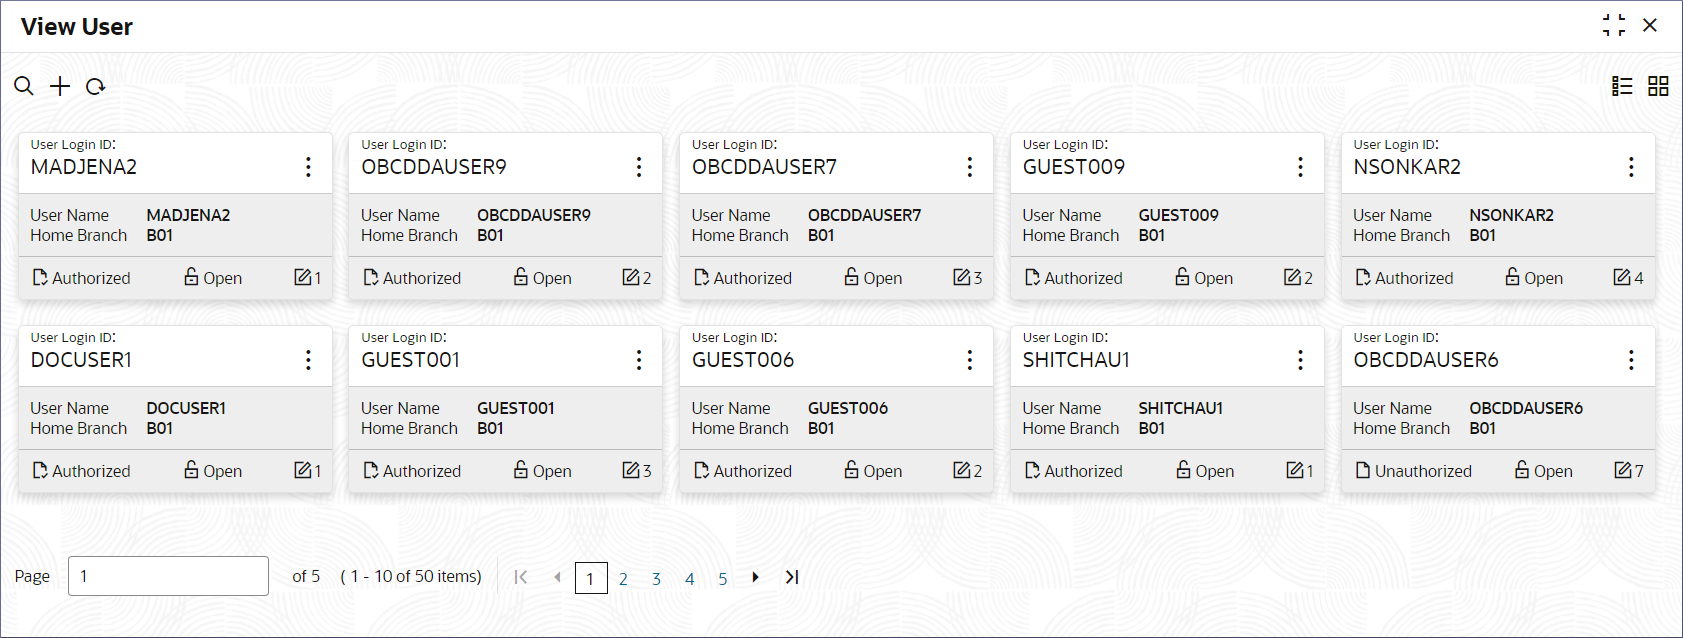
View user displays the list of users in the system. Each user record allows you to view, amend, copy, authorize, and delete the user. This topic provides the systematic instructions to view the list of users and perform specific actions on a user record.
- Click Security Management, and under Security Management, click User.
- Under User, click View User. The View User page displays the existing Users in the Tile view.
Tip:
Click or
or  to switch between the Tile view and the List view.
Table 2-6 View Role Tile - Field Description
Field Description User Login ID Displays the user login ID details. User Name Displays the user who has created the record. Home Branch Displays the details of the home branch associated with the user. Authorization Status Displays the authorization status of the record. The available options are:- Authorized
- Rejected
- Unauthorized
Record Status Displays the status of the record. The available options are:- Open
- Closed
The following table describes the action items in the More Options (
 ) menu on the record and the action items on the page.
Table 2-7 Action Items Description
Action Item Description Unlock Unlock a record and make amendments. Close Close a record to make it inactive. The record ceases to be available in the system. Note:
A closed record can be reopened to make it active.View View the details of a record. Delete Delete a record. Note:
Once deleted, the component can no longer be used to define an entity. But entities already defined using the component can continue to use it.Reopen Reopen a closed record. Authorize Authorize a record to make it active and available to define entities. Note:
Creator of a record cannot authorize the component. Another user with authorize permissions can.Audit Select to view the Maker, Checker, Status, and Modification Number of a record. Errors and Overrides Select to view all existing errors or warnings on the page. Note:
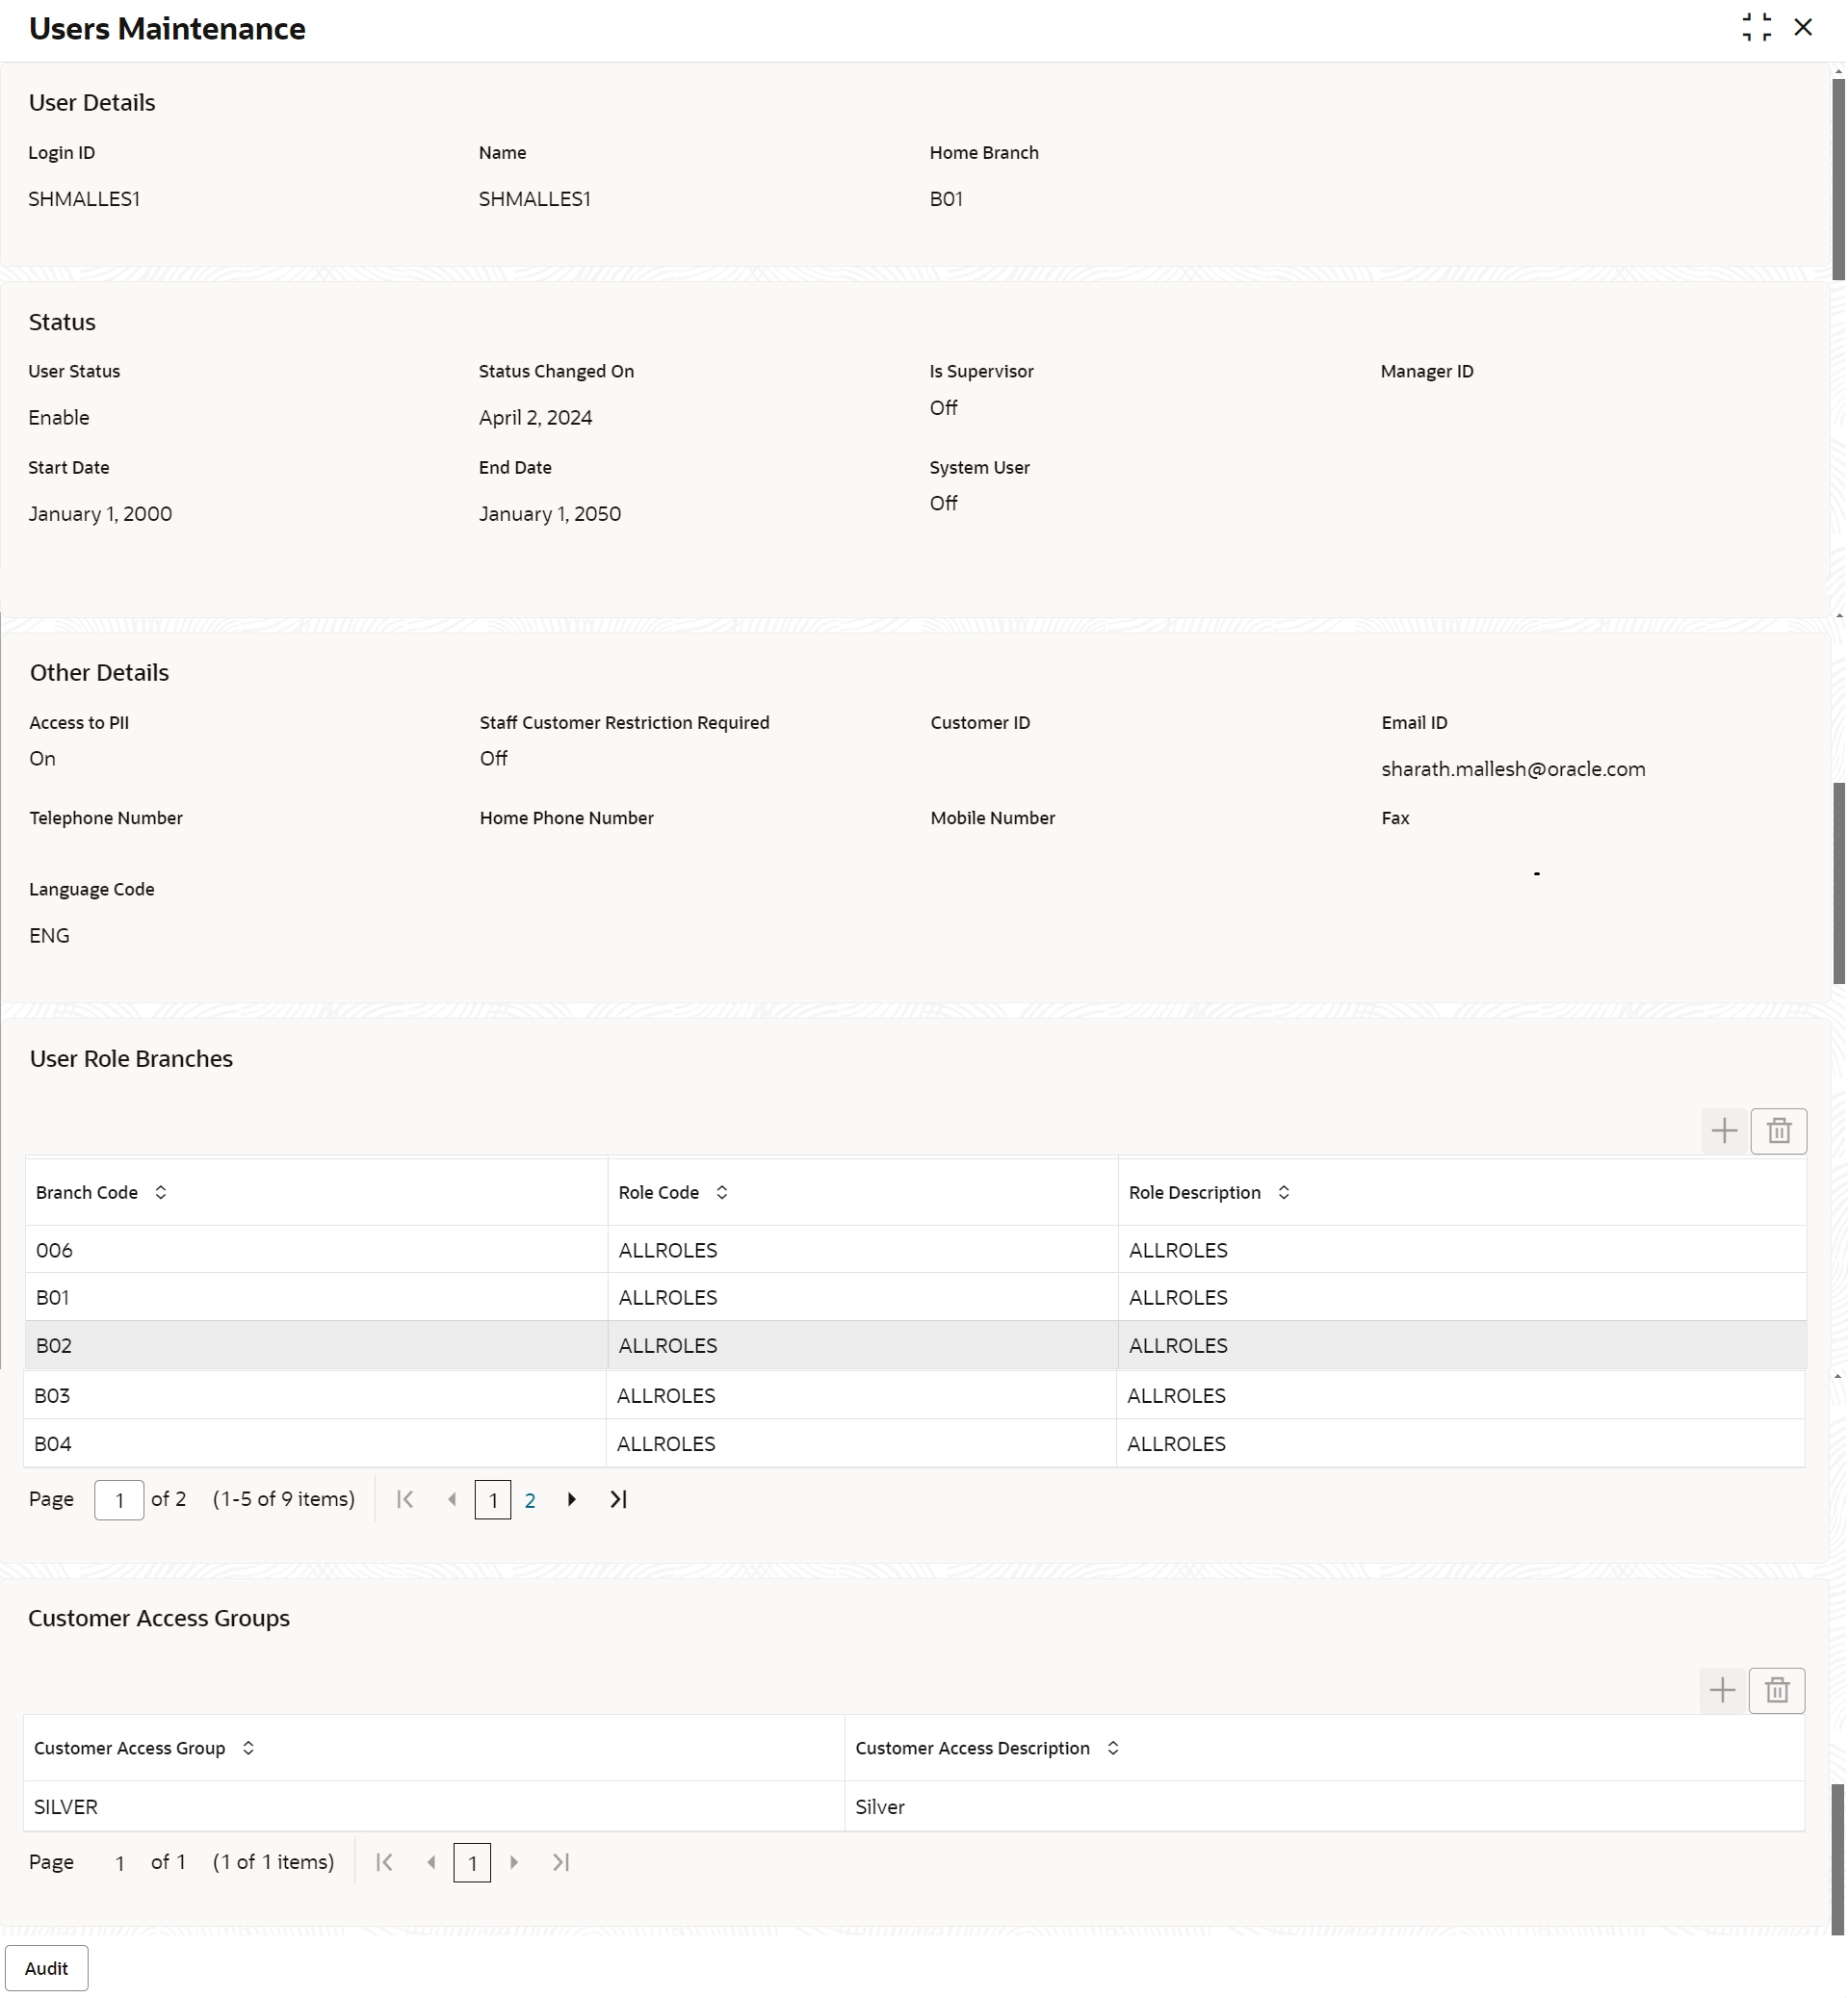
The actions you can perform depend on your role and the record status. - View the details of a User.
- Click
 and select View.The Users Maintenance page displays Role details.
Note:
To know more about the fields, see Create User. - Click Audit.The Maker, Checker, Status, and Modification No of the record displays.
- Click
- Unlock and update the User details.
- Click
 and select Unlock.The Users Maintenance page displays.
 - Update the User details as necessary.
Note:
To know more about updating Role details, see Create User. - Click
- Approve or Reject an unauthorized User.
- From the Search Filter, search for the required record that is in an Unauthorized and Open state.
- Click
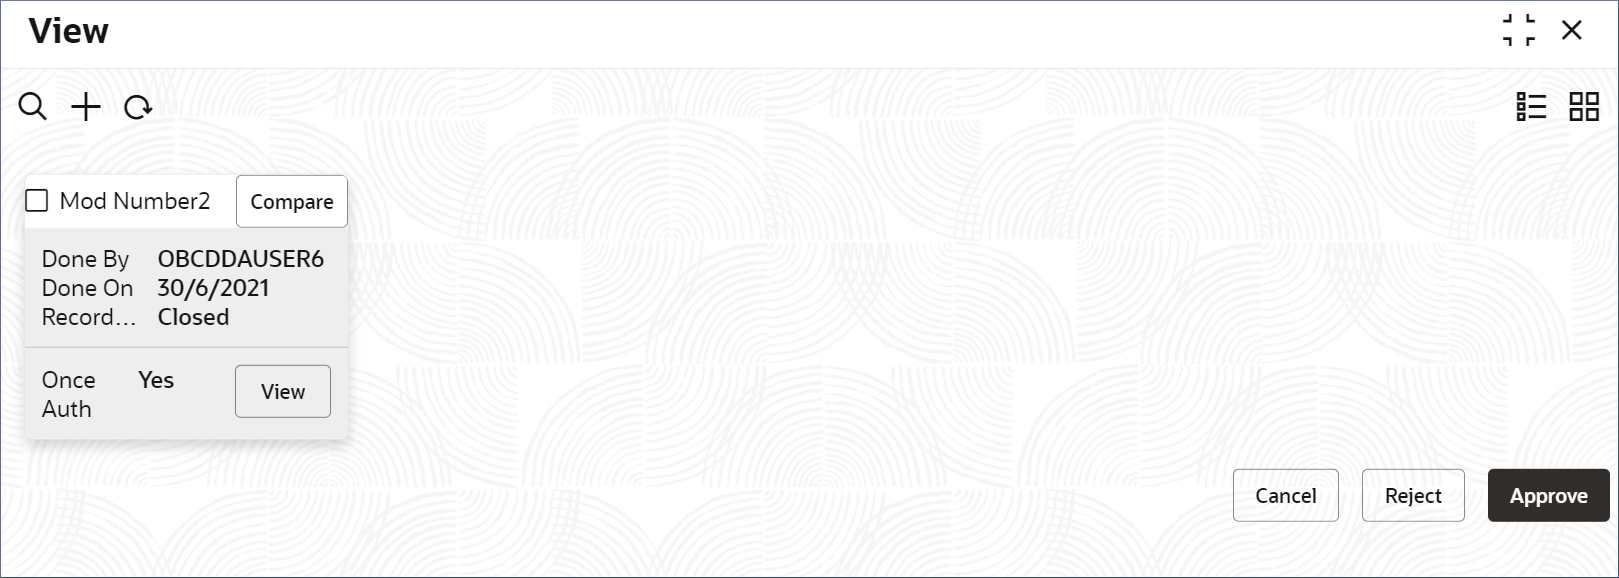
 and select Authorize.The View page displays.
Table 2-8 Authorize View
Field Name Description Mod Number<N> Indicates the number of times the record was modified. Where N represents the number of modifications. Note:
For a newly created record the modification number is1.Done By Name of the user who performed the latest modification. Done On Date on which the record was modified. Record Status The status of the record. Note:
To authorize a record, its status should be Open.Once Auth Specifies if the record was authorized at least once. Note:
For a newly created record, the value is No.Compare (Button) Click to compare the modified record with the previous version of the record. View (Button) Click to display the record details. - Click the check box besides Mod Number<N> to select the modified record.
- Click Approve or
Reject.The Confirm dialog displays.
- Enter any remarks and click Confirm.A toast message confirms the successful approval or rejection of the record.
Parent topic: User
2.3 Bulk Upload - Users
This topics describes the information to create the sms users in bulk.
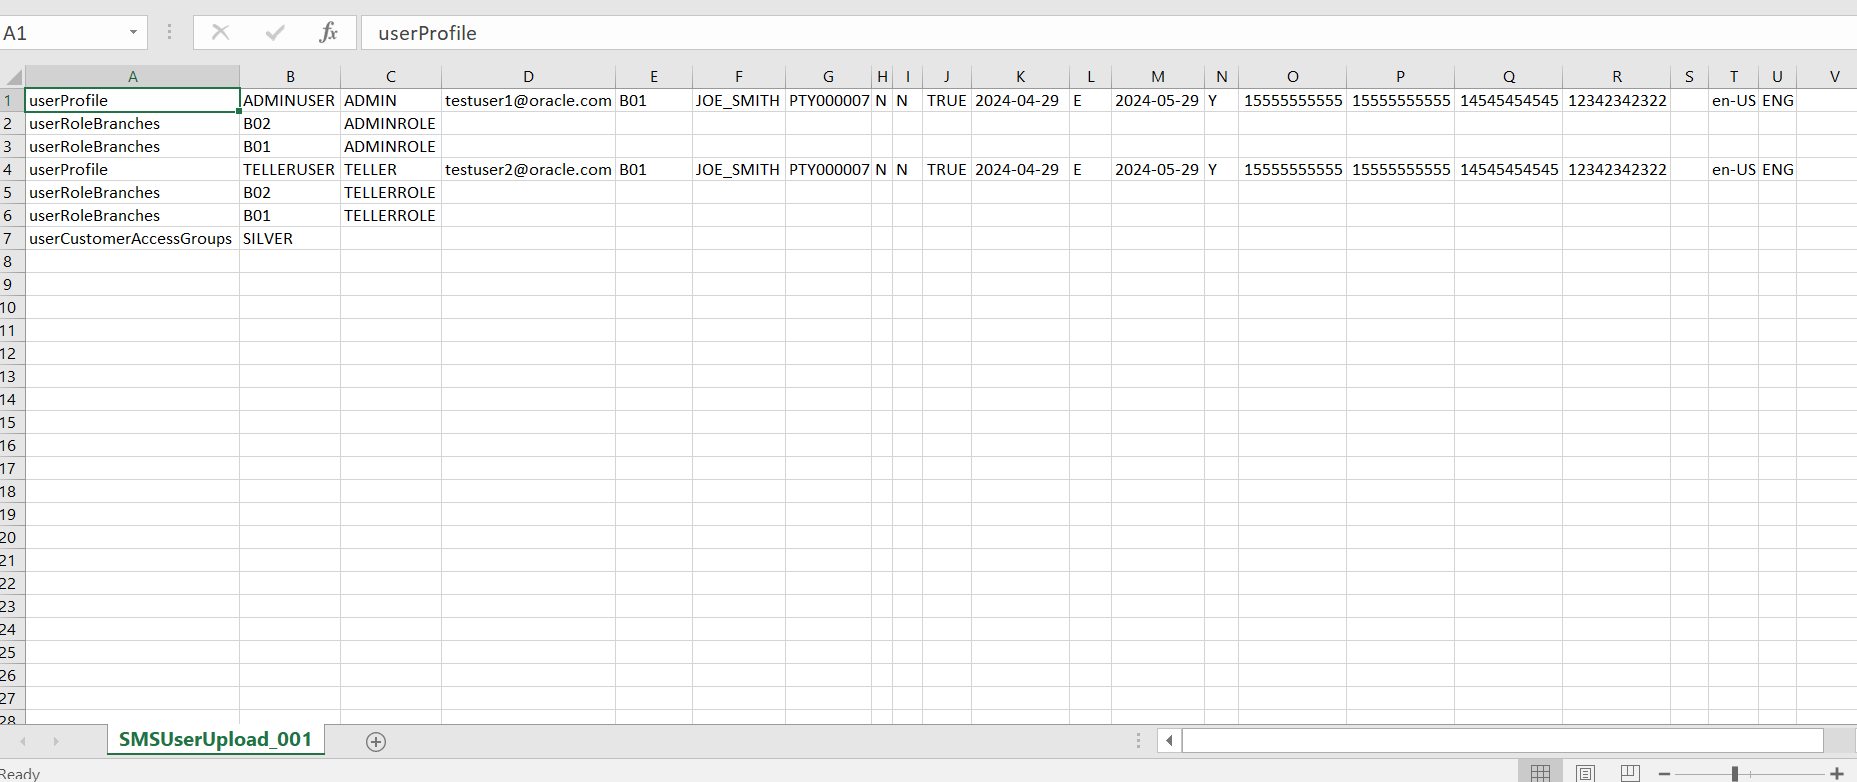
- Users can create multiple user by entering the required information in a csv
file and uploading it.
Note:
File Type Supported: CSVNote:
File Naming Convention - SMSUserUpload_<UniqueName>.csvNote:
The fields marked as Asterisk (*) are mandatory.Table 2-9 Bulk Upload - Users - Records
Sequence Attribute Name Type Size Description 1 Discriminator String 1 Denotes master record type. Default value is always “UserProfile”. For example, refer A1 column.
2 Login ID* String 320 Denotes login ID with which a user logs into the system. For example, refer B1 column.
3 Name* String 100 Name of the user. For example, refer C1 column.
4 Email* String 320 Email of the user. For example, refer D1 column.
5 Home Branch* String 6 Indicates the home branch. For example, refer E1 column.
6 Manager ID String 320 Denotes the manager. For example, refer F1 column.
7 Customer Number* String 20 Number for the customer. For example, refer G1 column.
8 System User String 1 Indicates the toggle to enable this feature. For example, refer H1 column.
9 Is Supervisor String 1 Indicates the toggle to indicate whether the user is a supervisor or not. For example, refer I1 column.
10 PII String 1 Indicates the toggle to enable the user to access the Personal Identifiable Information of the entity. For example, refer J1 column.
11 Start Date Date - Indicates the start date. The format will be in yyyy-mm-dd. For example, refer K1 column.
12 User Status* String 1 Indicates the user status. For example, refer L1 column.
13 End Date Date - Indicates the end date. The format will be in yyyy-mm-dd. For example, refer M1 column.
14 Staff Acc Restriction String 1 Indicates the toggle to enable the staff customer restriction. For example, refer N1 column.
15 Telephone Number String 50 Denotes the user contact number. For example, refer O1 column.
16 Home Number String 50 Denotes the user home contact number. For example, refer P1 column.
17 Mobile Number String 50 Denotes the user mobile number. For example, refer Q1 column.
18 Fax String 50 Denotes the fax details of the user. For example, refer R1 column.
19 Theme String 100 Denotes the theme for the user. For example, refer S1 column.
20 Locale String 10 Indicates locality of the user. For example, refer T1 column.
21 Language Code* String 3 Denotes the language code. For example, refer U1 column.
Table 2-10 Bulk Upload - Users - Child Records 1
Sequence Attribute Name Type Size Description 1 Discriminator String 1 Denotes child record type. Default value is always “UserProfile”. For example, refer A2 column.
2 Branch Code* String 6 Denotes the branch code. For example, refer B2 column.
3 Role Code* String 100 Denotes the role code. For example, refer C2 column.
Table 2-11 Bulk Upload - Users - Child Records 2
Sequence Attribute Name Type Size Description 1 Discriminator String 1 Denotes child record type. Default value is always “UserProfile”. For example, refer A7 column.
2 Customer Access Groups* String 100 Denotes the customer access group details. For example, refer B7 column.
Follow the below steps to upload the file:
- On Homescreen, click File
Management, under File Management, click
File UploadThe File Upload screen displays.
- Drag and drop or select a user bulk upload csv file.
- Click Search icon and select the source code SMS_UPLOAD from the LOV.
- Click the Upload to upload the selected file.
For more information on File Upload screen, refer File Upload in the Oracle Banking Microservices Platform Foundation User Guide.
Records created by bulk upload will be in an unauthorized status; users must manually authorize all the records through application.
Note:
To authorize all uploaded records automatically, create an Upload Source named SMS_UPLOAD, enable the System Authorization Required toggle, and authorize the source.
Parent topic: User
2.4 Clear User
Clear user clears the temporary data and settings associated with the user's current session in the system. The user is logged out of the system. This topic provides systematic instructions to clear a user's session.
- Click Security Management, and under Security Management, click User.
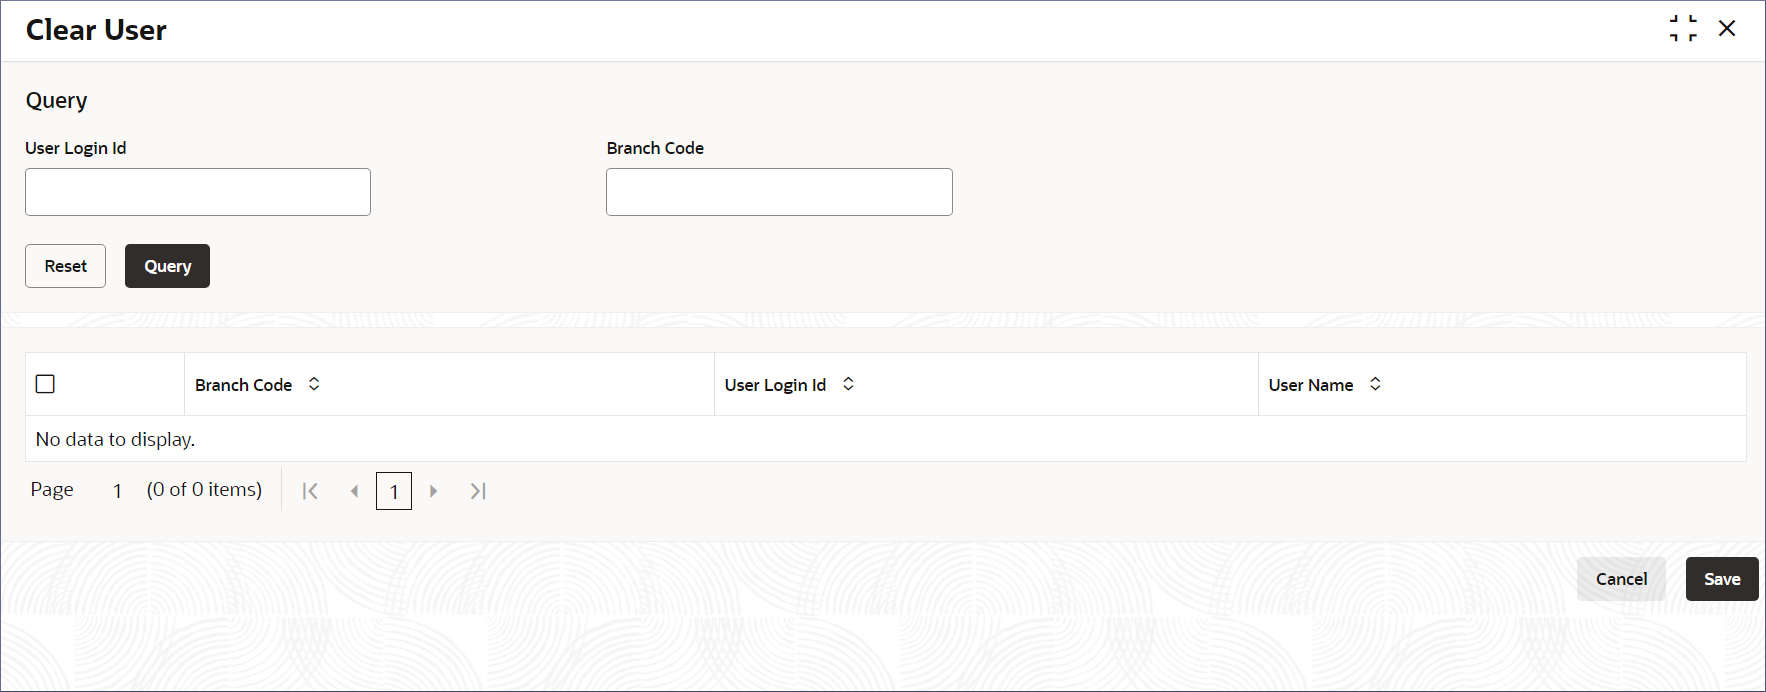
- Under User, click Clear User. The Clear User page displays.
- Specify the fields on the Clear User page.
Note:
Click Reset to reset the query parameters.Table 2-12 Clear User - Field Description
Field Description User Login ID Specify the login ID of the user. Branch Code Specify the branch code of the user. - Click Query. The users logged into the system and matching the search criteria are listed in the table. The columns in the table are listed below.
- Branch Code - The default branch code of the user.
- User Login ID - The Login ID of the user.
- User Name - The name of the user.
- Select the check box against the relevant users you want to clear.
- Click Save.TThe selected users are logged out of the system.
Parent topic: User
2.5 Unlock User
Unlock a user's account that is locked. For example, a user account is locked due to multiple failed login attempts. This topic provides the systematic instructions to unlock the user.
- Click Security Management, and under Security Management, click User.
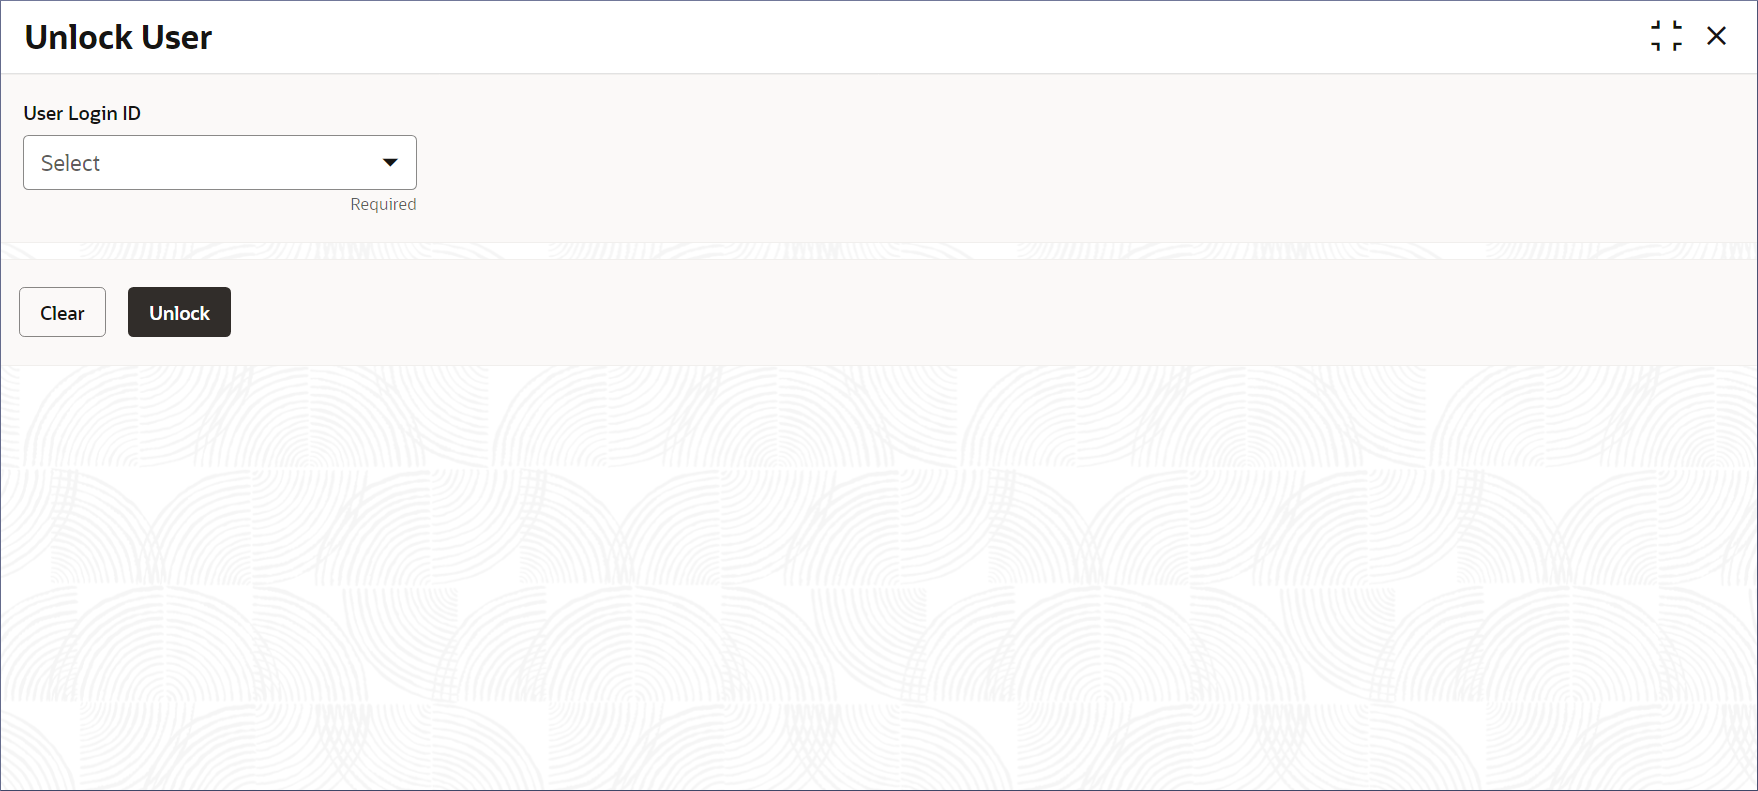
- Under User, click Unlock User. The Unlock User page displays
- Select the User Login ID from the drop-down list.
- Click Unlock.The selected user is unlocked.
Parent topic: User
