- Supply Chain Finance User Guide
- Maintenance for Supply Chain Finance
- System Parameters Maintenance
2.1 System Parameters Maintenance
This topic describes the information to view and modify the day-zero system parameters for Supply Chain Finance module.
- Workflow Parameters
- Finance Parameters
- Dashboard Parameters
- Product Parameters
- Delinquency Parameters
- Application Parameters
- View System Parameters
This topic describes the systematic instruction to view, modify, or authorize the day zero system parameters for Supply Chain Finance module.
Parent topic: Maintenance for Supply Chain Finance
2.1.1 View System Parameters
This topic describes the systematic instruction to view, modify, or authorize the day zero system parameters for Supply Chain Finance module.
- The status, whether Authorized, Unauthorized, or Rejected
- Open or Closed
- The number of times the record has been submitted by the Maker added.
- On Home screen, click Supply Chain Finance. Under Supply Chain Finance, click Maintenance. Under Maintenance, Click System Parameters.
- Under System Parameters, click View System
Parameters.The View System Parameters screen displays.
- Click Options icon and select
Unlock to modify the records.The System Parameters - Workflow Parameters screen displays.
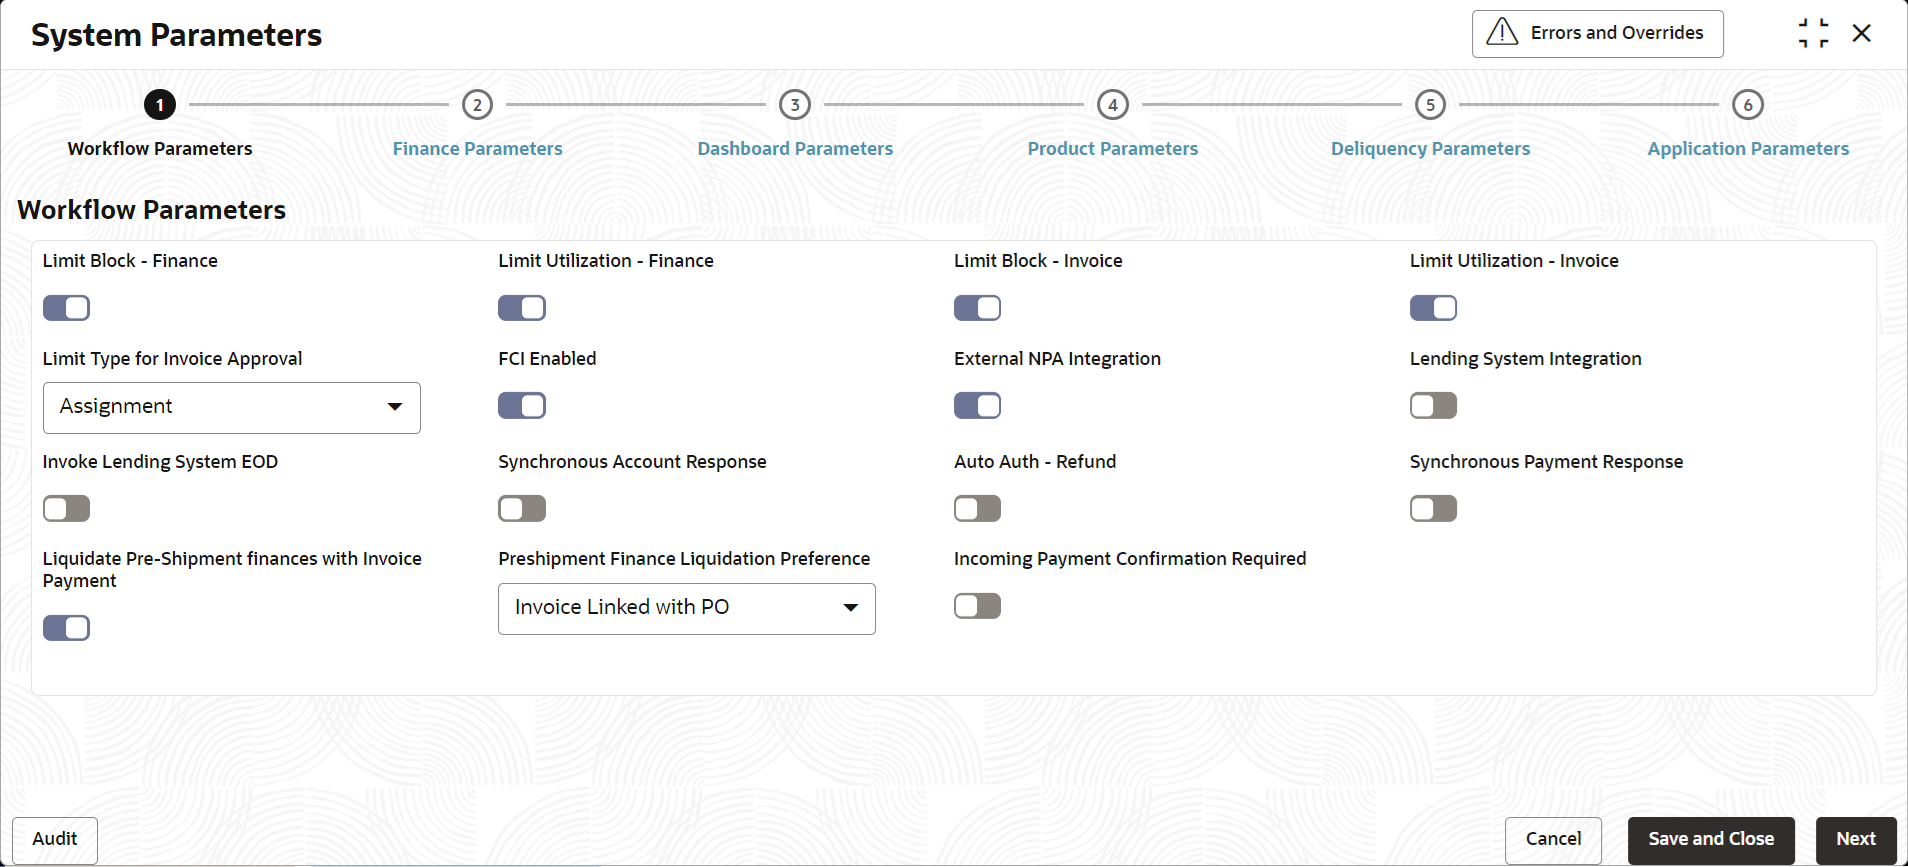
Figure 2-2 System Parameters - Workflow Parameters
- On Workflow Parameters tab, specify the fields to
configure the workflow parameters.For more information on fields, refer to the field description table.
Table 2-1 Workflow Parameters - Field Description
Field Name Description Limit Block – Finance Switch the toggle ON to enable limit blocking during finance transactions. Limit Utilization – Finance Switch the toggle ON to enable limit utilization and release during finance transactions. Limit Block – Invoice Switch the toggle ON to enable limit blocking during invoice transactions. Limit Utilization – Finance Switch the toggle ON to enable limit utilization and release during invoice transactions. Limit Type for Invoice Approval Select the limit type required for invoice approval. FCI Enabled Switch the toggle ON to enable or disable the FCI integration. External NPA Integration Switch the toggle ON to enable the NPA integration with external system. Lending System Integration Switch the toggle ON to enable the Integration with lending system. Invoke Lending System EOD Switch the toggle ON to enable the Integration of EOD process with the Lending System. Synchronous Account Response Switch the toggle ON to enable the account response as synchronous. Auto Auth – Refund Switch the toggle ON to enable the auto authorization required for the refund transactions. Synchronous Payment Response Switch the toggle ON to enable the payment response as synchronous. Liquidate Pre-Shipment finances with Invoice Payment † Switch this toggle ON to enable the liquidation of pre-shipment finances where post-shipment finance is not identified for an invoice. Pre-Shipment Finance Liquidation Preference Select the liquidation preference for the settlement of pre-shipment finance.
The available options are:- FIFO
- Invoice linked with PO and FIFO
- Invoice linked with PO
This field is mandatory if Liquidate Pre-Shipment finances with Invoice Payment is enabled.
Incoming Payment Confirmation Required Switch the toggle ON to enable the confirmation for the incoming payment. Note:
† For existing implementations where pre-shipment finances exist, a new parameter Liquidate Pre-Shipment finances for Invoice Disbursement is introduced at the system level.Note:
During version upgrade, the system will read the value of Liquidate Pre-Shipment finances for Invoice Disbursement and update the data for Pre-Shipment Finance Liquidation Preference and Liquidation Order for Auto Debit fields in Post-shipment programs based on this maintenance in the System Parameters. A migration script will be prepared for relevant Post-shipment programs during upgrade. - Click Next button.The System Parameters - Finance Parameters screen displays.
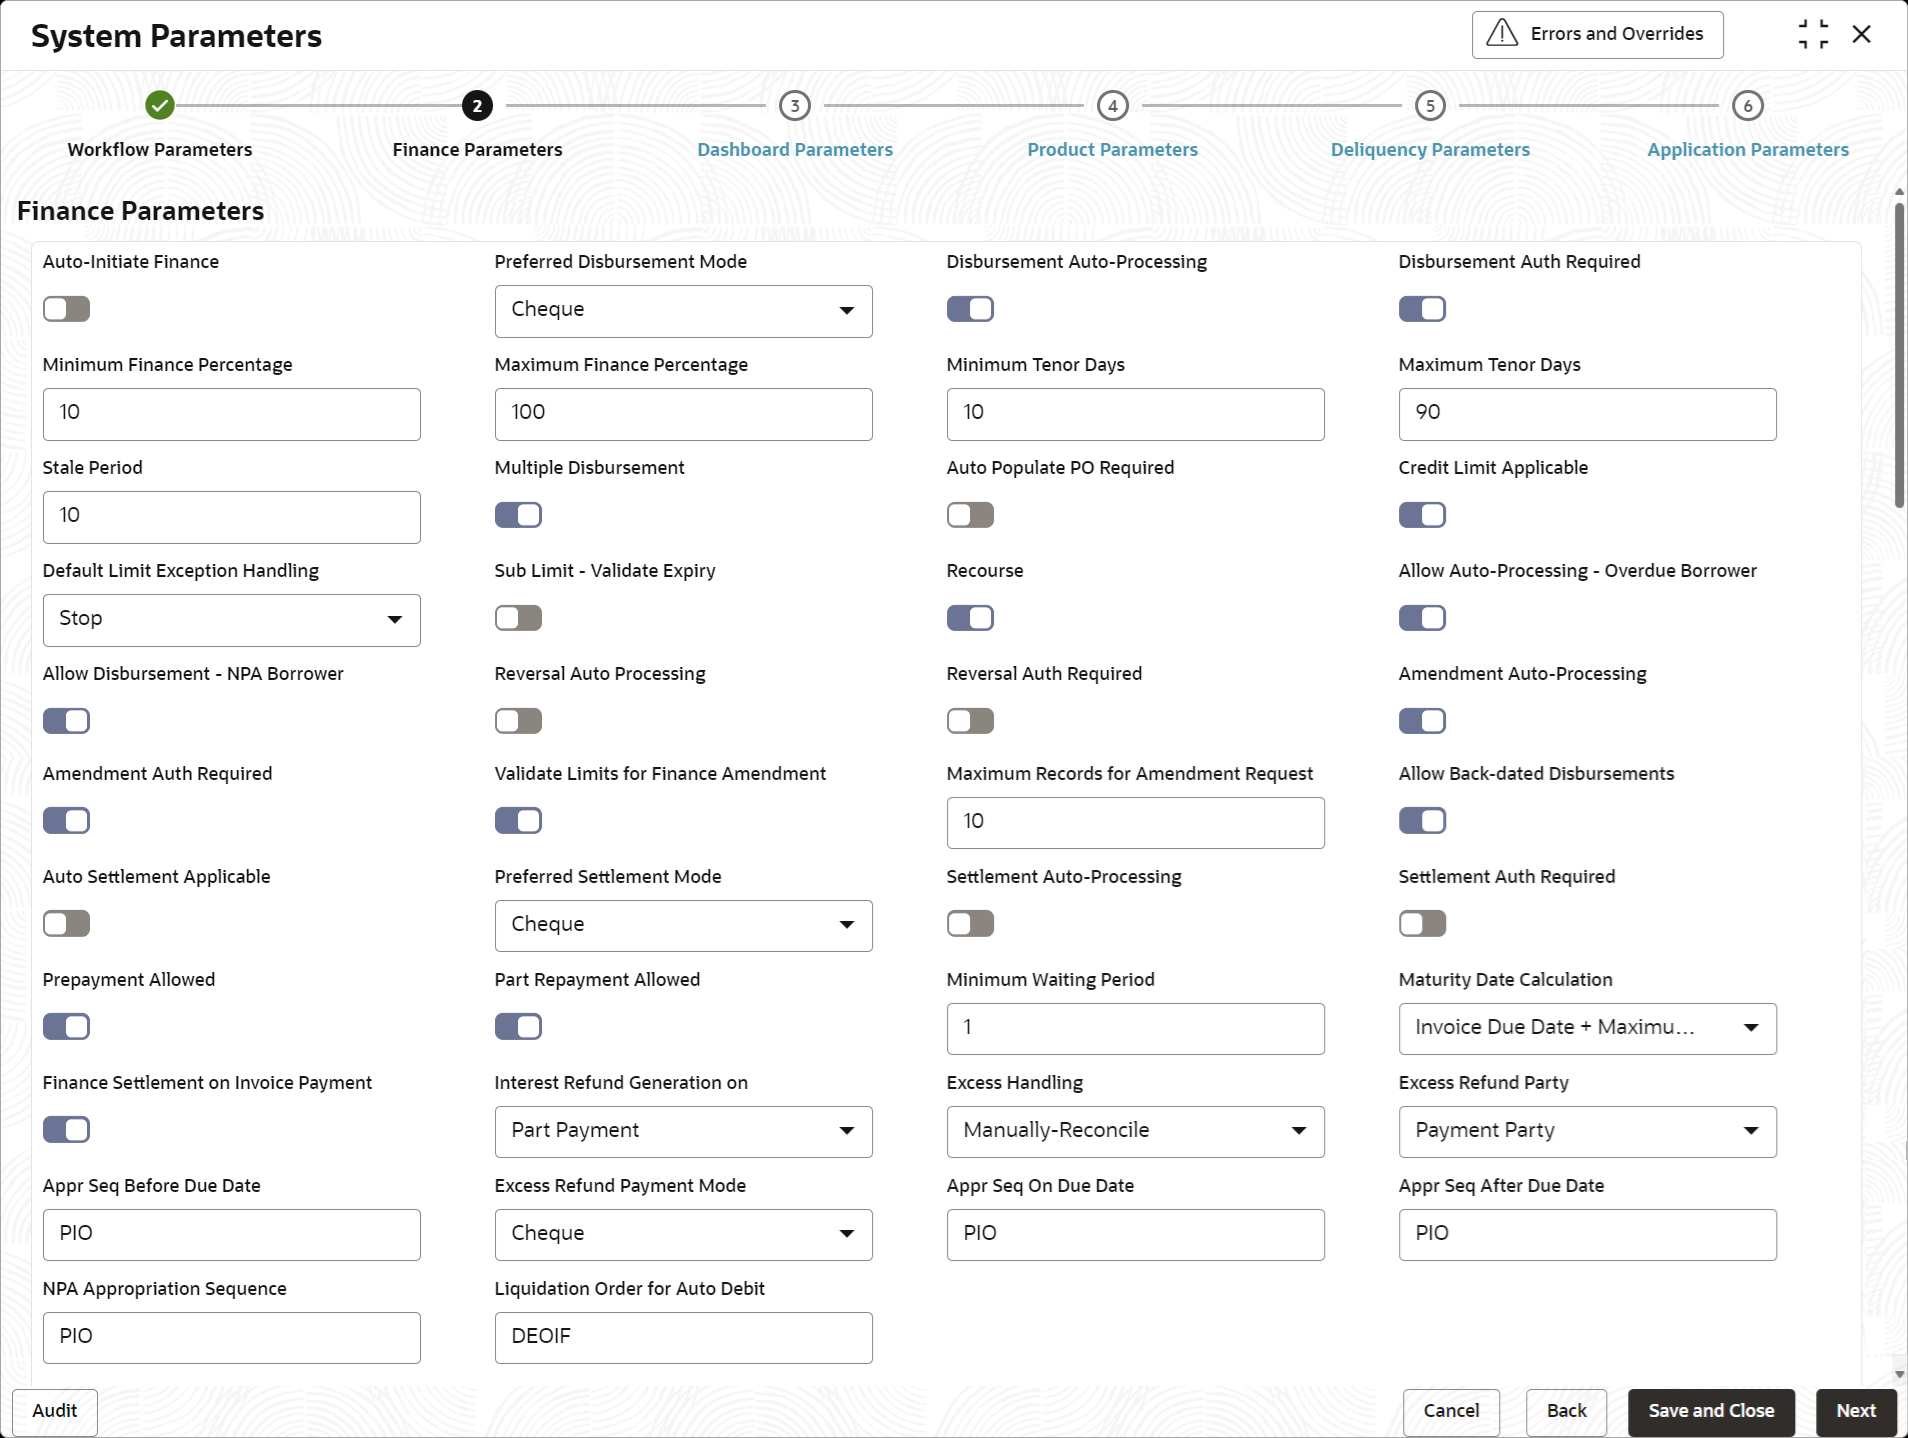
Figure 2-3 System Parameters - Finance Parameters
- On Finance Parameters tab, specify the fields to
configure the finance parameters.For more information on fields, refer to the field description table.
Table 2-2 Finance Parameters - Field Description
Field Name Description Auto-Initiate Finance Switch the toggle ON to enable the Auto-Initiation of the finance disbursement transaction. Preferred Disbursement Mode Select the preferred disbursement mode for the finance transaction.
The available options are:- Account Transfer
- Cheque
- EFT
Disbursement Auto – Processing Switch the toggle ON to enable the auto processing of the finance disbursement transaction. Disbursement Auth Required Switch the toggle ON to enable the authorization required for the disbursement of the finance transaction. Minimum Finance Percentage Specify the minimum finance percentage of Invoice amount allowed for financing. Maximum Finance Percentage Specify the minimum finance percentage of Invoice amount allowed for financing. Minimum Tenor Days Specify the minimum tenor allowed for a finance. Maximum Tenor Days Specify the maximum tenor allowed for a finance. Stale Period Specify the stale period in days after which the invoice cannot be financed any more. Stale period is calculated from Invoice date. Multiple Disbursement Switch this toggle ON if multiple disbursement is allowed on same invoice. Auto Populate PO Required Switch this toggle ON to auto populate the PO required. Credit Limit Applicable Switch the toggle ON to enable the credit limits applicability to the product. Default Limit Exception Handling Select the default exception handling for the Limit services.
The available options are:- Stop
- Skip
- Utilize
Sub Limit - Validate Expiry Switch the toggle ON to enable the Expiry date validation for the sub-limits. Recourse Switch the toggle ON to enable recourse for the program. Allow Auto-Processing - Overdue Borrower Switch the toggle ON to enable the auto processing of disbursement for Overdue borrower. Allow Disbursement - NPA Borrower Switch the toggle ON to enable the disbursement for NPA borrower. Reversal Auto Processing Switch the toggle ON to enable the auto processing of finance reversal transaction. Reversal Auth Required Switch the toggle ON to enable the authorization required for the reversal of the finance transaction. Amendment Auto-Processing Switch the toggle ON to enable the auto processing of finance amendment transaction. Amendment Auth Required Switch the toggle ON to enable the authorization required for the amendment of the finance transaction. Validate Limits for Finance Amendment Switch this toggle ON to enable limits validation for finance amendment transaction. Maximum Records for Amendment Request Specify the maximum number of finance amendment requests that can be raised. Allow Back-Dated Disbursements Switch the toggle ON to enable the back-dated disbursements. Auto Settlement Applicable Switch the toggle ON to enable Auto-Initiation of the finance repayment transaction. Preferred Settlement Mode Select the preferred settlement mode for the finance transaction.
The available options are:- Account Transfer
- Cheque
- EFT
Settlement Auto – Processing Switch the toggle ON to enable the auto processing of the finance repayment transaction. Settlement Auth Required Switch the toggle ON to enable the authorization required for the repayment of the finance transaction. Prepayment Allowed Switch the toggle ON to enable the prepayment for the finance. i.e., Part, or full repayment before the finance due date. Part Repayment Allowed Switch the toggle ON to enable the part repayment for the finance. Minimum Waiting Period Specify the minimum period up to which the finance cannot be closed. This should be enabled only if pre-closure is allowed. Maturity Date Calculation Select the finance maturity date calculation method.
The available options are:- Business Date + Maximum Tenor
- Payment Due Date
- Invoice Due Date
- Invoice Due Date + Maximum Tenor
Finance Settlement on Invoice Payment Switch the toggle ON to enable the underlying Finance repayment post the manual recon for the Invoice payment. Interest Refund Generation on Select the type of payment for Interest Refund to be generated.
The available options are:- Part Payment
- Full Payment
Excess Handling Select how excess payment made towards settling of outstanding invoice/finance should be handled.
The available options are:- Auto-Reconcile
- Auto-Reconcile and Refund
- Manually-Reconcile
- Refund to beneficiary or payment party
Excess Refund Party Select the party to refund the excess amount.
The available options are:- Beneficiary/Counter Party
- Payment Party
Appr Seq Before Due Date Specify the appropriation sequence for the repayment amount if the payment is received before due date.
The available options are:- I - Interest
- P - Principal
- E - Penalty on Interest
Valid Values – PIE, PEI, IPE, IEP, EIP, EPI
Excess Refund Payment Mode Select the mode of payment for the excess payment refund.
The available options are:- Account Transfer
- Cheque
- EFT
Appr Seq On Due Date Specify the appropriation sequence for the repayment amount if payment is received on due date.
The available options are:- I - Interest
- P - Principal
- E - Penalty on Interest
Valid Values – PIE, PEI, IPE, IEP, EIP, EPI
Appr Seq After Due Date Specify the appropriation sequence for the repayment amount if payment is received after due date.
The available options are:- I - Interest
- P - Principal
- O - Penalty on Principal
- E - Penalty on Interest
Valid Values – EOIP, EIOP, etc.,
NPA Appropriation Sequence Specify the appropriation sequence for the repayment amount if payment is received after the finance has turned NPA.
The available options are:- I - Interest
- P - Principal
- O - Penalty on Principal
- E - Penalty on Interest
Valid Values – EOIP, EIOP, etc.,
Liquidation Order for Auto Debit Specify the default auto-debit liquidation order to be applied in case partial funds are debited from the payment party on auto-debit.
The available options are:- E - Penalty on Interest Outstanding
- O - Penalty on Principal Outstanding
- I – Monthly Interest Due
- D - Overdue Finance (Delinquent finances)
- F - Finance Due or Overdue (Outstanding Finances)
This field is mandatory if Auto Debit Applicable is enabled.
- Click Next button.The System Parameters - Dashboard Parameters screen displays.
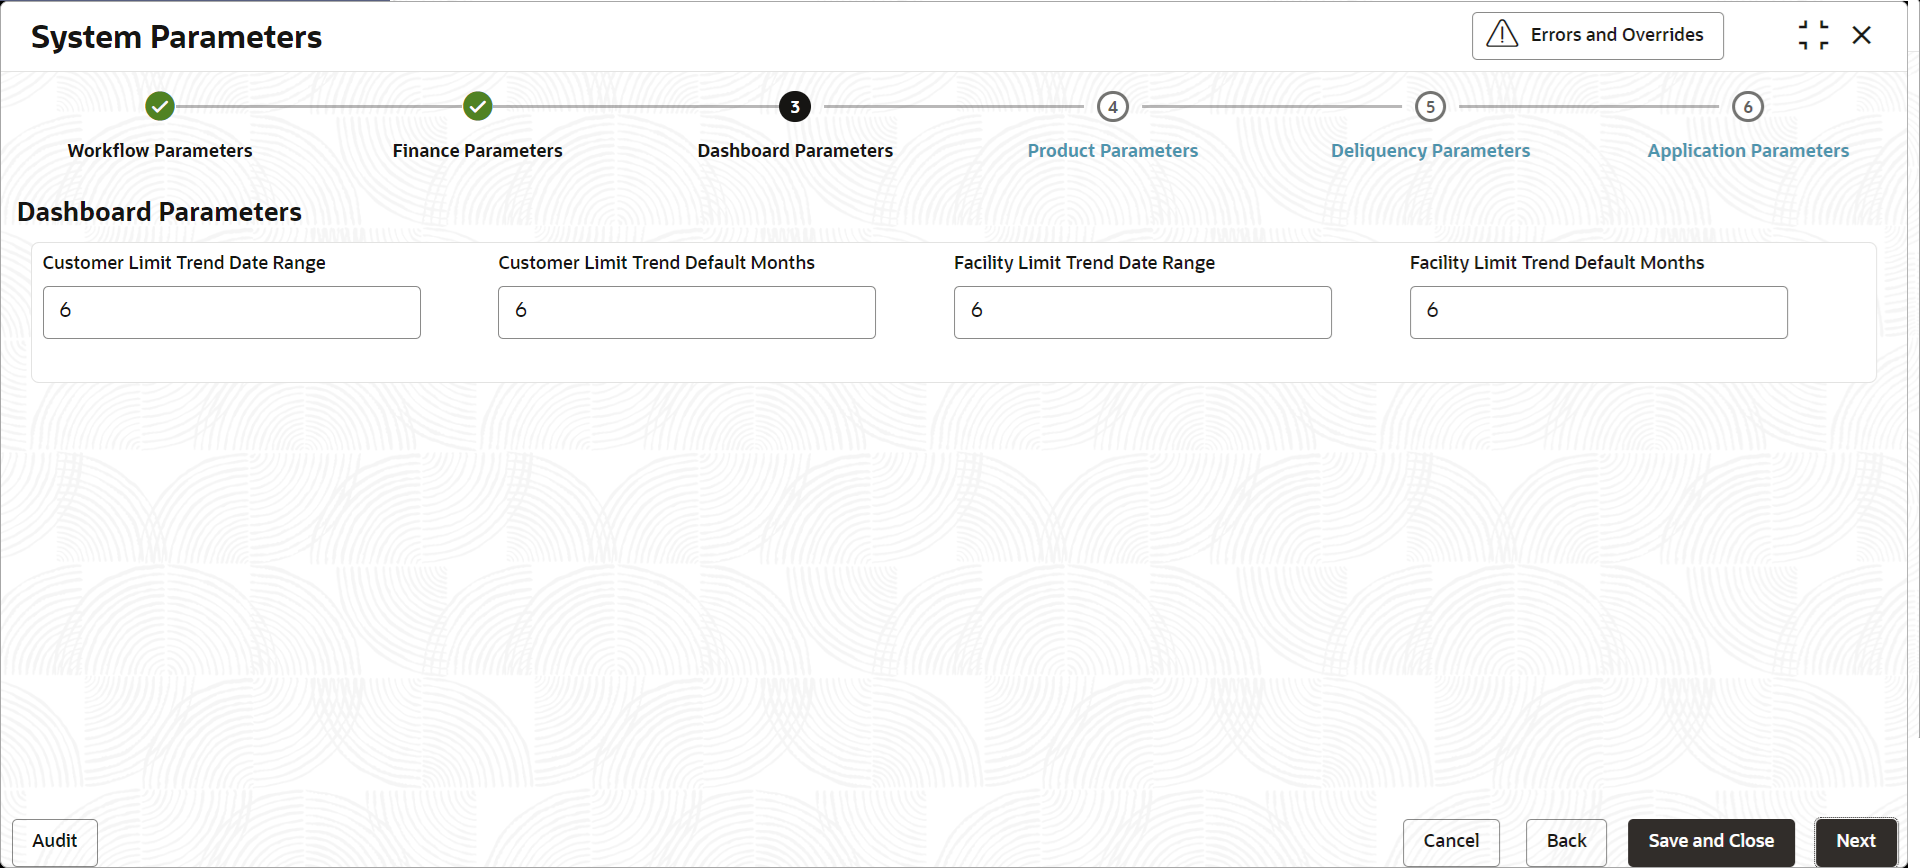
Figure 2-4 System Parameters - Dashboard Parameters
- On Dashboard Parameters tab, specify the fields to
configure the dashboard parameters.For more information on fields, refer to the field description table.
Table 2-3 Dashboard Parameters - Field Description
Field Description Customer Limit Trend Date Range Specify the date range for the customer limit trend in the dashboard. Customer Limit Trend Default Months Specify the month range for the customer limit trend in the dashboard. Facility Limit Trend Date Range Specify the date range for the facility limit trend in the dashboard. Facility Limit Trend Default Months Specify the month range for the facility limit trend in the dashboard. - Click Next button.The System Parameters - Product Parameters screen displays.
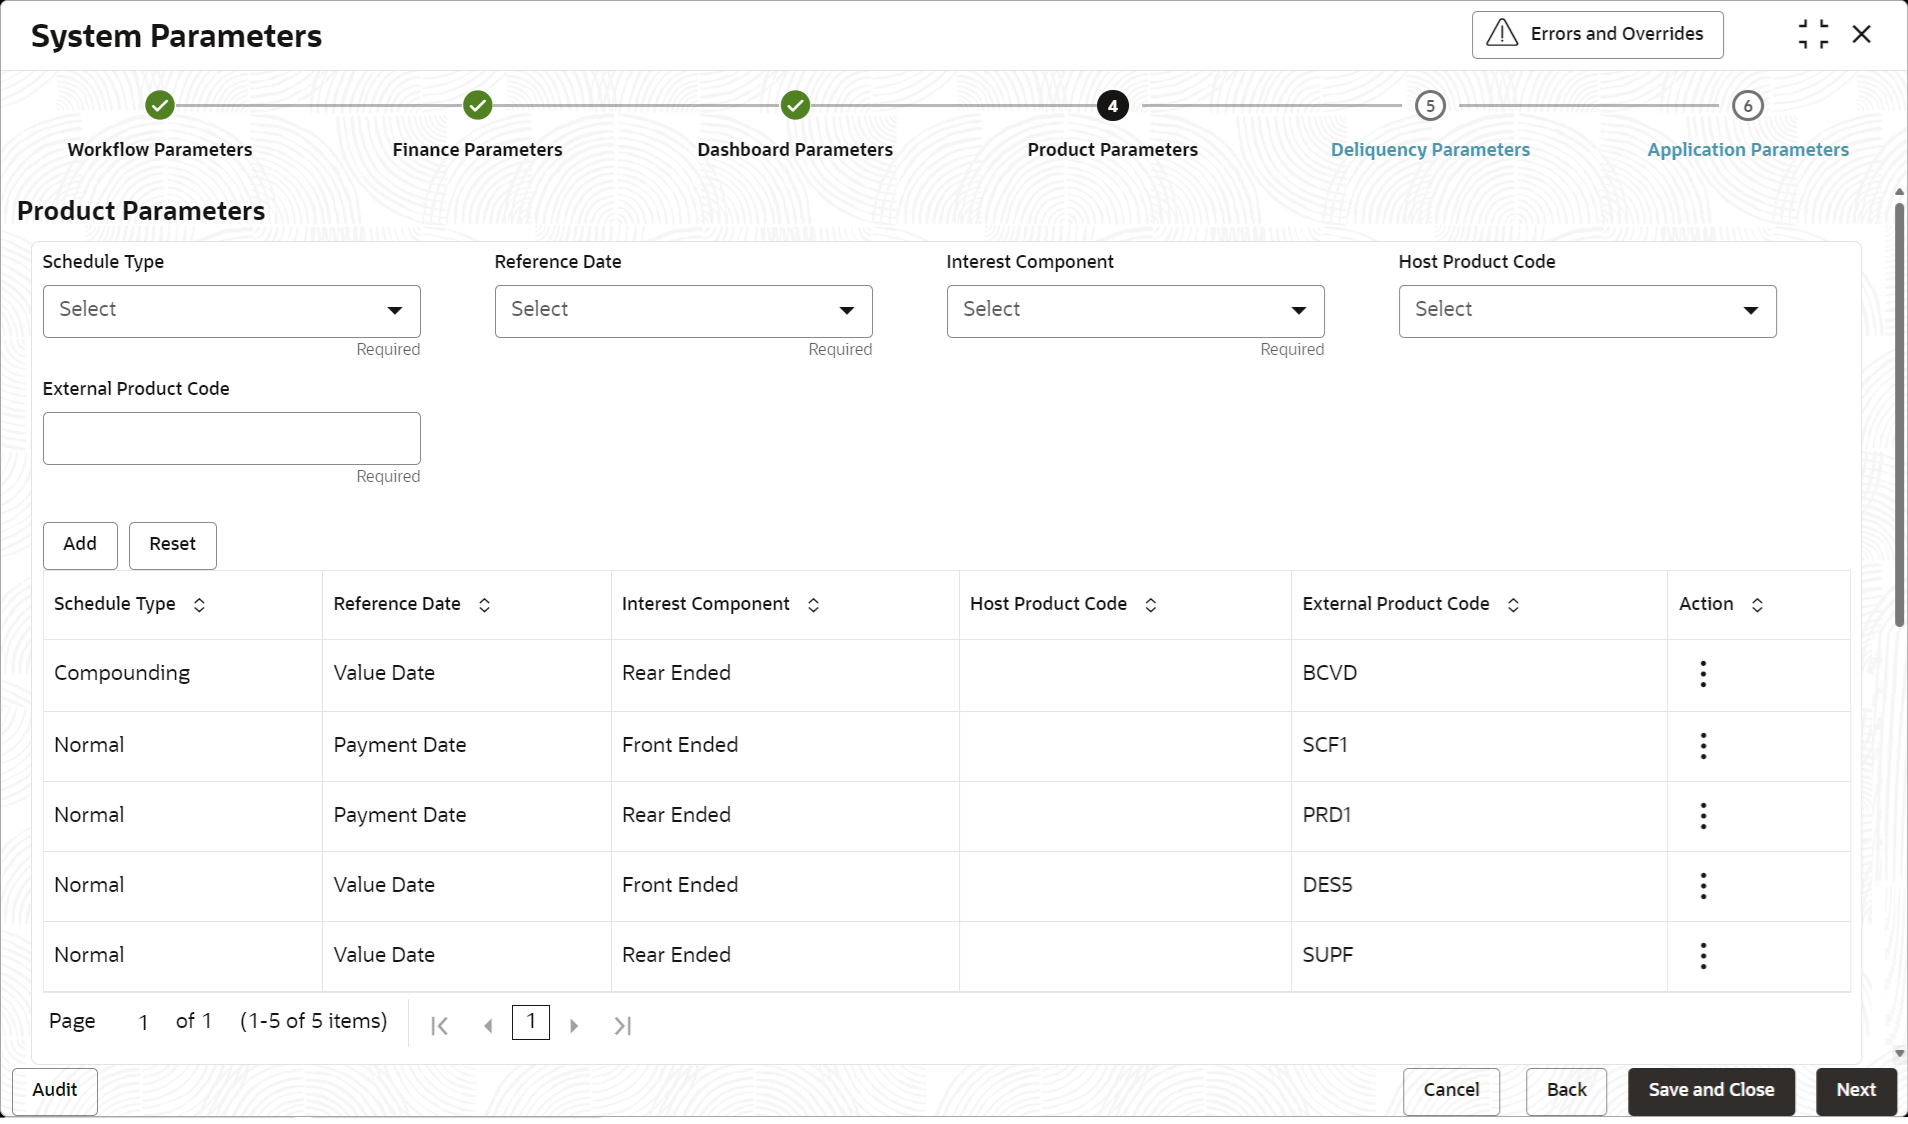
Figure 2-5 System Parameters - Product Parameters
- On Product Parameters tab, specify the fields to
configure the parameters for product mapping between supply chain finance and
the lending system.For more information on fields, refer to the field description table.
Table 2-4 Product Parameters - Field Description
Field Description Schedule Type Select the interest rate schedule.
The available options are:- Normal
- Compounding
Reference Date Select the reference date for the interest schedule.
The available options are:- Value Date
- Payment Date
Interest Component Select the type of Interest component.
The available options are:- Front Ended
- Rear Ended
Host Product Code Select the host product code to map individual supply chain products to external product codes. External Product Code Specify the product code defined in the Lending System.
- Once you enter the details, click Add or click
Reset to reset the fields, if required
- Once an entry is made in the grid, click in the Action column, to Edit or Delete it.
- Transactions created in the Oracle® Banking Supply Chain Finance application will be mapped to the
appropriate products in the lending application basis the above features
and mapping.
Note:
You can maintain only one record for a given combination of Schedule Type, Reference Date, Interest Component, and Host Product Code.
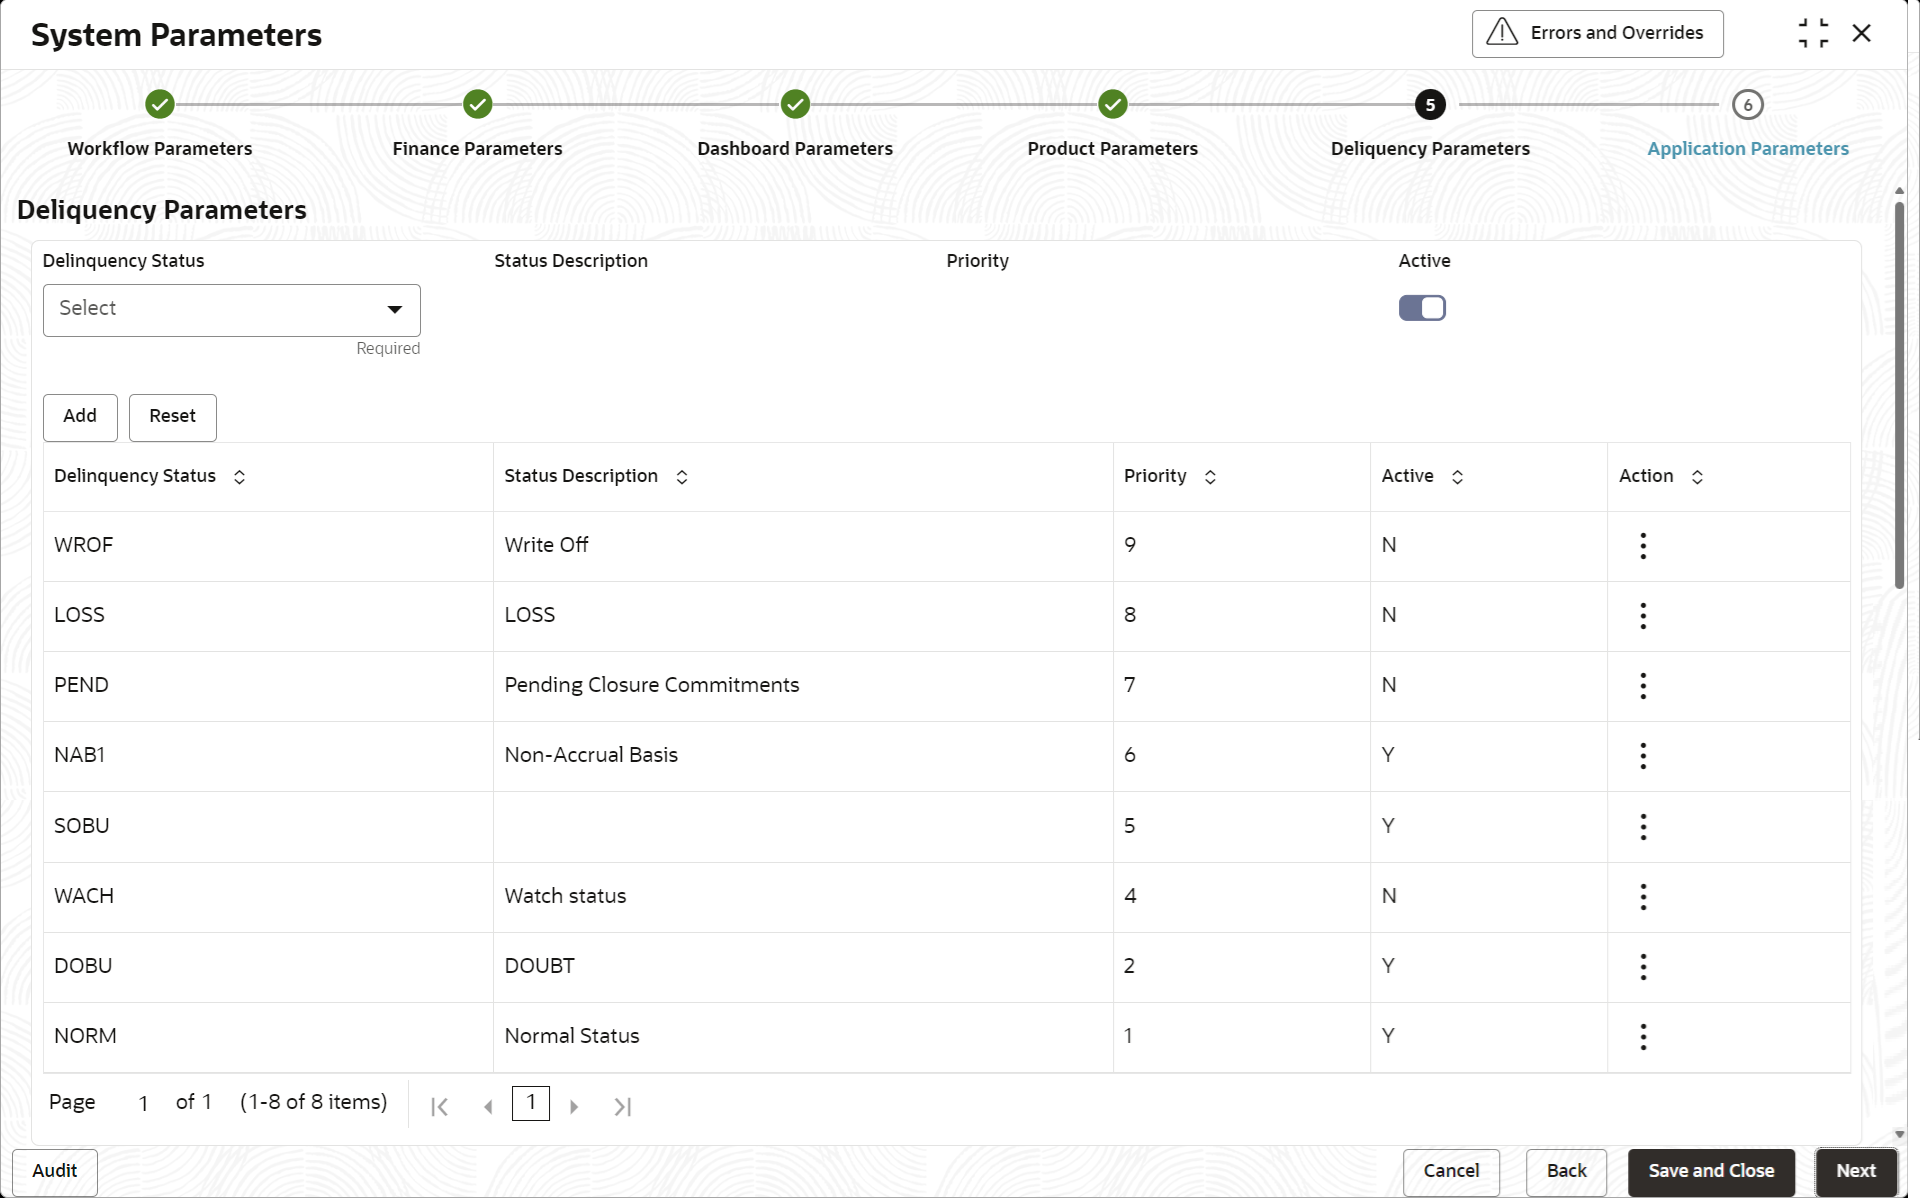
- Click Next button.The System Parameters - Delinquency Parameters screen displays.
Figure 2-6 System Parameters - Delinquency Parameters
- On Delinquency Parameters tab, specify the fields to
configure the delinquency parameters.For more information on fields, refer to the field description table.
Table 2-5 Delinquency Parameters - Field Description
Field Name Description Delinquency Status Select the delinquency status as per the regulatory requirements. Relevant statuses maintained in lending system gets populated here.
Example:- NORM - Normal Status
- CAU - Caution
- WACH - Watch Status
Status Description Displays the description of the delinquency status selected.
Example:- NORM - Normal Status
- NAB - Non-Accrual Basis
- WACH - Watch Status
Priority Displays the priority of the delinquency status selected. Active Switch the toggle ON to enable the type of delinquency status as Active depending on regulatory requirements. - Once you enter the details, click Add. or click
Reset to reset the fields, if required
- Once an entry is made in the grid, click in the Action column, to Edit or Delete it.
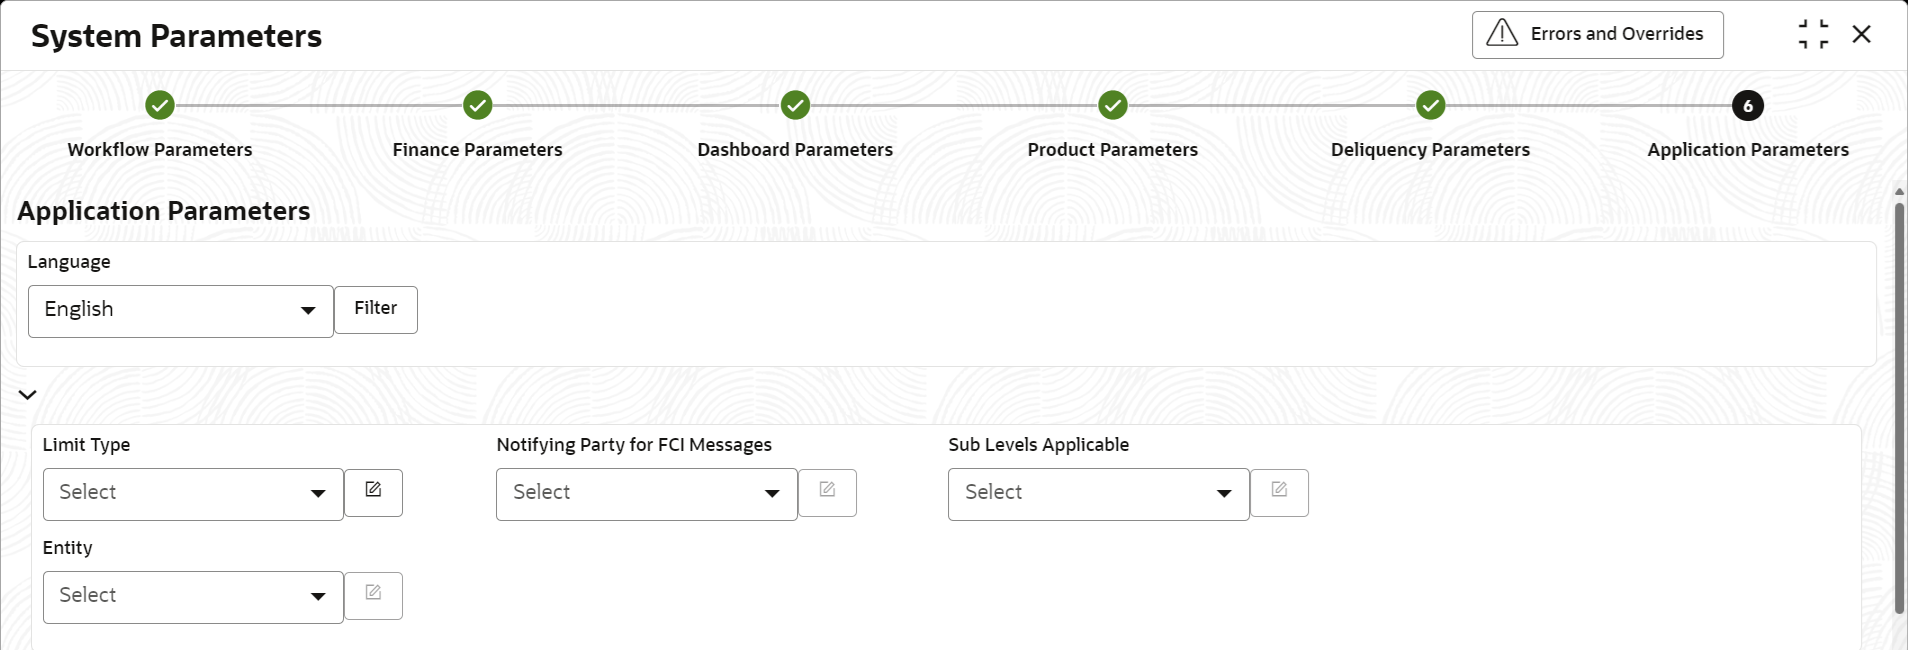
- Click Next button.The System Parameters - Application Parameters screen displays.
Figure 2-7 System Parameters - Application Parameters
- On Application Parameters tab, specify the fields to
configure unique codes to each of the application parameters.For more information on fields, refer to the field description table.
Table 2-6 Application Parameters - Field Description
Field Name Description Language Select the language from the drop-down and click Filter. This displays the existing codes created for each application parameter in the selected language. Limit Type Displays the list of limit types to be mapped with entity in the Limits Structure maintenance.
Click the Modify icon to add new, or view the existing limit types.
Notifying Party for FCI Messages Displays the list of notifying parties on whose behalf the relevant FCI message is sent for the applicable events such as Raise Dispute action in the Receivables and Payables Management screen.
Click the Modify icon to add new, or view the existing notifying parties.
Sub Levels Applicable Displays the list of entities that are applicable for maintaining sub level exception handling in the Credit Limit Mapping tab in Product Parameters maintenance.
Click the Modify icon to add new, or view the existing entities for sub level exception handling.
Entity Displays the list of entities in the Supply Chain Finance application.
Click the Modify icon to add new, or view the existing entities.
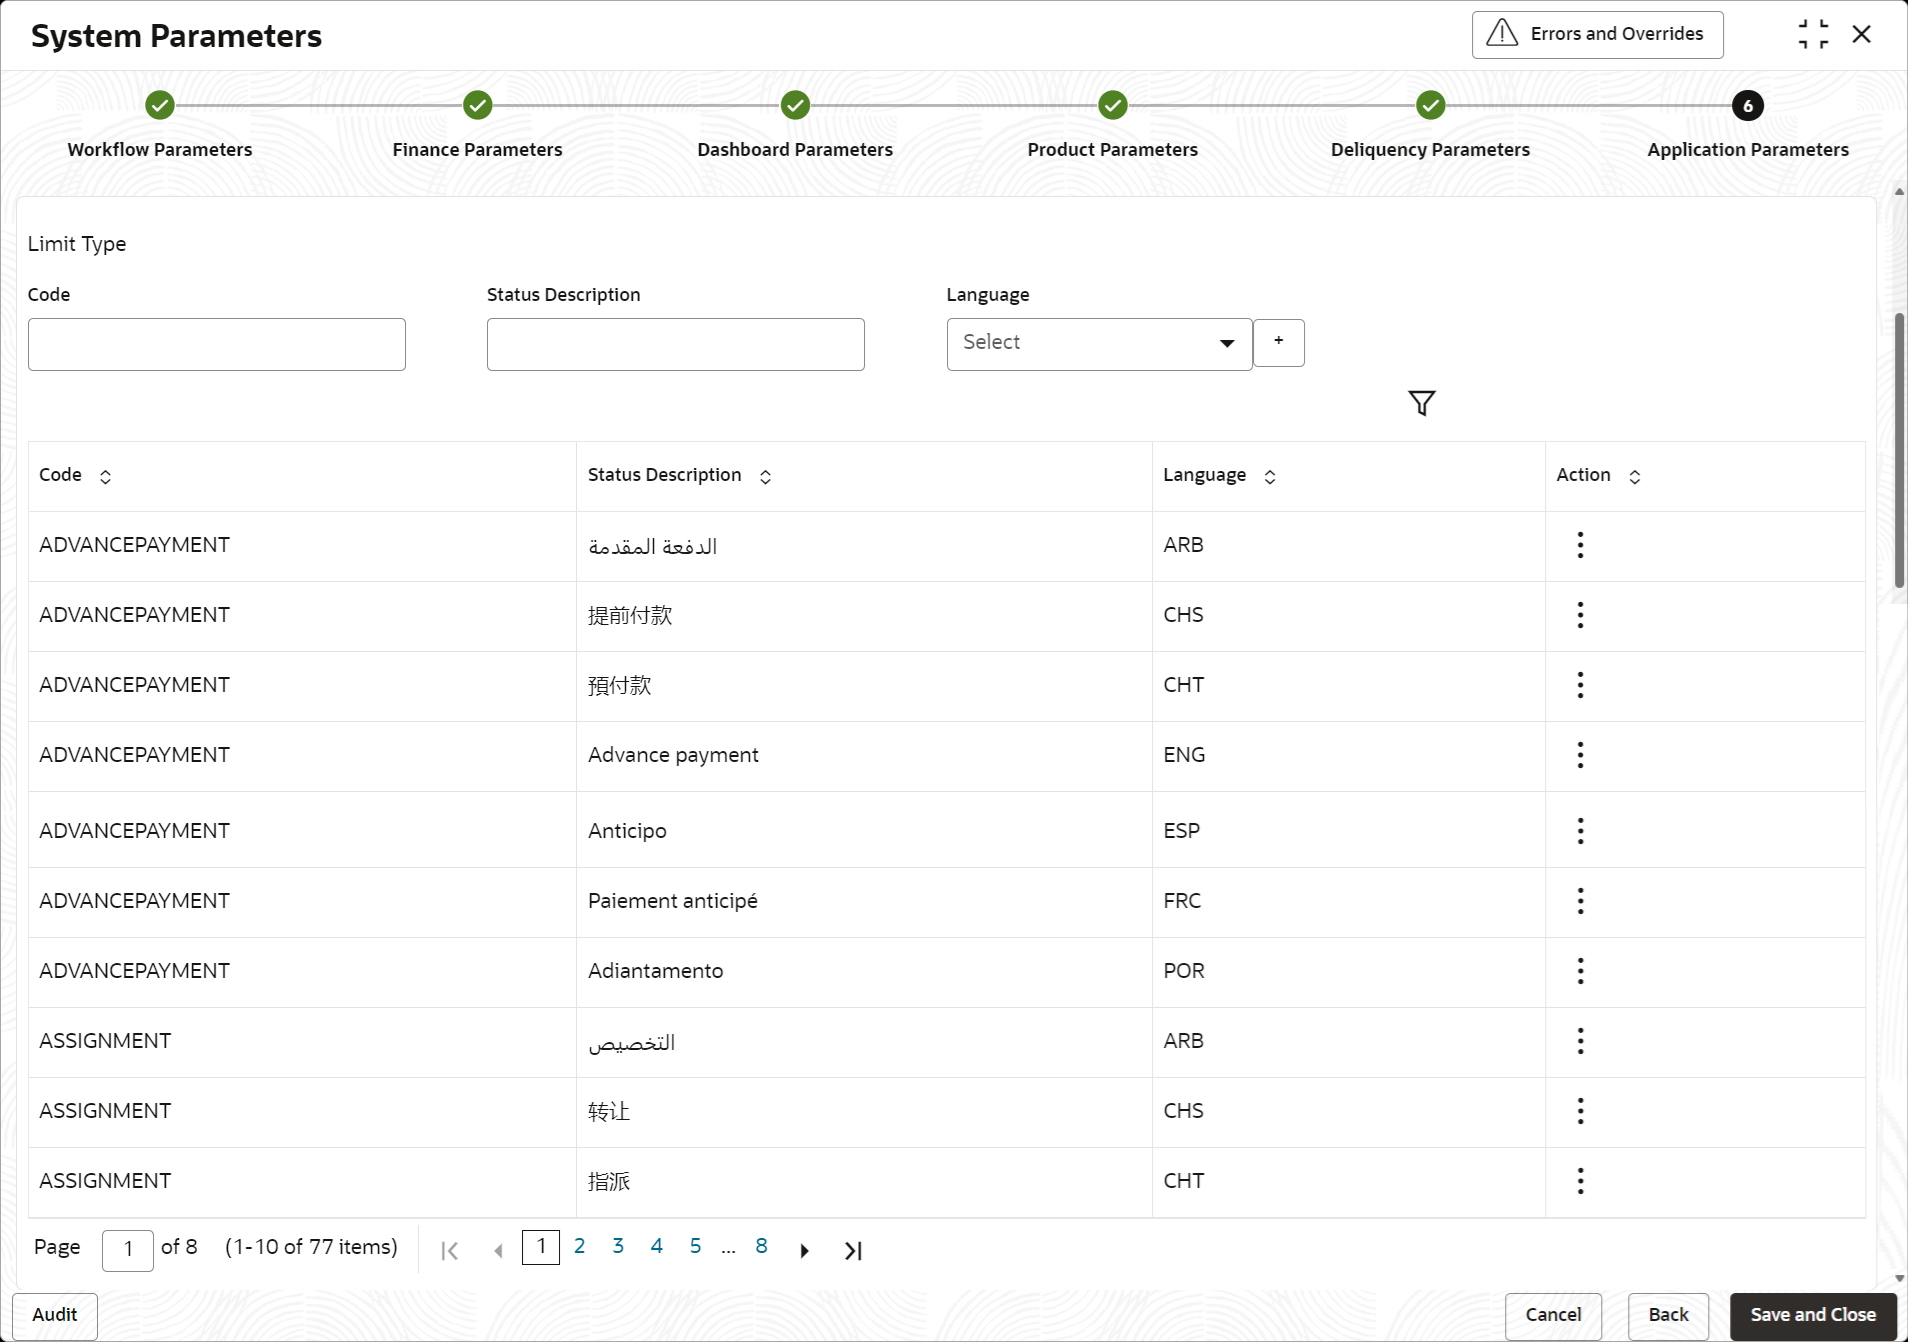
- Click the Modify icon next to the required application
parameter for which a new code needs to be created.The application displays the selected parameter in the section below. You can create new codes or view the existing codes.
Figure 2-8 Application Parameters - Parameter Modification
- Specify the values in the below fields and click the Add
icon to add the new codes.For more information on fields, refer to the field description table.
Table 2-7 Parameter Modification - Field Description
Field Name Description Parameter Name Displays the name of the application parameter selected for modification. Code Specify the unique code to be created for the selected application parameter. Status Description Specify the description for the code to be created. You can specify the description in the required language. Language Select the language for which the code is to be created. - Once you enter the details, click the Add icon to add a
new code.
- Once an entry is made in the grid, click in the Action column, to Edit or Delete it.
- Click the Filter icon to filter the existing codes by language.
- Click Save and Close to save the record and send for
authorization (if applicable).
Note:
If any flag in the system parameters is changed, the system promptly updates it upon authorization. However, processing the impact of the flag takes approximately 1-2 hours. - On the View System Parameters screen, click
Options icon and then select any of the following
options:
- Authorize – To authorize or reject the record.
Authorizing/Rejecting requires necessary access rights.
- Optional: Click View to view the record details.
- Select the record and click Approve to approve the record.
- Select the record and click Reject to reject the record. Specify the relevant comments in the pop-up window that appears, and click Confirm.
- View – To view the record details.
- Authorize – To authorize or reject the record.
Authorizing/Rejecting requires necessary access rights.
Parent topic: System Parameters Maintenance

