3.9.4 Modify Tenure and Installment
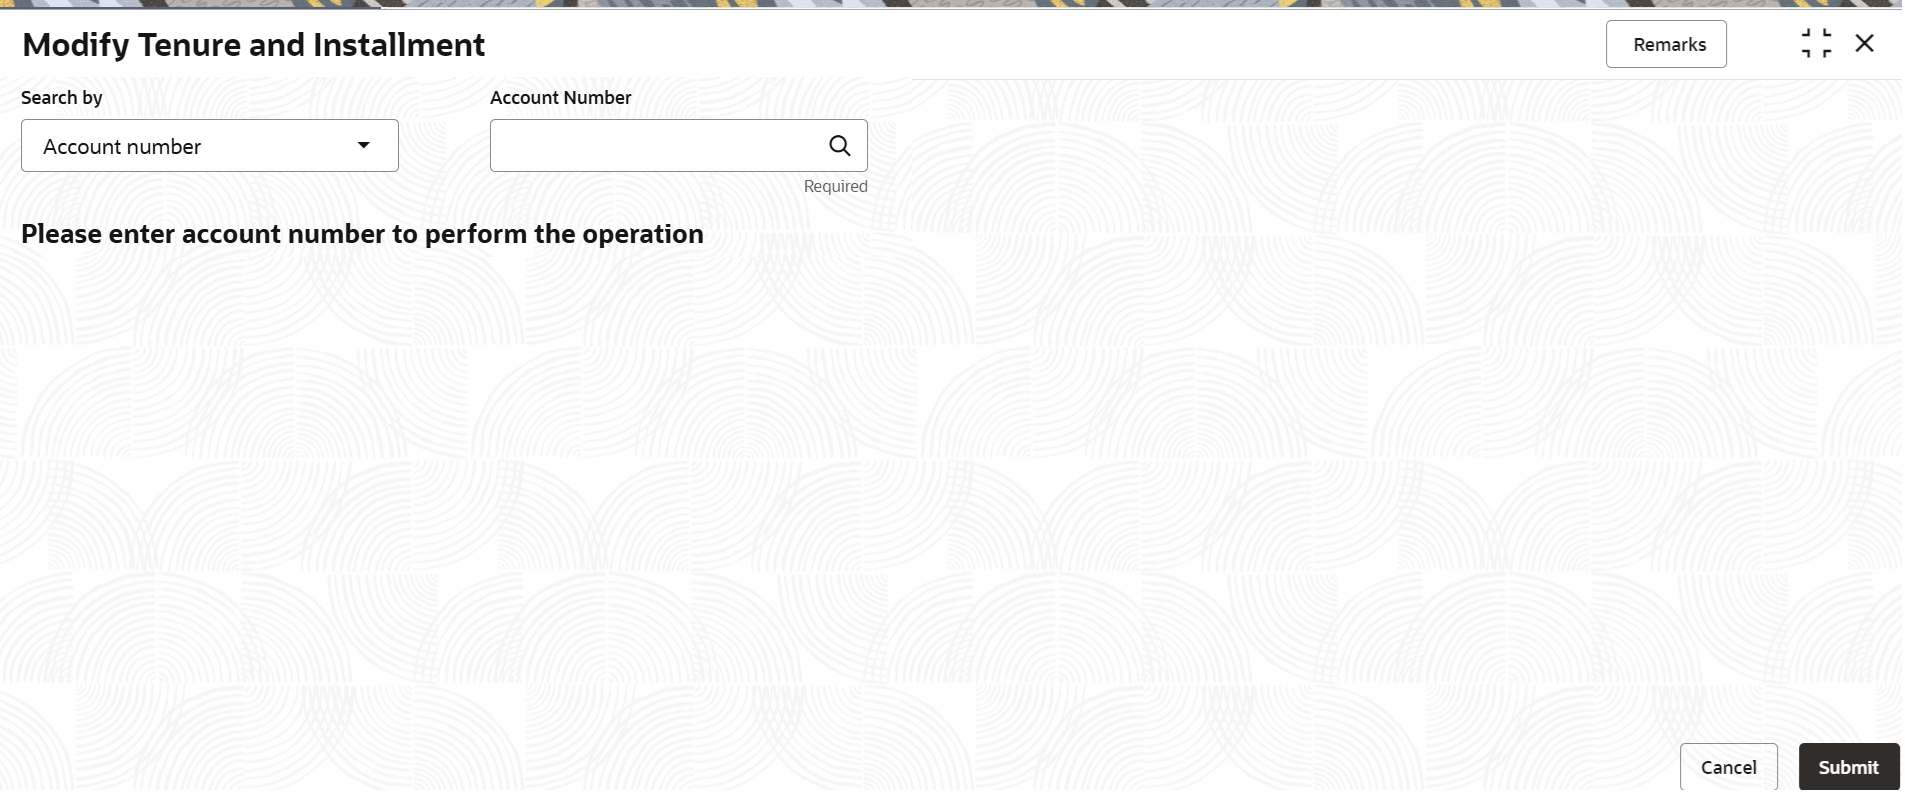
User can modify the existing tenure or installment based on customer request using the Modify Tenure and Installment screen.
Once the modification is done, the schedule impact is displayed and informed to the customer.
To modify tenure and installment:
Note:
The fields marked as Required are mandatory.- On the Homepage, from Loan Service mega
menu, under Schedule, click Modify Tenure and
Installment. User can also open the screen by specifying Modify
Tenure and Installment in the search icon bar and selecting the
screen.The Modify Tenure and Installment screen is displayed.
Figure 3-138 Modify Tenure and Installment

Description of "Figure 3-138 Modify Tenure and Installment" - Select the appropriate option from the Search by field.
- Perform the required action, based on the option selected from the Search
by field.
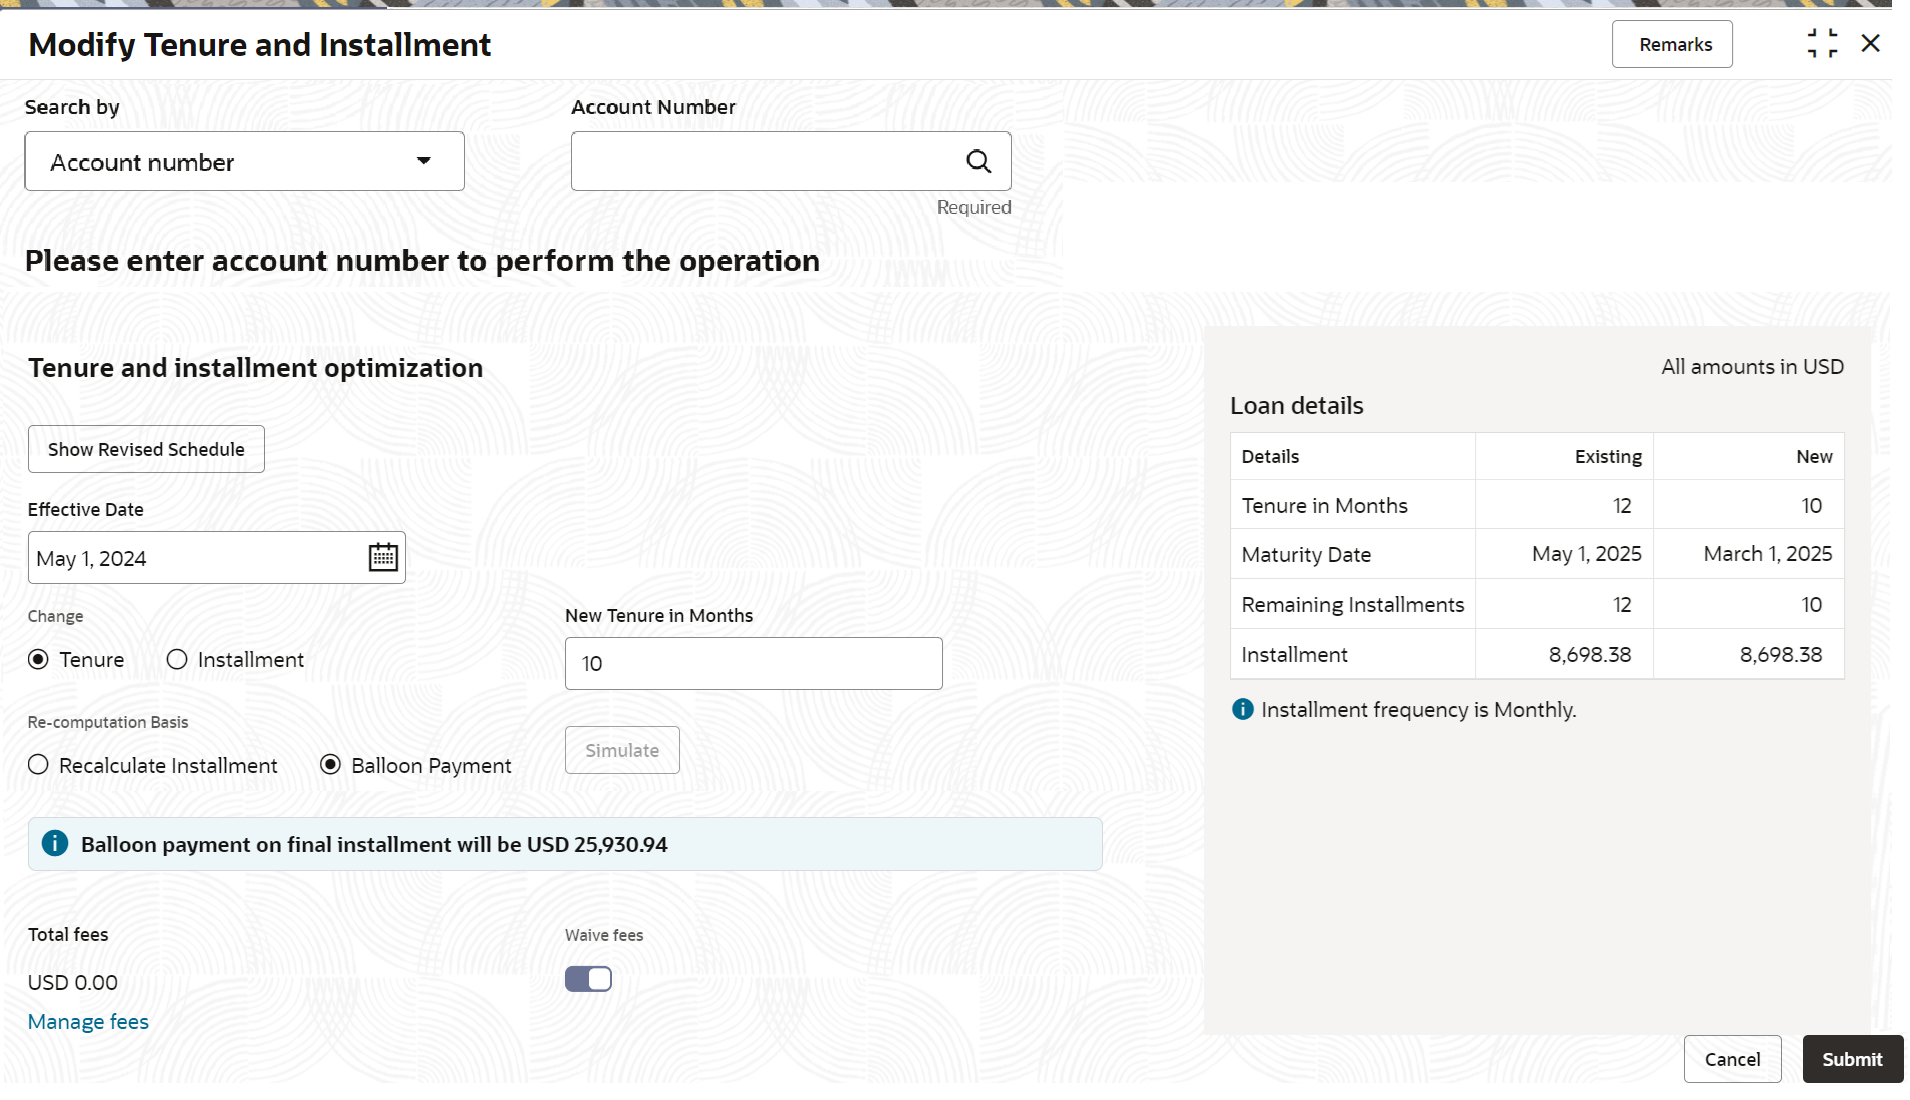
The Tenure and installment optimization and Loan details sections are displayed.
Figure 3-139 Modify Tenure and Installament Details

Description of "Figure 3-139 Modify Tenure and Installament Details" - In the Tenure and installment optimization section, user can
perform the required action. For more information on fields, refer to field description
table below:
Table 3-94 Modify Tenure and Installament - Field Description
Field Description Search by Users can search for an account number by using any of the available search criteria. The account number is set as the default search option. Users can specify the account number directly in the adjacent field or search for an account number by clicking the Search icon. Users can also search for the specific account number by providing customer ID, account number, or account name.
Other search options available in the Search by field are Customer ID, SSN, Mobile Number, and Email.
A specific customer ID can be searched by providing the customer name or customer ID. If SSN, mobile, or email IDs are chosen to find an account number, the respective IDs have to be input entirely in the adjacent field for the system to display the account number. For a given search criteria, multiple account numbers may be linked.
For example, two or more account numbers can be linked to a single mobile number. In such cases, the system displays all the account number matches and the user can select the relevant account number on which to perform a servicing operation.Note:
The label of the field adjacent to the Search by field changes dynamically. For example, if the Account number is chosen as the search criteria, the label of the adjacent field is displayed as the Account Number. If SSN is chosen as the search criteria, then the adjacent field would display the label as SSN.Tenure and installment optimization This section displays the fields required for modification of tenure and installment. Note:
The following two buttons are displayed in this section:- Show Revised Schedule: This button is enabled only after user click Simulate. For more information, refer Revised Schedule.
Effective Date Select or specify the effective date of the loan. Note:
User can specify or select a date earlier than the current system date and later than the loan's maturity date.Change Select the option for modification. The options are: - Tenure
- Installment
No. of Installments Specify the number of installments as requested by the customer. Note:
This field is displayed if user select the Tenure option from the Change field.New Installment Specify the new installment as request by the customer. Note:
This field is displayed if user select the Installment option from the Change field.Re-computation Basis Select the re-computation for modified details. The options are: - Recalculate Term
- Balloon Payment
Note:
There is Simulate button displayed next to this field. This button is displayed as user select an option from the Change field and specify the values based on the option selected. The button is enabled only after user select an option from the Re-computation Basis field.Total Fees Displays the total fees applicable for the loan. Note:
- This field is displayed as user click Simulate.
- The value is displayed as zero as user switch to
 in the Waive Fees field.
Waive Fees Switch to
 to waive the fees applied on the account.
Switch to
 to retain the fees applied on the account.
Note:
This field is displayed as user click Simulate.Fees Treatment Select the option for treating the fees amount. The options are: - Pay Now: If you select this option, then Settlement details section is displayed.
- Pay Later
Note:
This field is displayed if user select an option from the Re-computation Basis field, and click Simulate.Settlement details This section displays the existing settlement details. If no settlement details are present for the account, then user can add new settlement details using the Add New Settlement button. For more information, refer Pay Through Customer Account and Pay Through Other Customer's Account. Note:
This section is displayed, if Pay Now option is selected from the Fees Treatment field.Loan details This section displays the loan details and related values. Details Displays the loan details. Existing Displays the existing details of the loan. New Displays the new details of the loan. Note:
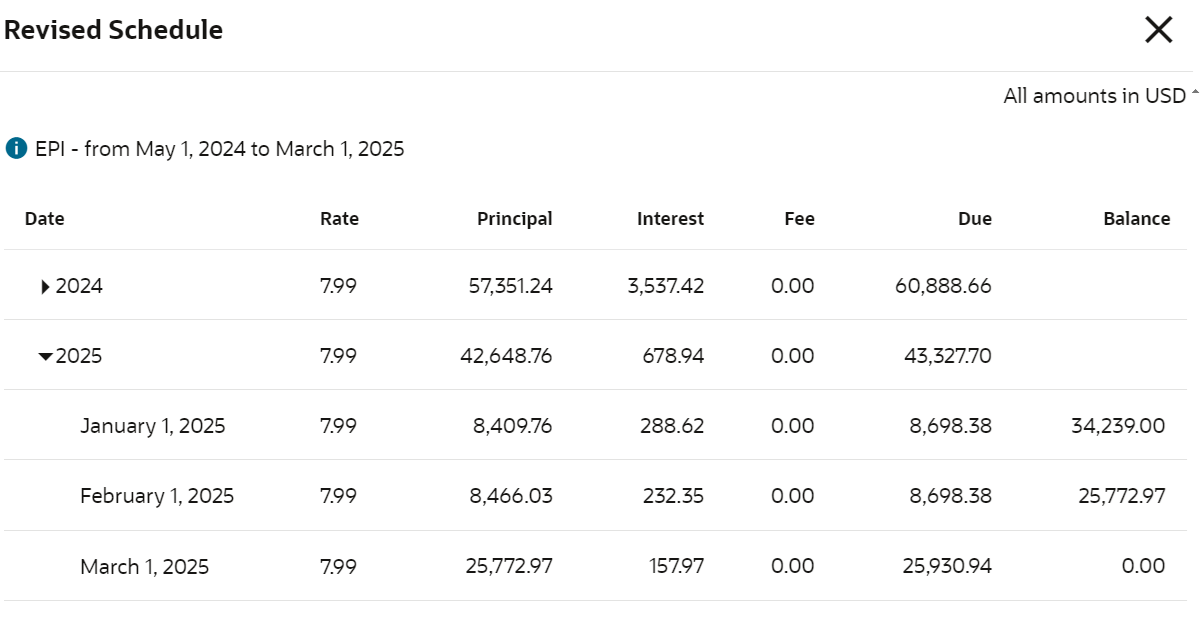
The new values are displayed after user click Simulate.To view the revised schedule:- Click Show Revised Schedule.The Revised Schedule section is displayed.
- User can view the revised schedule for the account. For more information on fields,
refer to field description table below:
Table 3-95 Revised Schedule - Field Description
Field Description Date Displays the year and the dates in a year when the arrear is raised. Note:
This column lists the years for which the schedule is generated. If user click the icon corresponding to a particular year, the monthly date
schedule list for a year displays.
Rate Displays the rate of interest. Principal Displays the amount of principal arrears. Interest Displays the amount of interest. Fees Displays the amount of fees. Due Displays the amount due. Balance Displays the balance amount after every installment. - Click Close.
To manage fees:- Click Simulate.The Manage Fees link is displayed along with other fields.
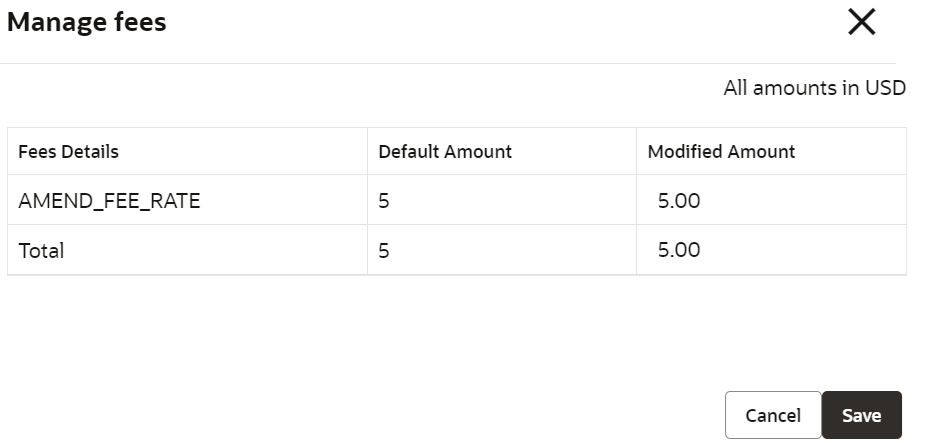
- Click the Manage Fees link.The Manage Fees section is displayed.
- In the Manage Fees section is displayed, specify the updated
amount. For more information on fields, refer to field description table below:
Table 3-96 Manage Fees – Field Description
Field Description Fees Details Displays the fees applied on the account. Defaulted Amount Displays the defaulted fees amount on the account. Modified Amount Displays the latest fees amount. Note:
User can edit the amount by clicking the field and specifying the amount.Total Displays the total of default and modified amount. - Click Save.
- Click Submit.The screen is successfully submitted for authorization.
- Settlement through Customer Account
User can settle the amount using the customer account. - Settlement through Other Customer's Account
User can settle the amount using the other customer's account.
Parent topic: Schedule

