- Standalone Scheduler Property File Creation
- Creating Property File for Standalone Scheduler
- Creating Property File
- Setting EMS FTP/FTPS Properties
Setting EMS FTP/FTPS Properties
You will be navigated to the ‘Scheduler EMS Properties’ screen. Here, you need to set the EMS details.
- Set the EMS properties:
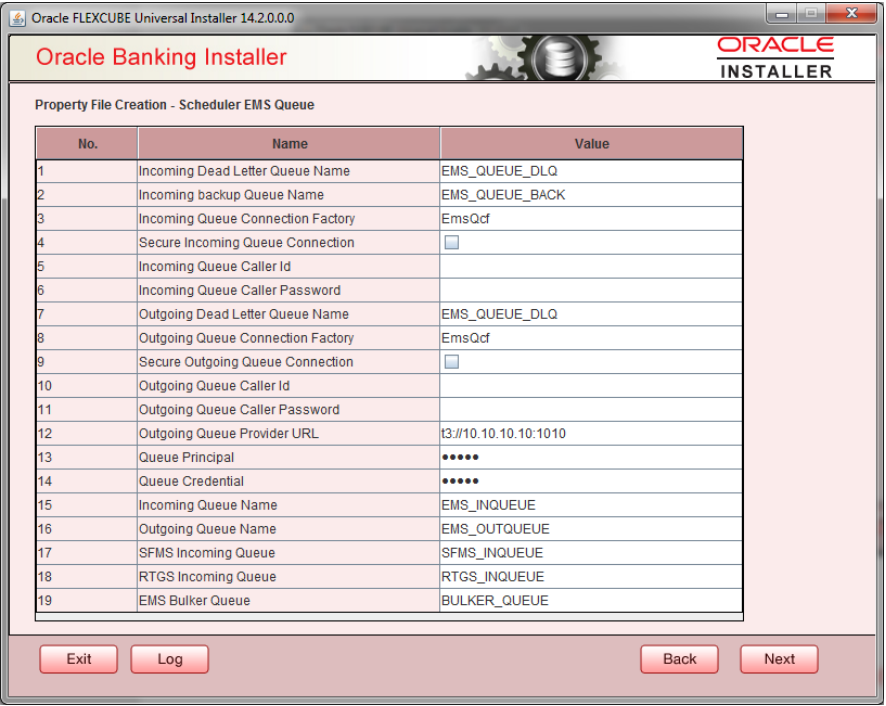
Figure 2-16 Setting EMS FTP/FTPS Properties

- Specify the following details:
OutGoing Connection Factory - Specify the name of the outgoing connection factory to which EMS listens. You need to create this connection factory at the application server.
For details on connection factory creation, follow the steps described for creation of notify connection factories.
Incoming Connection Factory - Specify the name of the incoming connection factory to which EMS listens. You need to create this connection factory at the application server.
For details on connection factory creation, follow the steps described for creation of notify connection factories.
Outgoing Queue Name - Specify the name of the outgoing queue for which EMS is configured. By default, this is set as ‘NOTIFY_QUEUE_DLQ’.
Incoming Queue Name Specify the name of the incoming queue for which EMS is configured. By default, this is set as ‘NOTIFY_QUEUE_DLQ’.
Incoming Backup Queue Name - Specify the name of the incoming backup queue for which EMS is configured.
Outgoing Queue Provider URL - In case EMS OUT MDB is to be configured to queue, you need to specify the URL for outgoing provider based on the application server. By default, the Installer displays the outgoing queue provider URL for Oracle WebLogic.
This value is application server dependent.
The details of Outgoing Queue Provider URL to be used for different application servers are given below:Application Server EMS Out Initial Context Factory Oracle WebLogic t3://<ip_adress>:port E.g.: t3://10.10.10.10:1010 Here, 10.10.10.10 represents the local host and 1010 to the target server default port (AdminServer/ManagedServer) Queue Principal - If EMS OUT MDB has to be configured to queue, you need to specify the EMS out queue principal. This is the user name for the application server in which the queue is configured.
Queue Credential - If EMS OUT MDB has to be configured to queue, you need to specify the EMS out queue credential. This is the password for the above user name created for application server in which the queue configured.
Incoming Queue Name - Specify the incoming queue name.
Outgoing Queue Name - Specify the outgoing queue name.
SFMS Incoming Queue - Specify the SFMS Incoming Queue.
RTGS Incoming Queue - Specify the RTGS incoming Queue.
EMS Bulker Queue - Specify the EMS Bulker Queue.
- Once you have specified the above details, click ‘Next’ and the following
screen is displayed:
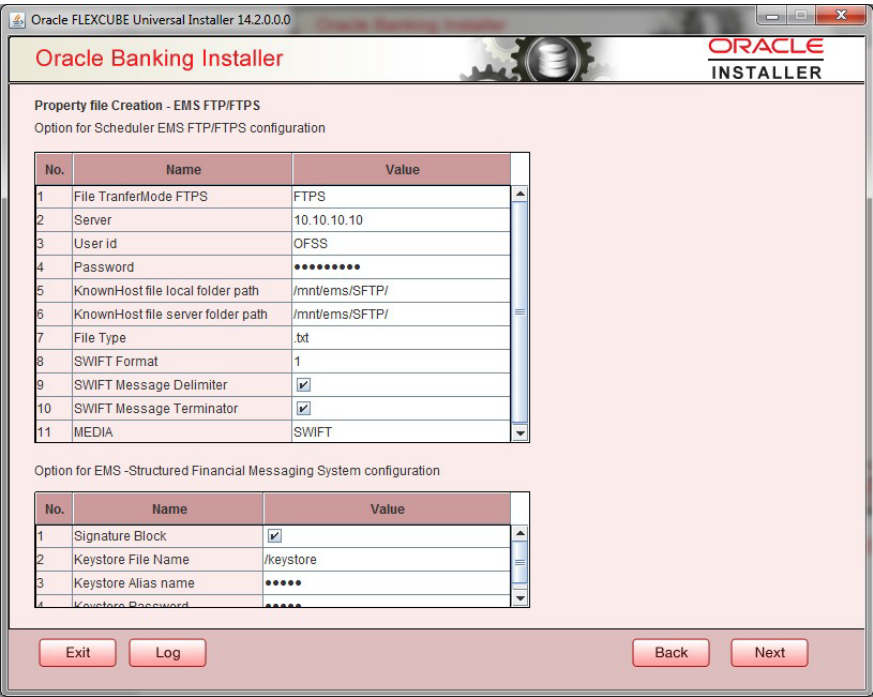
Figure 2-17 Setting EMS FTP/FTPS Properties

- Specify the following details:File Transfer Mode FTPS
Specify the mode of transferring files to EMS. Select one of the following:
- FTPS
- SFTP
- HTTP
Server - Specify the server IP address for the selected file transfer mode.
User ID - Specify the user ID to access the server of the file transfer mode.
Password - Specify the password to for the above user ID.
File Type - Specify the type of file that is transferred. By default, the Installer sets it as ‘.txt’.
SWIFT Message Delimiter - Specify the character which is used as the message delimiter.
SWIFT Message Terminator Specify the character which is used as the message terminator.
- Once you have specified the above details, click Next. and the following
screen is displayed:
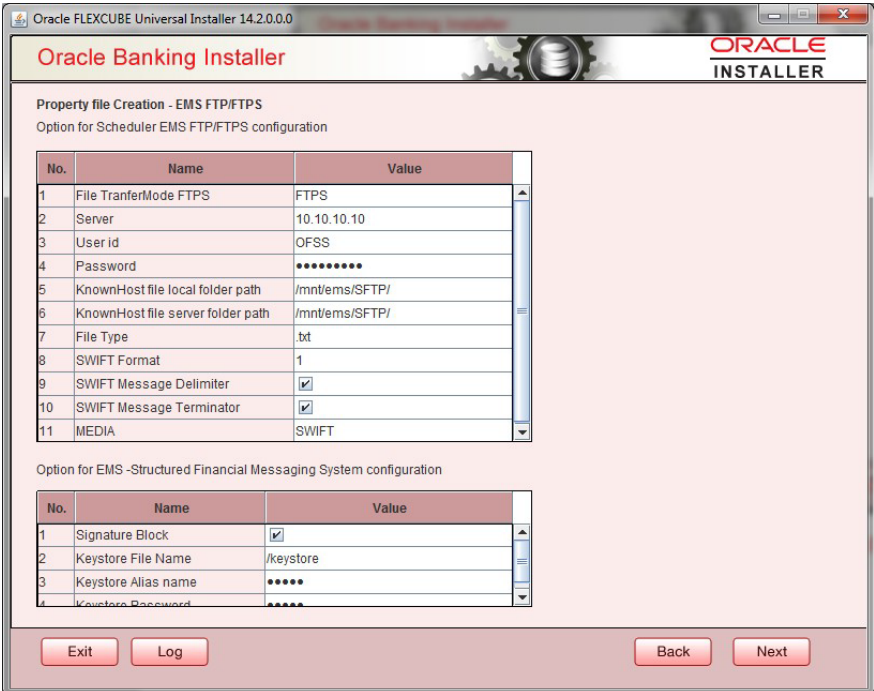
Figure 2-18 Setting EMS FTP/FTPS Properties

- Specify the following details:
Signature Block - Check this box to enable signature block.
Keystore File Name - Specify the keystore file name.
Keystore Alias Name - Specify the keystore alias name.
Keystore Password - Specify the keystore password.
- Once you have specified the above details, click Next and system displays the next screen.
Parent topic: Creating Property File