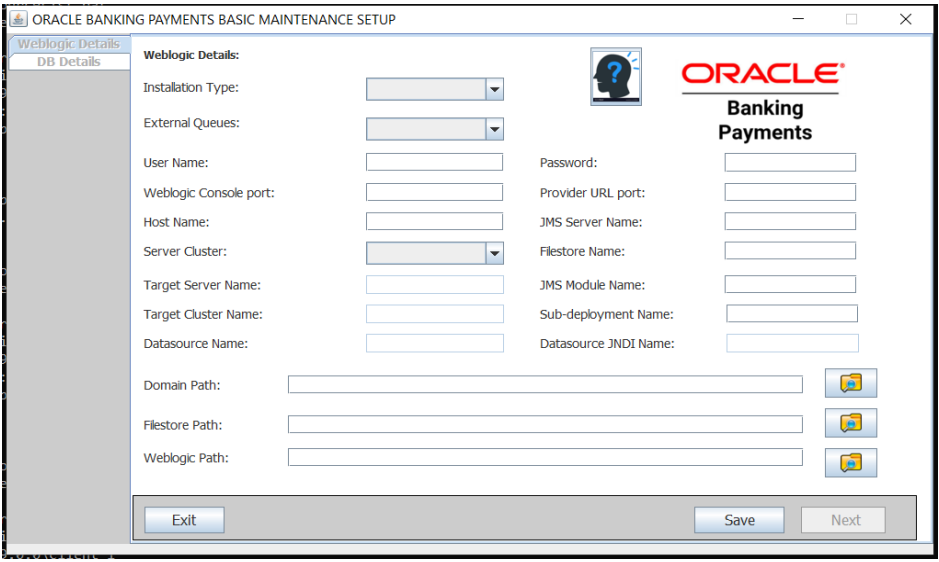
Weblogic Application Server Details
- Below is the TOOL-GUI Generated post selection of
YES.
Below screen has two tabs , one for entering the Weblogic Details and another tab for capturing the database details.
This tool requires that the Domain and the managed server /Cluster managed server to be already present in the Weblogic Application before the tool is launched.
|
Figure 3-5 Help |
Gives a brief explanation/help on the fields to be entered in the screen. |
Select one of the following values.
- New – This option is used for New Setup in Weblogic. Also Enables fields for entering the Datasource Details. Resource details will be fetched from PMResourceList.xlsx.
- Existing – This option is for creating addtional Queues , Topics and QCF on already existing weblogic Setup. Resource details will be fetched from PMResourceList_Patchset.xlsx.
Select one of the following values.
- Yes – To create External Queues List from Excel.
- No – To Ignore External Queues List from Excel.
Enter the Application server Console Access Details , Console Port and the Host name of the Weblogic server.
| User Name: | Weblogic |
| Password: | NA******** |
| Weblogic Console Port: | 7001 |
| Host Name: | whf00***.in.oracle. com |
Enter the port of the managed Server where the Queues will be created in the Application Server.
Example: 7010
Accept the Weblogic resource names to be created in Weblogic Application Server
| JMS Server Name: | JMSServer |
| File Store Name: | FileStore |
| JMS Module Name: | JMSModule |
| Sub-Deployment Name: | SBD |
Note:
For Installation type ‘New’ , all of the above JMS resource names will be concatenated with ‘PM’ at the beginning followed by the resource name at the time of resource creation. For eg : PMJMSServer.For Installation type ‘Existing’, provide the names of the resource already available in the setup.
Enter the details of the datasource name and the JNDI Name to be created for Payments.
| Datasource Name: | fcjdevDS |
| Datasource JNDI Name: | jdbc/fcjdevDS |
- Yes – For Existing Cluster Setup, this enables both Target Sever and Cluster Name.
- No – For Setup without Cluster, this enables Target Server Name only.
Enter the name of the Managed Server name used in Weblogic where the queues will be created. Managed Server should already be created/present in the server.
Enter the name of Cluster Managed Server. Cluster should already be created in the server.
| Weblogic Server Name: | ManagedServer1 |
| Weblogic Cluster Name: | MSCluster1 |
Enter the path in the Applcation Server where the Weblogic Domain is created. This should already be present in the server.
| i | Linux - /scratch/app/wl12213/user_projects/domains/FC142COD. |
| ii | Windows - C:\\app\\client\\aaf\\product\\19.0.0\\client_1. |
Filestore should already be present in the server and this path should be entered in this field.
| i | Linux - /scratch/work_area/DEV/PM143/PMFILESTORE |
| ii | Windows - D:\\FILESTORE |
Enter the path for the Weblogic Home for Local or Server Machine, where Weblogic is installed.
| i | Linux - /home/Oracle/Middleware/Oracle_Home/wlserver |
| ii | Windows - C:\\Oracle\\Middleware\\Oracle_Home\\wlserver |
Once above details are provided click on Save to create all the necessary folders and files also it enables Next button on successful creation. Click Next and proceed with steps in Database Server Details section. Logs can be monitored in \\ResourceListSetup_logs\\WeblogicTool_[DATE].log.
Parent topic: Resource Creation in Weblogic and Parameter updation
