6 Standalone WhatsApp/Facebook messenger integration with OBDX
This topic describes the systematic instruction to Standalone WhatsApp/Facebook messenger integration with OBDX option.
Bank can also setup WhatsApp without Oracle Digital Assistant in OBDX. In this release, basic intents are supported
- Help
- Balance
- Recent Transactions
- Upcoming Payments
All the above transactions will have authentication and authorization as in OBDX for a OBDX user.
Login will be performed based on OTP.
Below is the configuration setup:
- The relevant antifactory for server node application will be available fromOBDX
installer from this
path:
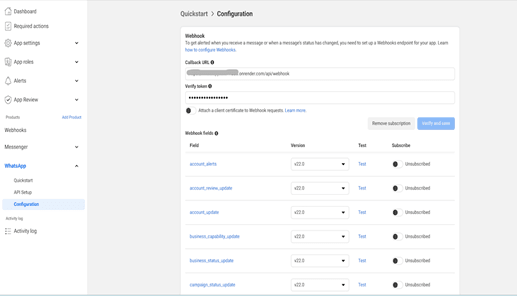
OBDX_Installer/installables/OBDX/BASE/<OBDX patchset version>/chatbot/config/digital-assistant/ - Navigate to Facebook Developers Console → WhatsApp Configuration. Add the
Webhook Callback URL and set up the Verification Token to enable webhook
integration.
- For setting up node server,
- Install node using homebrew
- Then open the path of the folder extracted from the installer package on terminal. This is be the path where package.json is located.
- Run “npm install”
- In environment variables add the following variables:
- PHONE_NUMBER_ID: can be fetched from Facebook developer’s console under: Quickstart > API Setup
- VERIFY_TOKEN: should be same as one set in Facebook developers console/ WhatsApp configuration
- PAGE_ID: is your Facebook page ID:
- Go to your Facebook Page.
- Click on About (left-hand menu).
- Scroll down to Page ID, and you will see a numeric ID.
- CHANNEL: can be set as WhatsApp or Facebook respectively to use any one of the channels (WhatsApp or Facebook). Only one at a time is supported.
- BASE_URL: should be a https URL of the environment you want to point to.
- DEFAULT_HOME_ENTITY: to be set based on requirement in OBDX
-
MYTOKEN: This token is required to send messages via the WhatsApp
API:
- Go to Meta for Developers.
- Navigate to My Apps and select your app.
- Under WhatsApp, go to API Settings.
- Find the Temporary Access Token or generate a permanent token via Business Manager.
- Use this token as
MYTOKENin your.envfile.
- PAGE_ACCESS_TOKEN: This token is needed to send messages via the
Facebook Messenger API:
- Go to Meta for Developers.
- Select your app and navigate to Messenger > Settings.
- Under Access Tokens, choose your Facebook Page and generate a token.
- Save this token as
PAGE_ACCESS_TOKENin your.envfile.
- After configuring the environment variables, deploy the code and start the application by running ‘node index.js to start the node server.
- Based on the channel that is set you can now test the chatbot on
WhatsApp/Facebook.
/digital-assistant/src/config/messages.json contains all text messages which can be customized.
Note:
There is language translation service in between the intent and WhatsApp server./digital-assistant/src/services/IntentService.js has mapped intent. These intents can be added in the array.
