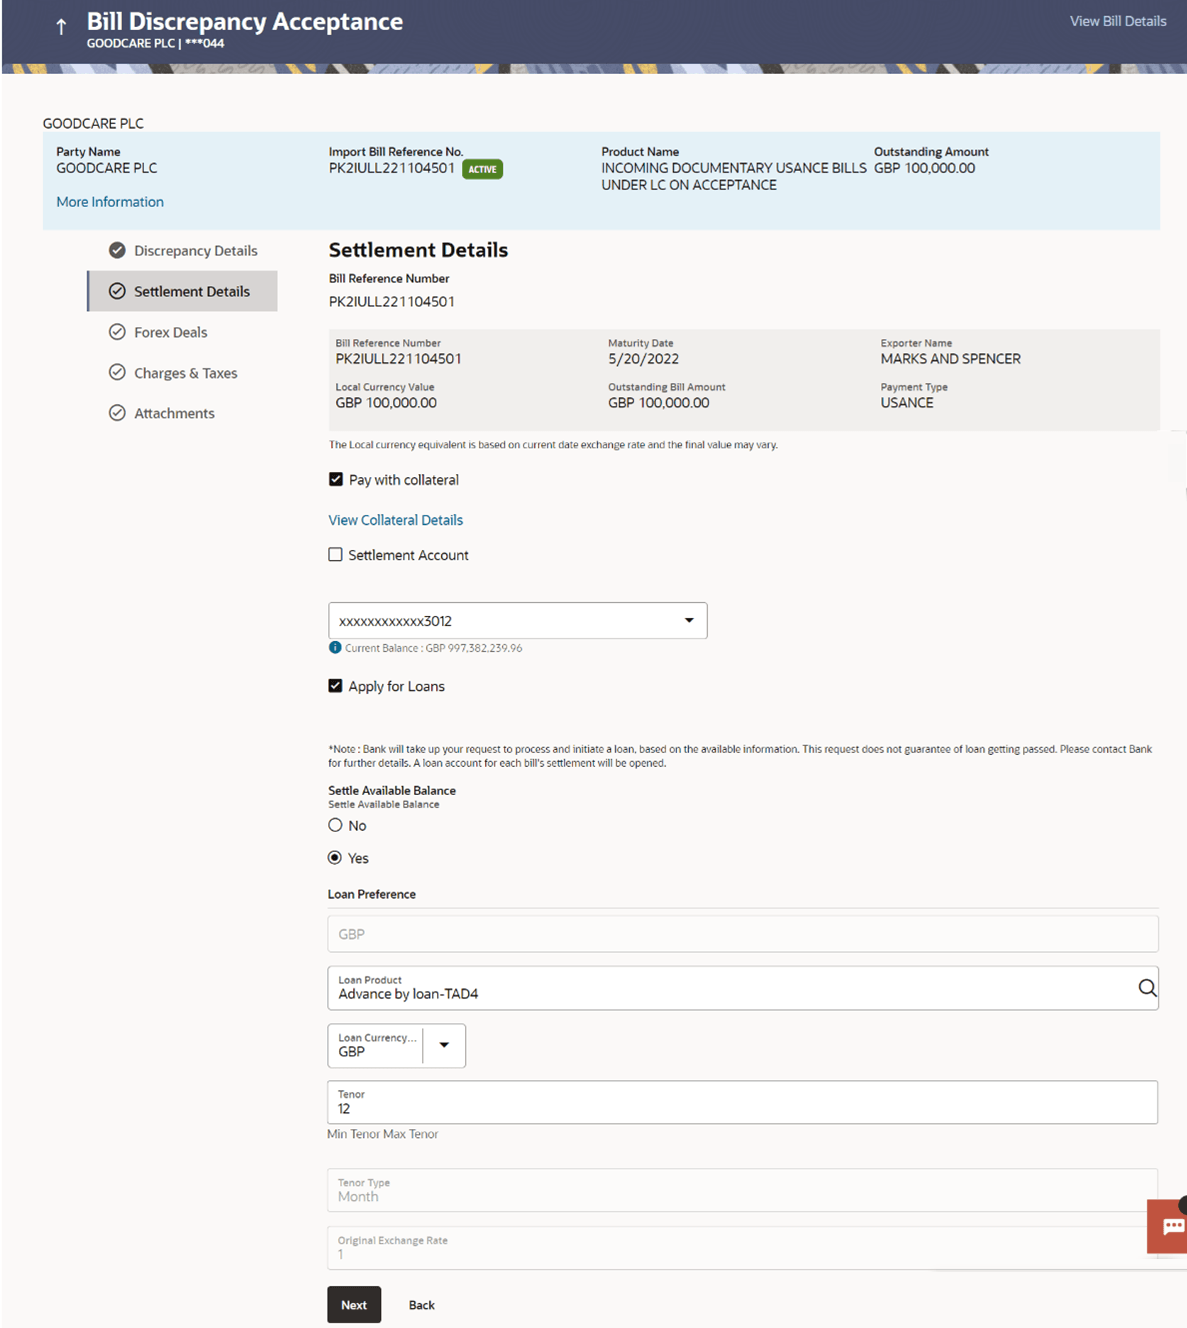
7.2 Bill Discrepancy Acceptance – Settlement Details
This topic provides the systematic instructions to view the settlement details in Import Bills in the application.
In this section user can view and enrich the settlement details.
To view the settlement details:
- Navigate to Settlement Details tab of Bill
Discrepancy Acceptance screen.
Figure 7-3 Bill Discrepancy Acceptance – Settlement Details
For more information refer to the field description table below:
Table 7-3 Bill Discrepancy Acceptance - Settlement Details - Field Description
Field Name Description Party Name Displays the name of the applicant. Import Bill Reference No. Displays the import bill reference number. Product Name Displays the import bill product name under which the LC is created. Outstanding Amount Displays the outstanding amount of the import bill. Maturity Date Displays the maturity date of the import Bill. This field appears if the user click on More Information link.
Linked to LC Displays the reference number of the LC. This field appears if the user click on More Information link.
Settlement Details This section displays the Settlement Details. Bill Reference Number Displays the Import Bill reference number. Bill Reference Number Displays the Import Bill reference number. Maturity Date Displays the maturity date of the import Bill. Exporter Name Displays the name of the Exporter of the Import Bill. Local Currency Value Displays the Bill value in local currency. Outstanding Bill Amount Displays the outstanding amount for the settlement of Bill Payment Type Displays the type of payment associated with the Bill. The options are:
- Sight
- Usance
Pay with Collateral Displays the remarks if any. Settlement Account Displays the account number from the available settlement account and user can change it to any other settlement account linked to the customer. Apply for Loans The option to select whether loans are to be used for bill settlement. Below section will be enabled when the user has selected the Apply for Loan option.
Settle Available Balance Option to select whether the user wishes to settle all funds available in the settlement account. The options are:
- Yes
- No
This field appears if Immediate Liquidation is applicable and will be populated with the Outstanding Bill Amount in read only mode.
The field is applicable only when the existing “Import Sight Bill” under the Immediate Liquidation product is marked as discrepant and the Operation is “Pay” in Bills Product Parameters.Loan Preference This section displays the Loan Preference details. Loan Product Displays the Loan Product defaulted from back-office. The user can change the value Loan Currency Displays either the Contract Currency or a Branch Local currency. The default should be Contract currency. Tenor The system fetches the default Loan Tenor from the back-office system. The user can change the value. Tenor Type Displays the tenor type fetches from the back-office system. Original Exchange Rate Displays the Original Exchange Rate fetches from the back-office system. - Select the Pay with Collateral option, if collaterals are to be used for bill settlement.
- Click the View Collateral Details link to view the collateral details.The Collateral Details overlay screen appears.
- Select the Settlement Account option, if settlement account are to be used for
bill settlement.
- From the Settlement Account list, select the appropriate option.
- Select the Apply for Loans option, if loans are to be used for bill
settlement.
- In the Settle Available Balance, select the appropriate option.
- From the Loan Product field, change the product if required.
- In the Tenor field, modify the value for tenor, if required.
- Perform any one of the following actions:
- Click View Bill Details link at top right corner of the screen to view the
bill
details.
The View Import Bill Under LC screen appears.
- Click Next to save the entered details and proceed to the next level.
- Click Back to navigate back to previous screen.
- Click View Bill Details link at top right corner of the screen to view the
bill
details.
Parent topic: Bill Discrepancy Acceptance
