12.3 Initiate Bill - Bill Details
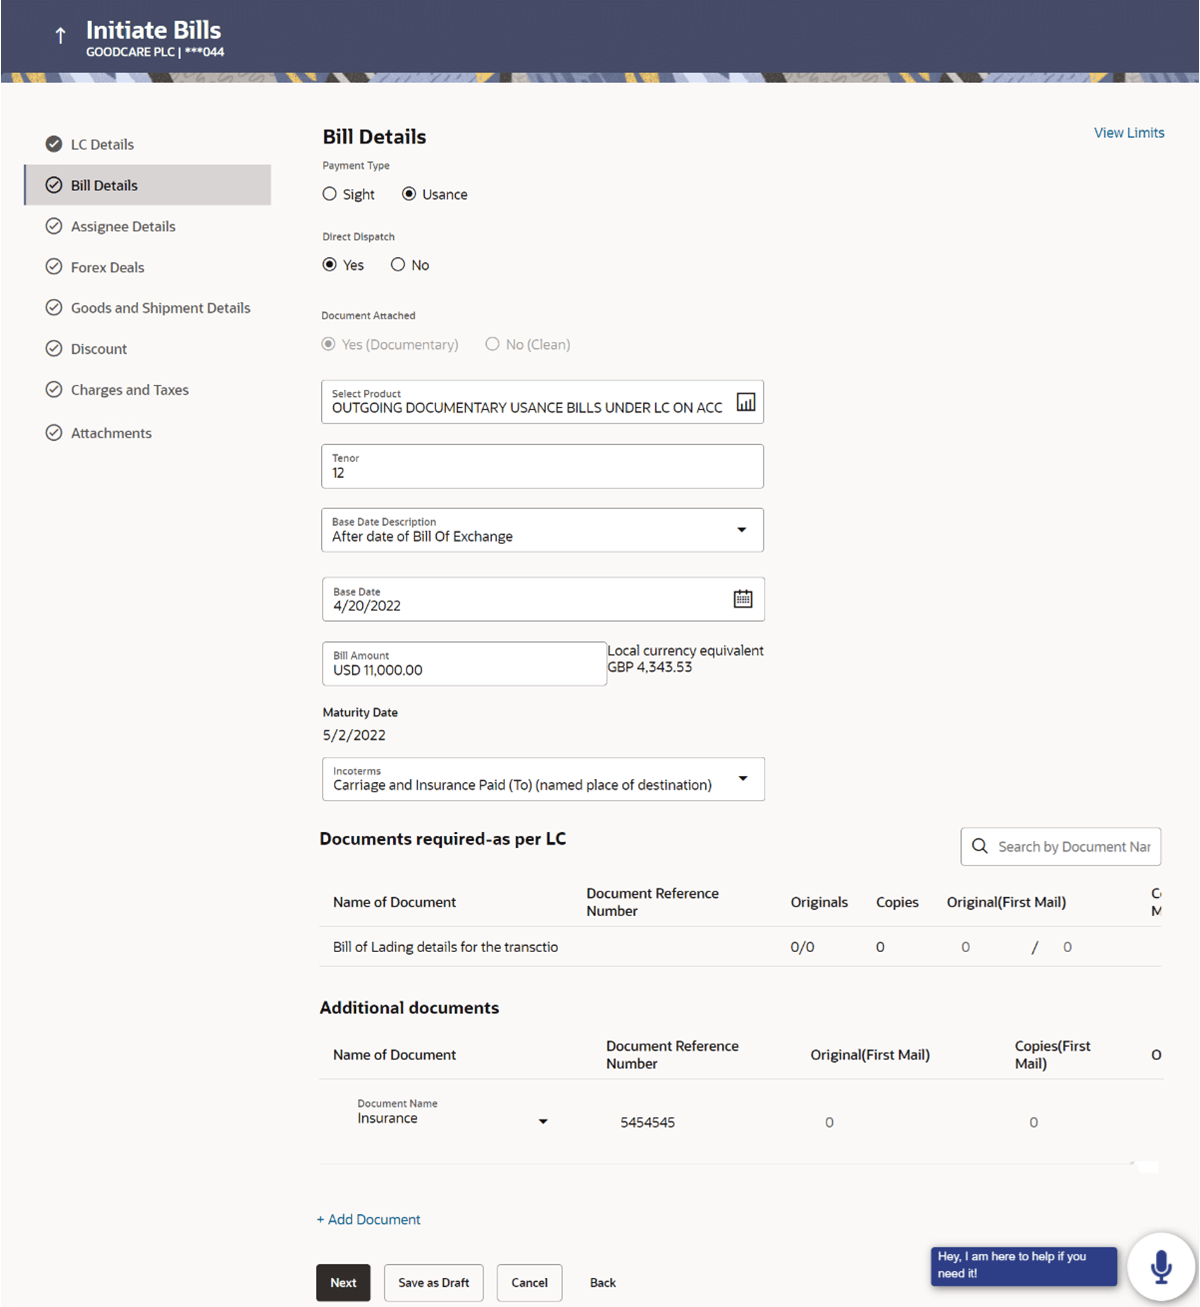
This topic provides the systematic instructions to initiate the Export Bill - Bill Details in the application.
The Initiate Bill - Bill Details captures the bill details of the initiate Bills in the application.
To view an Export Bills:
- Navigate to Bill Details tab of Initiate Bill - Bill
Details screen.
For more information refer to the field description table below:
Table 12-5 Initiate Bills - Islamic - Bill Details - Field Description
Field Name Description Bill Number Displays the bill number of the LC. Payment Type Select the type of payment associated with the Bill. The options are:
- Sight
- Usance
Direct Dispatch Select whether the bills to be dispatched directly or not. The options are:
- Yes
- No
Document Attached Select the value, if any documents a part of Bill. The value can be:
- Yes (Documentary)
- No (Clean)
This field is enabled if No option is selected in Direct Dispatch field.
Select Product Select the product type as coming from Host based on the input parameters (Payment/ LC linkage /Customer ID). Tenor Specify the tenor of the Bill. This field is enabled if Payment Type is Usance.
Base Date Description Select the base code and its description. It describes what the chosen base date for application is. Base Date Select the date to be considered as base date for Bill application. Bill Amount Specify the bill amount. Maturity Date Displays the tenor added to the base date, when the Bill ceases to exist. Incoterms Select the INCO terms for the LC application. Linked to LC Displays the reference number of the LC. Outstanding Amount Displays the amount availed against the LC. Local Currency Equivalent Displays the Bill amount in local currency. Maturity Date Displays the maturity date of the Export Bill. It is the tenor added to the base date, when the Bill ceases to exist.
Documents required – as per LC This section displays the document related fields if the user selects Yes (Documentary) option in Document Attached field. Document Description Displays the name of the document to be sent along with the LC. Document Reference Number Displays the reference number of the document. Original The required number of original documents required for the selected document from mail. It is provided as m/n, where m out of n available documents would be submitted to bank.
Copies Displays the required number of copies required for the selected document from mail. Original (First Mail) The required number of original documents required for the selected document from first mail. It is provided as m/n, where m out of n available documents would be submitted to bank.
Copies (First Mail) Displays the required number of copies required for the selected document from first mail. Original (Second Mail) The required number of original documents required for the selected document from second mail. It is provided as m/n, where m out of n available documents would be submitted to bank.
Copies (Second Mail) Displays the required number of copies required for the selected document from second mail. Clause Click the link to view the clause maintained in the bank application for each of the document. A document can have multiple clauses. The link to view the clause maintained in the bank application for each of the document or to modify as per needs.
View Clause This section appears if you select a document and click the View Clause link. In this section a user can view already maintained clause or can modify them as per his needs. User can select the pre-maintained clause using the identifiers under each clause. In a blank clause, corporate user can enter the details to have a clause customized to his/her requirement.
Clause Displays the name of the clause. Clause Description Displays the description and number of the selected clause. Additional Documents Click Add Document to add multiple additional documents. Document Description Displays the lists of all the documents required to be represented. Document Reference Number Displays the reference number of the document. Original (First Mail) Displays the number “n” out of “m” original documents of the first mail will be provided to bank. Copies (First Mail) Displays the number of copies of the first mail that will be submitted as a set of documents for Bill. Original (Second Mail) Displays the number “n” out of “m” original documents of the second mail will be provided to bank. Copies (First Mail) Displays the number of copies of the second mail that will be submitted as a set of documents for Bill. Clause Displays the default description of clauses, however user can modify the same. View Limit Click the link to open the Facility Summary screen. - Select the appropriate option from Payment Type field.
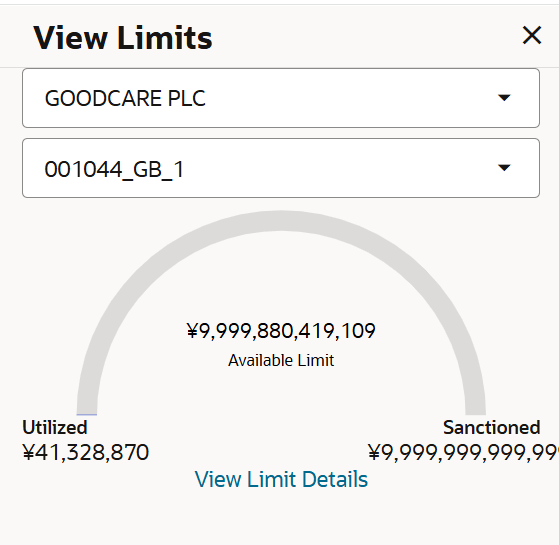
- Click the View Limit Details link. The View Limits overlay screen appears.
- On the View Limits screen, perform the following actions:
For more information on fields, refer to the field description table.
Table 12-6 View Limits
Field Name Description Party ID Select the The party Id of the LC product. Limit Select the limit. Line Limit Display the available limits, utilized and sanctioned limits for Accountee under the selected Line in a graphical format. - From the Party ID list, select the appropriate party Id.
- From the Limits list, select the appropriate limit.
- Click View Limit Details link to open the Facility Summary screen. The bottom graph appears.
- Click Reset to reset the limit details. The Reset popup appears.
- In the LC Type field, select the appropriate option.
- Select the appropriate option from Direct Dispatch field.
- Select the appropriate option from Document Attached field to confirm any documents a part of a Bill.
- From the Select Product list, select the appropriate option.
- From the Base Date Description list, select the appropriate option.
- From the Base Date field, select the appropriate date.
- In the Bill Amount field, enter the bill amount.
- From the Incoterm list, select the appropriate option.
- Click the Add Document link, to add the required document to be a part of the Initiated Bill.
- In the Document Reference Number field, specify the reference number of the document.
- Specify the number of originals required for the selected document in the Original (First Mail)/ (Second Mail) fields.
- Specify the umber of copies required for the selected document in the Copies (First Mail)/ (Second Mail) fields.
- In the Clauses section, list of clauses for each document will be listed and a check box is available against various clauses, user can choose amongst various clauses. Select the required clauses for each selected document. In the Clause Description field, enter/ modify the description of the clause, if required.
- Perform any one of the following actions:
- Click Next to proceed to the next
tab.
The Assignee Details tab appears in the sInitiate Bill screen.
- Click Save As Draft, system allows transaction details to be saved as a template or draft. (For more details, refer Save As Template or Save As Draft sections.)
- Click Cancel to cancel the
transaction.
The Dashboard appears.
- Click Next to proceed to the next
tab.
Parent topic: Initiate Bills

