5.2.1 Create Cheque Deposit
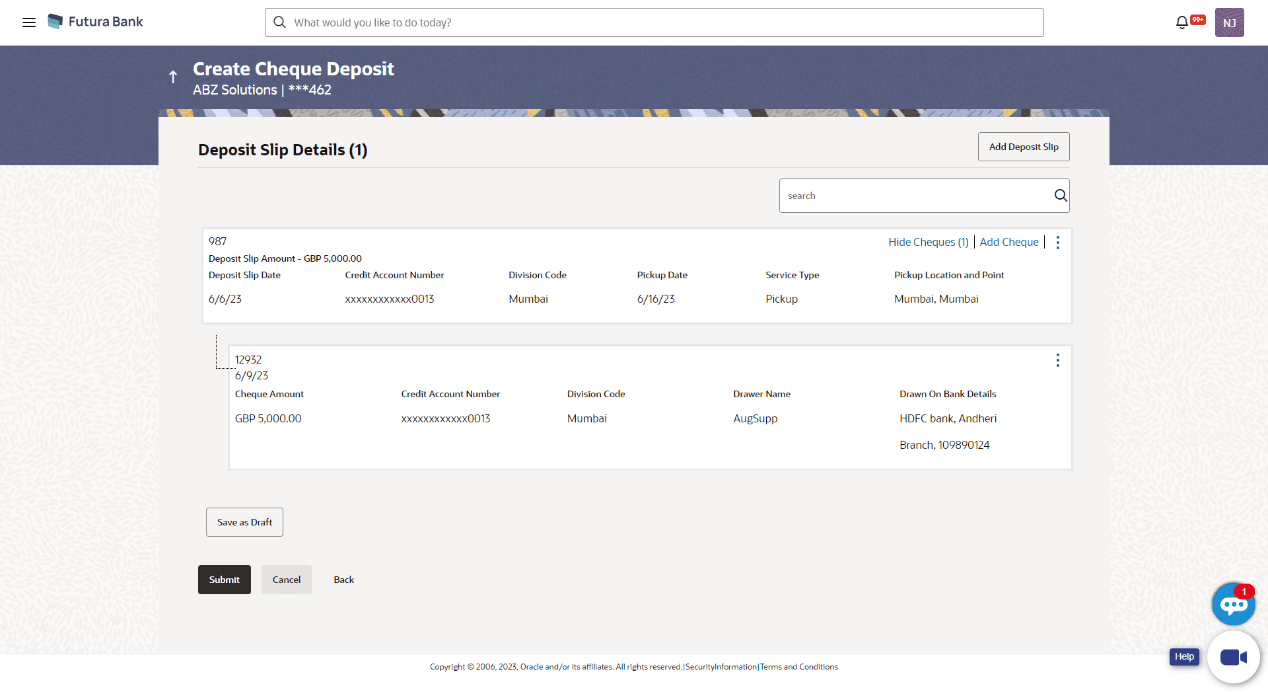
Using this screen, you can enter the details of the cheques being deposited into the corporate’s account. Once you enter the cheque details, you can also save the entry as a draft, to resume later.
For creating a cheque deposit slip, there are two separate entries to be made:
- Add Deposit Slip Details – It is mandatory to create a deposit slip for every deposit being made.
- Add Cheque Details – You can link one or more cheques to a single deposit slip.
To create a deposit slip and add cheques to it:
- Perform the following navigation to access the Corporate Loans Schedule Inquiry
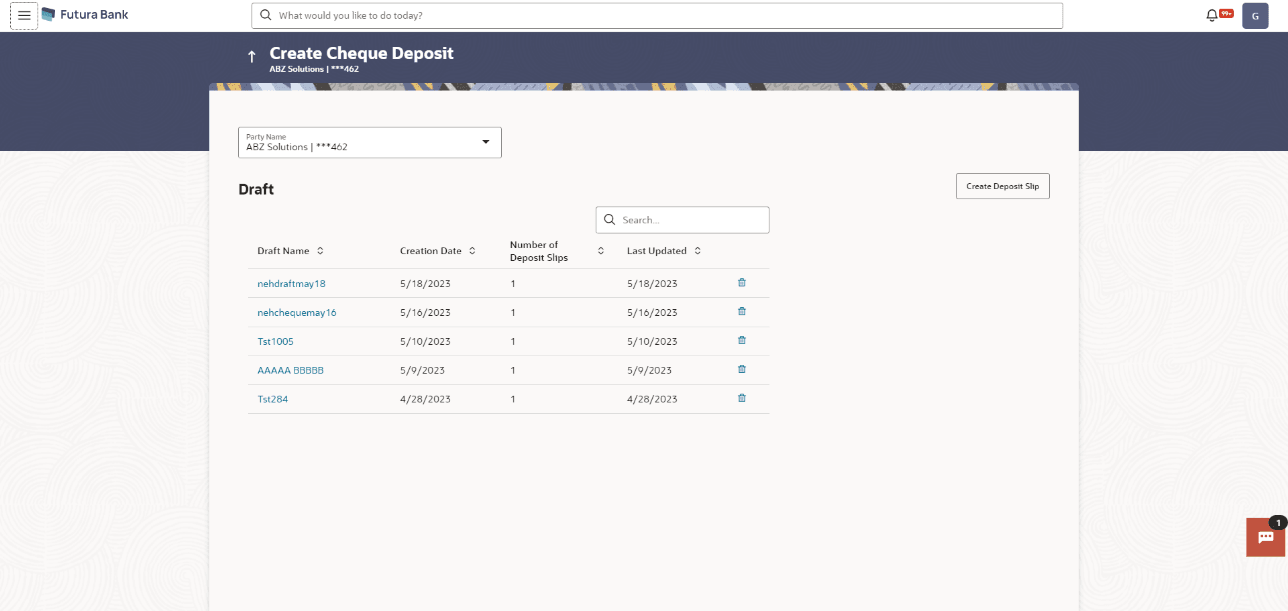
screen:From the Dashboard, click the Toggle Menu, then click Cash Management, Collections, and Cheque Deposit.The Create Cheque Deposit screen displays.
For more information on fields, refer to the field description table.
Table 5-5 Create Cheque Deposit - Field and Description
Field Description Party Name Select the party name from the dropdown list in which the Cheque Deposit must be created. By default, the primary party/gcif of the logged-in user is selected. Note:
Only accessible parties are displayed to the user.
Search Indicates an option to search for specific cheque deposit drafts. Enter the partial or complete draft name, or reference number, or creation date, or last updated date, to view matching records.
The search results appear as you type the search string.
Draft Name Displays the name that has been used to save the cheque deposit draft. This is a hyperlink which when clicked enables you to edit the draft. Creation Date Displays the date of creation of the cheque deposit draft record. Number of Deposit Slips Displays the number of deposit slips present in the cheque deposit draft record. Last Updated Displays the date when the cheque deposit draft record was last updated. 
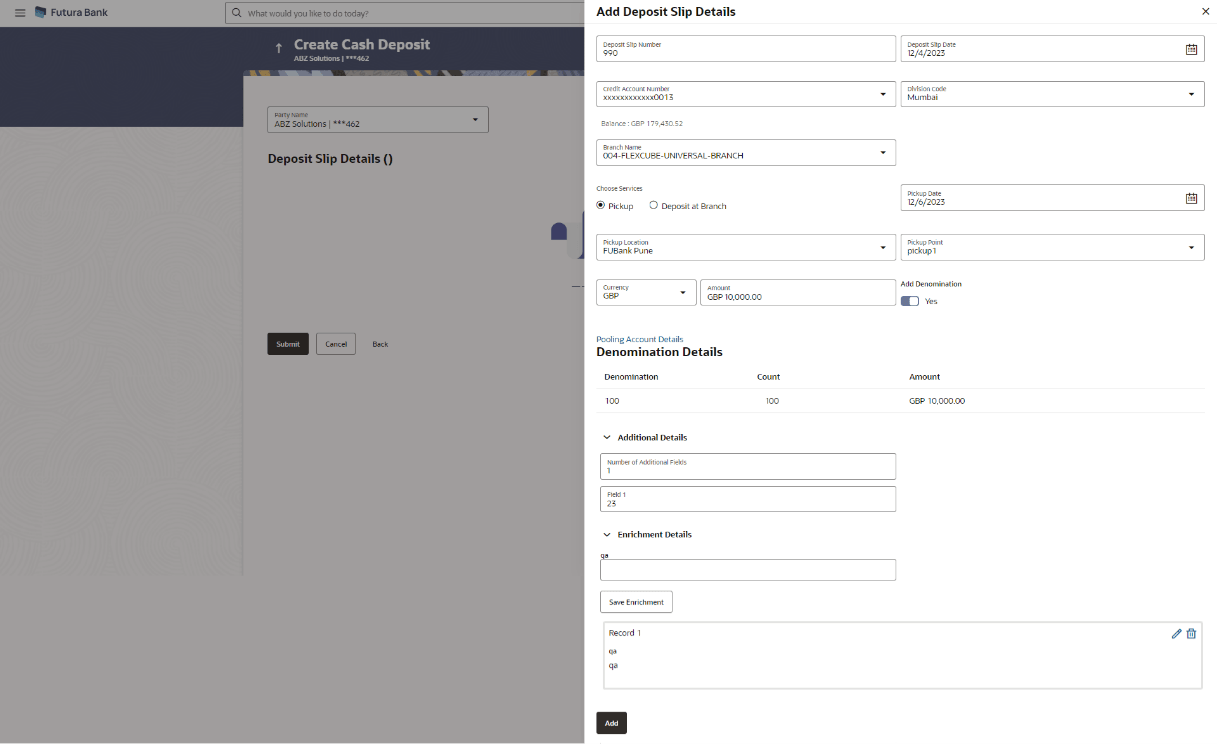
Indicates an option to delete the cheque deposit draft record. On clicking this icon, a pop-up window appears requiring you to confirm the deletion. - In the Create Cheque Deposit screen, click Create Deposit Slip to create a new deposit slip. The Add Deposit Slip Details overlay window appears.
Note:
If you have previously saved the deposit slip as a draft, then click the required link under Draft Name, to continue the creation process.For more information on fields, refer to the field description table.
Table 5-6 Add Deposit Slip Details - Field and Description
Field Description Deposit Slip Number Enter a unique number for the cheque deposit slip. Deposit Slip Date Select the date of creation of the cheque deposit slip. This date must be greater than or equal to the current date. Credit Account Number Select the account number for crediting the cheque amount. The dropdown list either displays the real account numbers or the International Bank Account Number (IBAN), based on the configuration set by the bank. Once you select an account number, the currency and balance of that specific account automatically appear below the account number.
If an account number is not provided in this field, then the same is picked up from the pooling details maintained. Click the Pooling Account Details link in the overlay window, to view these. However, if pooling details are not maintained, then it is mandatory to provide an account number here.
Division Code Select the relevant division code. You must select a value in this field, if division code is mandatorily required as per enrichment set up for the corporate party. Service Type Select the service to be used for depositing the cheque.
The options are:
- Pickup – This option is available for selection only if the corporate is registered for the pick-up service.
- Deposit at Branch – The corporate must make their own arrangements to deliver the cheque at the branch for depositing.
Pickup Date Select a date for the bank to pick up the cheque. This field appears when you select the Pickup option in the Service Type field. Pickup Location Select the location from where the bank must pick-up the cheque. This field appears when you select the Pickup option in the Service Type field. Pickup Point Select the required pick-up point. This field appears when you select the Pickup option in the Service Type field. Pooling Account Details This is a hyperlink which when clicked displays a pop-up window with the pooling level details fetched from the host. Pooling Level Displays the pooling level set at the host. Basis of Amount Credit Displays the level at which pooling will be applied to the cheque amount. Percentage Pooling Displays whether or not percentage pooling is applicable. Pooling Account Number Displays the account numbers that the cheque amount must be credited to. The list either displays the real account numbers or the International Bank Account Number (IBAN), based on the configuration set by the bank. Percentage Displays the percentage of cash being deposited in each account. Number of Additional Fields Enter the number of fields required for adding details. Once you add a number, those many data entry fields appear. The maximum value that is allowed in this field is 10. Field 1 – Field 10 Enter the additional details in the data entry fields. A maximum of 10 fields can be present. Enrichment Details
You can use this section to add enrichment information that must be associated with the cheque being deposited. The number and types of fields available in this section depend on what has been set up for the corporate, by the bank.
- Once you enter the required details, click Save Enrichment. A record entry with the enrichment details appears, with options to edit or delete it.
- To edit the enrichment details, click
 .
.
- To delete the enrichment details, click
 .
.
- To edit the enrichment details, click
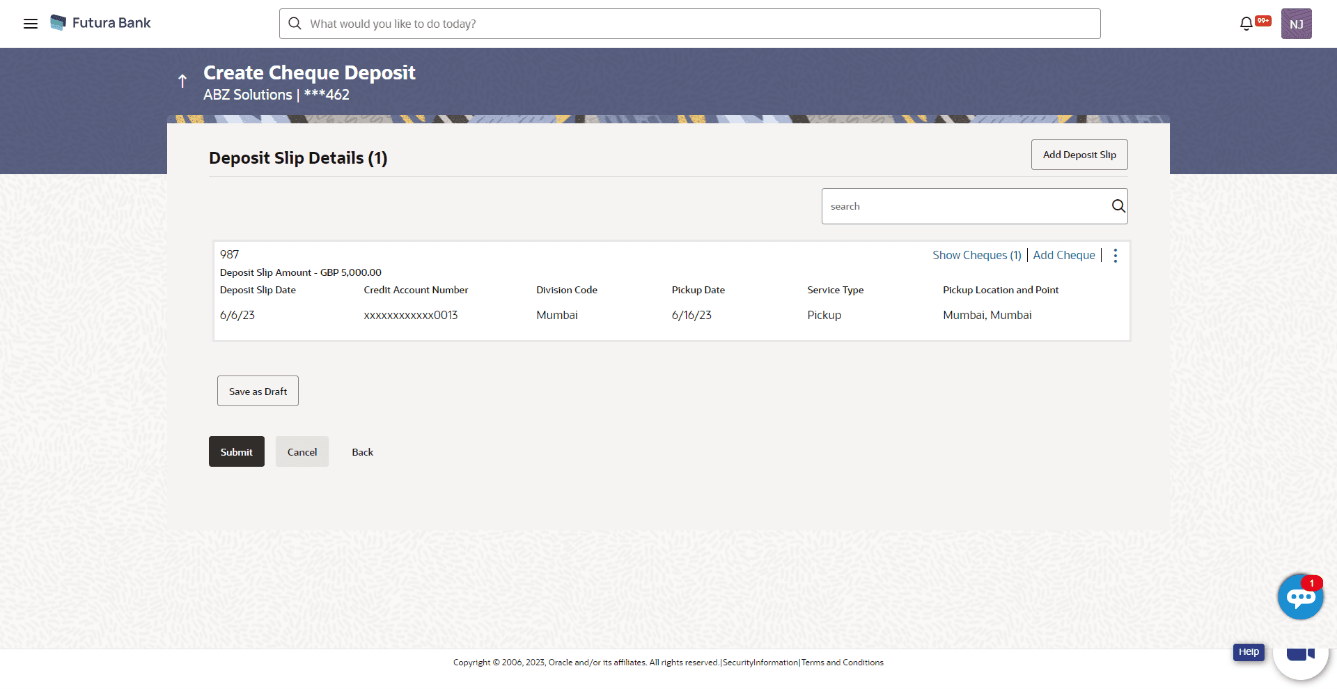
- Click Add. The record appears in the Deposit Slip Details list in the Create Cheque Deposit screen.
- To edit or delete the deposit slip record, you can click
 and select the relevant option.
- Click Save as Draft to save the entered values and resume at a later point in time.
- To edit or delete the deposit slip record, you can click
- Click the Add Cheque link in the deposit slip record, to add cheques
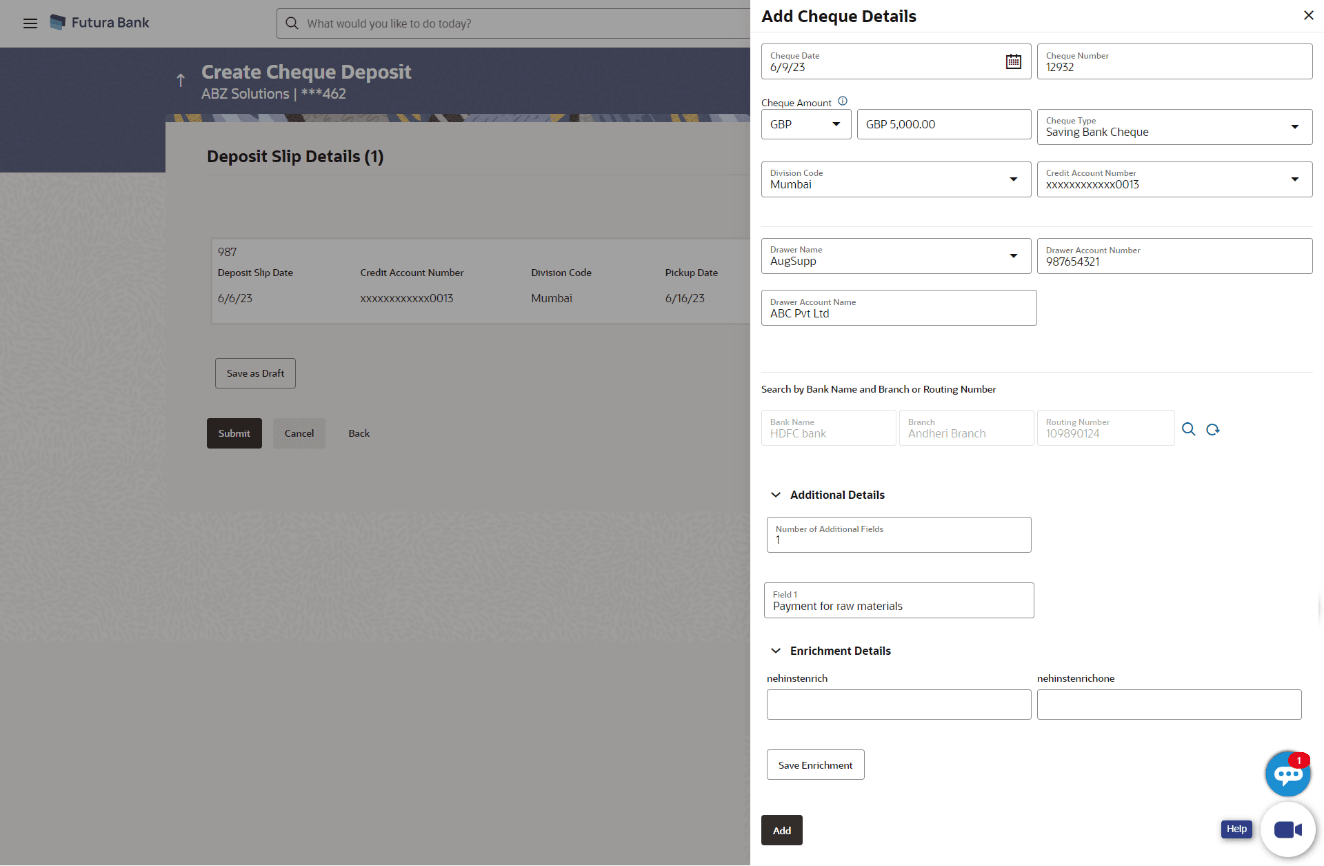
details to it. The Add Cheque Details overlay window appears.
For more information on fields, refer to the field description table.
Table 5-7 Add Cheque Details - Field and Description
Field Description Cheque Date Enter the date of the cheque. Cheque Number Enter the unique number of the cheque. Cheque Amount Select the cheque currency and enter the amount. Cheque Type Select the type of cheque being deposited. Division Code Select the relevant division code. You must select a value in this field, if division code is mandatorily required as per enrichment set up for the corporate party. Credit Account Number Select the account where the cheque needs to be deposited. The dropdown list either displays the real account numbers or the International Bank Account Number (IBAN), based on the configuration set by the bank. Drawer Name Select the name of the drawer of the cheque. Drawer Account Number Enter the account number of the drawer of the cheque. You can either enter the real account number or the International Bank Account Number (IBAN), based on the configuration set by the bank. Drawer Account Name Enter the name on the account of the drawer of the cheque. Bank Name Enter the partial or full bank name, on which the cheque has been drawn. This field should be used in conjunction with the branch field for the search.
The search results appear as you type the search string.
Branch Enter the partial or full branch name, on which the cheque has been drawn. This field should be used in conjunction with the bank field for the search.
The search results appear as you type the search string.
Routing Number Enter the partial or full routing number to search for the bank on which the cheque has been drawn.
The search results appear as you type the search string.

Click this icon to search for the bank on which the cheque has been drawn, after entering the search string(s). A list of matching bank names with their details appears. Click the Select link beside the required bank record. The selected bank record appears in the Drawn on Bank Details section. 
Click this icon to reset the search string(s) entered. Number of Additional Fields Enter the number of fields required for adding details. Once you add a number, those many data entry fields appear. The maximum value that is allowed in this field is 10. Field 1 – Field 10 Enter the additional details in the data entry fields. A maximum of 10 fields can be present. Enrichment Details
You can use this section to add enrichment information that must be associated with the cheque deposit record, for easy identification in future. The number of fields, their types, and whether they should be mandatory or optional during entry, are configured in the enrichment set up by the bank.
- Once you enter the required details, click Save Enrichment.
- Click Add. The cheque details are added to the deposit slip.
- To add another cheque record, click the Add Cheque link.
- To view the details of the cheques added, click the Show Cheques link. The number beside the link denotes the number of cheques added to the deposit slip.
- To edit or delete the deposit slip, click
 .
.
- To add another deposit slip to the transaction, click Add Deposit Slip.
- Click Save as Draft to save the entered details and resume at a later point in time.
- Perform the one of the following actions:
- Click Submit to submit the record.
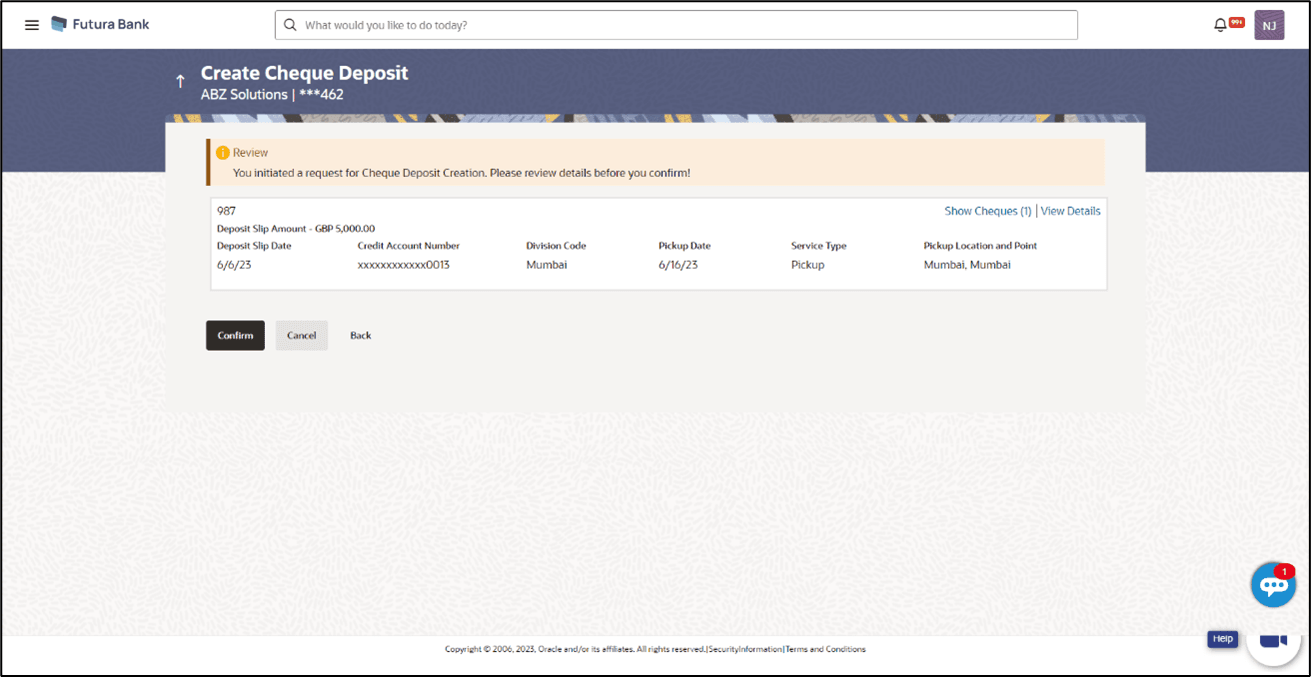
The Review screen appears.
- Click Cancel to cancel the transaction.
- Click Back to go to the previous screen.
Figure 5-17 Create Cheque Deposit - Review
- Click Submit to submit the record.
- In the Review screen, click the View Details link beside each record,
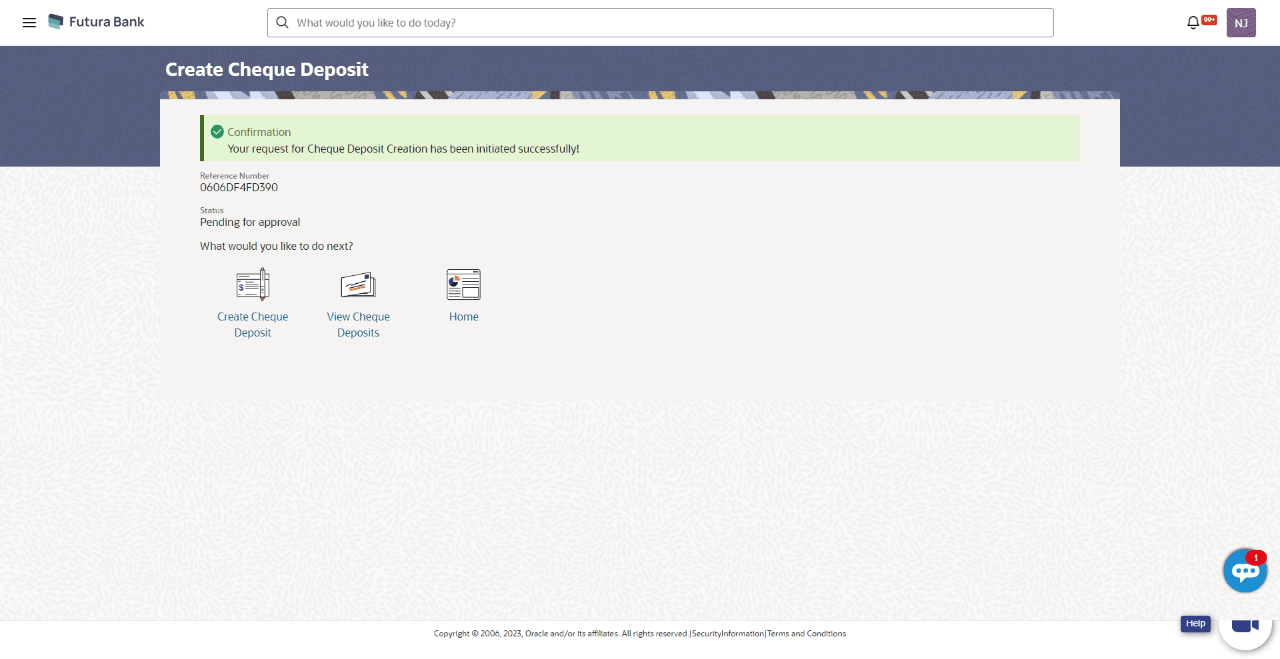
verify the details, and click Confirm. A confirmation
screen appears with the reference ID and status of the transaction.Perform the one of the following actions:
- Click Cancel to cancel the transaction.
- Click Back to go to the previous screen.
Figure 5-18 Create Cheque Deposit - Confirmation
- Perform the one of the following actions:
- Click the Click here to view Cheque deposit receipt link to view the receipt of the cheque deposit.
- Click the Create Cheque Deposit link to create further cheque deposit records.
- Click the View Cheque Deposits link to view the existing cheque deposit records.
- Click the Home link to go to the dashboard.
Parent topic: Cheques
