3.5.1 Create Hybrid Drain Pool

This topic describes the systematic instruction to Create Hybrid Drain Pool screen, that enables the user to build the hybrid structure with a pool on the top or it can be a sweep.

  1. On the Liquidity Management Structure Creation screen, click Get Started, under the Hybrid Structure section.
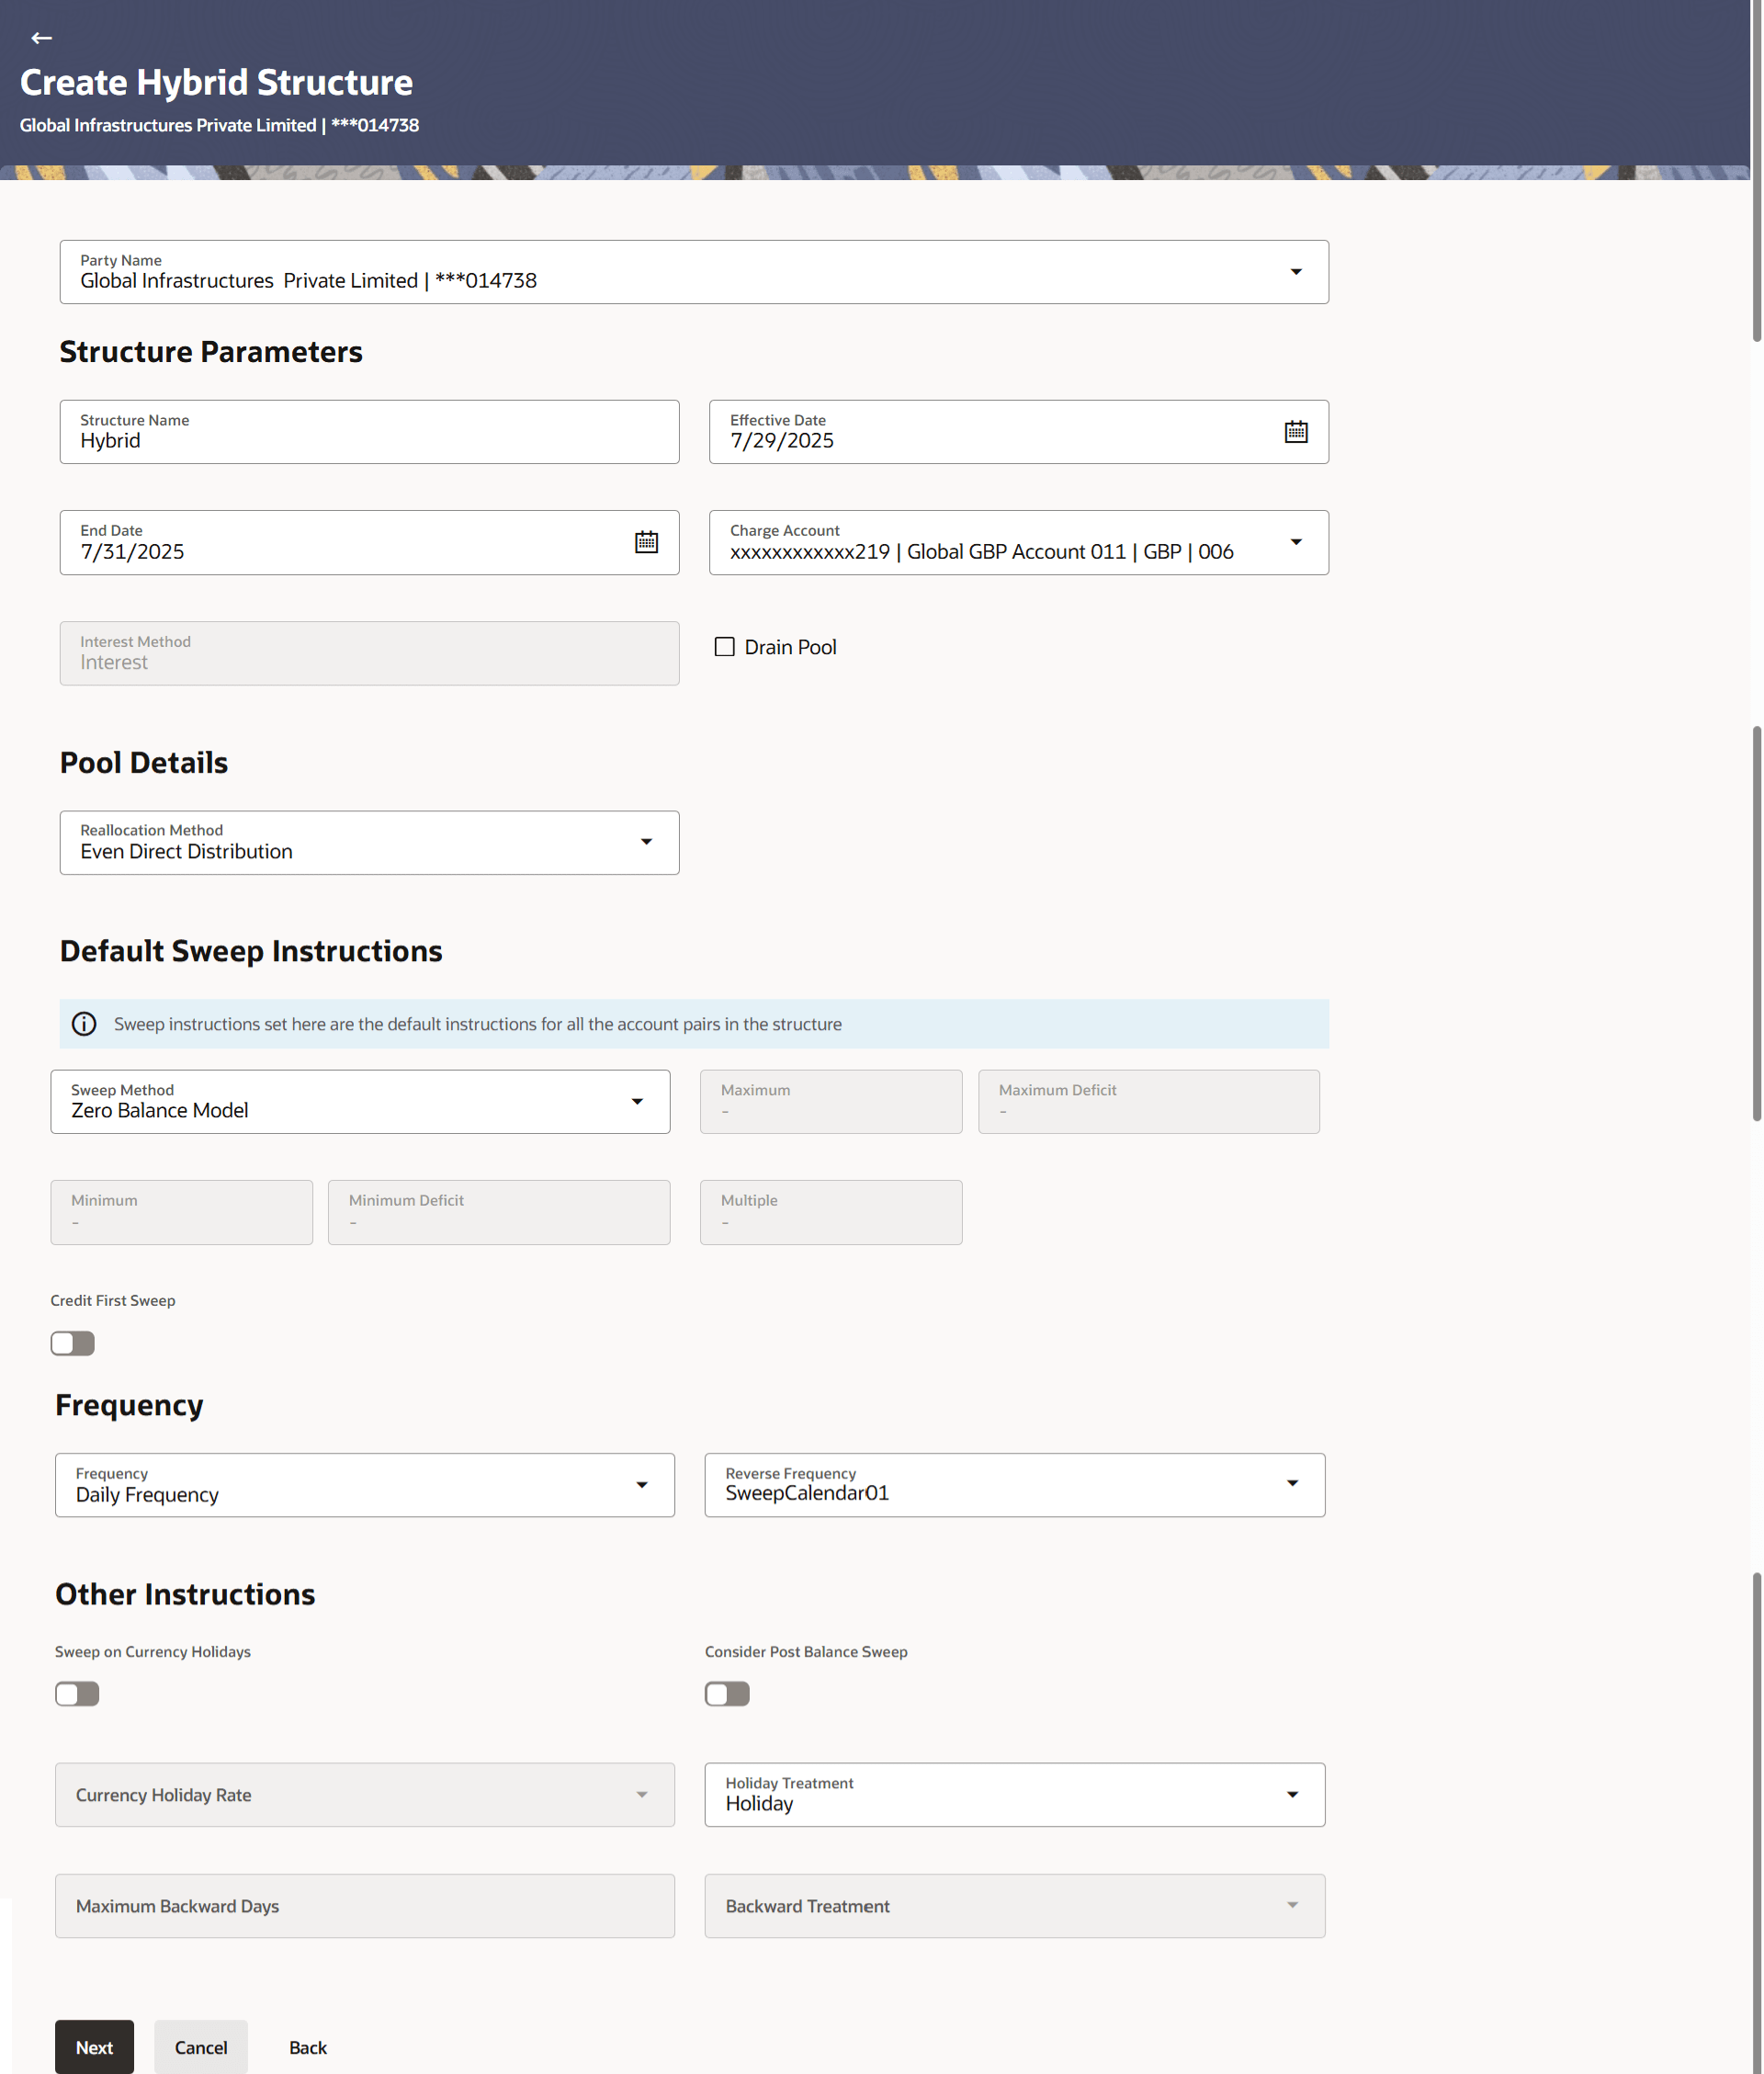
    The Create Hybrid Structure - Structure Parameters screen displays.

    Figure 3-142 Create Hybrid Structure - Structure Parameters


    For more information on fields, refer to the field description table.

    Table 3-98 Create Hybrid Structure - Structure Parameters - Field Description

    Field Description
    Party Name Select the party name and ID from the drop-down list in which the account structure must be created.

    By default, the primary party of the logged-in user is selected.

    Note: Only accessible parties are displayed to the user.

    Structure Parameters Information specified in below fields are related to structure parameters.
    Structure Name Specify the name of the hybrid structure that is to be created.
    Effective Date Select the date from which the hybrid structure execution should take place.
    End Date Select the date till which the hybrid structure execution should take place.
    Charge Account Select the charge account from the drop-down list for which the charges can be collected.
    Note:
    • Only accessible internal accounts of the primary party and the linked parties as part of GCIF will be displayed. This field is non-mandatory.
    • User can search the Charge Account by Account Name, Account Number, Branch or Currency based on the parameters set in the system configuration and also displays these details in the search results and the respective fields once the required account is selected.
    Interest Method Displays the method by which the interest is calculated.

    By default, this field will appear as Interest. This field is non-editable.

    Drain Pool Select the check box of the drain pool.

    With the drain pool structure creation, the user can have option to start the structure either with a pool or sweep structure.

    Pool Details Information specified in below fields are related to pool details.
    Reallocation Method Select the method in which the interest is shared with the participating accounts within the account structure.
    The available options are:
    • Absolute Pro-Data Distribution
    • Central Distribution
    • Even Direct Distribution
    • Even Distribution
    • Fair Share Distribution
    • No Reallocation
    • Reverse Fair Share Distribution

    Note: The Percentage Reallocation method is also available, but it can be defined only at the pair parent level in Select Reallocation Method & Link Accounts.

    Central Account Number Specify the account in which the interest arrived is credited to one central account, which can be any one of the participating accounts or a separate account.

    This field displays if the user selects Central Distribution from the Reallocation Method list.

    Note: User can search the central account number by account name, account number, branch or currency based on the parameters set in the system configuration and displays these details in the search results and the respective fields once the required account is selected.

    Central Account Currency & Branch Displays the currency and branch of the central account.

    This field appears if the user selects Central Distribution from the Reallocation Method list and select central account number from drop-down.

    Default Sweep Instructions Information specified in below fields is defaulted at each parent-child account pair whereas user can override and define a specific frequency for a specific pair of account as a part for instruction set up.
    Sweep Method Select the sweep method that is to be applied to the structure.
    The available options are:
    • Zero Balance Model
    • Fixed Amount Model
    • Collar Model
    • Target Model - Constant
    • Target Model - Fixed
    • Threshold Model
    • Range Based Model
    • Cover Overdraft Model
    • Percentage Model
    Credit First Sweep Move the slider to enable the credit first sweep.
    With credit first sweep functionality, the sweeps happen based on sweep priority when the parent account has multiple children.
    • System will first perform the upward/one-way sweeps before performing the downward/two-way sweeps at each parent level.
    • The priority maintained for sweeps will only be considered during the downward/ two-way sweeps- when child account is being funded.
    • The priority ignored during the upward/one-way sweeps being performed from child to parent.
    Frequency Information specified in below fields are related to frequency.
    Frequency Select the frequency at which the account structure should be executed.

    The list displays all the frequencies maintained in the product processor.

    Reverse Frequency Select the reverse frequency at which the reverse sweep for account structure should be executed.

    The list displays the frequencies for which the BOD is enabled.

    Other Instructions Information specified in below fields are related to other instructions.
    Sweep on Currency Holiday Move the slider to enable the sweep on currency holiday.
    Consider Post Sweep Balance Move the slider to consider the post sweep balance.
    Currency Holiday Rate Displays the default option as Previous Day Rate.

    Note: This field is enabled only if the user toggle on the Sweep on Currency Holidays.

    Holiday Treatment Select the holiday treatment.
    The available options are:
    • Holiday
    • Next Working Date
    • Previous Working Date
    Maximum Backward days Specify the maximum backward days.

    Note: This field is enabled only if the user select Previous Working Date from the holiday treatment.

    Backward Treatment Select the backward treatment.
    The available options are:
    • Move forward
    • Holiday

    Note: This field is enabled only if the user select Previous Working Date from the holiday treatment.

The first step of hybrid structure creation involves defining the basic details of the hybrid structure like structure name, effective date, end date, etc.

  1. In the Party Name field, select the party name and ID from the drop-down list.
  2. In the Structure Name field, enter the name of the account structure.
  3. From the Effective Date and End Date list, select the appropriate date to set up the instruction.
  4. From the Charge Account list, select the charge account.
  5. From the Interest Method list, select the appropriate method for interest calculation.
  6. Click the check box to select the Drain Pool flag for the structure.
  7. From the Reallocation Method list, select the appropriate reallocation method.
    • If the user has selected central distribution option:

      From the Central Account Number list, select the appropriate account.

  8. In the Default Sweep Instructions section, select the sweep method for the structure.
  9. Select the toggle to enable the Credit First Sweep flag for the structure.
  10. In the Frequency section, select the frequency and reverse frequency for the structure.
  11. In the Other Instructions section, select the appropriate instructions for hybrid structure.
  12. Perform any one of the following actions:
    • Click Next. The Start with Pool Or Sweep pop up screen displays.
    • Click Cancel to cancel the operation and navigate back to Dashboard.
    • Click Back to discard the entered data and navigate back to the previous screen.
  13. Select either Pool or Sweep radio button.
    • Click OK to start building the hybrid structure with a drain pool.
    • Click Cancel, to cancel and navigate back to previous screen.
    1. If the user choose the pool option: The user will create a pool structure at the top, which is the main notional header. Below this, only pool accounts can be added. From the third layer onward, the user is allowed to add either sweep accounts or another pool structure for the Drain pool.
    2. If the user chooses the sweep option: A normal sweep structure like flow will follow. First the user has to choose a header account and then other sweep accounts or a pool structure (which will be a Drain pool) can be added below the header.

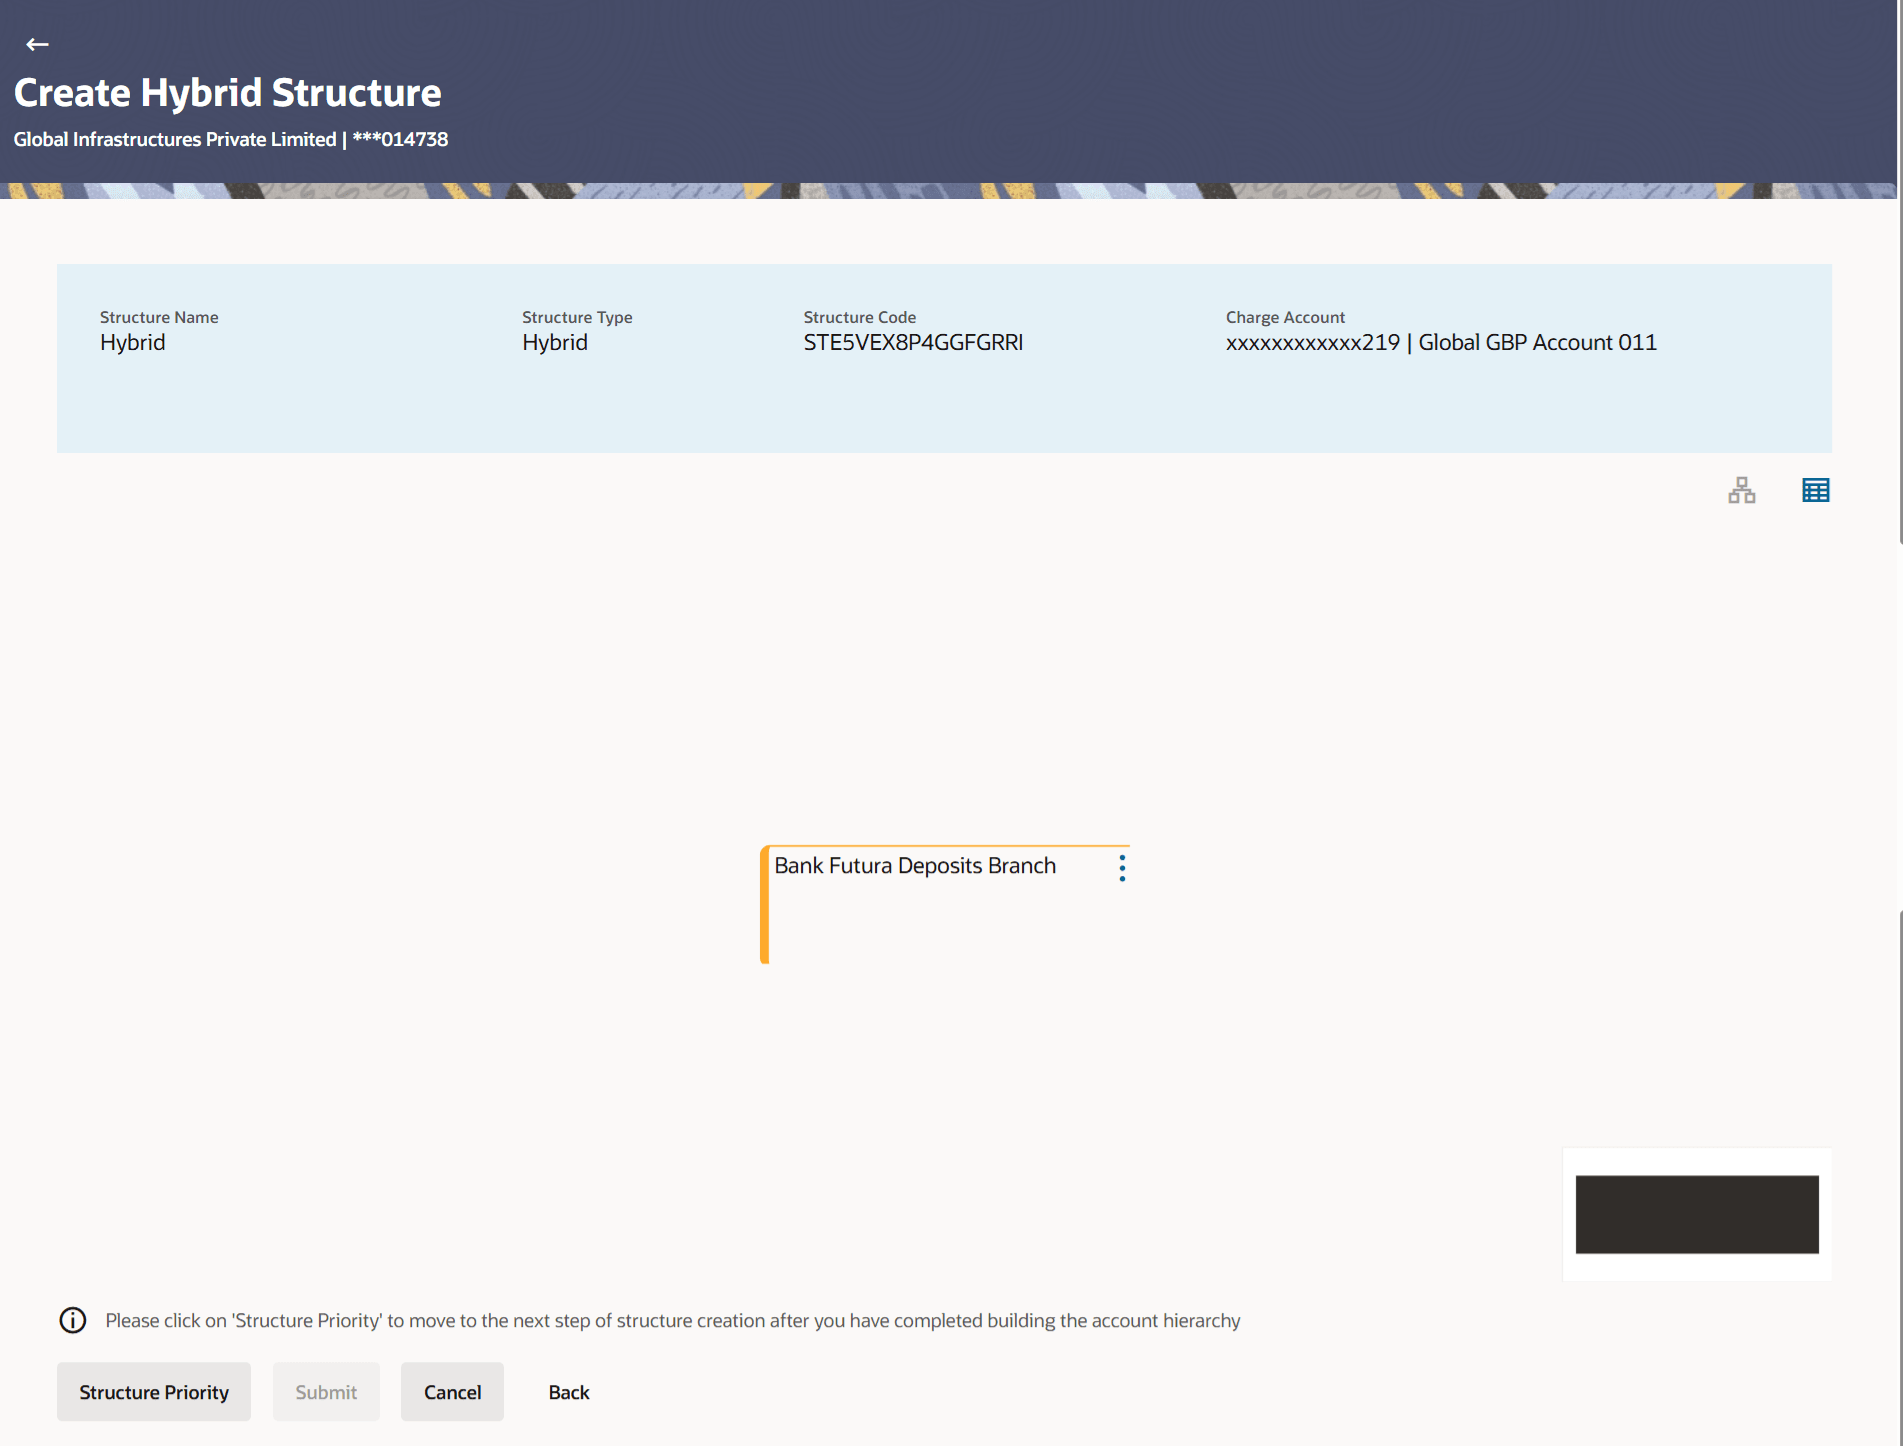
As a part of following step, the user can build the structure by adding the header and child accounts.

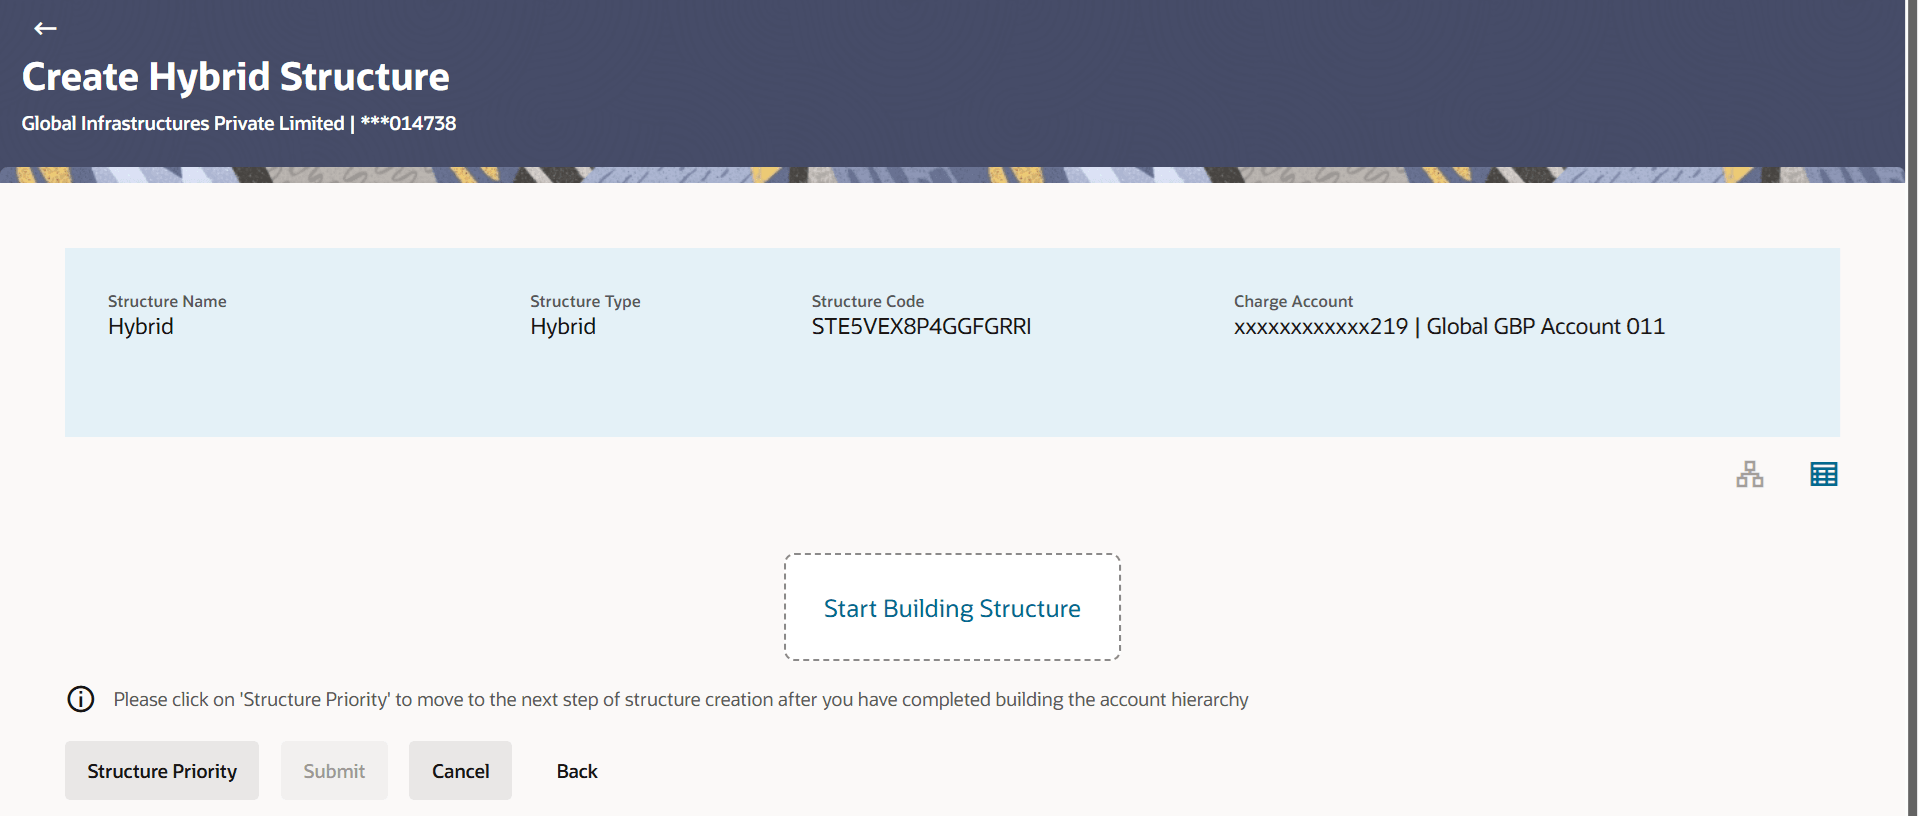
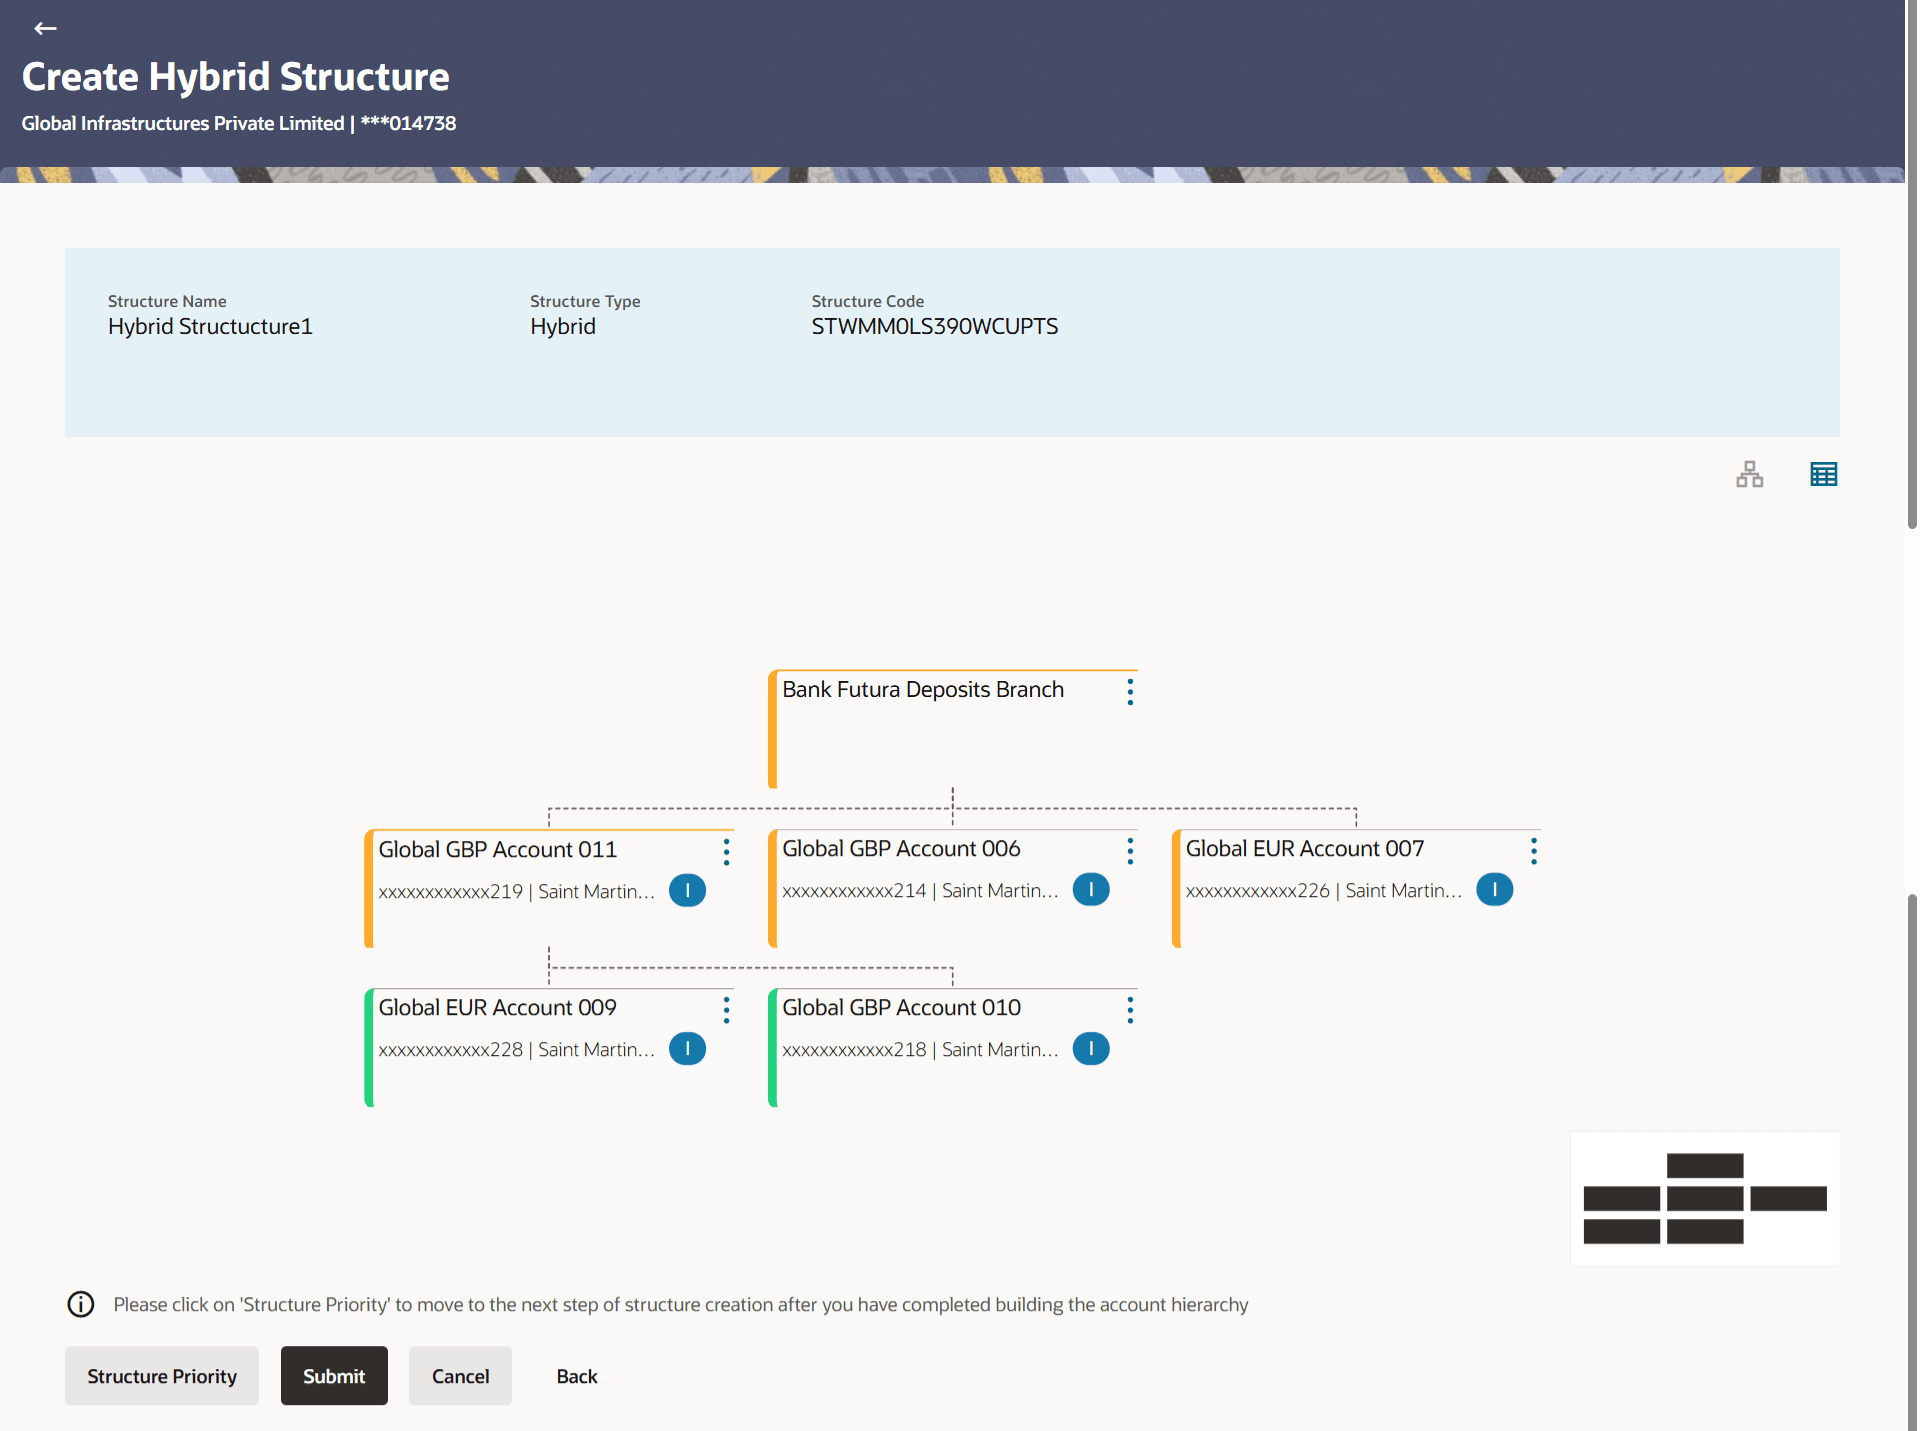
By default, the Build Structure screen displays in tree view.

Figure 3-143 Create Hybrid Structure – Build Structure – Tree View


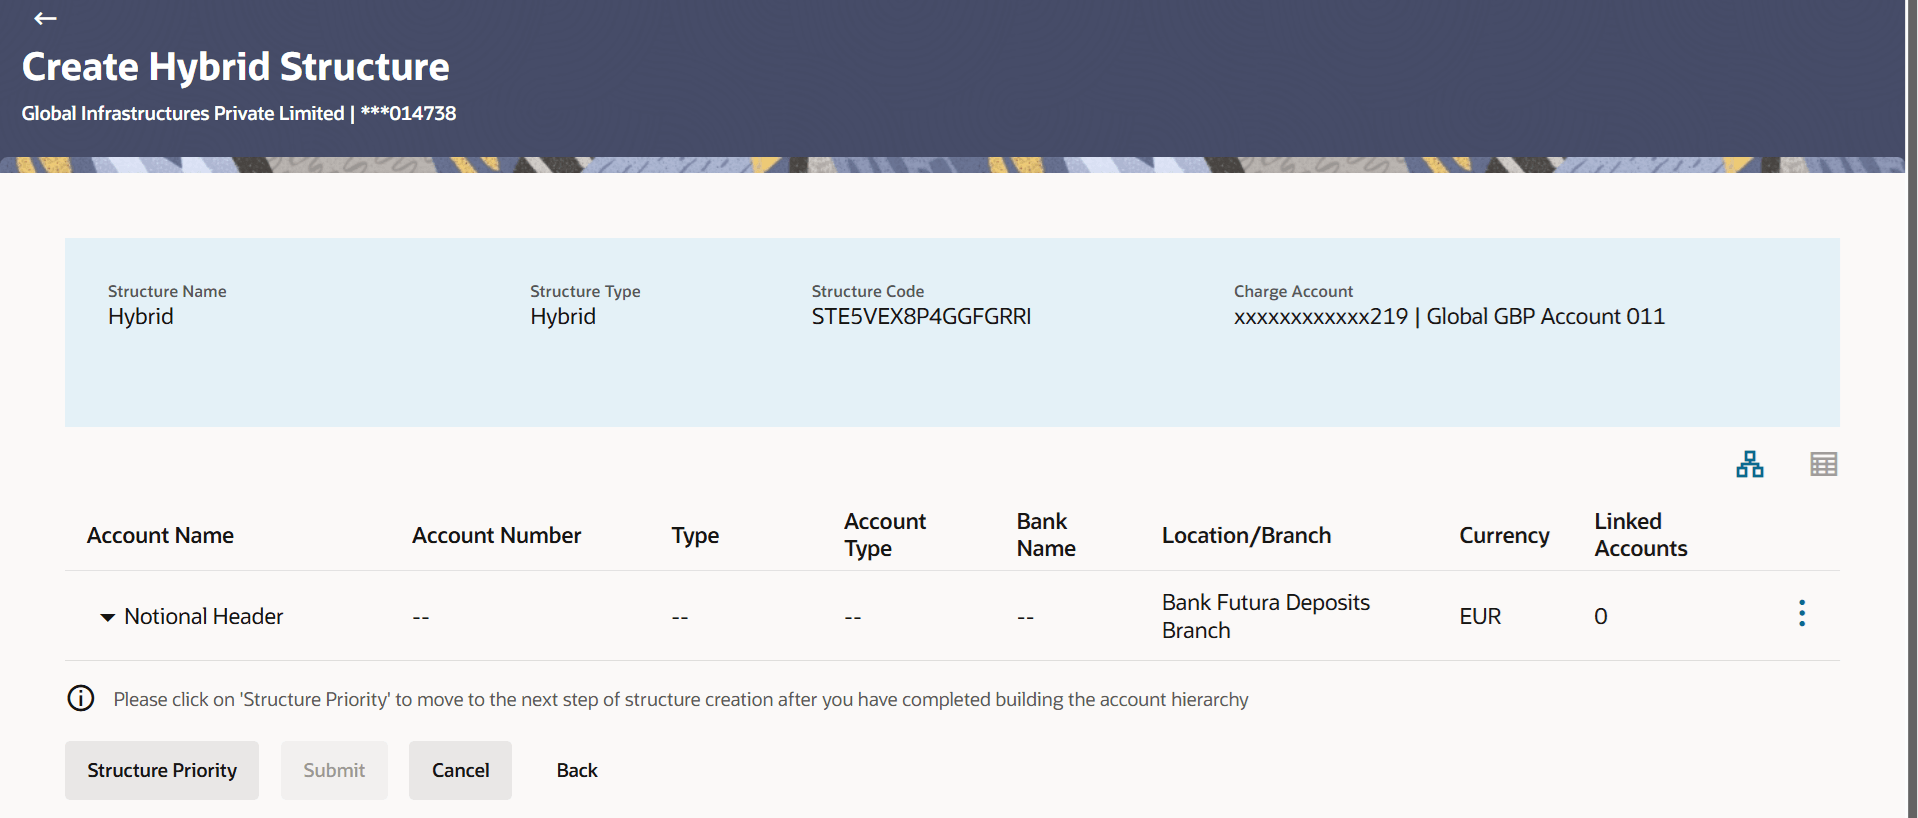
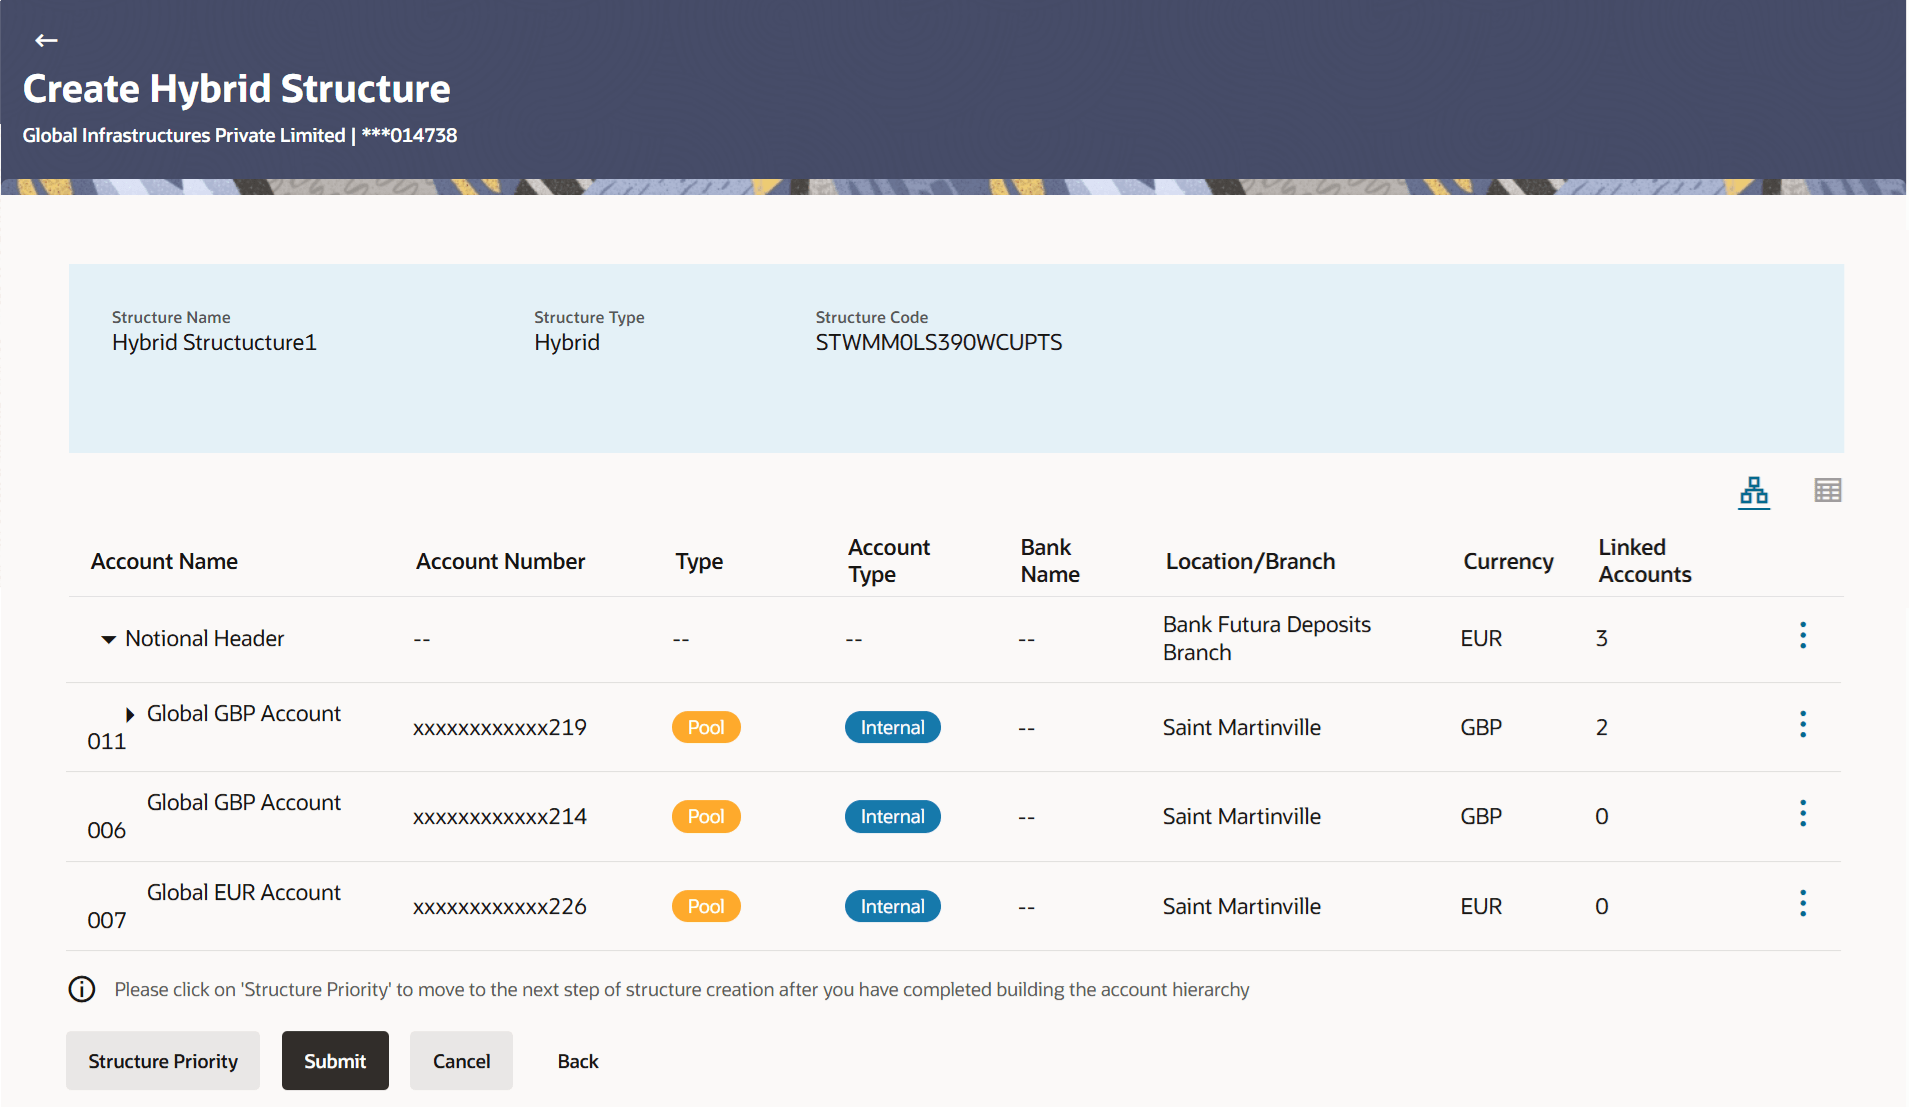
  1. Click create Hybrid structure - build structure - table view to build the structure in the table view.
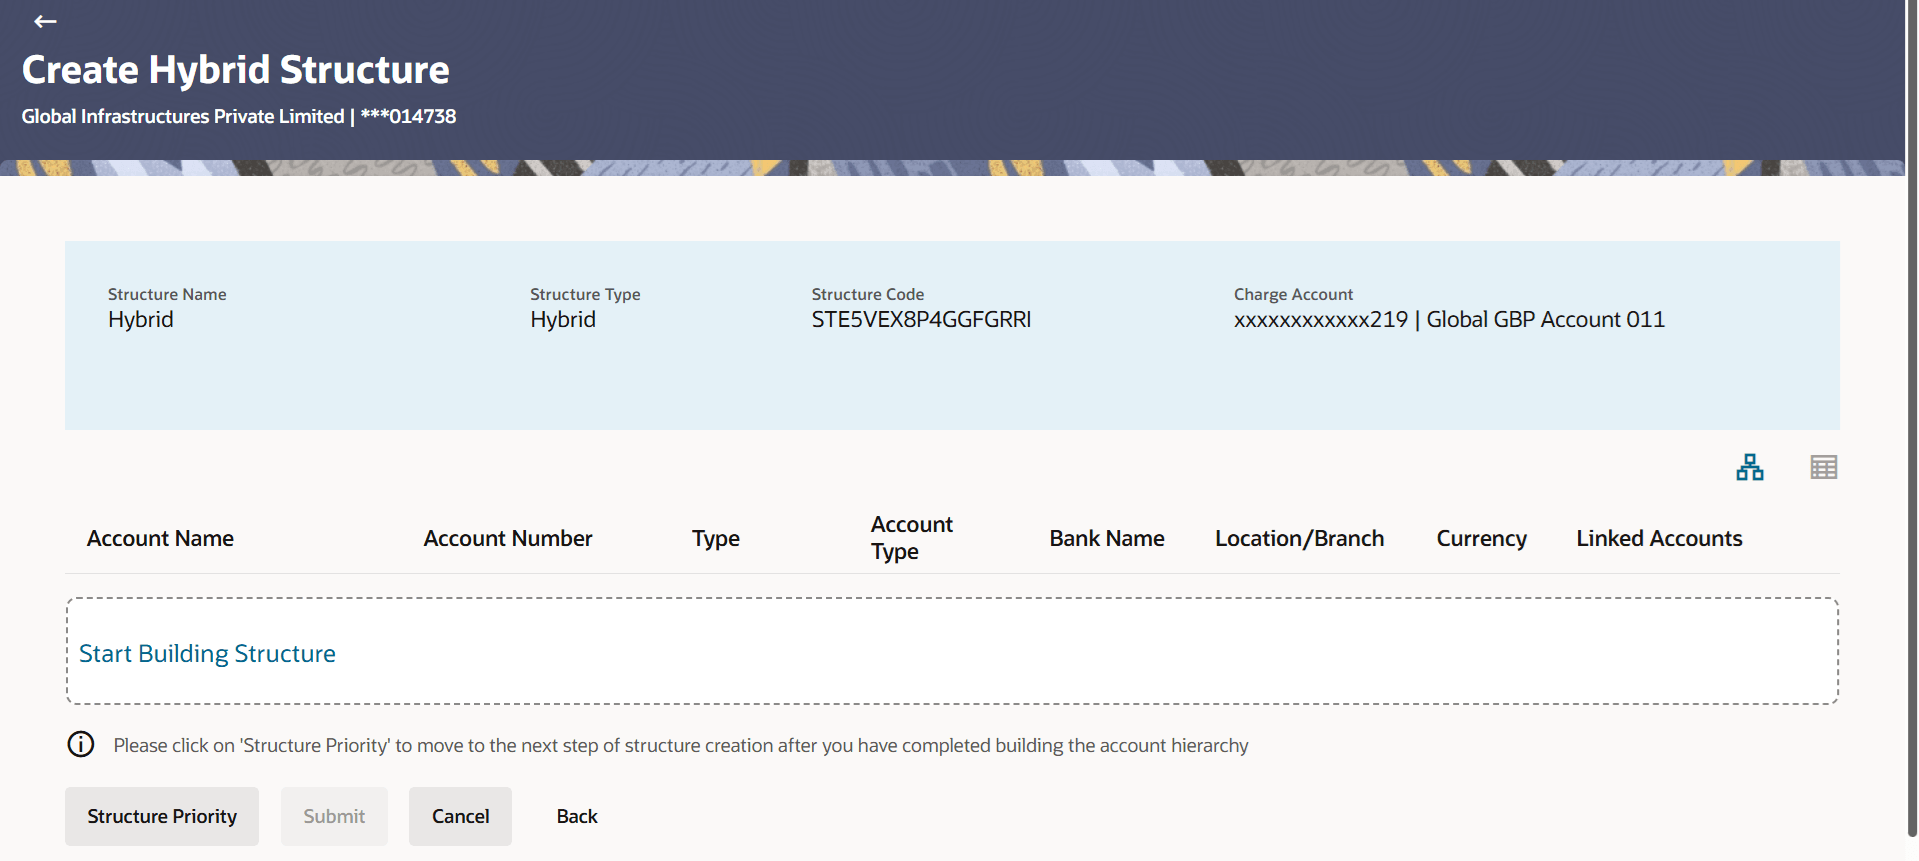
    The Create Hybrid Structure - Build Structure - Table View screen displays.

    Figure 3-144 Create Hybrid Structure - Build Structure – Table View


    The below field descriptions are common for both Tree View and Table View. For more information on fields, refer to the field description table.

    Table 3-99 Create Hybrid Structure - Build Structure – Field Description

    Field Description
    Structure Code Displays the structure ID of the structure.
    Structure Type Displays the type of the structure.
    Structure Name Displays the name of the structure.
    Charge Account Displays the charge account and account name from which the charges can be collected.

    Note: Only accessible internal accounts of the primary party and the linked parties as part of GCIF will be displayed. This field will appear only if the user selects the charge account number.

  2. Click Start Building Structure to build the structure.
    The Create Hybrid Structure - Select Header Account overlay screen displays.

As a part of following step, the user can select the header account in which the funds will be concentrated. The below screen displays when the user selects sweep option in the pop up.

Figure 3-145 Create Hybrid Structure – Select Header Account


For more information on fields, refer to the field description table.

Table 3-100 Create Hybrid Structure - Select Header Account - Field Description

Field Description
Search Specify and search the complete or partial account details to display the list of accounts that matches across the fields in the table.
Account Number and Name Displays the account number and name (Internal and External) mapped to the user in masked format.
Account Type Displays the type of account.
The available options are:
  • Internal: An account which is internal to the bank.
  • External: An account which is external to the bank and linked for liquidity management.
Party Name Displays the name of the party linked to the account.
IBAN Displays the IBAN number of the account.
Branch Displays the branch name of the account.
Currency Displays the currency of the account.

  1. In the Select Header Account screen, select the account that the user wants to add as Header Account in the structure and click OK.
    • The header account is created and added to the Create Hybrid Structure – Added Header Account screen.
    • Click Closeto close the overlay screen.
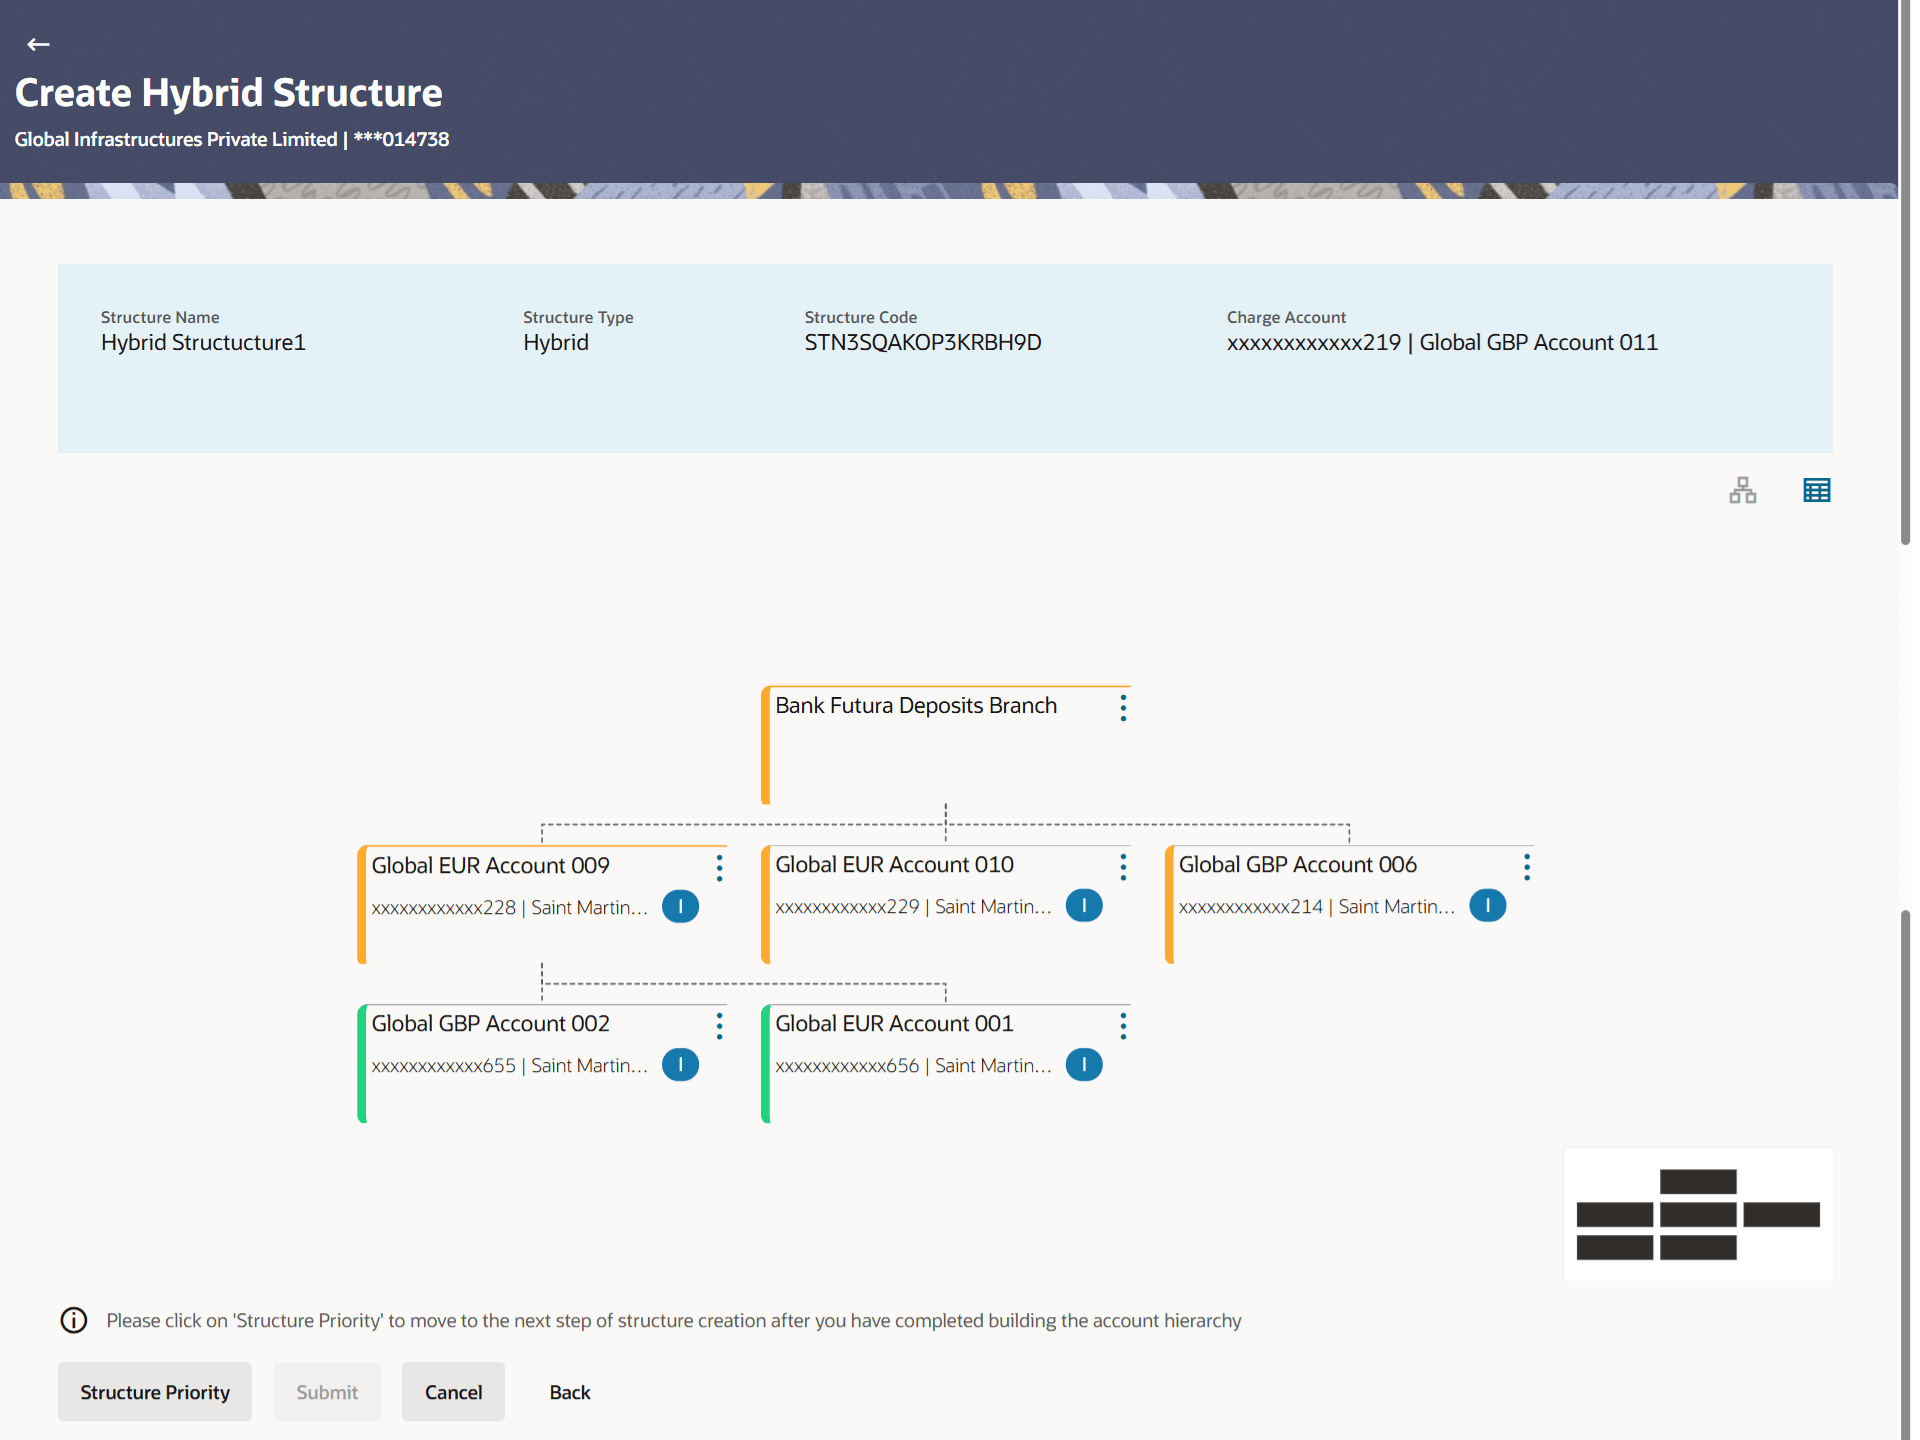
    Once the header account is added, the user can further link the child accounts. This screen is available in both Tree and Table view.

    Figure 3-146 Create Hybrid Structure – Added Header Account – Tree View


    For more information on fields, refer to the field description table.

    Table 3-101 Create Hybrid Structure - Create Header Account - Tree View - Field Description

    Field Description
    Structure Code Displays the structure ID of the structure.
    Structure Type Displays the type of the structure.
    Structure Name Displays the name of the structure.
    Charge Account Displays the charge account number and account name from which the charges can be collected.

    Note: Only accessible internal accounts of the primary party and the linked parties as part of GCIF will be displayed. This field will appear only if the user selects the charge account number.

    Notional Header Information displayed on notional header account card.
    Account Name Displays the name of the header account.
    Account Number Displays the account number of the header account in masked format.
    Location Displays the location of the account.
    Account Type Displays the type of account.
    The available options are:
    • I: An account which is internal to the bank.
    • E: An account which is external to the bank and linked for liquidity management.
    Account Currency Displays the currency of the account.
    link Displays the number of the child account(s) linked to the header account.
  2. Click table view to view the added accounts in the table view.
    The Create Hybrid Structure - Added Header Account - Table View screen displays.

    Figure 3-147 Create Hybrid Structure – Added Header Account – Table View


    For more information on fields, refer to the field description table.

    Table 3-102 Create Hybrid Structure – Added Header Account – Table View - Field Description

    Field Description
    Structure Code Displays the structure ID of the structure.
    Structure Type Displays the type of the structure.
    Structure Name Displays the name of the structure.
    Charge Account Displays the charge account number and account name from which the charges can be collected.

    Note: Only accessible internal accounts of the primary party and the linked parties as part of GCIF will be displayed. This field will appear only if the user selects the charge account number.

    Notional Header Account Information displayed for header account and each child account.
    Account Name Displays the name of the customer linked to the account.
    Account Number Displays the account number in masked format.
    Type Displays the type of the structure.
    Account Type Displays the type of account. The available options are:
    • Internal: An account which is internal to the bank.
    • External: An account which is external to the bank and linked for liquidity management.
    Bank Name Displays the name of bank.
    Location/Branch Displays the location/branch name of the bank.
    Currency Displays the currency of the account.
    Linked Accounts Displays the number of the child account(s) linked to the parent account.
  3. Click Kebab and then click Link to add the child accounts.
    • The Create Hybrid Structure - Select Reallocation Methods & Link Accounts overlay screen displays.
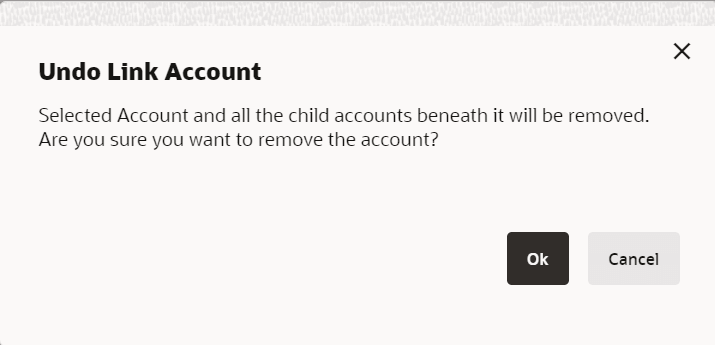
    • Click Undo Link. A Undo Link Account pop-up displays confirming the removal of accounts.

    • Click OK, if the user wants to remove the added header account.
    • Click Cancel to cancel the removing process.

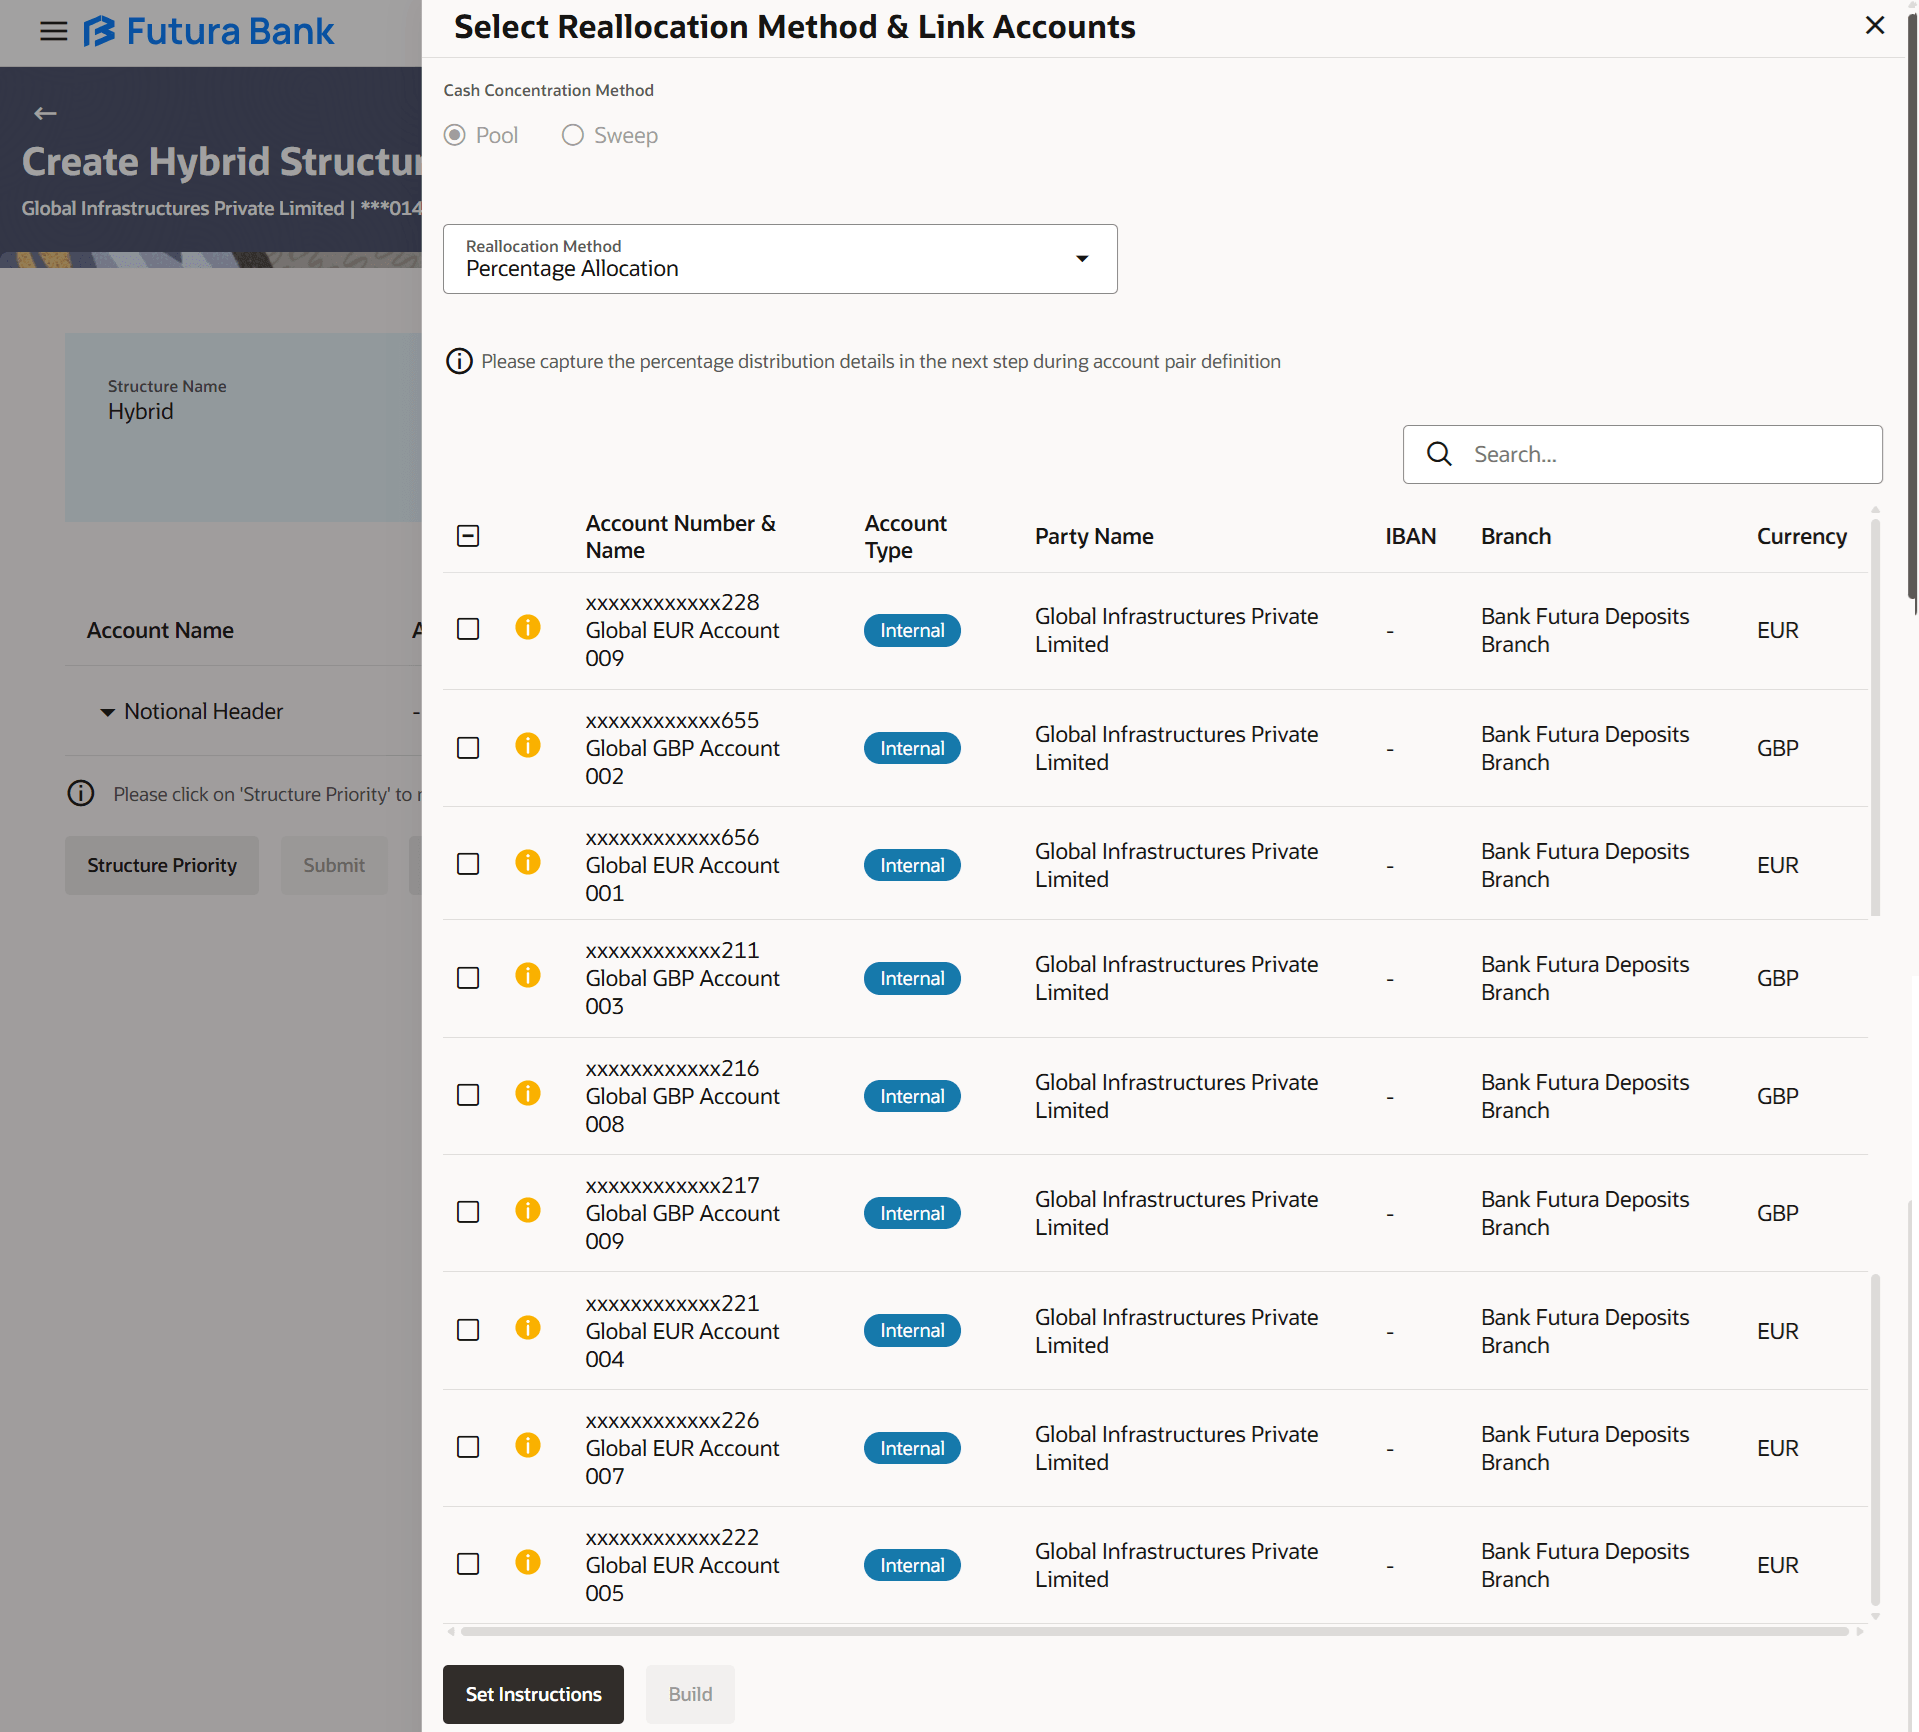
The user can search and select the accounts to be linked to the selected header/parent account. The filtered account list for which the user has access to will appear for linking the accounts. For GCIF enabled environment, the account list also shows the linked party account of the transaction party.

  1. Select the accounts that the user wants to link to the header account.
    • In the Search By Party Name, Account Number field, specify and search the complete or partial account details to display the list of accounts that matches across the fields in the table and select the accounts that the user want to link to the header account.

    Note:

    The user can either select the accounts directly in the overlay or can use the UI search to filter and select additional records. In this case, the accounts that were filtered using UI search will appear at the top, while those selected before applying UI search will appear at the bottom.
    The Create Hybrid Structure - Select Reallocation Method & Link Accounts screen displays.

    Figure 3-148 Create Hybrid Structure – Select Reallocation Method & Link Accounts


    For more information on fields, refer to the field description table.

    Table 3-103 Create Hybrid Structure - Select Reallocation Method & Link Accounts – Field Description

    Field Description
    Cash Concentration Method By default, it will be selected to sweep. (If the user selects sweep in the pop-up.)
    Search Specify and search the complete or partial account details and displays the list of accounts that matches across the fields in the table.
    Select All Select the check-box to select all the accounts.
    Account Number and Name Displays the account numbers and name of the user in masked format.
    Account Type Displays the type of account.
    The available options are:
    • Internal: An account which is internal to the bank.
    • External: An account which is external to the bank and linked for liquidity management.
    • Notional: Notional accounts represent Drain pool structure.
    Party Name Displays the name of the party linked to the user's account.
    IBAN Displays the IBAN number of the account.
    Branch Displays the branch name of the account.
    Currency Displays the currency of the account.
    info Accounts marked with this symbol, are marked for regulated debit.
  2. Click Set Instructions.
    • The Create Hybrid Structure - Set Instructions overlay screen displays, if the cash concentration method is selected as Sweep.
    • Click Build to use the default instructions and add the child accounts to the header account.

      The Create Hybrid Structure – Submit screen displays.

    • Click Closeto close the overlay screen.

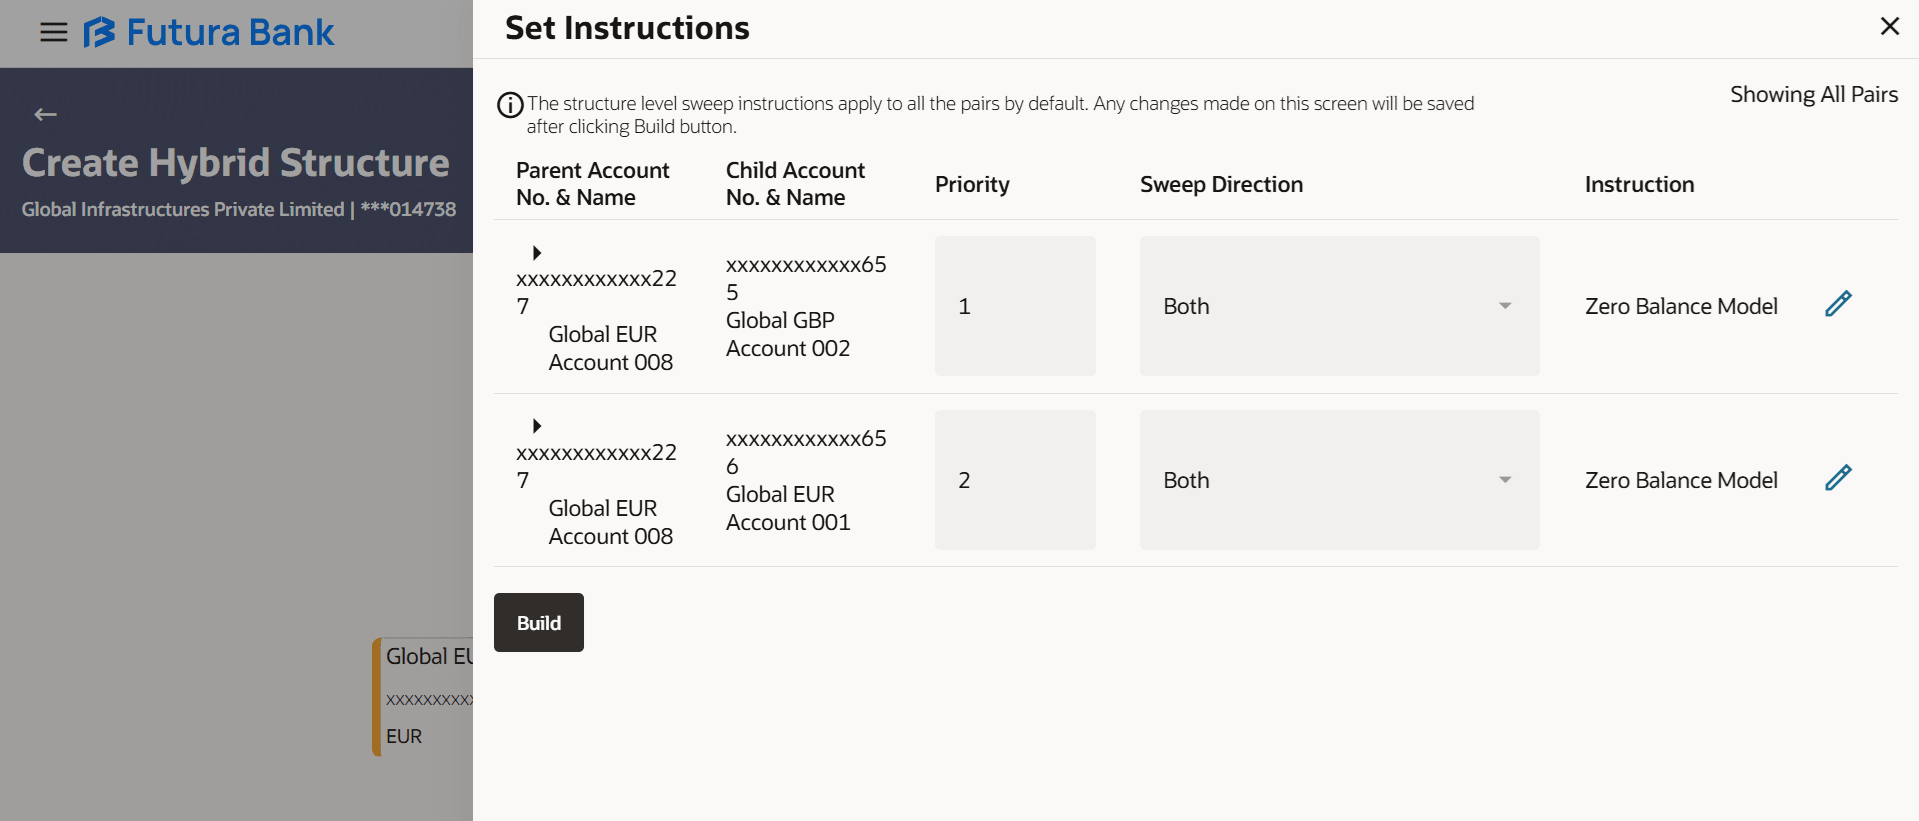
Once the child accounts are linked, the user can further set the instruction between an account pair along with the parent and child account information.

Note:

The Show All Pairs link displays when there are existing child accounts and user is trying to add new nodes at parent level. By clicking Show All Pairs allows the user to view and modify the instructions of all the child accounts that are linked to the header account.

In such cases, when the Show All Pairs links displays, user can modify the priority only after clicking the link.

Any unsaved changes made to the child accounts prior to clicking the Show All Pairs link gets lost and a warning message is displayed to the user.

Figure 3-149 Create Hybrid Structure – Set Instructions


For more information on fields, refer to the field description table.

Table 3-104 Create Hybrid Structure - Set Instructions – Field Description

Field Description
Parent Account No & Name Displays the parent account number & name of the structure in masked format.
Child Account No & Name Displays the child account number & name of the structure in masked format.
Priority Specify the sweep priority used to determine the order of execution across pairs at a level in the structure.

Note: Sweep Priority can be modified only if Showing All Pairs.

Sweep Direction Select the sweep direction for the account pair the sweep direction of the header account.
The options are:
  • Parent to Child - Downward only sweep option to set up child instructions to sweep from parent to child.
  • Child to Parent - Upward only sweep option to set up child instructions to sweep from child to parent.
  • Both - Sweep option to set up child instructions to sweep from parent to child as well as child to parent.
Instruction Displays the instruction type for the account pair.

  1. Click Expand to view the instructions for the account pair.

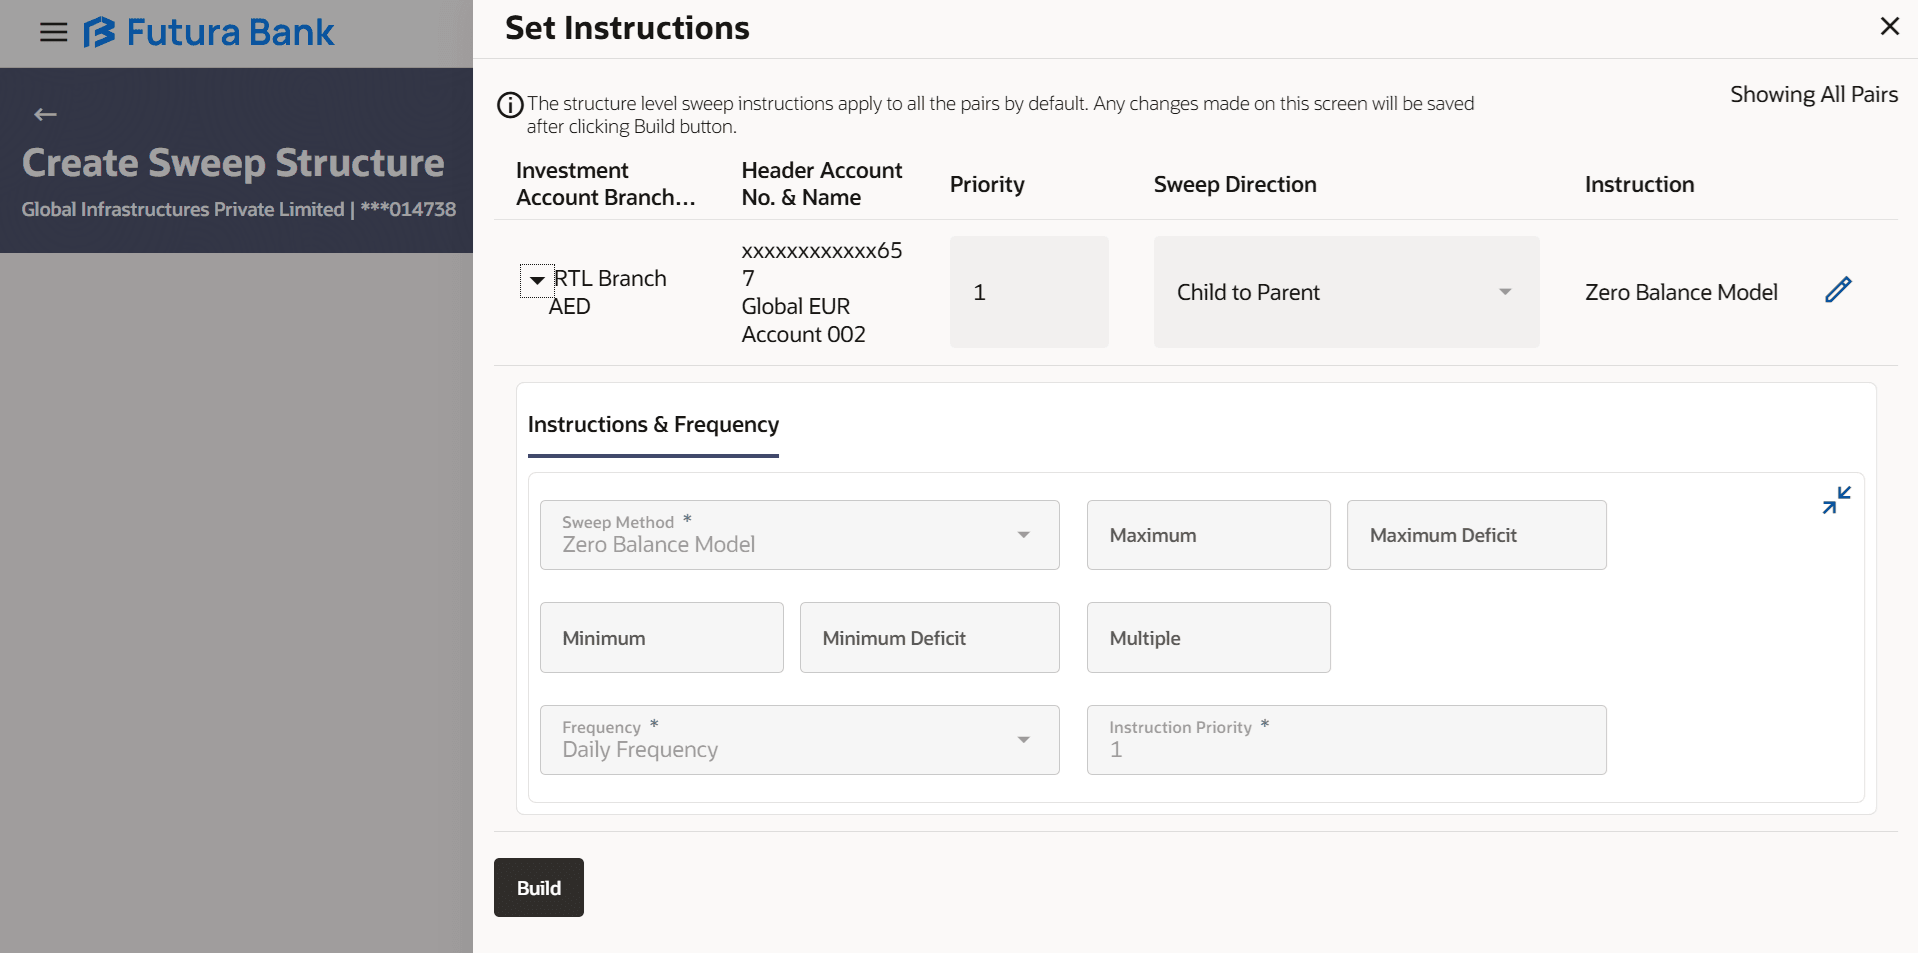
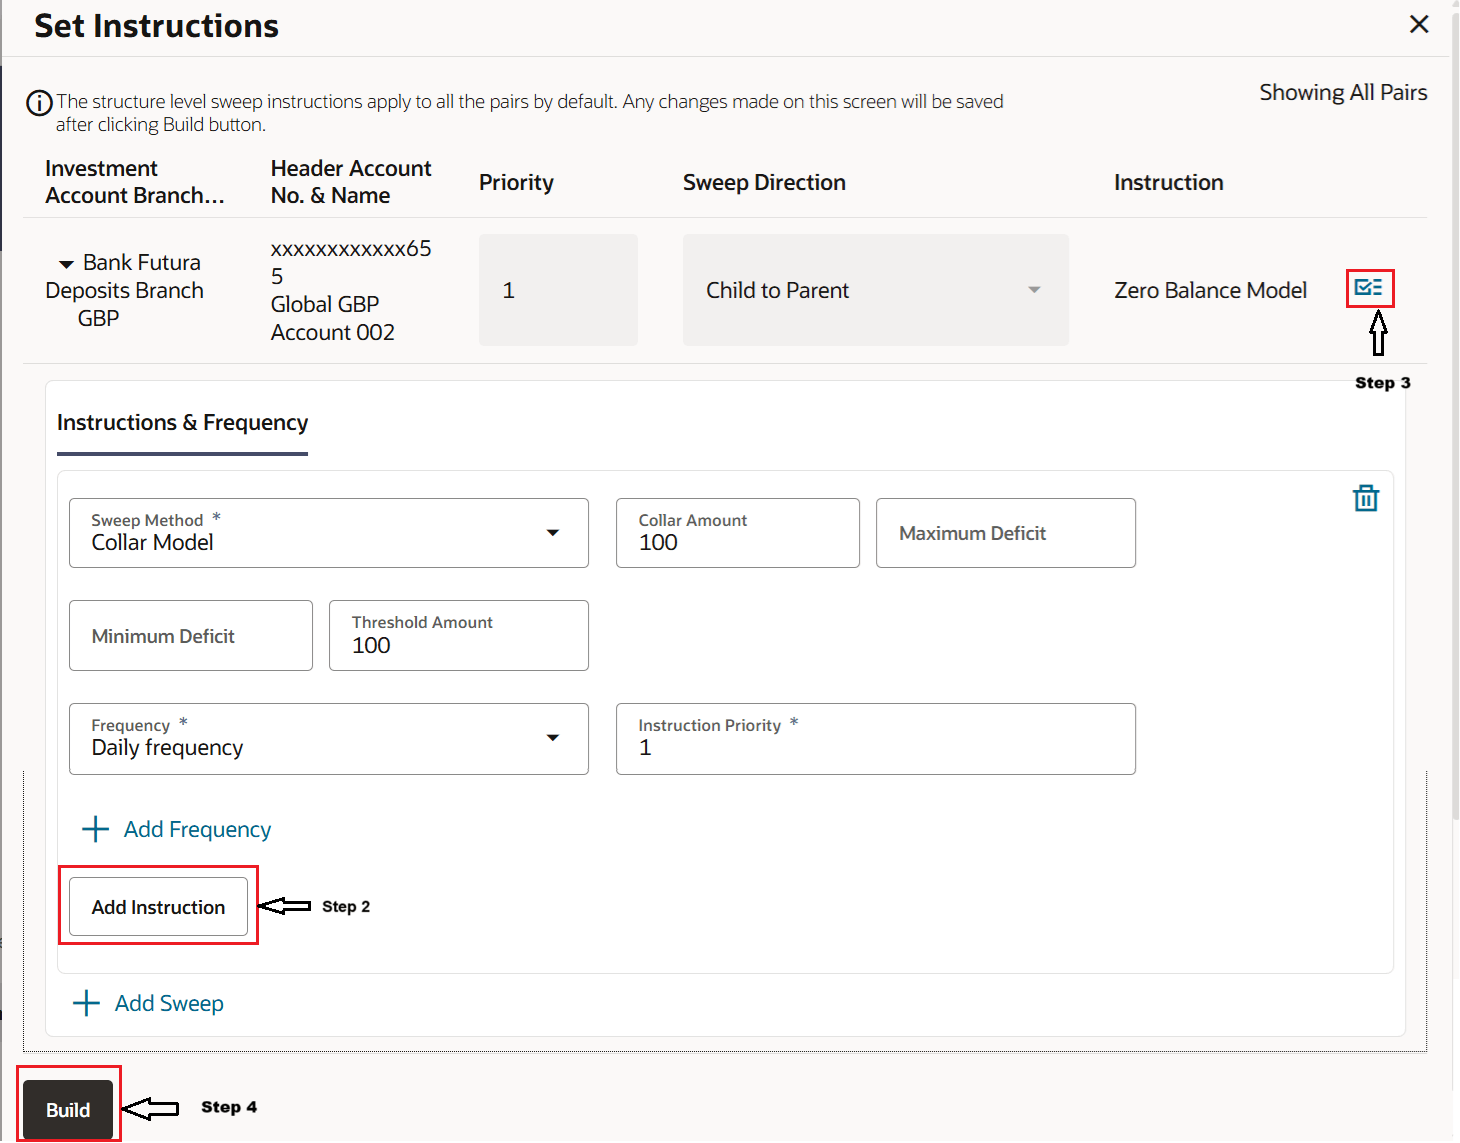
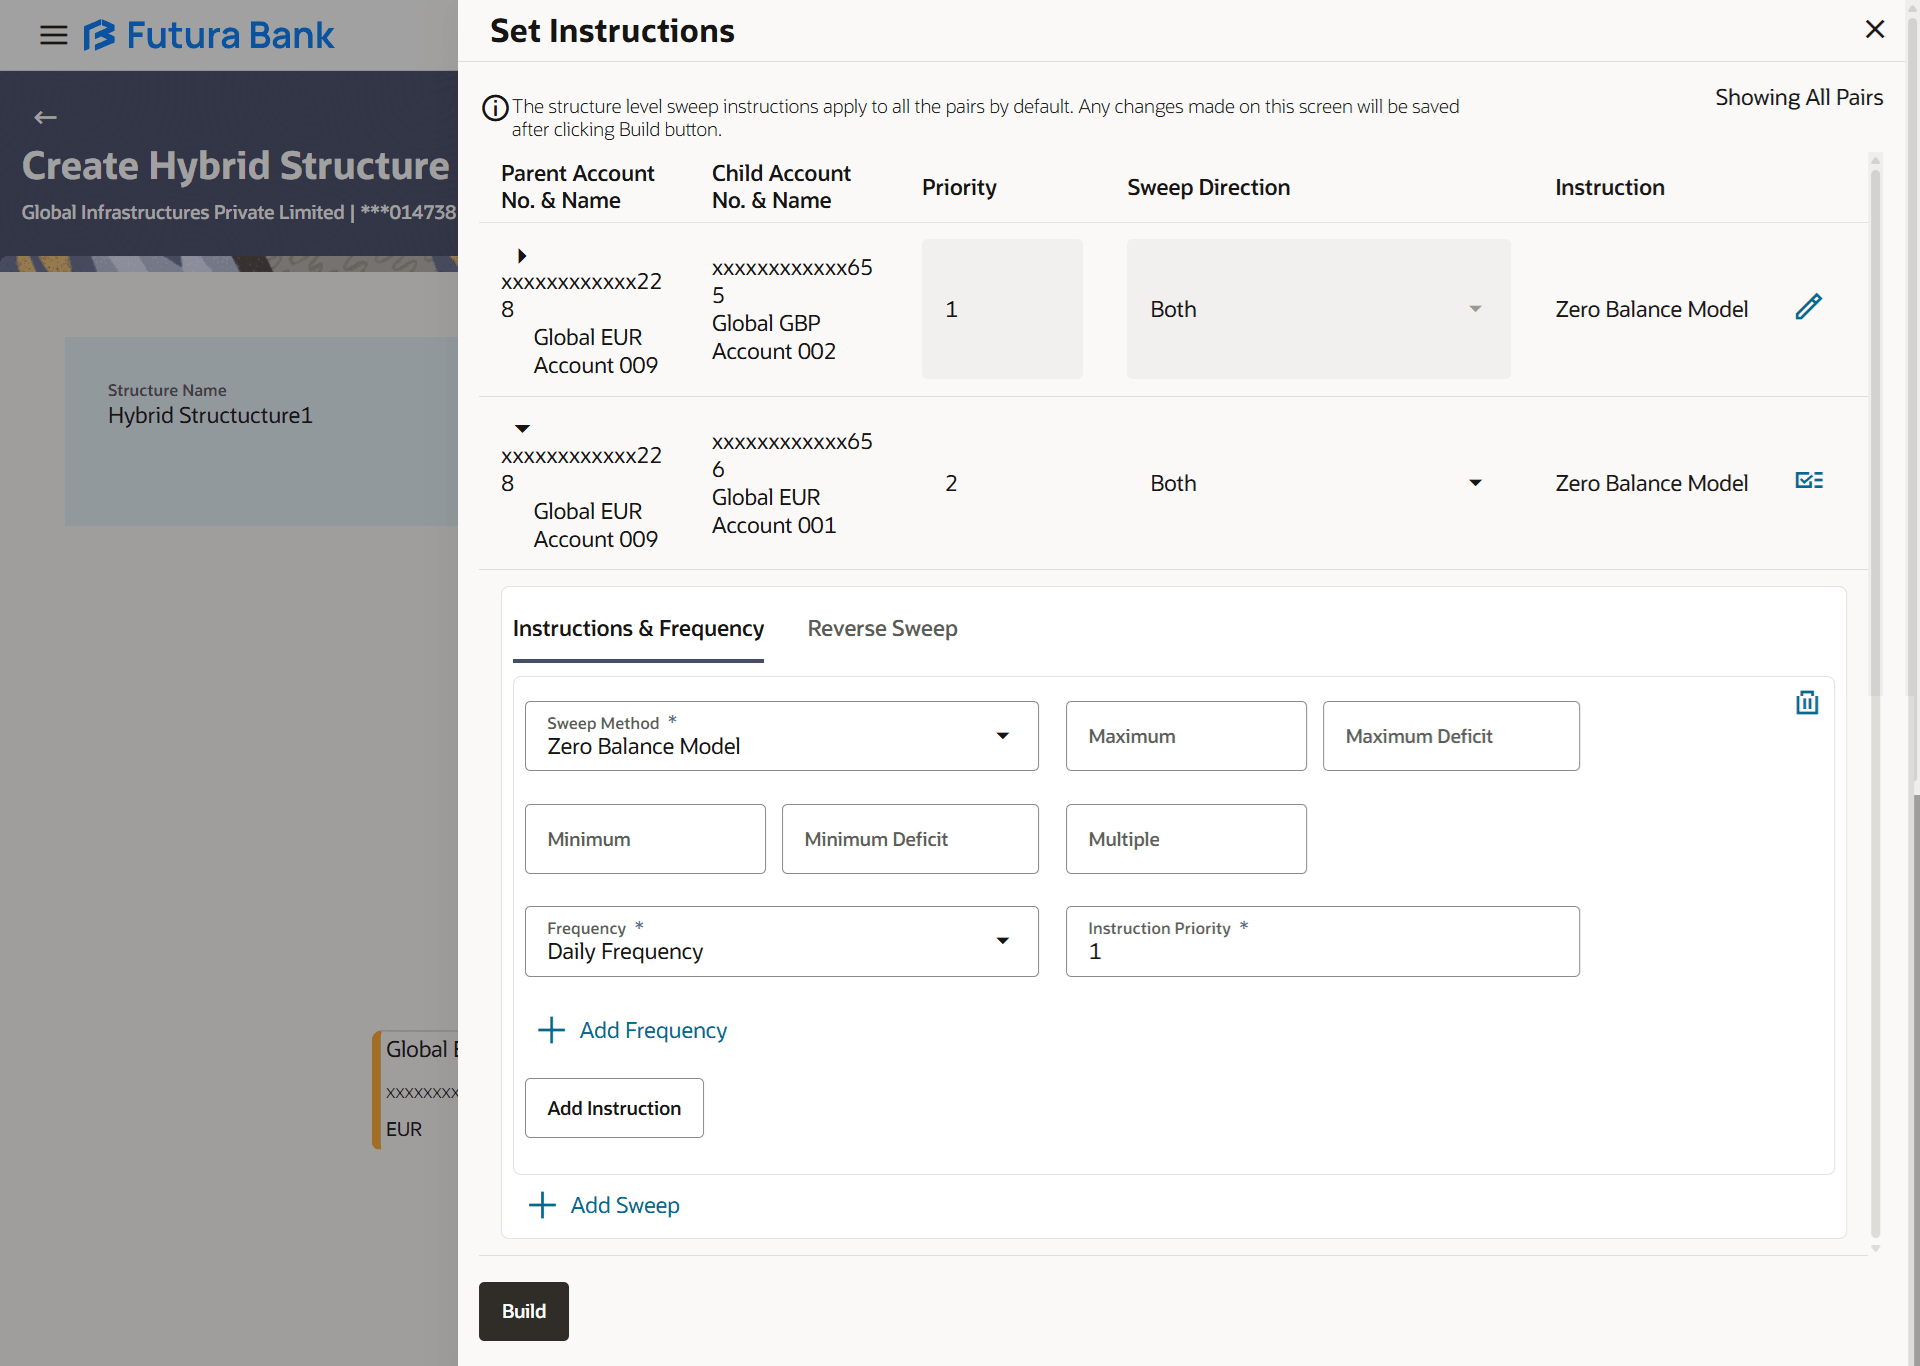
The user can create the instructions and frequency for the account pair.The Create Hybrid Structure - Set Instructions – Instructions & Frequency screen displays. The steps to take to set the instructions for the instructions and frequency screen are as follows.

Figure 3-150 Create Hybrid Structure – Set Instructions – Instructions & Frequency


  1. Click Editto modify the instruction and frequency for the header accounts.
  2. In the Instruction & Frequency tab, do the following:
    1. From the Sweep Method list, select the appropriate option.
    2. On selection of Sweep Method, the related parameters is displayed with defined values in the editable form.
    3. From the Frequency list, select the appropriate frequency.
    4. In the Instructions Priority field, the instruction priority will be defaulted.
    5. Click Add Frequency and select the frequency to add multiple frequency.
    6. Click Deleteto delete the frequency.
    7. Click Add Instruction to apply the changes made in the instruction & frequency tab.

      Note:

      Before moving on to the next step, the user must click the Add instruction.
    8. Click Add Sweep to add multiple sweep method in instruction & frequency.
    9. Click Deleteto delete the added sweep instruction & frequency.
  3. Click Update to update the changes made to the set instructions of child accounts.

    Note:

    In a structure, swapping the priority set in two instructions within an account pair is not allowed. To do so, the user will have to delete one of the instructions and then re-add it with the desired priority.

    Figure 3-152 Create Hybrid Structure – Set Instructions – Instructions & Frequency


    For more information on fields, refer to the field description table.

    Table 3-105 Create Hybrid Structure - Set Instructions - Instructions & Frequency

    Field Name Description
    Sweep Method Select the sweep method set between the account pair.

    The available options are:

    • Zero Balance Model
    • Fixed Amount Model
    • Collar Model
    • Target Model - Constant
    • Target Model - Fixed
    • Threshold Model
    • Range Based Model
    • Cover Overdraft Model
    • Percentage Model

    Value defined as a part of first step will be shown in an editable form.

    Note: Only compatible sweep methods, based on Sweep Direction, will get listed.

    Frequency Select the frequency at which the account structure should be executed.

    The list displays all the frequencies maintained in the product processor.

    Instruction Priority Specify the instruction priority across multiple instructions within an account pair.
    Parameters Applicability of the below fields varies based on the instruction type selected between the accounts.
    Collar Amount Specify the collar amount set for executing sweep is displayed.

    This field displays for if the user has selected Collar Model from Instruction Type list.

    Value set at the product processor is displayed in an editable form.

    Maximum Specify the maximum amount for executing sweep.

    Value set at the product processor is displayed in an editable form.

    Maximum Deficit Specify the maximum deficit amount for executing sweep.

    Value set at the product processor is displayed in an editable form.

    Minimum Specify the minimum amount for executing sweep.

    Value set at the product processor is displayed in an editable form.

    Minimum Deficit Specify the minimum deficit amount for executing sweep.

    Value set at the product processor is displayed in an editable form.

    Threshold Amount Specify the threshold amount for which the sweep is to be executed.

    Value set at the product processor is displayed in an editable form.

    Multiple Specify the amount in multiples of which the sweep is to be executed.

    Value set at the product processor is displayed in an editable form.

    Percentage Specify the percentage for which the sweep is to be executed.

    Value set at the product processor is displayed in an editable form.

    Fixed Amount Specify the fixed amount for which the sweep is to be executed.

    Value set at the product processor is displayed in an editable form.

    Note:

    In a structure, swapping the priority set in two instructions within an account pair is not allowed.

    To do so, the user will have to delete one of the instructions and then re-add it with the desired priority.

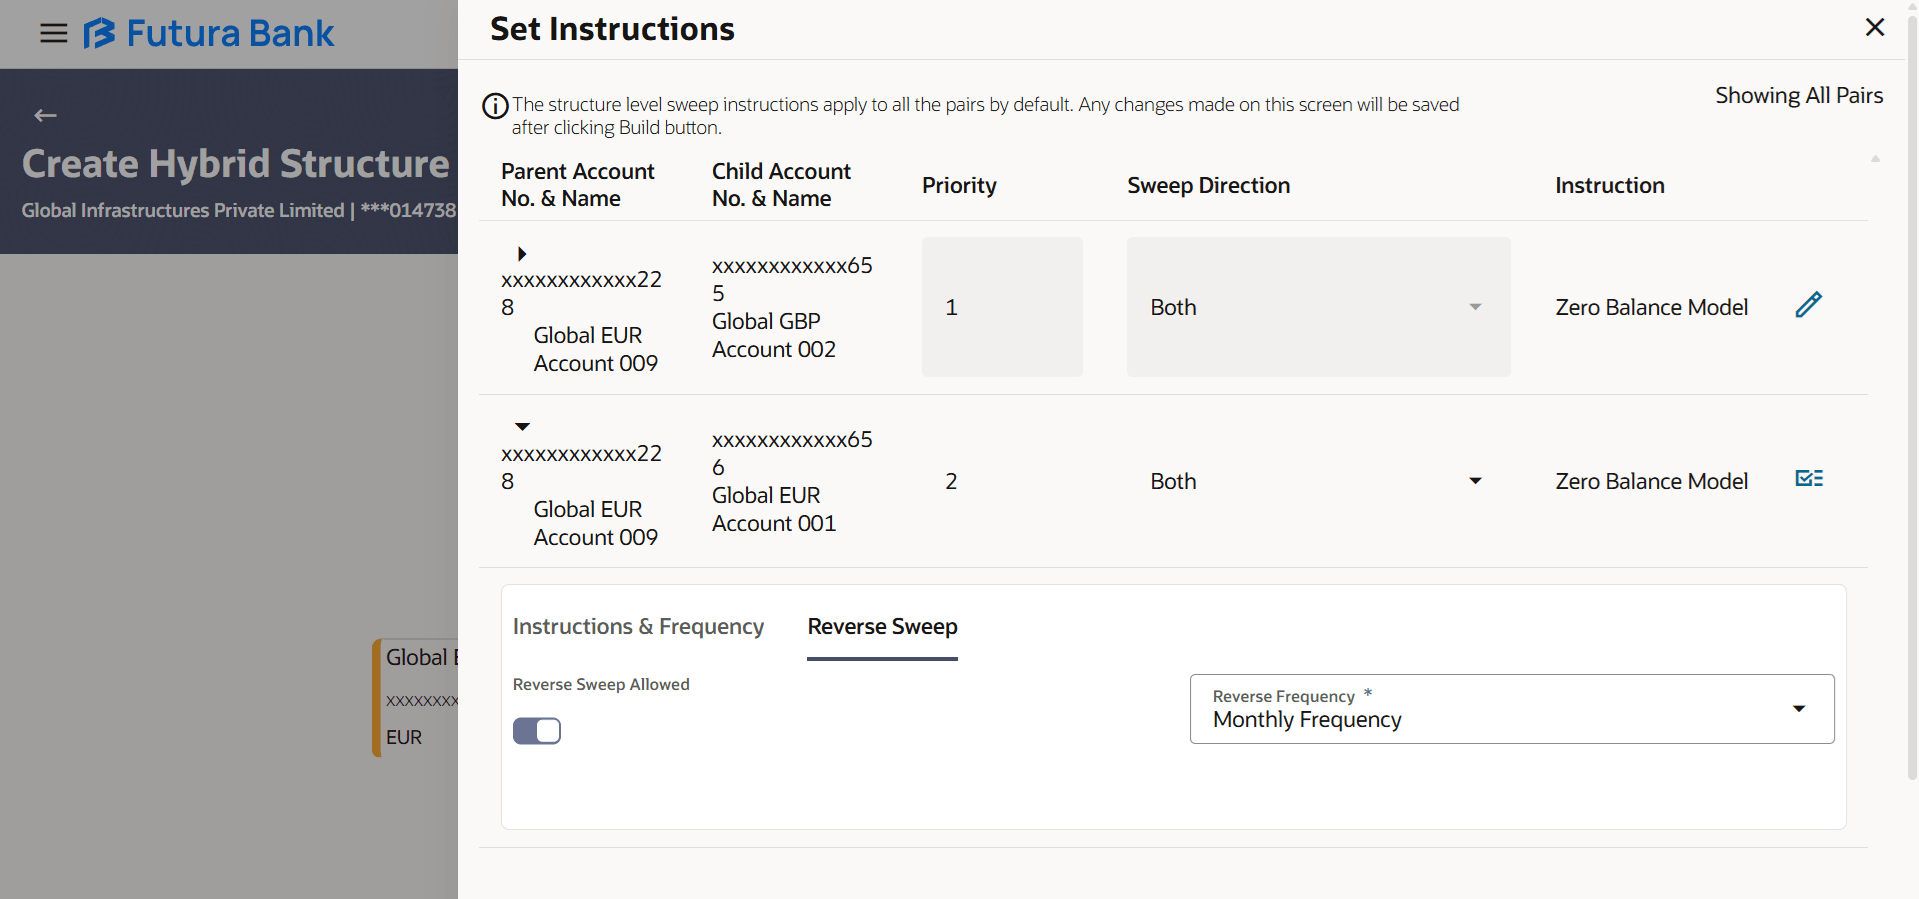
  4. Click Reverse Sweep tab to set the reverse sweep instruction for the account pair.

The user can create the reverse frequency for the account pair.The Create Hybrid Structure - Set Instructions – Reverse Sweep screen displays.

Figure 3-153 Create Hybrid Structure – Set Instructions – Reverse Sweep


For more information on fields, refer to the field description table.

Table 3-106 Create Hybrid Structure - Set Instructions – Reverse Sweep – Field Description

Field Description
Reverse Sweep Allowed Select the toggle to enable the reverse sweep for the account pair.
Reverse Frequency Select the frequency at which the reverse sweep for the account structure should be executed.

The list displays the frequencies for which the BOD is enabled.

Note: This field appears only if the Reverse Sweep Allowed toggle is enabled.

  1. In the Reverse Sweep tab, do the following:
    1. Select the Reverse Sweep Allowed toggle to enable the reverse sweep for the account pair.
    2. From the Reverse Frequency list, select the appropriate option if the Reverse Sweep Allowed toggle is enabled.
  2. Perform any one of the following actions:
    • Click Intercompany Loan tab to set the intercompany loan instruction for the account pair.
    • Click Closeto close the overlay screen.

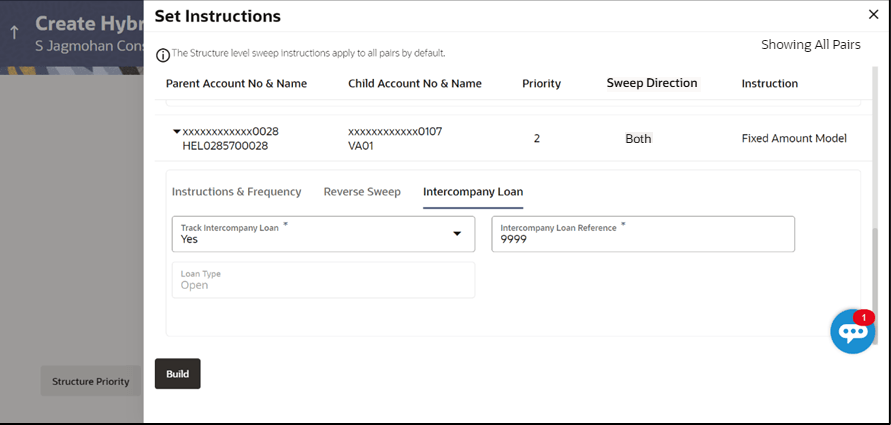
The user can create the intercompany loan for the sweeps between the account pair.

Note:

This tab appears only if the accounts in the account pair belong to the two different parties.The Create Hybrid Structure - Set Instructions – Intercompany Loan screen displays.

Figure 3-154 Create Hybrid Structure - Set Instructions – Intercompany Loan


For more information on fields, refer to the field description table.

Table 3-107 Create Hybrid Structure - Set Instructions – Intercompany Loan – Field Description

Field Description
Track Intercompany Loan Select the option from the drop-down list, to enable the Track Intercompany Loan for the account pair.
The available options are:
  • Yes
  • No

Note: By default, this field is selected as No.

Intercompany Loan Reference Specify the intercompany loan reference details.

Note: This field appears if Track Intercompany Loan is selected as Yes from the drop-down list.

Loan Type Displays the type of the loan.
Note:
  • If Reverse Sweep Allowed toggle is ON, the Loan Type is displayed as Fixed.
  • If Reverse Sweep Allowed toggle is OFF, the Loan Type is displayed as Open.
  • This field appears if Track Intercompany Loan is selected as Yes from the drop-down list.

  1. Perform any one of the following actions:
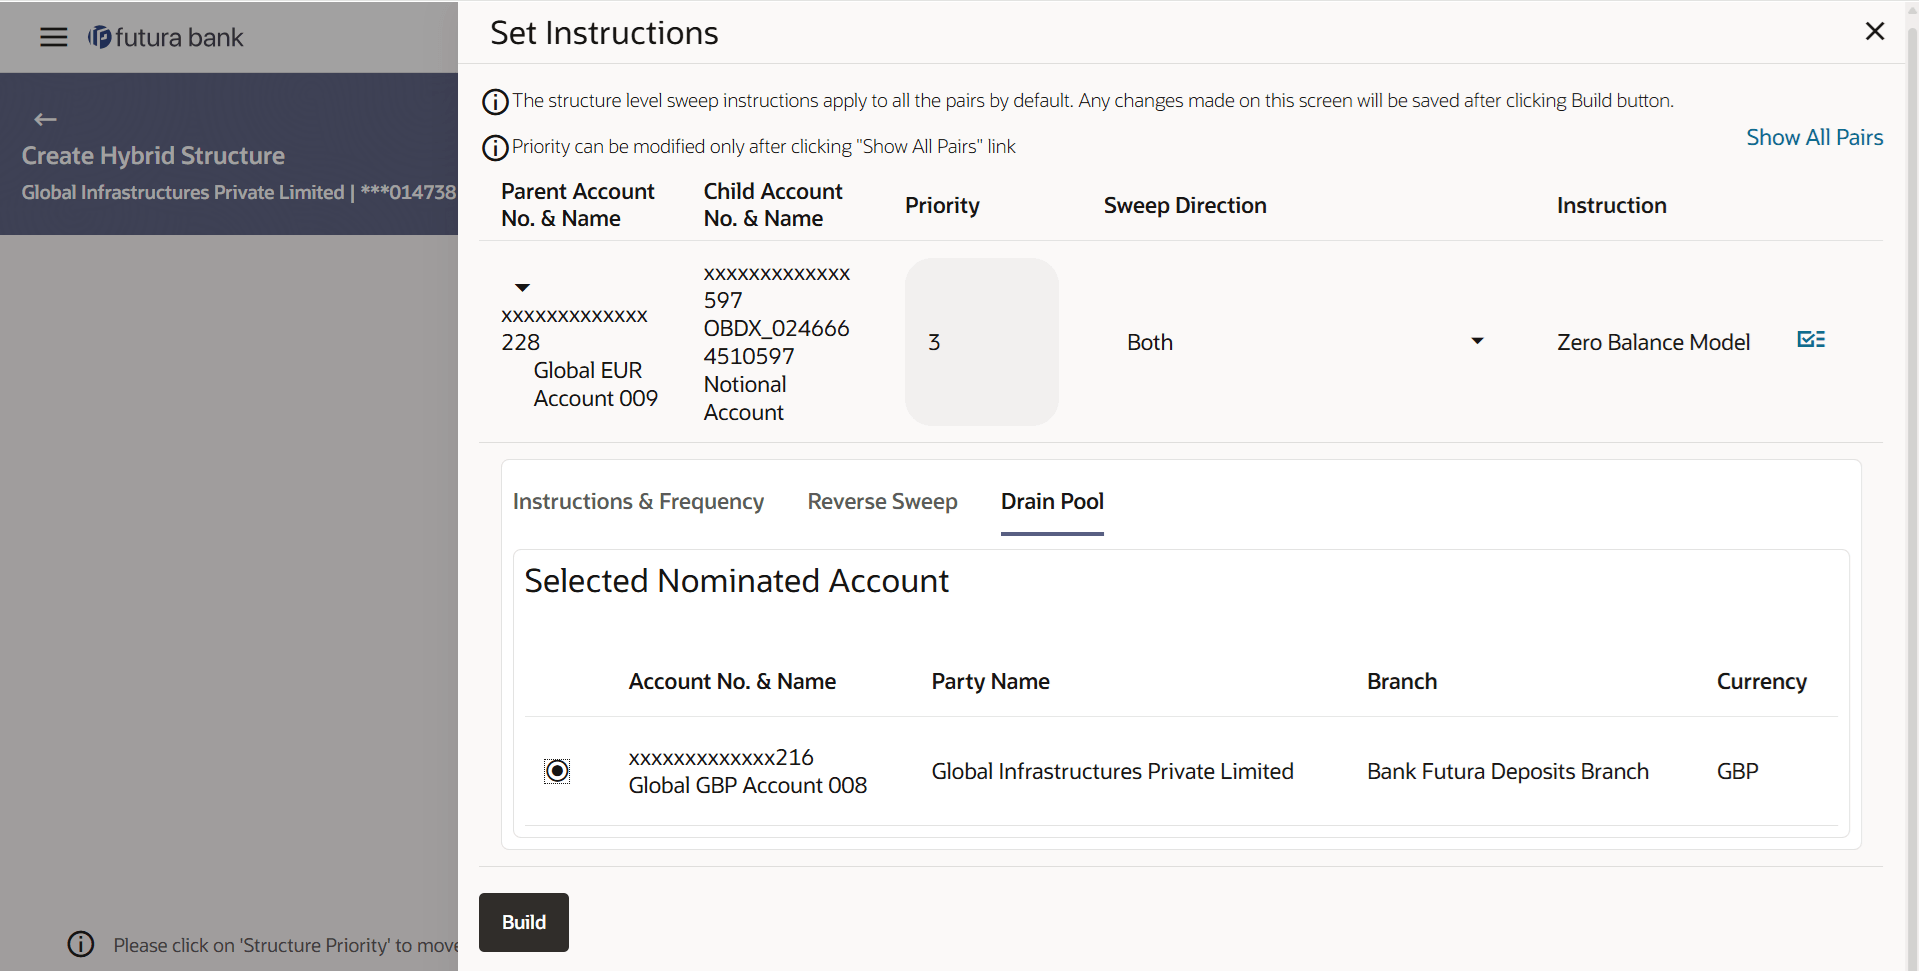
    • Click Drain Pool tab to select the drain pool for selected nominated accounts.
    • Click Closeto close the overlay screen.

The user can select the nominated account for the accounts.The Create Hybrid Structure – Set Instructions – Drain Pool screen appears.For more information on fields, refer to the field description table.

Figure 3-155 Create Hybrid Structure - Set Instructions – Drain Pool


Table 3-108 Create Hybrid Structure - Set Instructions – Drain Pool– Field Description

Field Description
Account No. & Name Select the account number and name of the account to nominate the account for the drain pool.

Note: By default, this field is selected as No.

Party Name Displays the party name of the account.
Branch Displays the branch of the account.
Currency Displays the currency type of the account.

  1. Click Add Instruction, from the Instruction and Frequency tab.
  2. Click Update in each row where you have modified the data and then proceed with Build.
  3. Click Build.
  4. Perform any one of the following actions:
    • Click Structure Priority the Create Hybrid Structure – Structure Priority screen displays.
    • Click Closeto close the overlay screen.

    Note:

    Submit button will be enabled only after the user clicks the Structure Priority on the overlay screen.

As a part of following step, the user can view and update the priority of other structures too and can also view the details of accounts in common participating in multiple structures.

Note:

Only Header node and its immediate child accounts will appear on the screen initially. To view further nodes, click on the respective nodes to expand and view its child accounts. Pagination will be displayed at every level of structure layer and displayed if the number of nodes exceeds the allowed limit as per the configuration.The Create Hybrid Structure – Structure Priority screen displays.

Figure 3-156 Create Hybrid Structure – Structure Priority


For more information on fields, refer to the field description table.

Table 3-109 Create Hybrid Structure - Structure Priority – Field Description

Field Description
Structure Code Displays the structure ID of the structure.
Structure Name Displays the name of the structure.
Charge Account Displays the charge account number and account name from which the charges can be collected.

Note: Only accessible internal accounts of the primary party and the linked parties as part of GCIF will be displayed. This field will appear only if the user selects the charge account number.

Parent/Child Account Information displayed on parent/child account card in tree view.
Account Name Displays the name of the account.
Account Number Displays the account number of the user in masked format.
Location Displays the location of the account.
Account Type Displays the type of account.
The available options are:
  • I: An account which is internal to the bank.
  • E: An account which is external to the bank and linked for liquidity management.
Account Currency Displays the currency of the account.
Link Displays the number of the child account(s) linked to the parent account.

  1. Click on Structure Priority.
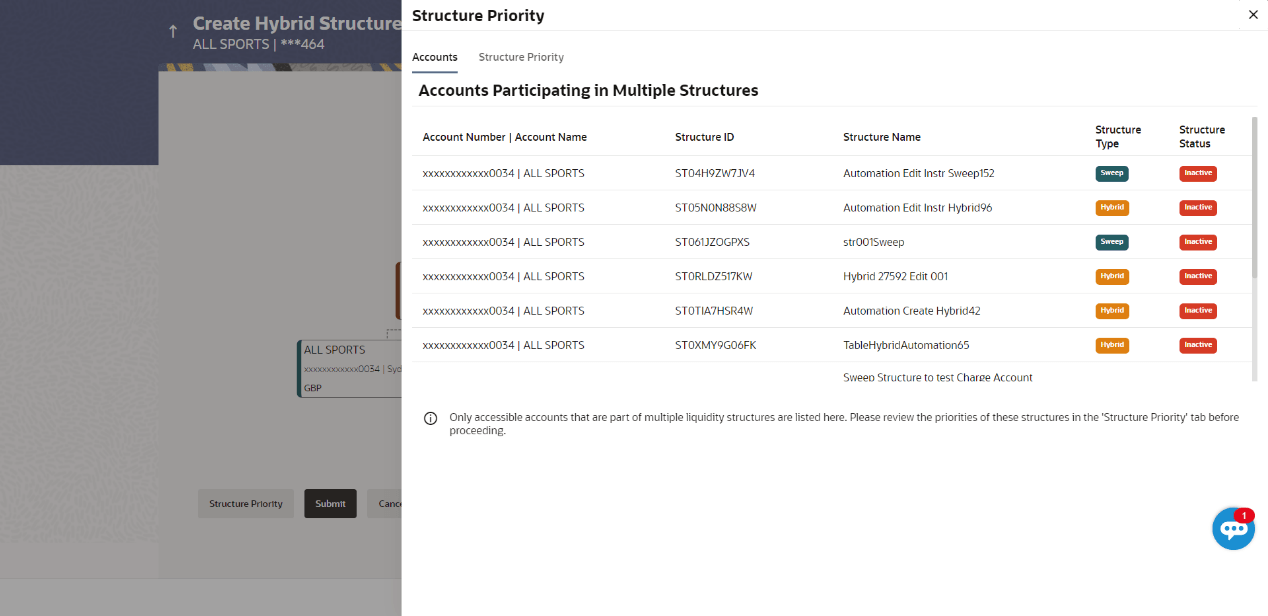
    The Create Hybrid Structure – Structure Priority pop-up overlay screen displays.

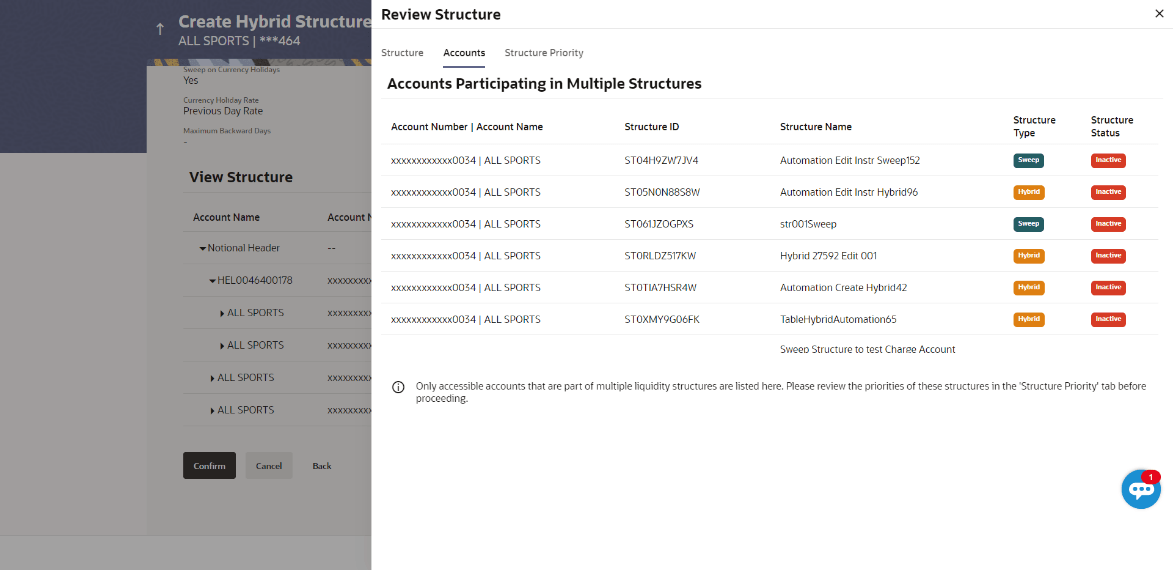
    Figure 3-157 Create Hybrid Structure – Structure Priority – Accounts Tab


    For more information on fields, refer to the field description table.

    Table 3-110 Create Hybrid Structure – Structure Priority – Accounts Tab - Field Description

    Field Description
    Account Number and Name Displays the account number and name of the structure in masked format.
    Structure ID Displays the structure ID of the structure.
    Structure Name Displays the name of the structure.
    Structure Type Displays the type of the structure.
    Structure Status Displays the status of the structure.

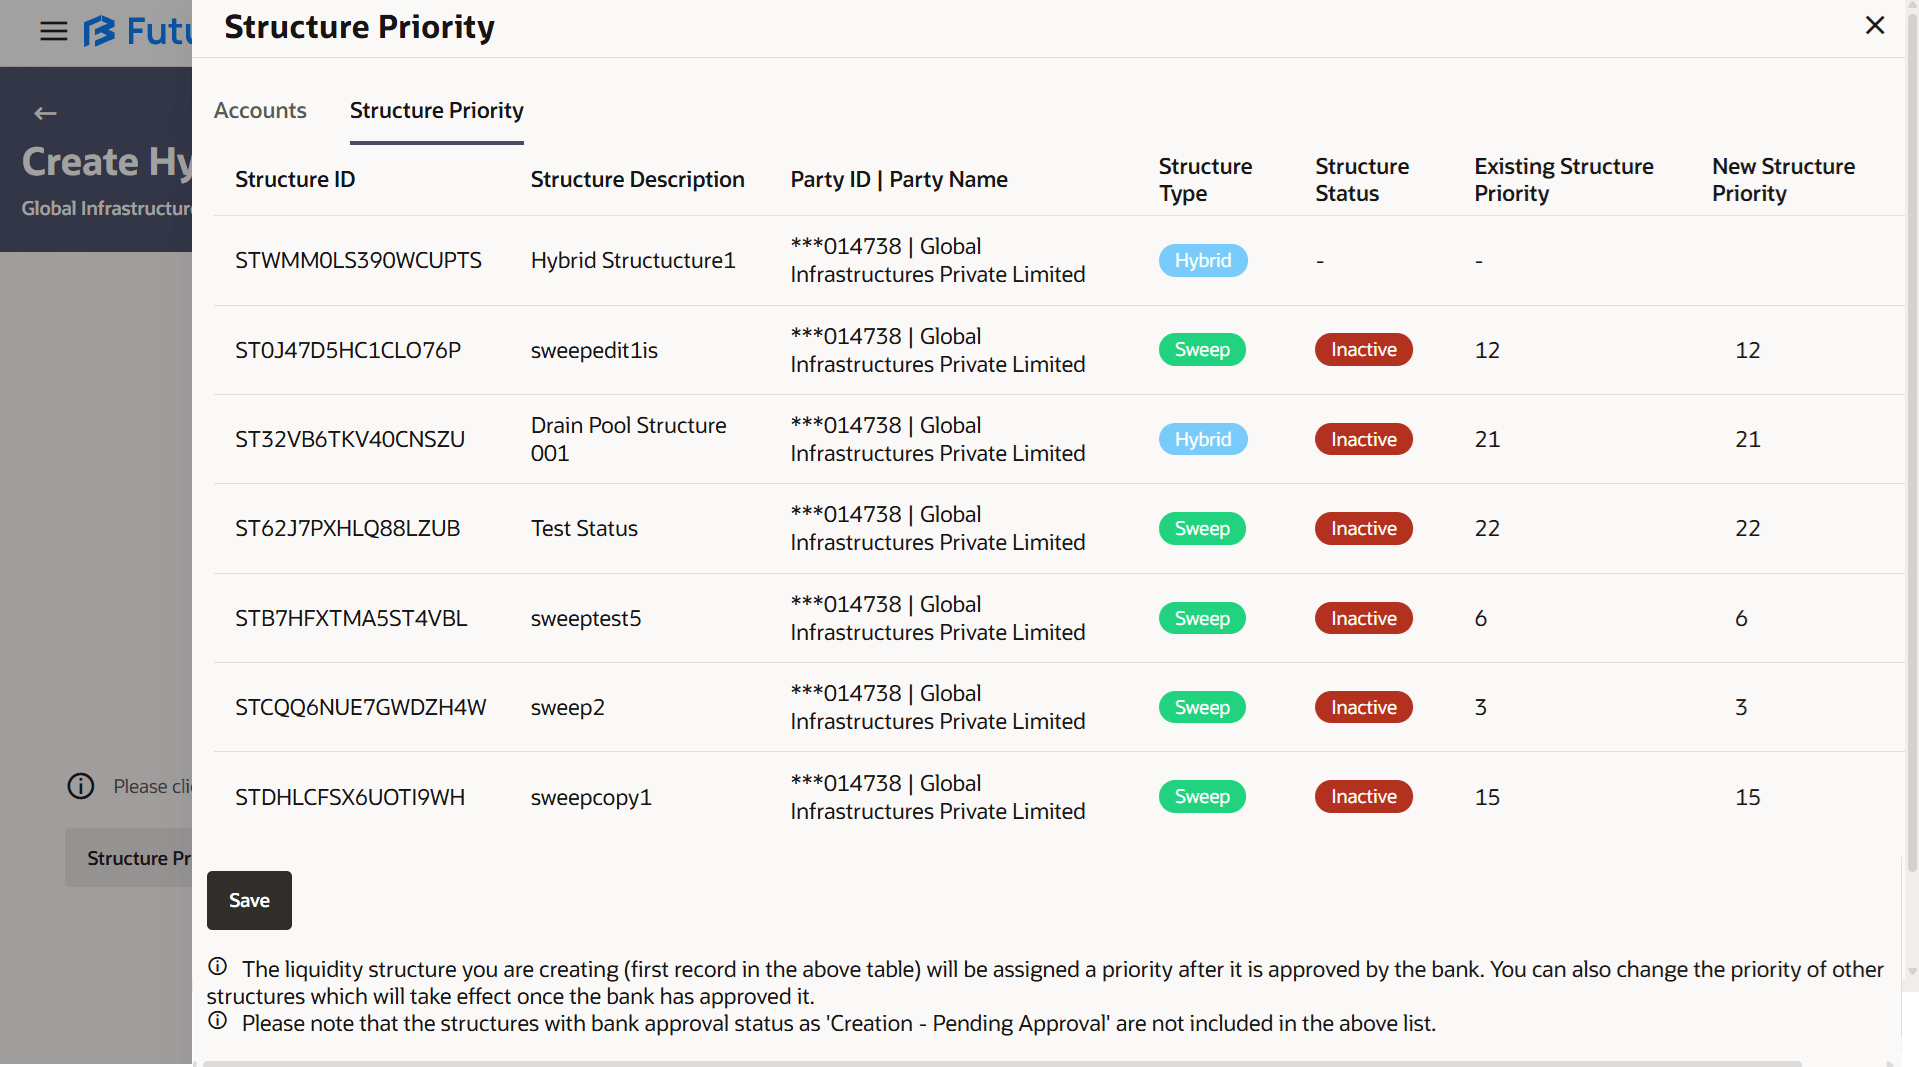
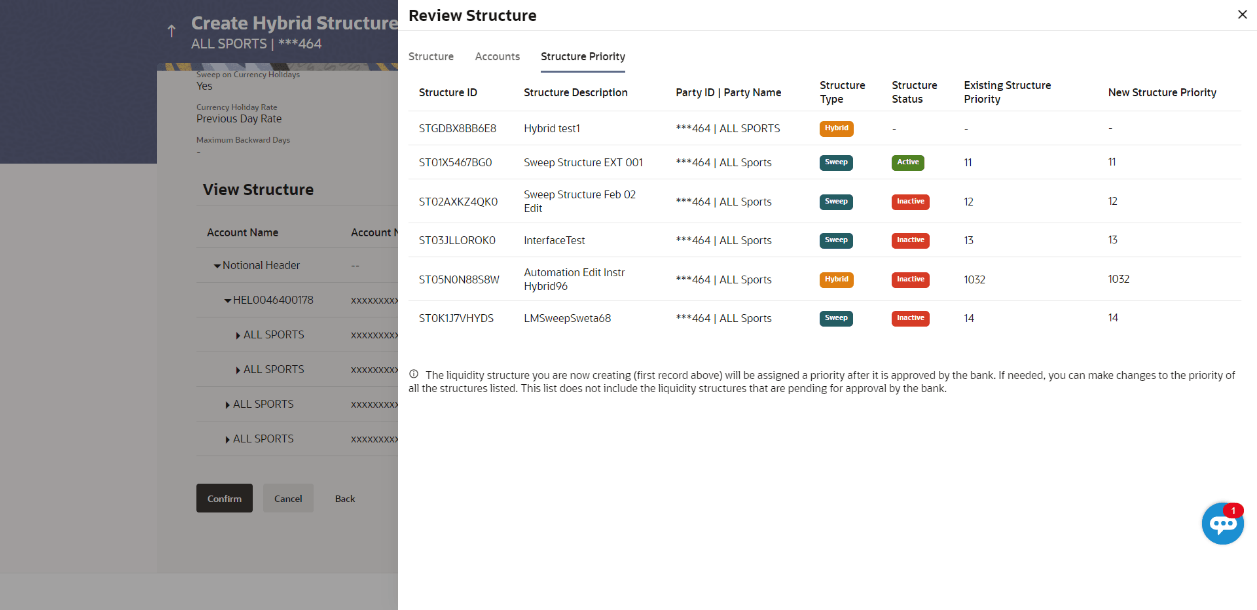
    Figure 3-158 Create Hybrid Structure – Structure Priority – Structure Priority Tab


    For more information on fields, refer to the field description table.

    Table 3-111 Create Hybrid Structure – Structure Priority – Structure Priority Tab - Field Description

    Field Description
    Structure ID Displays the structure ID of the structure.
    Structure Description Displays the description of the structure.
    Party ID | Party Name Displays the party ID and party name of the structure in masked format.
    Structure Type Displays the type of the structure.
    Structure Status Displays the status of the structure.
    Existing Structure Priority Displays the existing structure priority of the structure.
    New Structure Priority Specify the new structure priority of the structure.
    Note:
    1. Structure Priority should be unique for each structure.
    2. Except the first row, which indicates a new structure creation structure priority cannot be blank for any other row.
  2. Perform any one of the following actions:
    • Click Save to save the structure priority details.
    • Click Close to close the overlay screen.

This screen enables the user to view the added accounts in both the Tree and Table view.The Create Hybrid Structure – Submit - Tree View screen displays

Figure 3-159 Create Hybrid Structure – Submit - Tree View


For more information on fields, refer to the field description table.

Table 3-112 Create Hybrid Structure – Submit - Tree View – Field Description

Field Description
Structure Code Displays the structure ID of the structure.
Structure Type Displays the type of the structure.
Structure Name Displays the name of the structure.
Charge Account Displays the charge account number and account name from which the charges can be collected.

Note: Only accessible internal accounts of the primary party and the linked parties as part of GCIF will be displayed. This field will appear only if the user selects the charge account number.

Header Account Information displayed on notional header account card.
Branch Displays the branch name for the header account.
Currency Displays the currency for the header account.
Link Displays the number of the child account(s) linked to the parent account.
Real Account Information displayed on real account card.
Account Name Displays the name of the account.
Account Number Displays the account number of the user in masked format.
Location Displays the location of the account.
Account Type Displays the type of account.
The available options are:
  • I: An account which is internal to the bank.
  • E: An account which is external to the bank and linked for liquidity management.
Account Currency Displays the currency of the account.
Link Displays the number of the child account(s) linked to the parent account.

Note:

Only header node and its immediate child accounts will appear on the screen initially. To view further nodes, click on the respective nodes to expand and view its child accounts. Pagination will be displayed at every level of structure layer and displayed if the number of nodes exceeds the allowed limit as per the configuration.

  1. Click Table View to view the added accounts in the table view.
    The Create Hybrid Structure - Submit - Table View screen displays.

    Figure 3-160 Create Hybrid Structure – Submit - Table View


    For more information on fields, refer to the field description table.

    Table 3-113 Create Hybrid Structure - Submit - Table View – Field Description

    Field Description
    Structure Code Displays the structure ID of the structure.
    Structure Type Displays the type of the structure.
    Structure Name Displays the name of the structure.
    Charge Account Displays the charge account number and account name from which the charges can be collected.

    Note: Only accessible internal accounts of the primary party and the linked parties as part of GCIF will be displayed. This field will appear only if the user selects the charge account number.

    Header Account Information displayed for header account and each child account.
    Account Name Displays the name of the customer linked to the user’s account.
    Account Number Displays the account number of the user in masked format.
    Type Displays the type of structure.
    Account Type Displays the type of account.
    The available options are:
    • Internal: An account which is internal to the bank.
    • External: An account which is external to the bank and linked for liquidity management.
    Bank Name Displays the name of the bank.
    Location/Branch Displays the location/branch name of the account.
    Currency Displays the currency of the account.
    Linked Accounts Displays the number of the child account(s) linked to the parent account.

    Note:

    Only Header node and its immediate child accounts will appear on the screen initially. To view further nodes, click on the respective nodes to expand and view its child accounts
  2. Click Kebab and then click Link from the account header card.
    • The Create Hybrid Structure - Link Accounts overlay screen displays.
    • Click Child Instructions to set the instructions for the sweep account pairs. This option will appear only for the parent accounts with child accounts.

      The Create Hybrid Structure – Set Instructions screen displays.

    • Click Reallocation to update the reallocation method for the pool account pairs. This option will appear only for the parent accounts with the child accounts.

      The Create Hybrid Structure – Reallocation screen displays.

    • Click Account Details to view the account details.

      The Account Details overlay screen displays.

    • Click Undo link. A Undo Link Account pop-up displays confirming the removal of accounts.
  3. Perform any one of the following actions:
    • Click Submit to submit the hybrid structures. The Create Hybrid Structure - Review screen displays.
    • Click Cancel to cancel the operation and navigate back to Dashboard.
    • Click Back to navigate back to the previous screen.

This screen enables the user to review the updated structure details in the new structure.

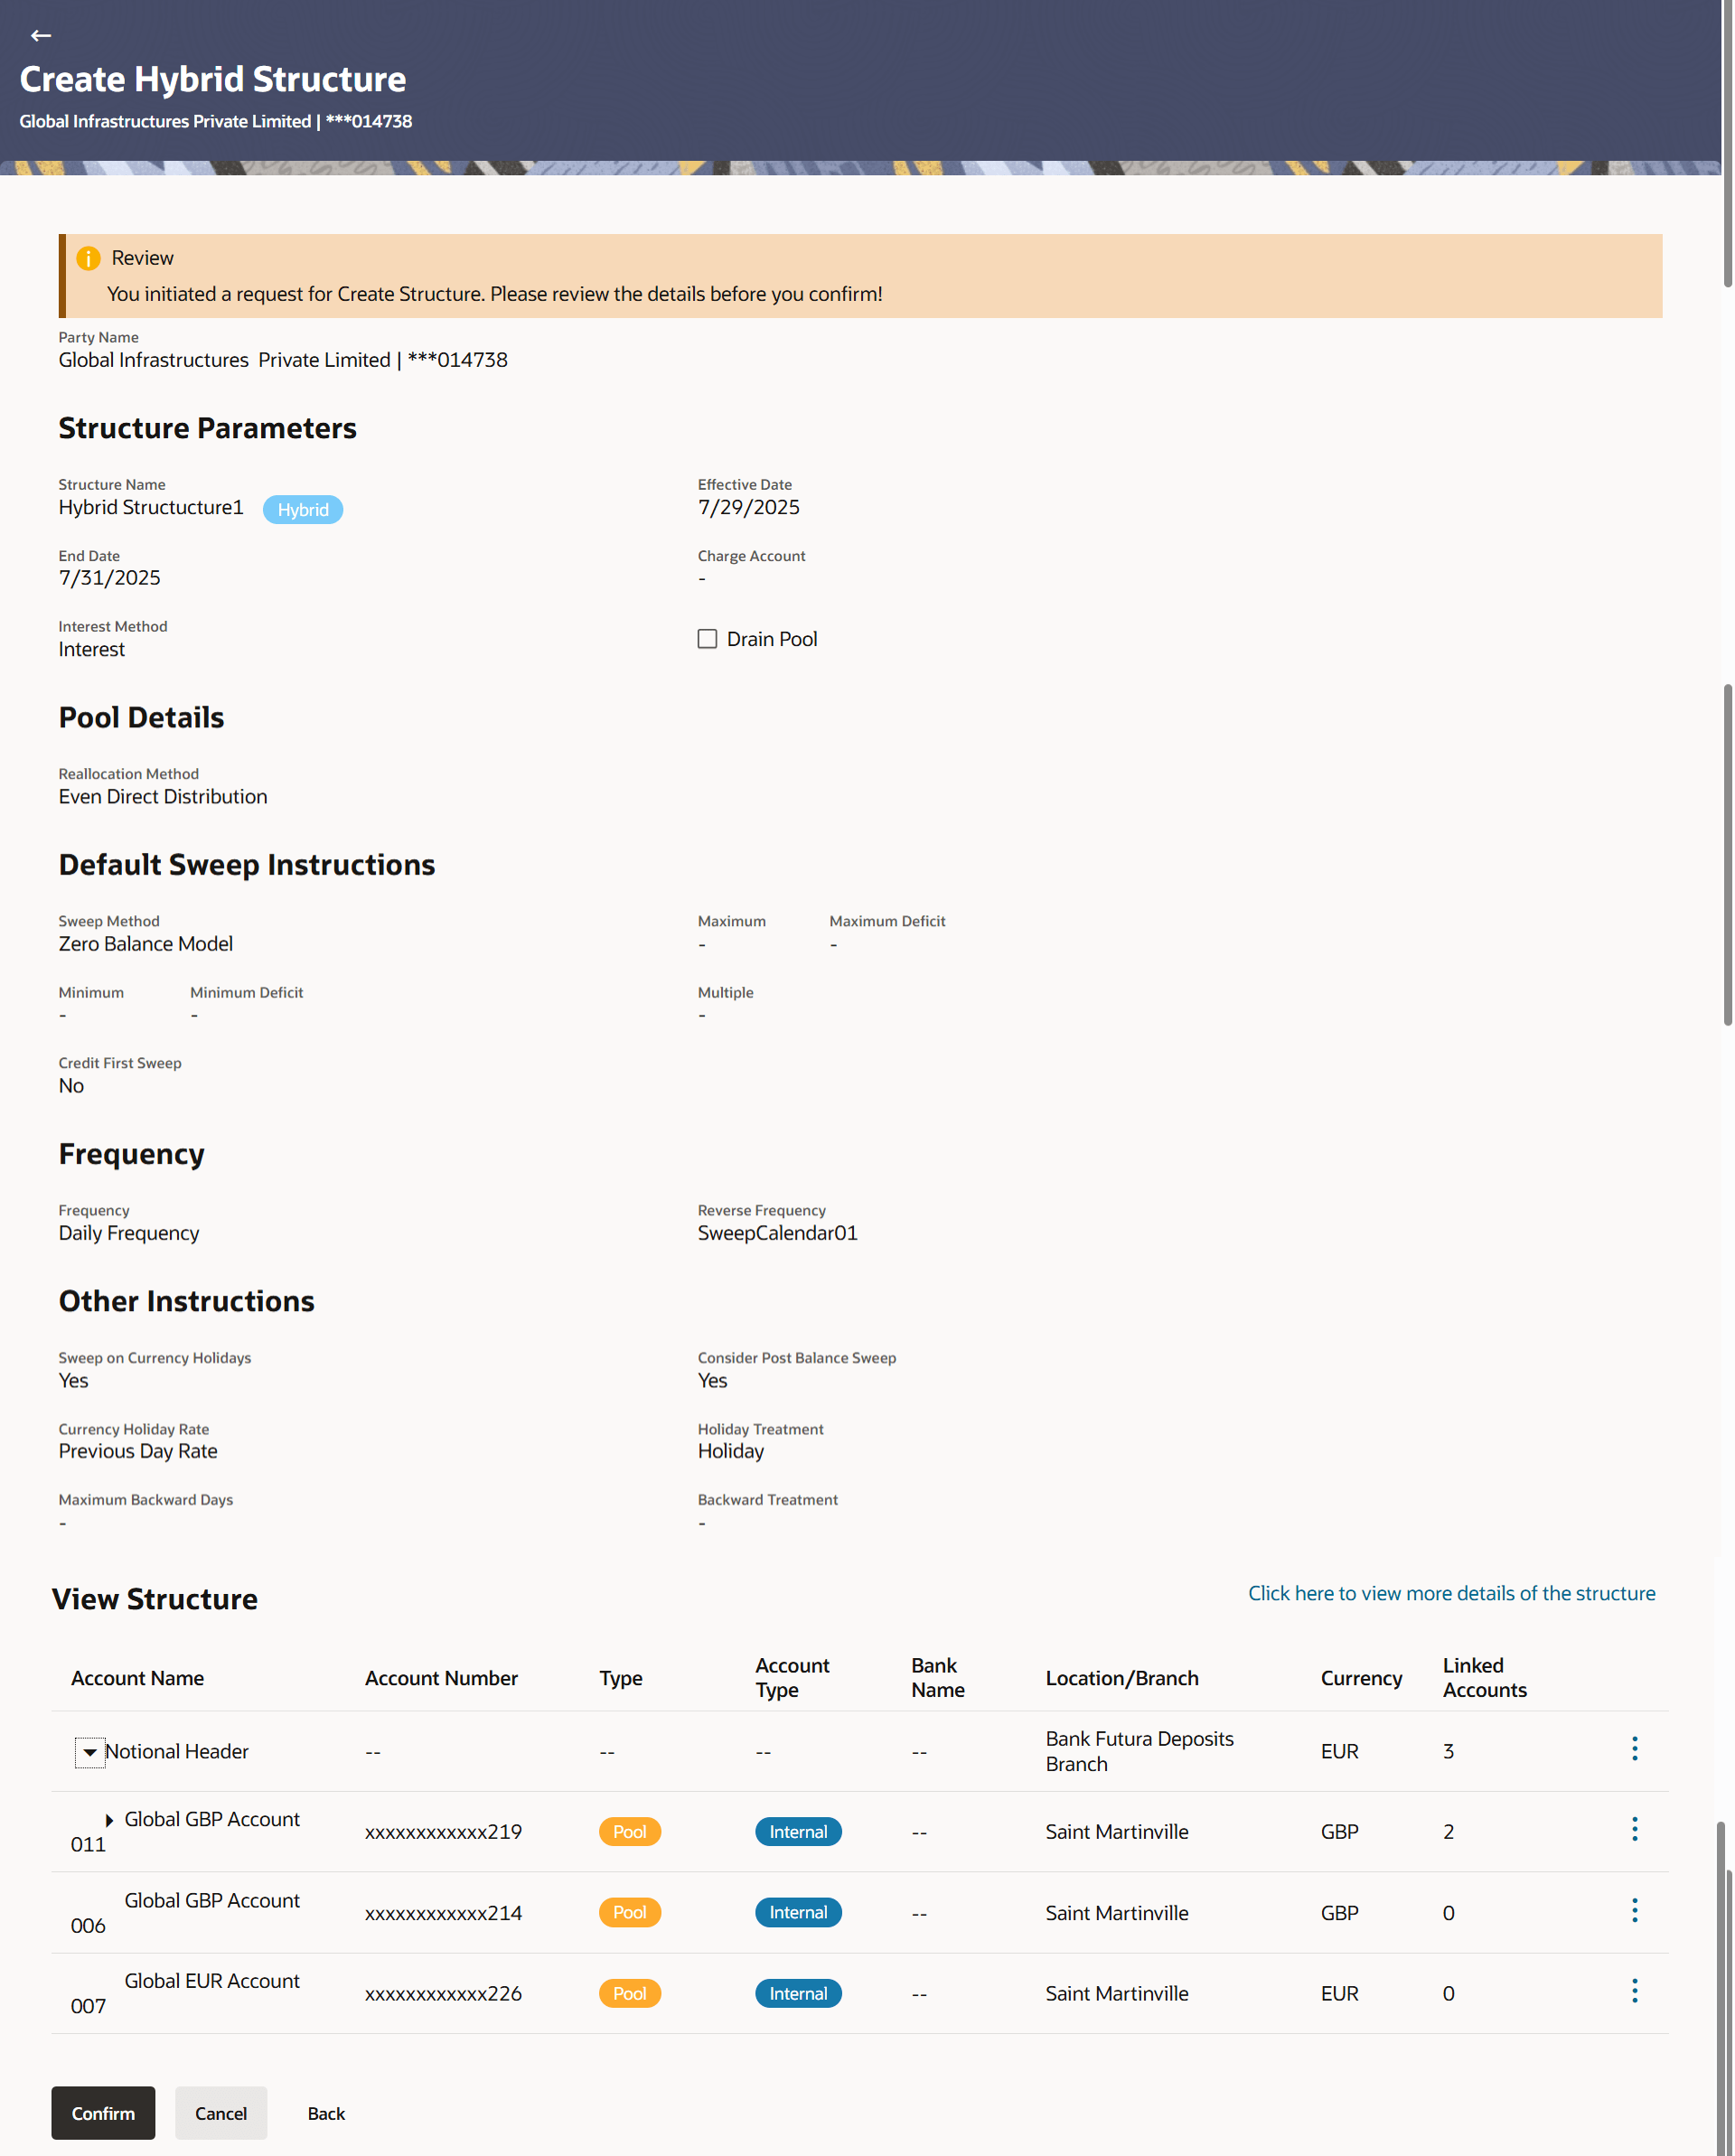
Figure 3-161 Create Hybrid Structure - Review


  1. Click Kebab and view the Account Details and Child Instruction/Reallocation of added accounts.

    Note:

    The Child Instruction/Reallocation option will be enabled only after the parent accounts nodes are expanded.
  2. Perform any one of the following actions:
    • Click Review Structure to review the structure.
    • Click Confirm to create the hybrid structure.
    • Click Cancel to cancel the operation and navigate back to Dashboard.
    • Click Back to navigate back to the previous screen.
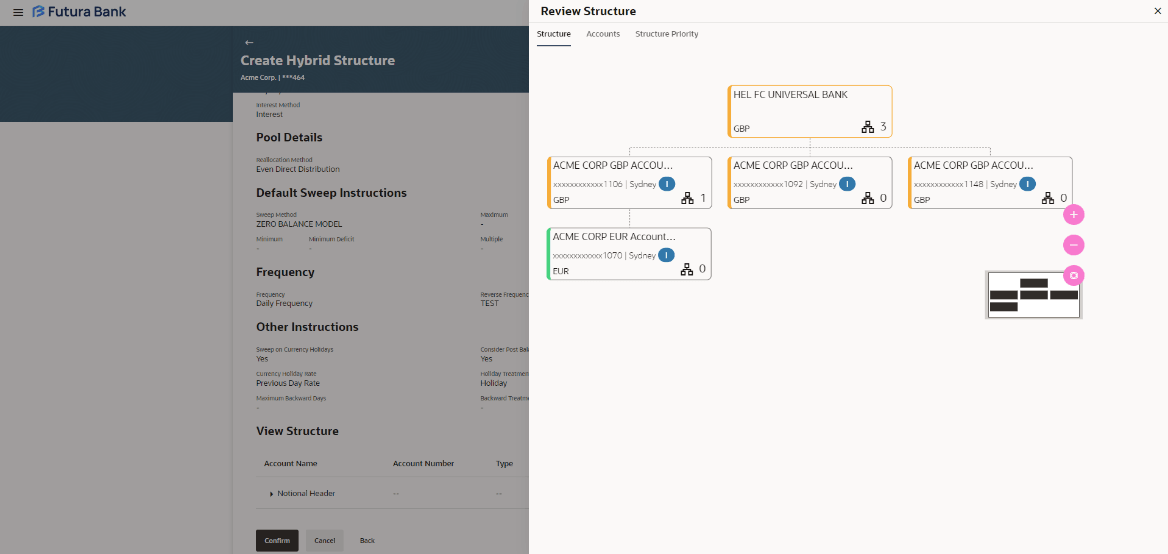
    The Create hybrid Structure – Review Structure overlay screen displays.

    Figure 3-162 Create Hybrid Structure – Review Structure Tab


    Figure 3-163 Create Hybrid Structure – Accounts Tab


    Figure 3-164 Create Hybrid Structure – Structure Priority Tab


    1. Click + icon to zoom in the structure.
    2. Click icon to zoom out the structure.
    3. Click Fitto fit the structure to screen.
    4. Click Close to close the review structure overlay screen.
  3. Perform any one of the following actions:

    The success message appears along with the transaction reference number, status and structure details.

    • Click Home to go to Dashboard screen.
    • Click Overview to go to the liquidity management dashboard.
    • Click List Structure to view the complete list of account structures.
    • Click Download Structure Details to download the created structure.

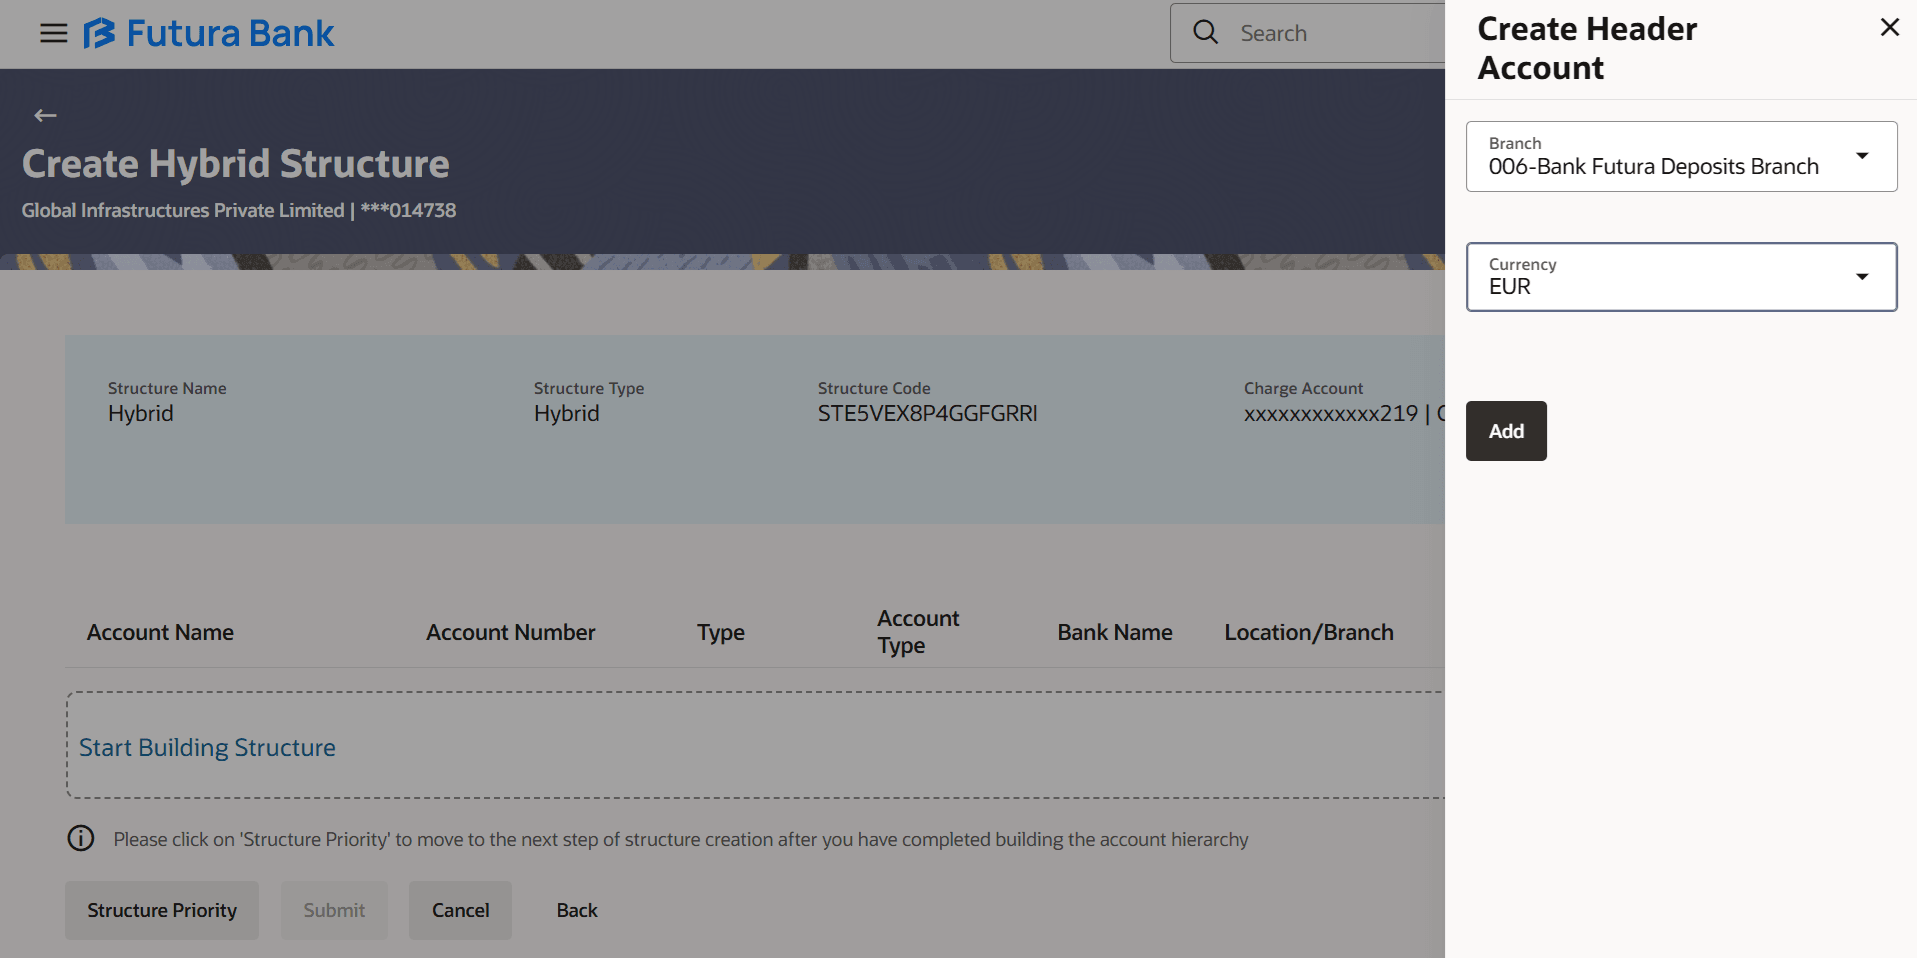
Create Hybrid Structure – Pool - Create Header Account (If the user selects Pool in the pop up)As a part of following step, the user can create the header account in which the funds will concentrated. The below screen displays when the user selects pool option in the pop up.

Table 3-114 Create Hybrid Structure – Create Header Account - Field Description

Field Description
Branch Select the branch name for the header account.
Currency Select the currency for the header account.

  1. In the Branch field, select the branch name for the header account.
  2. In the Currency field, select the currency for the header account.
  3. Perform any one of the following actions:
    • Click Add. The header account is created and added to the Create Hybrid Structure – Added Header Account screen.
    • Click Close to close the overlay screen.

Once the header account is added, the user can further link the child accounts. This screen is available in both Tree and Table view.The Create Hybrid Structure – Added Header Account screen displays in tree view.

Table 3-115 Create Hybrid Structure - Added Header Account - Tree View - Field Description

Field Description
Structure Code Displays the structure ID of the structure.
Structure Type Displays the type of the structure.
Structure Name Displays the name of the structure.
Charge Account Displays the charge account number and account name from which the charges can be collected.

Note: Only accessible internal accounts of the primary party and the linked parties as part of GCIF will be displayed. This field will appear only if the user selects the charge account number.

Header Account Information displayed for notional header account card.
Account Name Displays the name of the header account.
Account Number Displays the account number of the header account in masked format.
Location Displays the location of the account.
Account Type Displays the type of account.
The available options are:
  • I: An account which is internal to the bank.
  • E: An account which is external to the bank and linked for liquidity management.
Account Currency Displays the currency of the account.
link Displays the number of the child account(s) linked to the header account.

  1. Click Table View to view the added accounts in the table view.
    The Create Hybrid Structure - Added Header Account - Table View screen displays.
    For more information on fields, refer to the field description table.

    Table 3-116 Create Hybrid Structure – Added Header Account – Table View - Field Description

    Field Description
    Structure Code Displays the structure ID of the structure.
    Structure Type Displays the type of the structure.
    Structure Name Displays the name of the structure.
    Charge Account Displays the charge account and account name from which the charges can be collected.

    Note: Only accessible internal accounts of the primary party and the linked parties as part of GCIF will be displayed. This field is non-mandatory.

    Header Account Information displayed for header account and each child account.
    Account Name Displays the name of the customer linked to the account.
    Account Number Displays the account number in masked format.
    Type Displays the type of structure.
    Account Type Displays the type of account.
    The available options are:
    • Internal: An account which is internal to the bank.
    • External: An account which is external to the bank and linked for liquidity management.
    Bank Name Displays the name of the bank.
    Location/Branch Displays the location/branch name of the bank.
    Currency Displays the currency of the account.
    Linked Accounts Displays the number of the child account(s) linked to the parent account.
  2. Click Kebab and then click Link to add the child accounts.
    • The Create Hybrid Structure - Select Reallocation Methods & Link Accounts overlay screen displays.
    • Click Undo Link. A Undo Link Account pop-up displays confirming the removal of accounts.

    • Click OK, if the user wants to remove the added header account.
    • Click Cancel to cancel the removing process.

The user can search and select the accounts to be linked to the selected header/parent account. The filtered account list for which the user has access to will appear for linking the accounts. For GCIF enabled environment, the account list also shows the linked party account of the transaction party.

Note:

If the selected accounts are already part of existing Pool Structure or pool part of existing Hybrid Structure, then the accounts cannot be linked again. This condition is applicable only if the Cash Concentration Method is selected as Pool.

External accounts are not allowed for Pool of Hybrid Structure.

  1. From the Cash Concentration Method list, select the cash concentration method.

    Note:

    The Cash Concentration Method list is disabled while adding the child nodes at the notional header level.
  2. From the Reallocation Method list, select the reallocation method.
  3. Select the accounts that the user wants to link to the header account.
    • In the Search By Party Name, Account Number field, specify and search the complete or partial account details to display the list of accounts that matches across the fields in the table and select the accounts that the user want to link to the header account.

    Note:

    The user can either select the accounts directly in the overlay or can use the UI search to filter and select additional records. In this case, the accounts that were filtered using UI search will appear at the top, while those selected before applying UI search will appear at the bottom.
    The Create Hybrid Structure - Select Reallocation Method & Link Accounts screen displays.For more information on fields, refer to the field description table.

    Table 3-117 Create Hybrid Structure - Select Reallocation Method & Link Accounts – Field Description

    Field Description
    Cash Concentration Method Select the cash concentration methods for the account pair.
    The available options are:
    • Pool
    • Sweep

    Note: For notional header account, this option is defaulted as pool. This option is enabled only for leaf nodes (no existing children) with pool type linkage.

    Reallocation Method Select the method in which the interest is shared with the participating accounts within the account structure.
    The available options are:
    • Absolute Pro-Data Distribution
    • Central Distribution
    • Even Direct Distribution
    • Even Distribution
    • Fair Share Distribution
    • No Reallocation
    • Percentage Allocation
    • Reverse Fair Share Distribution

    This field is applicable only if the Cash Concentration Method is selected as Pool.

    Search Specify and search the complete or partial account details and displays the list of accounts that matches across the fields in the table.
    Select All Select the check-box to select all the accounts.
    Account Number and Name Displays the account numbers and name of the user in masked format.
    Account Type Displays the type of account.
    The available options are:
    • Internal: An account which is internal to the bank.
    • External: An account which is external to the bank and linked for liquidity management.
    • Notional: Notional accounts represent drain pool.

    Note: For Cash Concentration as Pool, the user cannot select the external accounts.

    Party Name Displays the name of the party linked to the users account.
    IBAN Displays the IBAN number of the account.
    Branch Displays the branch name of the account.
    Currency Displays the currency of the account.
    info Accounts marked with this symbol, are marked for regulated debit.
  4. Click Set Instructions.
    • The Create Hybrid Structure - Reallocation overlay screen displays, if the cash concentration method is selected as Pool.
    • Click Build to use the default instructions and add the child accounts to the header account.

      The Create Hybrid Structure – Submit screen displays.

    • Click Closeto close the overlay screen.

Once the child accounts are selected, the user can further set the allocation percentage for each child accounts. This screen is applicable only if the Reallocation Method is selected as Percentage Allocation.

Note:

The Show All Pairs link displays when there are existing child accounts and user is trying to add new nodes at parent level. In such cases when the Show All Pairs links appears, user can modify the Percentage Reallocation only after clicking the link.For more information on fields, refer to the field description table.

Table 3-118 Create Hybrid Structure - Reallocation – Field Description

Field Description
Reallocation Method Displays the method in which the interest is shared with the participating accounts within the account structure.

By default, the value displays as Percentage Allocation. The user can select and change, if required.

Account Number & Name Displays the account numbers and name of the account in masked format.
Allocation Percentage Specify the allocation percentage for the child account.
Note:
  • The sum of the allocation percentage for all the child accounts must be 100. This condition is applicable only for first level (accounts directly linked with notional header).
  • If the user wants to undo link any of the child nodes from the structure, then the user needs to zero the percentage of that node.

  1. Click Editto modify the allocation percentage for the child account.
  2. In the Allocation Percentage field, specify the allocation percentage for the child account.
  3. Click Update to update the changes made in the percentage allocation for the child account.
  4. Perform any one of the following actions:
    • Click Build to add the child accounts to the header account.
    • Click Closeto close the overlay screen.

The user can further add accounts/drain pool structure as sweep concentration method or accounts as pool cash concentration method from the third layer onward:

  1. If the user continues to link pool accounts under a child node, the above flow of linking will continue.
  2. If the user chooses to link sweep accounts under a child node, then the below flow will apply.

The user can search and select the accounts to be linked to the selected header/parent account. The filtered account list for which the user has access to will appear for linking the accounts. For GCIF enabled environment, the account list also shows the linked party account of the transaction party.

  1. Select the accounts that the user wants to link to the header account.
    In the Search By Party Name and Account Number field, specify and search the complete or partial account details to display the list of accounts that matches across the fields in the table and select the accounts that the user want to link to the header account.

    Note:

    The user can either select the accounts directly in the overlay or can use the UI search to filter and select additional records. In this case, the accounts that were filtered using UI search will appear at the top, while those selected before applying UI search will appear at the bottom.
    The Create Hybrid Structure – Select Reallocation Methods & Link Accounts screen displays.For more information on fields, refer to the field description table.

    Table 3-119 Create Hybrid Structure – Select Reallocation Methods & Link Accounts

    Field Description
    Cash Concentration Method Will be default selected to pool. (If the user selects pool in the pop up).
    Reallocation Method Select the method in which the interest is shared with the participating accounts within the account structure.
    The available options are:
    • Absolute Pro-Data Distribution
    • Central Distribution
    • Even Direct Distribution
    • Even Distribution
    • Fair Share Distribution
    • No Reallocation
    • Percentage Allocation
    • Reverse Fair Share Distribution

    This field is applicable only if the Cash Concentration Method is selected as Pool.

    Search Specify and search the complete or partial account details and displays the list of accounts that matches across the fields in the table.
    Select All Select the check-box to select all the accounts.
    Account Number and Name Displays the account numbers and name of the user in masked format.
    Account Type Displays the type of account.
    The available options are:
    • Internal: An account which is internal to the bank.
    • External: An account which is external to the bank and linked for liquidity management.
    • Notional: Notional accounts represent Drain pool structure.
    Party Name Displays the name of the party linked to the user's account.
    IBAN Displays the IBAN number of the account.
    Branch Displays the branch name of the user's account.
    Currency Displays the currency of the account.
    info Accounts marked with this symbol, are marked for regulated debit.
  2. Click Set Instructions.
    • The Create Hybrid Structure - Set Instructions overlay screen displays, if the cash concentration method is selected as Sweep.
    • Click Build to use the default instructions and add the child accounts to the header account.

      The Create Hybrid Structure – Submit screen displays.

    • Click Closeto close the overlay screen.

Once the child accounts are linked, the user can further set the instruction between an account pair along with the parent and child account information.

Note:

The Show All Pairs link displays when there are existing child accounts and user is trying to add new nodes at parent level. By clicking Show All Pairs allows the user to view and modify the instructions of all the child accounts that are linked to the header account.

In such cases, when the Show All Pairs links displays, user can modify the priority only after clicking the link. Any unsaved changes made to the child accounts prior to clicking the Show All Pairs link gets lost and a warning message is displayed to the user.

For more information on fields, refer to the field description table.

Table 3-120 Create Hybrid Structure - Reallocation – Field Description

Field Description
Parent Account No & Name Displays the parent account number & name of the structure in masked format.
Child Account No & Name Displays the child account number & name of the structure in masked format.
Priority Specify the sweep priority used to determine the order of execution across pairs at a level in the structure.

Note: Sweep Priority can be modified only if Showing All Pairs.

Sweep Direction Displays the option for sweep direction for the account pair.
Instruction Displays the instruction type for the account pair.

  1. Perform any one of the following actions:
    • Click Expand to view the instructions for the account pair.

      The Create Hybrid Structure – Set Instructions – Instructions & Frequency screen displays.

    • Click Closeto close the overlay screen.

The user can create the Instructions & Frequency for the account pair. The steps to take to set the instructions for the instructions and frequency screen are as follows.

  1. Click Editto modify the instruction and frequency for the header accounts.
  2. In the Instruction & Frequency tab, do the following:
    1. From the Sweep Method list, select the appropriate option.
    2. On Selection of Sweep Method, the related parameters is displayed with defined values in the editable form.
    3. From the Frequency list, select the appropriate frequency.
    4. In the Instructions Priority field, the instruction priority will be defaulted.
    5. Click Add Frequency and select the frequency to add multiple frequency.
    6. Click Deleteto delete the frequency.
    7. Click Add Instruction to apply the changes made in the instruction & frequency tab.

      Note:

      Before moving on to the next step, the user must click Add instruction.
    8. Click Add Sweep to add multiple sweep method in instruction & frequency.
    9. Click Delete to delete the added sweep instruction & frequency.
  3. Click Update to update the changes made to the set instructions of child accounts.

    Note:

    In a structure, swapping the priority set in two instructions within an account pair is not allowed. To do so, the user will have to delete one of the instructions and then re-add it with the desired priority.
    For more information on fields, refer to the field description table.

    Table 3-121 Create Hybrid Structure - Set Instructions - Instructions & Frequency

    Field Name Description
    Sweep Method Select the sweep method set between the account pair.

    The available options are:

    • Zero Balance Model
    • Fixed Amount Model
    • Collar Model
    • Target Model - Constant
    • Target Model - Fixed
    • Threshold Model
    • Range Based Model
    • Cover Overdraft Model
    • Percentage Model

    Value defined as a part of first step will be shown in an editable form.

    Note: Only compatible sweep methods, based on Sweep Direction, will get listed.

    Frequency Select the frequency at which the account structure should be executed.

    The list displays all the frequencies maintained in the product processor.

    Instruction Priority Specify the instruction priority across multiple instructions within an account pair.
    Parameters Applicability of the below fields varies based on the instruction type selected between the accounts.
    Collar Amount Specify the collar amount set for executing sweep is displayed.

    This field displays for if the user has selected Collar Model from Instruction Type list.

    Value set at the product processor is displayed in an editable form.

    Maximum Specify the maximum amount for executing sweep.

    Value set at the product processor is displayed in an editable form.

    Maximum Deficit Specify the maximum deficit amount for executing sweep.

    Value set at the product processor is displayed in an editable form.

    Minimum Specify the minimum amount for executing sweep.

    Value set at the product processor is displayed in an editable form.

    Minimum Deficit Specify the minimum deficit amount for executing sweep.

    Value set at the product processor is displayed in an editable form.

    Threshold Amount Specify the threshold amount for which the sweep is to be executed.

    Value set at the product processor is displayed in an editable form.

    Multiple Specify the amount in multiples of which the sweep is to be executed.

    Value set at the product processor is displayed in an editable form.

    Percentage Specify the percentage for which the sweep is to be executed.

    Value set at the product processor is displayed in an editable form.

    Fixed Amount Specify the fixed amount for which the sweep is to be executed.

    Value set at the product processor is displayed in an editable form.

    Note:

    In a structure, swapping the priority set in two instructions within an account pair is not allowed. To do so, the user will have to delete one of the instructions and then re-add it with the desired priority.
  4. In the Reverse Sweep tab, do the following:
    1. Select the Reverse Sweep Allowed toggle to enable the reverse sweep for the account pair.
    2. From the Reverse Frequency list, select the appropriate option if the Reverse Sweep Allowed toggle is enabled.

The user can create the reverse frequency for the account pair.The Create Hybrid Structure - Set Instructions – Reverse Sweep screen displays.For more information on fields, refer to the field description table.

Table 3-122 Create Hybrid Structure - Set Instructions – Reverse Sweep – Field Description

Field Description
Reverse Sweep Allowed Select the toggle to enable the reverse sweep for the account pair.
Reverse Frequency Select the frequency at which the reverse sweep for the account structure should be executed.

The list displays the frequencies for which the BOD is enabled.

Note: This field appears only if the Reverse Sweep Allowed toggle is enabled.

  1. Perform any one of the following actions:
    • Click Intercompany Loan tab to set the intercompany loan instruction for the account pair.

      The Create Hybrid Structure – Set Instructions – Intercompany Loan screen displays.

    • Click Closeto close the overlay screen.

The user can create the intercompany loan for the sweeps between the account pair.

Note:

This tab displays only if the accounts in the account pair belong to the two different parties.The Create Hybrid Structure - Set Instructions – Intercompany Loan screen displays.For more information on fields, refer to the field description table.

Table 3-123 Create Hybrid Structure - Set Instructions – Intercompany Loan – Field Description

Field Description
Track Intercompany Loan Select the option from the drop-down list, to enable the Track Intercompany Loan for the account pair.
The available options are:
  • Yes
  • No

Note: By default, this field is selected as No

Intercompany Loan Reference Specify the intercompany loan reference details.

Note: This field appears and mandatory, if Track Intercompany Loan is selected as Yes from the drop-down list.

Loan Type Displays the type of the loan.
Note:
  • If Reverse Sweep Allowed toggle is ON, the Loan Type is displayed as Fixed.
  • If Reverse Sweep Allowed toggle is OFF, the Loan Type is displayed as Open.
  • This field appears if Track Intercompany Loan is selected as Yes from the drop-down list.

  1. Click Drain Pool tab to select the drain pool for selected nominated accounts.
    • The Create Hybrid Structure – Set Instructions – Drain Pool screen displays.
    • Click Close to close the overlay screen.

The user can select the nominated account for the accounts.

Note:

This tab appears only if the accounts are notional accounts.

Table 3-124 Create Hybrid Structure - Set Instructions – Drain Pool Tab - Field Description

Field Name Description
Account No. & Name Select the account number and name of the account to nominate the account for drain pool.
Party Name Displays the party name of the account.
Branch Displays the branch of the account.
Currency Displays the currency type of the account.

  1. Click on Add Instruction from the Instruction and Frequency Tab.
  2. Click the Update icon in each row where you have modified the data and then proceed with Build.
  3. Click on Build.
  4. Perform any one of the following actions:
    • Click on Structure Priority. The Create Hybrid Structure – Structure Priority screen displays.
    • Click Close to close the overlay screen.

    Note:

    The Submit button will be enabled only after the user clicks the Structure Priority on the overlay screen.

As a part of following step, the user can view and update the priority of other structures too and can also view the details of accounts in common participating in multiple structures.

Note:

Only Header node and its immediate child accounts will appear on the screen initially. To view further nodes, click on the respective nodes to expand and view its child accounts. Pagination will be displayed at every level of structure layer and displayed if the number of nodes exceeds the allowed limit as per the configuration.The Create Hybrid Structure – Structure Priority screen displays.For more information on fields, refer to the field description table.

Table 3-125 Create Hybrid Structure - Structure Priority – Field Description

Field Description
Structure Code Displays the structure ID of the structure.
Structure Name Displays the name of the structure.
Charge Account Displays the charge account number and account name from which the charges can be collected.

Note: Only accessible internal accounts of the primary party and the linked parties as part of GCIF will be displayed. This field will appear only if the user selects the charge account number.

Parent/Child Account Information displayed on parent/child account card in tree view.
Account Name Displays the name of the account.
Account Number Displays the account number of the account in masked format.
Location Displays the location of the account.
Account Type Displays the type of account.
The available options are:
  • I: An account which is internal to the bank.
  • E: An account which is external to the bank and linked for liquidity management.
Account Currency Displays the currency of the account.
Link Displays the number of the child account(s) linked to the parent account.

Table 3-126 Create Hybrid Structure – Structure Priority – Accounts Tab - Field Description

Field Description
Account Number and Name Displays the account number and name of the structure in masked format.
Structure ID Displays the structure ID of the structure.
Structure Name Displays the name of the structure.
Structure Type Displays the type of the structure.
Structure Status Displays the status of the structure.

Table 3-127 Create Hybrid Structure – Structure Priority – Structure Priority Tab - Field Description

Field Description
Structure ID Displays the structure ID of the structure.
Structure Description Displays the description of the structure.
Party ID | Party Name Displays the party ID and party name of the structure in masked format.
Structure Type Displays the type of the structure.
Structure Status Displays the status of the structure.
Existing Structure Priority Displays the existing structure priority of the structure.
New Structure Priority Specify the new structure priority of the structure.
Note:
  1. Structure Priority should be unique for each structure.
  2. Except the first row, which indicates a new structure creation structure priority cannot be blank for any other row.

  1. Perform any one of the following actions:
    • Click Save to save the structure priority details.
    • Click Closeto close the overlay screen.

This screen enables the user to view the added accounts in both the Tree and Table view.The Create Hybrid Structure – Submit - Tree View screen displaysFor more information on fields, refer to the field description table.

Table 3-128 Create Hybrid Structure – Submit - Tree View – Field Description

Field Description
Structure Code Displays the structure ID of the structure.
Structure Type Displays the type of the structure.
Structure Name Displays the name of the structure.
Charge Account Displays the charge account number and account name from which the charges can be collected.

Note: Only accessible internal accounts of the primary party and the linked parties as part of GCIF will be displayed. This field will appear only if the user selects the charge account number.

Header Account Information displayed on notional header account card.
Branch Displays the branch name for the header account.
Currency Displays the currency for the header account.
Link Displays the number of the child account(s) linked to the parent account.
Real Account Information displayed on real account card.
Account Name Displays the name of the account.
Account Number Displays the account number of the user in masked format.
Location Displays the location of the account.
Account Type Displays the type of account.
The available options are:
  • I: An account which is internal to the bank.
  • E: An account which is external to the bank and linked for liquidity management.
Account Currency Displays the currency of the account.
Link Displays the number of the child account(s) linked to the parent account.

Note:

Only Header node and its immediate child accounts will appear on the screen initially. To view further nodes, click on the respective nodes to expand and view its child accounts. Pagination will be displayed at every level of structure layer and displayed if the number of nodes exceeds the allowed limit as per the configuration.

  1. Click Table View to view the added accounts in the table view.
    The Create Hybrid Structure - Submit - Table View screen displays.For more information on fields, refer to the field description table.

    Table 3-129 Create Hybrid Structure - Submit - Table View – Field Description

    Field Description
    Structure Code Displays the structure ID of the structure.
    Structure Type Displays the type of the structure.
    Structure Name Displays the name of the structure.
    Charge Account Displays the charge account number and account name from which the charges can be collected.

    Note: Only accessible internal accounts of the primary party and the linked parties as part of GCIF will be displayed. This field will appear only if the user selects the charge account number.

    Header Account Information displayed for header account and each child account.
    Account Name Displays the name of the customer linked to the user’s account.
    Account Number Displays the account number of the user in masked format.
    Type Displays the type of structure.
    Account Type Displays the type of account.
    The available options are:
    • Internal: An account which is internal to the bank.
    • External: An account which is external to the bank and linked for liquidity management.
    Bank Name Displays the name of the bank.
    Location/Branch Displays the location/branch name of the account.
    Currency Displays the currency of the account.
    Linked Accounts Displays the number of the child account(s) linked to the parent account.
  2. Click Kebab and then click Link from the account header card.
    • The Create Hybrid Structure - Link Accounts overlay screen displays.
    • Click Reallocation to update the reallocation method for the pool account pairs. This option will appear only for the parent accounts with the child accounts.

      The Create Hybrid Structure – Reallocation screen displays.

    • Click Account Details to view the account details.

      The Account Details overlay screen displays.

    • Click Undo link. A Undo Link Account pop-up displays confirming the removal of accounts.
  3. Perform any one of the following actions:
    • Click Submit to submit the hybrid structures. The Create Hybrid Structure - Review screen displays.
    • Click Cancel to cancel the operation and navigate back to Dashboard.
    • Click Back to navigate back to the previous screen.

This screen enables the user to review the updated structure details in the new structure.

  1. Click Kebab and view the Account Details and Child Instruction/Reallocation of added accounts.

    Note:

    The Child Instruction/Reallocation option will be enabled only after the parent accounts nodes are expanded.
  2. Perform any one of the following actions:
    • Click Click here to view more details of the structure to review the structure.

      The Create Hybrid Structure – Review Structure overlay screen displays.

    • Click Confirm to create the hybrid structure.
    • Click Cancel to cancel the operation and navigate back to Dashboard.
    • Click Back to navigate back to the previous screen.
    The Create hybrid Structure – Review Structure overlay screen displays.
    1. Click + icon to zoom in the structure.
    2. Click icon to zoom out the structure.
    3. Click Fitto fit the structure to screen.
    4. Click Close to close the review structure overlay screen.
  3. Perform any one of the following actions:

    The success message appears along with the transaction reference number, status and structure details.

    • Click Home to go to Dashboard screen.
    • Click Overview to go to the liquidity management dashboard.
    • Click List Structure to view the complete list of account structures.
    • Click Download Structure Details to download the created structure.