10.1 Demand Draft Issuance to Saved Payee
This topic describes the systematic instruction to Demand Draft Issuance to Saved Payee screen. A user can initiate a request for a Demand Draft using this transaction.
All Demand Draft payees (Domestic and Cross Border Demand Draft payees) created by the user are listed for selection. Details of the payee are auto populated on the transaction screen once a selection has been made. Based on the payee selection, the account for debiting funds towards the issue of the demand draft will get defaulted on the Transfer From field and user can change the source account if required. is selected. The user is then required to fill in details such as the amount for which the draft is to be drawn and the date on which the draft is payable, to initiate the demand draft request.
To issue demand draft to registered payee:
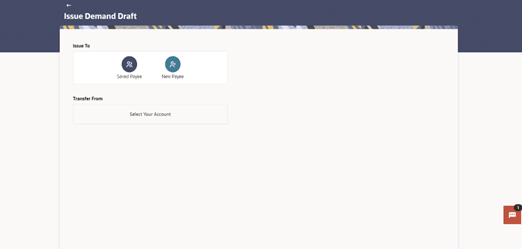
- Navigate to the Issue Demand Draft screen.
Note:
The fields which are marked as Required are mandatory.For more information on fields, refer to the field description table.
Table 10-1 Issue Demand Draft - Field Description
Field Name Description Issue To Information specified in below fields are related to issue to. Saved Payee Option to select the existing payee to whom you wish to issue the demand draft.
All the demand draft payees maintained will be listed for selection.
New Payee Option to add new payee to whom you wish to issue the demand draft. Transfer From Displays the debit account details such as Account Type, Account Nick Name/Account Name, Branch code, Account currency and Available Balance. All the user’s own accounts will be listed for selection. Badge Type Displays the type of the source account from which the funds are to be debited towards the payee. The options are:
- Islamic
- Conventional
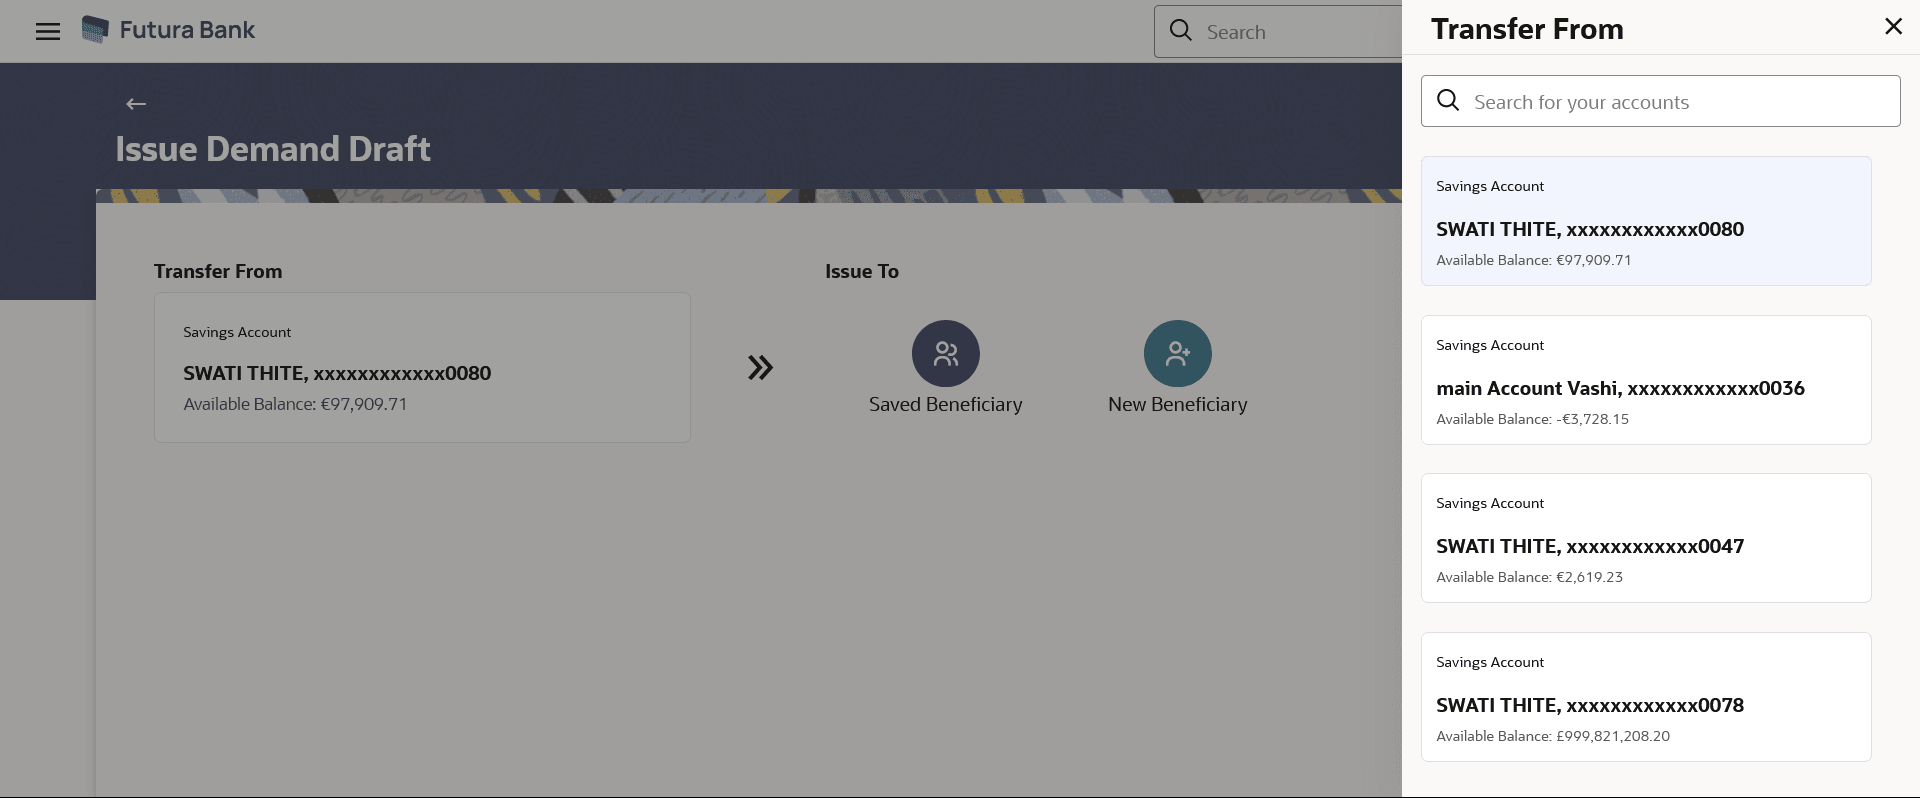
Account Details Displays details like - nick name, account number, branch, currency, current balance etc. based on configuration for account in day0. Current Balance The net balance in the selected source account is displayed against the Transfer From field once an account is selected. - Click on the Transfer From card. The Transfer From overlay screen will appear with all the user's own accounts.
- Select the source account from the list from which funds need to be drawn.
- Enter the search criteria and click on the
 icon to find the accounts.
Note:
Users can search for accounts by typing a few characters (type to search). This can be done in fields such as Account Type, Nickname, Account Name, Account Number, Currency, and Branch.Figure 10-3 Issue Demand Draft- Transfer From overlay screen
Note:
The fields which are marked as Required are mandatory.For more information on fields, refer to the field description table.
Table 10-2 Issue Demand Draft- Transfer From overlay screen - Field Description
Field Name Description Search for you account Allow user to search own accounts with the Account Type, Nickname, Account Name, Account Number, Currency, and Branch. Note: All the user’s own accounts will be listed on the Transfer From overlay screen. Refer Transfer From Drawer section.
- Under the Issue To section, click on the Saved
Payee.
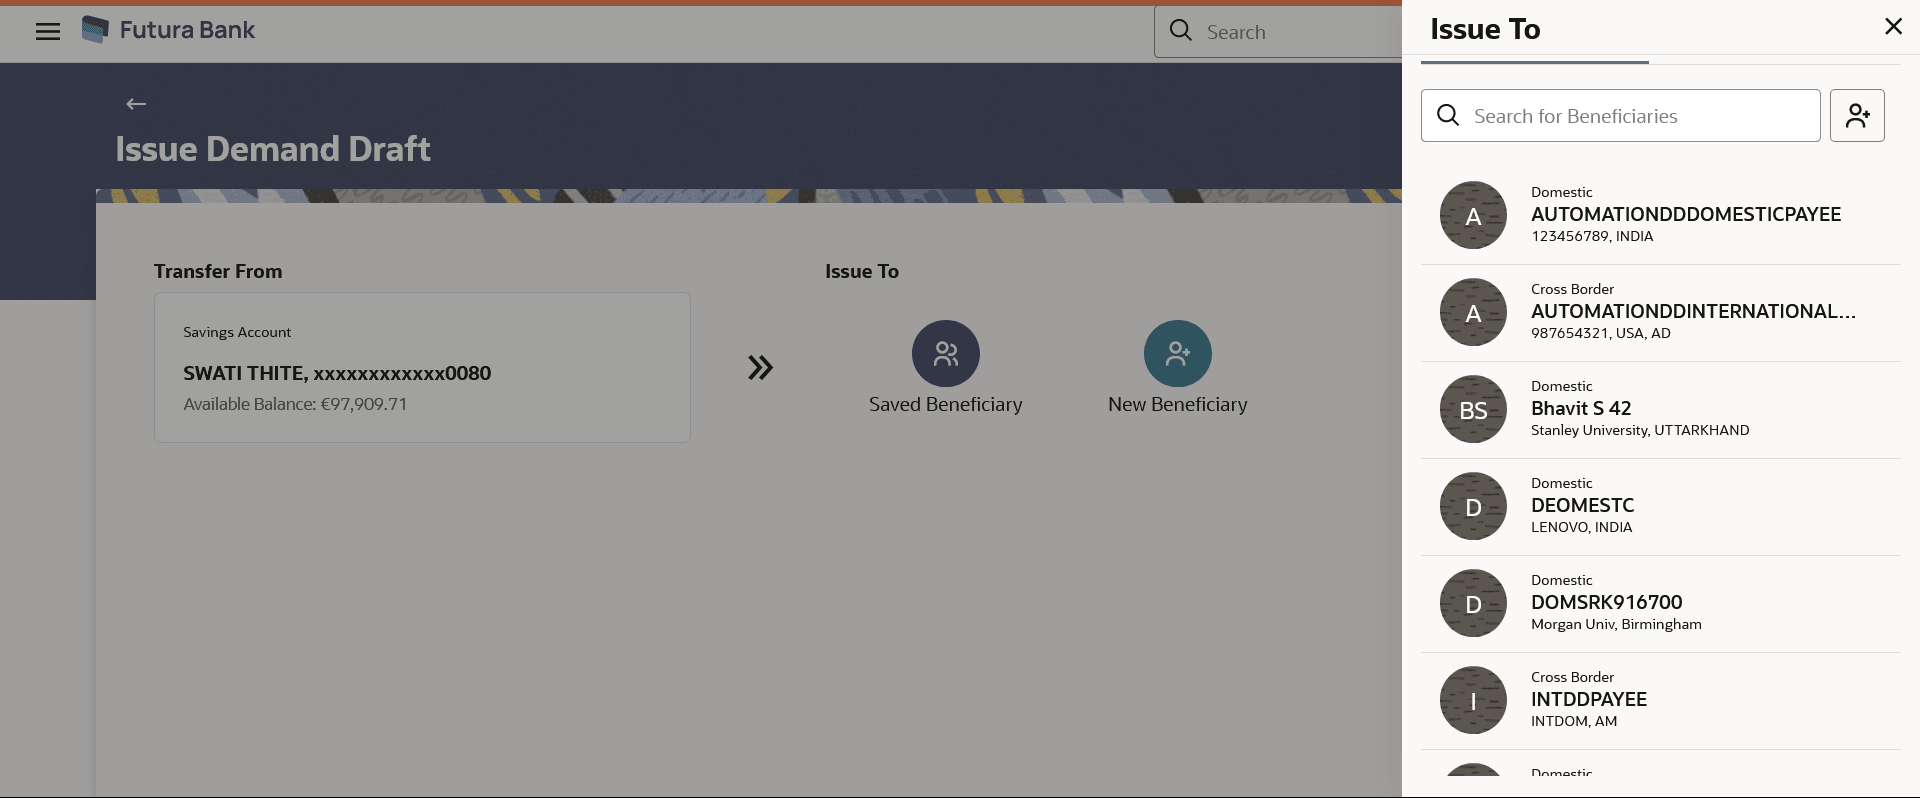
- The Issue To overlay screen will appear with the Saved Payee tab appears.
Note:
- Users can also add new payee from the New Payee tab.
- Users can search the specific payees by typing a few characters (type to search). This can be done in fields such as Draft Type, Nickname, Favouring, City/Country.
- Click on the
 icon to add the new payee.
Figure 10-4 Issue Demand Draft- Saved Payee
Note:
The fields which are marked as Required are mandatory.For more information on fields, refer to the field description table.
Table 10-3 Issue Demand Draft- Saved Payee - Field Description
Field Name Description Search for payee Allow user to search payee with the Draft Type, Nickname, Favouring, City/Country. Note: All the saved payees listed on the Saved Payees overlay screen.
Details of Payee The following details are displayed for each payee: Payee Photo/Initials, Draft Type, Nick Name, Favouring. Payee Photo/Initials Displays the payee's photo, if uploaded, against each payee name. If the payee’s photo is not uploaded, the initials of the payee will be displayed in place of the photo. Draft Type Displays the type of draft to be associated with the payee. It Could be:
- Domestic
- Cross Border
Payee Nickname Displays the payee by their nick names defined at the time of payee creation. Draft Favouring Displays the name of the payee i.e., the intended recipient of the funds. - The Issue To overlay screen will appear with the Saved Payee tab appears.
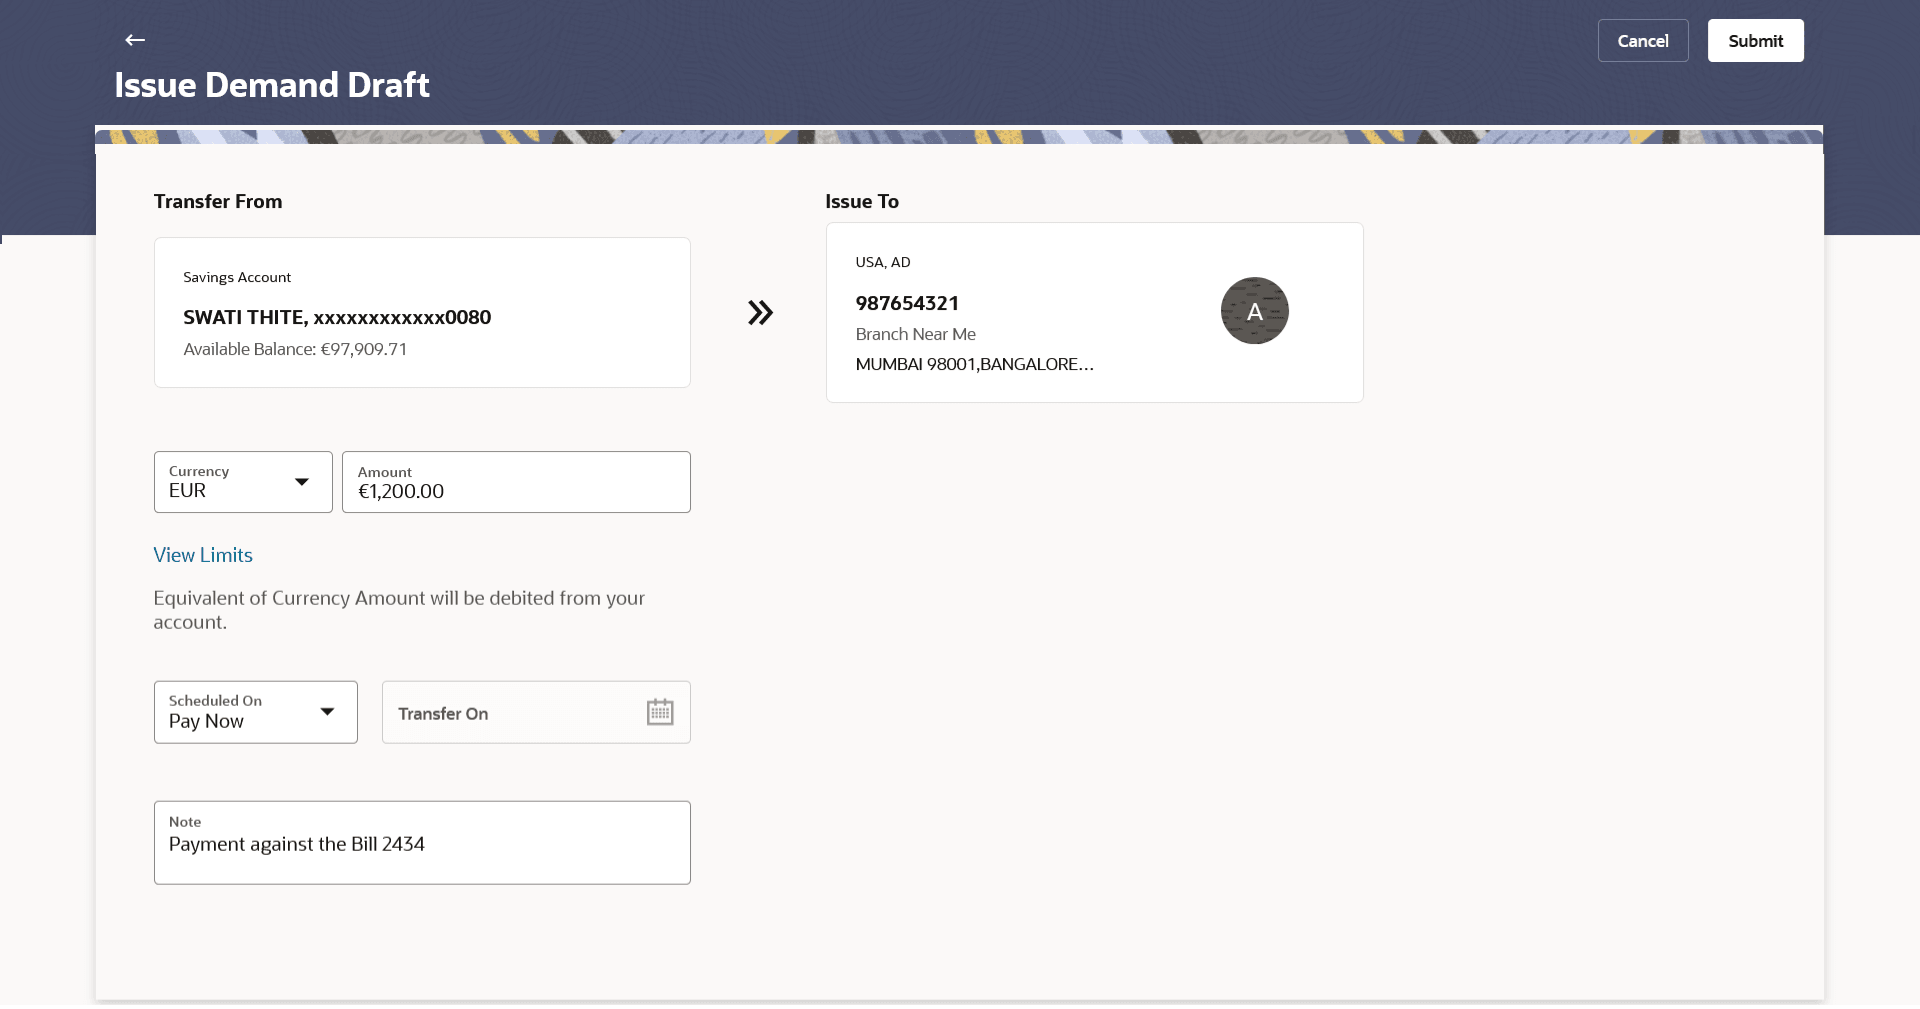
- On selection source account and beneficiary, the screen populates the Transfer
To and Payment Details.
Note:
The fields which are marked as Required are mandatory.For more information on fields, refer to the field description table.
Table 10-4 Issue Demand Draft - Field Description
Field Name Description Transfer From Select the source account from which the funds are to be debited towards the issue of the demand draft. Issue To Select the payee to whom the demand draft is to be issued. Currency Select the currency in which the draft is to be issued. In case the draft being issued is a domestic demand draft, the currency will be the local currency of the country.
Amount Specify the amount for which the draft is to be issued. View Limits Link to view the transaction limits. For more information on Limits, refer View Limits section.
Scheduled On The facility to specify the date on which the demand draft is to be issued. The options are:
- Pay Now: Select this option if you wish to have the draft drawn on the same day.
- Pay Later: Select this option if you wish to have the draft drawn at a future date. If you select this option, you will be required to specify the date on which the draft is to be drawn.
Transfer On Specify the date on which the draft is to be issued. This field appears if the option Pay Later is selected from the Scheduled On list.
Transfer From Select the source account from which the funds are to be debited towards the issue of the demand draft. Note Specify a note or remarks for the transaction, if required. - From the Currency list, select the preferred currency.
- In the Amount field, enter the amount for which the draft needs to be issued.
- In the Scheduled On field, select the option to indicate whether
the draft is to be issued for the same day or a date in the future.
- If you select the Pay Now option, the draft will be issued
on the same day.
- If you select the option Pay Later, select the date for when the draft is to be drawn.
- If you select the Pay Now option, the draft will be issued
on the same day.
- In the Note field, specify a note or remarks.
- Perform anyone of the following actions:
- Click Submit to initiate the request for the issue of the demand draft.
- Click Cancel to cancel the transaction.
- Perform anyone of the following actions:
- The Review screen appears. Verify the details and click Confirm.
- Click Cancel to cancel the transaction.
- Click Back to navigate back to previous screen.
The success message appears of request to create a new demand draft along with the reference number, host reference number, status and draft details.
- Click the e-Receipt link to download the e-receipt.For more information refer the e-Receiptsection in the Corporate Customer Services User Manual.
- Perform anyone of the following actions:
- Click Transaction Details to view the details of the transaction.
- Click Go to Dashboard to go to the Dashboard screen.
- Click Go to Payments Overview to go to the Payment Overview page.
- Click Issue Another Demand Draft to issue a new demand draft.
Parent topic: Issue Demand Drafts


