4.3.1.2 Mode of Liquidation

A loan inherits the attributes of the product it uses. One of the attributes defined for a loan product is the liquidation type that governs how schedules are liquidated. This attribute inherited by a loan can be changed when you enter the loan contract. For instance, if the liquidation type specified for the product was Auto, you can change it to Manual, if required, and so on.

If Auto liquidation has been set for the contract, then all components of the loan are liquidated automatically when each schedule is liquidated. You cannot modify the order in which components are automatically liquidated, which was defined for the product.

If Manual liquidation has been set for the contract, then a manual liquidation must be performed for each schedule, and all components of the loan must be liquidated manually. You cannot modify the order in which components are to be manually liquidated, which was defined for the product.

If Component liquidation has been set for the contract, then you can select the components that must be automatically liquidated, and specify the order in which the automatic liquidation take place. In such a case, only those components so selected are liquidated automatically in the order specified. The other components that are not selected must be liquidated manually.

When you select the liquidation mode, the system enables the Liquation Order button for all types of liquidation mode during contract booking as well as contract amendment. For Component liquidation, the specifications made for the product can be viewed in the Component Level Preferences screen when you enter a contract.

Specify the User ID and Password, and login to Homepage.

From the Homepage, navigate to Loan and Commitment-Contract Input screen.

On the Loan and Commitment-Contract Input screen, click Schedules tab.

  1. On the Schedules screen, click Liquidation Order.
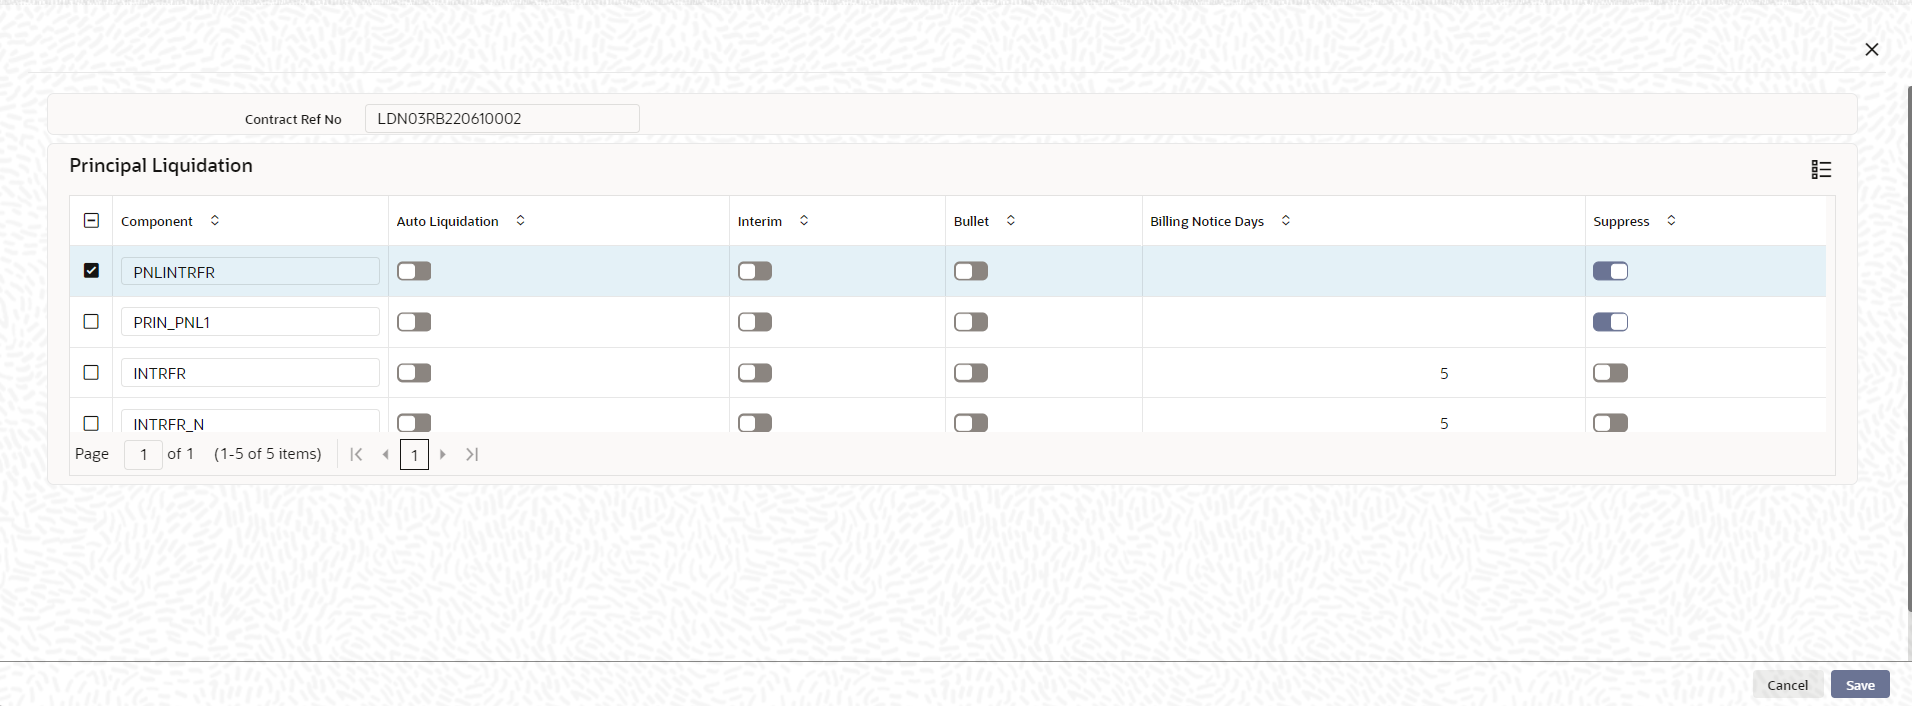
    The Component Level Preferences screen is displayed.

    Figure 4-9 Component Level Preferences


  2. The Component Liquidation Order screen is displayed, with the component liquidation preferences defined for the product. You can make changes to these specifications in this screen.

    Note:

    The system does not display the fee components in the component liquidation screen at the contract level.
    Here you can view the interest components and the Principal component linked to the product. The system defaults the Contract Reference Number, Component, and the Order of liquidation.

    Table 4-13 Mode Of Liquidation

    Fields Description
    Auto Liquidation Select the check box adjacent to each component to liquidate the contract automatically.
    Interim Schedule Select the check box to indicate the Interim schedule liquidation mode for each component. This is enabled for editing only if the liquidation mode selected is Component.
    Bullet Schedule Select the check box to indicate the Bullet schedule of liquidation for each component. This is enabled for editing only if the Liquidation mode is selected as Component.

    Note:

    • If Auto Liquidation flag is not selected, the system liquidates the component manually.
    • You are allowed to check the Interim Schedule and the Bullet Schedule flags only if the Auto Liquidation flag is selected.
    • You are allowed to check the Interim and Bullet schedules only against the main interest component and the principal component.

    Example

    Let us assume the following:
    A contract has the following interest payment schedules:
    • 01-Apr-2008 - USD 1000
    • 01-May-2008 - USD 1000
    • 01-Jun-2008 - USD 1000
    • 01-Jul-2008 - USD 10,000
    Assuming Principal is USD 10,000, if you select the liquidation mode for Bullet Schedule as Auto for Principal and Manual for Interest. The system liquidates the Principal automatically whereas the Interest is liquidated manually.
    Similarly if you select the liquidation mode for interim schedules as Auto for Interest and Manual for Principal, then the system liquidates the interest in all the interim interest schedules automatically and the Principal is liquidated manually.

    If interim interest schedules are in Auto Liquidation mode and the bullet schedule is in Manual liquidation mode. And if the last interim interest schedule has the residual amount for liquidation in the next schedule which is bullet schedule, the system does not allow the you to Liquidate the Bullet schedule, if there is any previous O/D amount.

    Note:

    If you change the liquidation mode for an overdue schedule from Manual to Auto then the system liquidates the overdue schedule as part of the next batch.
    Notice Days The system defaults the notice days from the product level notice days. However, you are allowed to amend the notice days defaulted and suppress flag for each component.
    Suppress Select this check box to suppress the bill for a particular component. If it is not selected, during notice generation the system considers the notice days specified instead of taking it from the Product Preference screen.

    You are allowed to amend Suppress Billing Notice flag during contract booking and as part of CAMD. Accordingly if the billing falls overdue due to the billing day’s amendment during CAMD, the system performs the auto billing in batch.

    While amending the Suppress Billing Notice flag from Y to N, the system generates the billing notice on the batch of amendment date, provided the Billing Notice days is less than the difference between the amendment date and the next schedule date.

    Example

    Let us assume the notice days defined at the Product Level is 3 Days and it is defaulted to the contract level.
    • Due Date - 17-Apr-2009
    • Notice Days - 3 Days
    • Notice Generation Date - 14-Apr-2009
    • You can change notice days to 5 days at the contract level for all the Components
    • Due Date: 17-Apr-2009
    • Notice Days: 5 Days
    • Notice Generation Date: 12-Apr-2009

    Note:

    • The system calculates the notice generation date based on the scheduled due date.
    • The system generates the bill for fee provided the Notice flag at the Component Level is deselected. It generates the bill as per the preferences maintained at the contract in the Fee screen available at the Contract level.
    • The system generates the single notice for both Principal and Interest, if the Billing Days, Schedule Date, and the Liquidation mode are same for both the component. Even if one of this is different, then the system generates a separate notice for each component.
    • The system does not generate any notices for Backdated Schedules in case of Manual/Auto Liquidation mode during contract booking.
    For any components selected for automatic liquidation in the product preferences, the Auto box is selected. You can deselect it to indicate that the component is not to be selected for automatic liquidation.

    For any components not selected for automatic liquidation in the product preferences, the Auto box is not selected. You can select the component for automatic liquidation.

    Note:

    You cannot change the liquidation order defined for the product, in the Component Liquidation Order screen, when you enter a contract.
    Mode of Status Control While defining the product, you indicate the various status codes for the product. For example - active, past due obligation, non-accrual basis, write-off, and so on. For the product, you can specify either manual or automatic change of status.

    When processing a loan you can change the mode of status change from automatic to manual or vice-versa.