This topic describes the systematic instruction to Group Corporate Profiling - Edit feature.
This function enables administrator user to edit the exiting Group
Corporate Profiling details.
To edit the Profiling details of the Group
Corporate:
- Navigate to one of the above paths.
The Group Corporate Profiling screen
appears.
- In the Search By field, select the appropriate option to
search the Group Corporate.
- If you select the Group Corporate option;
- Perform anyone of the following actions:
- In the Group Corporate ID field, enter the Group Corporate ID whose Group Corporate Details you wish to view.
- In the Group Corporate Name field, enter the name of the Group Corporate whose Group Corporate Details you want to view.
- If you select the Party option;
- In the Party ID field, enter
the party ID mapped to Group Corporate you wish to view.
The Search Party popup appears.
- From the Entity ID list,
select the entity from which party to be searched.
- Perform anyone of the following actions:
- In the Party ID field, enter the party ID to be searched.
- In the Party Name field, enter the name of the party to be searched.
- Perform anyone of the following actions:
- Click Search to search the party mapped to the Group Corporate.
- Click Cancel to cancel the transaction.
- Click Clear to rest the entered details.
- Perform anyone of the following actions:
- Click Search.
The Group Corporate summary screen with search results appears based on the searched criteria.
In case of invalid Group Corporate details, error message is shown on the screen.
- Click Clear to reset the details.
- Click Cancel to cancel the transaction.
- Click the link under the Onboarding Status or Modification
Status column.
The search result according to the search criteria appears
- Click on the
 icon adjacent to Group Corporate Name field to
modify the name of the Group Corporate.
- Enter the new Group Corporate name, and click Check
Availability to check the uniqueness of the name.
Note:
If the user ID is already used.
- Displays Available status
if new name assigned is unique and can be used.
- The
 icon is provided to reset and re-enter the new
name.
- Available status is shown if new name assigned is
unique and hence can be used.
- If user clicks on Save
without checking the availability, system displays the an
error message.
- Click Edit to edit the Group Corporate Profiling
details.
Note:
The fields which are marked as Required are mandatory.
For more information on fields, refer to the field description table.
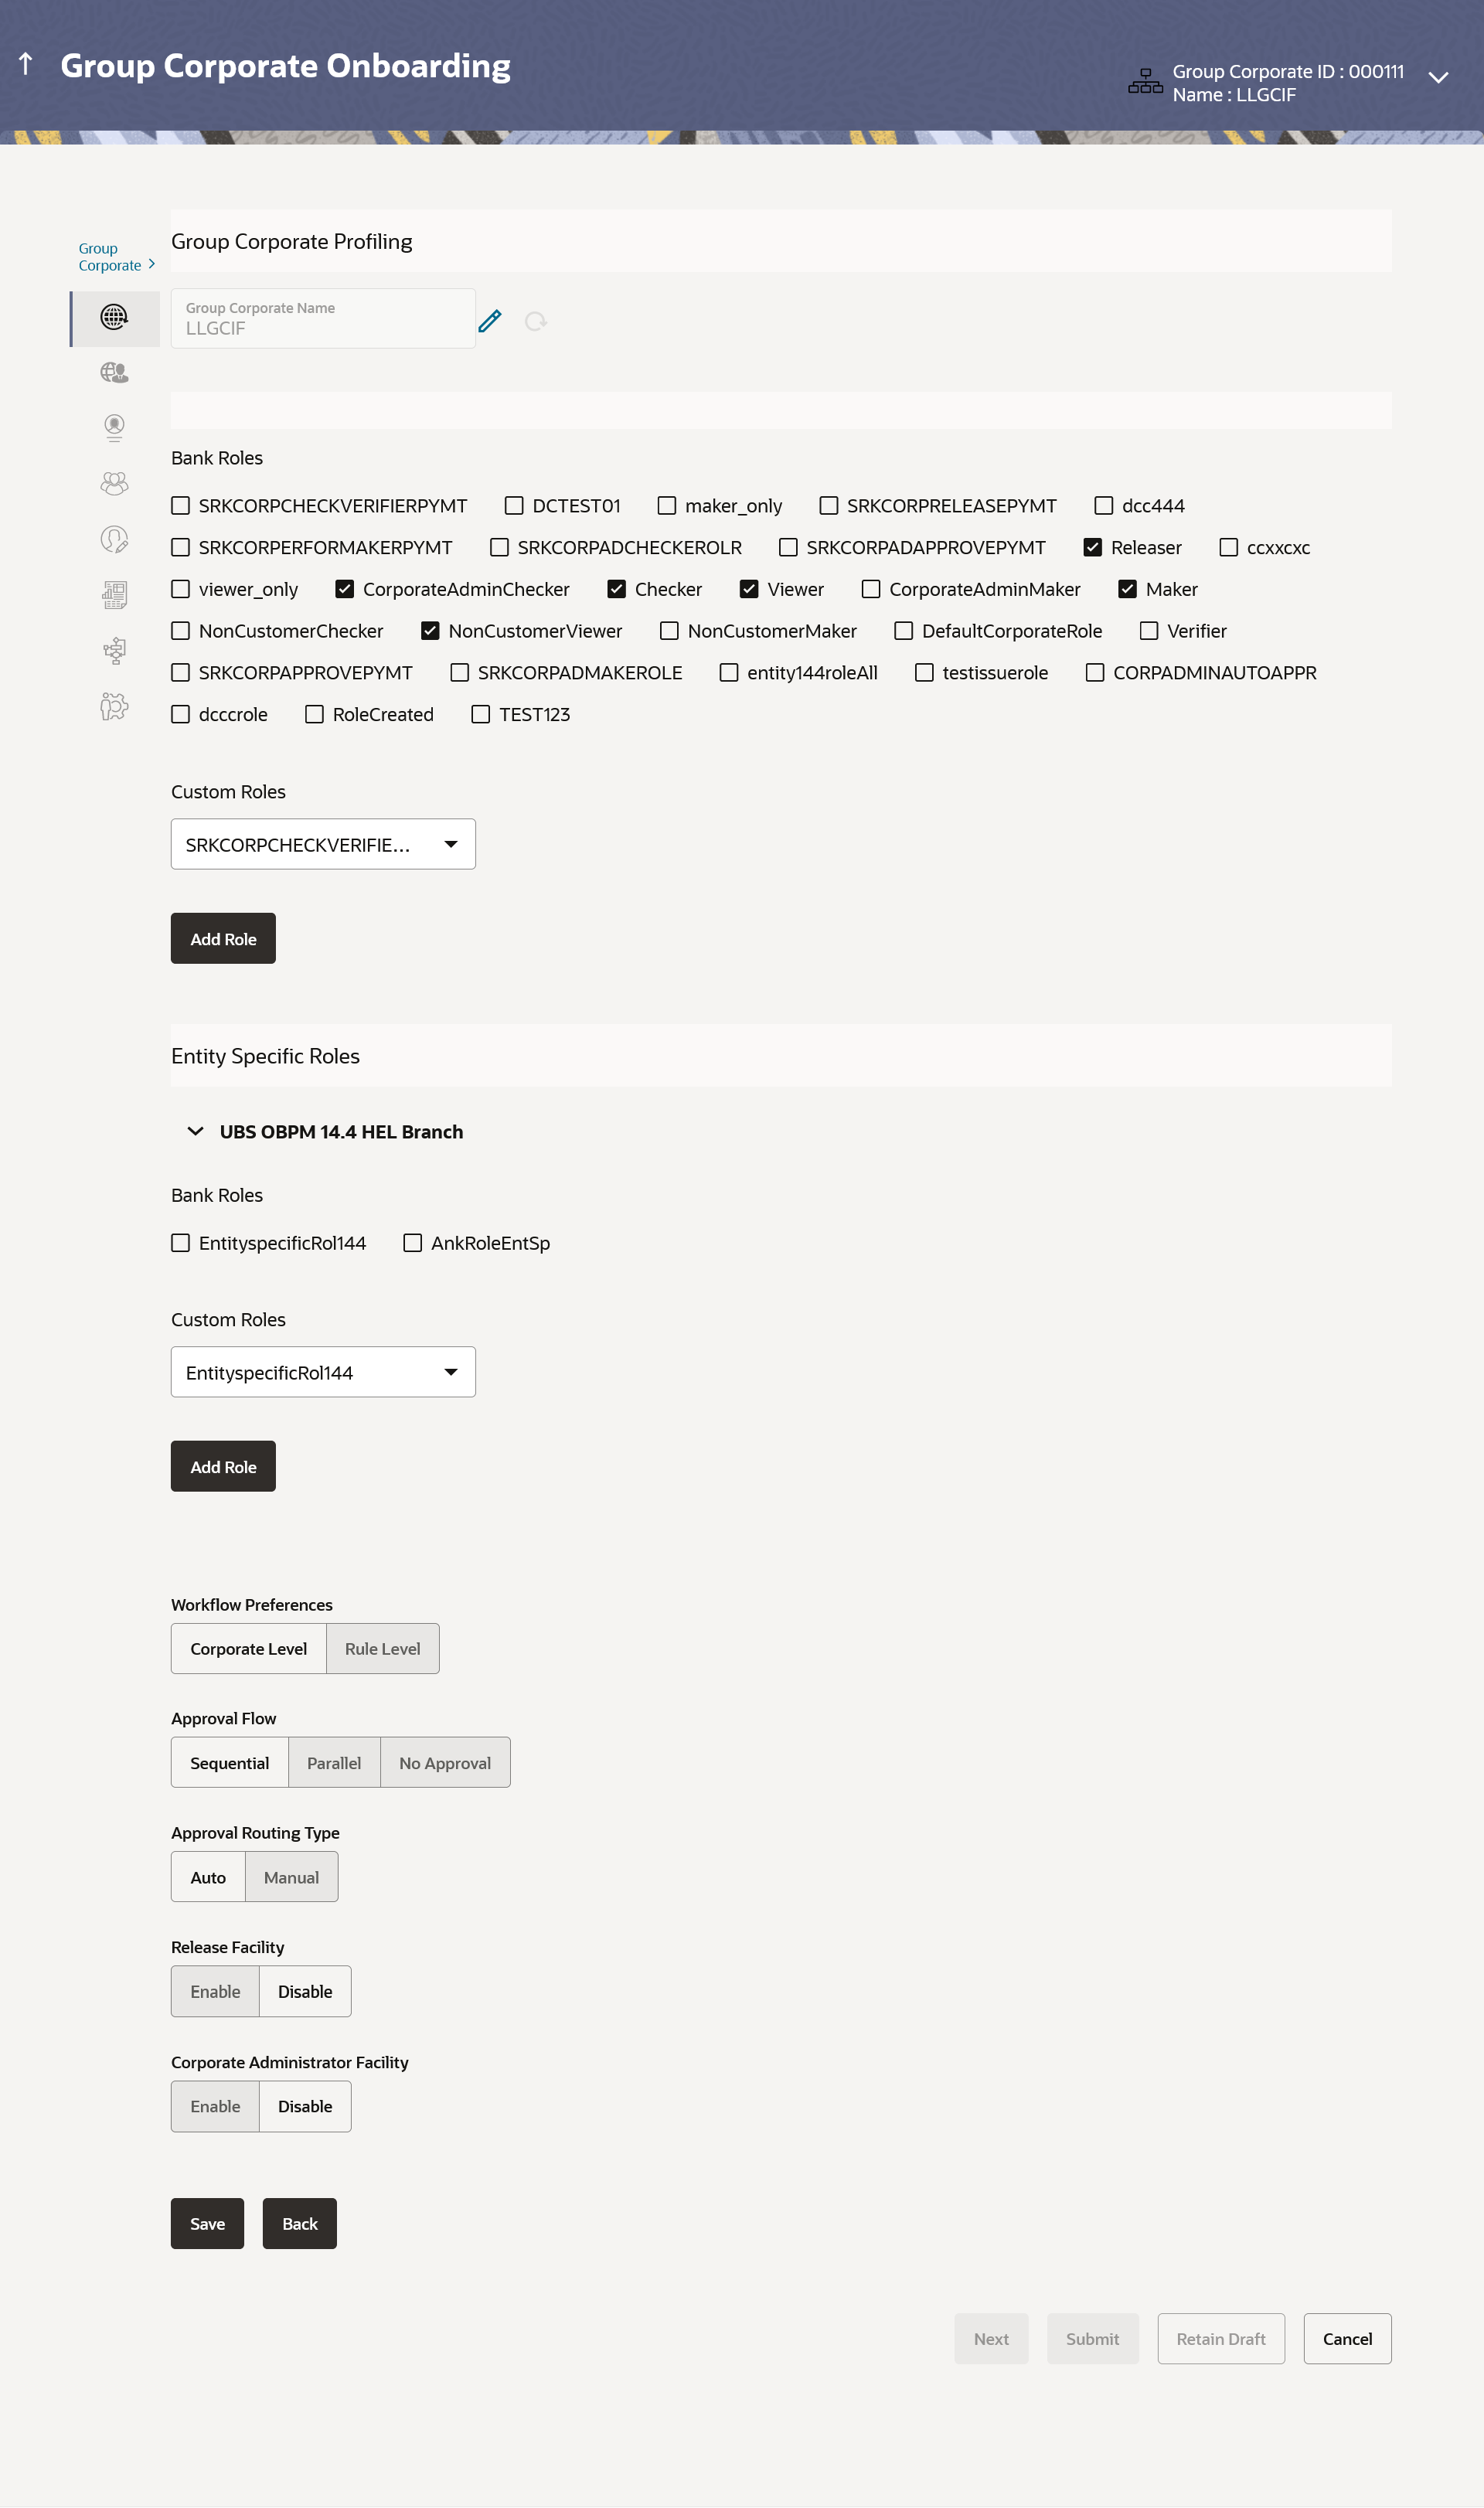
- In the Bank Role Name field, select the checkbox (s)
against the application roles and assign the Application
Roles available at enterprise level (This Application roles are
created using Role Transaction Mapping screen).
- From the Custom Role list, select the role, if a custom
role is required to be added for the Group Corporate.
- Click Add role to create application role.
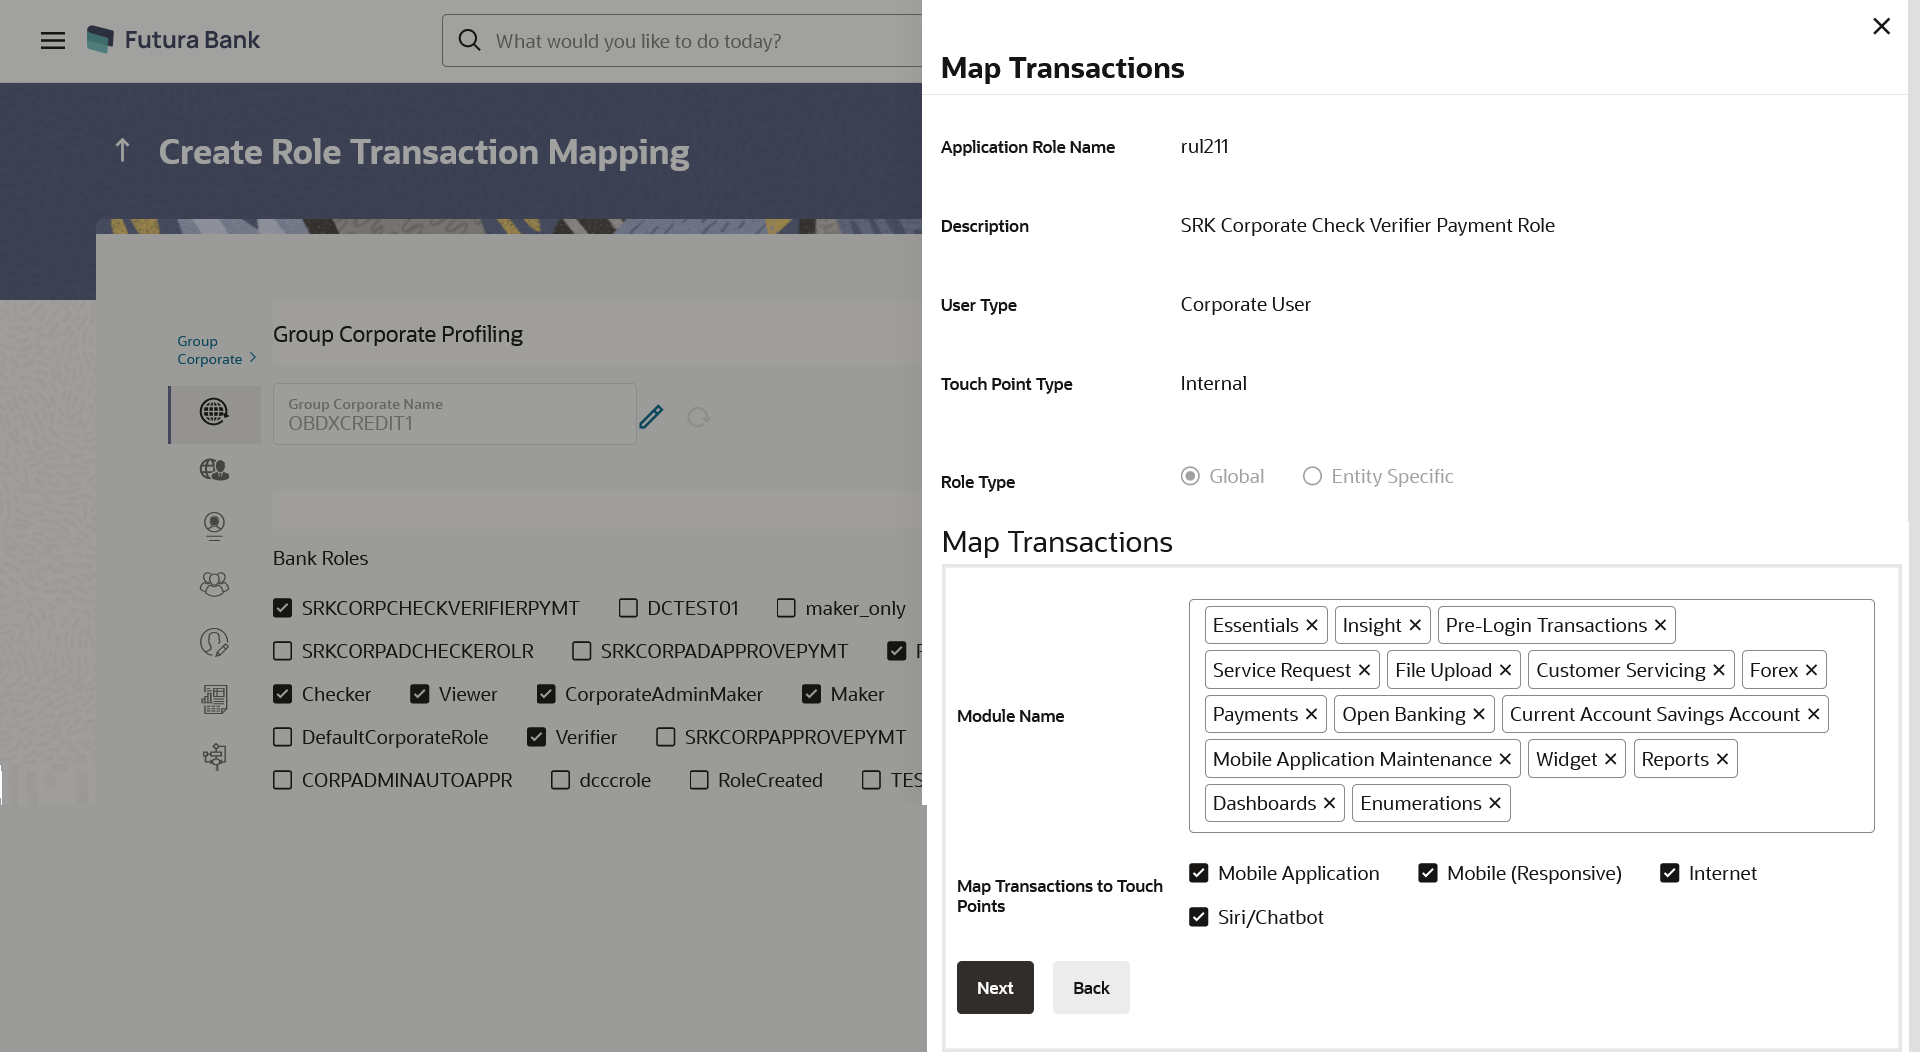
The Map Transaction overlay screen
appears.
- Perform anyone of the following actions:
- The Application Role Creation screen to add transaction modules and touch points appears.
- Click Cancel to cancel the transaction and to go back to previous screen.
Create Customer Role - Application Role Creation
Using this option, System Administrator can select and assign the roles available
at enterprise level as is, or he can create a custom role for the Group
Corporate by cloning a role available at Group Corporate level and map
transactions to it for selected touch points.
Figure 15-15 Application Role
Creation
Note:
The fields which are marked as Required are mandatory.For more information on fields, refer to the field description table.
Table 15-8 Application Role Creation - Field Description
- In the Application Role Name field, the existing
application role from which the clone of the application role is being created
will be displayed.
- In the Custom Application Role Name, enter the name of
the application role.
Note:
Enter the new
Custom Application Role Name, and click
Check
Availability to check the uniqueness of the name.
- Select appropriate Module Name for transactions
mapping.
- Select the check box against the list of Touch Points to
map the transactions to selected touch points.
- Perform anyone of the following actions:
- Click Next to proceed to the next logical step.
- Click Back to navigate to the previous screen.
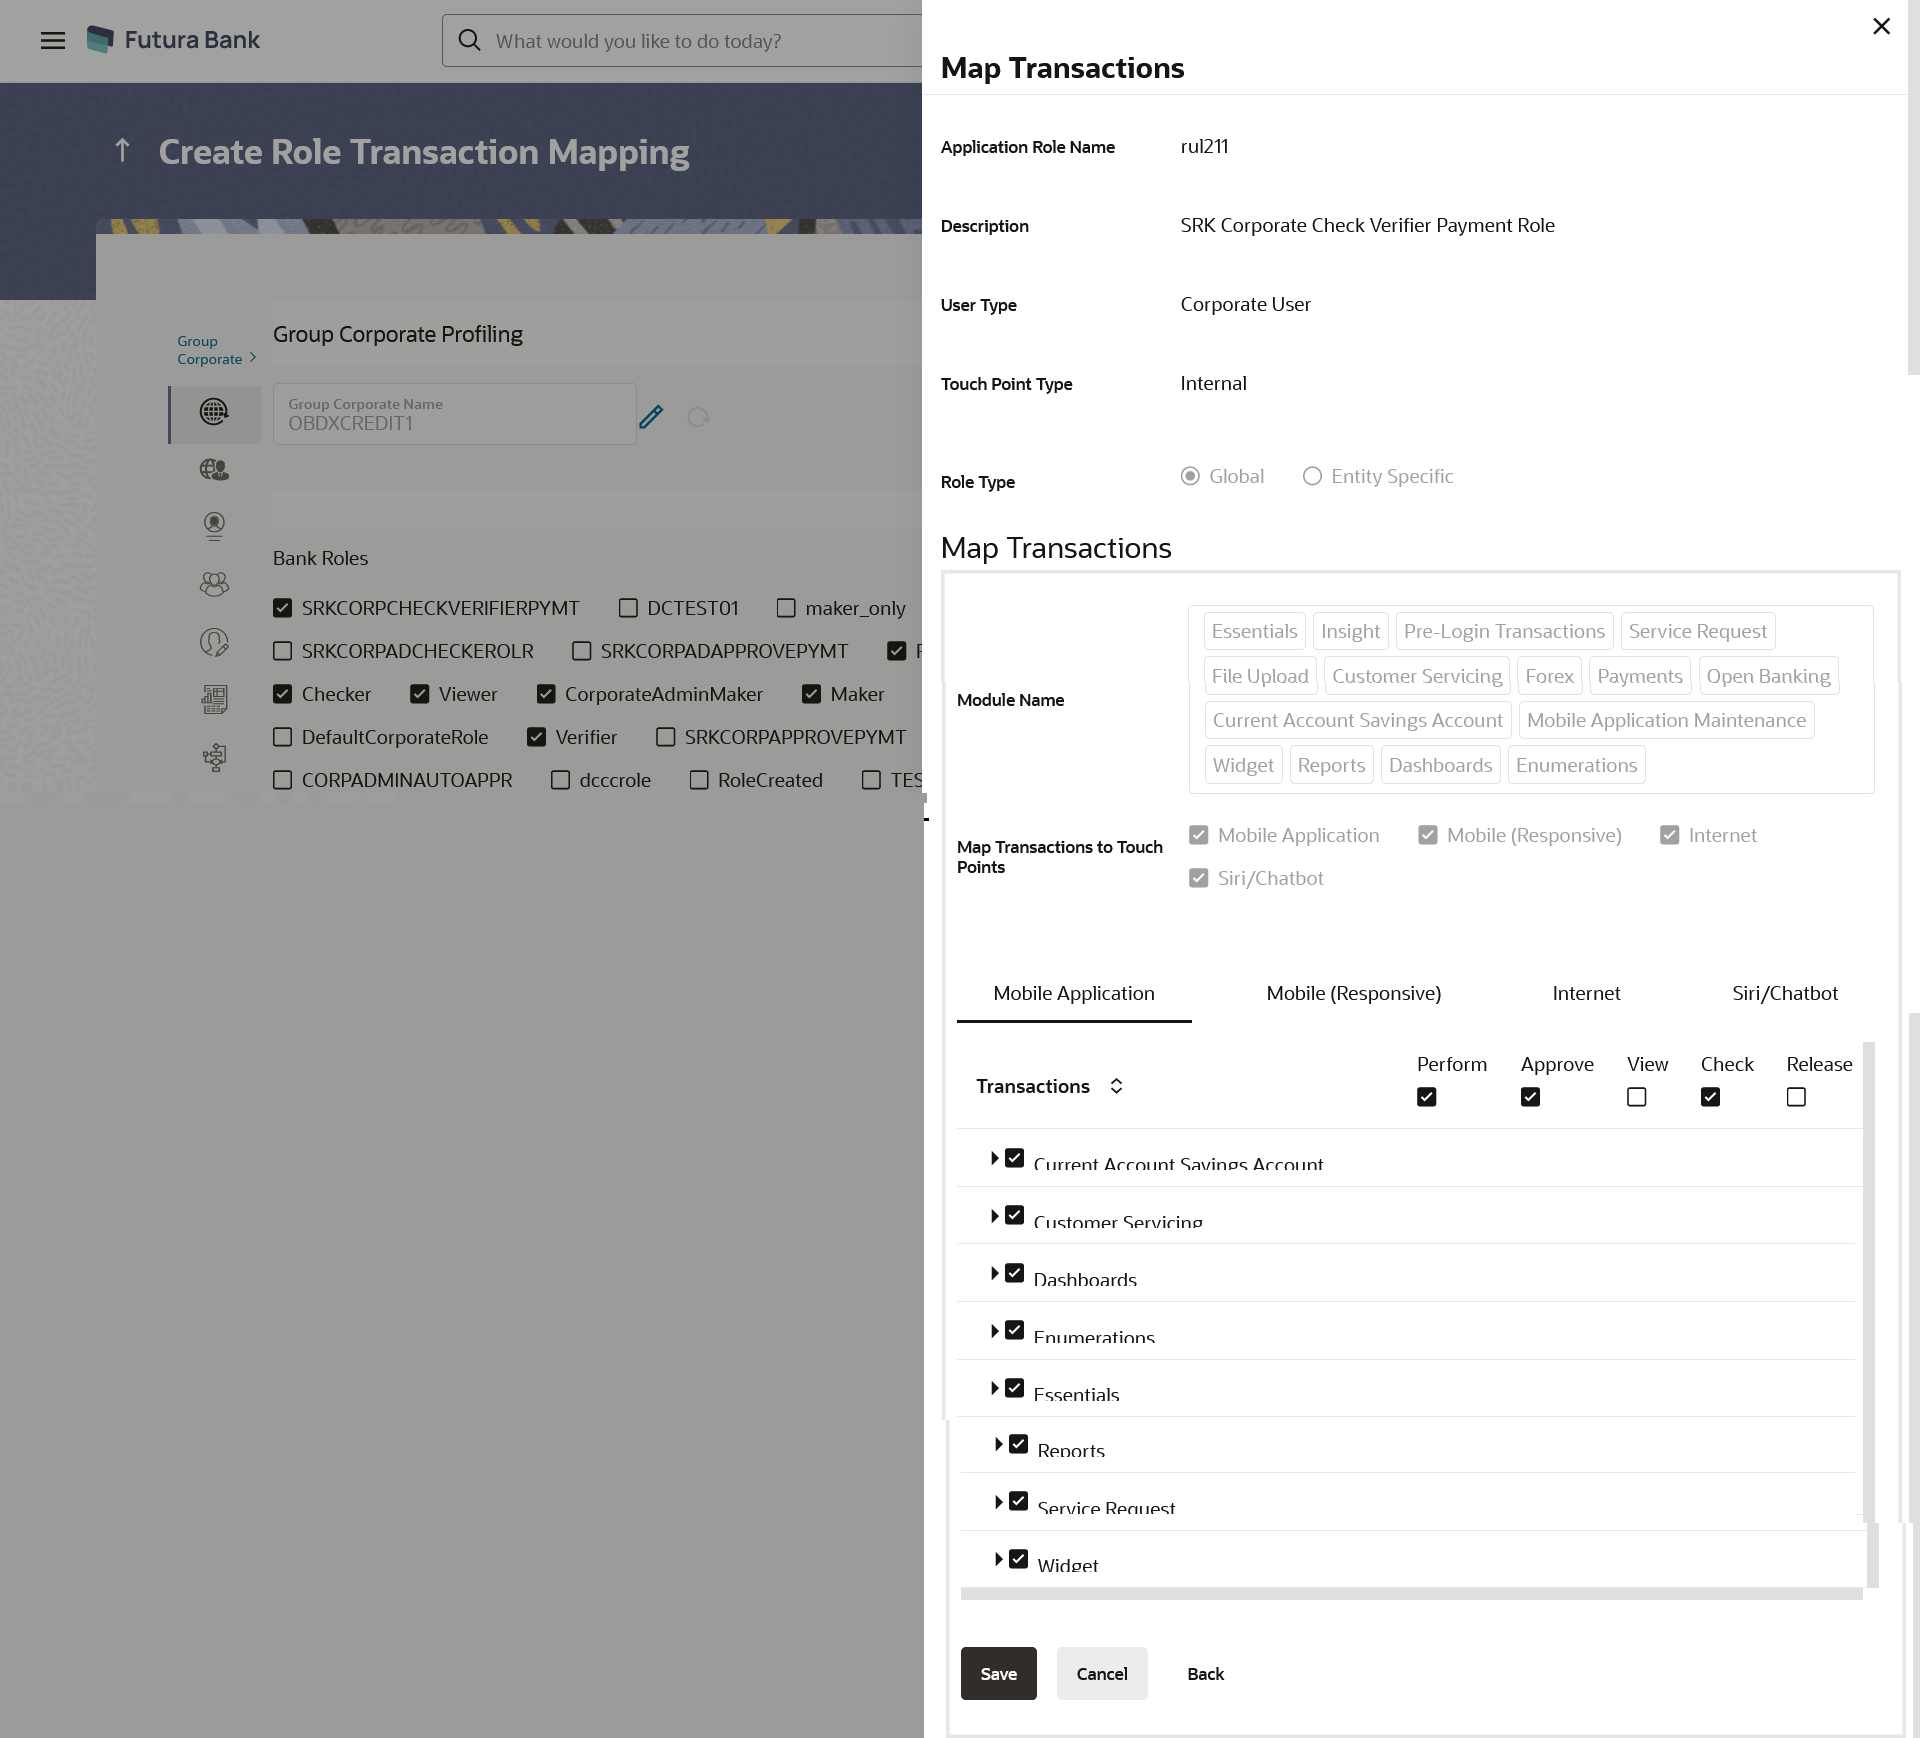
- To map the Transactions to the role, click
 icon against the particular module, then select the transaction type,
and then transactions to be mapped
- Perform anyone of the following actions:
- Select the respective check boxes preceding to transaction to be mapped.
- Select the checkbox at every transaction header level if you want to map all the transactions belong to that parent transactions at one instance.
- Perform anyone of the following actions:
- Click Save to save the changes.
- Click Cancel to cancel the transaction.
- Click Back to navigate to the previous screen.
- Select the appropriate Workflow Preference to specify
the preference to implement the workflow, whether at Corporate Level or at Rule
Level.
- Select the Approval Flow to define the Approval
workflow type, if it has to be sequential or parallel or No Approval is
required.
- Select the Approval Routing Type;
Perform anyone of the following actions:
- Select Auto if you wish system should resolve the rule and send the transaction for approval as per the rule resolved by the system.
- Select Manual if you wish to allow initiator to choose workflow from the resolved rules as part of transaction initiation.
- Select the Release Facility flag if the release
functionality needs to be enabled at Group Corporate level.
- the Accessible Roles for Corporate Administrator field,
select the roles that should be available to Corporate Administrator for
onboarding new users.
- Perform anyone of the following actions:
- Click Save to save the maintenance, and redirect to the review page.
- Click Next to proceed to the next logical step.
- Click Submit to submit the steps performed so far for approval.
- Click Retain Draft to save the details entered as draft.
- Click Cancel to cancel the transaction.
Note:
Admin can submit the
maintenance after any step. Maintenances saved so far will be sent for approval
in one flow. Admin would not be able to make any changes or maintain another
step for the same Group Corporate till the time the approval of the wizard is
not done.
- Perform anyone of the following actions:
- The Review screen appears. Verify the details, and click Submit.
- Click Edit to modify the details entered.
- Click Next to proceed to next step.
- Click Retain Draft to save all the steps completed so far, and allow Admin resume the same application.
- Click Cancel to cancel the transaction.
The success message appears along with the transaction reference number.
- Click OK to complete the transaction.


