- Corporate Accounts User Guide
- Corporate Account Services
- Account Creation
- Account Creation
4.4.1 Account Creation
This topic describes the systematic instructions to create an account for an existing customer.
- Search and Initiate an existing customer.
- Click Corporate Account Services, and under
Corporate Account Services, click
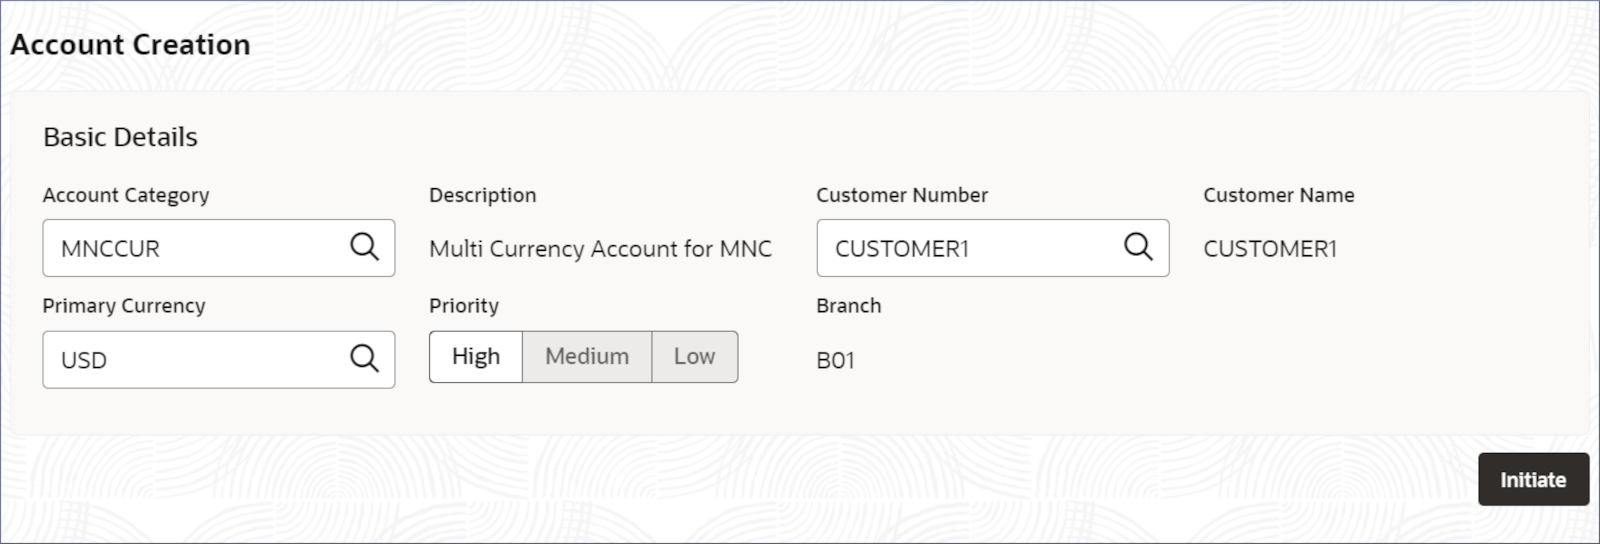
Account Creation.The Account Creation page displays.
- Specify the basic details of the account.
Table 4-4 Account Creation- Basic Details Fields
Field Description Account Category Specify the account category to which the account belongs. Description The description of the account category is auto-populated. Customer Number Specify the customer CIF number. CIF number can be part of the account mask. Customer Name Displays the customer name. This field is auto-populated. Primary Currency Specify the primary currency of the customer account. It denotes the currency in which the account can transact. Priority Specify the priority from the options – - High
- Medium
- Low
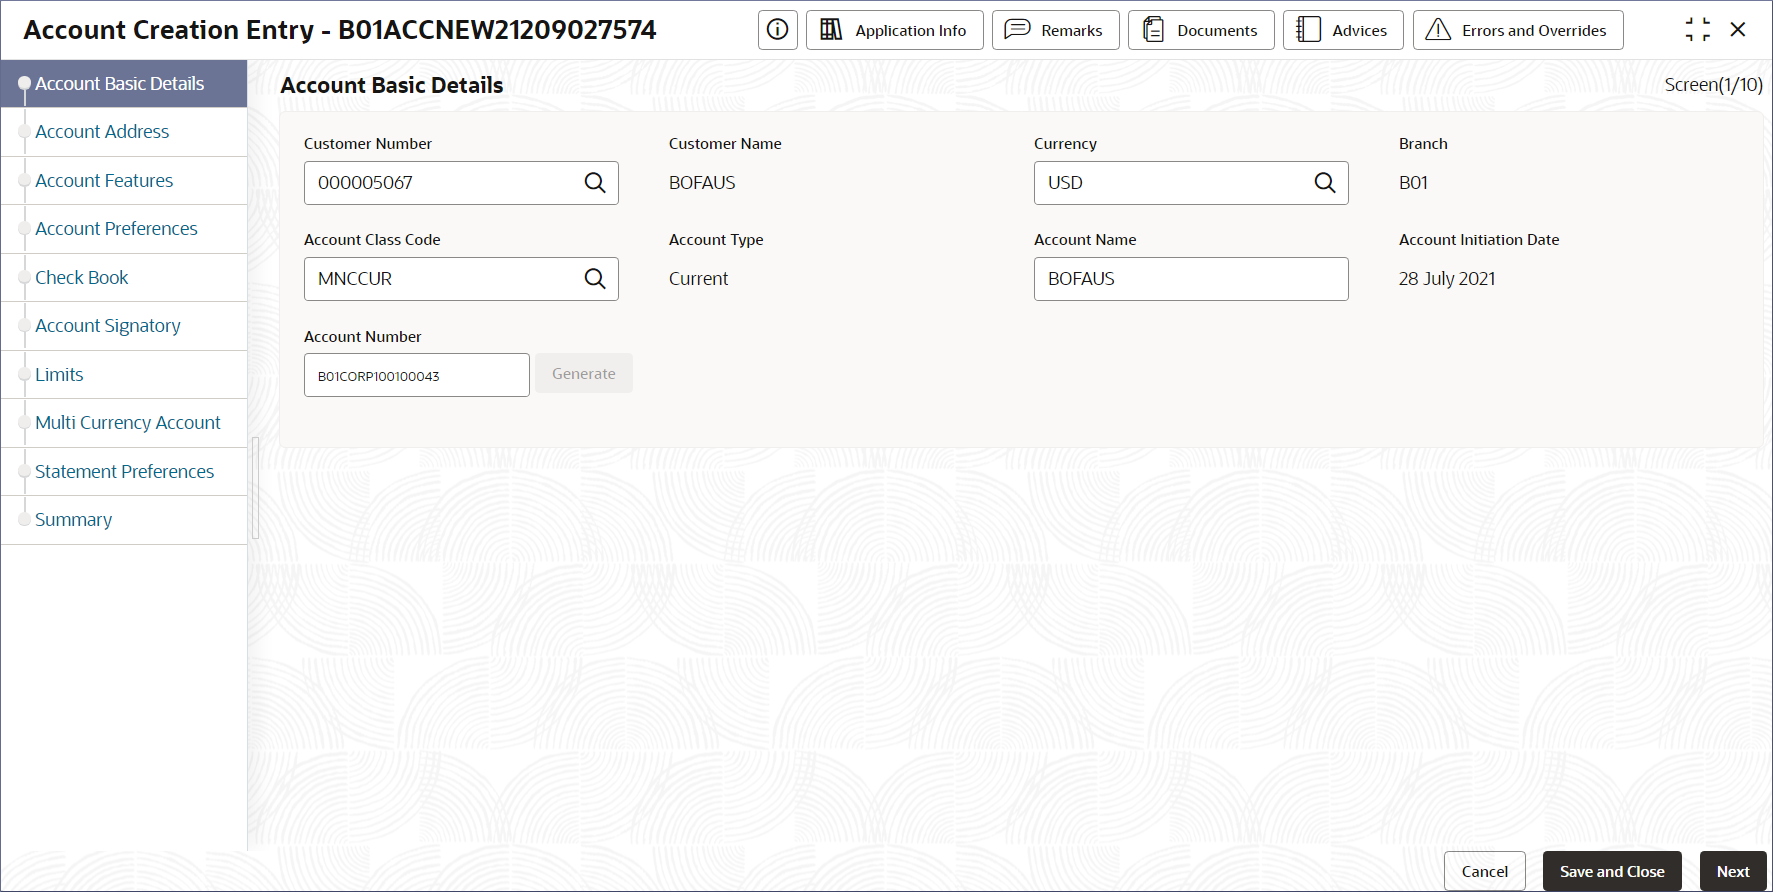
Branch This field displays the branch code of the account. - Click Initiate.The Account Creation Entry - <Application Number> page displays the Account Basic Details screen.
Note:
The screen is populated with the details provided in the previous step.Tip:
Make a note of the Application Number. This is needed to identify the task at the entry, enrich, and approval stages in the matching process, in the Free Tasks page.Note:
The account creation entry stage involves manually capturing the required details in the following data entry screens.- Account Basic Details
- Account Address
- Account Features
- Account Preferences
- Check book
- Account Signatory
- Limits
- Multi Currency Account
- Statement Preferences
- Summary
- Click Corporate Account Services, and under
Corporate Account Services, click
Account Creation.
- Provide the Account Basic Details.
- Specify the Account Class Code for the account.
Note:
The Account Class provides the Interest Details, Account Status, GL Reporting Details, and Account MIS details. Select the appropriate account class that supports the features you require in the account. For example, to include interests and charges in the account, ensure that the account class supports the interest and charges feature. - Click Generate.The Generate Account Number dialog displays.
Note:
The columns masked with L represent the account class (may or may not be present and is decided by the banking organization), the columns masked with b represent the branch code, the columns masked with a represent the alphabets to be provided, and the columns masked with n represent the number to be provided. Together they represent a unique Corporate account number. - Double-click the first column masked by a.
The cells become editable.
- Enter the required alphabets and numbers for the account number. Press the Tab key to move to the next cell.
- Press Verify.
The account number is verified and generated. The Account Basic Details screen displays the Account Number field populated with the new account number.
- Click Next.The Account Address page displays.
- Specify the Account Class Code for the account.
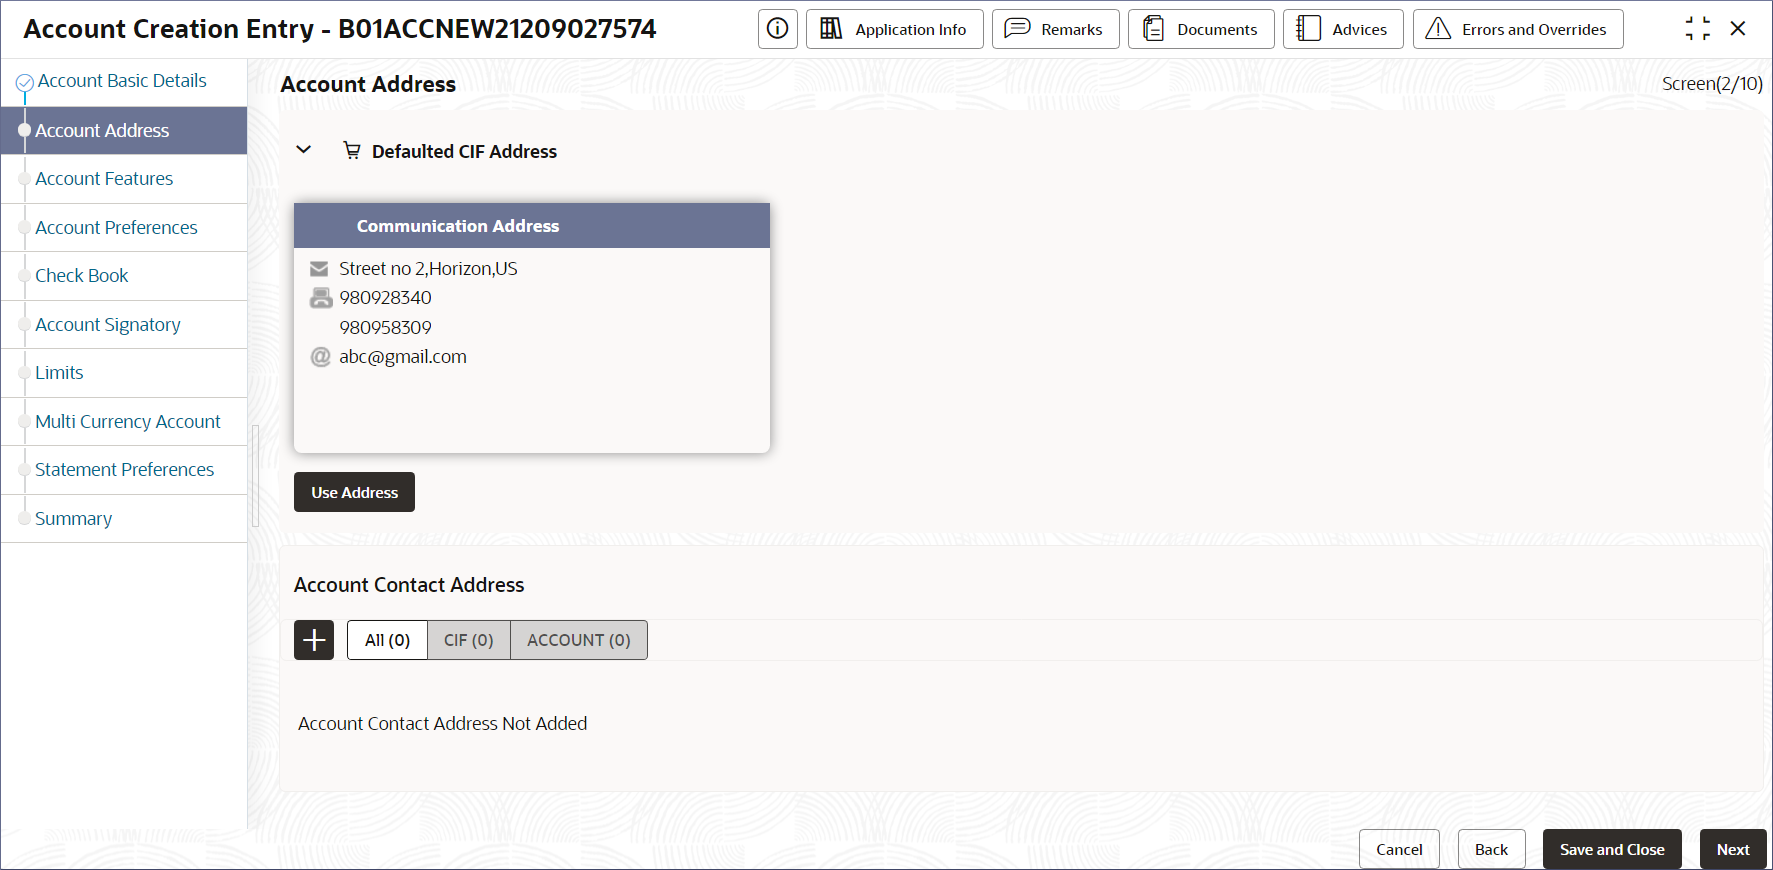
- Provide the details on the Account Address page.
- To use an existing CIF Address, expand the Defaulted CIF Address node and select the required address.
- Click Use Address.The selected CIF address is added to the Account Contact Address section.
- To add a new address, Click + in the Account Contact Address section.
Note:
Add as many addresses as needed.The Add Address dialog displays. - Specify the Address Type.Select the required address type from the following:
- HOA - Head Office
- ROA - Registered Office
- BOA - Branch Office
- COA- Communication Address
- Provide the mailing address details described in
the following table:
Table 4-5 Field Description
Field Description Language Specify the language of the address details. Department Specify the department which identifies a division of a large organization or building. Sub Department Specify the sub-division of a large organization or building. Street Name Specify the street or thoroughfare name. Building Name Specify the building name. Building Number Specify the building number. Floor Specify the floor or story within a building. Post Box Specify the numbered box in a post office assigned to a person or organization. Room Specify the room number in the building. Post Code Specify a code of letters or numbers. The Post Code ensures proper sorting of the mail. Town Name Specify the name of the town. A town is a built-up area with defined boundaries and a local government. Town Location Name Specify the specific Location name within the town. District Name Specify a subdivision within a country sub-division. Country Sub Division Specify a subdivision of a country such as a state, region, or county. Country Specify the nation with a government. - Click the Mobile tab and specify the mobile number in the Media Address field.
- Click the Swift tab and specify the BIC (Bank Identifier Code) in the Media Address field. BIC uses eight to eleven-digit characters that identify the country, city, bank, and branch.
- Click the Email tab and specify the Email address in the Media Address field.
- Click the Fax tab and specify the Fax number in the Media Address field.
- Click Add.
Adds a new account address row in the Account Address dialog.
- To add more addresses, repeat the above steps.
- Click Next.The Account Features page displays.
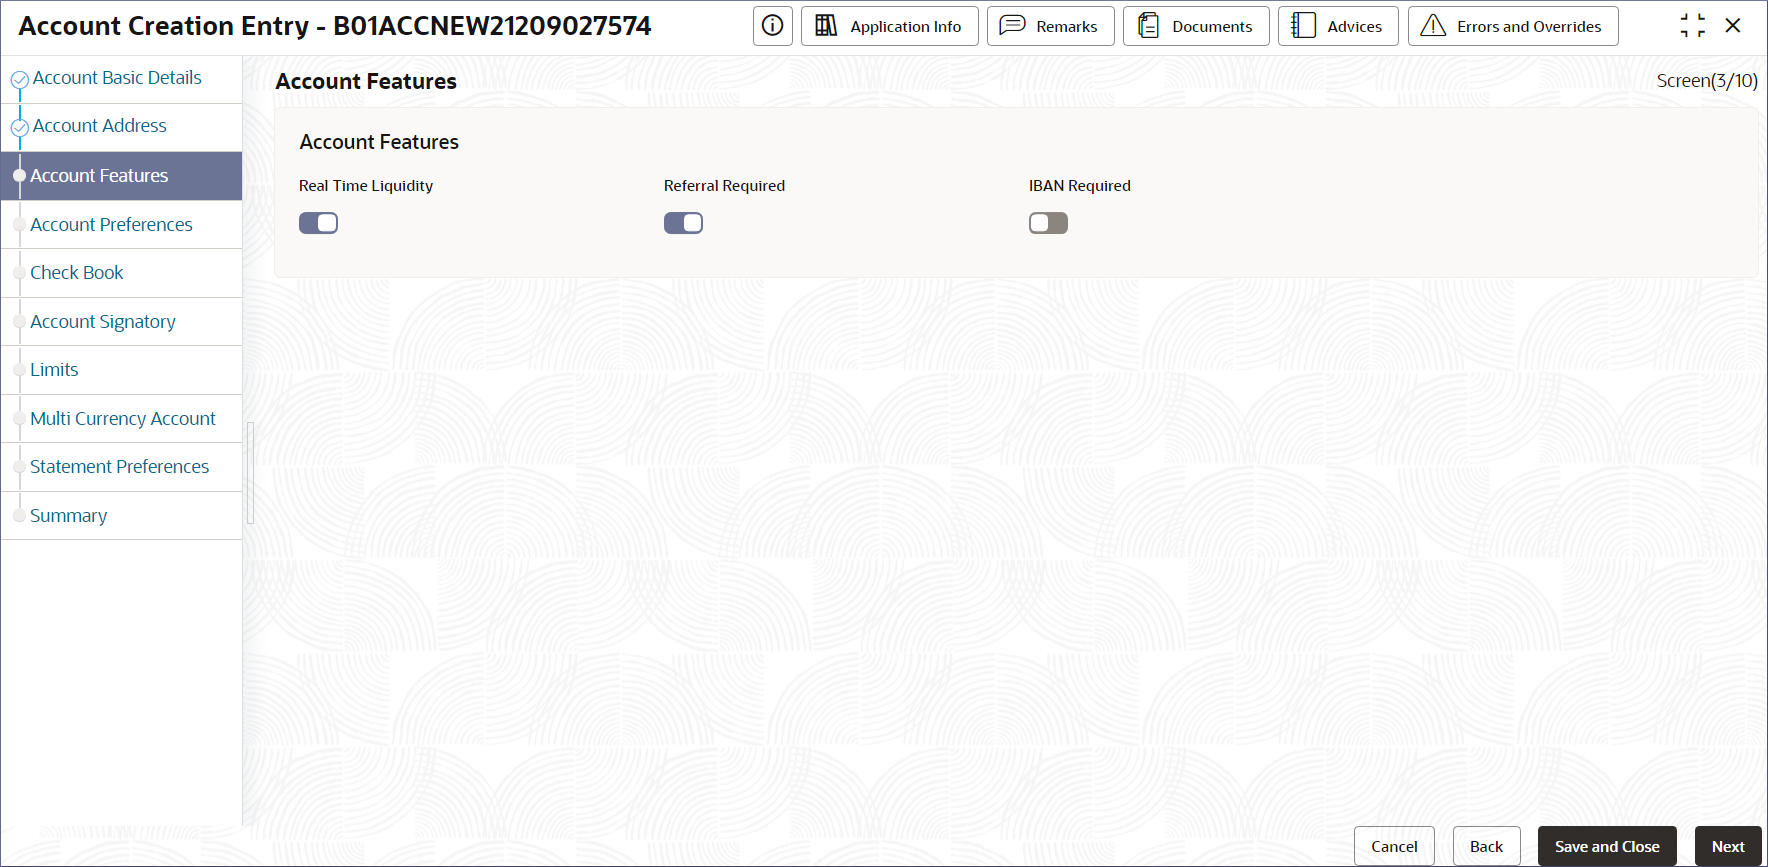
- Specify the details on the Account Features page.
- Specify the fields described in the following table.
Note:
The account features mentioned in the table can be activated only if the same is allowed for the account class selected for the account creation in Step 2.a.Table 4-6 Field Description
Field Description Real Time Liquidity Toggle the option On to enable real-time liquidity management. Referral Required Toggle the option On to perform referral checks on the account. The application checks the available balance before triggering a referral check for all transactions. IBAN Required Toggle the option On to enable the IBAN (International Bank Account Number) requirement. - Click Next.The Account Preferences page displays.
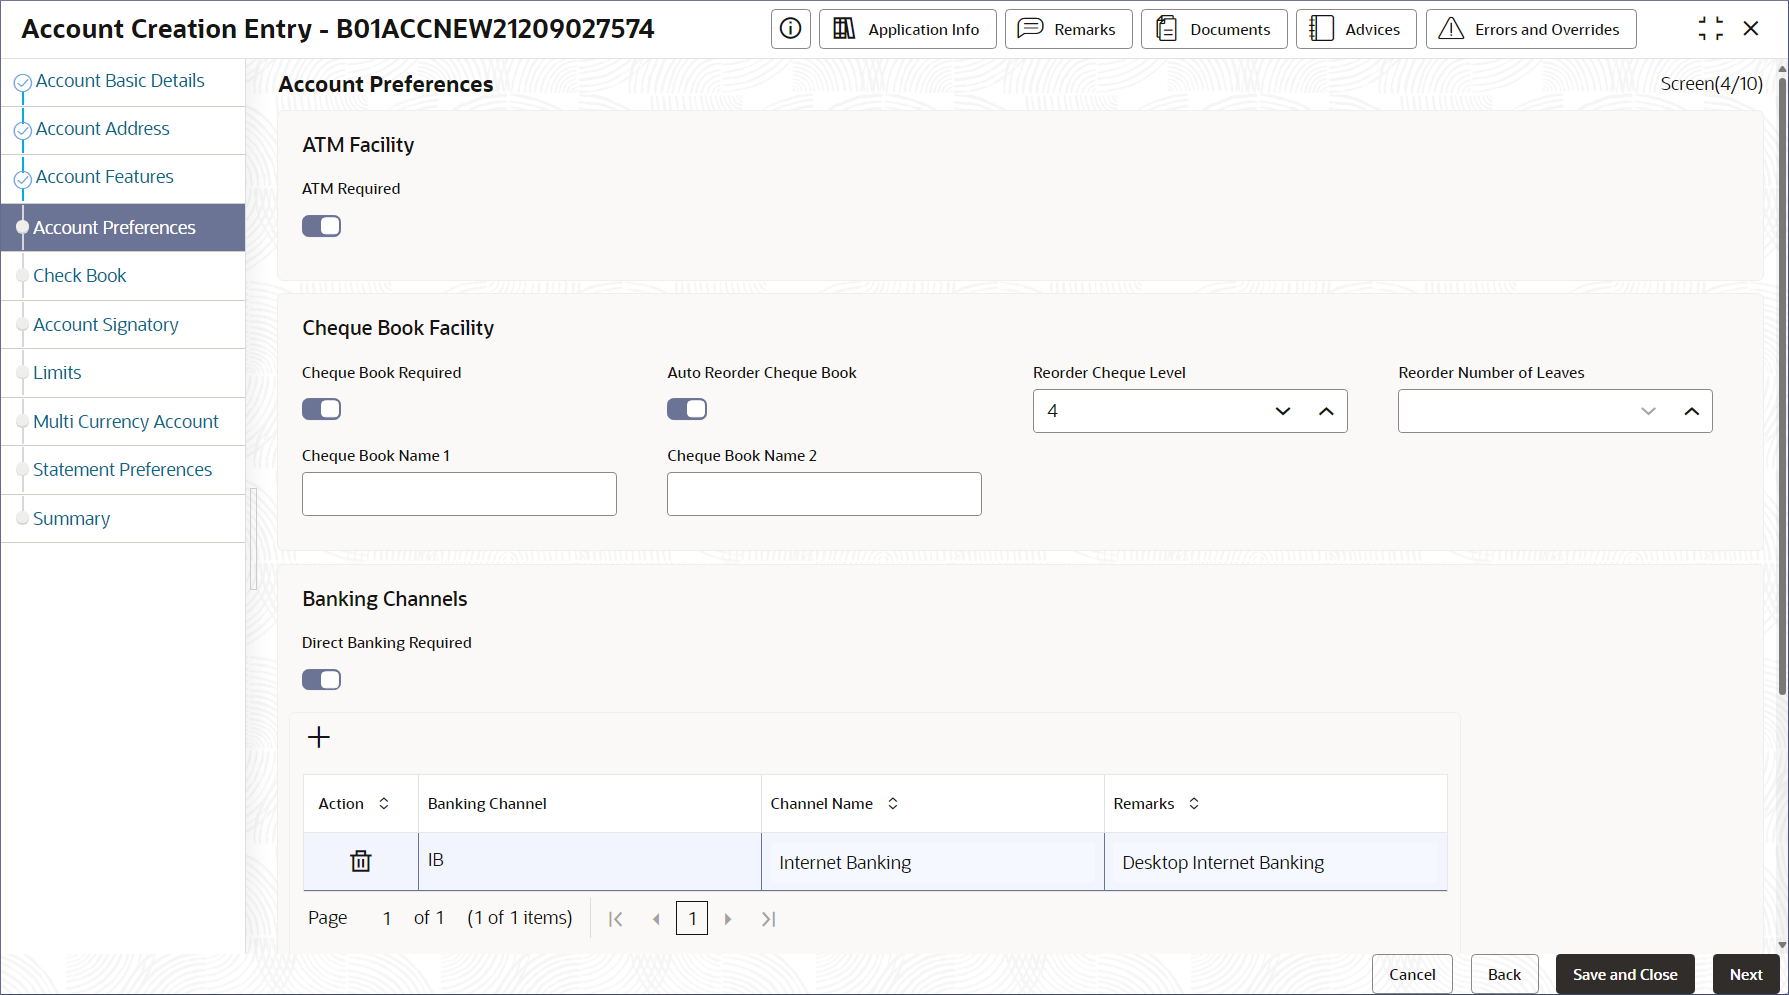
- Specify the fields described in the following table.
- Specify the details on the Account Preferences
screen.
- Specify the fields described in the following table.
Note:
The account preference mentioned in the following table can be activated only if the same is allowed for the account class selected for the account creation in Step 2.a.Table 4-7 Field Description
Field Description ATM Required Toggle the option On to enable the ATM facility for the account. Check Book Required Toggle the option On to enable the check book facility for the account. Auto Reorder Check Book Toggle the option On to auto-reorder check book. Reorder Check Level Specify the number of check leaves left when the reorder is triggered. Note:
To find the number of checks left, the automatic reorder process considers the stopped, blocked, and used checks.Reorder Number of Leaves Specify the number of check leaves in the new check book. Check Book Name 1 Specify a name for the first check book. Check Book Name 2 Specify a name for the second check book. Direct Banking Required Toggle the option On to enable direct banking options for the account. - Click Next.The Check Book screen displays.
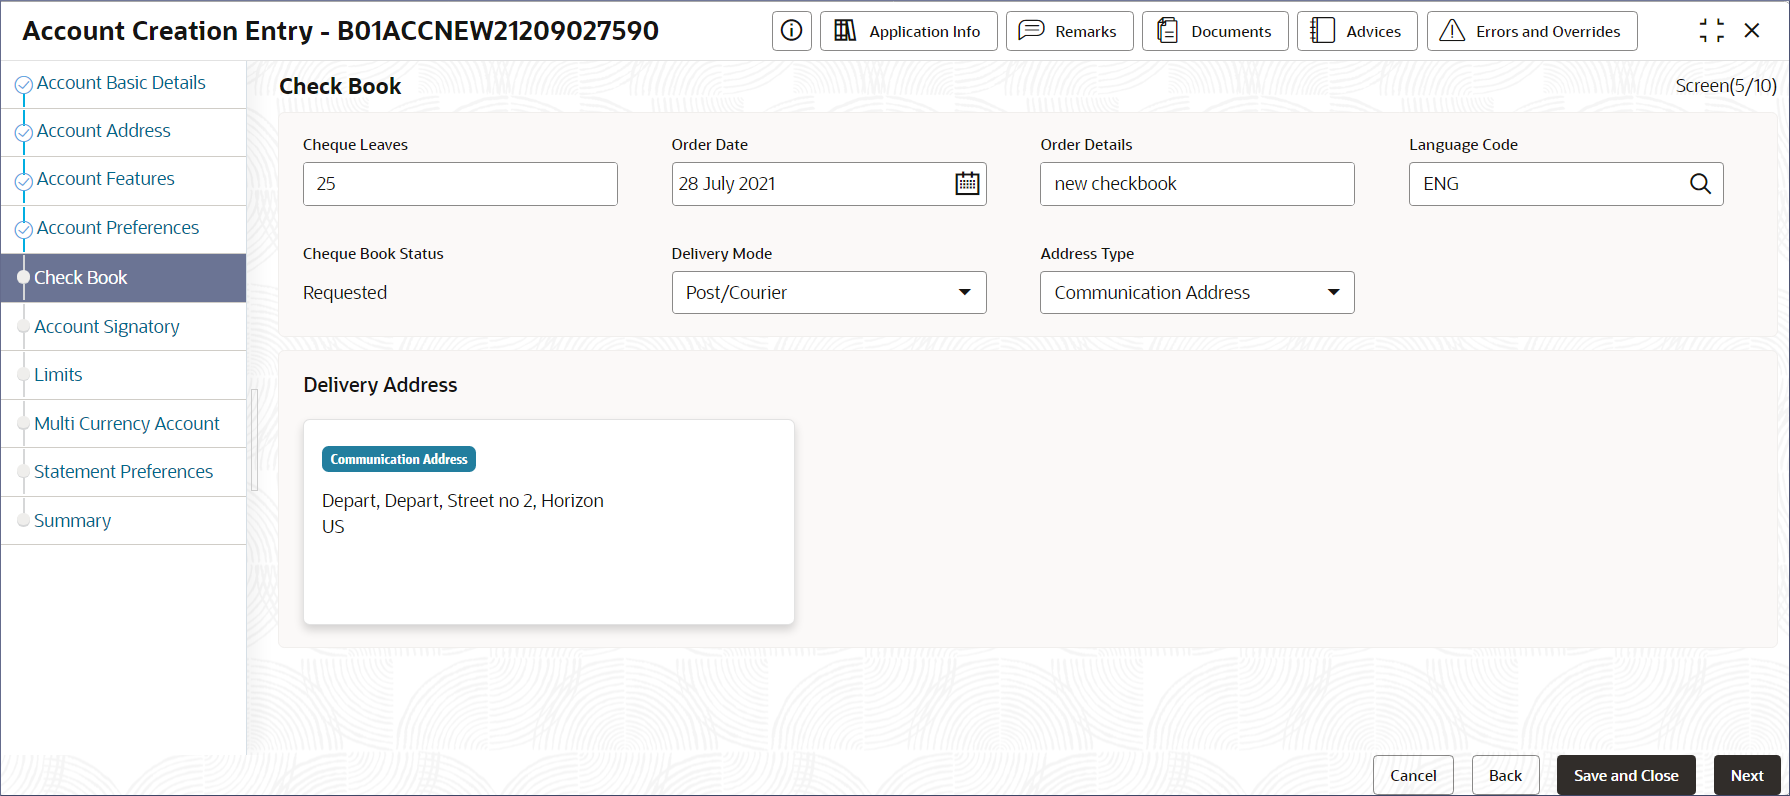
- Specify the fields described in the following table.
- Provide the Check Book details.
- Specify the fields described in the following table.
Table 4-8 Field Description
Field Description Check Details Specify the number of check leaves required in the check book. Order Date Specifies the Check Book order placement date. Order Details Specify the Order details, such as requesting a new check book. Language Code Select the language code from the available options. Check Book Status By default, this value is set to Requested. Delivery Mode Select the mode of the check book delivery from the following: - Branch- Check book is delivered at the specified branch.
- Post/Courier- Deliver the check book from the address types provided in the Account Address screen or a custom address to be provided.
Branch Code Specify the Branch code to deliver the check book. Note:
This field is visible only if the Delivery Mode is set to Branch.Address Type Select the address type from the drop-down list. The address types available are: - Custom - Select this option and provide the required address in the Add Address dialog.
- Other Address Types - These address types will be the ones provided in the Account Address screen.
Delivery Address Displays the address to deliver the check book that corresponds to the Delivery Mode selected. - If required, specify a custom delivery address.
- In the Delivery Mode drop-down field, choose Post/Courier.
- In the Address Type drop-down field, choose Custom.
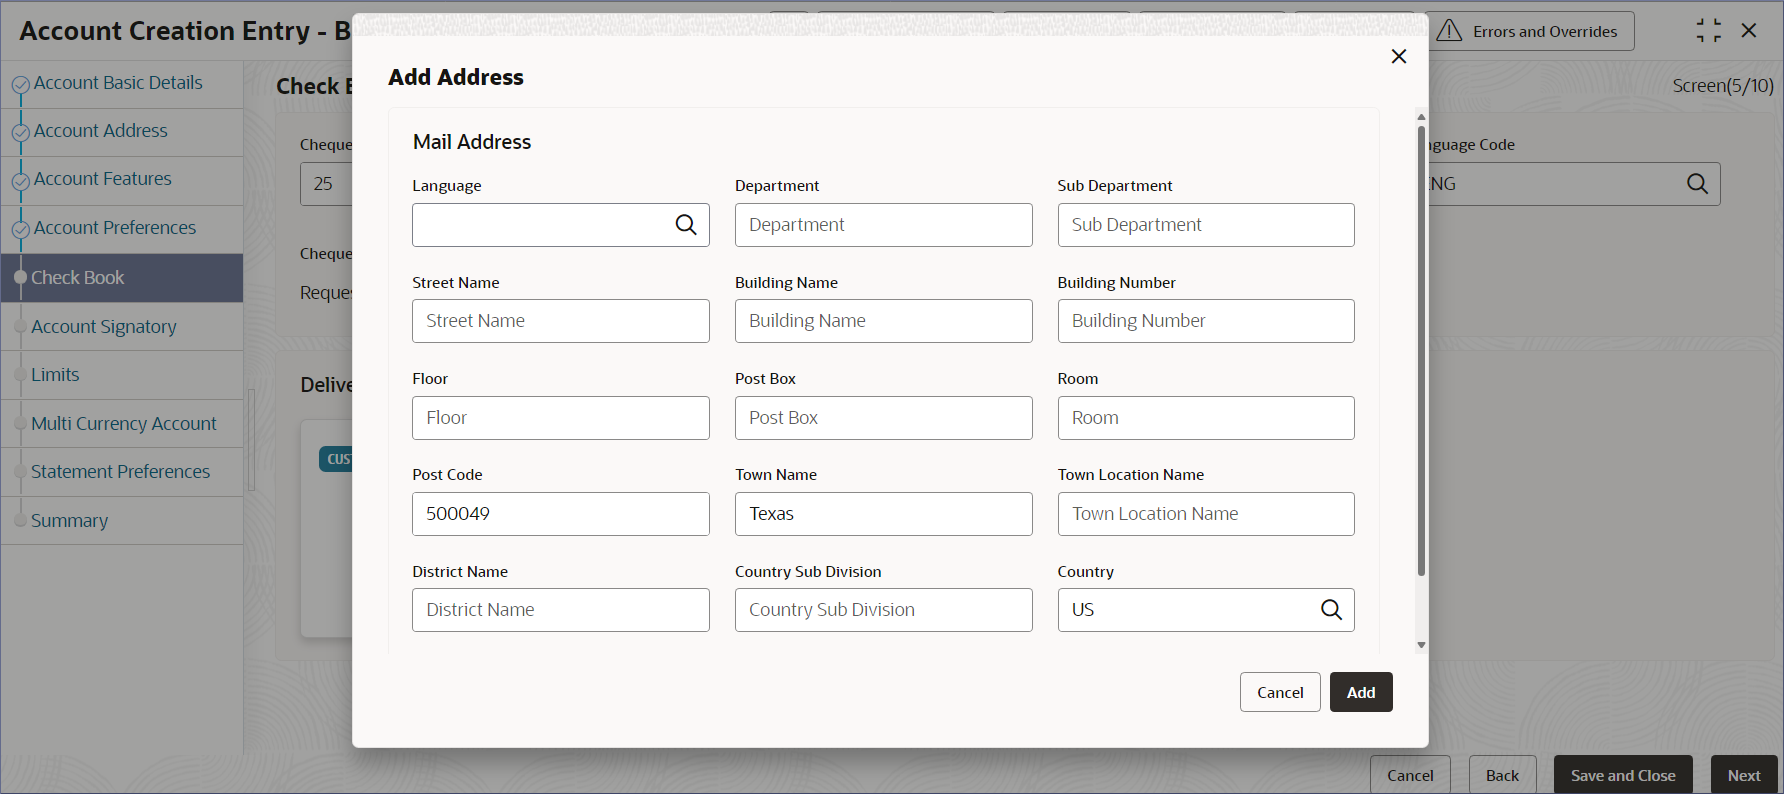
The Add Address dialog displays.
Figure 4-15 Check Book Request - Add Custom Mailing Address
- Specify the Mailing Address details described in the table below.
Table 4-9 Field Description - Custom Mailing Address
Field Description Language Specify the language of the address details. Department Specify the department which identifies a division of a large organization or building. Sub Department Specify the sub-division of a large organization or building. Street Name Specify the street or thoroughfare name. Building Name Specify the building name. Building Number Specify the building number. Floor Specify the floor or story within a building. Post Box Specify the numbered box in a post office assigned to a person or organization. Room Specify the room number in the building. Post Code Specify a code of letters or numbers. The Post Code ensures proper sorting of the mail. Town Name Specify the name of the town. A town is a built-up area with defined boundaries and a local government. Town Location Name Specify the specific Location name within the town. District Name Specify a subdivision within a country sub-division. Country Sub Division Specify a subdivision of a country such as a state, region, or county. Country Specify the nation with a government. - Click Add.
The CUSTOM address displays in the Delivery Address section.
- Click Next.The Account Signatory screen displays.
- Specify the fields described in the following table.
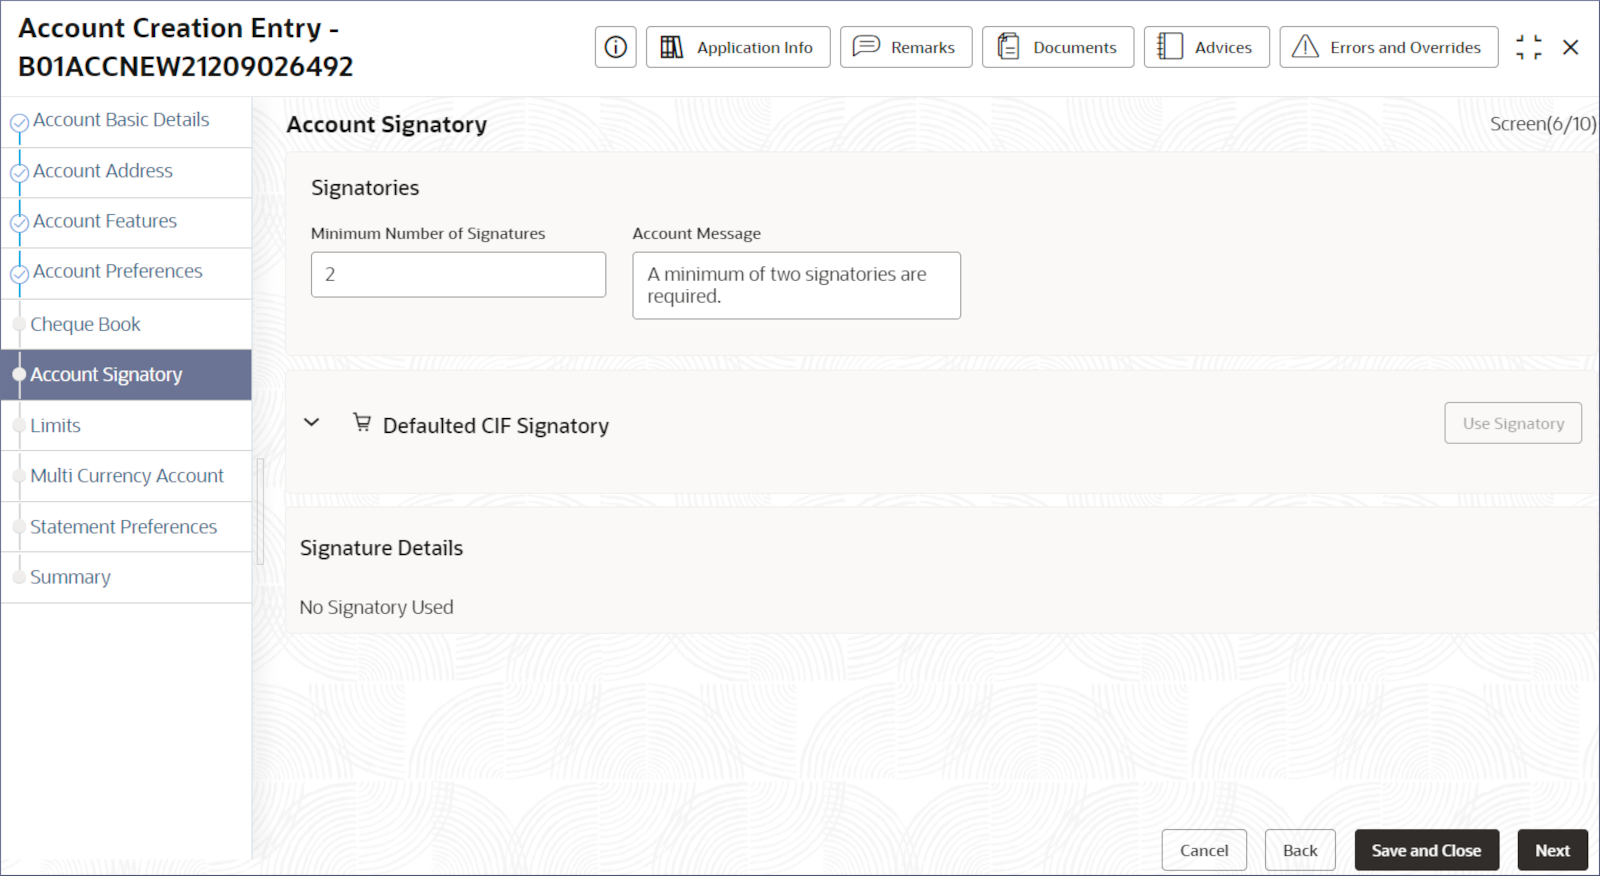
- Provide the details on the Account Signatory page.
- Specify the fields described in the following table.
Table 4-10 Field Description
Field Description Minimum number of Signatures Specify the minimum number of signatories required to perform a transaction on this account. Account Message Specify the message that is displayed when a transaction is initiated on this account. Defaulted CIF Signatories Select the default signatories imported from the Customer Information File. Use Signatories Click to use the selected default signatory. Signature Details Displays the signature details of the signatories. - Click Next.The Limits screen displays.
- Specify the fields described in the following table.
- Provide the limit details on the Limits Screen.
- Click + under
Limits.A blank node displays.
Note:
The primary currency of the account is available for selection. For multi-currency accounts all the sub-account currencies would be available to select. - Expand the node and specify the required currency in the currency
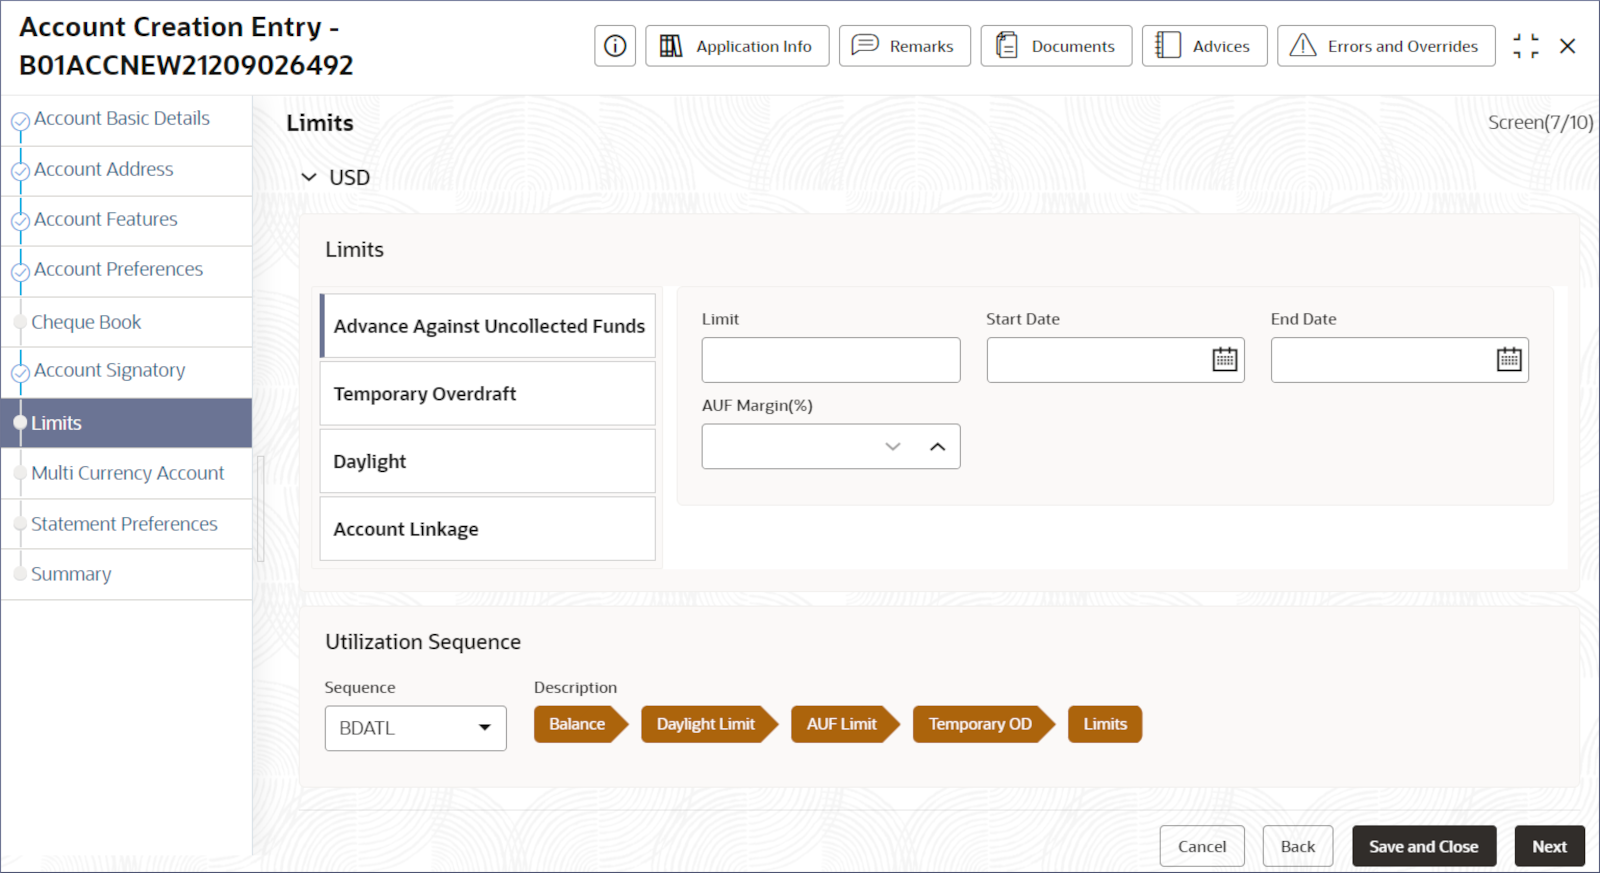
field.The specified Currency node displays limit details for the Advance Against Uncollected Funds tab.
Figure 4-17 Limits - Advance Against Uncollected Funds
- Specify the limit details on the Advance Against Uncollected
Funds tab described in the following table.
Table 4-11 Field Description
Field Description Limit Specify the limit amount on an AUF (Advance Against Uncollected Funds). Start Date The start date from when the limit is valid. End Date The end date of the limit validity. AUF Margin(%) The percentage of AUF allowed. - Click the Temporary Overdraft tab and specify the fields
described in the following table.
Table 4-12 Field Description
Field Description Limit Specify the limit amount. Start Date The limit start date. End Date The end date after which the limit is no longer available. Auto Renew Turn this option On to automatically renew the temporary overdraft after the end date. Frequency Select the limit renewal frequency from the following values: Daily, Monthly, and Yearly. Unit The number of limit renewals in the frequency interval.. Amount The temporary overdraft amount allowed. - Click the Daylight tab and specify the daylight limit amount allowed during business hours.
- Click the Account Linkage tab and specify the details described
in the following table.
Table 4-13 Field Description
Field Description Linkage Reference Specify the reference number of the linked liability account. Liability Number The liability number is auto-populated from the Linkage Reference. Effective Date The date on which the account linkage is active. Limit Amount Specify the limit amount that is available from the linked liability account. - Specify the Utilization Sequence of the limit
amounts.You can select from the following:
- BDATL - Balance, Daylight Limit, AUF Limit, Temporary OD, and Limits
- BDATLV - Balance, Daylight Limit, AUF Limit, Temporary OD, Limits and Overline.
- Click Next.The Multi Currency Account screen displays.
- Click + under
Limits.
- Create the sub-accounts for the required currencies in the Multi
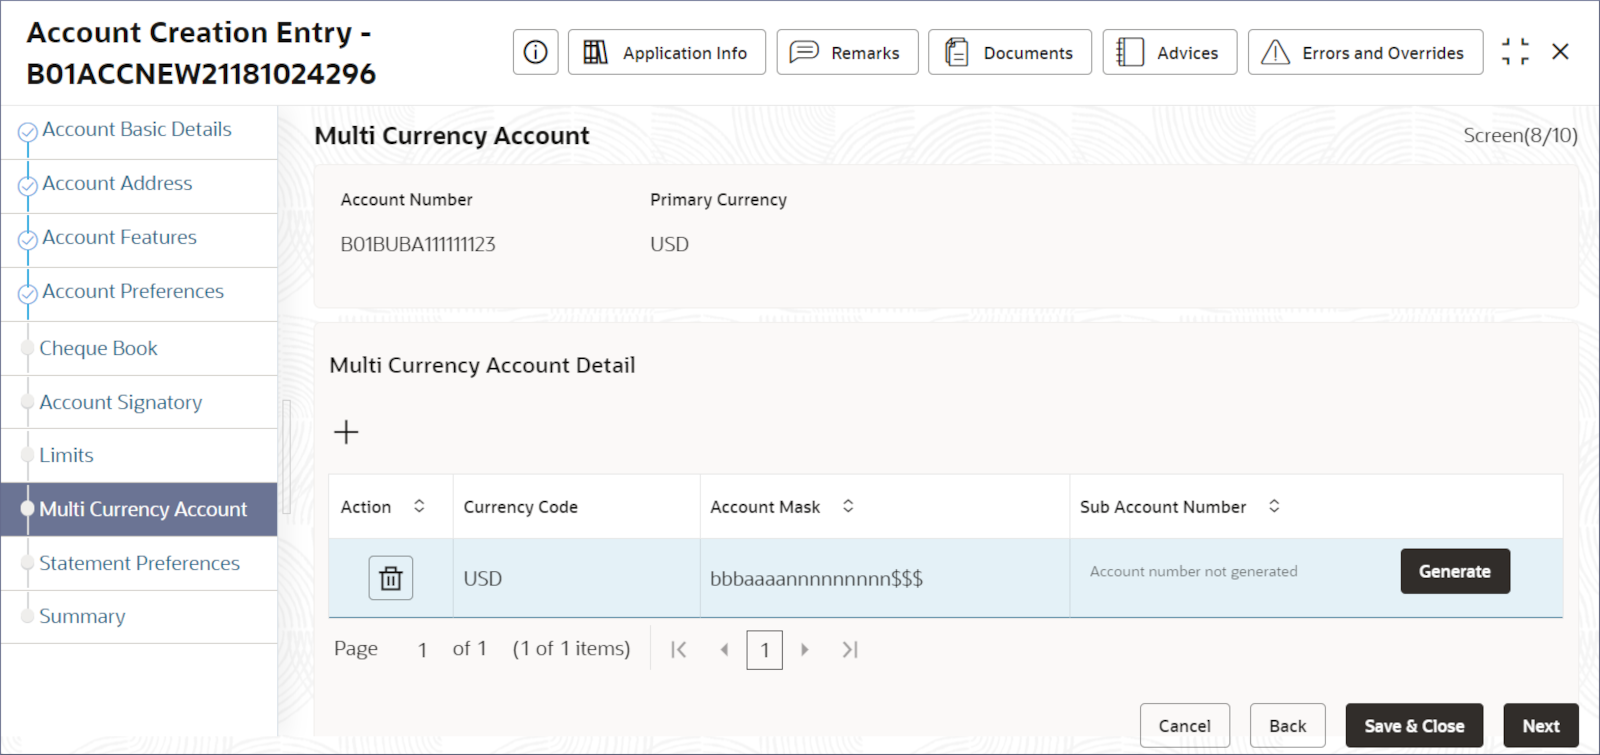
Currency Account screen.The Multi Currency Account page displays the primary currency of the account and allows the addition of sub-accounts for other supported currencies.
Note:
This screen is disabled for single currency account. To create a multi-currency account, select an appropriate account class that supports multiple currencies in Step 2. a. (Account Basic Details).- Click + under Multi Currency Account
Detail.The Sub-accounts table displays a new row.
- Double-click the Currency Code column to activate the row.
- Specify the currency code.The Account Mask column is auto-populated.
- Click the Sub Account Number column.The Generate Account Number dialog displays.
Note:
The columns masked with L represent the account class (may or may not be present and is decided by the banking organization), the columns masked with b represent the branch code, the columns masked with a represent the alphabets to be provided, the columns masked with n represent the number to be provided and the columns masked with $ represent the currency code. Together they represent a unique Corporate sub-account number. - Double-click the first column masked by a.
The cells become editable.
- Enter the required alphabet and numbers for the sub-account number. Press the Tab key to move to the next cell.
- Click Verify.
The account number is verified and generated, and the new account number is populated in the Sub Account Number column.
- Repeat the above steps to generate the sub-account number for more supported currencies.
- Click Next.The Statement Preferences screen displays.
- Click + under Multi Currency Account
Detail.
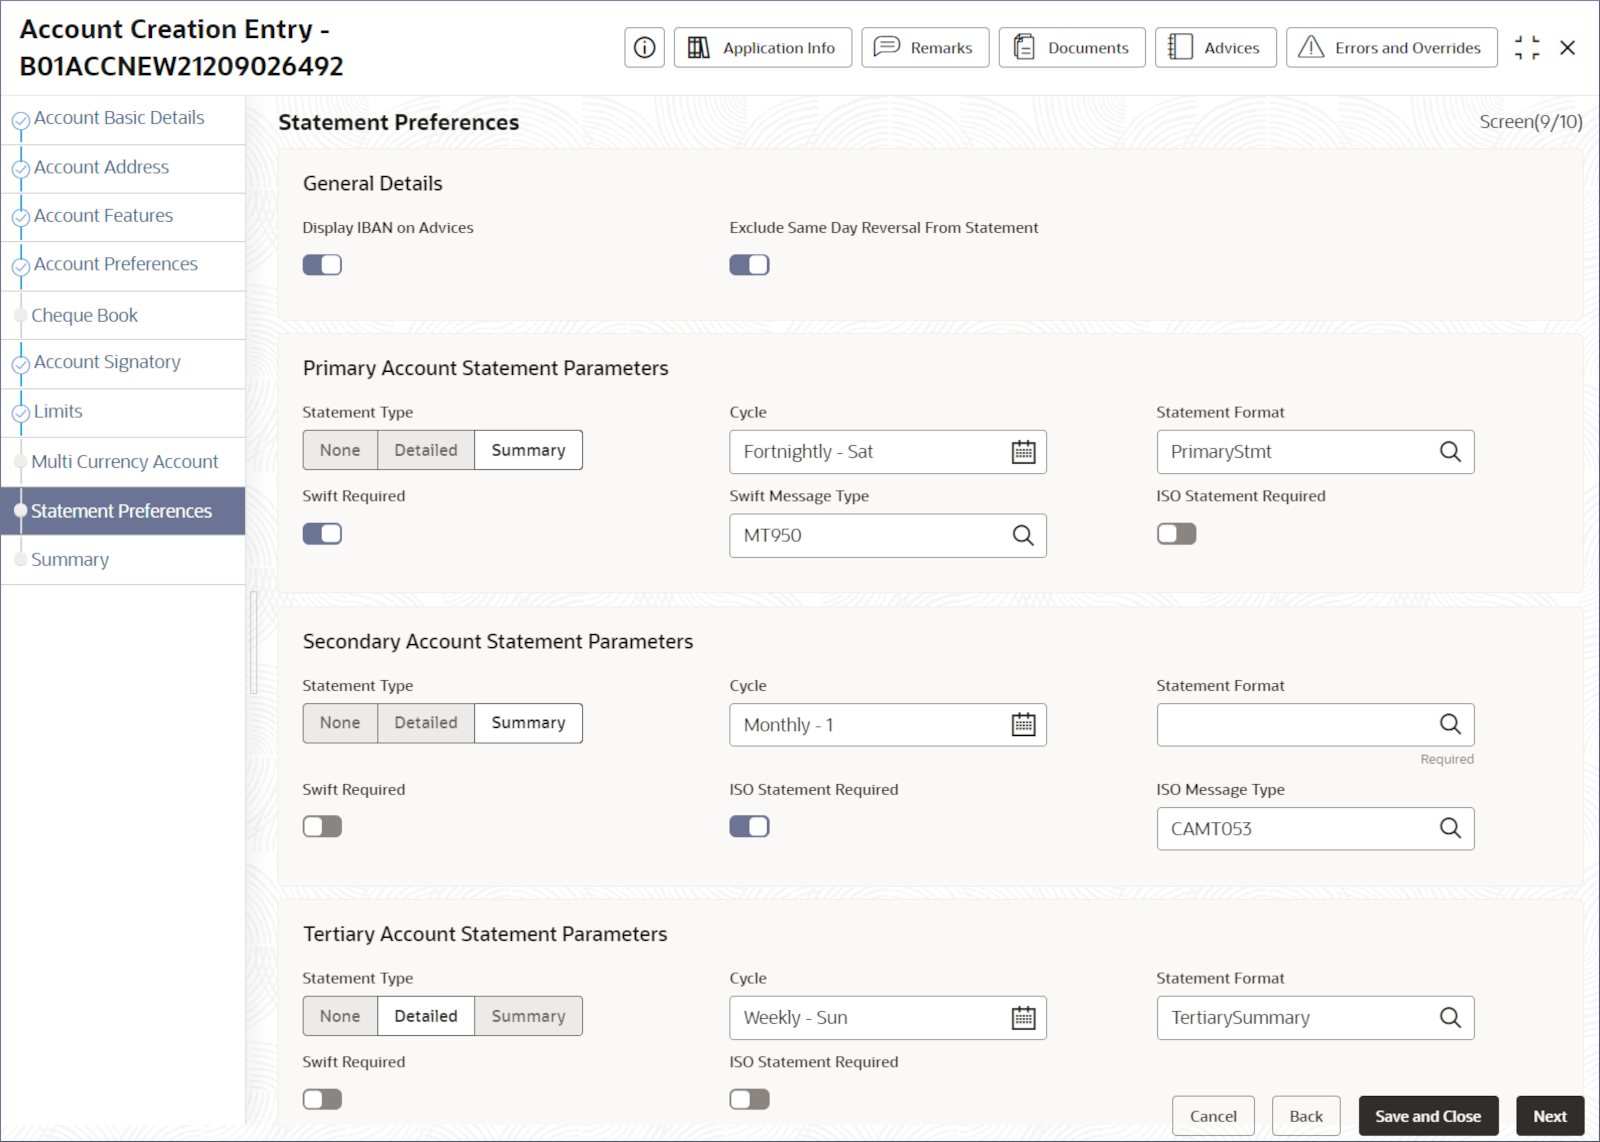
- Provide the details on the Statement Preferences
page.
- Specify the fields described in the following table.
Table 4-14 Field Description
Field Description Display IBAN on Advices Toggle the switch On to display IBAN on advices. Exclude Same Day Reversal From Statement Toggle the switch On to exclude the same day reversed transactions. Account Statement Parameters Provide the statement parameter details for the following statement types: - Primary
- Secondary
- Tertiary
Statement Type Select one of the following: - None
- Detailed
- Summary
Note:
The remaining fields in the table are common for these three statement types.Cycle Specify the frequency of the statement generated. Click the Calendar icon and specify one of the following: - Daily: Statements are generated every day.
- Weekly: Select the day of the week to generate the weekly statement.
- Fortnightly: Select the day of the week to generate the fortnightly statement.
- Monthly: Select the day of the month to generate the monthly statement.
Statement Format Specify the format of the statement generated. SWIFT Required Toggle this option On to generate statements in the SWIFT format. This field is available only when the Statement Type is Summary or Detailed. Swift message Type Specify the SWIFT message type to generate. The supported Swift message type currently is MT950. This field is available only when SWIFT Required is Yes. ISO Statement Required Toggle this option On to generate statements in the ISO format. This field is available only when the Statement Type is Summary or Detailed. ISO Message Type Specify the SWIFT message type to generate. The supported ISO message type currently is CAMT053. This field is available only when ISO Statement Required is Yes. - Click Next.The Summary Screen displays the data entry screen tiles.
- Specify the fields described in the following table.
- Click Submit.
The Stage Movement Submission dialog displays the Overrides stage.
- Complete the Stage Movement Submission process.
- Accept any Overrides generated and click Proceed
Next.The Checklist stage fetches and displays checklists mapped to this stage.
- Confirm the checklist items and then click Proceed
Next.The Outcome stage displays.
- Select PROCEED from the drop-down list and click
Submit.The Stage Movement Submission process creates the Account Creation Enrich task.
- Accept any Overrides generated and click Proceed
Next.
- Acquire and edit the Account Creation Enrich page.
- Select Tasks, and under
Tasks, click Free
Tasks. The Free Tasks page displays.
- Search the listed tasks with these column values. Process Name column contains Account Opening Existing Customer, the Stage column contains Account Creation Enrich, and the Application Number column contains the number noted in Step 1. c.
- Click Acquire and Edit.The Account Creation Enrich - <Application Number> page displays.
- Select Tasks, and under
Tasks, click Free
Tasks.
- Ensure that the GL Reporting Details, Account
MIS, Account Status, and
Interest Details screens are visible and populated
with appropriate data from the Account Class specified in
Step 2. a ( Account Basic Details).
Note:
A feature screen is not populated if the account class does not support it. For example, the Interest Details screen is blank if the selected account class does not support the Interests and Charges feature. - Review and enrich the Interest Details.
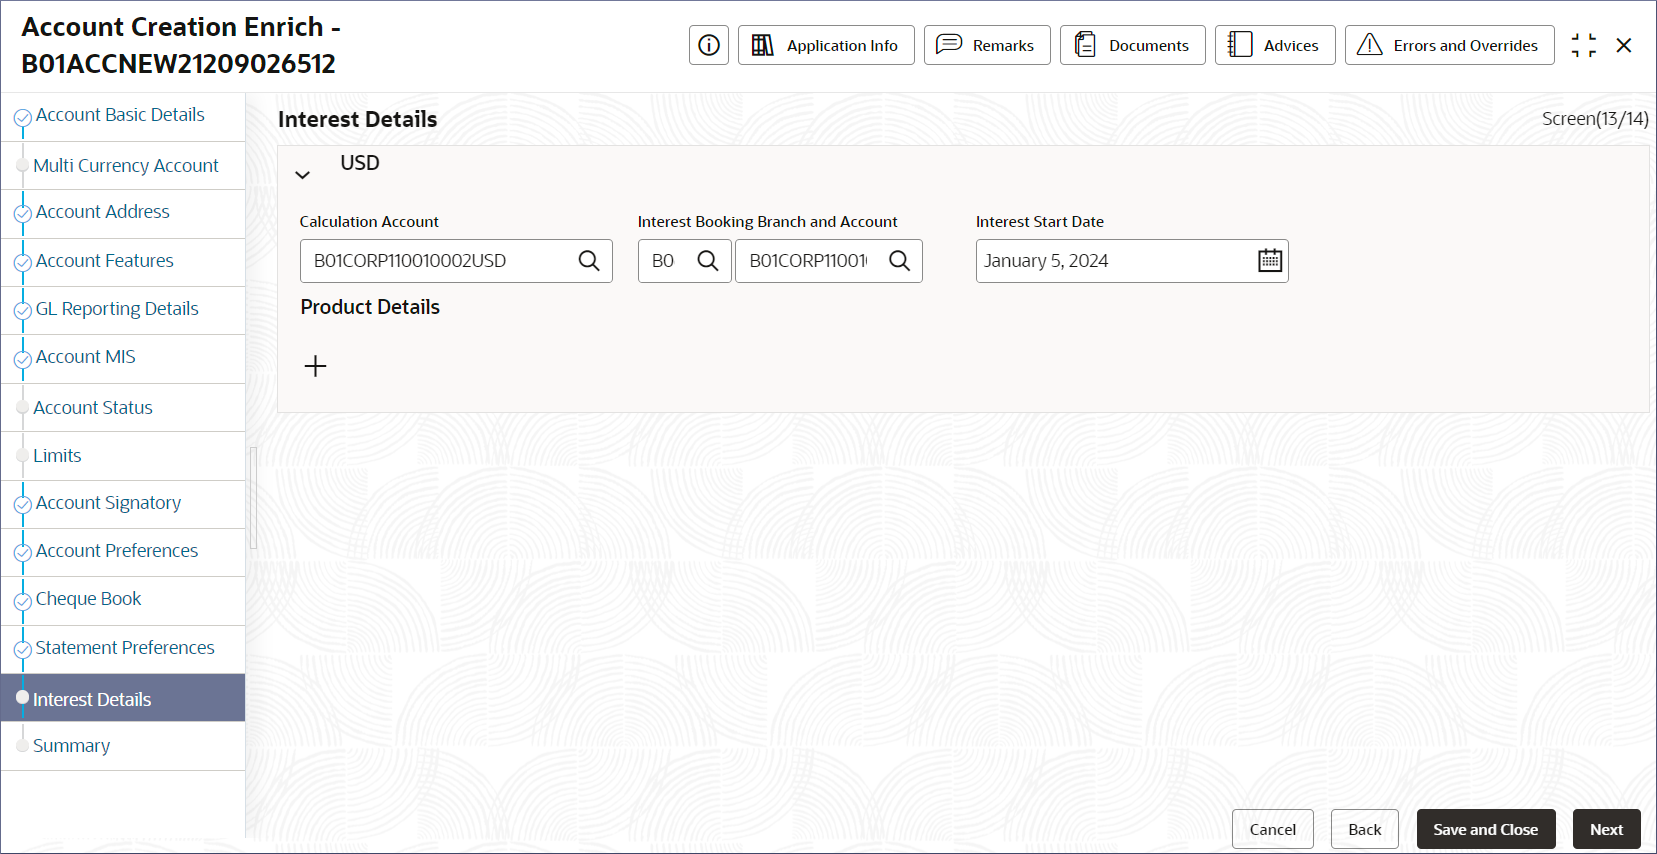
- Click the Interest Details tab.The Interest Details screen displays.
- Specify the fields described in the following table.
Table 4-15 Field Description
Field Description Calculation Account Specify the account to calculate interest. Note:
For a multi-currency account, specify the sub-account to calculate the interest.Booking Branch Specify the branch to book the interest. Booking Account Specify the account to book the interest. Note:
For a multi-currency account, the main account is the booking account. The sub-accounts cannot be a booking account.Interest Start Date The date to start interest calculation. Product Details Displays the interest products applied to the account. Note:
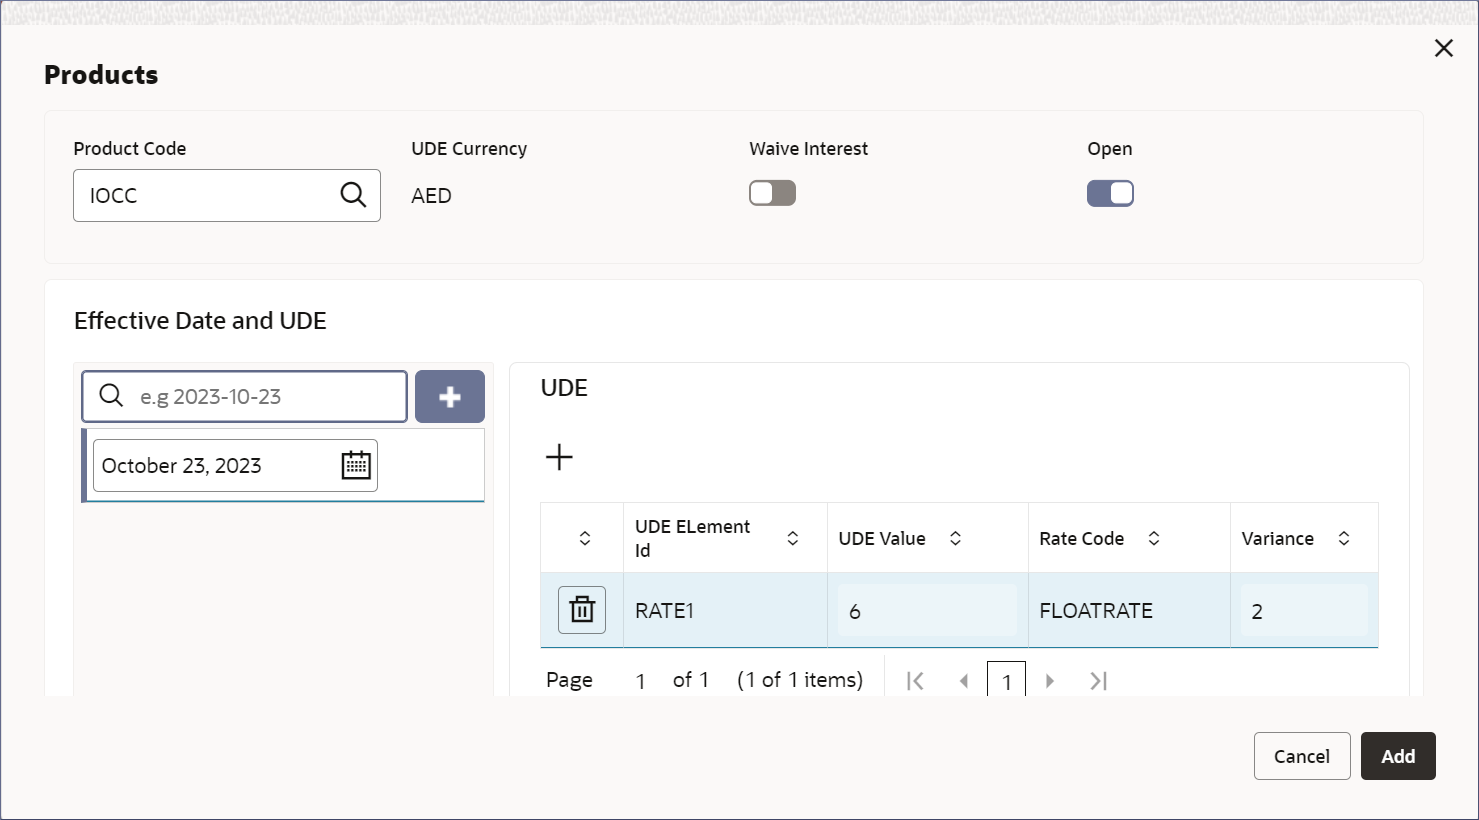
The interest product has to be applied before it is displayed. - Click + to add an interest product to the account.The Products dialog displays.
- Specify the interest product details fields described in the following
table.
Table 4-16 Field Description
Field Description Product Code Specify the interest product's code. UDE Currency Specify the currency of the UDE product. Waive Interest Toggle the option On to enable interest waiver. Effective Date and UDE Specify the effective date from which the interest product is active on the account. Specify the User Data Elements (UDE) of Interests and Charges. Note:
The interest product calculates interest using an interest rule. The interest rule has two components:- A method to calculate the interest or charge
- User Data Elements to be specified
- Click + under Effective Date and
UDE section.A blank date field displays.
- Click the date field and specify the date from which the interest product is active on the product.
- Click + under UDE.A blank row displays.
- Double-click the UDE Element ID column to
activate the row and specify the UDE details described in the following
table.
Table 4-17 Column Description
Field Description UDE Element ID Specify the ID of the Interest and Charges UDE element. The ID of the UDE. UDE Value Specify the interest or charge rate to be applied. Rate Code Select the Rate code to which the UDE Value is applied. Variance Specify the variance of the UDE Value that is allowed. - Click Add.The Interest Details page displays the new product details tile.
- Click Next.
- Click the Interest Details tab.
- Review and enrich the GL Reporting Details.
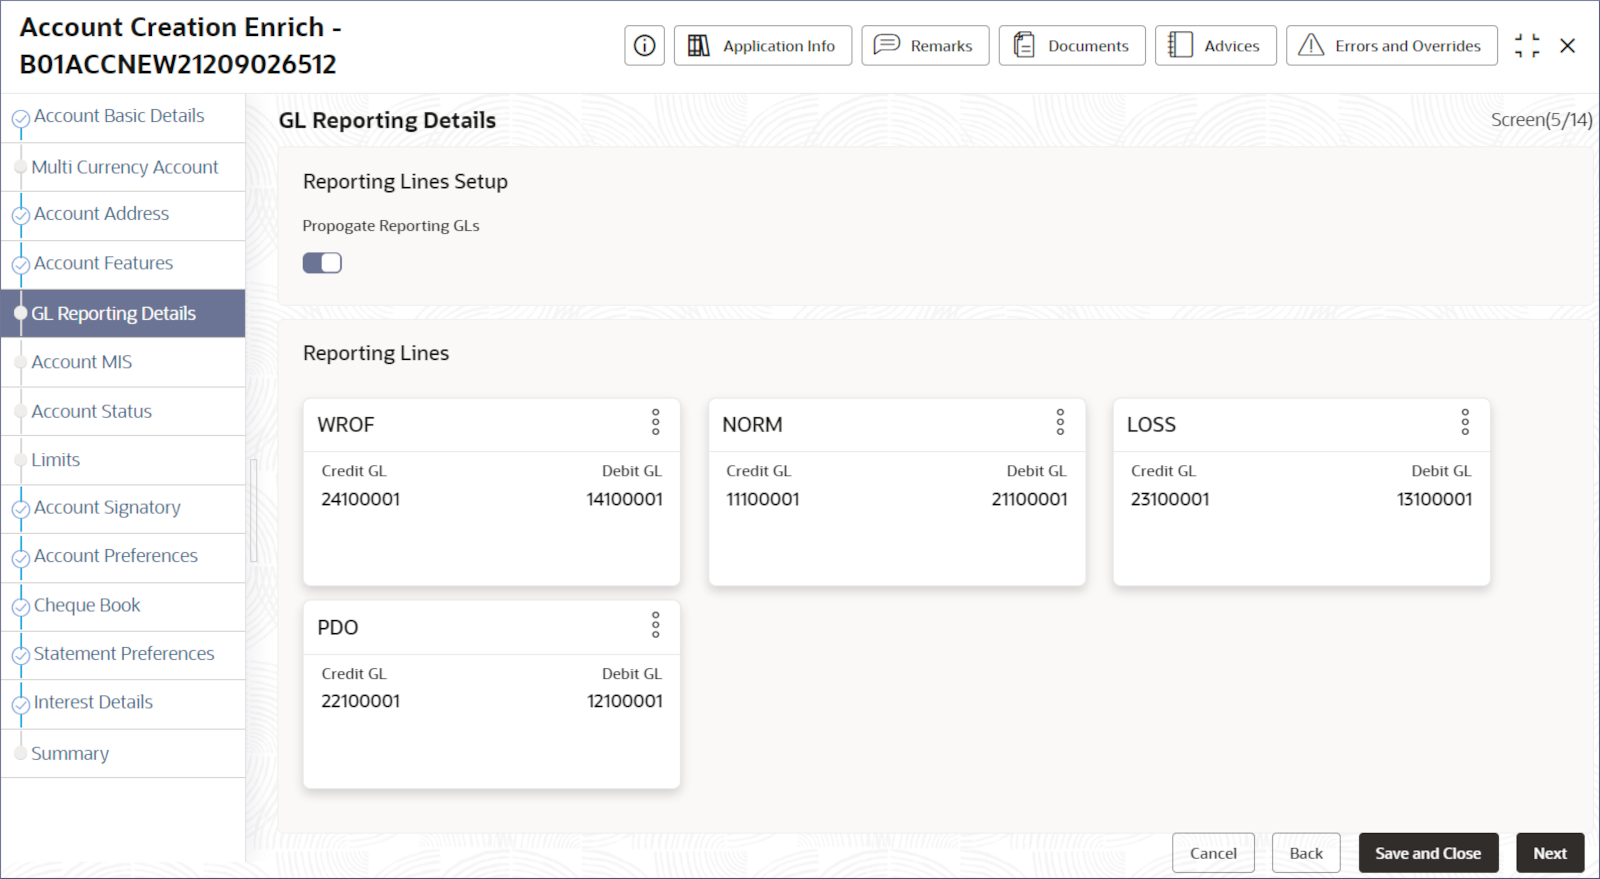
- Click the GL Reporting Details tab.The GL Reporting Details screen displays the Reporting Lines as tiles.
- Toggle the option Propagate Reporting GLs to
On or Off. If propagation of GL Lines is turned on then the Reporting lines cannot be edited. To edit the Reporting Lines turn this option off.
- From the More Options menu on the top right
corner of a Reporting Line tile, select
View or Edit.The Reporting Line dialog displays.
- Review and Edit the Status of the Reporting line, Credit GL, and Debit GL fields if necessary.
- Click Close (View mode) or Save (Edit mode).
- Click the GL Reporting Details tab.
- Review and Enrich the Account MIS details.
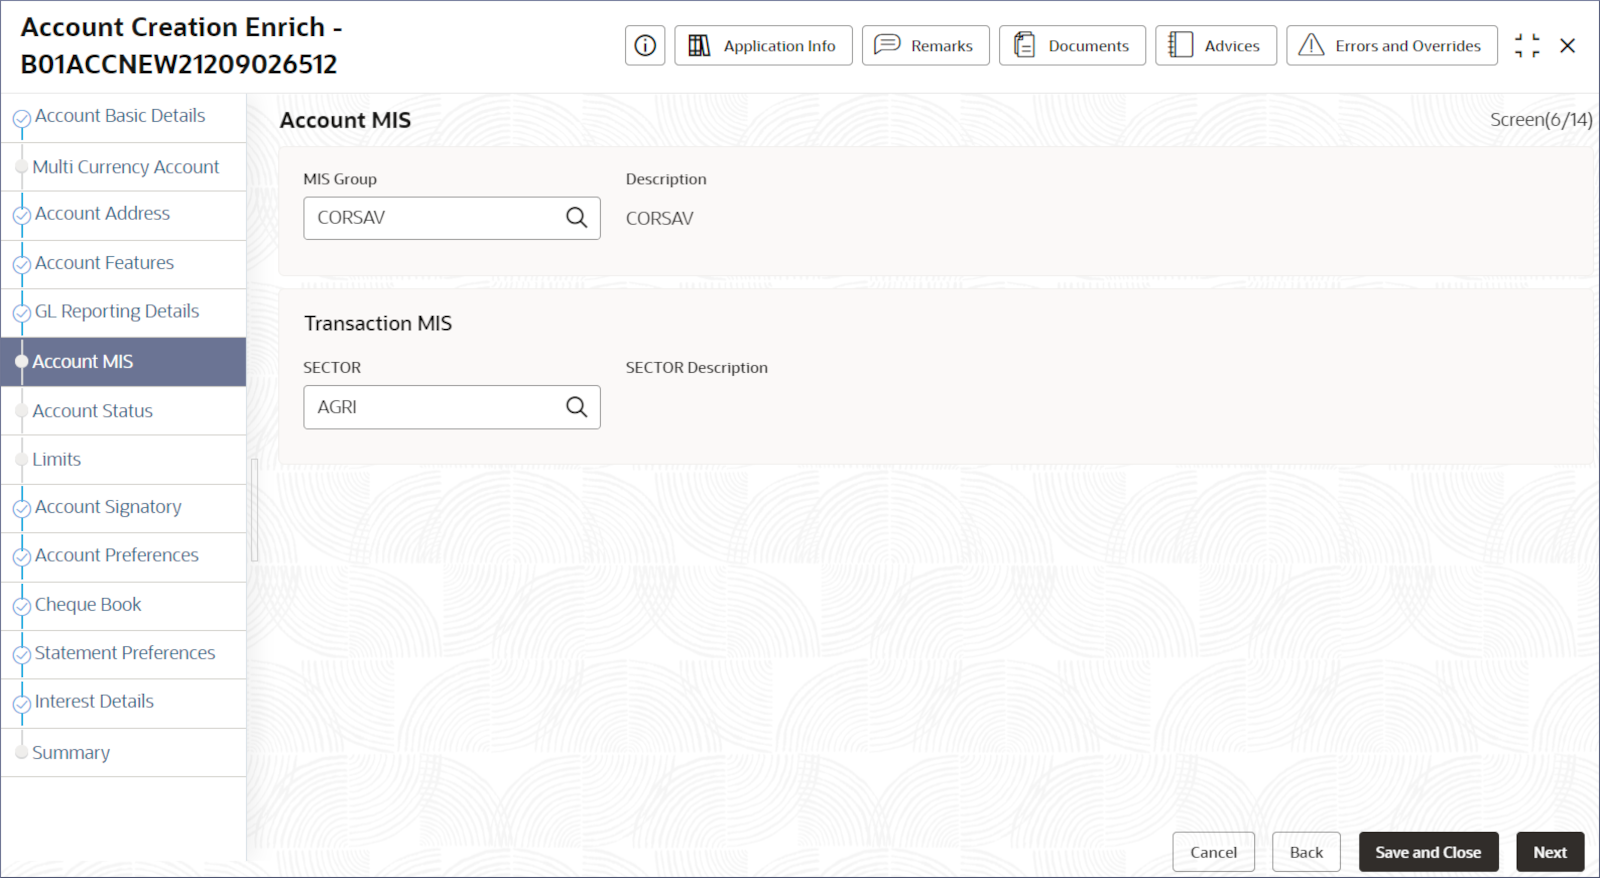
- Click the Account MIS tab.The Account MIS screen displays.
- Modify the Account MIS details if required. The following table
describes the fields.
Table 4-18 Field Description
Field Description MIS Group Specify the MIS Group the account belongs to. Description MIS Group description is auto-populated. Sector Specify the Sector the account belongs to. Description The Sector description is auto-populated.
- Click the Account MIS tab.
- Review and enrich the Account Status details.
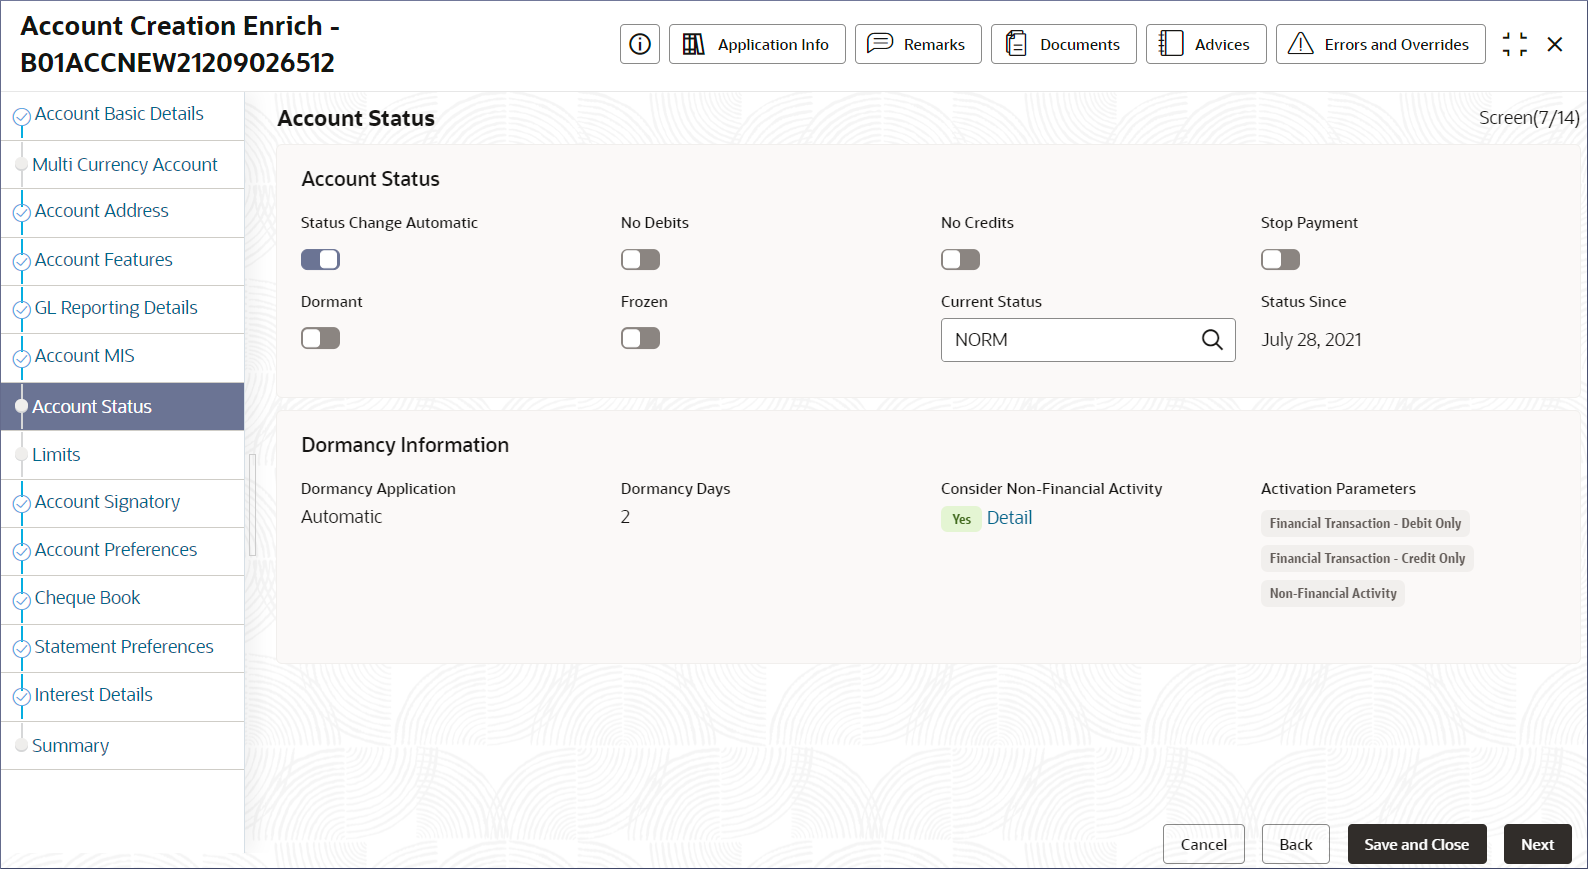
- Click the Account Status tab in the left
panel.The Account Status screen displays.
- Review and update the Account Status details if required.
- Click the Account Status tab in the left
panel.
- Review and Enrich the remaining data entry screens.
Note:
For more information on the data entry screens, see the steps from Step 2 to Step 10 above. - Click Submit from the Summary
screen.The Stage Movement Submission dialog displays.
- Complete the Stage Movement Submission process.
- Accept any Overrides generated and click Proceed
Next.The Checklist stage fetches and displays checklists mapped to this stage.
- Confirm the checklist items and then click Proceed
Next.The Outcome stage displays.
- Select PROCEED from the drop-down list and click
Submit.The Stage Movement Submission process creates the Scrutinize Account Creation task.
- Accept any Overrides generated and click Proceed
Next.
- Complete the Scrutinize Account Creation tasks.
- Click Tasks, and under
Tasks, click Free
Tasks. The Free Tasks page displays.
- Search the listed tasks with these column values. The Process Name column contains Account Opening Existing Customer, the Stage column contains Scrutinize Account Creation, and the Application Number column has the number noted in Step 1. c.
- Click Acquire and Edit.The Account Creation Scrutinize- <Application Number> page displays.
- Scrutinize and ensure that all the data entry screens are correct.
- Click Submit from the
Summary screen.The Stage Movement Submission dialog displays.
- Click Tasks, and under
Tasks, click Free
Tasks.
- Complete the Stage Movement Submission process.
- Accept any Overrides generated and click Proceed
Next.The Checklist stage fetches and displays checklists mapped to this stage.
- Confirm the checklist items and then click Proceed
Next.The Outcome stage displays.
- Select PROCEED from the drop-down list and click
Submit.The Stage Movement Submission process creates the Approve Account Creation task, and the Free Tasks page displays.
- Accept any Overrides generated and click Proceed
Next.
- Complete the Approve Account Creation task.
- Search the listed tasks with these column values. Process Name column contains Account Opening Existing Customer, the Stage column contains Approve Account Creation, and the Application Number column has the number noted in Step 1. c.
- Click Acquire and Edit.The Account Creation Approve- <Application Number> page displays.
- Review and ensure that all the data entry screens are correct.
- Click Submit from the
Summary screen.The Stage Movement Submission dialog displays.
- Complete the Stage Movement Submission process.
- Accept any Overrides generated and click Proceed
Next.The Checklist stage fetches and displays checklists mapped to this stage.
- Confirm the checklist items and then click Proceed
Next.The Outcome stage displays.
- Select PROCEED from the drop-down list and click
Submit.The account creation is complete.
- Accept any Overrides generated and click Proceed
Next.
- Confirm that all stages of the Account Creation process are complete.
- Click Tasks, and under Tasks, click Completed Tasks.
- The Completed Tasks page should display all four stages of the Account Creation process: Entry, Enrich, Scrutinize, and Approve.
Parent topic: Account Creation
