Updating Unified Assurance
Learn about how to update Oracle Communications Unified Assurance packages to the latest version.
About Updating Unified Assurance
The Unified Assurance package system allows for near seamless installation of new packages and updates to installed packages. Installing updates is first done on the primary presentation server, then other servers can be updated as well.
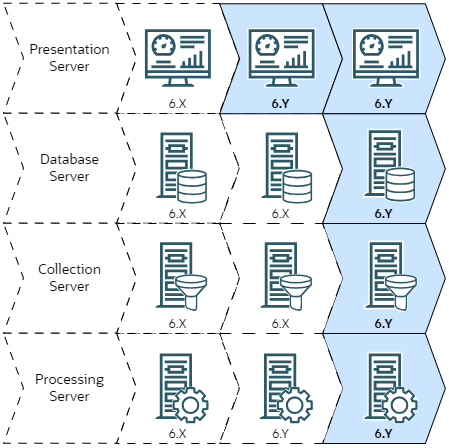
The image shows the update process for four individual servers running Unified Assurance: a presentation server, a database server, a processing server, and a collection server. For simplicity, the example shows a non-redundant setup. You perform an update in the following order:
-
First, update the primary presentation server, as shown in the second column.
-
Next, update all the other servers at the same time, as shown in the third column.
-
When the update is being installed, the database, processing, and collection servers check the primary presentation server's version and update to the same version.
Description of illustration update-path.png
Updating Unified Assurance
To update Unified Assurance:
-
If you are updating to version 6.0.5 or later, on all servers in the environment:
-
Install RPM packages required by the Unified Assurance installation RPM by running the following command:
dnf install selinux-policy-targeted policycoreutils policycoreutils-python-utilsAlthough these packages are required to support SELinux, you must install them regardless of whether you are enabling SELinux or not.
-
If you are planning to enable SELinux in an environment where it was previously disabled, perform all prerequisite steps described in Configuring SELinux.
-
-
If you are updating to version 6.1 or later and have the Flow Collector microservice deployed, you must stop all data coming from all deployed Flow Collector instances to the Historical database. Scale down the microservice by running the following command for all instances of Flow Collector, as the assure1 user:
a1k scale --replicas=0 deploy <flow-collector-release-name> -n <namespace>where:
-
<flow-collector-release-name> is the name of the microservice instance. This is typically flow-collector, but may be slightly different if you have multiple instances of the microservice deployed to the same cluster.
-
<namespace> is the namespace where the microservice is deployed. This is typically a1-zone1-pri, but may be slightly different if you deployed the microservice to a different zoned namespace or a redundant cluster.
See Managing Microservices and Flow Collector in Unified Assurance Implementation Guide for information about microservices.
-
-
Download the latest available Unified Assurance patch, and extract the contents of the collection file to the installation directory where you initially installed Unified Assurance. This is typically /opt/install, and is referred to as <installation_directory> in the documentation.
See Downloading the Latest Unified Assurance Software for more information about where to get the software and how to extract the collection file.
-
In the Unified Assurance UI, from the Configuration menu, select Broker Control, then Servers.
-
In the grid, select the primary presentation server.
-
From the Version menu, select the version you want to install.
-
Click Update Server(s) and wait for the Status column to show Complete.
Updated packages are copied from the directory where they were extracted into the internal package location on the primary presentation server. After the package files are copied, packages that have updates on the primary presentation server are installed.
-
Select all other servers by holding Ctrl or Shift and clicking the servers.
-
Click Update Server(s).
Packages that have updates available are downloaded from the primary presentation server to the other servers. After the packages are downloaded, packages that have updates on the server are installed.
When all servers show Complete, the package update process is complete.
Proceed to Post-Update Tasks.
Post-Update Tasks
After updating Unified Assurance, complete the required post-update tasks:
-
Enabling SELinux After Updating: Only required if you want to enable SELinux when it was previously disabled.
-
Tasks When Updating from Version 6.0.3 or Earlier 6.0.X Versions
Migrating Historical Data
In Unified Assurance 6.1, OpenSearch replaced Elasticsearch as the Historical database. You must migrate your Historical data to OpenSearch.
This includes:
-
Running scripts to automatically migrate database indexes
-
Manually migrating custom components
-
Removing Elasticsearch, Filebeat, and Kibana.
See About Migration in Unified Assurance Migration Guide for more information.
Redeploying Microservices
After updating, you must update and redeploy all deployed microservices on all microservice cluster servers.
For version 6.1:
-
The Redis microservice is no longer supported. Undeploy it and do not redeploy it. You can use the Coherence microservices for caching instead. See Coherence and Coherence Operator in Unified Assurance Implementation Guide.
-
Because of changes to the Historical database cluster, you must undeploy and redeploy the Flow Collector microservice after migration is complete so that Flow Collector includes the correct cluster host information.
-
Although for many microservices, you can run a1helm upgrade to finish the update, some microservices include configuration property changes in the default Helm charts. For the following microservices, you cannot run a1helm upgrade and must undeploy and redeploy them:
-
Pulsar
-
Graph Sink
-
Cisco Meraki Poller
-
CORBA Collector
-
Flow Collector
-
Ping Poller
-
SNMP Poller
-
VMWare Poller
-
This topic shows you how to perform the tasks using the command line. You can also undeploy and redeploy microservices by using the UI. See Managing Microservices for more information.
To redeploy microservices:
-
As the assure1 user, update the Helm repository:
a1helm repo update -
As the root user, upgrade the cluster:
$A1BASEDIR/bin/cluster/clusterctl upgrade -
Undeploy and redeploy each of the following microservices:
To undeploy and redeploy the microservices:
-
(Optional) Review the existing Helm chart and make note of any specific configuration settings:
a1helm show values assure1/<helm-chart-name>where <helm-chart-name> is the name of the Helm chart for the microservice. For example, event-sink.
Tip:
You can run a1k get pods -A or a1k get deployments -A to see what pods and microservices are running in all namespaces.
-
Undeploy the microservice:
a1helm delete <microservice-release-name> -n <namespace>where:
-
<microservice-release-name> is the release name for the microservice deployment. For example, event-sink.
In most cases, this is the same name as the microservice and Helm chart, but you may have used different values if you deployed multiple instances of the microservice in the same cluster.
-
<namespace> is the namespace where you deployed the microservice.
The default zoned namespace is a1-zone1-pri, but you may have used other zones or secondary namespaces. Supporting microservices are deployed to non-zoned namespaces, such as a1-monitoring for Prometheus, a1-cache for Coherence, and a1-messaging for Pulsar.
For example, to undeploy the Pulsar microservice:
a1helm delete pulsar -n a1-messagingAny Pulsar backlog is also deleted.
Tip:
You can also use the UI to undeploy a microservice. See Undeploying a Microservice by Using the UI in Unified Assurance Implementation Guide.
-
-
Redeploy the microservice, remembering to specify any configuration settings that you had previously used.
See Deploying a Microservice in Unified Assurance Implementation Guide for information about deploying a microservice using the command line or the UI. The documentation for each microservice also provides specific commands and configuration details.
-
Upgrade any other microservices that you did not have to undeploy:
a1helm upgrade <microservice-release-name> -n <namespace>Note:
You can only use a1helm upgrade to upgrade microservices that do not have configuration changes. You cannot use it to update configuration parameters in the Helm charts of running microservices.
Detaching and Rejoining Microservice Clusters
Unified Assurance version 6.1 includes a new version of Submariner.
To account for this change, after you have updated all servers where microservices are deployed, upgraded the cluster, and redeployed microservices, you must detach and rejoin the paired servers.
-
On each pair of servers in the cluster, run the following command as the root user from one of the pair:
$A1BASEDIR/bin/cluster/clusterctl detachThe command automatically identifies which cluster pair to detach based on the cluster association of the server host where the command was run.
-
Rejoin the cluster by running the following command from any server in the cluster:
$A1BASEDIR/bin/cluster/clusterctl join --primaryCluster <PrimaryHostFQDN> --secondaryCluster <SecondaryHostFQDN>
Enabling SELinux After Updating
Unified Assurance version 6.0.5 and later is supported on systems where SELinux is enabled and set to enforcing.
To enable SELinux after updating, do the following on all servers in the environment:
-
Update the servers as described in Updating Unified Assurance, which includes performing the prerequisite steps described in Configuring SELinux and Installing Required Package Dependencies.
-
Open the /etc/selinux/config file.
Note:
This is the core Linux etc directory, not the Unified Assurance $A1BASEDIR/etc directory.
-
Change the SELINUX= line to SELINUX=enforcing.
-
Save and close the file.
-
Reboot the server.
-
Run the ConfigSELinuxDocker application:
$A1BASEDIR/bin/ConfigSELinuxDocker enableConfigSELinuxDocker confirms that the required dependencies are met and sets up SELinux for the Unified Assurance instance of Docker.
Tasks when Updating from Version 6.0.3 or Earlier 6.0.X Versions
After updating from version 6.0.3 or earlier 6.0.X versions to 6.1, perform these tasks:
-
The Device picker combo box has been updated. Check the configuration of all Event List and Device Availability Pie dashboard panels to ensure that the correct device is selected.
-
If you are using custom foreach loops in your rules files, you may receive an error similar to the following:
experimental keys on scalar is now forbiddenTo resolve this issue, check your rules files for proper keys.
For example, the following lines are invalid:
foreach my $id ($hash_ref) {my @variants = keys $hash{$word}{variants};To fix them, dereference hash_ref and hash:
foreach my $id (%{$hash_ref}) {my @variants = keys %{ $hash{$word}{variants} }; -
A UI has been added to help add, remove, and make certain changes to fields in the Event.Events table, and a new column RootCauseKey has been added to the initial table layout. Run the ApplyEventSchema application to apply the changes to the table.
-
Optionally, run ApplyEventSchema with the --Dry-Run option for a preview of changes:
-
Log the queries that will be run to change the database:
$A1BASEDIR/bin/ApplyEventSchema --Dry-Run -
Review the queries in the log file:
lnav $A1BASEDIR/logs/ApplyEventSchema.log
-
-
Run ApplyEventSchema:
-
For non-sharded environments, run the following command:
$A1BASEDIR/bin/ApplyEventSchema -
For environments with multiple event shards, do one of the following:
-
On any of the database servers, run ApplyEventSchema with the --EventShard 0 flag:
$A1BASEDIR/bin/ApplyEventSchema --EventShard 0 -
On the primary instance of the database server, run ApplyEventSchema with the -EventShard flag, replacing <N> with the relevant shard number:
$A1BASEDIR/bin/ApplyEventSchema --EventShard <N>
-
-
-
Post Update Tasks for Vision
Unified Assurance 6.1 supports zone IDs in Vision entities.
Because the entity name in Vision must be unique, if you had devices with the same name in different zones, you previously could only import the first device as an entity. Now, with the addition of zone IDs, you can import multiple devices with the same name and different zone IDs.
The update process automatically adds the default zone ID (1) to all existing entities.
After updating to version 6.1, run the Create Vision Entities job to import devices with duplicate names in different zones that you were previously unable to import:
To run the Create Vision Entities job:
-
From the main Unified Assurance navigation menu, select Configuration, then Broker Control, and then Jobs.
-
Select the Create Vision Entities job and click Run.
Tip:
You can find the job quickly by using the filter bar to filter by the name column.