Update Devices with Route Sets

After you associate route sets with devices, do the following tasks to update devices with route sets:

  1. Add a task that updates all the associated devices.
  2. Start the task.
  3. While an update task is in progress, the target devices are locked to all other updates. Commit the update task to the device group or roll it back.
    • Committing an update removes the lock on the target device group and the update task from this table, and adds the update task to the table displayed on the Update Task History tab.
    • Rolling back an update rolls back any changes made to the target device group. (You cannot access the rollback function while an update task is in progress.

    Note:

    If the update task included multiple target device groups and rollback fails on any one device group, Oracle Communications Route Manager continues the rollback on all other device groups.
The update process flow is:
  1. Name the task.
  2. Select one or more device groups.
  3. Select a failure policy.
  4. Apply updates.
  5. Commit or rollback the update(s).

Whether your updates succeed or fail, you must commit or roll back the updates to release the device locks.

Add an Update Task

You can add an update task used to update one or more device groups.

  1. Expand the Route Manager slider, and click Devices.
  2. Select the Device Route Set Updates tab and click Update.
  3. In the Add Update Task pane, complete the following fields:
  4. Select a device group from the Route Set Devices list and click Add.
    The device group appears in the Devices to Update table. If you decide to remove the device group that you just added, you can select it and click Remove to return it to the Route Set Devices list.
  5. Repeat the previous step for each device group that you want to update.
  6. Click OK. The Update Task Details dialog box displays with a progress bar that indicates the status of the update process.

    Note:

    While an update task is in progress, the target device group is locked from all other updates.

    Note:

    If a failure occurs, select from the following failure policies:
    • Roll back all successfully updated devices
    • Abort the entire job
    • Skip the failed device update and continue

    Note:

    If the update fails because a targeted device group is busy or locked, an error message appears.
    Once the update task process is finished, the task appears in the Update Tasks table in the Device Route Set Updates tab, and indicates whether the update task process was a success or failure. If the update failed and you selected rollback as the action policy, you can click Retry Failures in the Update Task Details dialog box to try the update again. Otherwise, exit the dialog box and rollback the update. See the Roll Back an Update Task in this chapter for more information.
  7. Select the successful update task in the Update Tasks table and click Commit to remove the locks on the associated device group(s).

    Note:

    You must own the lock on the route set to commit the update(s) to the device group.
    The update is committed on the target device group and the update task is removed from the Update Tasks table and appears in the Update Task History tab.

Roll Back an Update Task

If the update failed and you selected the Roll back all successfully updated devices or Skip the failed device update and continue policy when adding an update task, you can rollback the update task and remove the locks on the associated device group.

Note:

You must own the lock on the route set to rollback for the device group.

Note:

If you do not rollback an update task that fails, an error message displays similar to the example below when you attempt to perform another update task on device group(s) associated with the previous update task.
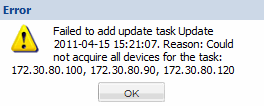
The error message says that there was a failure to add the update task update with the date because it could not acquire all devices for that task.
  1. Expand the Route Manager slider, and click Devices.
  2. Select the Device Route Set Updates tab.
  3. Select the failed update task you want to rollback in the Update Tasks table and click Rollback.
    The rollback process starts and a progress bar indicates the status of the rollback. The update task status is updated in the Update Tasks table and the lock is removed on the device group(s) and appears in the Update Task History tab.