Configuration Comparison

For more information, see:

Creating the Comparison Report

Comparing device configuration with a Golden Configuration allows you to view discrepancies from the baseline, and create a comparison report.

Create a comparison report by comparing the Golden Configuration against a device configuration of the same Plugin and Platform type.
Make sure that a Golden Configuration has been created for the same Plugin and platform type of the device that you are about to compare.
  1. Expand the Configuration Comparison slider.
  2. Click Compare Comparison.
  3. In the Configuration Comparison Reports page, click Create.
  4. In the Create Configuration Comparison page:

    Table 3-2 Fields in the Create Configuration Comparison Page

    Field Description
    Comparison Report Name Valid name of the configuration comparison report. A valid name can only contain letters, numbers, an underscore, or a hyphen. No blank space(s) are allowed, and the name must not start with ID.
    Source Select an existing source Golden Configuration against which the target configuration needs to be compared.
    Target Configuration Selection Target can be any one of these options: a device configuration, backup configuration or an external configuration file.
    • Managed device: The selected device must have an identical platform and plugin type as the source Golden Confguration.
    • Archived configuration displays only those backup configurations that match the platform and plugin type as that of the source Golden Configuration
    • Uploaded external file The external file must have an identical platform and plugin type as the source Golden Configuration.
  5. Click Apply.
    The Configuration Comparison report is created.

Viewing the Comparison Report

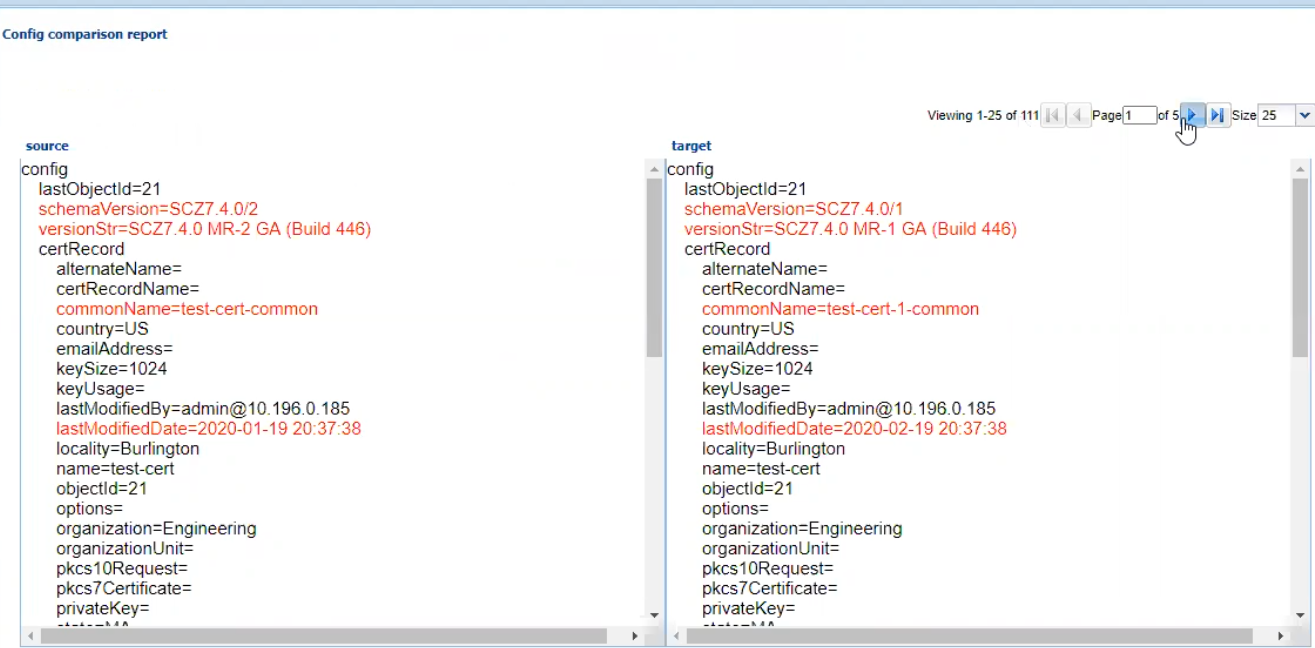
Viewing the comparison report shows the configuration differences between the source Golden Configuration and the taget configuration.

  1. Expand the Configuration Comparison slider.
  2. Click Compare Comparison.
  3. In the Configuration Comparison Reports page, click the comparison report that you want to view.
  4. Click View.
    The comparison report is shown in two-column mode highlighting the differences in red font.

    Figure 3-1 View Comparison Report

    Comparison Report
  5. Click Back to go back to the list of comparison reports.

Downloading the Comparison Report

You can download the Configuration Comparison Report for future reference.
  1. Expand the Configuration Comparison slider.
  2. Click Compare Comparison.
  3. In the Configuration Comparison Reports page, select the report that you want to download.
  4. Click Download.
  5. When the system prompts you to download the report in compressed gzip file format, click Yes. Clicking No allows you to download the report in a PDF format.
    The comparison report file that you download contains the following information:
    • Report name
    • Source Configuration
    • Target Configuration
    • Platform
    • Plugin type
    • Source Software version
    • Target Software version
    • Report Generated Date
    • Owner

Deleting the Comparison Report

You can delete the Comparison Reports that you no longer require or those that are not relevant anymore.

  1. Expand the Configuration Comparison slider.
  2. Click Compare Comparison.
  3. In Configuration Comparison Reports, click the report that you want to delete.
  4. Click Delete.
    On confirmation, the report is deleted from SDM

Setting the Purge Method for Comparison Reports

You can purge comparison reports in two ways: auto purge or manual method.

  1. Expand the Configuration Comparison slider.
  2. Click Compare Comparison.
  3. Expand the Configuration Comparison slider.
  4. Click Purge.
  5. In the Purge Comparison Reports page:

    Table 3-3 Fields in the Purge Comparison Reports

    Field Description
    Auto Purge Select this method to purge comparison reports automatically by the Purge task that runs everday at 1 A.M. All reports that are older than the auto-purge interval are purged.
    Enter the number of days to keep the comparison reports Set the auto purge interval in terms of days (24 hours day). By default, the purge interval value is 2 days. You can set the purge interval value as required, but the value must be greater than 2 days. If you set the purge interval as 4 days, then all reports that were saved 4 days before today are purged today by the Purge task.
    Manual Purge Select this method to manually purge the reports. Select the From date and To date. Do not select today, yesterday, or a future date. This is because the default purge interval is 2 days.
  6. Click Apply.
    Based on the method that you select, reports that qualify for purging are purged from SDM.