5 Starting the Upgrading Assistant

Upgrade product schemas using the Upgrade Assistant.

  1. Go to the oracle_common/upgrade/bin directory of new oracle home:
    [oracle@vm]$ cd $NEW_ORACLE_HOME/oracle_common/upgrade/bin
  2. To upgrade product schemas using the Upgrade Assistant, follow these steps:
    [oracle@vm bin]$ ./ua
  3. On the Welcome screen, review an introduction to the Upgrade Assistant and information about important pre-upgrade tasks.
  4. Click Next.
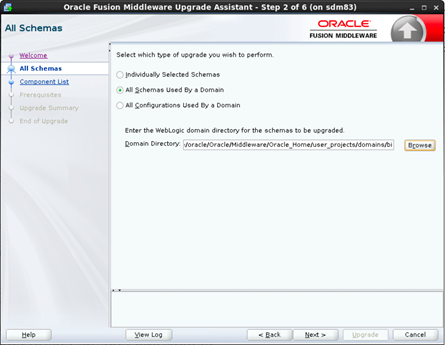
  5. On the All Schemas screen, select All Schemas Used by a Domain.
    1. Click All Schemas Used by a Domain to allow the Upgrade Assistant to discover and select all components that have a schema available to upgrade in the domain specified in the Domain Directory field. This is also known as a domain assisted schema upgrade. Additionally, the Upgrade Assistant pre-populates connection information on the schema input screens
    2. Give the Domain Directory of old Oracle_Home as:
      /home/oracle/Oracle/Middleware/Oracle_Home/user_projects/domains/bi

      Note:

      Oracle recommends that you select All Schemas Used by a Domain for most upgrades to ensure all of the required schemas are included in the upgrade
    3. Click Next.

      Figure 5-1 All Schemas Used by a Domain


      All schemas used by a Domain

  6. On the Component List screen, click Next.
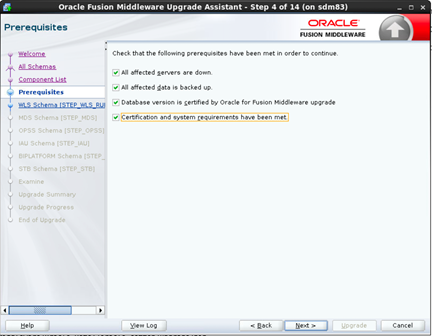
  7. 4. On the Prerequisites screen, acknowledge that the prerequisites have been met by selecting all the check boxes. Click Next.

    Figure 5-2 Prerequisites


    Prerequisites

    Note:

    The Upgrade Assistant does not verify whether the prerequisites have been met.

Component-WLS Schema (STEP_WLS_RUNTIME)

For the Component- WLS Schema (STEP_WLS_RUNTIME), keep the fields identified with default values and change any of the fields as required below, and click Next:

Table 5-1 WLS Schema (STEP_WLS_RUNTIME)

Fields Description
Database Type (Default) Oracle Database
Database Connect String (Non-editable) <hostname>:1521:ACMEPUBLISHER
DBA username nncentral
DBA password Enter the password for Oracle Database
Schema username (Default) STEP_WLS_RUNTIME
Schema password (Default) Password for Schema is filled

Figure 5-3 Component- WLS Schema (STEP_WLS_RUNTIME)
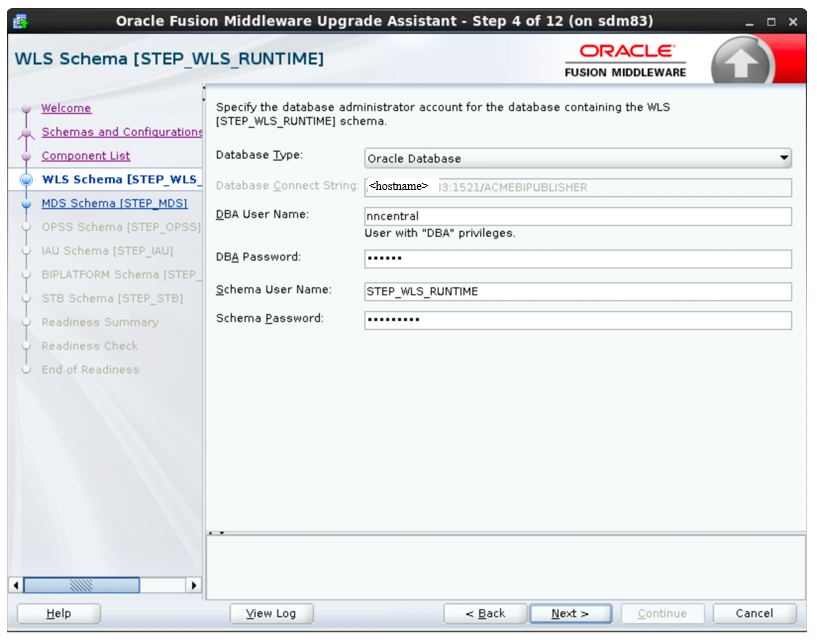

Component- WLS Schema (STEP_WLS_RUNTIME)

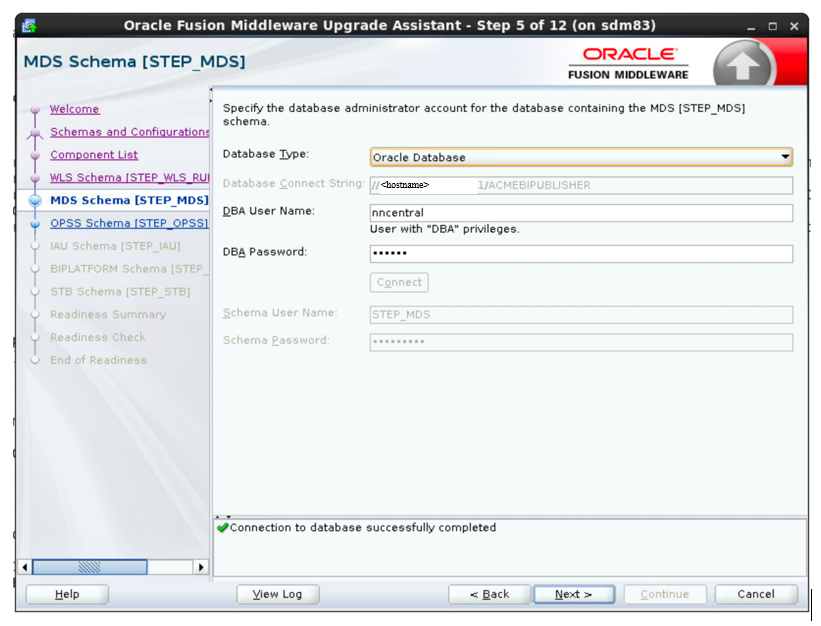
Component- MDS Schema (STEP_MDS)

For the Component- MDS Schema (STEP_MDS), keep the fields identified with default values and change any of the fields as required below, and click Next.

Table 5-2 Fields for Component- MDS Schema (STEP_MDS)

Field Description
Database Type (Default) Oracle Database
Database Connect String (Non-editable) <hostname>:1521:ACMEPUBLISHER
DBA username nncentral
DBA password Enter the password for Oracle Database
Schema username (Non-editable) STEP_MDS
Schema password (Default) Password for Schema is filled.

Figure 5-4 MDS Schema (STEP_MDS)


MDS Schema (STEP_MDS)

Component- OPSS Schema (STEP_OPSS)

For the Component- OPSS Schema (STEP_OPSS), keep the fields identified with default values and change any of the fields as required below

Table 5-3 Component- OPSS Schema

Fields Description
Database Type (Default) Oracle Database
Database Connect String (Non-editable) <hostname>:1521:ACMEPUBLISHER
DBA username nncentral
DBA password Enter the password for Oracle Database
Schema username (Non-editable) STEP_OPSS
Schema password (Default) Password for Schema is filled

Click Next.

Component- IAU Schema (STEP_IAU)

For the Component- IAU Schema (STEP_IAU), keep the fields identified with the default values.

  1. Change any of the fields as required below:
  2. See the table to view the descriptions of the fields on the Component- IAU Schema (STEP_IAU):

    Table 5-4 Component- IAU Schema (STEP_IAU)

    Field Description
    Database Type (Default) Oracle Database
    Database Connect String (Non-editable) <hostname>:1521:ACMEPUBLISHER
    DBA user name nncentral
    DBA password Enter the password for Oracle Database
    Schema user name (Non-editable) STEP_IAU
    Schema password (Default) Password for Schema is filled
  3. Click Next.

Component- BIPLATFORM Schema (STEP_BIPLATFORM)

For the Component- BIPLATFORM Schema (STEP_BIPLATFORM), keep the fields identified with the default values.

  1. Change any of the fields as required below:
  2. See the table to view the descriptions of the fields on the Component- BIPLATFORM Schema (STEP_BIPLATFORM):

    Table 5-5 Component- BIPLATFORM Schema (STEP_BIPLATFORM)

    Fields Description
    Database Type (Default) Oracle Database
    Database Connect String (Non-editable) <hostname>:1521:ACMEPUBLISHER
    DBA user name nncentral
    DBA password Enter the password for Oracle Database
    Schema user name (Non-editable) STEP_BIPLATFORM
    Schema password (Default) Password for Schema is filled
  3. Click Next.

Component- STB Schema (STEP_STB)

For the Component- STB Schema (STEP_STB), keep the fields identified with the default values.

  1. Change any of the fields as required below:
  2. See the table to view the descriptions of the fields on the Component- STB Schema (STEP_STB):

    Table 5-6 Component- STB Schema (STEP_STB)

    Field Description
    Database Type (Default) Oracle Database
    Database Connect String (Non-editable) <hostname>:1521:ACMEPUBLISHER
    DBA user name nncentral
    DBA password Enter the password for Oracle Database
    Schema user name (Non-editable) STEP_STB
    Schema password (Default) Password for Schema is filled
  3. Click Next.

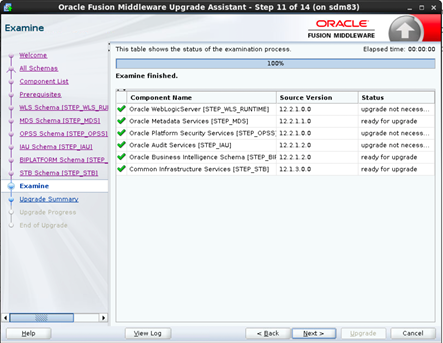
Reviewing the Status in the Examine Screen

On the Examine screen, review the status of the Upgrade Assistant as it examines each schema, verifying that the schema is ready for upgrade

  1. If the status in the Examine screen shows Examine finished, click Next.

    Figure 5-5 Review the Status in the Examine Screen


    Review the Status in the Examine Screen

  2. On the Upgrade Summary screen, review the summary of the schemas that are being upgraded and/or created.
  3. Click Upgrade.
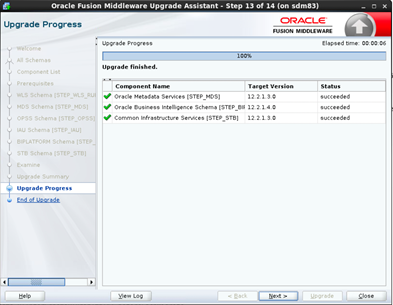
  4. On the Upgrade Progress screen, monitor the status of the upgrade.
  5. Click Next.

    Figure 5-6 Upgrade Progress Screen


    Upgrade Progress Screen

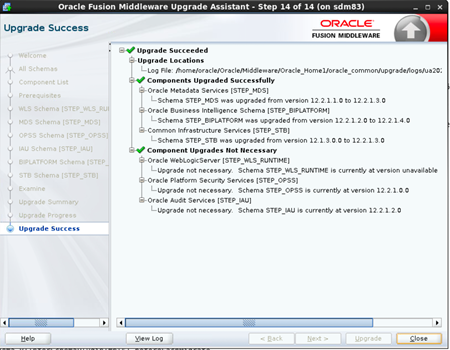
  6. If the upgrade is successful, on the Upgrade Success screen, click Close to complete the upgrade and close the wizard.

    Figure 5-7 Upgrade Success Screen


    Upgrade Success Screen

Backing Up the mapViewerConfig.xml File

From Oracle User, go to the path where mapViewerConfig.xml file is present, and create a new file and copy the existing mapViewerConfig.xml file to the backup file.

[oracle@vm]$ cd /home/oracle/Oracle/Middleware/Oracle_Home/oracle_common/modules/oracle.mapviewer/conf/
[oracle@vm conf]$ cp mapViewerConfig.xml mapViewerConfig_bckp.xml

Backing up the BI Domain

From Oracle User, go to the path where bi domain is present, and create a new folder and copy the existing bi domain to the backup folder.

[oracle@vm]$ cd /home/oracle/Oracle/Middleware/Oracle_Home/user_projects/domains
[oracle@vm domains]$ cp -r bi bi_bckp

Note:

Verify that the backed up versions of the domain are complete.

Reconfiguring Oracle BI Domain with the Reconfiguration Wizard

Run the Reconfiguration Wizard to reconfigure your domain component configurations to 12c (12.2.1.4.0).

  1. As the Oracle user, go to the folder: oracle_common/common/bin:
    [oracle@vm]$ cd $NEW_ORACLE_HOME/oracle_common/common/bin
  2. Start the Reconfiguration Wizard with the following logging options:
    [oracle@bin]$ ./reconfig.sh -log=log_file -log_priority=ALL
    where the log_file is the absolute path of the log file you want to create for the domain reconfiguration session. This is helpful if you need to troubleshoot the reconfiguration process.
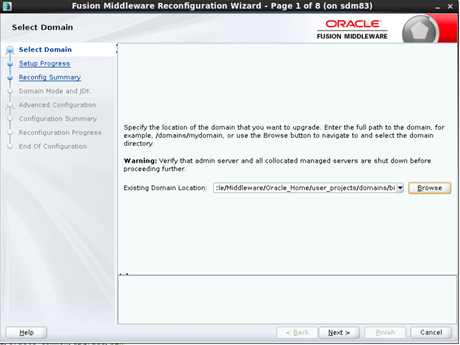
  3. On the Select Domain screen, specify the location of the domain you want to upgrade or click Browse to navigate and select the domain directory and click Next.
    Give the existing Domain Location as-
    /home/oracle/Oracle/Middleware/Oracle_Home/user_projects/domains/bi/

    Figure 5-8 Select Domain screen


    Select Domain screen

  4. On the Reconfiguration Setup Progress screen, view the progress of the setup process. After completion, click Next.
  5. On the Reconfiguration Summary screen, click Next.

Domain Mode and JDK

Select the JDK to use in the domain

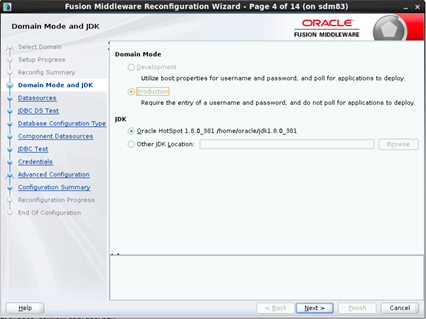
  1. On the Domain Mode and JDK screen, select the JDK to use in the domain or click Browse to navigate to the JDK file you want to use.
  2. Click Next.

    Note:

    The supported JDK version for 12c (12.2.1.4.0) is 1.8.0_131 and later.

    Figure 5-9 Domain Mode and JDK


    Domain Mode and JDK

    For a list of JDKs that are supported for a specific platform, see Oracle Fusion Middleware Supported System Configurations.

JDBC Data Sources

Configure the JDBC Data sources defined in your domain source.

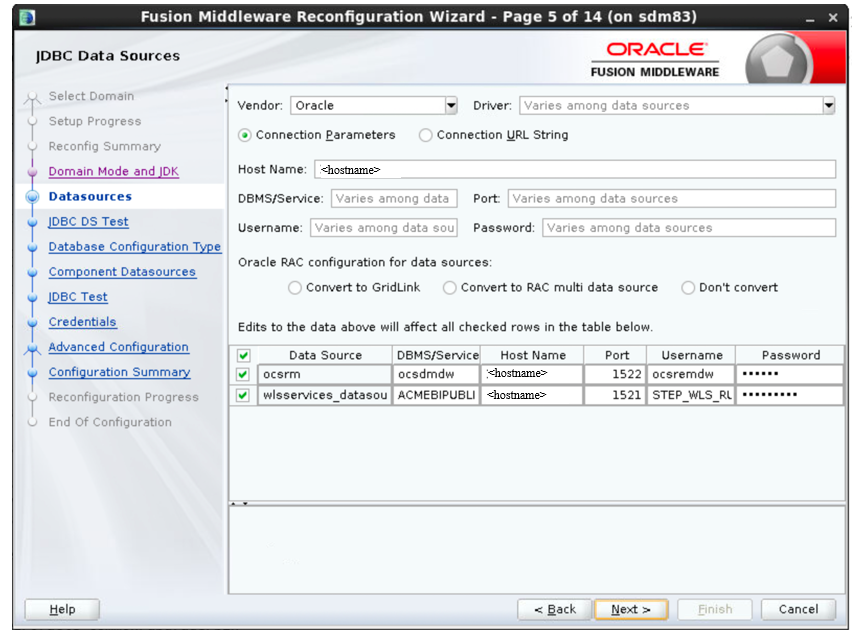
  1. On the JDBC Data Sources screen, configure the JDBC Data sources defined in your domain source. Select the check boxes for ocsrm and wlsservices_datasource. The following information is filled-in by default.

    Table 5-7 JDBC Data Sources

    Fields Description
    Vendor (Default) Oracle
    Driver (Default) Varies among data sources
    DBMS/Service (Default) Varies among data sources
    Port (Default) Varies among data sources
    Username (Default) Varies among data sources
    Password (Default) Varies among data sources

    Figure 5-10 Datasources


    Datasources

  2. Click Next.

    Note:

    If you do not select any datasources on the JDBC Data Sources screen, the following warning displays: Missing Driver. Click Ok to proceed without verification, click Cancel to return to the JDBC Data Sources page. In this case, if you click OK, the datasources are not verified.
  3. On the JDBC Datasources Test screen, select the check box for the data source connection you configured on the JDBC Data Sources screen and click Test Selected Connections to test the datasource connection, and.

    Note:

    To test the database connections, the database to which you are connecting must be running. If you do not want to test the connections at this time, do not select any datasources. Click Next to continue.

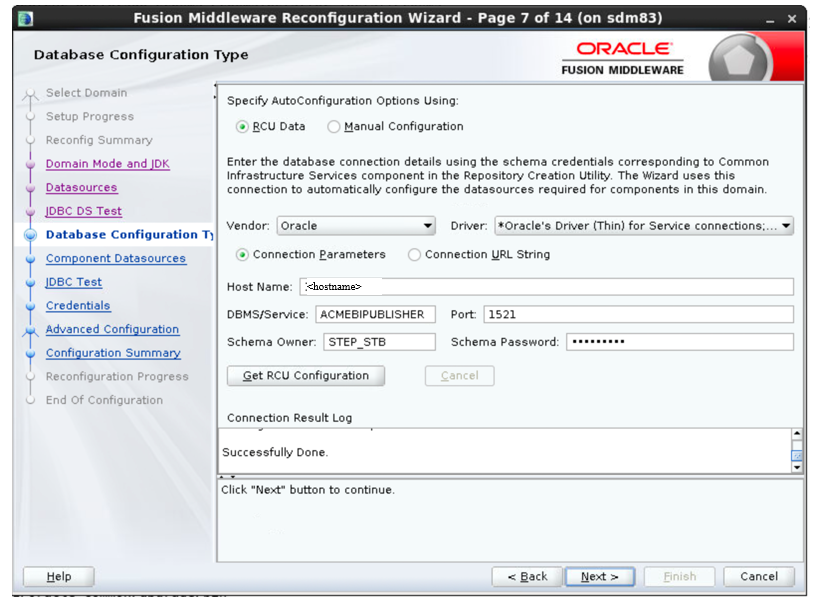
Database Configuration Type

Enter the database connection details.

  1. On the Database Configuration Type screen, the fields are automatically populated.
    1. Otherwise select RCU Data to connect to the Server Table (_STB) schema.
  2. Enter the database connection details using the RCU service table (_STB) schema credentials as follows:

    Table 5-8 Database Configuration Type

    Fields Description
    Vendor (Default) Oracle
    Driver (Default) *Oracle’s Driver (Thin) for Service connections: Versions: Any
    Host Name (Default) <hostname>
    DBMS/Service (Default) ACMEBIPUBLISHER
    Port (Default) 1521
    Schema Owner (Default) STEP_STB
    Schema Password (Default) Password for Schema is filled

    Figure 5-11 Database Configuration Type


    Database Configuraition Type

  3. Click Get RCU Configuration. The Reconfiguration Wizard uses this connection to automatically configure the data sources required for components in your domain.
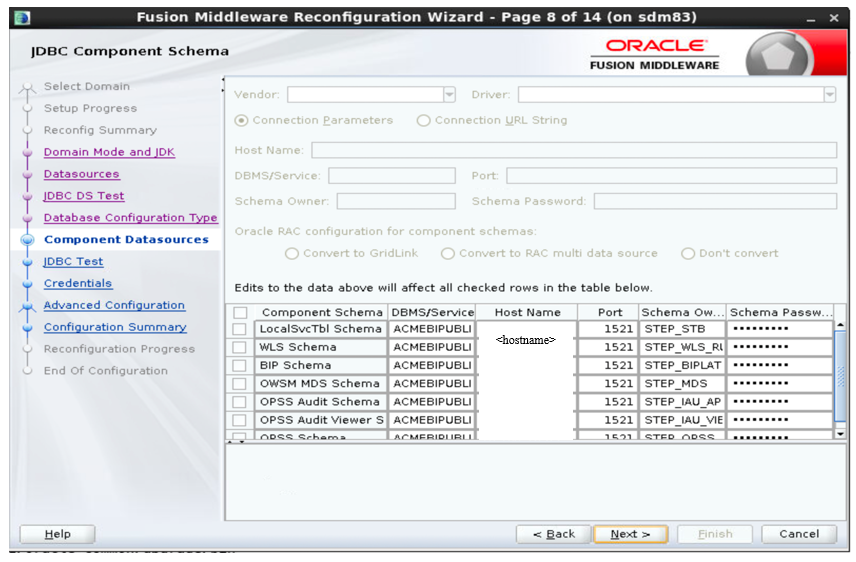
  4. On the Component Datasources screen, click Next.

    Figure 5-12 Component Datasources


    Component Datasources

JDBC Test

Select all the component schemas and test the connection for each schema.

  1. On the JDBC Test screen, select all the component schemas and click Test Selected Connections to test the connection for each schema. The result of the test is indicated in the Status column
  2. After completion of the check, click Next.
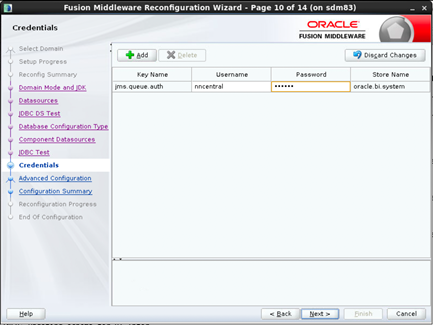
Credentials

Enter the username and provide the password.

  1. In the Credentials screen, enter the username as nncentral and provide the password.
  2. Click Next.

    Figure 5-13 Crendentials


    Crendentials

  3. On the Advanced Configuration screen, select none of the options
  4. Click Next.
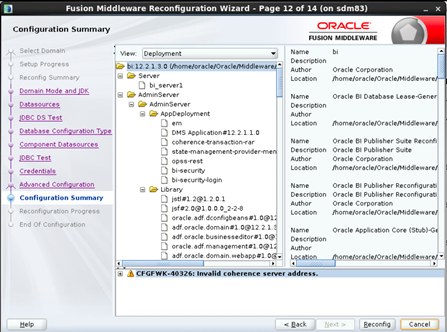
  5. On the Configuration Summary screen, review the detailed configuration settings of the domain before continuing, click Reconfig.

    Figure 5-14 Configuration Summary


    Configuration Summary

  6. The Reconfiguration Progress screen displays the progress of the reconfiguration process.
  7. When the progress bar shows 100%, click Next.
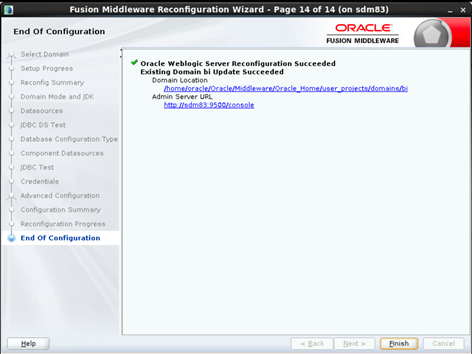
  8. The End of Configuration screen indicates whether the reconfiguration process completed successfully or failed.
  9. Click Finish.

    Figure 5-15 End of Configuration


    End of Configuration

Upgrading Domain Component Configurations

After reconfiguring the domain, use the Upgrade Assistant to upgrade the domain component configurations in the domain to match the updated domain configuration.

To upgrade the 12.2.1.4.0 domain:
  1. Go to the directory oracle_common/upgrade/bin of the new oracle home:
    [oracle@vm]$ cd $NEW_ORACLE_HOME/oracle_common/upgrade/bin
    [oracle@vm bin]$ ./ua
  2. On the Welcome screen, review the introduction to the Upgrade Assistant and information about important pre-upgrade tasks, and click Next.
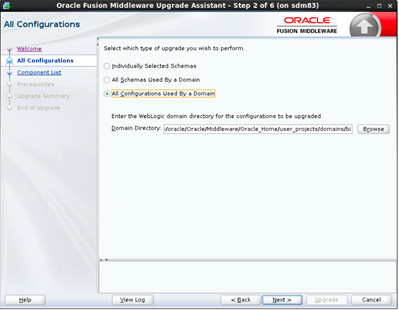
  3. On the next screen:
    1. Select All Configurations Used By a Domain.
    2. In the Domain Directory field, enter the WebLogic domain directory path as given below, and click Next.:
    /home/oracle/Oracle/Middleware/Oracle_Home/user_projects/domains/bi/ 

    Figure 5-16 All Configurations


    All Configurations

  4. On the Component List screen, verify that the list includes all the components for which you want to upgrade configurations and click Next.
  5. On the Prerequisites screen, acknowledge that the prerequisites have been met by selecting all the check boxes. Click Next.
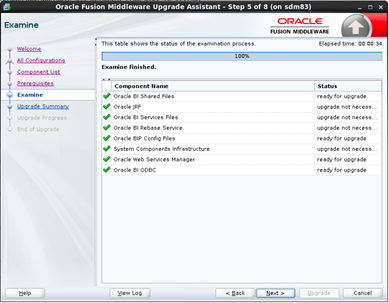
  6. On the Examine screen, review the status of the Upgrade Assistant as it examines each component, verifying that the component configuration is ready for upgrade. If the status is Examine finished, click Next.

    Figure 5-17 Examine Screen


    Examine Screen

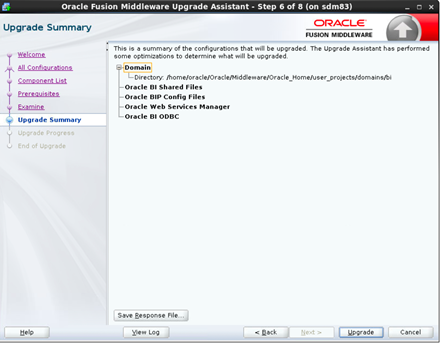
  7. On the Upgrade Summary screen, review the summary of the options you have selected for component configuration upgrade.

    Figure 5-18 Upgrade Summary screen


    Upgrade Summary screen

  8. Click Upgrade to start the upgrade process.
  9. On the Upgrade Progress screen, monitor the status of the upgrade. The progress bar on this screen displays the progress of the current upgrade procedure, and click Next.
  10. If the upgrade is successful, on the Upgrade Success screen, click Close to complete the upgrade and close the wizard.

Starting the Servers and Processes

This seciton contains information on how to Start the Fusion Middleware environment and Oracle BI instance and servers.

To start the Fusion Middleware environment and Oracle BI instance and servers:
  1. As oracle user, go to the path:
    [oracle@vm]$ cd /home/oracle/Oacle/Middleware/Oracle_Home/user_projects/domains/bi/bitools/bin
    
  2. Run this command:
    [oracle@bin]$ ./start.sh