2 Oracle SDM Cloud Deployment Process and Procedures
- Oracle SDM Cloud Deployment Process
- Establish an Oracle SDM Cloud Service Subscription
- Login to Oracle SDM Cloud to obtain inputs for Management Cloud Engine (MCE)
- Establish a site with the Oracle SDM Cloud's Registration ID to which the Management Cloud Engine (MCE) can connect
- Install, Configure, and Activate the MCE
Oracle SDM Cloud Deployment Process
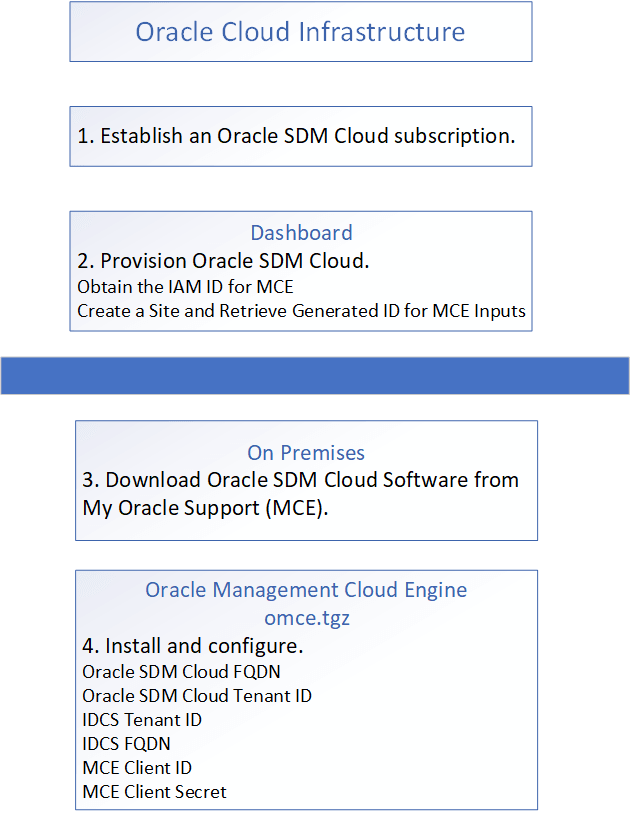
- Oracle Cloud—Contact your Oracle Cloud sales representative to establish a subscription for Oracle SDM Cloud and activate your Oracle Cloud and Oracle Identity Cloud Services accounts.
- Oracle Cloud—Login to Oracle SDM Cloud and obtain the Identity and Access Management (IAM) for inputs to Management Cloud Engine (MCE).
- Oracle Cloud—While logged into Oracle SDM Cloud, create a site. Once created, select the site to edit and obtain the generated site Registration ID to use for MCE inputs.
- On premises—Install the Management Cloud Engine (MCE) with the
install, activate, and configuration scripts provided in the software
download.
The following diagram illustrates the deployment process and shows the parameters you need to set in each Oracle SDM Cloud component to establish the service.
Supported Regions
Oracle® Session Delivery Management Cloud (Oracle SDM Cloud) supports deployment in two OCI Regions, Ashburn (IAD) and Frankfurt (FRA).
Within these two regions, users select a home region, which is where IAM resources are defined.
Oracle SDM Cloud supports the IAM domain home region to any of the following Ashburn deployment regions.
| Region Name | Region Location |
|---|---|
| Canada Southeast (Montreal) | Montreal, Canada |
| Canada Southeast (Toronto) | Toronto, Canada |
| US East (Ashburn) | Ashburn, VA |
| US West (Phoenix) | Phoenix, AZ |
| US West (San Jose) | San Jose, CA |
Oracle SDM Cloud supports the IAM domain home region to any of the following Frankfurt deployment regions.
| Region Name | Region Location |
|---|---|
| Germany Central (Frankfurt) | Frankfurt, Germany |
| Netherlands Northwest (Amsterdam) | Amsterdam, Netherlands |
| Switzerland North (Zurich) | Zurich, Switzerland |
Establish an Oracle SDM Cloud Service Subscription
To obtain the Oracle® Session Delivery Management Cloud (Oracle SDM Cloud) service, contact Oracle Cloud Sales to purchase a Cloud Services Agreement and the Oracle SDM Cloud service description.
- Go to https://docs.oracle.com/en/cloud/paas/identity-cloud/index.html for information about how to purchase a subscription to Oracle SDM Cloud.
- Go to https://docs.oracle.com/en/cloud/get-started/subscriptions-cloud/index.html for information about how to activate your Oracle Applications account order.
- Go to https://www.oracle.com/webfolder/technetwork/tutorials/obe/cloud/getting_started/create_cloud_account_admin_obe/create_cloud_acc_admin.html for information about how to manage your Oracle Cloud services.
Obtain the IAM Inputs for MCE
Create a Site and Retrieve Generated ID for MCE Inputs
MCE Host Installation
The host VM running the Management Cloud Engine (MCE) must use Oracle Linux 9.x as its operating system.
- Download the Oracle Linux 9 ISO.
- Log in to Oracle Software Delivery Cloud.
- Search for Oracle Linux.
- Select REL: Oracle Linux 9 (latest)
- Set Platform to x86 64 bit.
- Download the ISO.
- Upload the downloaded ISO to the ESXi datastore.
- In the ESXi host client, open Storage (or Datastore browser, depending on version).
- Upload the downloaded OL9 ISO to a location such as the datastore ISO folder.
- Create a new virtual machine.
- Log in to the VMware Host Client.
- Navigate to Virtual Machines, Create / Register VM (or Create a VM, depending on version).
- Select Create a new virtual machine and provide values in the following fields:
- Name—Enter a meaningful name for the VM.
- Guest OS Family—Enter Linux.
- Guest OS Version—Enter Oracle Linux 9 (64-bit)
- Storage type—Select Standard.
- Datastore—Select the datastore where you uploaded the ISO.
- Configure Virtual hardware as required for your deployment.
- Attach the ISO.
- Set CD/DVD Drive to Datastore ISO file.
- Browse to and select the uploaded Oracle Linux 9 ISO
- Ensure Connect at Power on is selected.
This opens the installation page.
- Install Oracle Linux 9.
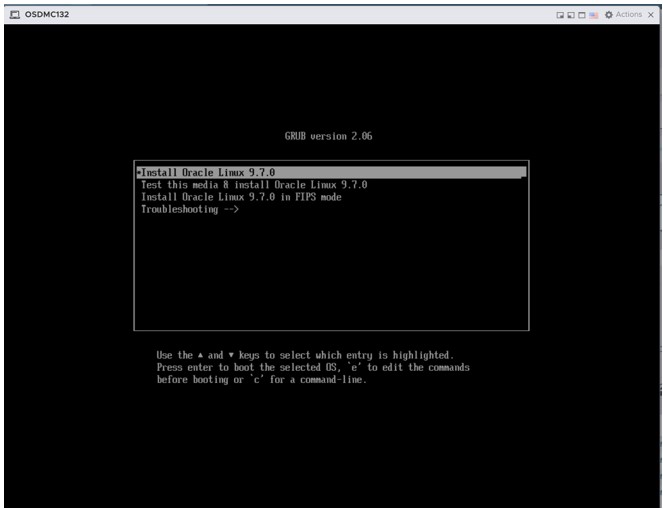
- Power on the VM.
- In the console, select Install Oracle Linux 9.
- Follow the installer, using defaults unless otherwise required.
- Select your software.
- Open Software Selection.
- Under Base Environment, select Server.
- Under Additional Software, select Remote Management for Linux.
- Select Done.
- Configure installation destination and partitioning.
- Open Installation Destination.
- Select Custom storage configuration and select Done.
- Under Manual Partitioning, use the plus (+) icon to create the required mount points, and select Done.
- Confirm any partitioning changes when prompted.
- Perform network configuration (recommended before installation)
- Open Network & Host Name.
- Enter the Host Name.
- Set the network interface to On.
- Click Configure and set your required IPv4 details.
- Ensure connectivity by configuring the following fields:
- DNS Servers
- Search domains (under the IPv4 Settings tab)
- Select Save, then Done.
- Begin the installation.
- Click Begin Installation.
- Complete any required prompts (for example, set root password or create an admin user), if requested.
- After installation completes, reboot and log in.
Configure Two Network Interfaces
You can configure two NICs (LAN and WAN) either before installing Oracle Linux 9 (recommended) or after.
- In the ESXi Host Client, select the VM and click Edit (Edit settings).
- Click Add other device, Network Adapter (or Add network adapter).
- Configure the second adapter with the name Network Adapter 2 and enter any required details.
- Select Save.
- Assign the new IP to the interface using the following command:
sudo ifconfig <INTERFACE_NAME> 192.x.x.x netmask 255.x.x.x up - Use the ifconfig command to verify the new interface is added.
Using Base Environment: Server with Additional software: Remote Management for Linux installs key components that commonly include Podman, Perl, and SNMP utilities, along with other base and management packages.
| Purpose/Function | Key Packages (Examples) |
|---|---|
| Base system | glibc, coreutils, util-linux, bash, filesystem |
| Remote management | cockpit*, openssh*, sssd*, realmd, net-snmp* |
| Automation | ansible-core, dnf*, yum |
| Cloud/Container | podman*, buildah, open-vm-tools, virt-what |
| Device/storage/tools | lvm2*, xfsprogs, udisks2*, device-mapper* |
| Security/SELinux | selinux-policy*, firewalld, audit*, rsyslog* |
| Monitoring | sos, tuned, strace, procps-ng |
| Python & Perl | python3*, perl* |
| Compression/utility | tar, unzip, zip, rsync, wget |
| Internal libraries | libgcc, zlib, libstdc++, libxml2, openssl-libs |
Note:
Package names may vary slightly by update level and repository configuration.Install and Configure the MCE
The Management Cloud Engine (MCE) installation procedure requires the archive file containing the installation and configuration scripts that you downloaded from Oracle onto your host hardware. Oracle recommends running the two scripts consecutively in one session the first time you install the MCE. For that reason, this procedure includes the prerequisites and steps for running both scripts.
Do the following before performing the procedure.
- Ensure that the host meets operating system and resource requirements.
- Operating System Oracle Linux 9 or higher or Red Hat compatible Kernel
Note:
The latest version of Oracle SDM Cloud is not tested on Red Hat Enterprise Linux (RHEL) and Oracle recommends using the base version of Linux on the 9.x release. - Install Perl V5.32.1 or higher on the host.
- Install Podman v5.4.0 or higher on the host.
- Download the archive file (mce-<version>.tgz) from My Oracle Support (MOS) to the host server. This .tgz file includes all necessary scripts.
Note:
MCE activation, configuration, and deactivation no longer require root privileges. Root access remains mandatory for the installation, uninstallation, and upgrades.
- Ensure that there is no MCE installation existing on the hardware. See the last step in this procedure for instructions.
- Ensure that you have root access.
- Note the MCE WAN IP, MCE LAN IP, and MCE name.
- Navigate to Oracle® Session Delivery Management Cloud (Oracle SDM Cloud) Security Manager, IAM page to configure IAM parameters.
Procedure
Note:
Before re-installing, you must first uninstall the existing MCE.Traffic Flow and Firewall Port Recommendations
The following table provides traffic flow and firewall port recommendations for communication between the Management Cloud Engine (MCE) and Network Functions (NFs).
| Port Number | Protocol | Service | Configurable | Purpose |
|---|---|---|---|---|
| 161 | UDP | SNMP | Y | SNMP traffic between the MCE and the NF. |
| 162 | UDP | SNMP | Y | SNMP trap reporting from the device to the MCE server. |
| 22 | TCP | SFTP/SSH | N | Used for secure file transfer (for example, software upgrades, Route Manager, and LRT updates) and SSH sessions between MCE and southbound NFs. |
| 3001/3000 | TCP | ACP/ACLI | N | Used by the MCE to communicate with all versions of a NF. |
| 443 | TCP | HTTPS | N | Usec by MCE to communicate with Media Engines (MEs). |
Upgrading the MCE
To upgrade the Management Cloud Engine (MCE), download the MCE upgrade archive from My Oracle Support (MOS) to the MCE host.
- Log in to the MCE host as the root user.
- Deactivate the currently installed MCE.
/opt/oracle/mce/perl/deactivate.plWhen prompted, enter y to continue. The script stops the MCE container, removes its associated volumes and image, and removes the MCE auto-start service.
- Download the latest MCE archive from My Oracle Support.
- Extract the archive.
tar -xvf mce-<version>.<build>.tgz - Change to the directory created when you extracted the archive.
cd mce-<version>.<build> - Run the upgrade script.
./upgrade.plThe script verifies that an MCE installation exists in
/opt/oracle/mce, that the MCE is not active, and that the upgrade path is supported. When the validation succeeds, enter y to continue with the upgrade. - Activate the upgraded MCE.
/opt/oracle/mce/perl/activate.plWhen prompted, enter y to activate the MCE. To configure the MCE to start automatically after the virtual machine reboots, enter y when prompted to create the auto-start service. Enter n if you prefer to start the MCE manually after each reboot.
During the upgrade, persistent data such as configuration properties and artifacts created when the MCE registers with Oracle SDM Cloud are copied to the new installation. The previous installation is moved from /opt/oracle/mce to /opt/oracle/mce.bak, and the upgraded installation is placed in /opt/oracle/mce.
Configure MCE Behind NAT or Firewall
Oracle® Session Delivery Management Cloud (Oracle SDM Cloud) allows you to configure the Management Cloud Engine (MCE) to operate behind a Network Address Translation (NAT) or a firewall. Oracle SDM Cloud contacts the MCE using the value for the mce.ip in mce.properties or wan-ip on setting up ./config.pl configuration.
mce.ip : 10.x.x.x Note:
The MCE does not have proxy support between itself and devices.Manage MCE Traps
Oracle® Session Delivery Management Cloud (Oracle SDM Cloud) provides trap filtering at the Management Cloud Engine (MCE) level. This allows administrators to prevent specific SNMP traps from being processed based on defined criteria, such as the source IP address or the trap name.
Trap filtering is configured through a trap-filter.json file located on the MCE.
When a trap is received, MCE evaluates it against the configured filters. If the trap matches any of the specified criteria, it is excluded from further processing.
The filter configuration supports multiple source IP addresses and trap names. Administrators can enable or disable filtering by modifying the trap-filter.json file and restarting the MCE for the changes to take effect.
| Filter Type | Description |
|---|---|
| trapName | Excludes traps matching the specified trap name. Note that trap names are case-sensitive. |
| sourceIp | Excludes all traps received from the specified source IP address. Note that only IPv4 is currently supported. |
Note:
Although both are referred to as filters, MCE-level trap filters and Fault Manager filters behave differently:- MCE-level filters block matching traps from being processed or forwarded.
- Fault Manager filters allow matching traps to be forwarded to configured receivers.
For information on adding and removing trap filters at the MCE level, see Add a Trap Filter At the MCE Level and Remove a Trap Filter at the MCE Level in Getting Started.
Add a Trap Filter At the MCE Level
- Navigate to the trap filter configuration directory.
cd /opt/oracle/mce/cfg/trapfilter - Open the trap filter configuration file.
vi trap-filter.json - In the trapfilterList array, add one or more filter objects. Each object must include:
- filterType—Specifies the filter criteria (trapName or sourceIp)
- value—The corresponding trap name or source IP address to filter
For example:
{
  "trapFilterList": [
    { "filterType": "trapName", "value": "linkDown" },
    { "filterType": "sourceIp", "value": "100.77.41.61" }
  ]
}
- Save the file.
- Restart the MCE for the changes to take effect.
./deactivate.pl
./activate.pl
Note:
In high availability (HA) deployments, include both the primary and secondary IP addresses when configuring filters to ensure traps from both nodes are handled consistently.For additional details, examples, and validation rules, see the README file located in /opt/oracle/mce/cfg/trapfilter.
Remove a Trap Filter At the MCE Level
- Navigate to the trap filter configuration directory.
cd /opt/oracle/mce/cfg/trapfilter - Open the trap filter configuration file.
vi trap-filter.json - Locate the filter entry you want to remove in the trapFilterList array, then do one of the following:
- Delete the filter object from the array, or
- Set the value field to null.
- Save the file.
- Restart the MCE for the changes to take effect.
./deactivate.pl
./activate.pl
For additional details, examples, and validation rules, see the README file located in /opt/oracle/mce/cfg/trapfilter.