3 Security Shield Deployment Process and Procedures
Obtaining and installing the Oracle® Communications Security Shield Cloud Service (Security Shield) service requires a multi-step process that includes tasks for you to perform in the Oracle Cloud and on premises. New customers must take steps to establish and set up their Oracle Cloud account in addition to the procedures for installing the Security Shield service. See the following topics to guide you through the process.
Topics:
- Establish a Security Shield Subscription
- Download the Cloud Communication Service Software from MOS
- Configure TLS Certificates for the Cloud Communication Service
- Install, Configure, and Activate the Cloud Communication Service
- Configure TLS Certificates for the OCSBC
- Configure the Session Border Controller for the Security Shield Service
Security Shield Deployment Process
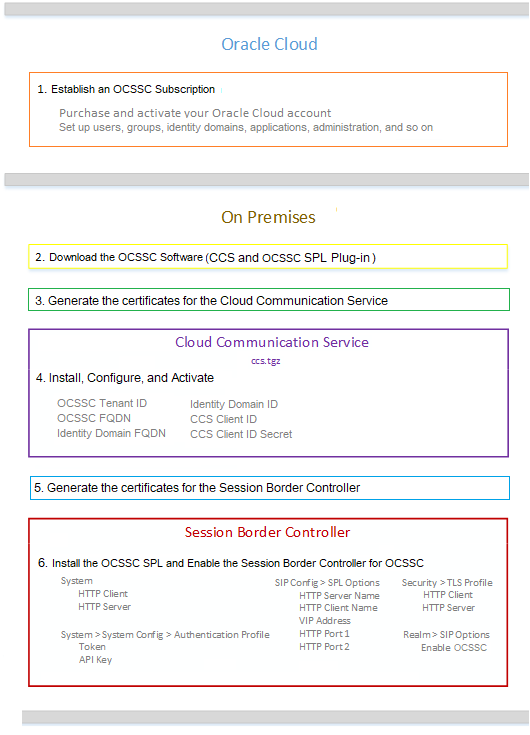
The high-level process for deploying the Oracle® Communications Security Shield Cloud Service (Security Shield) includes the following steps. You will perform some steps in the Oracle Cloud and others on-premises.
- Oracle Cloud—Contact your Oracle Cloud sales representative to establish a subscription for Security Shield and activate your account. (Security Shield is not available for purchase online in the Oracle Marketplace.) See Establish a Security Shield Subscription.
- On premises—Log on to Oracle Service Delivery Cloud at edelivery.oracle.com using the Customer Support Identifier number that you received in your Oracle Cloud Welcome email and download the Security Shield software. (Cloud Communication Service and Security Shield SPL file) See Download the Cloud Communication Service Software from MOS.
- On-premises—Generate the TLS certificates for the Cloud Communication Service. The installation script requires a pem file and a key file for both the LAN side and the WAN side. Configure TLS Certificates for the Cloud Communication Service.
- On premises—Install the Cloud Communication Service with the install, configure, and activate scripts provided in the software download. See either Install, Configure, and Activate the Cloud Communication Service.
- On-premises—Generate the TLS certificate for the Session Border Controller and install it on the SBC. Configure TLS Certificates for the OCSBC.
- On premises—Install the Security Shield SPL on the Session Border Controller (SBC) and enable Security Shield on the SBC, which registers the SBC with the Cloud Communication Service. See Configure the Session Border Controller for the Security Shield Service.
The following diagram illustrates the deployment process and shows the parameters you need to set in each Security Shield component to establish the service.

Next Steps
- Oracle Cloud—Log on to theSecurity Shield Dashboard and customize the threat protection settings. See "Customize the Security Shield Autonomous Threat Protection Settings" in the Security Shield User's Guide.
- Oracle Cloud—Log on to the Security Shield Dashboard and create managed phone number lists. See the "Add Phone Numbers to Policy Rules" in the Security Shield User's Guide.
Establish a Security Shield Subscription
To obtain the Oracle® Communications Security Shield Cloud Service (Security Shield), contact Oracle Cloud Sales to purchase a Cloud Services Agreement and the Security Shield service subscription. Oracle does not offer the Security Shield service as an online purchase in the Oracle Cloud Marketplace. You must purchase through Oracle Sales.
- Go to Oracle Communications Security Shield Cloud and click Contact Sales for information about how to purchase a subscription to Security Shield.
- Go to Activate Your Cloud Account for instructions to activate your subscription.
- Go to Oracle Cloud Infrastructure Identity and Access Management for information about how to manage your Users and Groups, Identity Domains, Applications, Administration, and more.
Download the Security Shield Software
Before you can install the Cloud Communications Service (CCS) and the OCSSC SPL plug-in file on-premises, you must download the software on to the host. Only authorized customers with a valid password may download the software. Note that the download includes both the CCS software and the Oracle® Communications Security Shield Cloud Service (Security Shield) SPL plug-in file that you must install on the Session Border Controller.
Note:
If you prefer, you can download the CCS software and SPL plug-in file from My Oracle Support (MOS). See Download the Cloud Communication Service Software from MOS.Procedure
Configure TLS Certificates for the Cloud Communication Service
The Cloud Communication Service (CCS) uses TLS to encrypt and secure your data on the Local Area Network between CCS and the Session Border Controller (SBC) and on the Wide Area Network (WAN) between CCS and Oracle® Communications Security Shield Cloud Service (Security Shield). The WAN and LAN connections both require a pem format certficate file and its matching key file. You also need the intermediateCA certificate file when you run the activate script in the "Install, Configure, and Activate the Cloud Communication Service" procedure.
- Acquire the intermediateCA certificate. (LAN-side signing CA "lan-ca-cert.pem")
- Run the CCS activation script which requires the LAN and WAN certificates and matching keys, plus the LAN-side signing CA certfiicate. Install, Configure, and Activate the Cloud Communication Service.
Install, Configure, and Activate the Cloud Communication Service
The Cloud Communication Service (CCS) installation procedure requires the archive file containing the installation, configuration, and activation scripts that you downloaded from Oracle onto your host hardware.
Do the following before performing the CCS installation procedure.
- Ensure that the host meets Operation System and resource requirements. Version Requirements for External Components.
- Install Perl v5.16.3 or higher on the host.
- Ensure that you have Root access or equivalent Super User privileges.
- Ensure that the Docker (v18.09.1 or higher) or Podman (v4.4.1 or higher) package is installed and that the daemon is running as a service if you use Docker.
- Ensure that you synchronize the CCS Docker host and the Session Border Controller with the Network Time Protocol (NTP) server, if you use Docker.
- Ensure that there is no CCS installation existing on the hardware. See the last step in this procedure for instructions.
- Download the archive file (ccs-<version>.tgz) from Oracle Service Delivery Cloud at edelivery.oracle.com, which includes all of the scripts, to the host server.
- Generate the local API key and local API alternate key. See the Security Shield Security and Privacy Guide for instructions for generating keys.
- Host WAN FQDN provided by the customer
- Host WAN IP Address provided by the customer
- Host LAN IP Address provided by the customer
- Identity Domain FQDN provided by Security Shield through the Cloud Communications Service Configuration link on the Settings tab
- Identity Domain ID provided by Security Shield through the Cloud Communications Service Configuration link on the Settings tab
- Security Shield FQDN provided by Security Shield through the Cloud Communications Service Configuration link on the Settings tab
- Security Shield Tenant ID provided by Security Shield through the Cloud Communications Service Configuration link on the Settings tab
- Security Shield API Key provided by the customer (the CCS API key)
- Security Shield API Key Alternate provided by the customer
- CCS Client ID provided by Security Shield through the Cloud Communications Service Configuration link on the Settings tab
- CCS Client Secret provided by Security Shield through the Cloud Communications Service Configuration link on the Settings tab
- CCS is installed and not activated
- CCS JSON configuration (cfg.json) provided by customer from prior configuration step
- LAN/OAM server certificate provided by customer
- LAN/OAM server private key provided by customer
- LAN/OAM server signing certificate provided by customer
- (Optional)—WAN server certificate provided by customer. Use when you want ground-to-cloud communication, which allows mid-call updates. Omit when you do not want cloud-to-ground communication, which does not allow mid-call updates.
- (Optional)—WAN server private key provided by customer. Use when you want ground-to-cloud communication,which allows mid-call updates. Omit when you do not want cloud-to-ground communication, which does not allow mid-call updates.
Note:
See the Security Shield Security and Privacy Guide for information about certificate management and deploying CCS behind Network Address Translation (NAT) or a firewall.Procedure
The CCS installation script sets the defaults for the LAN, WAN, and OAM server instances to the address of 0.0.0.0 and the ports to 8000, 443, and 2000, respectively. After you execute config.pl, CCS creates the cfg.json file and sets the WAN listening port to the default 443. If you provide the WAN certificate and private key in the activate.pl script configuration, the WAN listening port remains 443. If you do not provide the WAN certificate and private key, CCS changes the port to 9000.
Note:
If you change the Cloud Communication Service (CCS) public IP address (WAN interface), it may take up to twenty four hours for mid-call updates to resume.In the following procedure, wait for each script to finish running successfully before running the next one.
Note:
The Cloud Communication Service (CCS) does not support simultaneous use of the same CCS instance by different services, for example Security Shield and Oracle Session Delivery Manager Cloud (OSDMC). You must configure each CCS instance to support only one service.Configure TLS Certificates for the OCSBC
The process for configuring a certificate on the Oracle Communications Session Border Controller (OCSBC) requires the following steps.
- Configure a certificate record on the SBC. See Configure a Certificate Record.
- Generate a certificate request by the SBC. See Generate a Certificate Request.
- Import the certificate into the SBC. See Import a Certificate Using SFTP or Import a Certificate Using the ACLI.
- Reboot the system.
Configure a Certificate Record
Use the certificate-record object to add a certificate record to the Oracle® Communications Security Shield Cloud Service (Security Shield). The certificate record configuration represents either the end-entity or the Certificate Authority (CA) certificate on the Security Shield.
When you configure a certificate for the E-SBC, the name that you enter must be the same as the name that you use when you generate a certificate request. If configuring for an end stations CA certificate for mutual authentication, the certificate name must be the same name used during the import procedure.
- If this certificate record is used to present an end-entity certificate, associate a private key with this certificate record by using a certificate request.
- If this certificate record is created to hold a CA certificate or certificate in PKCS12 format, a private key is not required.
To verify a certificate record, see "Security" in the ACLI Configuration Guide.
Generate a Certificate Request
Using the ACLI generate-certificate-request <record-name> command allows you to generate a private key and a certificate request in PKCS10 PEM format.
Note:
You can only perform this task after you configure a certificate record.The Oracle® Communications Security Shield Cloud Service (Security Shield) stores the private key that is generated in the certificate record configuration in 3DES encrypted form with an internally generated password. The Security Shield displays the PKCS10 request in PEM (Base64) form.
You use this command for certificate record configurations that hold end-entity certificates. If you have configured the certificate record to hold a CA certificate, then you do not need to generate a certificate request because the CA publishes its certificate in the public domain. You import a CA certificate by using the ACLI import-certficate <certficate-record-name> command.
The generate-certificate-request command sends information to the CA to generate the certificate, but you cannot have Internet connectivity from the Security Shield to the Internet. You can access the Internet through a browser such as Internet Explorer if it is available, or you can save the certificate request to a disk and then submit it to the CA.
To run the applicable command, you must use the value you entered in the name parameter of the certificate record configuration. You run the command from the main Superuser mode command line, and then save and activate the configuration.
ACMEPACKET# security certificate request acmepacket
Generating Certificate Signing Request. This can take several
minutes....

-----BEGIN CERTIFICATE REQUEST-----

MIIB2jCCAUMCAQAwYTELMAkGA1UEBhMCdXMxCzAJBgNVBAgTAk1BMRMwEQYDVQQH
EwpCdXJsaW5ndG9uMRQwEgYDVQQKEwtFbmdpbmVlcmluZzEMMAoGA1UECxMDYWJj
MQwwCgYDVQQDEwNhYmMwgZ8wDQYJKoZIhvcNAQEBBQADgY0AMIGJAoGBALOMLHo8
/qIOddIDVuqot0Y72l/BfH8lolRKmhZQ4e7sS+zZHzbG8phzmzhfOSECnZiA2bEo
f+Nti7e7Uof4lLwiYl9fvhURfzhENOKThAPKPiJCzBBglTITHTYal00Cq2fj5A8B
ZcuAHj7Vp5wP2zpz6EUTFpqTDMLVdwJGJrElAgMBAAGgOTAMBgNVHRExBRMDZGVm
MCkGA1UdDzEiEyBkaWdpdGFsU2lnbmF0dXJlLGtleUVuY2lwaGVybWVudDANBgkq
hkiG9w0BAQUFAAOBgQAtel4ZSLI8gqgMzodbYwgUHUGqTGeDzQDhJV5fKUXWeMFz
JsTmWn5Gy/kR4+Nq274G14fnk00fTAfMtgQ5aL3gM43TqaPOTZjJ6qgwuRKhoBPI
7hkovkgAxHge7wClghiAp/ELdl7tQ515k04BMd5f/fxG7nNiu8iEg7PO0OIBgg==
-----END CERTIFICATE REQUEST-----
WARNING: Configuration changed, run "save-config" command.
ACMEPACKET# save config
copying file /code/config/dataDoc.gz -> /code/config/dataDoc_3.gz
copying file /code/config/tmp/editing/dataDoc.gz ->
/code/config/dataDoc.gz
Save complete
ACMEPACKET# activate config
activate complete
Import a Certificate Using the ACLI
For an end-entity certificate, after a certificate is generated using the ACLI security certificate request command, submit the request to a CA for generation of a certificate in PKCS7 or X509v3 format. When the certificate has been generated, you can import it into the Oracle® Communications Security Shield Cloud Service (Security Shield) using the security certificate import command.
The syntax is:
ACMEPACKET # security certificate import [try-all | pkcs7 | pkcs12 |
x509] [certificate-record file-name]
To import a certificate:
Import a Certificate Using SFTP
You can put the certificate file in the directory /ramdrv and execute the import-certificate command, or you can paste the certificate in PEM/Base64 format into the ACLI. If you paste the certificate, you may have to copy and paste it a portion at a time, rather than pasting the whole certificate at once.
Configure the Session Border Controller for the Security Shield Service
Specify the following information on the Session Border Controller (SBC) to complete the Oracle® Communications Security Shield Cloud Service (Security Shield) installation by setting security parameters and SPL options for communications between the SBC and Oracle® Communications Security Shield Cloud Service components.
- Create the TLS profile that you want to use for the Security Shield HTTP client and server. See "Configure a TLS Profile" in the ACLI Configuration Guide.
- Create the authentication profile that you want to use for the Security Shield HTTP client and server. See the "Security" chapter in the ACLI Configuration Guide.
- Install the Security Shield SPL plug-in, which is included in the CCS download package. See Add the Security Shield SPL Plug-in.
Procedure
- Log on to theSecurity Shield Dashboard and customize the threat protection settings. See "Customize theSecurity Shield Autonomous Threat Protection Settings" in the Security Shield User's Guide.
- Log on to the Security Shield Dashboard and create managed phone number lists. See the "Add Phone Numbers to Policy Rules" in the Security Shield User's Guide.
Support for On-Premises Resilience and High Availability
You can configure the Session Border Controller (SBC) to connect to as many as three Cloud Communication Service (CCS) instances simultaneously to provide resilience and continuity of service when one or more CCS instances stops responding or the SBC loses connectivity to CCS or the Oracle® Communications Security Shield Cloud Service (Security Shield).
Connectivity
The SBC tests connectivity all the way to the Security Shield application by sending a "connection check" message to Security Shield through each of the CCS configured instances at one-second intervals. The SBC allows a maximum of 500ms (round trip) for the response from Security Shield before marking the check test as unsuccessful. After three consecutive unsuccessful connection check tests, Security Shield removes the CCS from use for lookup requests. Security Shield continues sending connection check requests to the removed CCS at the specified interval. When Security Shield receives a successful connection check response, the SBC returns the CCS the pool of available CCS instances.
Lookup Requests
Note:
The SBC uses the "hunt" strategy for selection based on the order in which you configured the CCS instances in the SBC configuration.SBC to CCS Registrations
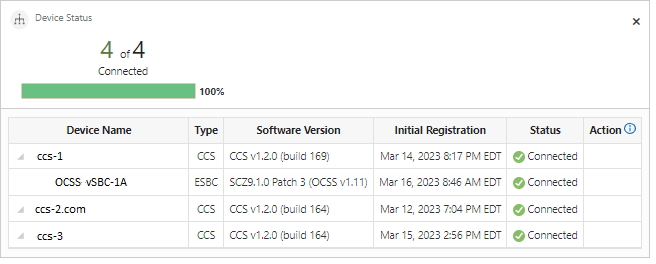
The SBC registers with only one CCS at a time. Using the same priority list used for lookup requests, the SBC registers with the highest priority CCS available. When the CCS registered to the SBC does not pass the connection check and is taken out of service, the SBC hunts for another CCS. As seen in the Device Status tile on the Security Shield Dashboard, the SBC registration will move from one CCS to another and its registration time will update. Each SBC registration is independent of any other SBC. It is possible that even with identical prioritization of CCS instances in their configurations, SBCs in your network may temporarily register with different CCS instances.
CCS Registration
The CCS registers directly with Security Shield and reports any registered SBCs. Upon completion of the initial registration with Security Shield, the CCS sends periodic registration updates at ten second intervals with one exception. The exception occurs when there are changes to an SBC registration, which results in an immediate CCS registration update to Security Shield.
When registered, the CCS registration time does not update on the Security Shield Device Status tile unless the registration expires. If the registration expires because Security Shield does not receive a registration refresh, the next registration request received by Security Shield results in updating the registration time with the current time.
Device Status and the Activity Log
On the Security Shield Dashboard, the Device Status tile refreshes the registration status of devices at ten second intervals. The following example of the Device Status tile shows the types of information provided.

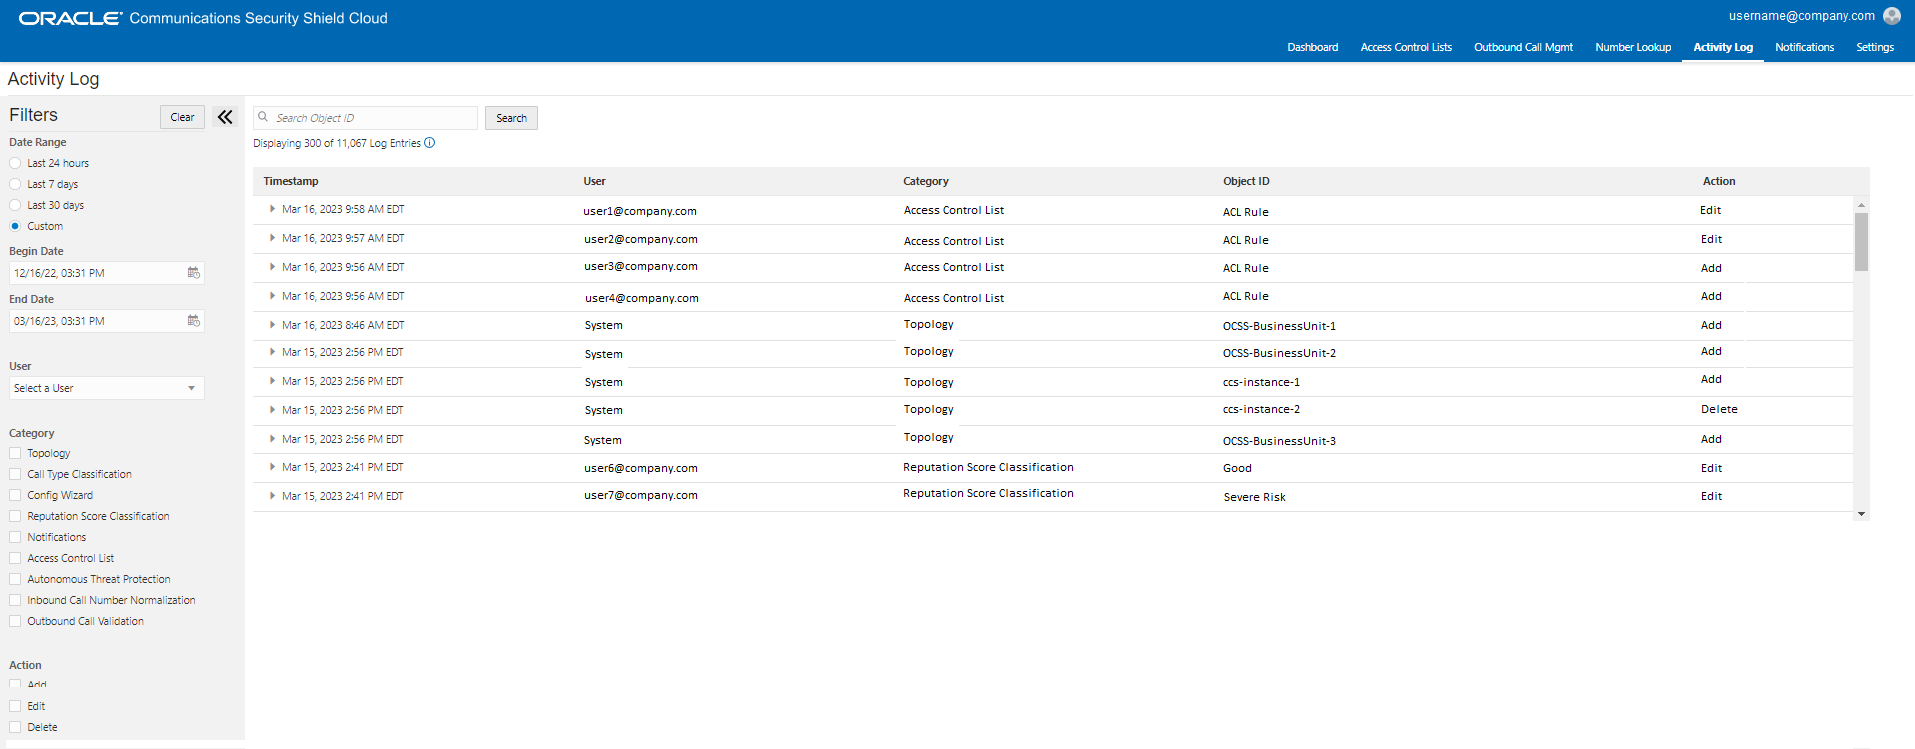
Be aware that although changes are occurring at the SBC and CCS instance, it is possible that the changes do not appear in the Device Status tile at the moment you view the tile due to the ten second refresh rate. Topology changes, even those that revert quickly, for example in less than one second, will display in the activity log. The following example of the Activity Log shows topology changes noted in the Category column. The Object ID and Action columns display additional information about the topology changes.

Configuration
To configure connections to the CCS, you must specify the ocss-service-address for the CCS instances you want
connected to the SBC. From either the ACLI or the Web GUI, go to Configuration,
Session Router, sip-config, spl-options. In the spl-options field,
enter the ocss-service-address for each CCS
instance.
You can configure an HTTPS Client for each instance, which allows you to use different clients for connectivity with each CCS including specific certificates for each CCS.
ocss-service-address={192.168.100.105:8060;httpClientConf}{192.168.100.106:8050;httpClientConf}{192.168.100.107:8000;httpClientConf2},ocss-server-config=httpServerConf