1 Using Network Integrity
This section describes how to use Oracle Communications Network Integrity.
Getting Started with Network Integrity
Network Integrity maintains the integrity of an inventory system, by:
-
Comparing the data in the inventory system with the data collected from the network devices themselves, and by
-
Providing a means to resolve discrepancies on the inventory systems or elsewhere.
The features and functionality offered by Network Integrity are described in the following topics:
About the UI
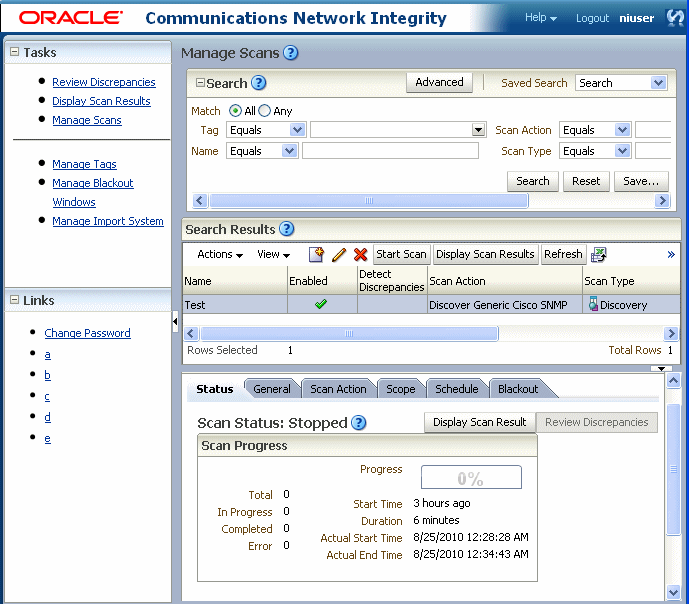
The following figure provides an overview of the Network Integrity UI.
The Network Integrity UI enables you to carry out tasks such as:
-
Configuring network device discovery and inventory system import scans
-
Initiating and/or scheduling scans
-
Checking scan results
-
Managing discrepancy comparisons between network and discovery results
The UI is made up of a number of work areas:
-
The global area. See "About the Global Area".
-
The regional area. See "About the Regional Area".
-
The local area. See "About the Local Work Area".
About the Global Area
The global area at the top of the Network Integrity UI consists of:
-
A product identification area; Oracle Communications Network Integrity
-
An area showing the name of the currently logged in user; niuser
-
A logout link. See "Logging Out of Network Integrity"
-
A Help menu. See "About the Help Menu"
-
A processing indicator. See "About the Processing Indicator".
The following figure displays the global area.
About the Help Menu
The Help menu consists of two items:
-
Help: Select to open a new browser window showing the main online Help page for Network Integrity. Expand the table of contents to view the subject headings, and select the required topic. Use the search function to look for a Help topic.
-
About: Select to open a dialog box showing the version of the Network Integrity product, and the versions of all cartridges deployed in Network Integrity.
About the Processing Indicator
The processing indicator is an Oracle logo at the upper right corner of the global area. The indicator displays the following states:
-
Idle (the normal state): the indicator is not spinning
-
Processing: the indicator is spinning; for example: a scan search is being carried out
-
Disconnected: A red broken circle is displayed.
About the Regional Area
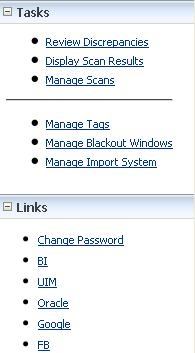
The regional area on the left of the UI consists of two panels:
-
The Tasks panel; See "About the Tasks Panel"
-
The Links panel; See "About the Links Panel"
The following figure displays the regional area.
About the Tasks Panel
The Tasks panel provides access to tasks required to complete the business process associated with a work area. When you select a task link, it replaces the local area contents.
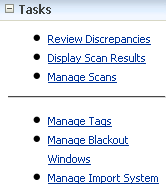
The following figure displays the Tasks panel.
The task panel for Network Integrity has the following links:
-
Review Discrepancies. See "About the Review Discrepancies Link".
-
Display Scan Results. See "About the Display Scan Results Link".
-
Manage Scans. See "About the Manage Scans Link".
-
Manage Tags. See "About the Manage Tags Link".
-
Manage Blackout Windows. See "About the Manage Blackout Windows Link".
-
Manage Inventory System. See "About the Manage Import System Link".
About the Review Discrepancies Link
Click this link to load the Review Discrepancies page. Initially, the search pane is expanded and the search results table is empty. Enter some search criteria, execute a search, and then review the resulting list of discrepancies.
You can then take further actions based on the discrepancies under review.
About the Display Scan Results Link
Click this link to load the Scan Results page. Initially, the search pane is expanded and the results table is empty. Enter some search criteria, execute a search, and then review the resulting list of scan results.
If you use the default search criteria, and click Search, the latest scan results are returned.
See "Working with Scan Results".
About the Manage Scans Link
Click this link to load the Manage Scans page. Initially, the search pane is expanded and the results table is empty. Enter some search criteria, execute a search, and then review the resulting list of scans.
If you use the default search criteria, and click Search, you carry out a search for all scans.
See "Using Scans".
About the Manage Tags Link
Click this link to load the Manage Tags page. This page displays a tree-table of all tags in the Network Integrity system. From this page, you can create, edit, and delete tags.
See "Managing Tags".
About the Manage Blackout Windows Link
Click this link to load the Manage Blackout Windows page. This page displays a table of all blackout windows in the Network Integrity system. From this page, you can create, edit, and delete blackout windows. You can also view scans assigned to blackout windows.
See "Using Blackout Windows".
About the Manage Import System Link
Click this link to load the Manage Import System page. This page is used to display and edit the connection setting for a single inventory system. This setting is used by all inventory import and inventory resolution actions to communicate with the target system. From this page, you can create, edit, and delete the connection setting.
About the Links Panel
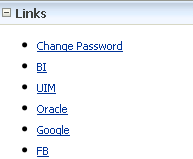
You can place convenient web links in the Links panel. Typically, these are links to the web pages of external systems that may be used in conjunction with Network Integrity; for example, a link to the Oracle Communications Unified Inventory Management (UIM) login page or to the technical specifications for equipment on the network.
The following figure displays the Links panel.
Links are configured by the Network Integrity administrator. All links are application-wide, so all Network Integrity users see the same links with the same link text. For more information on creating links, see “Configuring System Wide Links" in Oracle Communications System Administrator's Guide.
If Oracle BI Publisher is installed as part of the Network Integrity install, then a link to the installed BI Publisher instance is created automatically by the installer. The Network Integrity administrator can edit or remove this link later.
A link to the Change Password page is optionally created by the installer. This link is displayed as the Change Password link. The Network Integrity Administrator can edit or remove this link later. See "About the Change Password Link".
About the Change Password Link
The Change Password link is displayed only if the Oracle WebLogic Server Embedded LDAP server is selected as the authentication agent for Network Integrity during the installation.
You can click this link to load the Change Password page where you can change your password for the Network Integrity UI.
See "Changing Your Password".
About the Local Work Area
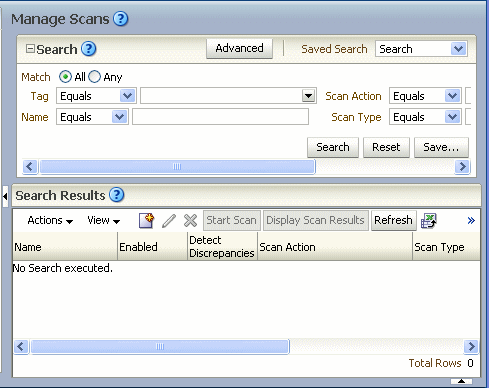
The local work area is on the right of the UI. The default work area displays the Manage Scans page when Network Integrity first starts up. When a task link is selected from the Tasks panel, it replaces the local area contents.
The following figure shows the default work area at startup.
Working with the Network Integrity UI
For information on using the Network Integrity UI, see the following:.
Navigating the UI
The Network Integrity UI works entirely inside a single page display. You should not use your web browser buttons; for example: Back, Forward, Refresh, to navigate within the page. If the web browser is used accidentally, simply navigate to the main link, and log on to Network Integrity again if necessary.
Do not open multiple instances of Network Integrity in different tabs of the same browser; either in Internet Explorer, or Mozilla Firefox.
Using the Integrated Online Help
The Network Integrity online Help system features Help topics which are integrated with components of the application.
To select an integrated Help topic:
-
Click the Help icon associated with a component.

The related Help topic appears in the main Network Integrity online Help page within a new browser window.
-
Use the information in the Help topic to configure the Network Integrity component.
-
(Optional) Expand the Contents node to view Help subject headings.
-
(Optional) Expand the Search node to find a Help topic.
-
Exit the browser window when finished.
Selecting a Help topic replaces any topics currently displayed in the web browser. To display multiple Help topics at the same time, right-click the Help icon and use the browser menu commands.
Creating a Network Integrity Object
To create a Network Integrity object:
-
Click the Create icon, or right-click the object and select Create.

-
Carry out the configuration required.
-
Click Save and Close.
Editing a Network Integrity Object
To edit a Network Integrity object:
-
Select a single object in a Network Integrity table.
-
Click the Edit icon, or right-click the object and select Edit.

-
Carry out the configuration required.
-
Click Save and Close.
Deleting a Network Integrity Object
To delete a Network Integrity object:
-
Select the object in the relevant table.
-
Click the Delete icon, or right-click the object and select Delete.

-
Confirm the deletion.
Sorting Data in Tables
All table sort operations in Network Integrity are case-sensitive. However, not all columns can be sorted. See "Data Sorting Exceptions".
To sort data in table columns:
-
Hold the mouse pointer over the column header to display arrows for sorting data in ascending (up arrow) or descending (down arrow) order.
-
Select the sorting method required.
Data Sorting Exceptions
On the Review Discrepancies page, Search Results table, there are a number of columns which do not use the standard sorting method:
-
The Type, Resolution, Status columns do not sort alphabetically but instead follow their own order.
-
The Discovery Value, Discovery Source, Import Value, Import Source columns cannot be sorted.
On the Manage Scans page, Search Results table, the following column does not use the standard sorting method:
-
The Scan Type column does not sort alphabetically but instead follows its own order.
Exporting Data in Microsoft Excel Format
Certain tables in Network Integrity support the export of data in Microsoft Excel format.
To export data in Microsoft Excel format:
-
Click the Export All Rows to Excel icon on the table toolbar.

-
Carry out one of the following:
-
Open the spreadsheet.
-
Choose a directory into which to save the file and name the spreadsheet.
-
Changing Your Password
The Change Password page allows a currently logged-in user to change the Network Integrity password. The password is changed using the Oracle WebLogic Server embedded LDAP server.
You can access this page using a pre-configured link in the Links panel.
To change your Network Integrity password:
-
On the Links panel, click Change Password to open the Password Details dialog box.
-
In the Current Password field, enter your current password.
-
In the New Password field, enter your new password.
-
In the Verify New Password field, confirm your new password.
-
Click Save and Close.
See also "About the Change Password Link".
