Netra Server X5-2 Platform Preparation
Oracle Communications produces a variety of software products that run on the Netra X5-2 for Communications platform, including Oracle session delivery applications.
Use your Hardware documentation to install and establish system management by way of ILOM. Then use the steps below to prepare the Netra X5-2 for session delivery software installation.
Note:
The Connect ILOM to the Netra X5 for Communications also displays ILOM cabling.- Confirm applicable firmware
on the server.
- To check the firmware versions installed in the server, go to the Oracle Integrated Lights Out Manager (ILOM) web interface, and navigate to System Information, Firmware.
- Review your session delivery product Release Notes for qualified software and firmware versions.
- Upgrade or downgrade the firmware on the server as necessary. Go to https://docs.oracle.com/cd/E37444_01/index.html for ILOM upgrade instructions.
- Configure the BIOS settings.
(Settings navigation may differ based on the BIOS version.)
- Observe the boot procedure and use the documented key sequence to interrupt the boot and display the BIOS configuration dialogs. For example, pressing the F2 key is a common way to enter BIOS configuration from a terminal application that supports function keys.
- Navigate to the Boot menu and, depending on the software distribution you are using, set the USB or CD as the first device followed by the disk controller.
- Disable Hyper-Threading.
Note:
Refer to "Hyperthreading and CPU Affinity" in the Session Border Controller Installation Guide for Oracle guidelines on the use of Hyper-threading. - Disable CPU power limit.
- Disable C6 Reporting.
- Disable the UEFI Stack.
- Change Energy Performance to Performance. (For example, set "ENERY_PERF_BIAS_CFG" mode to "PERF".)
- To decrease boot up time, Oracle recommends disabling Intel PXE Boot Agent for both onboard and NIC ethernet ports. To disable the Boot Agent for the onboard ethernet ports, navigate to the OpROM option for NET0, NET1, NET2, and NET3 interfaces (for example, IO, Internal Devices) and set it to disabled.
- To disable Boot Agent for NIC ethernet ports, note the blue PCIe slot number label at the back of the Netra server where the NICs are installed, then disable the OpROM option for those slots. (Note that you may be able to identify slot number through the ILOM System Information, PCI Devices menu.)
- Reboot the server.
- Initialize the HDD.
- Open the ILOM remote system console to observe the system's boot cycle, and interrupt the boot cycle to enter the LSI MegaRAID status display. For example, pressing the Ctrl-R key is a common way to enter LSI MegaRAID BIOS Configuration Utility.
- Navigate the utility to establish the elements of your virtual drive, typically consisting of a New Configuration with two entire HDDs.
- Access the menu from which you create a virtual drive.
- Set the RAID level to RAID-1.
- Select all of the drives that you want.
- From the Virtual Drive Management dialog, select the new drive and initialize it. For example, pressing F2 and selecting Fast Init from the command menu is a common way to execute initialization.
- After initialization is complete, Escape from the LSI MegaRAID Configuration Utility and reboot the system.
- Perform a cold shutdown by removing all system power.
Cable the Netra X5-2 for Communications
After mounting the Netra X5-2 for Communications in an equipment rack and installing all components, use the following instructions to connect all appropriate data cables to the ports before powering the system up and beginning the configuration.
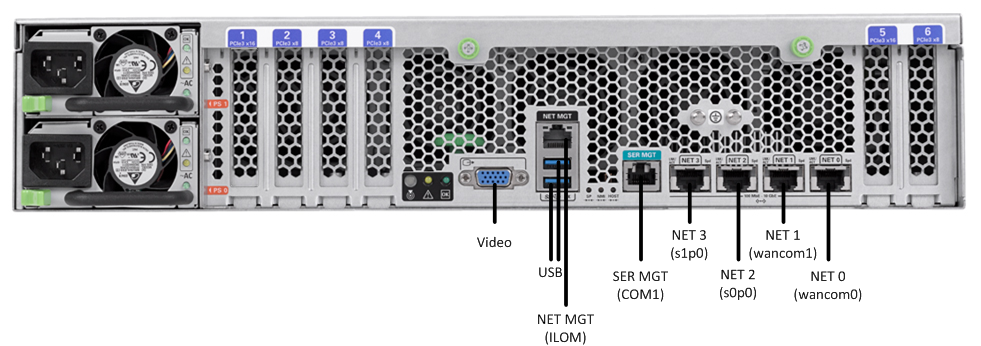
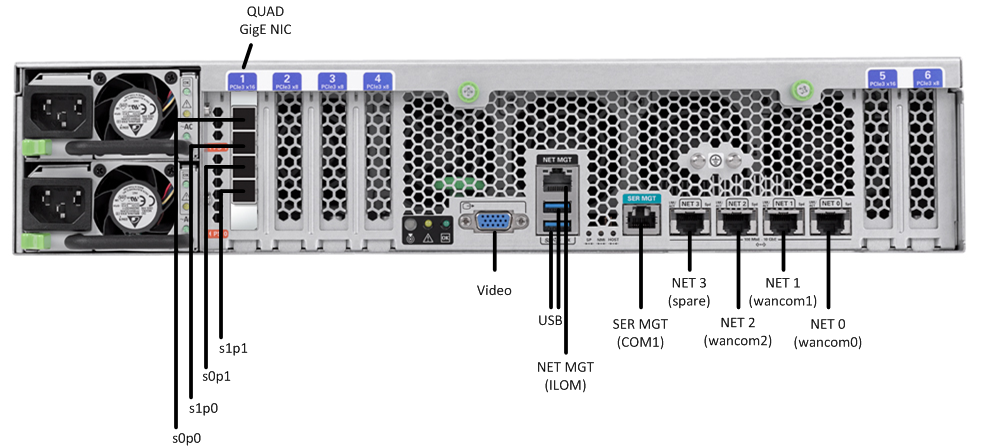
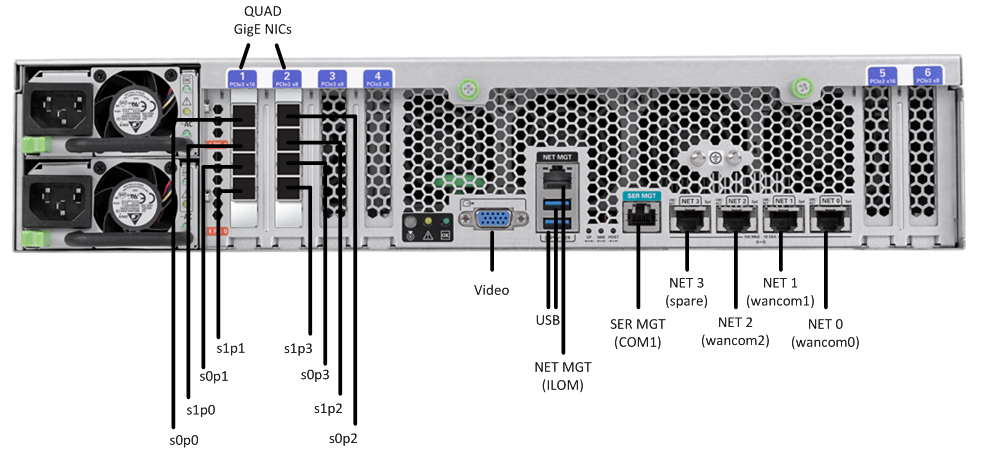
Oracle has qualified the following configurations of the Netra X5-2 for Communications (the onboard 10 GigE ports are configured for 1G operation):
- Configuration A: Four onboard 10 GigE ports and no Quad GigE NIC
- Configuration B: Four onboard 10 GigE ports and 1 Quad GigE NIC
- Configuration C: Four onboard 10 GigE ports and 2 Quad GigE NICs
Figure 1-31 Netra X5-2 for Communications Configuration A (4 Onboard 10 GigE Ports)

Figure 1-32 Netra X5-2 for Communications Configuration B (4 Onboard 10 GigE Ports & 1 Quad GigE NIC)

Figure 1-33 Netra 5-2 for Communications Configuration C (4 Onboard 10 GigE Ports & 2 Quad GigE NICs)

Oracle recommends using Category 6 (or better) for all Ethernet connections.
You do not need to use every port for proper operation.
You can install and remove Ethernet and 1000BASE-T cables while the Netra X5-2 for Communication runs, but when you disconnect a cable the link is lost and the system generates an alarm.
Available Connections
Please read all of the information for each of the available connections prior to cabling the Netra X5-2 for Communications.
| Port | Description | You Need |
|---|---|---|
| NET (0-3) | 10 GigE ports - labeled Net 3, Net 2, Net 1 and Net 0 (left to right). Enables you to connect the Netra X5-2 to your network. | A Category 6 (or better) Ethernet cable to
connect to the NET 0 port to your network
Network parameters such as an IP address (can be provided by DHCP services or assigned a static address in the OS) Additional Category 6 (or better) Ethernet cables and Ethernet addresses as needed for additional connections to NET 1 - 3 |
| NET MGT | Provides a 10/100BASE-T Ethernet connection to the Service Processor (SP) through an RJ-45 connector. The NET MGT port provides support connections to the SP using the Oracle Integrated Lights Out Manager (ILOM) CLI and Web interface. By default, the NET MGT port is configured to use DHCP to automatically obtain an IP address. Alternatively, you can assign a static IP address to the NET MGT port. To use the NET MGT port, you must configure its network settings. Once configured, use the NET MGT port IP address to log on to the device using a browser or secure shell. | Category 6 (or better) Ethernet cable to
connect the NET MGT port to your network
IP address for this port (required from DHCP or a static address) |
| SER MGT (COM1) | Provides a TIA/EIA-232 serial Oracle/Cisco
standard connection to the SP through an RJ-45 connector. Default settings:
8N1: eight data bits, no parity, one stop bit 115200 baud Disable hardware flow control (CTS/RTS) Disable software flow control (XON/XOFF) |
A terminal device (e.g., terminal, connection
to a terminal server, or computer such as a laptop running terminal emulation
software)
A cable to connect the terminal device to the SER MGT (COM1) port |
| USB | Provides USB connections to the SP. The USB ports are hot pluggable, so you can connect and disconnect USB cables from these ports and peripheral devices without affecting server operations. | USB keyboard
USB mouse Note: Maximum USB cable length: 5 meters |
| VIDEO | Provides a temporary video connection to the SP. | VGA monitor
HDB-15 video cable with a maximum cable length of 6 meters (19.7 feet) |
Cable the Local Console
You can connect the Administration console to either the Oracle Integrated Lights Out Manager (ILOM) (NET MGT), the local VGA+USB console ports, or the local SER MGT (COM1) serial console port.
- To cable a serial console
connection:
- Serial console cable with an RJ-45 connector
- To cable a USB and Video
Connection:
- DB-15 video cable with a maximum cable length of 6 meters (19.7 feet)
- USB cable with a maximum cable length of 6 meters (19.7 feet)
- USB keyboard
In the following procedure, you have the option to either cable a serial connection or to cable a USB/Video connection.
Note:
Do not configure COM2 in the bootparams menu.When configuring boot loader parameters, set the console to VGA when you use ILOM or VGA+USB, or to COM1 when you use SER MGT. The boot loader is accessible on all console ports, but only input from the active console port can be recognized by the Netra X5-2 for Communications.
Connect ILOM to the Netra X5 for Communications
Use the following procedure to make a connection to the Netra X5-2 for Communications Oracle Integrated Lights Out Manager (ILOM) port. For a remote permanent connection to the Service Processor over the ILOM connection, use the rear panel NET MGT port.
Note:
Keep Ethernet cables separated from power cables by at least 60mm where possible and never run them in the same channel of the rack without segregation.- Category 6 (or better) Ethernet cable with RJ-45 jacks
- Refer to the Netra X5-2 for Communications hardware documentation for information on how to configure the Web browser application to connect to the console, and how to establish communications with the Netra X5-2 for Communications.
Software Installation - Netra and Server-based Platforms
Oracle Communications Session Delivery software requires software installation when deployed on Netra and Server-based platforms.
Installation Procedure
Software installation to Netra and server-based platforms includes the following high-level steps:
- Ensure your device is set to boot from your boot media. This may be by way of USB or CD.
- Insert your installation media in any USB slot or CD drive.
- Power up the device, observing the boot cycle.
- When power-up is complete, the device loads the Oracle Enterprise Communications Broker (OECB) software. Wait for this to complete.
- When notified, remove the
boot media and allow the device to boot to the newly installed
OECB software.
(This step may not be required as some platforms support a boot priority mechanism that knows to boot from your hard drive after the installation is complete.)
Note:
Note that the OECB boots by default to VGA (or as configured by BMC) during the installation. You can change this to serial temporarily during installation. After installation you can set the boot option to VGA or serial in the boot parameters. This setting is “permanent,” meaning that any device set to boot to VGA appears “dead” at serial (and vice-versa).Logging Into the System
The Oracle Enterprise Communications Broker (OECB) requires you to set passwords for the Admin and User accounts the first time you power up a new or factory reset system by way of local access. You cannot access the Admin and User accounts until you set the corresponding passwords. Use either an SSH or console connection when setting passwords. You log into your system after setting passwords.
- 8-64 characters
- Include three of the
following:
- Lower case letters
- Uppercase letters
- Numerals
- Punctuation
- Power up the SBC. The system prompts you to set the User account password.
- At the prompt, type acme, and press ENTER. The system prompts you to enter the password that you want for the User account.
- Type the User account password, and press ENTER.
- Type enable, and press ENTER. The system prompts you to set the Admin account password.
- Type packet, and press ENTER. The system prompts you to enter the password that you want for the Admin account.
- Type the Admin account password, and press ENTER. The system logs you in as Admin.
First Steps after Software Installation
Oracle recommends the following steps after installation on the Oracle X7-2 platform.
- Execute the OECB format hard-disk command, per your requirements. See the "Formatting the Disk Volume" section for reference and instructions.
- Turn off the OECB using the Halt command. This provides you with a graceful software shutdown, after which the hardware is still powered on.
- Power cycle the hardware using the power switch.
To configure the OECB, refer to the ACLI Configuration Guide.
Boot parameter changes to consider prior to service configuration include:
- Set your “Target Name” to your preferred OECB name.
- Verify your “Console Device”, eg, com1 (serial).
- Set the "IP Address" to your preferred management port IP address.
Note:
Note at the boot parameters that the default system is named “/boot/bzImage”. Be aware that upgrading code includes obtaining images with, for example, an SCz prefix and the .bz file extension.Known Issues
Netra X5-2 for Communications
The interface-mapping locate command does not work with the Netra X5-2 for Communications onboard interfaces. The command does work with PCI interfaces installed on the platform.
The Onboard Ethernet ports of the Oracle X-series servers (X3-2, X5-2, and so on.) run natively at 10GBASE- T, which requires the use of Category 6a cabling. These ports negotiate down to 1000BASE-T or 100BASE-T, but the negotiation might not succeed when you use incompatible cables. For example, do not use Cat5/5e cables or Cat6 cables not rated for 500MHz operation.

