5 SEAS Over IP Configuration Procedures

Chapter 5, SEAS Over IP Configuration Procedures, describes the procedures used to configure the SEAS over IP feature.

5.1 Introduction

The SEAS over IP feature is a TCP/IP-based interface for SEAS that creates a path between the EAGLE and the CCS MR (Common Channel Signaling Message Router). The CCS MR is a stand-alone, self-contained system developed by Telcordia that provides a centralized mechanism for routing CCS network operations traffic between STPs/SCPs and existing and new OSs.

One of the eight telnet terminals on the E5-IPSM is used to provide the connection from the EAGLE and the CCS MR. This terminal is referred to as a SEAS terminal.

Note:

As of Release 46.5, the E5-IPSM card and its functionality is replaced by the E5-ENET-B (p/n 870-2971-01) or SLIC (p/n 7094646) card. Any references to E5-IPSM and the 870-2877-01 part number should be replaced by the 46.5 and greater card and part number.

The EAGLE can contain a maximum of two SEAS terminals. Only one SEAS terminal can be assigned to an E5-IPSM. The remaining seven telnet terminals on the E5-IPSM continue to provide generic IP-based services such as Telnet and FTP.

SEAS over IP Feature Configurations

The SEAS over IP feature supports three configurations"

  • Dual SEAS terminals with a single CCS MR
  • Dual SEAS terminals with dual CCS MRs
  • One SEAS terminal with one CCS MR.

Dual SEAS Terminals with a Single CCS MR SEAS Configuration

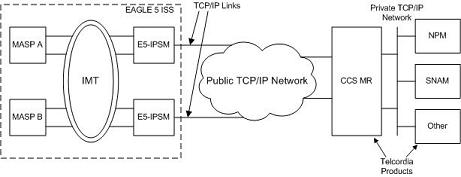
The two SEAS terminals are connected to a single CCS MR as shown in Figure 5-1. The two SEAS terminals operate in a redundant fashion allowing a maximum of two active connections to the CCS MR. While the connection to the CCS MR is dedicated to SEAS, the other terminals on the E5-IPSM may still be used for other IP-based operations, such as Telnet and FTP, or their secure counterparts, SSH and SFTP. Different SEAS information can be transmitted and received separately over each connection to the CCS MR.

Figure 5-1 Dual SEAS Terminals with Single CCS MR SEAS Configuration
img/dual_e5-ipsm_single_ccs_mr_configuration.jpg

Dual SEAS Terminals with Dual CCS MRs SEAS Configuration

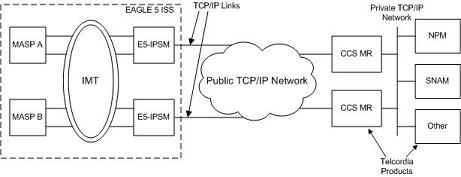
When the two SEAS terminals are connected to two CCS MRs, as shown in Figure 5-2, the operation of the SEAS connections is similar to the "Dual SEAS Terminals with a Single CCS MR SEAS Configuration" section with the following exceptions:

  • Each SEAS terminal is configured with a connection to one of the CCS MRs.
  • The pair of CCS MRs operate in a round robin manner if they each have an active connection to a SEAS terminal. When the EAGLE receives a command request from a CCS MR, the response to the command request is sent to the CCS MR on the same TCP connection that the CCS MR used to send the command request.

Figure 5-2 Dual SEAS Terminals with Dual CCS MRs SEAS Configuration
img/dual_e5-ipsm_dual_ccs_mr_configuration.jpg

Simplex SEAS Terminal Operation

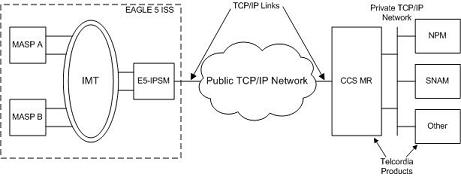
With the simplex SEAS terminal operation, there is only one SEAS terminal connected to one CCS MR. There are no redundant connections to the CCS MR and this configuration is intended to serve as a restricted mode of operation until another SEAS terminal is returned to service. The simplex mode of operation is not recommended as a standard mode of operation for the SEAS over IP feature.

  • All SEAS information is transmitted over this single IP connection to the CCS MR.
  • The SEAS system will be in an IS-ANR/Restricted state while the system is in the simplex SEAS terminals operation and a major alarm, UAM 0348, is generated for the SEAS system. Refer to Unsolicited Alarm and Information Messages Reference for more information on UAM 0348.

Figure 5-3 Simplex SEAS Terminal Configuration
img/single_e5-ipsm_single_ccs_mr_configuration.jpg

Provisioning the SEAS over IP Feature

To provision the SEAS over IP feature, perform these steps.

  1. Add the E5-IPSMs to the database using the ent-card command. Perform the Adding an E5-IPSM procedure.
  2. Enable the SEAS over IP feature using the enable-ctrl-feat command. Perform the Activating the SEAS over IP Feature procedure.
  3. Configure the SEAS connections using the chg-seas-config command. Perform the Performing the Initial SEAS Configuration procedure.
  4. Configure the SEAS terminals using the chg-trm command. Perform the Configuring SEAS Terminals procedure.
  5. Turn the SEAS over IP feature on using the chg-ctrl-feat command. Perform the Activating the SEAS over IP Feature procedure.

5.2 Activating the SEAS over IP Feature

This procedure is used to enable and turn on the SEAS over IP feature using the feature’s part number and a feature access key.

The feature access key is based on the feature’s part number and the serial number of the EAGLE, making the feature access key site-specific.

The enable-ctrl-feat command enables the feature by inputting the feature’s access key and the feature’s part number with these parameters:

:fak – The feature access key provided by Oracle.

:partnum – The Oracle-issued part number of the SEAS over IP feature, 893018801.

Once this feature is enabled, it is permanently enabled. This feature cannot be enabled with a temporary feature access key.

The Telnet feature (IP User Interface), part number 893005701, must be enabled and turned on before the SEAS over IP feature can be enabled. Perform the Activating Controlled Features procedure to enable and turn on the Telnet feature.

Once the SEAS over IP feature has been enabled, the SEAS over IP feature must be turned on with the chg-ctrl-feat command. The chg-ctrl-feat command uses these parameters:

:partnum – The Oracle-issued part number of the SEAS over IP feature, 893018801.

:status=on – used to turn the SEAS over IP feature on.

Note:

To turn the SEAS over IP feature on in step 5, these items must be provisioned in the database.
  • The seasclli value must be provisioned.
  • The IP address and port for at least one connection must be provisioned.
  • At least one SEAS terminal must be provisioned.
  • If the Eagle OAM IP Security Enhancement feature is enabled and turned on, the login and hname values for at least one connection must be provisioned.

If you wish to provision the EAGLE for the SEAS over IP feature at this time, perform these procedures.

Once the SEAS over IP feature has been turned on, it be can be turned off. For more information on turning the SEAS over IP feature off, go to the Turning Off the SEAS Over IP Feature procedure.

The status of the SEAS over IP and Telnet features is shown with the rtrv-ctrl-feat command.

Caution:

When the SEAS over IP feature is turned on, and the SEAS terminals and SEAS configuration is provisioned, SEAS traffic is sent to the CCS MR using the SEAS terminals.
  1. Display the status of the controlled features by entering the rtrv-ctrl-feat command.

    The following is an example of the possible output.

    
    rlghncxa03w 06-10-01 21:15:37 GMT EAGLE5 36.0.0
    The following features have been permanently enabled:
    
    Feature Name              Partnum    Status  Quantity
    HC-MIM SLK Capacity       893012707  on      64
    Command Class Management  893005801  off     ----
    LNP Short Message Service 893006601  on      ----
    Intermed GTT Load Sharing 893006901  off     ----
    XGTT Table Expansion      893006101  off     ----
    XMAP Table Expansion      893007710  on      3000
    Large System # Links      893005910  on      2000
    Routesets                 893006401  on      6000
    
    The following features have been temporarily enabled:
    
    Feature Name              Partnum    Status  Quantity     Trial Period Left
    Zero entries found.
    
    The following features have expired temporary keys:
    
    Feature Name              Partnum
    Zero entries found.
    

    If the SEAS over IP feature is enabled and turned on, no further action is necessary. This procedure does not need to be performed.

    If the SEAS over IP feature is enabled and but not turned on, skip steps 2 and 3 and go to step 4.

    If the SEAS over IP feature is not enabled, go to step 2.

  2. To enable the SEAS over IP feature, the Telnet feature must be enabled and turned on. The Eagle OA&M IP Security Enhancement feature can also be used with the SEAS over IP feature. If the rtrv-ctrl-feat output in step 1 shows that the Telnet and Eagle OA&M IP Security Enhancement features are enabled and turned on, skip this step and go to step 3.

    If the rtrv-ctrl-feat output in step 1 shows that the Telnet is not enabled or turned on, perform the Activating Controlled Features procedure to enable and turn on the Telnet feature.

    The Eagle OA&M IP Security Enhancement feature can be enabled and turned on if the Telnet feature is not enabled and turned on. After the Telnet feature is enabled, and the rtrv-ctrl-feat output shows that the Eagle OA&M IP Security Enhancement feature is enabled and turned on, go to step 3.

    If the Eagle OA&M IP Security Enhancement feature is not enabled and turned on, and you do not wish to use the If the Eagle OA&M IP Security Enhancement feature with the SEAS over IP feature, go to step 3.

    If the Eagle OA&M IP Security Enhancement feature is not enabled and turned on, and you wish to use the If the Eagle OA&M IP Security Enhancement feature with the SEAS over IP feature, perform the Activating the EAGLE OA&M IP Security Enhancement Controlled Feature procedure to enable and turn on the Activating the Eagle OA&M IP Security Enhancement Controlled Feature. When the Activating the Eagle OA&M IP Security Enhancement Controlled Feature is enabled and turned on, go to step 3.

  3. Enable the SEAS over IP feature with the enable-ctrl-feat command specifying the part number for the SEAS over IP feature and the feature access key. Enter this command.

    enable-ctrl-feat:partnum=893018801:fak=<SEAS over IP feature access key>

    Note:

    The SEAS over IP feature cannot be enabled with a temporary feature access key.

    Note:

    The values for the feature access key (the fak parameter) are provided by Oracle. If you do not have the feature access key for the SEAS over IP feature, contact your Oracle Sales Representative or Account Representative.

    When the enable-ctrl-feat command has successfully completed, this message should appear.

    
    rlghncxa03w 06-10-01 21:15:37 GMT EAGLE5 36.0.0
    ENABLE-CTRL-FEAT: MASP B - COMPLTD
    

    Note:

    To turn the SEAS over IP feature on in step 5, these items must be provisioned in the database.
    • The seasclli value must be provisioned.
    • The IP address and port for at least one connection must be provisioned.
    • At least one SEAS terminal must be provisioned.
    • If the Eagle OAM IP Security Enhancement feature is enabled and turned on, the login and hname values for at least one connection must be provisioned.

    If you wish to provision the EAGLE for the SEAS over IP feature at this time, perform these procedures.

    After the SEAS over IP feature provisioning has been completed, skip step 4 and go to step 5.

    If you do not wish to provision the EAGLE for the SEAS over IP feature at this time, skip steps 4 and 5, and go to step 6.

    Note:

    If the SEAS over IP feature was enabled in this step, skip step 4 and go to step 5.
  4. Before the SEAS over IP feature can be turned on, the SEAS over IP feature configuration must be correct (see the third note in step 3). Display the SEAS over IP configuration by entering the rtrv-seas-config command.

    The following is an example of the possible output if the Eagle OA&M IP Security Enhancement feature is not enabled and turned on.

    rlghncxa03w 07-01-23 18:46:01 EST  EAGLE 37.5.0
    SEASCLLI     CONNECTION  IPADDRESS        PORT   TERMINAL
    --------     ----------  ---------        ----   --------
    TEAGLESTP001 IPMR1       192.168.25.10    2500   18
                 IPMR2       192.168.25.20    2600   27 

    The following is an example of the possible output if the Eagle OA&M IP Security Enhancement feature is enabled and turned on.

    tekelecstp 07-01-23 18:46:01 EST EAGLE 37.5.0
    SEASCLLI            AUTHMODE
    ----------------------------
    TEAGLESTP001        Password
    
    TERMINAL      CONNECTION    IPADDR          PORT   LOGIN      HNAME
    
    ----------------------------------------------------------------------
    18            IPMR1         198.168.25.10   2500    root      abaco-a
    27            IPMR2         198.168.25.20   2600    root      abaco-b
    

    To turn this feature on in step 5, the items shown in the third note in step 3 must be provisioned. If the SEAS configuration is not correct, perform the Changing the Existing SEAS Configuration procedure to make the necessary corrections to the SEAS over IP configuration. If no SEAS terminals are shown in this step, perform the Configuring SEAS Terminals procedure to configure the SEAS terminals.

  5. Turn the SEAS over IP feature on with the chg-ctrl-feat command specifying the part number for the SEAS over IP feature and the status=on parameter. Enter this command.

    chg-ctrl-feat:partnum=893018801:status=on

    Caution:

    When the SEAS over IP feature feature is turned on, SEAS traffic is sent to the CCS MR using the SEAS terminals.

    When the chg-ctrl-feat command has successfully completed, the following message should appear.

    
    rlghncxa03w 06-10-01 21:15:37 GMT EAGLE5 36.0.0
    CHG-CTRL-FEAT: MASP B - COMPLTD
    
  6. Verify the changes by entering the rtrv-ctrl-feat command with the SEAS over IP feature part number. Enter this command.

    rtrv-ctrl-feat:partnum=893018801

    The following is an example of the possible output.

    
    rlghncxa03w 07-05-28 21:15:37 GMT EAGLE5 37.0.0
    The following features have been permanently enabled:
    
    Feature Name              Partnum    Status  Quantity
    SEAS over IP              893018801  on      ----
    
    The following features have been temporarily enabled:
    
    Feature Name              Partnum    Status  Quantity     Trial Period Left
    Zero entries found.
    
    The following features have expired temporary keys:
    
    Feature Name              Partnum
    Zero entries found.
    
  7. Backup the new changes using the chg-db:action=backup:dest=fixedcommand.

    These messages should appear, the active Maintenance and Administration Subsystem Processor (MASP) appears first

    .
    
    BACKUP (FIXED) : MASP A - Backup starts on active MASP.
    BACKUP (FIXED) : MASP A - Backup on active MASP to fixed disk complete.
    BACKUP (FIXED) : MASP A - Backup starts on standby MASP.
    BACKUP (FIXED) : MASP A - Backup on standby MASP to fixed disk complete.
    

Figure 5-4 Activating the SEAS over IP Feature


Sheet 1 of 2


Sheet 2 of 2

5.3 Performing the Initial SEAS Configuration

This procedure is used to configure the connections to the CCS MR using the chg-seas-config command. This procedure is performed only when configuring the connections to the CCS MR for the first time.

The chg-seas-config command can be used to change the SEAS configuration after the connections have been configured for the first time. Perform the Changing the Existing SEAS Configuration procedure to make this type of change.

The chg-seas-config command uses these parameters.

:conn – The name of the SEAS connection, either IPMR1 or IPMR2

:seasclli – The CLLI part of node name of the EAGLE consisting of one alphabetic character and up to 15 alphanumeric characters. The seasclli value is different from the EAGLE clli value that is entered with the chg-sid command. The seasclli value must also be configured on the Telcordia Message Router (CCS MR). Refer to Telcordia Configuration Specification "Telcordia Technologies System Documentation", BD-SNAM-ADMIN-4 Issue 14, November 2006.

:ipaddr – The IP address of the CCS MR.

:port – The port number of the CCS MR that the EAGLE connects to, from 1024 to 5000.

:hname – The name of the remote host of the CCS MR, 1 to 15 alphanumeric characters.

:login – The login name of the CCS MR, 1 to 15 alphanumeric characters.

:authmode – The method of authentication used for the connection. Currently, only password authentication is used for SEAS connections, so this parameter has only one value, password. This parameter is optional and does not need to be specified.

The hname, login, and authmode parameters are used only when the Eagle OA&M IP Security feature is enabled and turned on. The values for these parameters are displayed in the rtrv-seas-config output only when the Eagle OA&M IP Security feature is enabled and turned on. The status of the Eagle OA&M IP Security feature is shown in the rtrv-ctrl-feat output.

Caution:

The IP address and port value combination for each SEAS connection must be unique or the chg-seas-config command will be rejected.

The IP address for the SEAS over IP configuration cannot be shown as the IPADDR value in the rtrv-ip-lnk or rtrv-ftp-serv outputs, or the BPIPADDR value in the rtrv-ip-card output.

  1. Verify whether or not the SEAS over IP feature is enabled by entering this command.

    rtrv-ctrl-feat:partnum=893018801

    This is an example of the possible output.

    
    rlghncxa03w 07-05-28 21:15:37 GMT EAGLE5 37.0.0
    The following features have been permanently enabled:
    
    Feature Name              Partnum    Status  Quantity
    SEAS over IP              893018801  off      ----
    
    The following features have been temporarily enabled:
    
    Feature Name              Partnum    Status  Quantity     Trial Period Left
    Zero entries found.
    
    The following features have expired temporary keys:
    
    Feature Name              Partnum
    Zero entries found.
    

    If the SEAS over IP feature is enabled, continue the procedure with 2.

    If the SEAS over IP feature is not enabled, perform the Activating the SEAS over IP Feature procedure in this chapter to enable SEAS over IP feature. After the SEAS over IP feature has been enabled, continue the procedure with 2.

  2. Display the current SEAS configuration using the rtrv-seas-config command.

    The following is an example of the possible output if the Eagle OA&M IP Security Enhancement feature is not enabled and turned on.

    rlghncxa03w 07-01-23 18:46:01 EST  EAGLE 37.5.0
    SEASCLLI     CONNECTION  IPADDRESS        PORT   TERMINAL
    --------     ----------  ---------        ----   --------
    ------------ IPMR1       -------------    ----   --
                 IPMR2       -------------    ----   -- 

    The following is an example of the possible output if the Eagle OA&M IP Security Enhancement feature is enabled and turned on.

    tekelecstp 07-01-23 18:46:01 EST EAGLE 37.5.0
    SEASCLLI            AUTHMODE
    ----------------------------
    ------------        --------
    
    TERMINAL      CONNECTION    IPADDR          PORT   LOGIN      HNAME
    
    -----------------------------------------------------------------------
    --            IPMR1         -------------   ----    ----      --------
    --            IPMR2         -------------   ----    ----      --------
     
  3. Enter the SEASCLLI value by entering the chg-seas-config command with the seasclli parameter. For this example, enter this command.

    chg-seas-config:seasclli=TEAGLESTP001

    Note:

    The SEASCLLI value is different from the CLLI value specified with the chg-sid command.
  4. Verify whether or not the Eagle OA&M IP Security Enhancement feature is enabled and turned on by entering this command.

    rtrv-ctrl-feat:partnum=893400001

    This is an example of the possible output.

    
    rlghncxa03w 07-05-28 21:15:37 GMT EAGLE5 37.0.0
    The following features have been permanently enabled:
    
    Feature Name              Partnum    Status  Quantity
    EAGLE OA&M IP Security    893400001  on      ----
    
    The following features have been temporarily enabled:
    
    Feature Name              Partnum    Status  Quantity     Trial Period Left
    Zero entries found.
    
    The following features have expired temporary keys:
    
    Feature Name              Partnum
    Zero entries found.
    
  5. Provision the first connection to the CCS MR. Enter the chg-seas-config command with these parameters:
    • :conn=ipmr1
    • :ipaddr=the IP address of the CCS MR
    • :port = the port number of the CCS MR

    Caution:

    The IP address and port value combination for each SEAS connection must be unique or the chg-seas-config command will be rejected.

    If the Eagle OA&M IP Security Enhancement feature is enabled and turned on, these parameters must also be specified.

    • :hname = The name of the remote host of the CCS MR.
    • :login = The login name of the CCS MR.

    If the Eagle OA&M IP Security Enhancement feature is not enabled and turned on, for this example, enter this command.

    chg-seas-config:conn=ipmr1:ipaddr=198.168.25.10:port=2500

    If the Eagle OA&M IP Security Enhancement feature is enabled and turned on, for this example, enter this command.

    chg-seas-config:conn=ipmr1:ipaddr=198.168.25.10:port=2500:hname=abaco-a:login=root

    When this command has successfully completed, this message should appear.

    
    rlghncxa03w 06-10-01 15:08:45 GMT EAGLE5 36.0.0
    CHG-SEAS-CONFIG: MASP A - COMPLTD 
    

    If the login parameter is specified with the chg-seas-config command, the Enter Password: prompt appears. When the Enter Password: prompt appears, enter the password for the login name. The length of the password is from 1 to 15 alphanumeric characters. The password is not echoed on the screen.

  6. Provision the second connection to the CCS MR. Enter the chg-seas-config command with these parameters:
    • :conn=ipmr2
    • :ipaddr=the IP address of the CCS MR
    • :port = the port number of the CCS MR

    Caution:

    The IP address and port value combination for each SEAS connection must be unique or the chg-seas-config command will be rejected.

    If the Eagle OA&M IP Security Enhancement feature is enabled and turned on, these parameters must also be specified.

    • :hname = The name of the remote host of the CCS MR.
    • :login = The login name of the CCS MR.

    If the Eagle OA&M IP Security Enhancement feature is not enabled and turned on, for this example, enter this command.

    chg-seas-config:conn=ipmr2:ipaddr=198.168.25.20:port=2600

    If the Eagle OA&M IP Security Enhancement feature is enabled and turned on, for this example, enter this command.

    chg-seas-config:conn=ipmr2:ipaddr=198.168.25.20:port=2600:hname=abaco-b:login=root

    When this command has successfully completed, this message should appear.

    
    rlghncxa03w 06-10-01 15:08:45 GMT EAGLE5 36.0.0
    CHG-SEAS-CONFIG: MASP A - COMPLTD 
    

    If the login parameter is specified with the chg-seas-config command, the Enter Password: prompt appears. When the Enter Password: prompt appears, enter the password for the login name. The length of the password is from 1 to 15 alphanumeric characters. The password is not echoed on the screen.

  7. Verify the SEAS configuration using the rtrv-seas-config command.

    The following is an example of the possible output if the Eagle OA&M IP Security Enhancement feature is not enabled and turned on.

    rlghncxa03w 07-01-23 18:46:01 EST  EAGLE 37.5.0
    SEASCLLI     CONNECTION  IPADDRESS        PORT   TERMINAL
    --------     ----------  ---------        ----   --------
    TEAGLESTP001 IPMR1       192.168.25.10    2500   18
                 IPMR2       192.168.25.20    2600   27 

    The following is an example of the possible output if the Eagle OA&M IP Security Enhancement feature is enabled and turned on.

    tekelecstp 07-01-23 18:46:01 EST EAGLE 37.5.0
    SEASCLLI            AUTHMODE
    ----------------------------
    TEAGLESTP001        Password
    
    TERMINAL      CONNECTION    IPADDR          PORT   LOGIN      HNAME
    
    -----------------------------------------------------------------------
    18            IPMR1         198.168.25.10   2500    root      abaco-a
    27            IPMR2         198.168.25.20   2600    root      abaco-b
     
  8. Back up the new changes using the chg-db:action=backup:dest=fixed command.

    These messages should appear, the active Maintenance and Administration Subsystem Processor (MASP) appears first.

    
    BACKUP (FIXED) : MASP A - Backup starts on active MASP.
    BACKUP (FIXED) : MASP A - Backup on active MASP to fixed disk complete.
    BACKUP (FIXED) : MASP A - Backup starts on standby MASP.
    BACKUP (FIXED) : MASP A - Backup on standby MASP to fixed disk complete.
    

Figure 5-5 Performing the Initial SEAS Configuration


Sheet 1 of 2


Sheet 2 of 2

5.4 Configuring SEAS Terminals

This procedure is used to configure SEAS terminals for the SEAS over IP feature. The SEAS terminal can be configured only on E5-IPSMs.

Note:

As of Release 46.5, the E5-IPSM card and its functionality is replaced by the E5-ENET-B (p/n 870-2971-01) or SLIC (p/n 7094646) card. Any references to E5-IPSM and the 870-2877-01 part number should be replaced by the 46.5 and greater card and part number.

The EAGLE can contain a maximum of two SEAS terminals, but only one SEAS terminal can be configured on an E5-IPSM. When an E5-IPSM is configured in the database, eight telnet terminals are created. To configure the SEAS terminal, one of these telnet terminals is changed to a SEAS terminal using the chg-trm command with these parameters.

:trm – The number of the telnet terminal being changed, 17 through 40

:type=seas – The SEAS terminal type.

The chg-trm command contains other parameters, but these parameters cannot be used in this procedure. For more information on these parameters, see the Changing Terminal Characteristics procedure in this manual, or the chg-trm command description in Commands User's Guide.

SEAS terminals can be configured only if the SEAS over IP feature is enabled. The status of the SEAS over IP feature is shown in the rtrv-ctrl-feat output. If the SEAS over IP feature is not enabled, perform the Activating the SEAS over IP Feature procedure in this chapter to enable the SEAS over IP feature.

When the SEAS terminal is configured, the value for the SEAS output group parameter is set to YES. The values for the other output group parameters and the tmout, dural, and mxinv parameters are not changed.

The other output group parameters can be changed with the specific output group parameter or the all parameter. If the all=no parameter is specified for a SEAS terminal (type=seas), all the output group values are changed to NO except for the SEAS output group. The SEAS output group value remains set to YES and this message is displayed.

SEAS Output Group is SET for SEAS terminal <terminal number>
  1. Verify whether or not the SEAS over IP feature is enabled by entering this command.

    rtrv-ctrl-feat:partnum=893018801

    This is an example of the possible output.

    
    rlghncxa03w 07-05-28 21:15:37 GMT EAGLE5 37.0.0
    The following features have been permanently enabled:
    
    Feature Name              Partnum    Status  Quantity
    SEAS over IP              893018801  off      ----
    
    The following features have been temporarily enabled:
    
    Feature Name              Partnum    Status  Quantity     Trial Period Left
    Zero entries found.
    
    The following features have expired temporary keys:
    
    Feature Name              Partnum
    Zero entries found.
    

    If the SEAS over IP feature is enabled, go to step 2.

    If the SEAS over IP feature is not enabled, perform the Activating the SEAS over IP Feature procedure in this chapter to enable SEAS over IP feature. After the SEAS over IP feature has been enabled, perform the Performing the Initial SEAS Configuration procedure in this chapter. After the Performing the Initial SEAS Configuration procedure has been performed, go to step 2.

  2. Display the terminals in the EAGLE using the rtrv-trm command.

    This is an example of the possible output.

    
    rlghncxa03w 06-10-01 16:02:08 GMT EAGLE5 39.0.0
    TRM  TYPE     COMM        FC    TMOUT MXINV DURAL
    1    VT320    9600-7-E-1  SW    30    5     99:59:59
    2    KSR      9600-7-E-1  HW    30    5     INDEF
    3    PRINTER  4800-7-E-1  HW    30    0     00:00:00
    4    VT320    2400-7-E-1  BOTH  30    5     00:30:00
    5    VT320    9600-7-O-1  NONE  30    5     00:00:30
    6    VT320    9600-7-E-2  SW    30    9     INDEF
    7    PRINTER  9600-7-N-2  HW    30    5     00:30:00
    8    KSR     19200-7-E-2  BOTH  30    5     00:30:00
    9    VT320    9600-7-E-1  SW    30    7     00:30:00
    10   VT320    9600-7-E-1  HW    30    5     00:30:00
    11   VT320    4800-7-E-1  HW    30    5     00:30:00
    12   PRINTER  9600-7-E-1  HW    30    4     00:30:00
    13   VT320    9600-7-O-1  NONE  30    5     00:30:00
    14   VT320    9600-7-E-2  SW    30    8     00:30:00
    15   VT320    9600-7-N-2  HW    30    5     00:30:00
    16   VT320    9600-7-E-2  BOTH  30    3     00:30:00
    
    TRM  TYPE      LOC              TMOUT MXINV DURAL      SECURE
    17   TELNET    1201             60    5     00:30:00   yes
    18   TELNET    1201             60    5     00:30:00   yes
    19   TELNET    1201             60    5     00:30:00   yes
    20   TELNET    1201             60    5     00:30:00   yes
    21   TELNET    1201             60    5     00:30:00   yes
    22   TELNET    1201             60    5     00:30:00   yes
    23   TELNET    1201             60    5     00:30:00   yes
    24   TELNET    1201             60    5     00:30:00   yes
    25   TELNET    1203             60    5     00:30:00   yes
    26   TELNET    1203             60    5     00:30:00   yes
    27   TELNET    1203             60    5     00:30:00   yes
    28   TELNET    1203             60    5     00:30:00   yes
    29   TELNET    1203             60    5     00:30:00   yes
    30   TELNET    1203             60    5     00:30:00   yes
    31   TELNET    1203             60    5     00:30:00   yes
    32   TELNET    1203             60    5     00:30:00   yes
    33   TELNET    1205             60    5     00:30:00   yes
    34   TELNET    1205             60    5     00:30:00   yes
    35   TELNET    1205             60    5     00:30:00   yes
    36   TELNET    1205             60    5     00:30:00   yes
    37   TELNET    1205             60    5     00:30:00   yes
    38   TELNET    1205             60    5     00:30:00   yes
    39   TELNET    1205             60    5     00:30:00   yes
    40   TELNET    1205             60    5     00:30:00   yes
    
    TRM  LOGINTMR LOGOUTTMR PNGTIMEINT PNGFAILCNT
         (sec)    (sec)     (msec)
    17   none     none      none       1
    18   none     none      none       1
    19   none     none      none       1
    20   none     none      none       1
    21   none     none      none       1
    22   none     none      none       1
    23   none     none      none       1
    24   none     none      none       1
    25   none     none      none       1
    26   none     none      none       1
    27   none     none      none       1
    28   none     none      none       1
    28   none     none      none       1
    30   none     none      none       1
    31   none     none      none       1
    32   none     none      none       1
    33   none     none      none       1
    34   none     none      none       1
    35   none     none      none       1
    36   none     none      none       1
    37   none     none      none       1
    38   none     none      none       1
    39   none     none      none       1
    40   none     none      none       1
    
    TRM  TRAF LINK SA  SYS PU  DB  UIMRD
    1    NO   YES  NO  YES NO  YES YES
    2    NO   NO   NO  NO  NO  NO  NO
    3    YES  YES  YES NO  YES YES YES
    4    YES  NO   NO  NO  NO  NO  NO
    5    NO   YES  NO  NO  NO  NO  YES
    6    NO   NO   YES NO  NO  NO  NO
    7    YES  YES  YES YES YES YES YES
    8    NO   NO   NO  NO  YES NO  YES
    9    NO   YES  NO  NO  NO  YES NO
    10   NO   NO   NO  NO  NO  NO  YES
    11   YES  YES  YES YES YES YES YES
    12   YES  YES  YES YES YES YES YES
    13   NO   YES  NO  NO  NO  NO  YES
    14   NO   NO   YES NO  NO  NO  NO
    15   YES  YES  YES NO  YES YES YES
    16   NO   NO   NO  NO  YES NO  YES
    17   NO   NO   NO  NO  NO  NO  NO
    18   NO   NO   NO  NO  NO  NO  NO
    19   NO   NO   NO  NO  NO  NO  NO
    20   NO   NO   NO  NO  NO  NO  NO
    21   NO   NO   NO  NO  NO  NO  NO
    22   NO   NO   NO  NO  NO  NO  NO
    23   NO   NO   NO  NO  NO  NO  NO
    24   NO   NO   NO  NO  NO  NO  NO
    25   NO   NO   NO  NO  YES NO  YES
    26   NO   NO   NO  NO  NO  NO  NO
    27   NO   NO   NO  NO  NO  NO  NO
    28   NO   NO   NO  NO  NO  NO  NO
    29   NO   NO   NO  NO  NO  NO  NO
    30   NO   NO   NO  NO  NO  NO  NO
    31   NO   NO   NO  NO  NO  NO  NO
    32   NO   NO   NO  NO  NO  NO  NO
    33   NO   NO   NO  NO  NO  NO  NO
    34   NO   NO   NO  NO  YES NO  YES
    35   NO   NO   NO  NO  NO  NO  NO
    36   NO   NO   NO  NO  NO  NO  NO
    37   NO   NO   NO  NO  NO  NO  NO
    38   NO   NO   NO  NO  NO  NO  NO
    39   NO   NO   NO  NO  NO  NO  NO
    40   NO   NO   NO  NO  NO  NO  NO
     
         APP  APP
    TRM  SERV SS  CARD CLK DBG GTT GWS MEAS MON MPS SEAS 
    1    YES  YES YES  YES YES YES YES YES  YES YES NO   
    2    YES  YES YES  YES YES YES YES YES  YES YES NO   
    3    YES  YES YES  YES YES YES YES YES  YES YES NO   
    4    YES  YES YES  YES YES NO  YES YES  YES YES NO   
    5    YES  YES YES  YES YES YES YES YES  YES YES NO   
    6    YES  YES YES  YES YES YES YES YES  YES YES NO   
    7    NO   YES YES  YES YES YES YES YES  YES YES NO   
    8    YES  YES YES  YES YES YES YES YES  YES YES YES  
    9    YES  YES YES  YES YES YES YES YES  YES YES YES  
    10   NO   NO  NO   NO  NO  NO  NO  NO   NO  NO  NO   
    11   NO   NO  NO   NO  NO  NO  NO  NO   NO  NO  NO   
    12   NO   NO  NO   NO  NO  NO  NO  NO   NO  NO  NO   
    13   NO   NO  NO   NO  NO  NO  NO  NO   NO  NO  NO   
    14   NO   NO  NO   NO  NO  NO  NO  NO   NO  NO  NO   
    15   NO   NO  NO   NO  NO  NO  NO  NO   NO  NO  NO   
    16   NO   NO  NO   NO  NO  NO  NO  NO   NO  NO  NO   
    17   NO   NO  NO   NO  NO  NO  NO  NO   NO  NO  NO   
    18   NO   NO  NO   NO  NO  NO  NO  NO   NO  NO  NO   
    19   NO   NO  NO   NO  NO  NO  NO  NO   NO  NO  NO   
    20   NO   NO  NO   NO  NO  NO  NO  NO   NO  NO  NO   
    21   NO   NO  NO   NO  NO  NO  NO  NO   NO  NO  NO   
    22   NO   NO  NO   NO  NO  NO  NO  NO   NO  NO  NO   
    23   NO   NO  NO   NO  NO  NO  NO  NO   NO  NO  NO   
    24   NO   NO  NO   NO  NO  NO  NO  NO   NO  NO  NO   
    25   NO   NO  NO   NO  NO  NO  NO  NO   NO  NO  NO   
    26   NO   NO  NO   NO  NO  NO  NO  NO   NO  NO  NO   
    27   NO   NO  NO   NO  NO  NO  NO  NO   NO  NO  NO   
    28   NO   NO  NO   NO  NO  NO  NO  NO   NO  NO  NO   
    29   NO   NO  NO   NO  NO  NO  NO  NO   NO  NO  NO   
    30   NO   NO  NO   NO  NO  NO  NO  NO   NO  NO  NO   
    31   NO   NO  NO   NO  NO  NO  NO  NO   NO  NO  NO   
    32   NO   NO  NO   NO  NO  NO  NO  NO   NO  NO  NO   
    33   NO   NO  NO   NO  NO  NO  NO  NO   NO  NO  NO   
    34   NO   NO  NO   NO  NO  NO  NO  NO   NO  NO  NO   
    35   NO   NO  NO   NO  NO  NO  NO  NO   NO  NO  NO   
    36   NO   NO  NO   NO  NO  NO  NO  NO   NO  NO  NO   
    37   NO   NO  NO   NO  NO  NO  NO  NO   NO  NO  NO   
    38   NO   NO  NO   NO  NO  NO  NO  NO   NO  NO  NO   
    39   NO   NO  NO   NO  NO  NO  NO  NO   NO  NO  NO   
    40   NO   NO  NO   NO  NO  NO  NO  NO   NO  NO  NO   
    

    If no telnet terminals are shown in the rtrv-trm output, or only one telnet terminal is shown in the rtrv-trm output, perform the Adding an E5-IPSM procedure and add E5-IPSM cards to the database. A minimum of two E5-IPSMs are required. After the E5-IPSMs have been added to the database, skip step 3 and go to step 4.

    If two or three telnet terminals are shown in the rtrv-trm output, go to step 3.

  3. Verify that the cards containing the telnet terminals shown in the rtrv-trm output in step 2 are E5-IPSMs. Enter the rept-stat-card command specifying the card location shown in the rtrv-trm output in step 2. For this example, enter these commands.

    rept-stat-card:loc=1201

    This is an example of the possible output.

    rlghncxa03w 06-10-01 09:12:36 GMT EAGLE5 36.0.0
    CARD   VERSION      TYPE      GPL        PST            SST        AST
    1201   126-003-000  IPSM      IPSHC      IS-NR          Active     -----
      ALARM STATUS       =  No Alarms.
      IMTPCI  GPL version = 126-002-000
      BLVXW6  GPL version = 126-002-000
      BLDIAG6 GPL version = 126-002-000
      BLBEPM  GPL version = 126-002-000
      BLCPLD  GPL version = 126-002-000
      IMT BUS A           = Conn
      IMT BUS B           = Conn
      CURRENT TEMPERATURE   =  32C ( 90F)
      PEAK TEMPERATURE:     =  39C (103F)     [06-05-02 13:40]
      Command Completed.

    rept-stat-card:loc=1203

    This is an example of the possible output.

    rlghncxa03w 06-10-01 09:12:36 GMT EAGLE5 36.0.0
    CARD   VERSION      TYPE      GPL        PST            SST        AST
    1203   126-003-000  IPSM      IPS        IS-NR          Active     -----
      ALARM STATUS       =  No Alarms.
      IMTPCI  GPL version = 126-002-000
      BLVXW6  GPL version = 126-002-000
      BLDIAG6 GPL version = 126-002-000
      BLBEPM  GPL version = 126-002-000
      BLCPLD  GPL version = 126-002-000
      IMT BUS A           = Conn
      IMT BUS B           = Conn
      CURRENT TEMPERATURE   =  32C ( 90F)
      PEAK TEMPERATURE:     =  39C (103F)     [06-05-02 13:40]
      Command Completed.

    rept-stat-card:loc=1205

    This is an example of the possible output.

    rlghncxa03w 06-10-01 09:12:36 GMT EAGLE5 36.0.0
    CARD   VERSION      TYPE      GPL        PST            SST        AST
    1205   126-003-000  IPSM      IPS        IS-NR          Active     -----
      ALARM STATUS       =  No Alarms.
      IMTPCI  GPL version = 126-002-000
      BLVXW6  GPL version = 126-002-000
      BLDIAG6 GPL version = 126-002-000
      BLBEPM  GPL version = 126-002-000
      BLCPLD  GPL version = 126-002-000
      IMT BUS A           = Conn
      IMT BUS B           = Conn
      CURRENT TEMPERATURE   =  32C ( 90F)
      PEAK TEMPERATURE:     =  39C (103F)     [06-05-02 13:40]
      Command Completed.

    If the GPL value shown in the rept-stat-card output is IPSHC, the card is an E5-IPSM. If the GPL value shown in the rept-stat-card output is IPS, the card is an IPSM.

    If there are a minimum of two E5-IPSMs shown in the rept-stat-card outputs, go to step 4.

    If there is only one E5-IPSM or no E5-IPSMs shown in the rept-stat-card outputs, E5-IPSMs must be added to the database so that there are a minimum of two E5-IPSMs in the database. Remove enough IPSMs from the database so that when the E5-IPSMs are added, the EAGLE will contain a minimum of two E5-IPSMs. Perform the Removing an E5-IPSM procedure to remove the IPSMs. After the IPSMs have been removed from the database, remove the IPSM from the shelf.

    When the IPSMs have been removed, perform the "Adding an IPSM" procedure in Chapter 4 of this manual to add the E5-IPSMs.

  4. Select two telnet terminals. Each telnet terminal must be assigned to different E5-IPSMs. Display the status of this terminal by entering the rept-stat-trm command with the number of the selected telnet terminal. For this example, enter these commands.

    rept-stat-trm:trm=18

    This is an example of the possible output.

    
    rlghncxa03w 06-10-01 15:08:45 GMT EAGLE5 36.0.0
    TRM   PST           SST           AST
    18    IS-NR         Active        -----
    
    Command Completed.
    

    rept-stat-trm:trm=27

    This is an example of the possible output

    
    rlghncxa03w 06-10-01 15:08:45 GMT EAGLE5 36.0.0
    TRM   PST           SST           AST
    27    IS-NR         Active        -----
    
    Command Completed.
    
    • If the state of both telnet terminals displayed in step 4 is OOS-MT-DSBLD, skip step 5 and go to step 6.
    • If the state of both telnet terminals displayed in step 4 is not OOS-MT-DSBLD, go to step 5.
  5. To change the terminal type to a SEAS terminal type, the telnet terminal must be placed out of service using the rmv-trm command. Enter the rmv-trm command with the number of the terminal whose state is not OOS-MT_DSBLD. Perform this step only for the terminals shown in step 4 whose state is not OOS-MT_DSBLD.

    rmv-trm:trm=18

    rmv-trm:trm=27

    When these commands have successfully completed, this message should appear.

    
    rlghncxa03w 06-10-01 15:08:45 GMT EAGLE5 36.0.0
    Inhibit message sent to terminal
    
    rlghncxa03w 06-10-01 15:08:45 GMT EAGLE5 36.0.0
    Command Completed.
    
  6. Verify that the terminal that was inhibited in step 5 is in the OOS-MT-DSBLD state by entering the rept-stat-trm command with the number of the terminal specified in step 5.

    For this command, enter these commands.

    rept-stat-trm:trm=18

    This is an example of the possible output.

    
    rlghncxa03w 06-10-01 15:08:45 GMT EAGLE5 36.0.0
    TRM   PST            SST           AST
    18    OOS-MT-DSBLD   MANUAL        -----
    Command Completed.
    

    rept-stat-trm:trm=27

    This is an example of the possible output.

    
    rlghncxa03w 06-10-01 15:08:45 GMT EAGLE5 36.0.0
    TRM   PST            SST           AST
    27    OOS-MT-DSBLD   MANUAL        -----
    Command Completed.
    
  7. Change the terminal type of the terminals shown in step 6 to the SEAS terminal type using the chg-trm command with the number of the terminals shown in step 6.

    For this example enter these commands.

    chg-trm:trm=18:type=seas

    chg-trm:trm=27:type=seas

    When these commands have successfully completed, this message should appear.

    
    rlghncxa03w 06-10-01 15:08:45 GMT EAGLE5 36.0.0
    CHG-TRM: MASP A - COMPLTD
    
  8. Verify the changes made in step 7 by using the rtrv-trm command with the terminal number specified in step 7.

    For this example, enter these commands.

    rtrv-trm:trm=18

    This is an example of the possible output.

    
    rlghncxa03w 06-10-01 16:02:08 GMT EAGLE5 39.0.0
    TRM  TYPE      LOC              TMOUT MXINV DURAL      SECURE
    18   SEAS      1201             30    5     00:01:00   yes
                                   
    TRM  LOGINTMR LOGOUTTMR PNGTIMEINT PNGFAILCNT
         (sec)    (sec)     (msec)
    18   none     none      none       1
    
    TRM  TRAF LINK SA  SYS PU  DB  UIMRD
    18   NO   NO   NO  NO  NO  NO  NO
    
         APP  APP
    TRM  SERV SS  CARD CLK DBG GTT GWS MEAS MON MPS SEAS 
    18   NO   NO  NO   NO  NO  NO  NO  NO   NO  NO  YES  
    

    rtrv-trm:trm=27

    This is an example of the possible output.

    
    rlghncxa03w 06-10-01 16:02:08 GMT EAGLE5 39.0.0
    TRM  TYPE      LOC              TMOUT MXINV DURAL      SECURE
    27   SEAS      1203             30    5     00:01:00   yes
                                   
    TRM  LOGINTMR LOGOUTTMR PNGTIMEINT PNGFAILCNT
         (sec)    (sec)     (msec)
    27   none     none      none       1
    
    TRM  TRAF LINK SA  SYS PU  DB  UIMRD
    27   NO   NO   NO  NO  NO  NO  NO
    
         APP  APP
    TRM  SERV SS  CARD CLK DBG GTT GWS MEAS MON MPS SEAS 
    27   NO   NO  NO   NO  NO  NO  NO  NO   NO  NO  YES  
  9. Display the SEAS configuration using the rtrv-seas-config command.

    The following is an example of the possible output if the Eagle OA&M IP Security Enhancement feature is not enabled and turned on.

    rlghncxa03w 07-01-23 18:46:01 EST  EAGLE 37.5.0
    SEASCLLI     CONNECTION  IPADDRESS        PORT   TERMINAL
    --------     ----------  ---------        ----   --------
    TEAGLESTP001 IPMR1       192.168.25.10    2500   --
                 IPMR2       192.168.25.20    2600   -- 

    The following is an example of the possible output if the Eagle OA&M IP Security Enhancement feature is enabled and turned on.

    rlghncxa03w 07-01-23 18:46:01 EST  EAGLE 37.5.0
    SEASCLLI            AUTHMODE
    ----------------------------
    TEAGLESTP001        Password
     
    TERMINAL      CONNECTION    IPADDR          PORT   LOGIN      HNAME
    ---------------------------------------------------------------------
    --            IPMR1         198.168.25.10   2500    root      abaco-a
    --            IPMR2         198.168.25.20   2600    root      abaco-b
     
  10. Verify the connection to the CCS MR by entering the pass:cmd=”ping” command specifying the card location of the SEAS terminal (shown in step 8) and the IP address assigned to the connection (shown in step 9). Perform this step for both connection to the CCS MR. For this example, enter these commands

    pass:loc=1201:cmd=”ping 198.168.25.10”

    The following is an example of the possible output.

    
    rlghncxa03w 07-05-28 21:15:37 GMT EAGLE5 37.0.0
    PASS: Command sent to card
    
    rlghncxa03w 07-05-28 21:15:37 GMT EAGLE5 37.0.0
    PING command in progress
    
    rlghncxa03w 07-05-28 21:15:37 GMT EAGLE5 37.0.0
    PING 198.168.25.10: 56 data bytes
    64 bytes from tekral.nc.tekelec.com (198.168.25.10): icmp_seq=0. time=5. ms
    64 bytes from tekral.nc.tekelec.com (198.168.25.10): icmp_seq=1. time=9. ms
    64 bytes from tekral.nc.tekelec.com (198.168.25.10): icmp_seq=2. time=14. ms
    ----tekral PING Statistics----
    3 packets transmitted, 3 packets received, 0% packet loss
    round-trip (ms)  min/avg/max = 5/9/14
    
    PING command complete


    pass:loc=1203:cmd=”ping 198.168.25.20”

    The following is an example of the possible output.

    
    rlghncxa03w 07-05-28 21:15:37 GMT EAGLE5 37.0.0
    PASS: Command sent to card
    
    rlghncxa03w 07-05-28 21:15:37 GMT EAGLE5 37.0.0
    PING command in progress
    
    rlghncxa03w 07-05-28 21:15:37 GMT EAGLE5 37.0.0
    PING 198.168.25.20: 56 data bytes
    64 bytes from tekral.nc.tekelec.com (198.168.25.20): icmp_seq=0. time=5. ms
    64 bytes from tekral.nc.tekelec.com (198.168.25.20): icmp_seq=1. time=9. ms
    64 bytes from tekral.nc.tekelec.com (198.168.25.20): icmp_seq=2. time=14. ms
    ----tekral PING Statistics----
    3 packets transmitted, 3 packets received, 0% packet loss
    round-trip (ms)  min/avg/max = 5/9/14
    
    PING command complete
    
    
  11. Put the SEAS terminals into service using the alw-trm command with the number of the SEAS terminals shown in step 8.

    alw-trm:trm=18

    When this command has successfully completed, this message should appear.

    
    rlghncxa03w 04-01-07 11:11:28 EST  EAGLE 31.3.0     
    Allow message sent to terminal      
    
    rlghncxa03w 04-01-07 11:11:28 EST  EAGLE 31.3.0     
    1062.0046      TERMINAL     18         Terminal Enabled 
    

    alw-trm:trm=27

    When this command has successfully completed, this message should appear.

    
    rlghncxa03w 04-01-07 11:11:28 EST  EAGLE 31.3.0     
    Allow message sent to terminal      
    
    rlghncxa03w 04-01-07 11:11:28 EST  EAGLE 31.3.0     
    1062.0046      TERMINAL     27         Terminal Enabled 
    
  12. Back up the new changes using the chg-db:action=backup:dest=fixed command.

    These messages should appear, the active Maintenance and Administration Subsystem Processor (MASP) appears first.

    
    BACKUP (FIXED) : MASP A - Backup starts on active MASP.
    BACKUP (FIXED) : MASP A - Backup on active MASP to fixed disk complete.
    BACKUP (FIXED) : MASP A - Backup starts on standby MASP.
    BACKUP (FIXED) : MASP A - Backup on standby MASP to fixed disk complete.
    

Figure 5-6 Configuring SEAS Terminals


Sheet 1 of 3


Sheet 2 of 3


Sheet 3 of 3

5.5 Changing the Existing SEAS Configuration

This procedure is used to change the existing SEAS configuration using the chg-seas-config command.

The chg-seas-config command uses these parameters.

:conn – The name of the SEAS connection, either IPMR1 or IPMR2

:seasclli – The CLLI part of node name of the EAGLE consisting of one alphabetic character and up to 15 alphanumeric characters. The seasclli value is different from the EAGLE clli value that is entered with the chg-sid command. The seasclli value must also be configured on the Telcordia Message Router (CCS MR). Refer to Telcordia Configuration Specification "Telcordia Technologies System Documentation", BD-SNAM-ADMIN-4 Issue 14, November 2006.

:ipaddr – The IP address of the CCS MR.

:port – The port number of the CCS MR that the EAGLE connects to, from 1024 to 5000.

:hname – The name of the remote host of the CCS MR, 1 to 15 alphanumeric characters.

:login – The login name of the CCS MR, 1 to 15 alphanumeric characters.

:authmode – The method of authentication used for the connection. Currently, only password authentication is used for SEAS connections, so this parameter has only one value, password. This parameter is optional and does not need to be specified.

The hname, login, and authmode parameters are used only when the Eagle OA&M IP Security feature is enabled and turned on. The values for these parameters are displayed in the rtrv-seas-config output only when the Eagle OA&M IP Security feature is enabled and turned on. The status of the Eagle OA&M IP Security feature is shown in the rtrv-ctrl-feat output.

If the seasclli value is being changed, all the SEAS terminals must be taken out of service. If the connection information for one connection is being changed, only the terminal associated with this connection must be taken out of service.

Caution:

The IP address and port value combination for each SEAS connection must be unique or the chg-seas-config command will be rejected.

The IP address for the SEAS over IP configuration cannot be shown as the IPADDR value in the rtrv-ip-lnk or rtrv-ftp-serv outputs, or the BPIPADDR value in the rtrv-ip-card output.

  1. Display the current SEAS configuration using the rtrv-seas-config command.

    The following is an example of the possible output if the Eagle OA&M IP Security Enhancement feature is not enabled and turned on.

    rlghncxa03w 07-01-23 18:46:01 EST  EAGLE 37.5.0
    SEASCLLI     CONNECTION  IPADDRESS        PORT   TERMINAL
    --------     ----------  ---------        ----   --------
    TEAGLESTP001 IPMR1       192.168.25.10    2500   18
                 IPMR2       192.168.25.20    2600   27 

    The following is an example of the possible output if the Eagle OA&M IP Security Enhancement feature is enabled and turned on.

    tekelecstp 07-01-23 18:46:01 EST EAGLE 37.5.0
    SEASCLLI            AUTHMODE
    ----------------------------
    TEAGLESTP001        Password
    
    TERMINAL      CONNECTION    IPADDR          PORT   LOGIN      HNAME
    
    -----------------------------------------------------------------------
    18            IPMR1         198.168.25.10   2500    root      abaco-a
    27            IPMR2         198.168.25.20   2600    root      abaco-b
     
  2. Display the status of the SEAS terminal associated with the connection that is being changed. Enter the rept-stat-trm command with the terminal number shown in 1 .

    If the seasclli value is being changed, both SEAS terminals must be taken out of service. Perform this step for both SEAS terminals.

    For this example, enter these commands.

    rept-stat-trm:trm=18

    This is an example of the possible output.

    rlghncxa03w 06-10-01 15:08:45 GMT EAGLE5 36.0.0
    TRM   PST           SST           AST
    18    IS-NR         Active        -----
    
    Command Completed.

    rept-stat-trm:trm=27

    This is an example of the possible output.

    rlghncxa03w 06-10-01 15:08:45 GMT EAGLE5 36.0.0
    TRM   PST           SST           AST
    27    IS-NR         Active        -----
    
    Command Completed.
  3. Place the SEAS terminals displayed in 2 out of service using the rmv-trm command. Enter the rmv-trm command with the number of the terminal whose state is not OOS-MT_DSBLD. Perform this step only for the terminals shown in 2 whose state is not OOS-MT_DSBLD.

    Note:

    If the SEAS terminal specified in this step is the last SEAS terminal that is in service, the force=yes parameter must be specified with the rmv-trm command.

    rmv-trm:trm=18

    rmv-trm:trm=27:force=yes

    When these commands have successfully completed, this message should appear.

    
    rlghncxa03w 06-10-01 15:08:45 GMT EAGLE5 36.0.0
    Inhibit message sent to terminal
    
    rlghncxa03w 06-10-01 15:08:45 GMT EAGLE5 36.0.0
    Command Completed.
    

    Note:

    If the SEASCLLI value is not being changed, skip step 4 and go to step 5.
  4. Change the SEASCLLI value by entering the chg-seas-config command with the seasclli parameter. For this example, enter this command.

    chg-seas-config:seasclli=TEAGLESTP002

    Note:

    The SEASCLLI value is different from the CLLI value specified with the chg-sid command.

    Note:

    If only the SEASCLLI value is being changed in this procedure, skip step 5 and go to step 6.
  5. Change the connection information for a connection to the CCS MR. Enter the chg-seas-config command with these parameters:
    • :conn=<the name of the connection being changed, ipmr1 or ipmr2>
    • :ipaddr=the IP address of the CCS MR
    • :port = the port number of the CCS MR

    Caution:

    The IP address and port value combination for each SEAS connection must be unique or the chg-seas-config command will be rejected.

    If the Eagle OA&M IP Security Enhancement feature is enabled and turned on, these parameters can also be specified.

    • :hname = The name of the remote host of the CCS MR.
    • :login = The login name of the CCS MR.

    If the LOGIN column is shown in the rtrv-seas-config output in 1 , the Eagle OA&M IP Security Enhancement feature is enabled and turned on.

    Note:

    If you wish to specify the login and hname parameters for the connection being changed, and the Eagle OA&M IP Security Enhancement feature is not enabled and turned on, perform the Activating the EAGLE OA&M IP Security Enhancement Controlled Feature procedure to enable and turn on the Eagle OA&M IP Security Enhancement feature. Enable and turn on the Eagle OA&M IP Security Enhancement feature before performing the chg-seas-config command.

    If the Eagle OA&M IP Security Enhancement feature is not enabled and turned on, for this example, enter this command.

    chg-seas-config:conn=ipmr1:ipaddr=198.168.25.30:port=3000

    If the Eagle OA&M IP Security Enhancement feature is enabled and turned on, for this example, enter this command.

    chg-seas-config:conn=ipmr1:ipaddr=198.168.25.30:port=3000:hname=remote2:login=root

    When this command has successfully completed, this message should appear.

    
    rlghncxa03w 06-10-01 15:08:45 GMT EAGLE5 36.0.0
    CHG-SEAS-CONFIG: MASP A - COMPLTD 
    

    If the login parameter was specified with the chg-seas-config command, the Enter Password: prompt appears. When the Enter Password: prompt appears, enter the password for the login name. The length of the password is from 1 to 15 characters. The password is not echoed on the screen.

  6. Verify the SEAS configuration using the rtrv-seas-config command.

    The following is an example of the possible output if the Eagle OA&M IP Security Enhancement feature is not enabled and turned on.

    rlghncxa03w 07-01-23 18:46:01 EST  EAGLE 37.5.0
    SEASCLLI     CONNECTION  IPADDRESS        PORT   TERMINAL
    --------     ----------  ---------        ----   --------
    TEAGLESTP002 IPMR1       192.168.25.30    3000   18
                 IPMR2       192.168.25.20    2600   27 

    The following is an example of the possible output if the Eagle OA&M IP Security Enhancement feature is enabled and turned on.

    tekelecstp 07-01-23 18:46:01 EST EAGLE 37.5.0
    SEASCLLI            AUTHMODE
    ----------------------------
    TEAGLESTP002        Password
    
    TERMINAL      CONNECTION    IPADDR          PORT   LOGIN      HNAME
    
    -----------------------------------------------------------------------
    18            IPMR1         198.168.25.30   3000    root      abaco-a
    27            IPMR2         198.168.25.20   2600    root      abaco-b


    Note:

    If only the SEASCLLI value was changed, continue the procedure with 9.
  7. Display the SEAS terminal associated with the connection that was changed in 6 using the rtrv-trm with the number of the SEAS terminal associated with the connection that was changed.

    For this example, enter this command.

    rtrv-trm:trm=18

    This is an example of the possible output.

    
    rlghncxa03w 06-10-01 16:02:08 GMT EAGLE5 36.0.0
    TRM  TYPE      LOC              TMOUT MXINV DURAL      SECURE
    18   SEAS      1201             30    5     00:01:00   yes
                                   
    TRM  TRAF LINK SA  SYS PU  DB  UIMRD
    18   NO   NO   NO  NO  NO  NO  NO
    
         APP  APP
    TRM  SERV SS  CARD CLK DBG GTT GWS MEAS MON MPS SEAS 
    18   NO   NO  NO   NO  NO  NO  NO  NO   NO  NO  YES  
    
  8. Verify the connection to the CCS MR by entering the pass:cmd=”ping” command specifying the card location of the SEAS terminal (shown in 7 ) and the IP address assigned to the connection (shown in 6 ).

    pass:loc=1201:cmd=”ping 198.168.25.30”

    The following is an example of the possible output.

    
    rlghncxa03w 07-05-28 21:15:37 GMT EAGLE5 37.0.0
    PASS: Command sent to card
    
    rlghncxa03w 07-05-28 21:15:37 GMT EAGLE5 37.0.0
    PING command in progress
    
    rlghncxa03w 07-05-28 21:15:37 GMT EAGLE5 37.0.0
    PING 198.168.25.30: 56 data bytes
    64 bytes from tekral.nc.tekelec.com (198.168.25.30): icmp_seq=0. time=5. ms
    64 bytes from tekral.nc.tekelec.com (198.168.25.30): icmp_seq=1. time=9. ms
    64 bytes from tekral.nc.tekelec.com (198.168.25.30): icmp_seq=2. time=14. ms
    ----tekral PING Statistics----
    3 packets transmitted, 3 packets received, 0% packet loss
    round-trip (ms)  min/avg/max = 5/9/14
    
    PING command complete


    If you wish to change the other connection, repeat this procedure from 2 .

    If all the changes to the SEAS configuration have been made, continue the procedure with 9.

  9. Put the SEAS terminals into service using the alw-trm command with the number of the SEAS terminals shown in 6 . This step should be performed for all the SEAS terminals that were taken out of service in 3 .

    alw-trm:trm=18

    When this command has successfully completed, this message should appear.

    
    rlghncxa03w 04-01-07 11:11:28 EST  EAGLE 31.3.0     
    Allow message sent to terminal      
    
    rlghncxa03w 04-01-07 11:11:28 EST  EAGLE 31.3.0     
    1062.0046      TERMINAL     18         Terminal Enabled 
    

    alw-trm:trm=27

    When this command has successfully completed, this message should appear.

    
    rlghncxa03w 04-01-07 11:11:28 EST  EAGLE 31.3.0     
    Allow message sent to terminal      
    
    rlghncxa03w 04-01-07 11:11:28 EST  EAGLE 31.3.0     
    1062.0046      TERMINAL     27         Terminal Enabled 
    
  10. Back up the new changes using the chg-db:action=backup:dest=fixed command.

    These messages should appear, the active Maintenance and Administration Subsystem Processor (MASP) appears first.

    
    BACKUP (FIXED) : MASP A - Backup starts on active MASP.
    BACKUP (FIXED) : MASP A - Backup on active MASP to fixed disk complete.
    BACKUP (FIXED) : MASP A - Backup starts on standby MASP.
    BACKUP (FIXED) : MASP A - Backup on standby MASP to fixed disk complete.
    

Figure 5-7 Changing the Existing SEAS Configuration


Sheet 1 of 3


Sheet 2 of 3


Sheet 3 of 3

5.6 Turning Off the SEAS Over IP Feature

This procedure is used to turn off the SEAS over IP feature using the chg-ctrl-feat command.

The chg-ctrl-feat command uses the following parameters:

:partnum - The part number of the SEAS over IP feature, 893018801.

:status=off – used to turn off the SEAS over IP feature.

The status of the SEAS over IP feature must be on and is shown with the rtrv-ctrl-feat command.

Caution:

If the SEAS over IP feature is turned off, all SEAS terminal traffic stops.
  1. Display the status of the SEAS over IP feature by entering the rtrv-ctrl-feat:partnum=893018801 command. The following is an example of the possible output.

    The following is an example of the possible output.

    
    rlghncxa03w 07-05-28 21:15:37 GMT EAGLE5 37.0.0
    The following features have been permanently enabled:
    
    Feature Name              Partnum    Status  Quantity
    SEAS over IP              893018801  on      ----
    
    The following features have been temporarily enabled:
    Feature Name              Partnum    Status  Quantity     Trial Period Left
    Zero entries found.
    
    The following features have expired temporary keys:
    
    Feature Name              Partnum
    Zero entries found.
    

    If the status of the SEAS over IP feature is off, or if the SEAS over IP feature is not enabled, this procedure cannot be performed.

  2. Turn off the SEAS over IP feature by entering the chg-ctrl-feat command with the status=off parameter. Enter this command.

    chg-ctrl-feat:partnum=893018801:status=off

    When this command has successfully completed, the following message should appear.

    
    rlghncxa03w 06-10-01 21:16:37 GMT EAGLE5 36.0.0
    CHG-CTRL-FEAT: MASP A - COMPLTD
    
  3. Verify that the SEAS over IP feature has been turned off by using the rtrv-ctrl-feat:partnum=893018801 command. The following is an example of the possible output.
    
    rlghncxa03w 07-05-28 21:15:37 GMT EAGLE5 37.0.0
    The following features have been permanently enabled:
    
    Feature Name              Partnum    Status  Quantity
    SEAS over IP              893018801  off     ----
    
    The following features have been temporarily enabled:
    
    Feature Name              Partnum    Status  Quantity     Trial Period Left
    Zero entries found.
    
    The following features have expired temporary keys:
    
    Feature Name              Partnum
    Zero entries found.
    

    Note:

    Once the SEAS over IP feature is turned off, the SEAS terminals can be changed to TELNET terminals. If you do not wish to change the SEAS terminals to TELNET terminals, skip steps 4 through 6, and go to step 7.
  4. Display the SEAS configuration by entering the rtrv-seas-config command.

    The following is an example of the possible output if the Eagle OA&M IP Security Enhancement feature is not enabled and turned on.

    rlghncxa03w 07-01-23 18:46:01 EST  EAGLE 37.5.0
    SEASCLLI     CONNECTION  IPADDRESS        PORT   TERMINAL
    --------     ----------  ---------        ----   --------
    TEAGLESTP001 IPMR1       192.168.25.10    2500   18
                 IPMR2       192.168.25.20    2600   27 

    The following is an example of the possible output if the Eagle OA&M IP Security Enhancement feature is enabled and turned on.

    tekelecstp 07-01-23 18:46:01 EST EAGLE 37.5.0
    SEASCLLI            AUTHMODE
    ----------------------------
    TEAGLESTP001        Password
    
    TERMINAL      CONNECTION    IPADDR          PORT   LOGIN      HNAME
    
    -----------------------------------------------------------------------
    18            IPMR1         198.168.25.10   2500    root      abaco-a
    27            IPMR2         198.168.25.20   2600    root      abaco-b
     
  5. Change the terminal type of the terminals shown in step 4 to the TELNET terminal type using the chg-trm command with the number of the terminals shown in step 4.

    For this example enter these commands.

    chg-trm:trm=18:type=telnet

    chg-trm:trm=27:type=telnet

    When these commands have successfully completed, this message should appear.

    
    rlghncxa03w 06-10-01 15:08:45 GMT EAGLE5 36.0.0
    CHG-TRM: MASP A - COMPLTD
    

    A warning message, “Invalidating the Terminal data in SEASCFG table”, is also displayed.

  6. Verify the changes made in step 5 by using the rtrv-trm command with the terminal number specified in step 5.

    For this example, enter these commands.

    rtrv-trm:trm=18

    This is an example of the possible output.

    
    rlghncxa03w 06-10-01 16:02:08 GMT EAGLE5 36.0.0
    TRM  TYPE      LOC              TMOUT MXINV DURAL      SECURE
    18   TELNET    1201             30    5     00:01:00   yes
                                   
    TRM  TRAF LINK SA  SYS PU  DB  UIMRD
    18   NO   NO   NO  NO  NO  NO  NO
    
         APP  APP
    TRM  SERV SS  CARD CLK DBG GTT GWS MEAS MON MPS SEAS 
    18   NO   NO  NO   NO  NO  NO  NO  NO   NO  NO  YES  
    

    rtrv-trm:trm=27

    This is an example of the possible output.

    
    rlghncxa03w 06-10-01 16:02:08 GMT EAGLE5 36.0.0
    TRM  TYPE      LOC              TMOUT MXINV DURAL      SECURE
    27   TELNET    1203             30    5     00:01:00   yes
                                   
    TRM  TRAF LINK SA  SYS PU  DB  UIMRD
    27   NO   NO   NO  NO  NO  NO  NO
    
         APP  APP
    TRM  SERV SS  CARD CLK DBG GTT GWS MEAS MON MPS SEAS 
    27   NO   NO  NO   NO  NO  NO  NO  NO   NO  NO  YES  
  7. Backup the new changes using the chg-db:action=backup:dest=fixedcommand.

    These messages should appear, the active Maintenance and Administration Subsystem Processor (MASP) appears first.

    
    BACKUP (FIXED) : MASP A - Backup starts on active MASP.
    BACKUP (FIXED) : MASP A - Backup on active MASP to fixed disk complete.
    BACKUP (FIXED) : MASP A - Backup starts on standby MASP.
    BACKUP (FIXED) : MASP A - Backup on standby MASP to fixed disk complete.
    

Figure 5-8 Turning Off the SEAS Over IP Feature