2 Installing Rated Event Loader
Learn how to install the Oracle Communications Billing and Revenue Management (BRM) Rated Event Loader (RE Loader) software, which includes the Rated Event Manager (RE Manager) software.
Topics in this chapter:
About Configuring RE Loader for Pipeline Manager
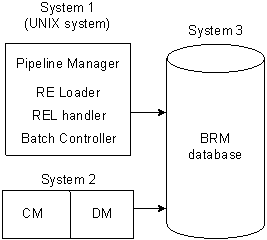
RE Loader uses Batch Controller, which needs access to the pipeline output files. Therefore, Pipeline Manager, Batch Controller, and RE Loader software should be installed on the same system that contains the pipeline output files.
If Pipeline Manager and RE Loader are on different systems, you need to map the Pipeline Manager output directories to a drive local to RE Loader.
Figure 2-1 shows the recommended configuration for installing RE Loader and its related features.
Note:
Event Extraction Tool can be installed on any of these systems or on its own system.
Figure 2-1 Recommended Configuration for RE Loader Installation
Note:
Though it is possible to install RE Loader on a BRM system or the database system, you get better performance if you install it on the Pipeline Manager system.
About the Pipeline Manager Database
RE Loader uses a partitioned database and inserts rated events into separate partitions.
Note:
You must partition your database when loading rated events.
About Using RE Loader in a Multischema System
If you use a multischema system, you must set up the following for each BRM database schema in your system:
-
Pipeline Manager instance. Each instance of Pipeline Manager must also have its own set of output files.
-
RE Loader instance. Each instance of RE Loader must also have its own set of RE Loader processing directories.
-
(Running RE Loader automatically only) An instance of Batch Controller and the RE Loader batch handler.
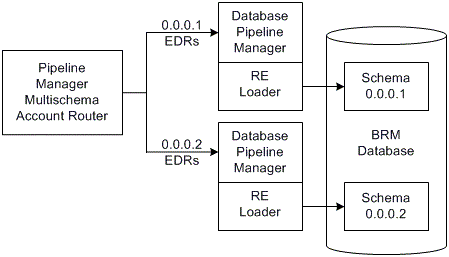
You must also install and configure a separate instance of Pipeline Manager. This Pipeline Manager multischema account router routes EDRs to the appropriate schema Pipeline Manager instance based on the account's database number.
Figure 2-2 shows the flow of data in a multischema system:
Setting Up RE Loader for Multischema Systems
To set up RE Loader for multischema systems:
-
Install and configure one instance of Pipeline Manager for each BRM database schema and one instance for the multischema account router.
For example, if your BRM system contains three schemas, install and configure four instances of Pipeline Manager.
-
In the multischema account router instance of Pipeline Manager, configure the following:
-
Set the FCT_AccountRouter module's Mode registry entry to ROUTER and configure the module's streams registry entry to create an output stream for each schema Pipeline Manager instance. See "FCT_AccountRouter" in BRM Pipeline Manager Reference.
-
Set the DAT_AccountBatch module's UseAsRouter registry entry to True. See "DAT_AccountBatch" in BRM Pipeline Manager Reference.
-
Installing RE Loader
To install RE Loader and RE Manager, perform the procedures in these sections:
Granting Execute Permission for dbms_lock
Before you install RE Loader, you must grant execute permission to pin_user for dbms_lock:
-
Log in to your database as the SYS user:
% sqlplus sys@databaseAlias Enter password: password -
Grant execute privileges to pin_user:
SQL> grant execute on dbms_lock to pin_user
Granting Write Permission to the Data Manager
When you install RE Loader on a system where BRM is not installed, you must grant the Data Manager (DM) write permission before installing RE Loader.
Perform the following on all machines containing a DM:
-
In a text editor, open your DM configuration file (BRM_home/sys/dm_oracle/pin.conf), where BRM_home is the directory in which you installed BRM components.
-
Write down the values of your dd_write_enable_fields, dd_write_enable_objects, dd_write_enable_portal_objects, and dd_mark_as_portal entries.
-
Set the values of the following entries to 1:
- dm dd_write_enable_fields 1
- dm dd_write_enable_objects 1
- dm dd_write_enable_portal_objects 1
- dm dd_mark_as_portal 1
Note:
If any entry is not in the file, add it.
For more information, see the information in the DM pin.conf file.
-
Save and close the file.
-
Stop and restart the DM.
You can now install RE Loader.
Installing the RE Loader Package
To install RE Loader, see "Installing Individual BRM Components" in BRM Installation Guide.
Creating RE Loader Database Partitions
Note:
You must perform this step to ensure that the new event tables have the same partitioning layout as your existing event tables. If you install several optional components, perform this step only after installing the last component.
To create partitions for RE Loader events:
-
On the system where BRM is installed, go to the BRM_home/apps/partition_utils directory.
-
Run the partition_utils utility to enable delayed-event partitions:
perl partition_utils.pl -o enable -t delayed -c storable_classwhere storable_class specifies the event classes for which you want partitioning.
Note:
You must create partitions for all subclasses of a specific event that you want to load.
For example, this command creates partitions for /event/delayed/session/telco/gsm delayed events:
perl partition_utils.pl -o enable -t delayed -c /event/session/telco/gsm
For more information, see:
-
"Enabling Delayed-Event Partitioning" in BRM System Administrator's Guide
-
"partition_utils" in BRM System Administrator's Guide.
Your RE Loader installation is now complete.
Returning Data Manager Permissions to their Original Values
To return your DM permissions to their original values:
-
In a text editor, open your DM configuration file:
BRM_home/sys/dm_oracle/pin.conf
-
Restore the following entries to their original values (the values they had before you modified them). The default value for each entry is 0:
- dm dd_write_enable_fields - dm dd_write_enable_objects - dm dd_write_enable_portal_objects - dm dd_mark_as_portal -
Save and close the file.
-
Stop and restart the DM.
Preventing POID Errors in Multischema Systems
BRM multischema systems ensure that all POIDs are unique across all database schemas by using a POID-generation algorithm. This BRM algorithm sets each schema's starting sequence number to a unique value and then increments each sequence number by a set value. By default, BRM sets the increment value equal to the number of schemas in your system.
For example, if your system contains three schemas:
- Schema 1 uses a starting sequence number of 10000
- Schema 2 uses a starting sequence number of 10001
- Schema 3 uses a starting sequence number of 10002
The incremental value is 3.
This example results in the following POID numbers shown in Table 2-1:
Table 2-1 Example Schema POID Numbers
| Time | POID for Schema 1 | POID for Schema 2 | POID for Schema 3 |
|---|---|---|---|
|
1 |
10000 |
10001 |
10002 |
|
2 |
10003 |
10004 |
10005 |
|
3 |
10006 |
10007 |
10008 |
When RE Loader loads a batch of objects into the BRM database, it reserves a group of POIDs as follows:
-
Changes the increment value by using the following equation:
(Number of objects to load) x (Current increment value)For example, if RE Loader must load 2,000 objects into the database and the current increment value is 3, it changes the increment value to 2,000 x 3 = 6,000.
-
Allocates POIDs to objects.
-
Returns the increment value to its original value.
However, if a major error occurs during the allocation process, the increment value can remain at the incorrect high value. To catch these situations, you can configure RE Loader to check the database increment value against a specified maximum before it reserves a group of POIDs. When the increment value exceeds the specified maximum, RE Loader exits and logs an error message, notifying your database administrator to manually reset the increment value.
To configure RE Loader to compare the increment value against a specified maximum:
-
Open the BRM_home/apps/pin_rel/Infranet.properties file in a text editor.
-
Set the infranet.rel.max_increment_by entry to the number of database schemas in your system:
infranet.rel.max_increment_by = 20The default is 20.
-
Save and close the file.
Configuring Oracle Libraries for RE Loader when Using Pipeline Manager
RE Loader requires Oracle 32-bit libraries, and Pipeline Manager requires Oracle 64-bit libraries. If RE Loader and Pipeline Manager reside on the same system, make sure both the 32-bit and 64-bit Oracle libraries are installed on your system.
To support the libraries on the same machine, set up your Oracle environment so that RE Loader points to the 32-bit Oracle libraries and Pipeline Manager points to the 64-bit Oracle libraries:
-
Install the 32-bit and 64-bit libraries in separate directories on the Pipeline Manager system.
-
Set environment variables in the pin_rel and SampleRelHandler_config.values files to point to the 32-bit libraries. See "Setting the Oracle Library Paths".
-
Set up your default Pipeline Manager environment in the Oracle_home/.cshrc file to use Oracle 64-bit libraries. See Example 2-1.
Setting the Oracle Library Paths
To set the Oracle library paths:
-
Open the BRM_home/apps/pin_rel/pin_rel file in a text editor. BRM_home is the directory where you installed BRM components.
-
Add the following before the command that runs Java.
setenv ORACLE_HOME Oracle_home
setenv SHLIB_PATH ${ORACLE_HOME}/lib
setenv PATH ${PATH}:${ORACLE_HOME}/bin
Note:
Oracle_home points to the location where you installed the full 32-bit client software.
-
Save and close the file.
-
Open the BRM_home/apps/pin_rel/SampleRelHandler_config.values file in a text editor.
-
Add these lines between the FILETYPE and HANDLER_DIR variables:
Note:
The paths you set depend on your system setup.
$ENV{'ORACLE_HOME'} = "/u01/app/oracle/product/11i64"; $ENV{'SHLIB_PATH'} = "/usr/lib:/opt/portal/7.5/lib:/u01/app/oracle/product/11i64/lib"; $ENV{'PATH'} = ".:/bin:/usr/bin:/usr/local/bin:/u01/app/oracle/product/11i64/bin:/opt/portal/7.5/bin"; -
Save and close the file.
Example 2-1 Example of the Oracle 64-Bit Setting in the .cshrc File
setenv ORACLE_HOME /u01/app/oracle/product/10g64
setenv ORACLE_SID       PIND10g64
setenv NLS_LANG American_America.AL32UTF8
setenv LD_LIBRARY_PATH $LD_LIBRARY_PATH:$ORACLE_HOME/lib32:$ORACLE_HOME/rdbms/lib32
setenv LD_LIBRARY_PATH_64 $IFW_HOME/lib:$ORACLE_HOME/lib:$ORACLE_HOME/rdbms/lib
setenv ORACLE_BIN $ORACLE_HOME/bin
setenv ORACLE_DOC $ORACLE_HOME/odoc
setenv ORA_NLS33 $ORACLE_HOME/ocommon/nls/admin/data
alias ora 'cd $ORACLE_HOME'
set path = ($path $ORACLE_BIN)
Setting Up RE Loader Processing Directories for Pipeline Manager
The processing directory is where you run RE Loader. It must include all RE Loader execution scripts, configuration files, and RE handler files. Most systems require only one RE Loader processing directory, but you must create additional processing directories in the following situations:
-
You have a multischema system. Each database schema in your system must have a corresponding instance of RE Loader and the RE Loader processing directory.
-
You want to distribute load among multiple instances of RE Loader. If your system contains multiple pipelines that generate a large number of output files, you can increase database loading performance by using multiple RE Loader instances. In this case, each instance has its own processing directory and a corresponding pipeline output directory.
Note:
Do not configure multiple instances of RE Loader to process the same file type from the same directory. Doing so provides no advantage and can cause errors.
To set up processing directories, do the following in each instance of RE Loader:
-
In your BRM_home/apps/pin_rel directory, create processing directories.
For example, create a BRM_home/apps/pin_rel/GPRS directory and a BRM_home/apps/pin_rel/GSM directory.
-
Configure the Infranet.properties file. See "Configuring the RE Loader Infranet.properties File".
-
Copy all files from the BRM_home/apps/pin_rel directory to each processing directory.
-
If RE Loader and Pipeline Manager are installed on separate systems, do the following:
-
Go to the system where Pipeline Manager is installed.
-
Mount the RE Loader processing directories onto the Pipeline Manager output directory.
-
-
Follow the instructions in "Configuring SE Loader for Standard Recycling" in .BRM Suspending and Recycling Pipeline EDRs
Uninstalling RE Loader
To uninstall RE Loader, see "Uninstalling Optional Components" in BRM Installation Guide.

