18 Performing Zero-Downtime Upgrades of Disaster Recovery Cloud Native Systems
You can perform a zero-downtime upgrade of an Oracle Communications Billing and Revenue Management (BRM) cloud native deployment in an active-active disaster recovery system.
Topics in this document:
About the Zero-Downtime Upgrade of an Active-Active Disaster Recovery System
The steps for performing a zero-downtime cloud native upgrade of an active-active disaster recovery system assume that you are upgrading to the new release and assumes that your system contains a secondary BRM and ECE instance, which can be on a disaster recovery site or the primary site.
Caution:
Be aware that during the upgrade process:
-
Usage processing is done in a single instance only.
-
PDC is not available.
-
ECE cache federation is supported from the old to the new version but not from the new to the old version.
-
If an Oracle Data Guard role reversal is required for the BRM database, a short (few minutes) downtime occurs for provisioning.
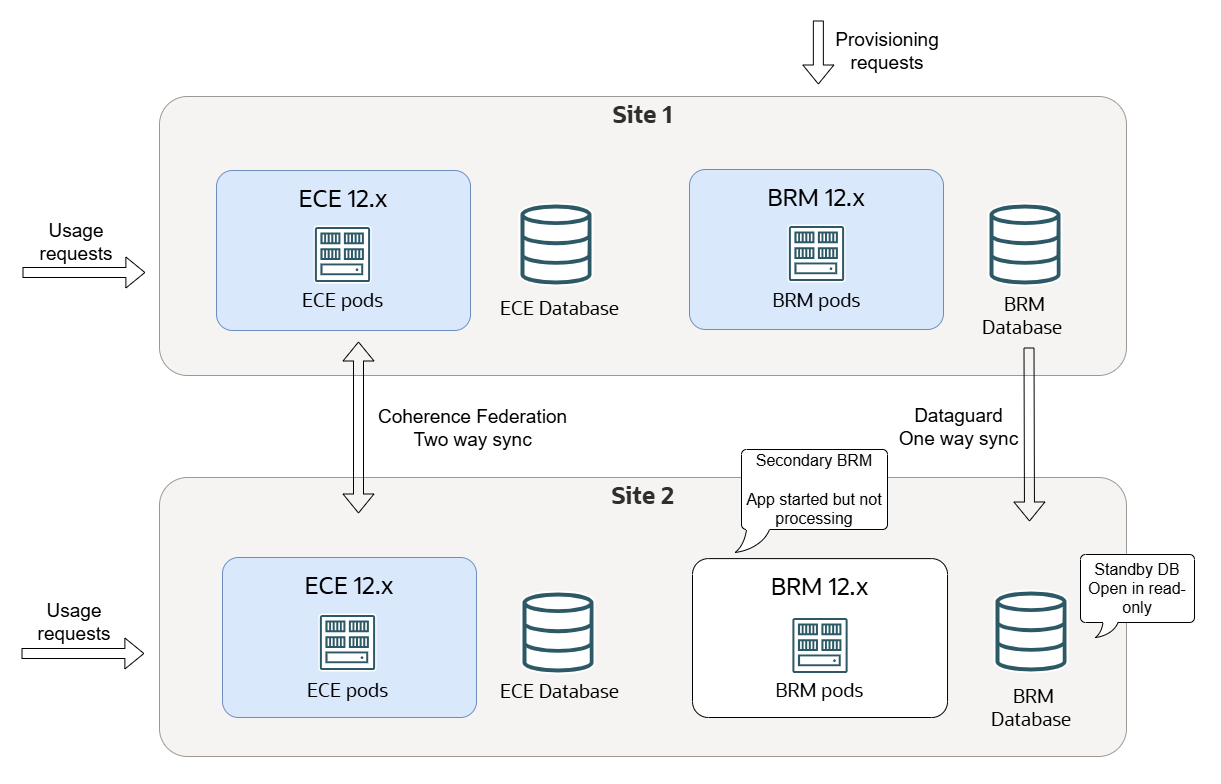
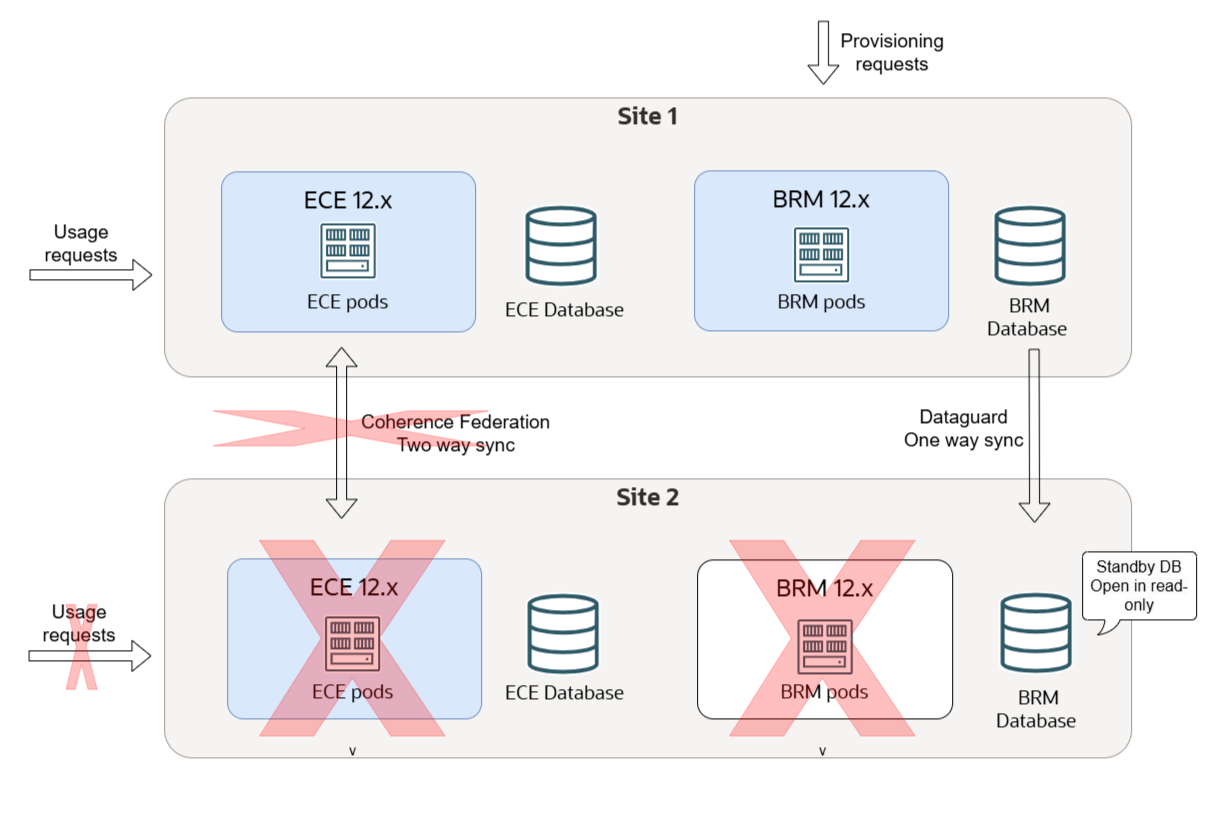
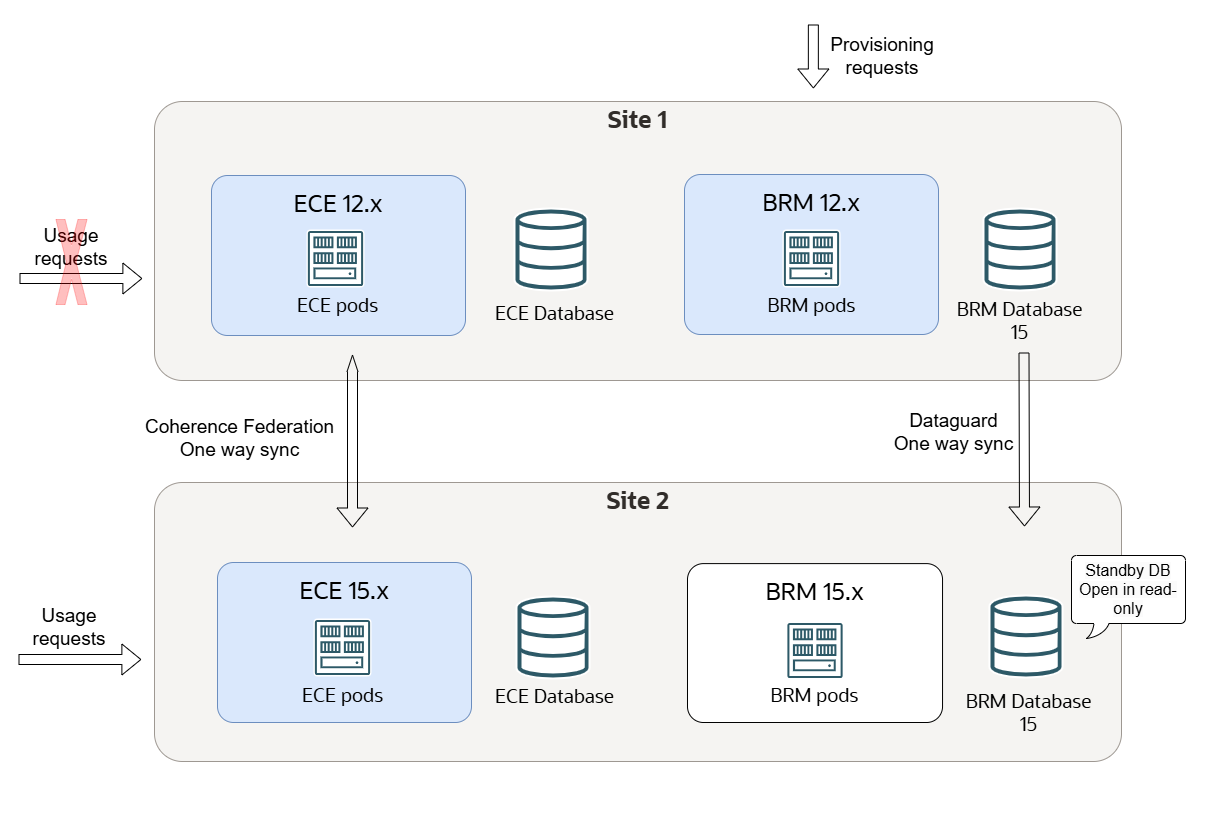
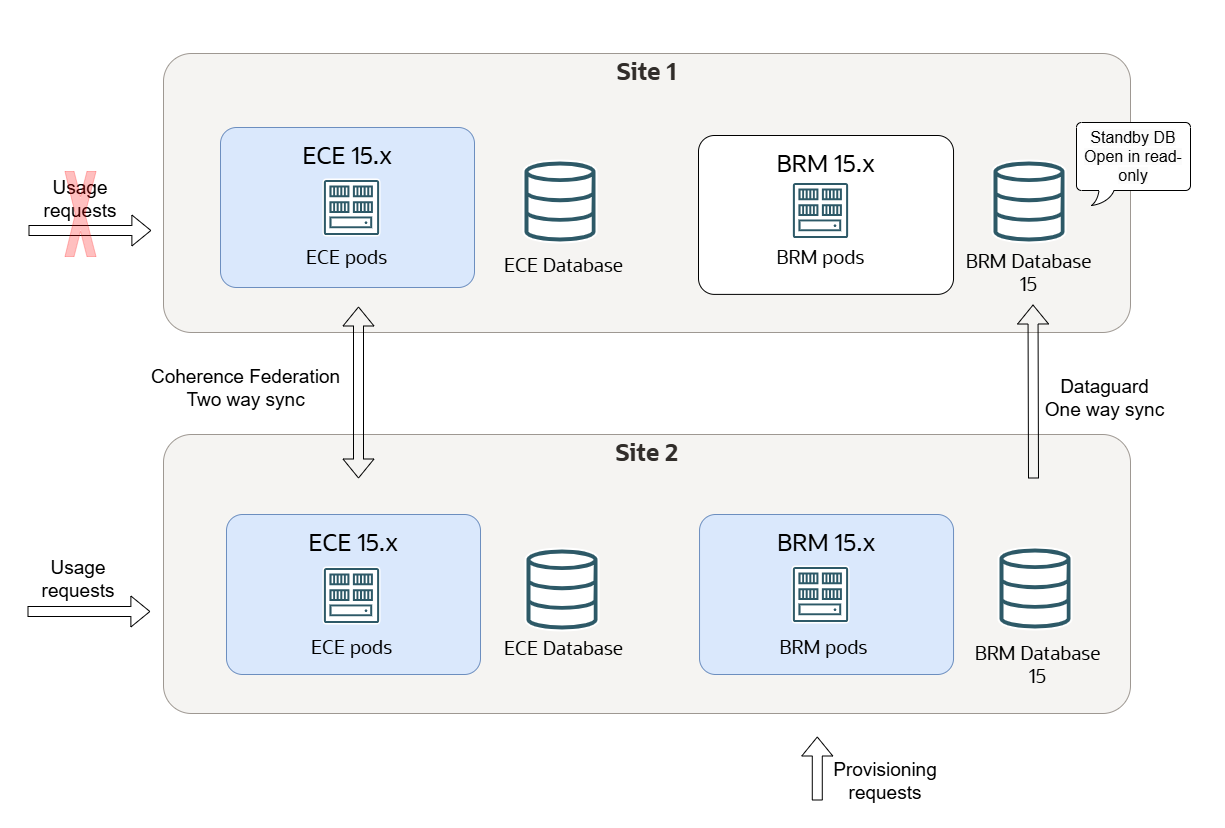
Figure 18-1 shows initial state of a BRM cloud native active-active disaster recovery system.
Figure 18-1 Initial State of BRM Cloud Native Active-Active Disaster Recovery System
For information about the supported software versions, see BRM Compatibility Matrix.
Tasks for Upgrading a BRM Cloud Native Active-Active System
To upgrade your BRM cloud native active-active disaster recovery system using the zero-downtime upgrade process:
-
Turn off Site 2. See "Switching Off Site 2".
-
From Site 2, uninstall the old version of BRM and ECE. See "Uninstalling BRM and ECE from Site 2".
-
On Site 2, upgrade the Kubernetes platform and all prerequisite software to the versions required by the 15.x release. See BRM Compatibility Matrix for the list of supported software versions.
For information, see "Upgrade a Cluster" in the Kubernetes documentation.
-
On Site 2, upgrade the BRM database schema to the 15.x release. See "Upgrading Your BRM Database Schema in Site 2".
-
On Site 2, install the BRM 15.x cloud native software. See "Installing BRM 15.x Cloud Native on Site 2".
-
From Site 2, drop the old persistence database schema. See "Dropping the ECE Persistence Database Schema from Site 2".
-
On Site 2, install ECE 15.x. See "Installing ECE 15.x Cloud Native on Site 2".
-
Transfer usage processing from Site 1 to Site 2. See "Failing Over Site 1 to Site 2".
-
From Site 1, uninstall the old version of BRM and ECE. See "Uninstalling BRM and ECE from Site 1".
-
On Site 1, upgrade the Kubernetes platform and all prerequisite software to the versions required by the 15.x release. See BRM Compatibility Matrix for the list of supported software versions.
For information, see "Upgrade a Cluster" in the Kubernetes documentation.
-
From Site 1, drop the old ECE persistence database schema. See "Dropping the ECE Persistence Database Schema from Site 1".
-
On Site 1, install ECE 15.x. See "Installing ECE 15.x Cloud Native on Site 1".
-
Restart the federation process between Site 1 and Site 2. See "Federating ECE Cache Data Between Site 1 and Site 2".
-
If required, move the provisioning flow back to Site 1 and do an Oracle Data Guard role reversal.
Note:
The Data Guard role reversal may cause a few minutes of downtime in the provisioning flow, but it does not impact the usage flow.
Switching Off Site 2
During the first phase of the upgrade process, Site 1 processes usage requests while you upgrade the software in Site 2.
To switch off Site 2:
-
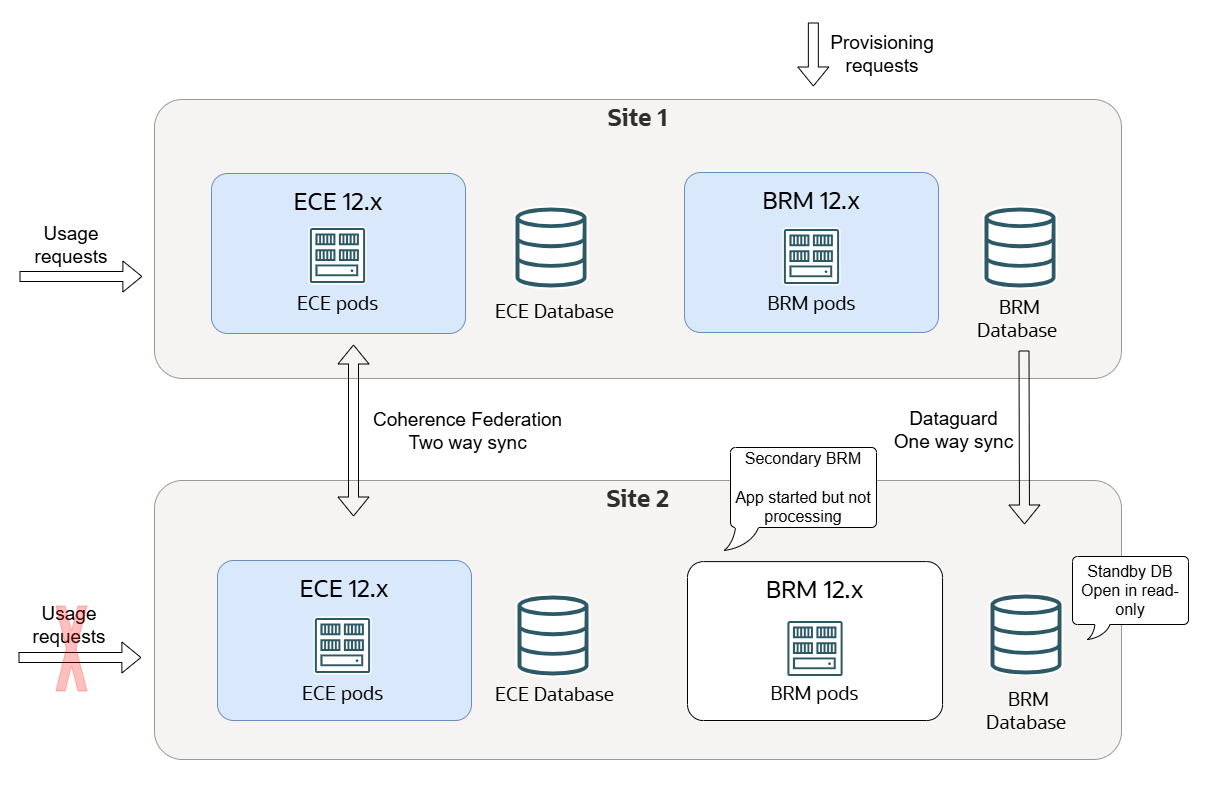
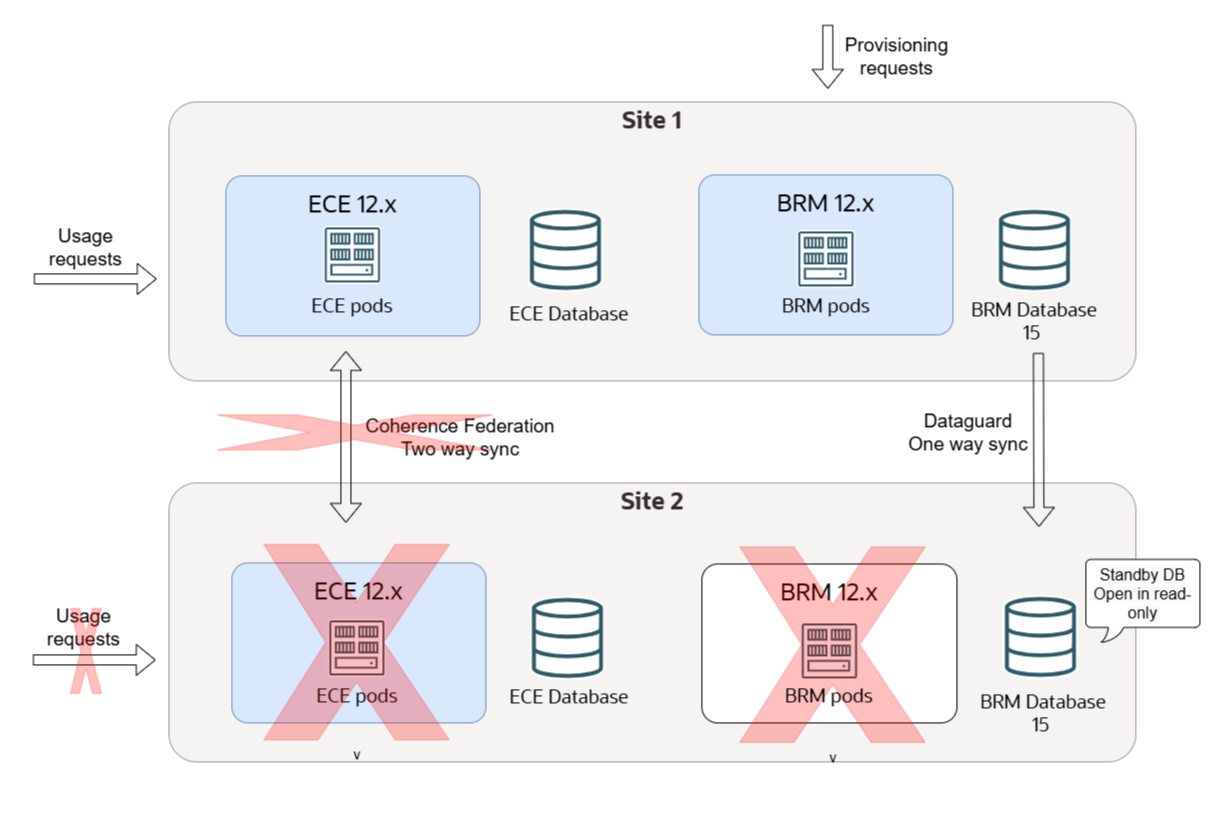
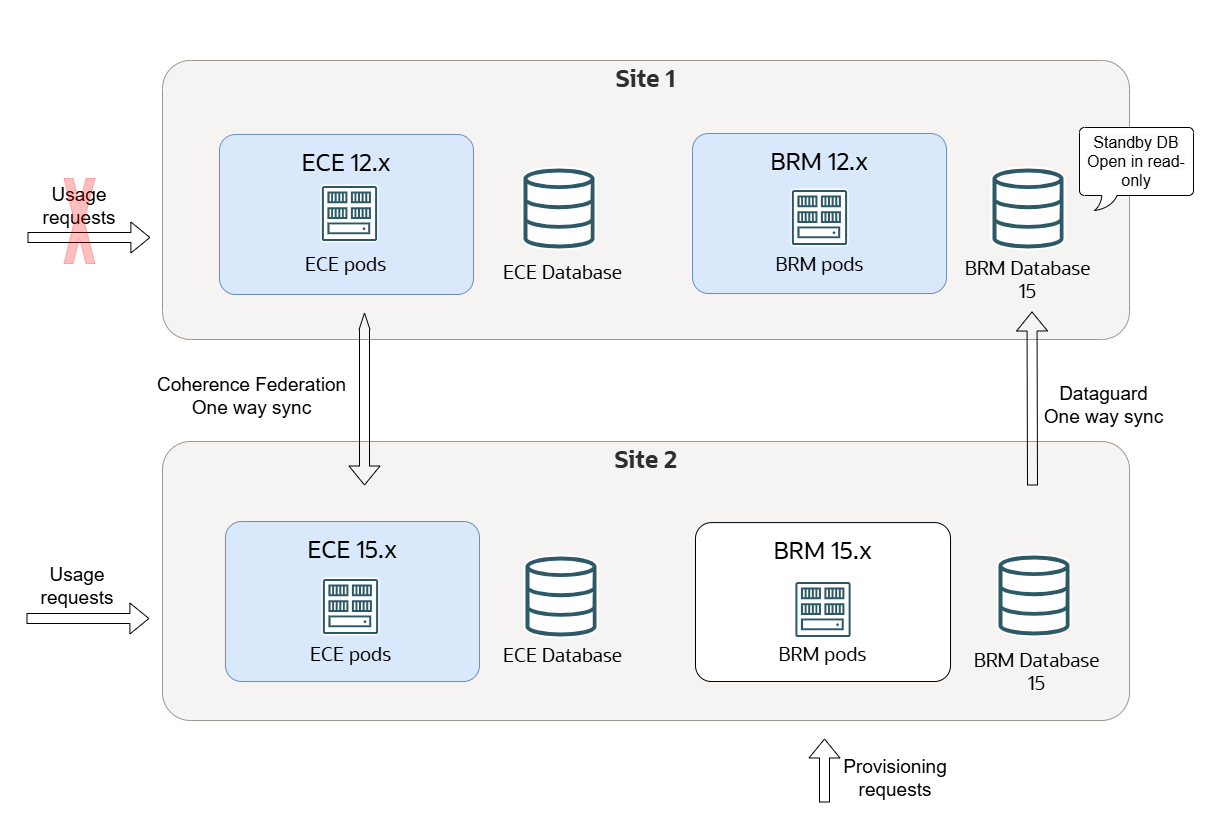
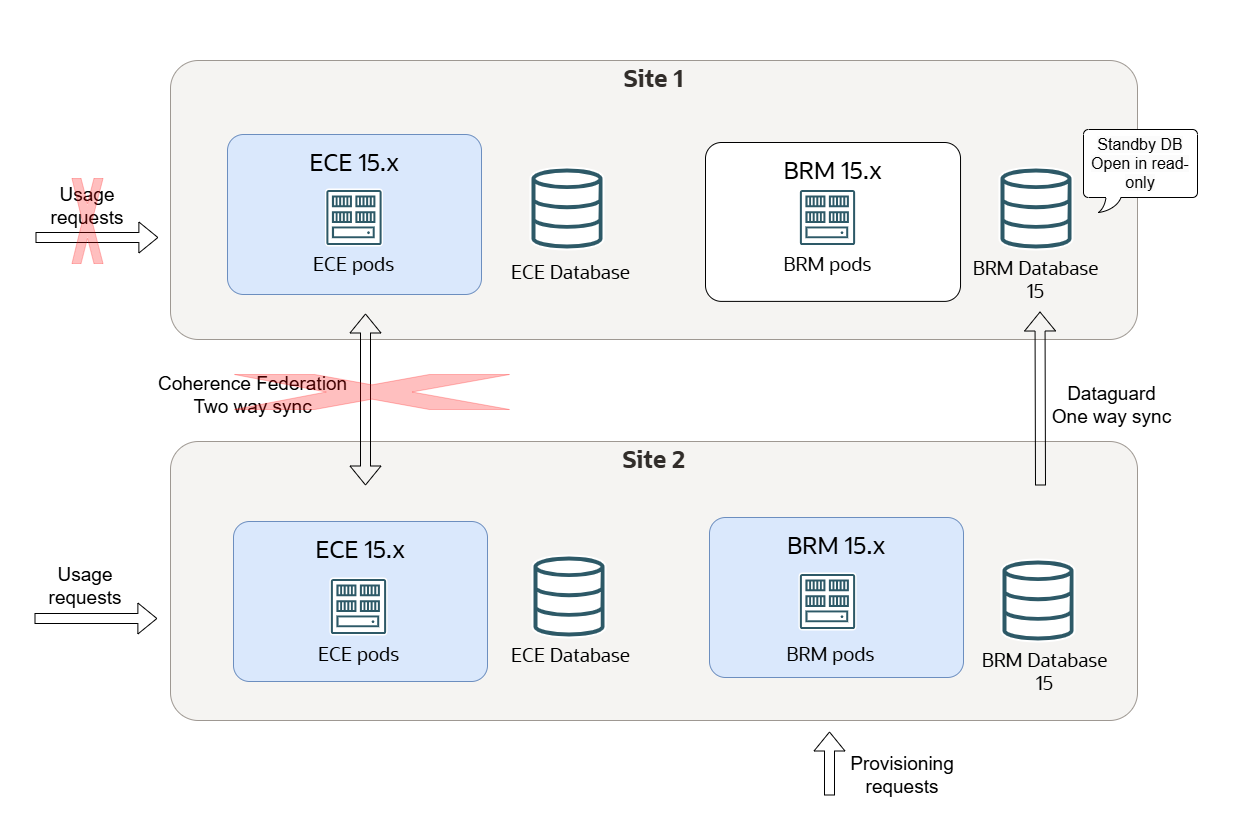
Stop all usage requests to Site 2 and direct all usage requests to Site 1, as shown in Figure 18-2.
Figure 18-2 Usage Requests for Switching Off Site 2
-
Stop the connection from BRM on Site 1 to ECE on Site 2. To do so:
-
On ECE Site 2, stop the EM Gateway.
-
On BRM Site 1, remove any connection to the EM Gateway on Site 2.
-
-
On ECE Site 1, mark Site 2 as failed.
This stops ECE from forwarding rating requests to Site 2 for subscribers with Site 2 as their preferred site. Usage requests are now rated on Site 1.
-
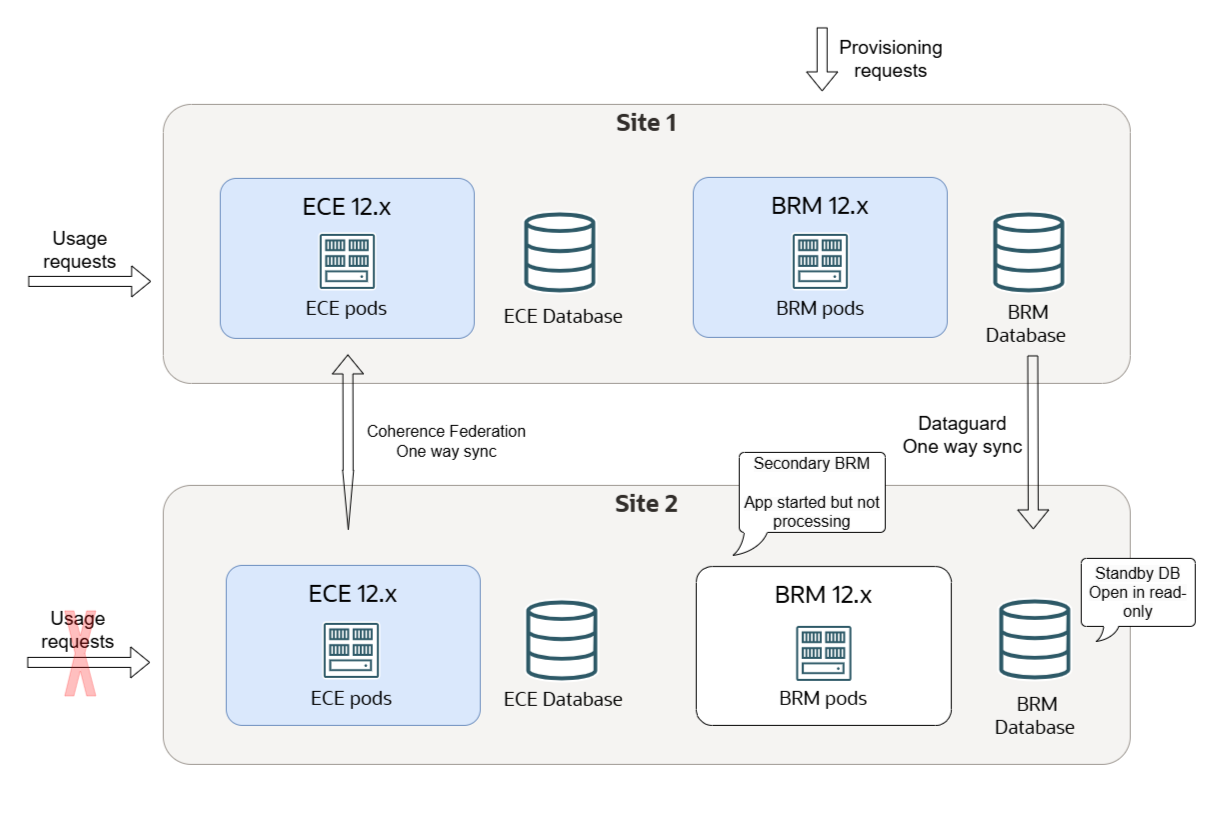
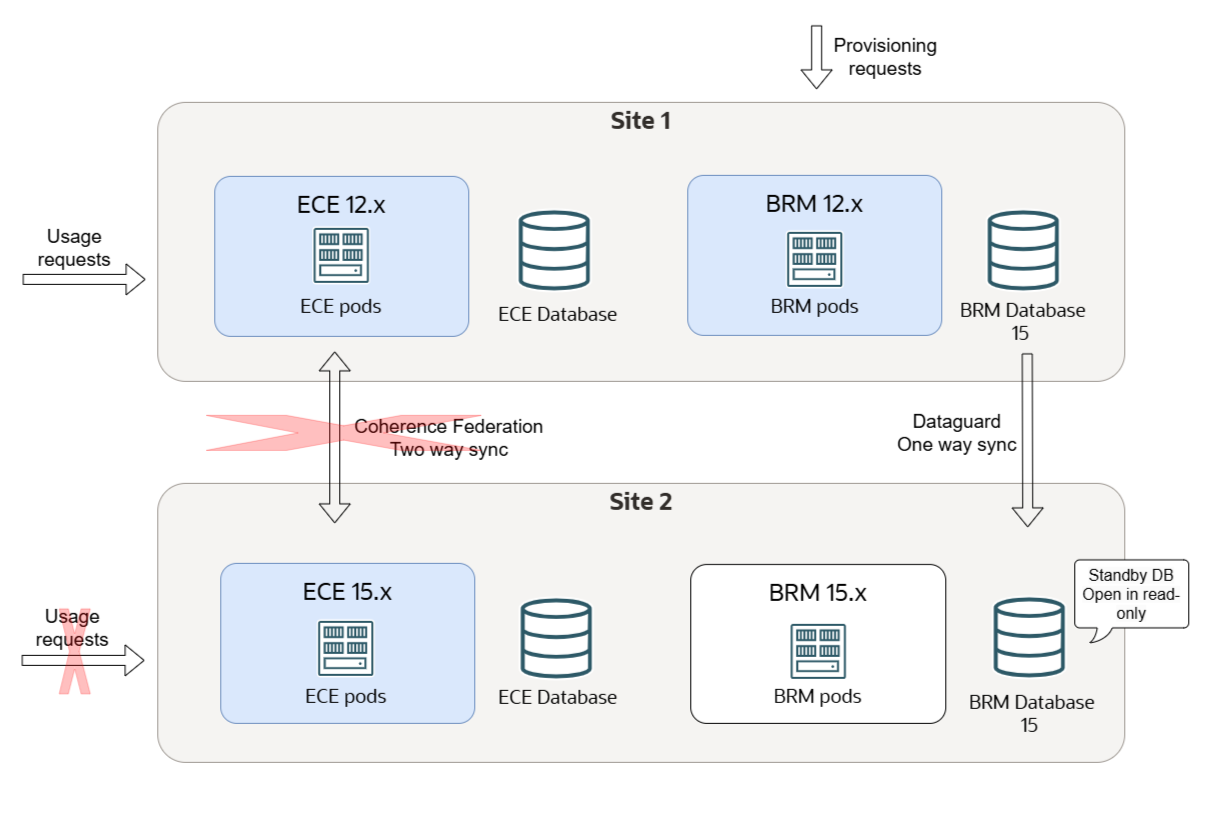
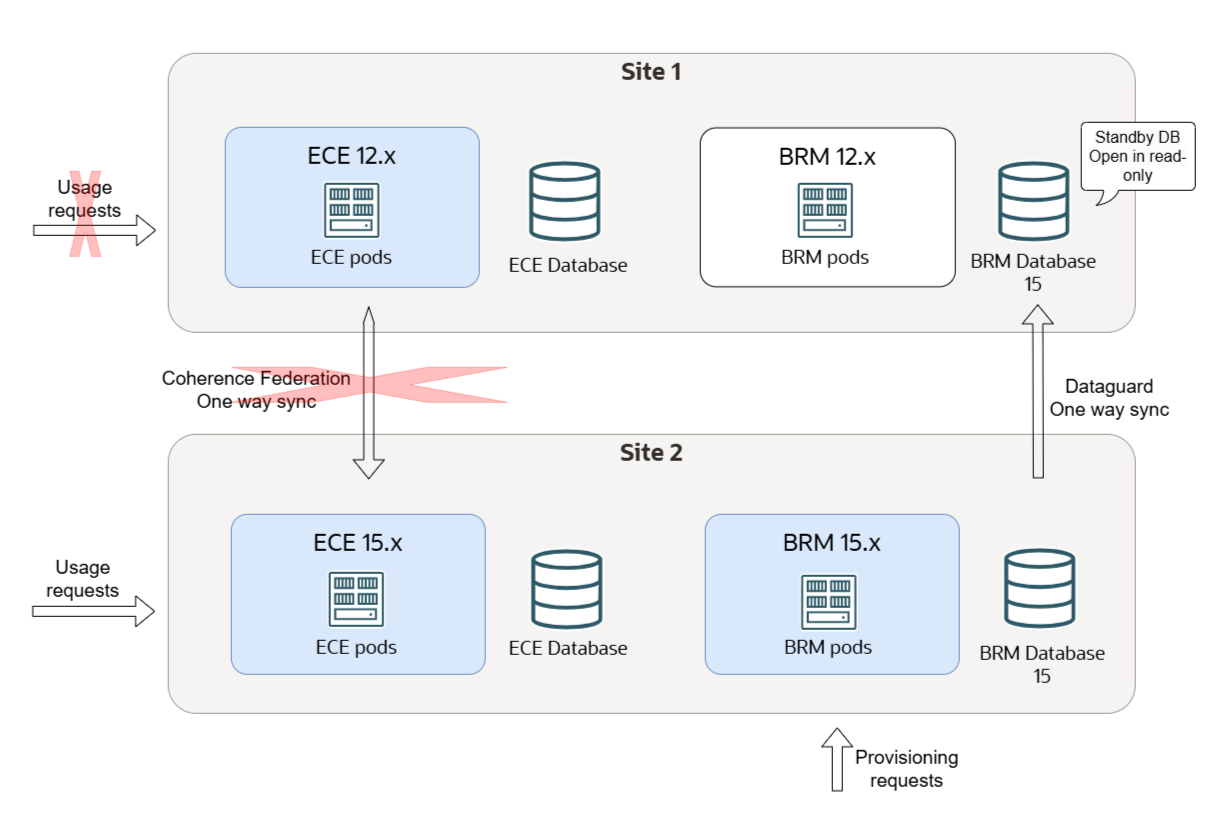
Disable the federation from ECE Site 1 to Site 2, as shown in Figure 18-3.
Note:
Keep the Site 2 to Site 1 federation active to drain any remaining data from Site 2.
Figure 18-3 Disabled Federation from ECE Site 1 to Site 2
-
Check that the federation backlog from Site 2 to Site 1 has been cleared.
All traffic to Site 2 is stopped. Ensure all data from Site 2 has been synchronized with Site 1. The Coherence Federation Metrics should show as IDLE instead of YIELDING.
-
On Site 2, check that all rated events in the ECE cache have been extracted by running the following with the query.sh utility:
./query.sh
Coherence Command Line Tool
CohQl> select value() from AggregateObjectUsage
If successful, the query displays zero entries. See "query" in ECE Implementing Charging for information about the utility's syntax and parameters.
-
On Site 2, use SQL*Plus to check that all Site 2 rated events have been extracted from the persistence database and are present in BRM:
sqlplus pin@databaseName
Enter password: password

SQL> select count(*) from ratedevent_site2Name
where databaseName is the service name or database alias of the BRM database, and password is the password for the pin user.
Note:
The Site 2 persistence database might contain some Site 1 events. After the Site 2 to Site 1 federation process is stopped, these events are not extracted or purged. However, they will be processed on Site 1. You can ignore these events because they get purged when you re-create the Site 2 persistence database later.
-
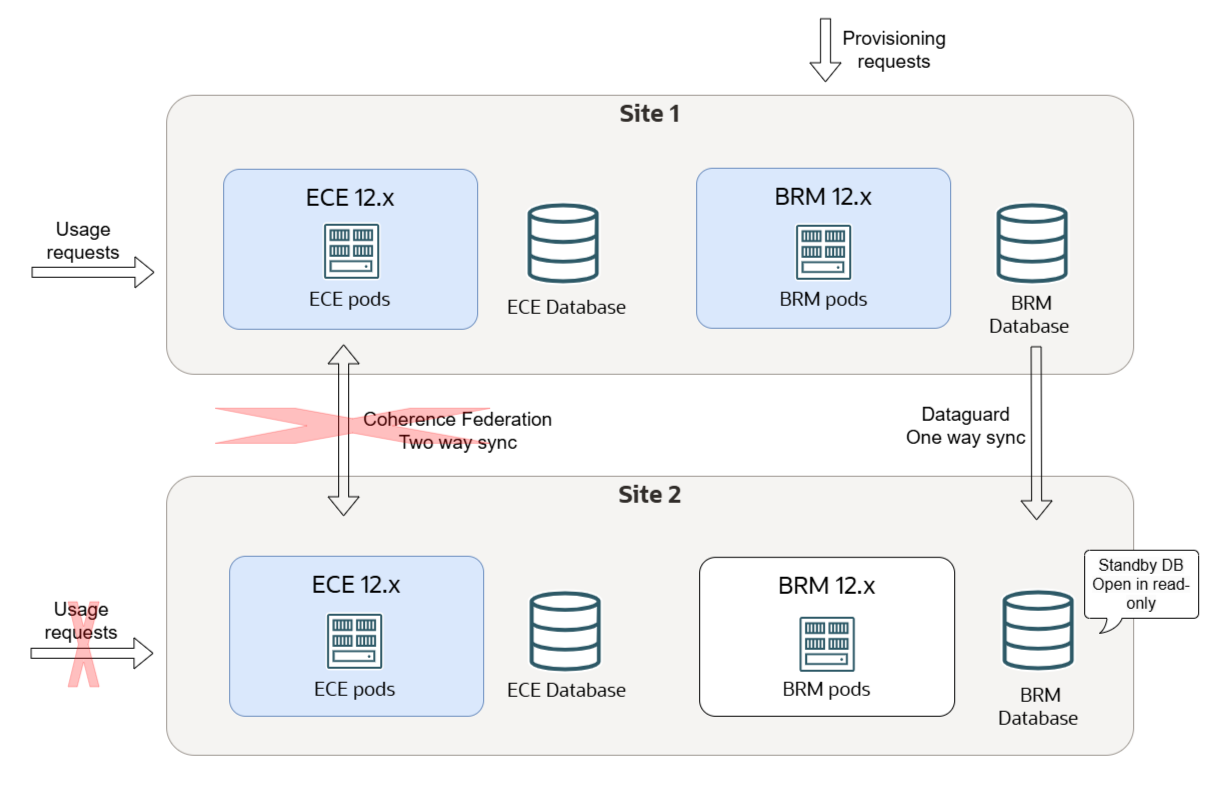
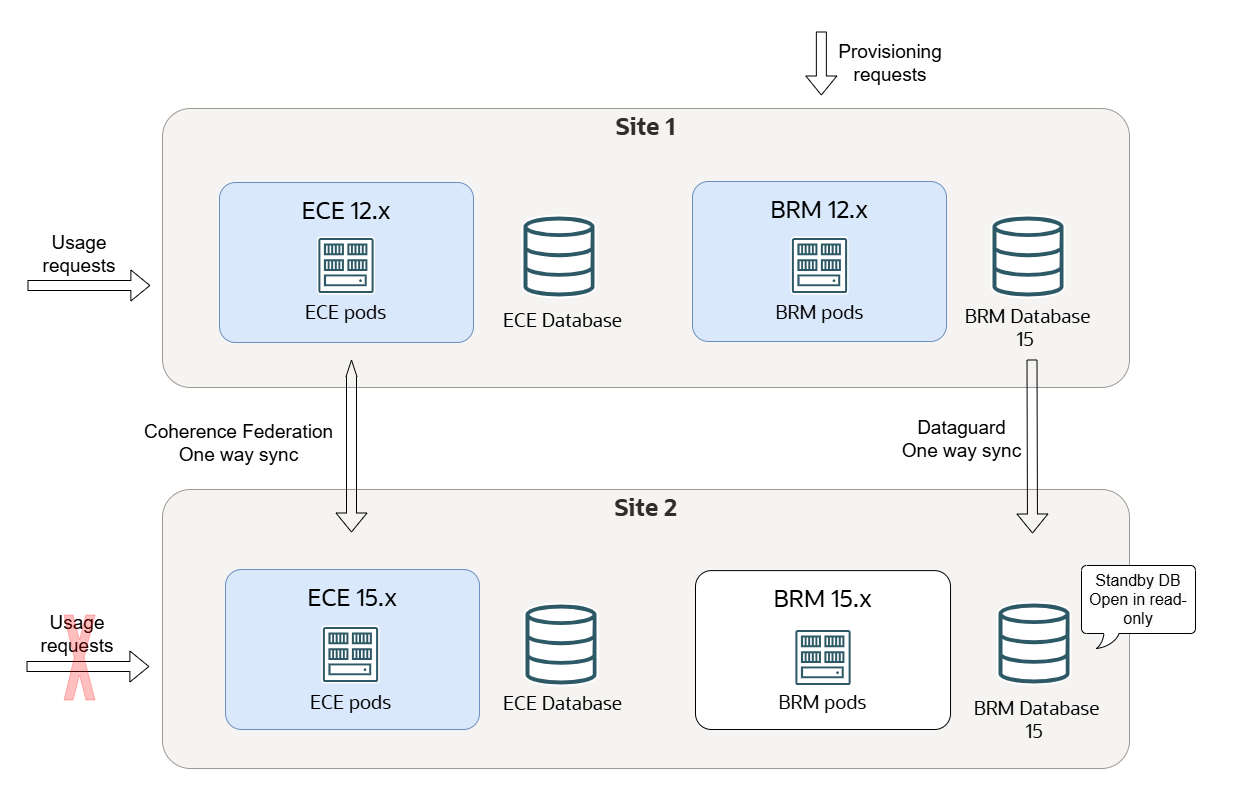
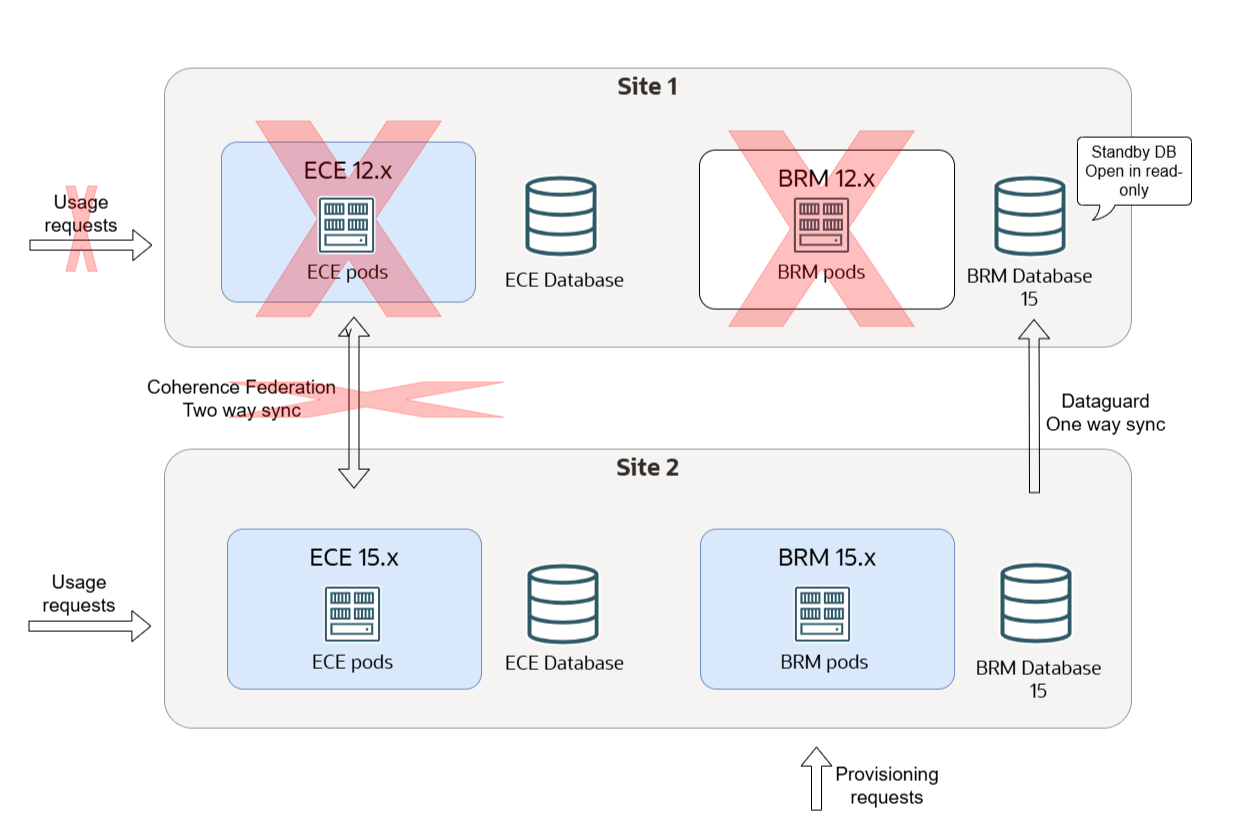
Stop the federation process from Site 2 to Site 1, as shown in Figure 18-4.
Figure 18-4 Stopped Federation from ECE Site 2 to Site 1
All data is now synchronized with Site 1. Site 2 is isolated and ready for the upgrade.
Uninstalling BRM and ECE from Site 2
To uninstall the old version of BRM and ECE from Site 2:
-
Uninstall the old version of BRM cloud native from Site 2:
helm uninstall BrmReleaseName --namespace BrmNameSpace -
Uninstall the old version of ECE cloud native from Site 2:
helm uninstall EceReleaseName --namespace BrmNameSpacewhere:
-
BrmReleaseName is the release name for oc-cn-helm-chart and is used to track this installation instance.
-
EceReleaseName is the release name for oc-cn-ece-helm-chart and is used to track this installation instance.
-
BrmNameSpace is the namespace in which to create BRM Kubernetes objects for the BRM Helm chart.
-
These commands delete all the resources associated with the chart's last release and the release history.
Figure 18-5 shows how to uninstall BRM and ECE from Site 2.
Figure 18-5 Uninstall BRM and ECE from Site 2
Upgrading Your BRM Database Schema in Site 2
To upgrade your BRM database schema in Site 2 to release BRM 15.x:
-
Download and extract the BRM 15.x cloud native database initializer Helm chart (oc-cn-init-db-helm-chart) from Oracle Software Delivery Cloud (https://edelivery.oracle.com).
See "Downloading Packages for the BRM Cloud Native Helm Charts and Docker Files" for more information.
-
Copy your old wallet files (ewallet.p12 and cwallet.sso) from the dm-oracle pod's /oms/wallet/client directory to the BRM 15.x Helm chart's oc-cn-init-db-helm-chart/existing_wallet/ directory.
Note:
Copying old wallet files is applicable only if the base version is 12.x.
-
Create an override-init-db-15.yaml file for the 15.x version of oc-cn-init-db-helm-chart.
-
In your override-init-db-15.yaml file, set the following keys:
-
ocbrm.is_upgrade: Set this to true.
-
ocbrm.existing_rootkey_wallet: Set this to true.
-
ocbrm.wallet.client: Set this to the password for the client wallet. This value must match that of your old release.
-
ocbrm.wallet.server: Set this to the password for the server wallet. This value must match that of your old release.
-
ocbrm.wallet.root: Set this to the password for the root wallet. This value must match that of your old release.
-
-
Enter this command from the helmcharts directory to upgrade the database schema. Ensure you run the 15.x oc-cn-init-db-helm-chart Helm chart with a new release name and namespace.
helm install newInitDbReleaseName oc-cn-init-db-helm-chart --namespace newInitDbNameSpace --values oldOverrideValues --values override-init-db-15.yamlwhere:
-
newInitDbReleaseName is the new release name for the 15.x version of oc-cn-init-db-helm-chart.
-
newInitDbNameSpace is the new namespace for the 15.x version of oc-cn-init-db-helm-chart.
-
oldOverrideValues is the name and path to your old override-values.yaml file for oc-cn-init-db-helm-cart.
-
Figure 18-6 shows an upgraded BRM database schema in Site 2.
Figure 18-6 Upgraded BRM Database Schema in Site 2
Installing BRM 15.x Cloud Native on Site 2
To configure and deploy BRM 15.x on your cloud native system on Site 2:
-
Download and extract the BRM 15.x cloud native (oc-cn-helm-chart) and BRM 15.x Operator Job Helm Chart (oc-cn-op-job-helm-chart) from Oracle Software Delivery Cloud (https://edelivery.oracle.com).
See "Downloading Packages for the BRM Cloud Native Helm Charts and Docker Files" for more information.
-
To reuse your old SSL KeyStore with the new release, copy the PDC KeyStore files from the old Helm chart to the 15.x oc-cn-op-job-helm-chart/pdc/pdc_keystore/ directory.
-
Create an override-values-15.yaml file.
You will use this file with the 15.x version of oc-cn-helm-chart and oc-cn-op-job-helm-chart.
-
In your override-values-15.yaml file, set the following keys:
-
In the BRM section:
-
ocbrm.is_upgrade: Set this to true.
-
ocbrm.existing_rootkey_wallet: Set this to false.
-
ocbrm.db.*: Set the BRM database schema details to the same values as your old release.
-
-
In the PDC section:
-
ocpdc.configEnv.pdcSchemaUserName: Set this to the same value as your old release.
-
ocpdc.configEnv.crossRefSchemaUserName: Set this to the same value as your old release.
-
ocpdc.configEnv.rcuPrefix: Set this key to a new prefix to create a new RCU schema.
-
ocpdc.configEnv.transformation.upgrade: Set this to true. (For upgrades to 15.0.0 only)
-
ocpdc.secretValue.walletPassword: Set this to the same value as your old release.
-
ocpdc.configEnv.deployAndUpgradeSite2: Set this to true. (For upgrades to 15.0.1 on later)
-
ocpdc.configEnv.upgrade: Set this to true. (For upgrades to 15.0.1 or later)
-
-
In the Business Operations Center section:
-
ocboc.boc.configEnv.bocSchemaUserName: Set this to the same value as your old release.
-
ocboc.boc.configEnv.runUpgrade: Set this to true.
-
ocboc.boc.configEnv.rcuPrefix: Set this to a new prefix to create a new RCU schema.
-
ocboc.boc.secretVal.*: Set the Business Operations Center passwords to the same values as your old release.
-
-
In the Billing Care section:
-
ocbc.bc.configEnv.rcuPrefix: Set this to a new prefix to create a new RCU schema.
-
ocbc.bc.secretVal.*: Set the Billing Care passwords to the same values as your old release.
-
-
In the Billing Care REST API section:
-
ocbc.bcws.configEnv.rcuPrefix: Set this to a new prefix to create a new RCU schema.
-
ocbc.bcws.secretVal.*: Set the Billing Care REST API passwords to the same values as your old release.
-
-
-
Create WebLogic domains by running the 15.x version of oc-cn-op-job-helm-chart from the helmcharts directory:
helm install oldOpJobReleaseName oc-cn-op-job-helm-chart --namespace oldBrmNameSpace --namespace oldOverrideValuesFile --values override-values-15.yaml -
Install BRM cloud native services by running the 15.x version of oc-cn-helm-chart from the helmcharts directory:
helm install oldBrmReleaseName oc-cn-helm-chart --namespace oldBrmNameSpace --values oldOverrideValuesFile --values override-values-15.yaml
Dropping the ECE Persistence Database Schema from Site 2
To drop the ECE persistence database schema from Site 2:
-
Run the following command:
DROP USER schemaname CASCADE -
Uninstall the old version of the ECE Helm chart:
helm uninstall oldEceReleaseNamewhere oldEceReleaseName is the release name for your old version of oc-cn-ece-helm-chart.
-
Delete the old version of ece-persistence-job from your system by running this command:
kubectl delete job ece-persistence-job --namespace oldBrmNameSpace
where oldBrmNameSpace is the namespace for your old version of your BRM Helm release.
Note:
The ECE 15.x Helm chart re-creates the persistence database schema when you install it later.
Installing ECE 15.x Cloud Native on Site 2
To install ECE 15.x cloud native on Site 2:
-
Download and extract the ECE 15.x cloud native (oc-cn-ece-helm-chart) from Oracle Software Delivery Cloud (https://edelivery.oracle.com).
See "Downloading Packages for the BRM Cloud Native Helm Charts and Docker Files" for more information.
-
Create an override-values-ece-15.yaml file.
-
In the file, configure your ECE 15.x cloud native services by following the instructions in "Configuring ECE Services".
-
Deploy the ECE 15.x cloud native services by entering this command from the helmcharts directory:
helm install oldEceReleaseName oc-cn-ece-helm-chart --namespace oldBrmNameSpace --values oldOverrideValuesFile --values override-values-ece-15.yamlwhere:
-
oldEceReleaseName is the release name for your old version of oc-cn-ece-helm-chart.
-
oldBrmNameSpace is the namespace for your old oc-cn-helm-chart deployment.
-
oldOverrideValuesFile is the file name and path to the old version of your override-values.yaml file for oc-cn-ece-helm-chart.
-
Failing Over Site 1 to Site 2
Site 2 has been upgraded at this stage, but it is not handling any usage requests. You now switch usage request processing from Site 1 to Site 2.
Figure 18-7 shows failing over Site 1 to Site 2.
To fail over from Site 1 to Site 2:
-
Delete the NFProfileConfiguration and NFServiceConfiguration ECE configuration MBeans from the site running the ECE 12.0 patch set (production site) before federating cache data to the backup site from the production site.
See "Changing the ECE Configuration During Runtime" in BRM Cloud Native System Administrator’s Guide for information about changing ECE configuration MBeans.
-
Start the Coherence federation process from Site 1 to Site 2, as shown in Figure 18-8. This provisions the empty ECE Site 2 cache with the latest data from Site 1.
Figure 18-8 Coherence Federation Process from Site 1 to Site 2
-
On Site 2, mark Site 1 inactive to ensure no preferred site routing occurs from Site 2 to Site 1.
Note:
Site 1 also has Site 2 marked as inactive.
-
Check that the federation process is up to date. After the federation process completes successfully:
-
The ECE pods in Site 2 transition to the Running state.
-
Site 2 transitions to the Usage Processing state and spawns Monitoring Agent pods.
Note:
Follow the steps in "Reloading ECE Application Configuration Changes" in the BRM Cloud Native System Administrator's Guide to update the values:-
Under brmGatewayConfigurations set the kafkaPartition value to 3.
-
Under httpGatewayConfigurations set the kafkaPartition value to 5,6,7,8,9.
-
-
Stop all usage requests to Site 1 and then redirect them to Site 2, as shown in Figure 18-9.
Figure 18-9 Usage Requests for Failing Over Site 1 to Site 2
-
Switch provisioning to BRM on Site 2, as shown in Figure 18-10. To do so:
-
On BRM Site 2, remove any connections to EM Gateway on Site 1.
-
On the client side, switch provisioning to BRM on Site 2.
-
On ECE Site 1, stop the EM Gateway.
Note:
If latency between Site 1 and Site 2 is too high to give you acceptable performance for the provisioning flow, reverse the Oracle Data Guard roles and make the BRM database on Site 2 active. Be aware that this can cause a service interruption of a few minutes for provisioning.
Figure 18-10 Switched Provisioning to BRM on Site 2
-
-
Check that the federation process from Site 1 to Site 2 has completed.
Now that all traffic to Site 1 has stopped, ensure all data from Site 1 has been synchronized with Site 2. The Coherence Federation Metrics should display IDLE instead of YIELDING.
-
Check that all rated events in the ECE Site 1 cache have been extracted by running the query utility:
./query.sh
Coherence Command Line Tool
CohQl> select value() from AggregateObjectUsage
If successful, this command returns zero entries.
-
On Site 1, check that all Site 1 rated events have been extracted from the persistence database and are present in BRM by using SQL*Plus:
sqlplus pin@databaseName
Enter password: password

SQL> select count(*) from ratedevent_site1Name
where databaseName is the service name or database alias of the BRM database, and password is the password for the pin user.
Note:
The Site 1 persistence database might contain some Site 2 events. After the Site 2 to Site 1 federation process is stopped, these events are not extracted or purged. However, they will be processed on Site 2. You can ignore these events because they get purged when you re-create the Site 1 persistence database later.
-
Stop the federation process from Site 1 to Site 2, as shown in Figure 18-11.
Site 1 is isolated and ready for the upgrade.
Figure 18-11 Stopped Federation Process from Site 1 to Site 2
Uninstalling BRM and ECE from Site 1
Uninstall the old version of BRM and ECE from Site 1.
To do so, perform the following steps on Site 1:
-
Uninstall the old version of BRM cloud native:
helm uninstall BrmReleaseName --namespace BrmNameSpace -
Uninstall the old version of ECE cloud native:
helm uninstall EceReleaseName --namespace BrmNameSpace
where:
-
BrmReleaseName is the release name for oc-cn-helm-chart and is used to track this installation instance.
-
EceReleaseName is the release name for oc-cn-ece-helm-chart and is used to track this installation instance.
-
BrmNameSpace is the namespace in which to create BRM Kubernetes objects for the BRM Helm chart.
These commands delete all of the resources associated with the chart's last release and the release history.
Figure 18-12 shows uninstallation of BRM and ECE from Site 1.
Figure 18-12 Uninstallation of BRM and ECE from Site 1
Installing BRM Cloud Native on Site 1
To configure and deploy BRM 15.x cloud native on Site 1:
-
Download and extract the BRM 15.x cloud native Helm chart (oc-cn-helm-chart) and BRM Operator Job Helm Chart (oc-cn-op-job-helm-chart) from Oracle Software Delivery Cloud (https://edelivery.oracle.com).
See "Downloading Packages for the BRM Cloud Native Helm Charts and Docker Files" for more information.
-
To reuse your old SSL KeyStore, copy the PDC KeyStore files from the old Helm chart to the 15.x oc-cn-op-job-helm-chart/pdc/pdc_keystore/ directory.
-
Create an override-values-15.yaml file.
You will use this file with the 15.x version of oc-cn-helm-chart and oc-cn-op-job-helm-chart.
-
In your override-values-15.yaml file, set the following keys:
-
In the BRM section:
-
ocbrm.is_upgrade: Set this to true.
-
ocbrm.existing_rootkey_wallet: Set this to false.
-
ocbrm.db.*: Set the BRM database schema details to the same values as your old release.
-
-
In the PDC section:
-
ocpdc.configEnv.pdcSchemaUserName: Set this to the same value as your old release.
-
ocpdc.configEnv.crossRefSchemaUserName: Set this to the same value as your old release.
-
ocpdc.configEnv.rcuPrefix: Set this key to a new prefix to create a new RCU schema. The value must be different from the one used in Site 2.
-
ocpdc.configEnv.transformation.upgrade: Set this to true. (For upgrades to 15.0.0 only)
-
ocpdc.secretValue.walletPassword: Set this to the same value as your old release.
-
ocpdc.configEnv.deployAndUpgradeSite2: Set this to false. (For upgrades to 15.0.1 or later)
-
ocpdc.configEnv.upgrade: Set this to true. (For upgrades to 15.0.1 or later)
-
-
In the Business Operations Center section:
-
ocboc.boc.configEnv.bocSchemaUserName: Set this to the same value as your old release.
-
ocboc.boc.configEnv.runUpgrade: Set this to true.
-
ocboc.boc.configEnv.rcuPrefix: Set this to a new prefix for the RCU schema. The value must be different from the one used in Site 2.
-
ocboc.boc.secretVal.*: Set the Business Operations Center passwords to the same values as your old release.
-
-
In the Billing Care section:
-
ocbc.bc.configEnv.rcuPrefix: Set this to a new prefix for the RCU schema. This value must be different from the one used in Site 2.
-
ocbc.bc.secretVal.*: Set the passwords to the same values as your old release.
-
-
In the Billing Care REST API section:
-
ocbc.bcws.configEnv.rcuPrefix: Set this to a new prefix for the RCU schema. This value must be different from the one used in Site 2.
-
ocbc.bcws.secretVal.*: Set the passwords to the same values as your old release.
-
-
-
Save and close the file.
-
Create WebLogic domains by running the 15.x version of oc-cn-op-job-helm-chart from the helmcharts directory:
helm install oldOpJobReleaseName oc-cn-op-job-helm-chart --namespace oldBrmNameSpace --namespace oldOverrideValuesFile --values override-values-15.yamlwhere:
-
oldOpJobReleaseName is the release name assigned to your old release of the oc-cn-op-job-helm-chart installation.
-
oldBrmNameSpace is the namespace for your old version of the BRM deployment.
-
oldOverrideValuesFile is the file name and path of your old version of the override-values.yaml file for oc-cn-op-job-helm-chart.
-
-
Install BRM cloud native services by running the 15.x version of oc-cn-helm-chart from the helmcharts directory:
helm install oldBrmReleaseName oc-cn-helm-chart --namespace oldBrmNameSpace --values oldOverrideValuesFile --values override-values-15.yamlwhere oldBrmReleaseName is the release name assigned to your old version of the oc-cn-helm-chart installation.
Dropping the ECE Persistence Database Schema from Site 1
To drop the old persistence database schema from Site 1:
-
Run the following command:
DROP USER schemaname CASCADE -
Uninstall the old version of ECE Helm chart:
helm uninstall oldEceReleaseNameoldEceReleaseName is the release name for the old version of oc-cn-ece-helm-chart.
-
Uninstall the old version of ece-persistence-job from your system by running this command:
kubectl delete job ece-persistence-job --namespace oldBrmNameSpace
where BrmNameSpace is the namespace for the old version of the BRM Helm chart.
Note:
The ECE Helm chart re-creates the database schema when you install it later.
Installing ECE 15.x Cloud Native on Site 1
To install ECE 15.x cloud native on Site 1:
-
Download and extract the ECE 15.x cloud native (oc-cn-ece-helm-chart) from Oracle Software Delivery Cloud (https://edelivery.oracle.com).
See "Downloading Packages for the BRM Cloud Native Helm Charts and Docker Files" for more information.
-
Create an override-values-ece-15.yaml file.
-
In the file, configure your ECE 15.x cloud native services by following the instructions in "Configuring ECE Services".
-
Deploy the ECE 15.x cloud native services by entering this command from the helmcharts directory:
helm install oldEceReleaseName oc-cn-ece-helm-chart --namespace oldBrmNameSpace --values oldOverrideValuesFile --values override-values-ece-15.yamlwhere:
-
oldEceReleaseName is the release name for your old version of oc-cn-ece-helm-chart.
-
oldBrmNameSpace is the release name for your old version of oc-cn-helm-chart deployment.
-
oldOverrideValuesFile is the file name and path to the old version of your override-values.yaml file for oc-cn-ece-helm-chart.
-
Site 1 is now upgraded, but it is idle.
Figure 18-13 shows installation of ECE on Site 1.
Figure 18-13 Installation of ECE Cloud Native on Site 1
Federating ECE Cache Data Between Site 1 and Site 2
Now that Site 1 and Site 2 have been upgraded to release 15.x, you can restart the federation process between them.
To start the federation process of ECE cache data between Site 1 and Site 2:
-
Enable the two-way federation process between Site 1 and Site 2, as shown in Figure 18-14.
Figure 18-14 Federation of ECE Cache Data Between Sites
-
Check that the federation backlog is processed successfully.
After the federation process completes, ECE in Site 1 transitions to the Usage Processing state and spawns the Monitoring Agent pods.
-
In ECE Site 1, mark ECE in Site 2 as active. Likewise, in ECE Site 2, mark ECE in Site 1 as active.
This enables usage rating requests to be forwarded to the subscriber's preferred site.
-
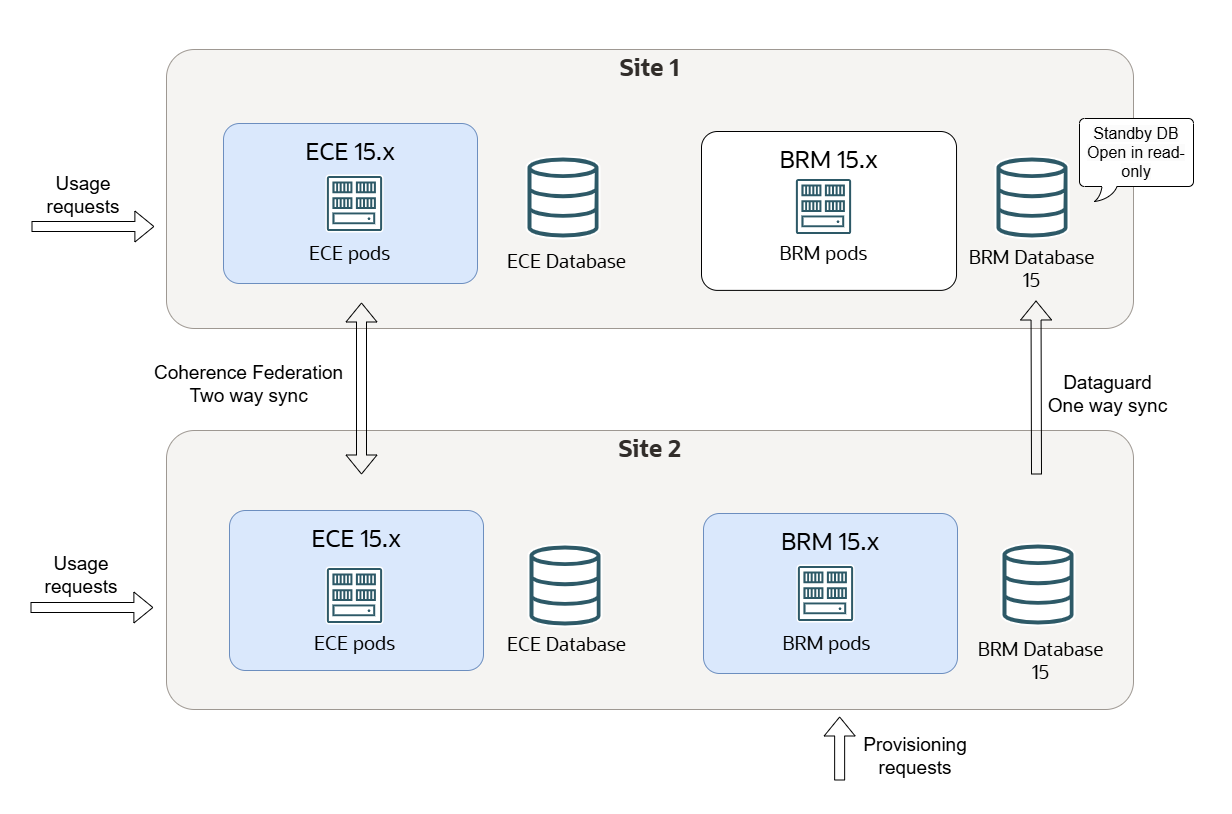
Enable usage requests to Site 2, as shown in Figure 18-15.
Figure 18-15 Enabled Usage Requests for Site 2
-
Enable failover connection to the EM Gateway. On both sides, ensure the CM has a failover EM connection to the EM Gateway on the other site.
