18 Discovering and Configuring Oracle Identity Management Targets
Discovering Identity Management Targets
This section describes how to discover Identity Management targets.
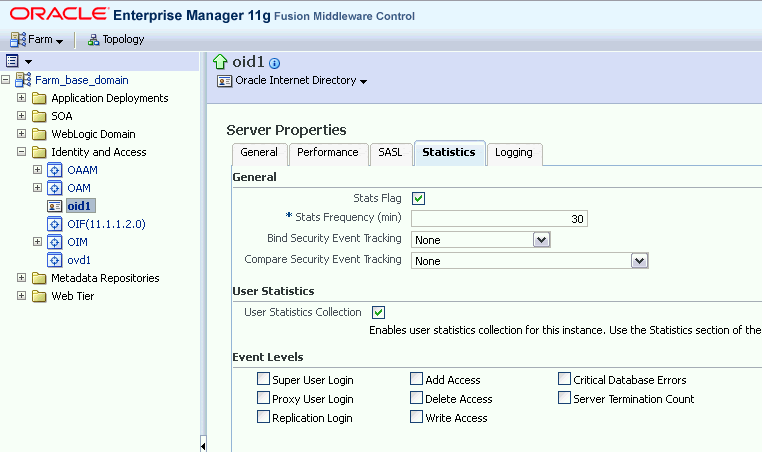
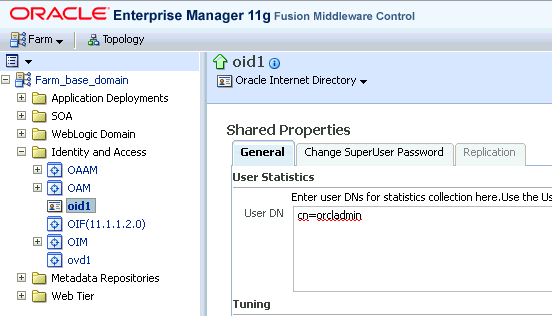
Collecting User Statistics for Oracle Internet Directory
With Enterprise Manager, you can collect user statistics for Oracle Internet Directory allowing you to view charts for failed and completed LDAP operations like Add, Bind, Compare, Delete, Modify, and Search.
To enable the collection of user statistics, perform the following steps:
Creating Identity Management Elements
This section describes how to create Identity Management elements.
Creating Identity and Access System Target
With Enterprise Manager, you can create an Identity and Access System target that can be modeled with any discovered Oracle Identity Management target (including both Identity Management 10g and Identity Management 11g targets) and the underlying hosts, databases and LDAP servers as the key components providing an end-to-end system oriented view of the monitored Identity Management environment.
The Identity and Access System target provides access to metrics, alerts, charts, and topology view. In addition to monitoring your Oracle Identity Management environment from a system perspective, you can also monitor your environment from a service-oriented perspective using the Cloud Control Service Level Management framework.
To create a target of type Identity and Access System associated with any of the monitored Identity Management targets, perform the following steps:
Creating Generic Service or Web Application Targets for Identity Management
The Discovery wizard for Oracle Identity and Access Management Suite allows you to create a System target to store the end-to-end topology of monitored Oracle Identity Management components. The Management Pack Plus for Identity Management allows you to create the following System targets:
-
Access Manager - Access System
-
Access Manager - Identity System
-
Identity Federation System
-
Identity Manager System
-
Identity and Access System
A System target is modeled with all monitored Oracle Identity Management components and the underlying hosts as the key components providing an end-to-end system oriented view of the monitored Oracle Identity Management environment.
A System target provides access to metrics, alerts, charts, and topology view of all the infrastructure components. In addition to monitoring your Oracle Identity Management environment from a system perspective, you can also monitor your environment from a service-oriented perspective using the Cloud Control Service Level Management framework.
With the Management Pack Plus for Identity Management, users can create targets of type Generic Service or Web Application associated with any of the monitored Identity Management Systems: Access Manager - Access System, Access Manager - Identity System, Identity Federation System, and Identity Manager System.
The Web Application or Generic Service target provides an end-to-end service oriented view of the monitored Oracle Identity Management targets with access to performance and usage metrics, service tests, service level rules, service availability definition, alerts, charts, and topology view.
To create a target of type Generic Service associated with any of the monitored Identity Management Systems, perform the following steps:
- Log in to Enterprise Manager. Select Targets, then select Services.
- From the Add menu, select Generic Service.
- Enter the general information requested for the new Generic Service.
Creating a Service Dashboard Report
Once you have created Generic Service or Web Application targets associated with your monitored Oracle Identity Management Systems, you can create a Services Monitoring Dashboard that summarizes Service Level Agreement Compliance, Actual Service Level Achieved, Key Performance and Usage Metrics, and Status of Key Components. Perform the following steps to create a Services Monitoring Dashboard:
-
From the Enterprise menu, select Reports, then select Information Publisher Reports.
-
Click the Create button.
-
Enter the general information requested for the new Report. Click the Elements tab after all information requested is entered.
-
Title
Enter a title for your new dashboard.
-
Category/Sub-Category
Select a category and sub-category for your dashboard, for example, Category: Monitoring, Sub-Category: Dashboards.
-
Use the specified target
Leave blank if this report has no report-wide target.
-
Options - Visual Style
Select Dashboard for a dashboard-view of your services.
-
-
Enter the elements information requested for the new Report. Click the Schedule tab once all information requested is entered.
-
Add
Select Services Monitoring Dashboard and click Continue.
-
Set Parameters
Click Set Parameters. Select the available services and click the Move button to add them to the Selected Services.
-
-
Enter the schedule information requested for the new Report. Click the Access tab once all information requested is entered.
-
Schedule
Enter your scheduling preferences for the report.
-
E-Mail Report
Enter the email address and preferences for the report recipient.
-
-
Enter information about your access and security preferences for the new report. Click OK to create the new Services Monitoring Dashboard.

