4 Plug-in Builder
This chapter describes the following topics:
Overview
The Enterprise Manager Plug-in builder is a JDeveloper extension that helps integrators to create plug-ins using JDeveloper editor. The intuitive GUI wizards available within the plug-in builder enable you to easily develop plug-ins that can be imported and deployed onto Enterprise Manager. Traditional way of creating a Metadata Plug-in using various XML editors has always been prone to semantic and syntactic errors. Therefore, Oracle recommends using this interactive development environment to take advantage of the various run time validation intelligence embedded in the extension.
To develop plug-ins, you need to download the plug-in builder tool that is shipped with Extensibility Development Kit (EDK). To download the EDK kit, from Enterprise Manager console, select Setup, then Extensibility, and Development Kit. Following are the key components required to develop metadata plug-ins:
-
Plugin.xml: A
plugin.xmlfile provides the metadata describing the plug-in, and is used for deploying plug-ins. It contains properties that identify the plug-in, such as name and version, and declares the set of target types that will be added to Enterprise Manager. -
Plugin_registry.xml: A
plugin_registry.xmlfile provides the metadata required by the Management Agent to which the plug-in will be deployed. It is packaged in the/agentdirectory within the plug-in archive and is deployed to the Management Agent that will monitor a target. -
Target Type: A target type metadata file is an integral part of defining a new target type. The target type file describes a set of metrics that can be collected for a specific type of target. Essentially, it tells the Management Agent what data to retrieve and how to obtain that data for this particular target type. To add a new target type, provide the following details:
-
Instance properties defines what properties an administrator must specify in the Enterprise Manager console when adding a new target instance of this particular target type.
-
Credentials are required for a plug-in to authenticate with each target instance that it will collect data for, or run jobs against. Credential types and credential sets are needed to enable authentication.
-
Metrics are at the core of Enterprise Manager's target monitoring capabilities. Basically, Enterprise Manager's ability to monitor and manage various targets. This in-turn refers to its ability to collect, process, and display target metrics.
-
-
Default Collection: The default collection file defines the metric data to be collected from targets and written to the Management Repository along with information such as the collection frequency. The default collection metadata file for a target type defines the following:
-
The frequency of at which this metric data is collected.
-
Thresholds that, when exceeded, will cause a Metric Alert event to be raised.
-
An optional message to display when a threshold is exceeded.
-
Prerequisites For Using Plug-in Builder
-
Ensure that you have downloaded and installed the latest version of JDK 7 on your system.
-
For developing plug-ins using plug-in builder, Oracle recommends using Oracle JDeveloper 12.1.3.0.0 Studio Version. To install this JDeveloper version along with the plug-in, follow the steps listed in Installing Plug-in Builder and a New JDeveloper Instance.
Note:
If you select Oracle JDeveloper 12g 12.1.3.0.0 - Java Edition - Generic, then you must have an existing JDeveloper instance running. To install JDeveloper, see
http://www.oracle.com/technetwork/developer-tools/jdev/documentation/index.html. Following which, you can install plug-in builder using the steps listed in Installing Plug-in Builder into an Existing JDeveloper Instance. -
Ensure that you have downloaded the latest EDK kit to your local system. To do so, follow the steps listed in Installing the Extensibility Development Kit (EDK).
Installing Plug-in Builder
This section contains the following topics:
Note:
After installing the Plug-in Builder, to verify if the Plug-in Builder extension has been properly deployed, follow these steps:
-
On the Oracle JDeveloper page, from help menu, select About.
-
In the About Oracle JDeveloper dialog box, select Extensions.
-
In the Extensions Tab, look for:
Name:
EM Plug-in BuilderIdentifier:
oracle.em.edk.pluginbuilderVersion:
12.1.0.1.0Status:
Loaded
Installing Plug-in Builder and a New JDeveloper Instance
To install the JDeveloper studio version, and the plug-in builder components, follow these steps:
Installing Plug-in Builder into an Existing JDeveloper Instance
If you have an existing JDeveloper instance, then you must use JDeveloper update mechanism to install plug-in builder extension. To do so, follow these steps:
-
Set the following environmental variables:
On Unix:
export JAVA_HOME=/usr/jdk7

On Windows:
set JAVA_HOME=C:\Program Files\Java\jdk7
-
Run the command to start the existing JDeveloper instance.
-
On the Oracle JDeveloper page, from help menu, select Check for Updates. Check for Updates Wizard is displayed.
-
On the Welcome page, click Next.
-
On the Source Page, select Install from Local File. Click browse, or enter the path to the plug-in builder file:
On Linux
<EDK_INSTALL_DIR>/lib/empluginbuilder.zipOn Windows:
<EDK_INSTALL_DIR>\lib\empluginbuilder.zipWhere,
EDK_INSTALL_DIRis the directory where EDK is installed.Click Next.
-
On the Summary page, upgraded extensions, and the new extensions are displayed. Click Finish.
You are then prompted to exit the JDeveloper wizard.
-
To update the JDeveloper reference to EDK, follow these steps:
-
Start the JDeveloper instance.
-
On the Oracle JDeveloper page, from Tools menu, select Preferences.
-
On the Preferences page, select EM Plug- in Builder, and update the location of the EDK.
Note:
If you miss updating the EDK home location, the plug-in project fails with
set the EDK locationerror.
-
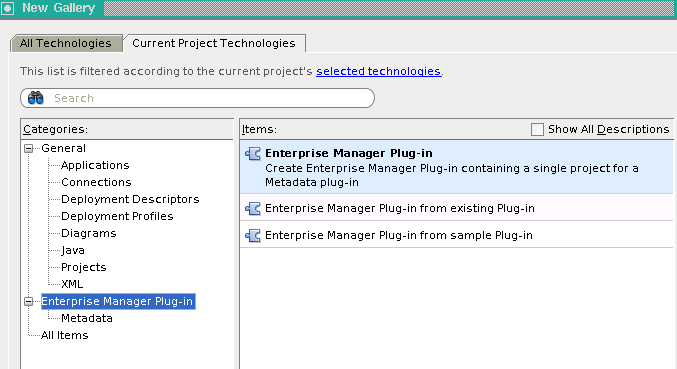
Creating an Enterprise Manager Plug-in Project
To create an Enterprise Manager project, follow these steps:
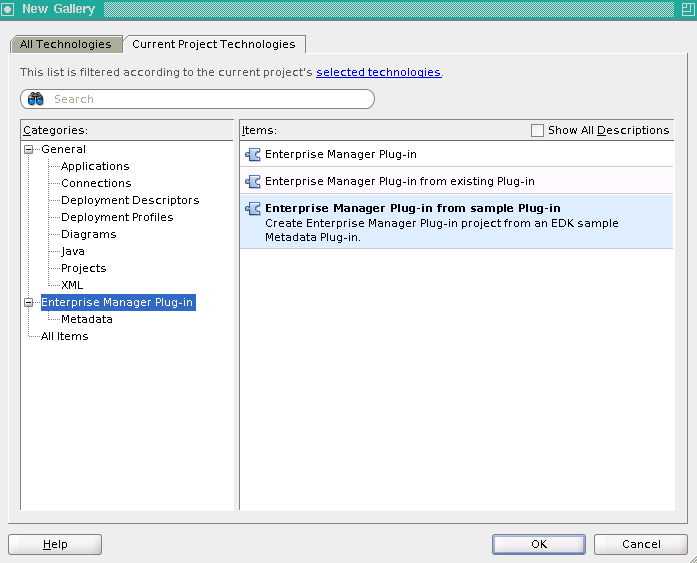
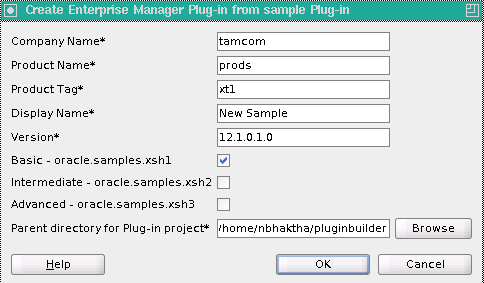
Creating a Plug-in Project Using Sample Plug-ins
To create an Enterprise Manager plug-in project using sample plug-ins, follow these steps:
Discovering Targets
Starting with EDK 12.1.0.4.0, plug-in builder supports specifying discovery metadata and target specific discovery code. That means, whenever a new target type is created, the discovery metadata gets updated automatically to include the newly added target types. If you do not want to discover some target types, then you can manually delete that information from the discovery.xml file available at: <project_name>/Resources/oms/metadata/discovery. To access and view the details of this xml file, see Viewing Basic Discovery Information. The target specific discovery code is supported using a Perl script located under /Resources/discovery folder. For any new target type added, the corresponding discovery code should be added in the Perl script. For an example on how to update the Perl script to discover targets, see Discovery Integration Example Requiring User Input.
See Also:
For more information about how discovery of targets can be accomplished in Enterprise Manager manually, see Defining Target Discovery.
Updating Discovery Metadata for a Pre-existing Plug-in
If you have a plug-in that was created without the discovery metadata, then you can use the Plug-in Builder to manually add the discovery files to the correct folders. Follow these steps to enable discovery support for a pre-existing plug-in:
Deploying the Plug-in Archive into Enterprise Manager
Before you deploy the plug-in archive file into Enterprise Manager, perform the following pre-requisite tasks:
- The Enterprise Manager instance where you plan to deploy the plug-in, must have the Software Library configured, and contain the plug-in archive file.
- If you want to deploy the plug-in using the Plug-in Builder, ensure that the required preferences are set. To set the Enterprise Manager Plug-in Builder preferences, from the Tools menu, select Preferences. In the Preferences dialog box, select EM Plug-in Builder, and select I would like to specify a test Enterprise Manager installation.
Once the plug-in archive file (.opar) is ready, to deploy the plug-in archive file into Enterprise Manager, right-click the project name, and from the context menu, select Deploy Plug-in, and then click OK.
Note:
If you haven't created the Plug-in archive file, you will not be allowed to perform the deploy step.
After the plug-in has been successfully deployed, to access the plug-in, log into Enterprise Manager, and from the Setup menu, select Extensibility, then click Plug-ins. You must see the newly deployed plug-in on the Plug-ins page.
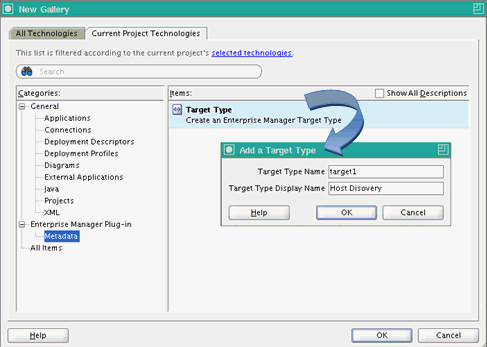
Adding a New Target Type
There are two approaches to add a new target type. They are:
Table 4-2 Adding A Target Type
| Approach 1 | Approach 2 |
|---|---|
|
On Oracle JDeveloper page, from File menu, select New. A New Gallery dialog box is displayed. |
Select the project name from the Application menu. |
|
In the Categories section, select Metadata, then select Target Type. |
Expand the oms folder present inside the project folder, and drill down to the targetType folder. |
|
Click OK. |
Right-click the targetType folder, and select New |
|
NA |
In the New Gallery window, select Metadata., then click Target Type. Click Ok. |
Note:
The newly added target type automatically becomes available for discovery. In order to discover the targets, you must ensure that the perl script available in /Resources/discovery directory is manually updated to include all the target type information. For more information, see Discovering Targets.
Updating Target Type Information
For a new Target Type, you need to provide the following details:
Note:
The metric references are completely synchronized with the collection metadata, which means, if you delete or rename a metric for a target type, then the corresponding reference in the collection items are also updated accordingly.
Adding Instance Properties
To define what properties an administrator must specify in the Enterprise Manager console when adding a new target instance of this particular target type, follow these steps:
Adding Dynamic Properties
The values for dynamic instance properties are passed back by the Management Agent collecting data from the target instance. They are typically used within a QueryDescriptor to define properties passed to the fetchlet responsible for metric collection. To add dynamic instance properties, follow these steps:
Adding Credential Type
Credential type is the type of authentication supported by a target type. To add a credential type, follow these steps:
- Double-click the target type file (
target_type.xml) to open with the Overview editor. - Select Credentials tab, and click add (+) in the CredentialType section.
- In the Insert CredentialType dialog box, enter a Name, NLSID, and label for the credentials you are adding.
- Click add (+) icon in the CredentialType Columns section.
- In the add Credentialtype Column dialog box, enter the column values for each credential type, and click OK.
For example, to create a host credential with two columns UserName and Password, you need to provide the following details:
In the Insert CredentialType dialog box, enter the following details:
NAME: XP2HostCreds
NLSID: CREDS_HOST_HOSTCREDS
LABEL: XP2 Host Credentials

In the AddCredentialType Column, enter the following details:
NAME: XP2HostUserName
NLSID: CREDS_HOST_USERNAME
LABEL: XP2 Host UserName

NAME: XP2HostPassword
NLSID: CREDS_HOST_Password
LABEL: XP2 Password
You can edit or delete the Credentials by selecting the respective option available in the CredentialType section.
Adding Credential Set
To create an instance of a CredentialType, follow these steps:
- Double-click the target type file (
target_type.xml) to open with the Overview editor. - Select Credentials tab, and click add (+) in the CredentialSet section.
- In the Insert CredentialSet dialog box, enter a unique name, select the Credential type from the menu, select a value for usage, enter an NLSID, and a label for the instance of the credential type that you are creating.
- Click add (+) icon in the CredentialTypeColumns section.
- In the Add CredentialSet Column dialog box, enter the column values for each credential set, and click OK.
For example, to create an instance of Host Credential type called Normal host credential with two columns Normal Username and Normal Password, you need to provide the following details:
In the Insert CredentialSet dialog box, enter the following details:
NAME: HostCredsNormal
CREDENTIALTYPE: XP2HostCreds
USAGE: PREFERRED_CRED
NLSID: CREDS_HOST_HOSTCREDS_NORMAL
LABEL: Normal Host Credentials

In the AddCredentialSet Column, enter the following details:
SET_COLUMN: username
TYPE_COLUMN: XP2HostUsername
NLSID: CREDS_HOST_HOSTCREDS_NORMAL
LABEL: Normal Username

SET_COLUMN: password
TYPE_COLUMN: XP2HostPassword
NLSID: CREDS_HOST_HOSTCREDS_NORMAL
LABEL: Normal Password
You can edit or delete the Credentials by selecting the respective option available in the CredentialType section.
Adding Metric Properties for a Target
To add a metric property, follow these steps:
- Double-click the target type file (
target_type.xml) to open with the Overview editor. - Select Metrics tab, and click add (+) in the Metric section. The Metric Properties dialog box is displayed.
- In the general tab, enter name, NLSID, value, and type for the metric.
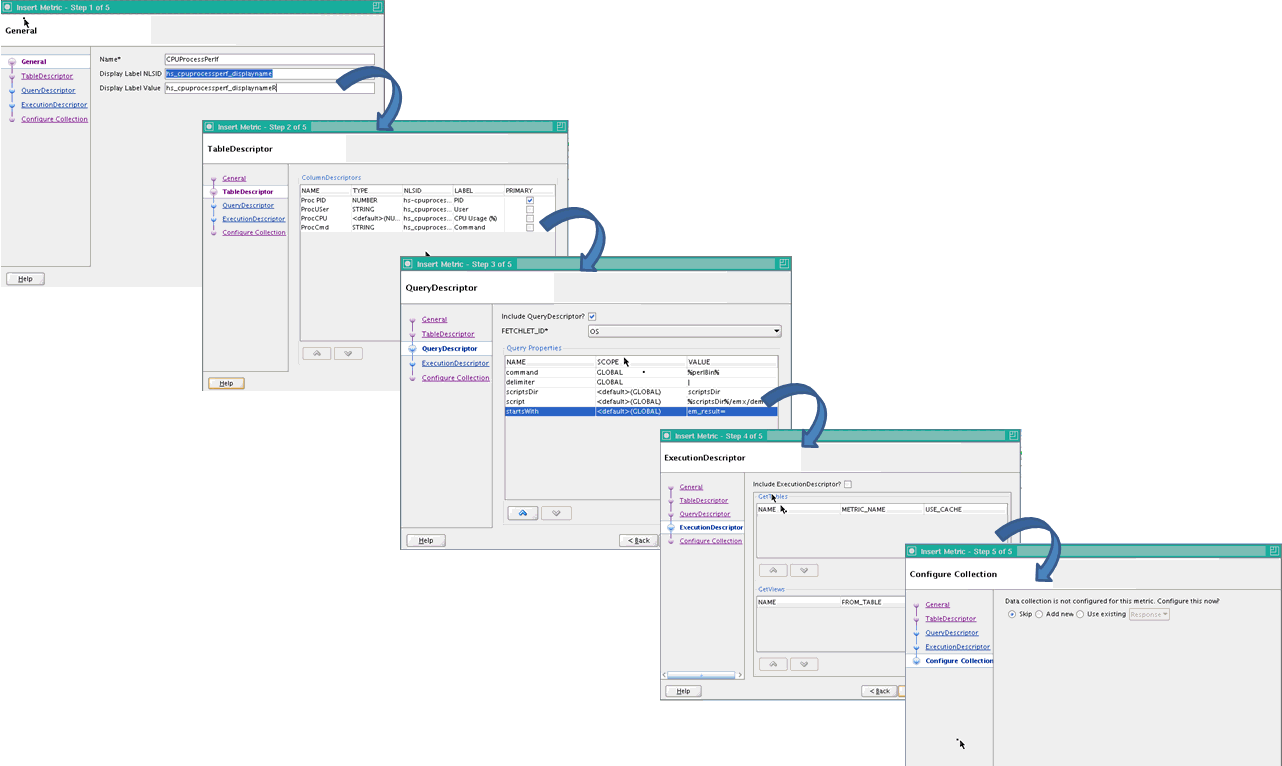
- In the TableDescriptor tab, provide a name for the table, and follow the steps listed in Adding ColumnDescriptor to add a ColumnDescriptor.
- In the QueryDescriptor tab, select IncludeQueryDescriptor if you want to run a query. Select the FETCHLET_ID from the menu, and insert the Query Properties. To add Query Properties, see Adding QueryProperties.
- In the ExecutionDescriptor tab, enter relevant values in the GetTables and GetViews section. To do so, see Adding ExecutionDescriptor Table and Adding ExecutionDescriptor View.
- In the Configure Collection tab, to setup data configuration for the metric, click Add new. For more information, see Configuring Collection Items for a Target.
- Click Finish.
For example, the following graphic describes how to create a metric group containing metrics that collect CPU performance data:
You can edit or delete the metric property by selecting the respective option available in the Metric section.
Adding ColumnDescriptor
To add a ColumnDescriptor, follow these steps:
- In the TableDescriptor tab, click add (+) icon. Add ColumnDescriptor dialog box is displayed.
- Enter Name, Type, NLSID, and Label for the output column that you would like to include in the table. Select the IS_PRIMARY check box to make the selected column the primary key column in the Management Repository. Click OK.
Adding QueryProperties
To add a QueryDescriptor, follow these steps:
- In the QueryDescriptor tab, click add (+) icon. Add QueryDescriptor Property dialog box is displayed.
- Enter Name and Scope for the query property. Click OK.
Adding ExecutionDescriptor Table
To add an ExecutionDescriptor table, follow these steps:
- In the ExecutionDescriptor tab, click add (+) icon in the GetTables section. Add ExecutionDescriptor Table dialog box is displayed.
- Enter Name and Metric Name, and click OK.
Adding ExecutionDescriptor View
To add an ExecutionDescriptor view, follow these steps:
- In the ExecutionDescriptor tab, click add (+) icon in the GetViews section. Add ExecutionDescriptor Table dialog box is displayed.
- Enter Name and Metric Name. If you select Filter, you can provide a single column name, and a corresponding value. If you do not select Filter, click add (+) icon to add multiple column names and values. Click OK.
Configuring Collection Items for a Target
In the Configure Collection tab, you can perform the following tasks:
-
Skip: Choose skip to bypass this step. Basically, no collection item is associated with this metric.
-
Add New: Choose Add New to configure a new collection item that will collect data for this metric. To add or edit the properties for a collection item, see Inserting or Updating Collection Item Properties.
-
Use Existing: Choose Use Existing, and select the collection item from the menu to associate an existing collection item to this metric for data collection.
Adding a Collection Item for the Target
There are two approaches to add new collection item for the target.
Table 4-3 Adding or Updating a Collection Item
| Approach 1 | Approach 2 |
|---|---|
|
Select the project name from the Application menu. |
|
|
Expand the oms folder for your project, then select Target Type. A list of target types is displayed. |
Open the plugin.xml file in an overview editor. |
|
Select the target type to associate collection item. |
Select Collection Items tab. A list of all the available collection items for the target is displayed. |
|
Select Metrics tab, then click Add icon. In the Insert Metric wizard, select Configure Collection, then click Add New. Note: To add or edit the properties for a collection item, see Inserting or Updating Collection Item Properties |
Select one collection item from the list, and do the following: In the General tab, the metadata version and target type information is displayed. In the Collection Items tab, the collection item name is displayed. Note: To add or edit the properties for a collection item, see Inserting or Updating Collection Item Properties |
Inserting or Updating Collection Item Properties
To add or edit the properties of a collection item, follow these steps:
- In the General tab, enter a name for the collection item. Upload value determines the value following which the data will be written to the repository. For example, an UPLOAD value of 6 implies that every sixth collection of data will be written to the Management Repository. Provide a value for Interval and the time unit. For example, an interval of 5, and time unit of Min would mean that collection will happen at 5 minutes interval. Click Next.
- In the Conditions tab, you can set a metric alert condition. To do so, click Add (+) in the Conditions section. The Add Conditions dialog box is displayed. Enter all the values for your condition here, and click OK. Click Next.
- In the Metric Collection tab, provide the necessary details, and click Finish.
The following example represents the CollectionItem entry for the basic Response metric group, which includes the Status metric. It specifies that data for this metric should be collected every 5 minutes, which is the standard collection interval for this type of metric. A condition has been set on the Status metric.:
In the General tab, enter the following details:
META_VER: 1.0
TYPE: test_demo_targetType

In the CollectionItem tab, enter the following details:
NAME: Response
UPLOAD: 6
INTERVAL: 5
TIME_UNIT: Min

In the Add Condition Dialog box, enter the following details:
COLUMN_NAME: Status
CRITICAL: 0
OPERATOR: EQ
CLEAR_MESSAGE_NLSID: Response_Status_clearalertmessage
MESSAGE: Failed to connect to database instance: %oraerr%.
Appendix
This section contains the following topics:
Using the Structure View
Structure view shows the element structure of the XML file and can be used to navigate to specific elements whose attributes will then be displayed in the Property Inspector section.
Using Property Inspector
Instead of using the Overview section, you can choose to use the plug-in builder specific labels and elements available in the property inspector section to modify the source XML code of the plug-in. This section provides all the plug-in specific attributes that make the editing experience user-friendly
Note:
For a complete list of DTD elements and their usage, see Enterprise Manager DTD.
Directory Structure for a Plug-in Project
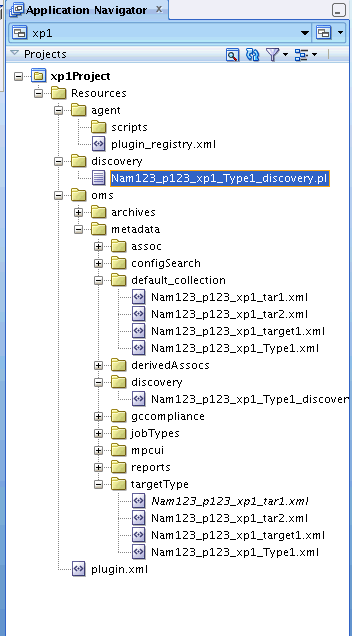
The following is a typical example for a plug-in project. This example describes four targets, and their corresponding collection items. The collection items are essentially meant to collect data from these target types. There are four Collection Items, one for each target. A Perl script is available in the discovery folder. The primary function of this script is to automatically discover all the targets added as a part of this project when the plug-in archive is imported and deployed to Enterprise Manager.
