Defining the Hierarchy
On this page you define the administration group hierarchy that reflects the organizational hierarchy you planned earlier and which target properties are associated with a particular hierarchy level.
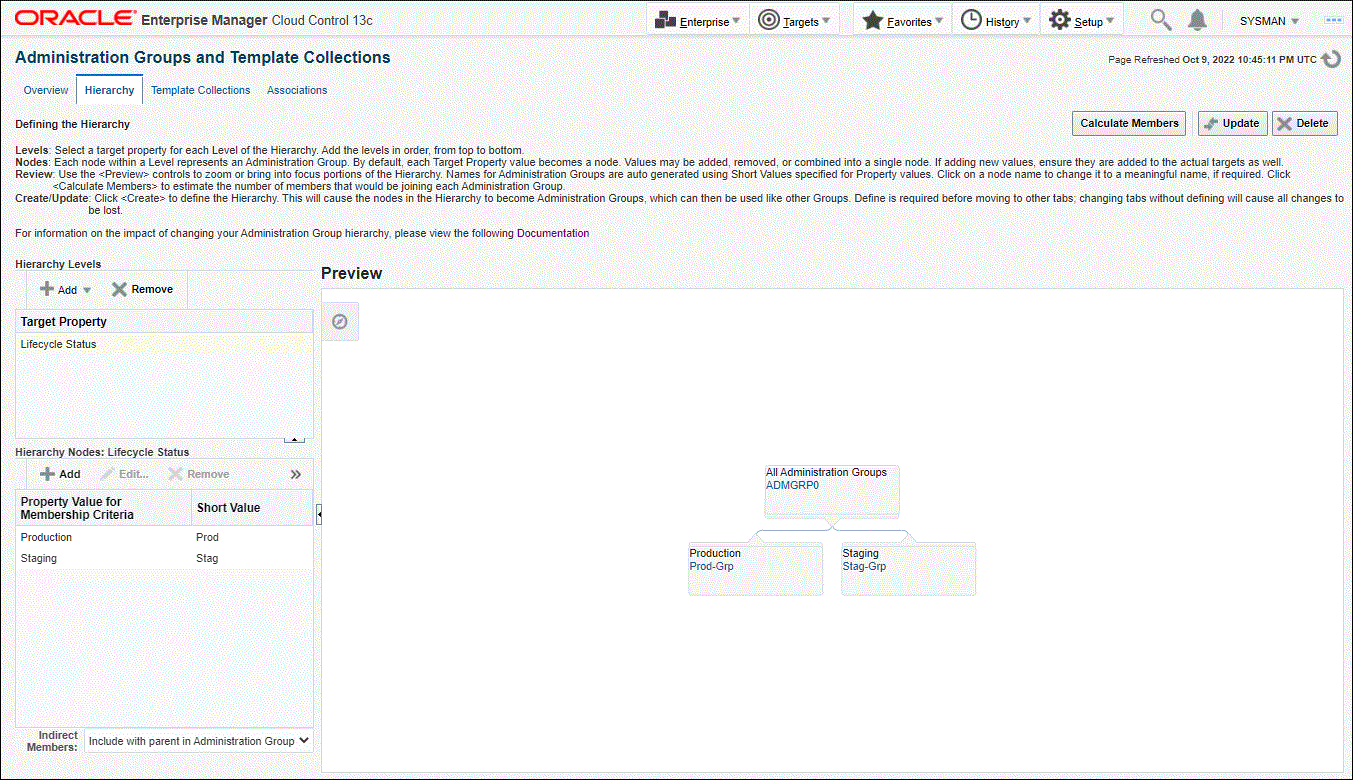
On the left side of the page are two tables: Hierarchy Levels and Hierarchy Nodes. There is also a drop-down menu to include/exclude indirect members.

The Hierarchy Levels table allows you to add the target properties that define administration group hierarchy. The Hierarchy Nodes table allows you to define the values associated with the target properties in the Hierarchy Levels table. When you select a target property, the related property values are made available in the Hierarchy Nodes table, where you can add/remove/merge/split the values. In the Hierarchy Nodes table, each row corresponds to a single administration group. The Short Value column displays abbreviated value names that are used to auto-generate group names.
The Hierarchy Levels table allows you to add the target properties that define each level in the administration group hierarchy. The Hierarchy Nodes table allows you to define the values associated with the target properties in the Hierarchy Levels table. Each row in the Hierarchy Nodes table will correspond to a node or group in the administration group hierarchy for that level. When you select a target property in the Hierarchy Levels table, the related property values are made available in the Hierarchy Nodes table, where you can add/remove/merge/split the values. Merge two or more values if either value should be used as membership criteria for the corresponding administration group. The Short Value column displays abbreviated value names that are used to auto-generate group names.
The Indirect Members drop-down menu provides you with the option to include or exclude any indirect member targets as part of the administration group hierarchy. For more information on indirect members, see Group Member Type and Synchronization (Indirect Members).
Adding a Hierarchy Level
-
On the Administration Group page, click the Hierarchy tab.
-
From the Hierarchy Levels table, click Add and choose one of the available target properties. You should add one property/level at a time instead of all properties at once.
-
With the target property selected in the Hierarchy Levels table, review the list of values shown in the Hierarchy Nodes table. The values of the target property in the Hierarchy Nodes table.
Enterprise Manager finds all existing values of the target property across all targets and displays them in the Hierarchy Nodes table. For some target properties, such as Lifecycle Status, predefined property values already exist and are automatically displayed in the Hierarchy Nodes table. You can select and remove target property values that will not be used as membership criteria in any administration group. However, property values that are not yet available but will be used as administration group membership criteria, will need to be added.
The next step shows you how to add property values.
-
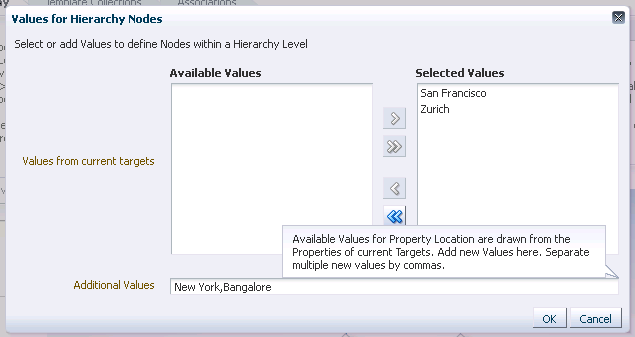
From the Hierarchy Nodes table, click Add. The associated property value add dialog containing existing values from various targets displays. Add the requisite value(s). Multiple values can be specified using a comma separated list. For example, to add multiple locations such as San Francisco and Zurich, add the Location target property to the Hierarchy Level table. Select Location and then click Add in the Hierarchy Nodes table. The Values for Hierarchy Nodes dialog displays. Enter "San Francisco,Zurich" as shown in the following graphic.

Extending Administration Group Hierarchy Maximum Limits
There is a default maximum for the number of values that can be supported for a target property as administration group criteria. If you see a warning message indicating that you have reached this maximum value, you can extend it using the OMS property admin_groups_width_limit. Specify the maximum number of values that should be supported for a target property. For example, to support up to 30 values for a target property that will be used in administration group criteria, set the admin_groups_width_limit as follows (using the OMS
emctlutility):emctl set property -name admin_groups_width_limit -value 30 -module emoms
You can also add up to four levels after the root node of an administration group hierarchy. If there is a need to add additional level, you will first need to change the OMS admin_groups_height_limit property to the maximum height limit. For example, if you want to create to administration group hierarchy consisting of five levels after the root node, set the admin_groups_height_limit property as follows (using the OMS emctl utility):
emctl set property -name admin_groups_height_limit -value 5 -module emoms
This is a global property and only needs to be set once using the emctl utility of any OMS. This is also a dynamic property and does not require a stop/restart of the OMS in order to take effect.
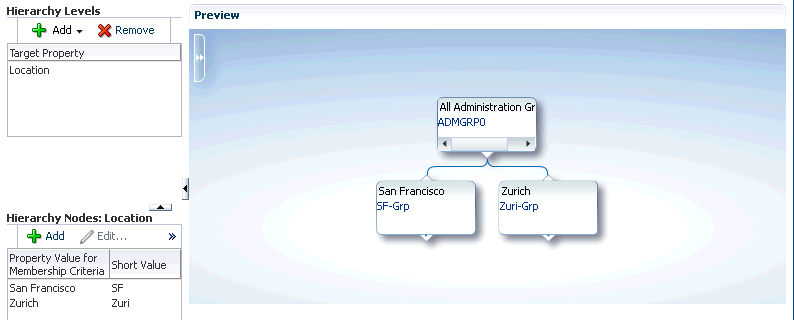
Click Create. The two locations "San Francisco" and "Zurich" appear as nodes in the Preview pane as shown in the following graphic.
Under certain circumstances, it may be useful to treat multiple property values as one: Targets may have different target property values, but should belong to the same administration group because they have the same monitoring profile/settings. For example, a combination of values is needed for the Lifecycle Status property where you have the following:
- Production Group: Criteria is based on Lifecycle Status = Mission Critical or Production
- Non-Production Group: Criteria is based on Lifecycle Status = Development, Test, Staging
In this situation, the two Lifecycle Status properties should be merged (combined into a single node).
To merge property values:
-
Select a target property from the list of chosen properties in the Hierarchy Levels table. The associated property values are displayed.
-
Select two or more property values by holding down the Shift key and clicking on the desired values.
-
Click Merge.
- From the Indirect Members drop-down menu, choose whether you want to include or exclude any indirect member targets as part of the administration group. For more information on indirect group members, see Group Member Type and Synchronization (Indirect Members).
-
Continue adding hierarchy levels until the group hierarchy is complete. The Preview pane dynamically displays any changes you make to your administration group hierarchy.
-
Set the time zone for the group.
-
Click on the group name. The Administration Group Details dialog displays allowing you to select the appropriate time zone.

The administration group time zone is used for displaying group charts and also for scheduling operations on the group. Because this is also the default time zone for all subgroups that may be created under this group, you should specify the time zone at the highest level group in the administration group hierarchy before the subgroups are created. Note that the parent group time zone will be used when creating any child subgroups, but user can always select a child subgroup and change its time zone.
The auto-generated name can also be changed.
-
-
Click Create to define the hierarchy.
Note:
Review and define the complete hierarchy before clicking Create.
Even after your administration group hierarchy has been created, you can always make future updates if organizational needs change. For example, adding/removing group membership criteria property values, which equates to creating/deleting additional administration groups for a given level. Using the previous example, if in addition to San Francisco and Zurich you add more locations, say New York and Bangalore, you can click Add in the Hierarchy Node table to add additional locations, as shown in the following graphic. For more information about changing the administration group hierarchy, see "Changing the Administration Group Hierarchy".
Click Update to save your changes.