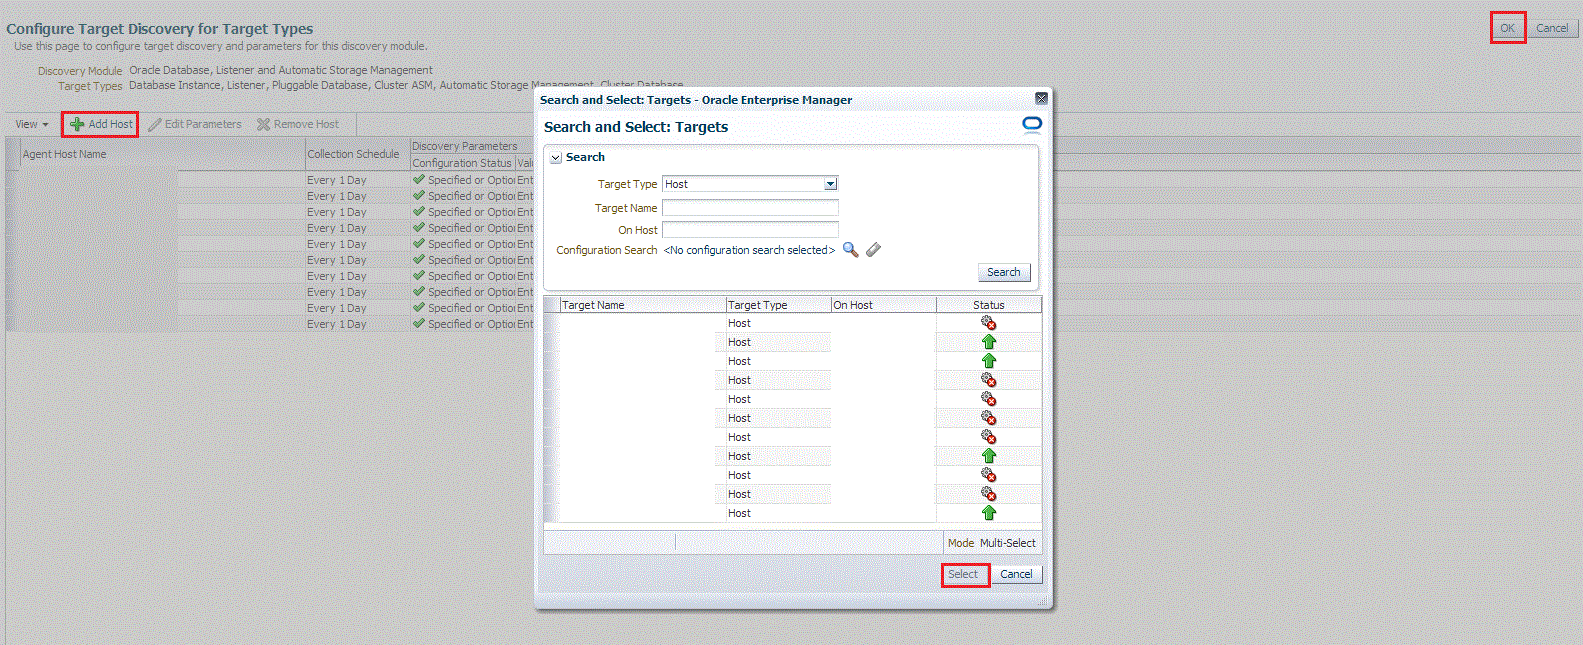
2 Discovering and Adding Database Targets
-
Discovering and Adding Container Database and Pluggable Database Targets
-
Discovering and Adding Single Instance High Availability Service Targets
-
Discovering and Adding Cluster Automatic Storage Management Targets
-
Adding Connection Manager Targets By Using the Declarative Process
- Preferred Connect Strings
Enabling Autodiscovery of Database Targets
Autodiscovery of database targets is enabled by default. If autodiscovery has been disabled, you can enable it, by following these steps:
Discovering and Adding Container Database and Pluggable Database Targets
This section describes the different methods in which you can discover, promote, and add container database (CDB) and pluggable database (PDB) targets in Cloud Control. In particular, this section covers the following:
Discovering CDB and PDB Targets Using Autodiscovery
Autodiscovery of databases is enabled by default. If autodiscovery has been disabled, follow the steps described in Enabling Autodiscovery of Database Targets.
Note:
A database system is automatically created on discovery of an Oracle Database. The system is built on the new target and association model that can be used to monitor the database's storage, connectivity, and high availability. This also enables you to monitor and manage applications that are dependent on the database. Database System topology can be used to view relationship between various entities within the database system as well as external dependencies.
A database system contains a primary database and related targets such as Listener and Automatic Storage Management. It also includes standby databases and their related targets if the database is in a Data Guard configuration. However, you cannot create database systems for standby databases.
To promote a CDB target and its associated PDB targets using automatic discovery, follow these steps:
Note:
By default, promoting a CDB target also promotes all its associated discovered PDB targets. Also, by default, Enterprise Manager runs a background job (every 24 hours) to automatically discover and promote newly created PDB targets present on managed hosts. Hence, to discover and promote PDB targets, you only need to discover and promote the associated CDB target, as described in this section.
-
From the Setup menu, select Add Target, then select Auto discovery Results. Click Agent-based Targets.
-
Search for and select the Database Instance target that you want to promote, then click Promote.
Note:
You can also discover Application Root PDBs. However, they are not explicitly shown as Application Root Pluggable Database, but just as Pluggable Database.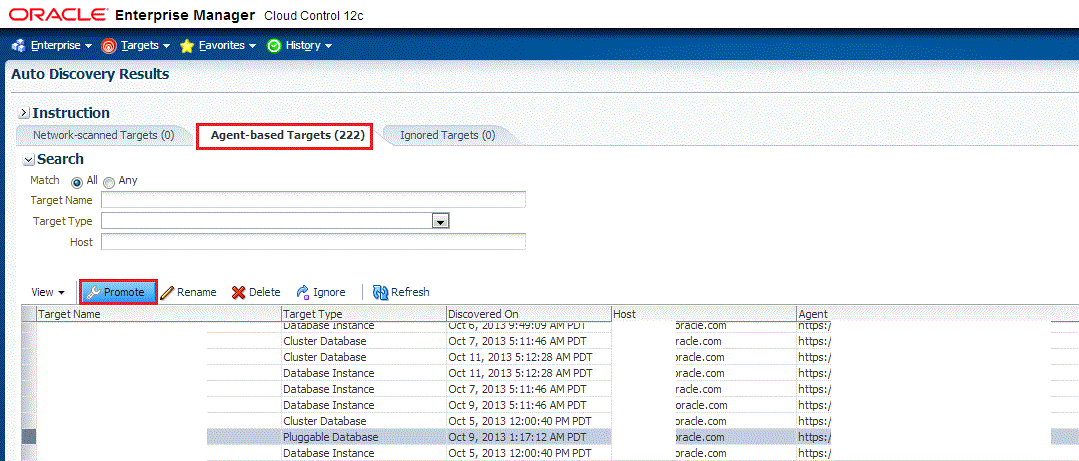
-
On the Promote Target: Results page, under the Databases section, select the CDB target.
By default, selecting a CDB target for promotion also selects all its associated and discovered PDB (and Application Root PDB) targets for promotion. If you want to add or remove a target from the ones selected for promotion, select the CDB target, then click Configure.

Select the Pluggable Databases tab, then click Add or Remove. Click Save.
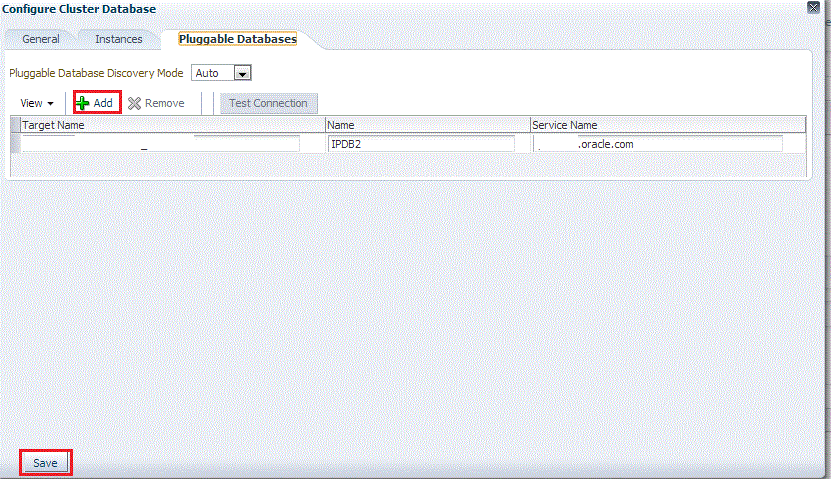
Enterprise Manager runs a background job (every 24 hours) to automatically discover and promote newly created PDB targets present on managed hosts. If you do not want Enterprise Manager to automatically promote the PDB targets associated with a particular CDB target, and instead want to promote them manually, select the CDB target on the Promote Target: Results page, then click Configure. Select the Pluggable Databases tab, then select Manual for Pluggable Database Discovery Mode. Click Save.
-
Specify the monitoring credentials for the selected CDB target, that is, the user name, password, and role. Also, if you want the selected target to be added to a group, specify a value for Group.
If you specify Normal for Role, then the user name can be dbsnmp or a DB monitoring user. If you specify SYSDBA for Role, then you can provide any SYSDBA user.
-
Click Test Connection to test the connection made to the CDB target using the specified monitoring credentials.
-
To specify global target properties for all the targets you have selected on the Promote Target: Results page, click Set Global Target Properties, specify the required properties, then click OK.
To specify a common group for all the targets you have selected on the Promote Target: Results page, click Specify Group for Targets, select a group, then click Select.
-
Click Next.
-
Review the displayed information, then click Submit.
Adding CDB and PDB Targets Using the Guided Discovery Process
To add a CDB target and its associated PDB (and Application Root PDB) targets using a guided discovery process, follow these steps:
Note:
-
You can also add Application Root PDBs. However, they are not explicitly shown as Application Root Pluggable Database, but just as Pluggable Database.
-
A database system is automatically created on discovery of an Oracle Database. The system is built on the new target and association model that can be used to monitor the database's storage, connectivity, and high availability. This also enables you to monitor and manage applications that are dependent on the database. Database System topology can be used to view relationship between various entities within the database system as well as external dependencies.
A database system contains a primary database and related targets such as Listener and Automatic Storage Management. It also includes standby databases and their related targets if the database is in a Data Guard configuration. However, you cannot create database systems for standby databases.
-
From the Setup menu, select Add Target, then select Add Targets Manually.
-
On the Add Targets Manually page, select Add Using Guided Process.
-
In the Add Using Guided Process dialog box, select Oracle Database, Listener, and Automatic Storage Management. Click Add...
-
Select Add Targets Using Guided Process (Also Adds Related Targets). For Target Types, select Oracle Database, Listener, and Automatic Storage Management. Click Add Using Guided Process.
-
On the Database Discovery: Search Criteria page, for Specify Host or Cluster, specify the CDB host.
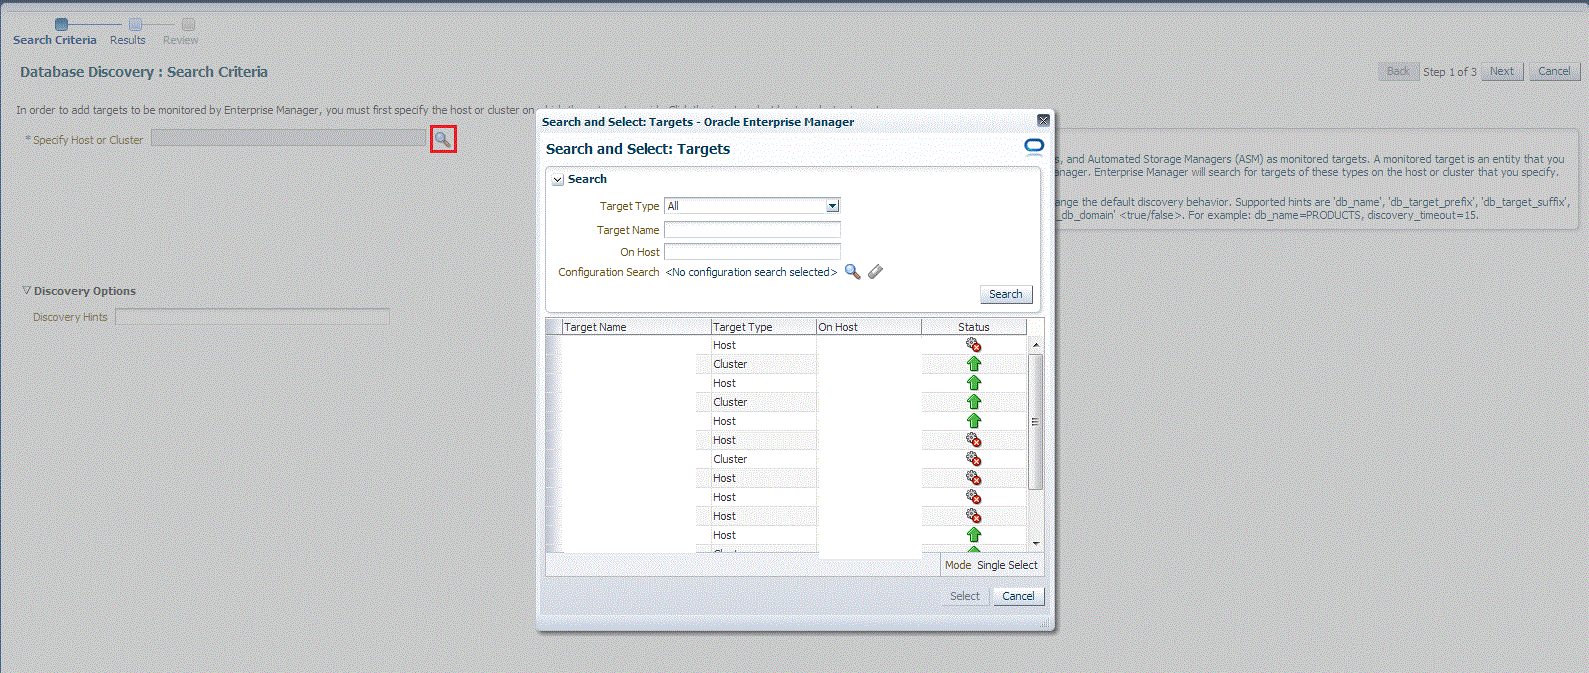
If the host you select is a member of a cluster, then use this page to also indicate whether the PDB targets should be searched only on the selected host or on all hosts within the cluster.
After you click the search icon, a Select Targets dialog box appears. Specify the target name or select a target from the target table. You can filter the search to search for all down targets or up targets, by clicking the filter arrows in the Status column.
You can also configure your search by clicking the Configuration Search icon. After you select the CDB, click Select.
You get an option to choose if you want to search for pluggable database targets only on the current host that you selected, or on all the hosts in the cluster that the host target is a member of.
This option enables you to save time, if you want to search for PDB targets only on the current host selected.
The Discovery Options section enables you to specify discovery hints. You can specify additional discovery options to change the default discovery behavior. Supported hints are
db_name, db_target_prefix, db_target_suffix, discovery_timeout <in seconds per host>, andno_db_domain.For example,
db_name=PRODUCTS, discovery timeout=15. -
Click Next.
-
On the Database Discovery: Results page, under the Databases section, select the CDB target.
By default, selecting a CDB target for promotion also selects all its associated and discovered PDB (and Application Root PDB) targets for promotion. If you want to add or remove a PDB target from the ones selected for promotion, select the CDB target, then click Configure. Select the Pluggable Databases tab, then click Add or Remove. Click Save.

Enterprise Manager runs a background job (every 24 hours) to automatically discover and promote newly created PDB targets present on managed hosts. If you do not want Enterprise Manager to automatically promote the PDB targets associated with a particular CDB target, and instead want to promote them manually, select the CDB target on the Promote Target: Results page, then click Configure. Select the Pluggable Databases tab, then select Manual for Pluggable Database Discovery Mode. Click Save.
-
Specify the monitoring credentials for the selected CDB target, that is, the user name, password, and role. Also, if you want the selected target to be added to a group, specify a value for Group.
If you specify Normal for Role, then the user name can be dbsnmp or a DB monitoring user. If you specify SYSDBA for Role, then you can provide any SYSDBA user.
-
Click Test Connection to test the connection made to the CDB target using the specified monitoring credentials.
-
To specify global target properties for all the targets you have selected on the Promote Target: Results page, click Set Global Target Properties, specify the required properties, then click OK.
To specify a common group for all the targets you have selected on the Promote Target: Results page, click Specify Group for Targets, select a group, then click Select.
If you have selected multiple databases and you want to set the same monitoring properties for all of them, select Specify Common Monitoring Credentials. Enter the monitoring credentials, monitoring password, and role. Click Apply.
-
Click Next.
-
Review the displayed information, then click Submit.
Adding CDB and PDB Targets By Using the Declarative Process
To add a CDB target and its associated PDB (and Application Root) targets by specifying target monitoring properties, follow these steps:
Note:
A database system is automatically created on discovery of an Oracle Database. The system is built on the new target and association model that can be used to monitor the database's storage, connectivity, and high availability. This also enables you to monitor and manage applications that are dependent on the database. Database System topology can be used to view relationship between various entities within the database system as well as external dependencies.
A database system contains a primary database and related targets such as Listener and Automatic Storage Management. It also includes standby databases and their related targets if the database is in a Data Guard configuration. However, you cannot create database systems for standby databases.
-
From the Setup menu, select Add Target, then select Add Targets Manually.
-
On the Add Targets Manually page, select Add Target Declaratively.
-
In the Add Target Declaratively dialog box, select Pluggable Database, and click Add...
For Monitoring Agent, specify the Management Agent present on the CDB host. Click Add Manually.
-
On the Add Pluggable Database: Specify Container Database page, specify the CDB or click the search icon to select the CDB to which the target will be added.
Click Continue.

-
On the Add Pluggable Database: Properties page, specify a unique name for the target, the name, the default service name, the OMS preferred string connection, and the Agent preferred connect string.
Note:
In Enterprise Manager Release Update 12 and later, Service Name is now supported through Preferred Connection Strings. For more information, please view the following Preferred Connect Strings.
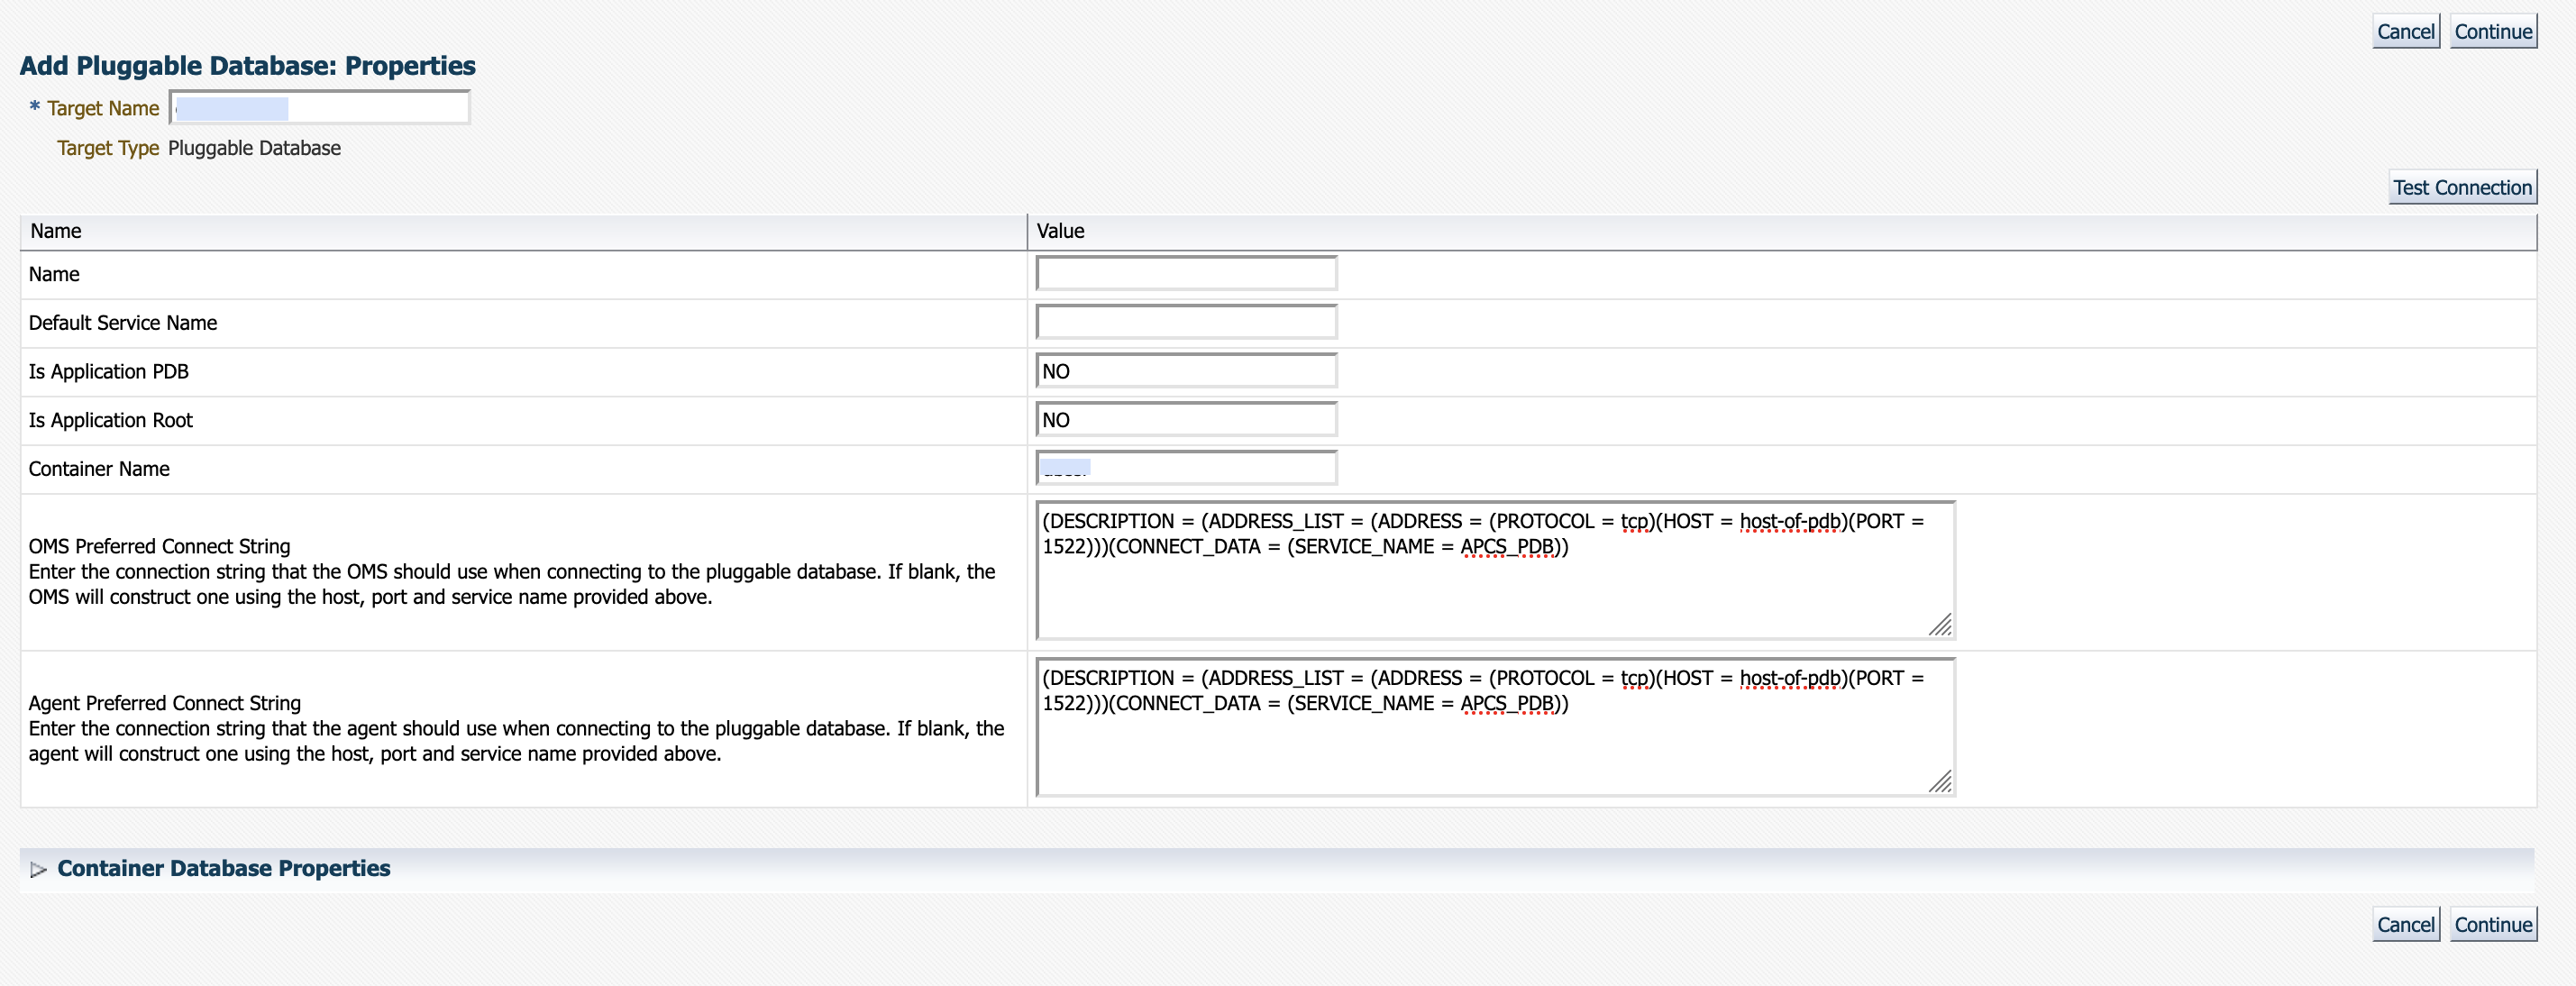
Expand the Container Database section to verify the properties of the CDB.
Click Test Connection to test the connection made to the CDB target using the specified monitoring credentials.
Click Continue.
-
Specify the required information on each page and then click Next, until you reach the Review page.
-
Review the displayed information, and then click Submit.
Discovering and Adding Cluster Database Targets
This section describes the different methods in which you can discover and add cluster database targets. In particular, this section cover the following:
Discovering Cluster Database Targets Using Autodiscovery
Autodiscovery of databases is enabled by default. If autodiscovery has been disabled, follow the steps described in Enabling Autodiscovery of Database Targets.
Note:
A database system is automatically created on discovery of an Oracle Database. The system is built on the new target and association model that can be used to monitor the database's storage, connectivity, and high availability. This also enables you to monitor and manage applications that are dependent on the database. Database System topology can be used to view relationship between various entities within the database system as well as external dependencies.
A database system contains a primary database and related targets such as Listener and Automatic Storage Management. It also includes standby databases and their related targets if the database is in a Data Guard configuration. However, you cannot create database systems for standby databases.
To promote cluster database targets using autodiscovery, follow these steps:
-
From the Setup menu, select Add Target, and then select Auto Discovery Results.
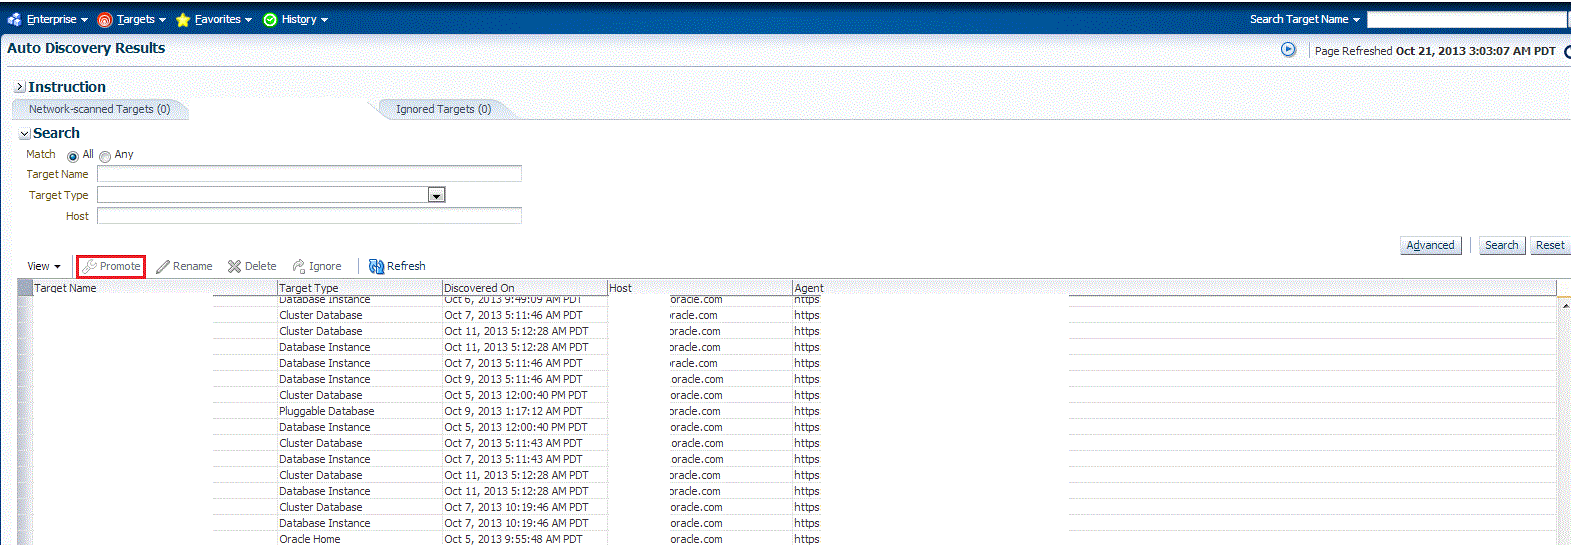
From the results table, from the Agent-based targets tab, select the discovered cluster database target that you want to add for monitoring, and click Promote.
-
The Promote Targets:Result page displays the databases discovered on the cluster. Select the database
On the Promote Target: Results page, under the Databases section, in the Cluster Databases section, select the cluster database target that you want to promote.
By default, selecting the cluster database target for promotion also selects all its associated discovered database instance targets for promotion. If you want to add or remove a database instance target from the ones selected for promotion, select the cluster database target, then click Configure. Select the Instances tab, then click Add or Remove. Click Save.

-
In the Cluster Databases section, specify the monitoring credentials for the selected cluster database target, that is, the Monitor user name, Monitor password, and role. Also, if you want the selected target to be added to a group, specify a value for Group.
If you specify Normal for Role, then the user name can be dbsnmp or a DB monitoring user. If you specify SYSDBA for Role, then you can provide any SYSDBA user.
Note:
Enterprise Manager lets you use the job system to automate database password change for the monitoring user. See Automate Monitoring and Non-monitoring User Password Management for more information. -
Click Test Connection to test the connection made to the cluster database target using the specified monitoring credentials.
-
To specify global target properties for all the targets you have selected on the Promote Target: Results page, click Set Global Target Properties, specify the required properties, then click OK.
To specify a common group for all the targets you have selected on the Promote Target: Results page, click Specify Group for Targets, select a group, then click Select.
-
If you have selected multiple databases and you want to set the same monitoring properties for all of them, select Specify Common Monitoring Credentials. Enter the monitoring credentials, monitoring password, and role. Click Apply.
-
Click Next.
-
Review the displayed information, then click Submit.
Adding Cluster Database Targets Using the Guided Discovery Process
To add cluster database targets using the guided process, follow these steps:
Note:
A database system is automatically created on discovery of an Oracle Database. The system is built on the new target and association model that can be used to monitor the database's storage, connectivity, and high availability. This also enables you to monitor and manage applications that are dependent on the database. Database System topology can be used to view relationship between various entities within the database system as well as external dependencies.
A database system contains a primary database and related targets such as Listener and Automatic Storage Management. It also includes standby databases and their related targets if the database is in a Data Guard configuration. However, you cannot create database systems for standby databases.
-
From the Setup menu, select Add Target, then select Add Targets Manually.
-
On the Add Targets Manually page, select Add Using Guided Process.
-
In the Add Using Guided Process dialog box, select Oracle Database, Listener, and Automatic Storage Management. Click Add...
-
On the Database Discovery: Search Criteria page, specify the cluster database host, or click on the Specify Host or Cluster search icon to select the cluster.

If the host you select is a member of a cluster, then use this page to also indicate whether the database targets should be searched only on the selected host or on all hosts within the cluster.
After you click the search icon, a Select Targets dialog box appears.Specify the target name or select a target from the target table. You can filter the search to search for all down targets or up targets, by clicking the filter arrows in the Status column.
You can also configure your search by clicking the Configuration Search icon. After you select the host target, click Select.
You get an option to choose if you want to search for cluster database targets only on the current host that you selected, or on all the hosts in the cluster that the host target is a member of.
This option enables you to save time, if you want to search for cluster database targets only on the current host selected.
The Discovery Options section enables you to specify discovery hints. You can specify additional discovery options to change the default discovery behavior. Supported hints are
db_name, db_target_prefix, db_target_suffix, discovery_timeout <in seconds per host>, andno_db_domain.For example,
db_name=PRODUCTS, discovery timeout=15.Click Next.
-
On the Database Discovery: Results page, under the Databases section, in the Cluster Databases section, select the cluster database target that you want to add.
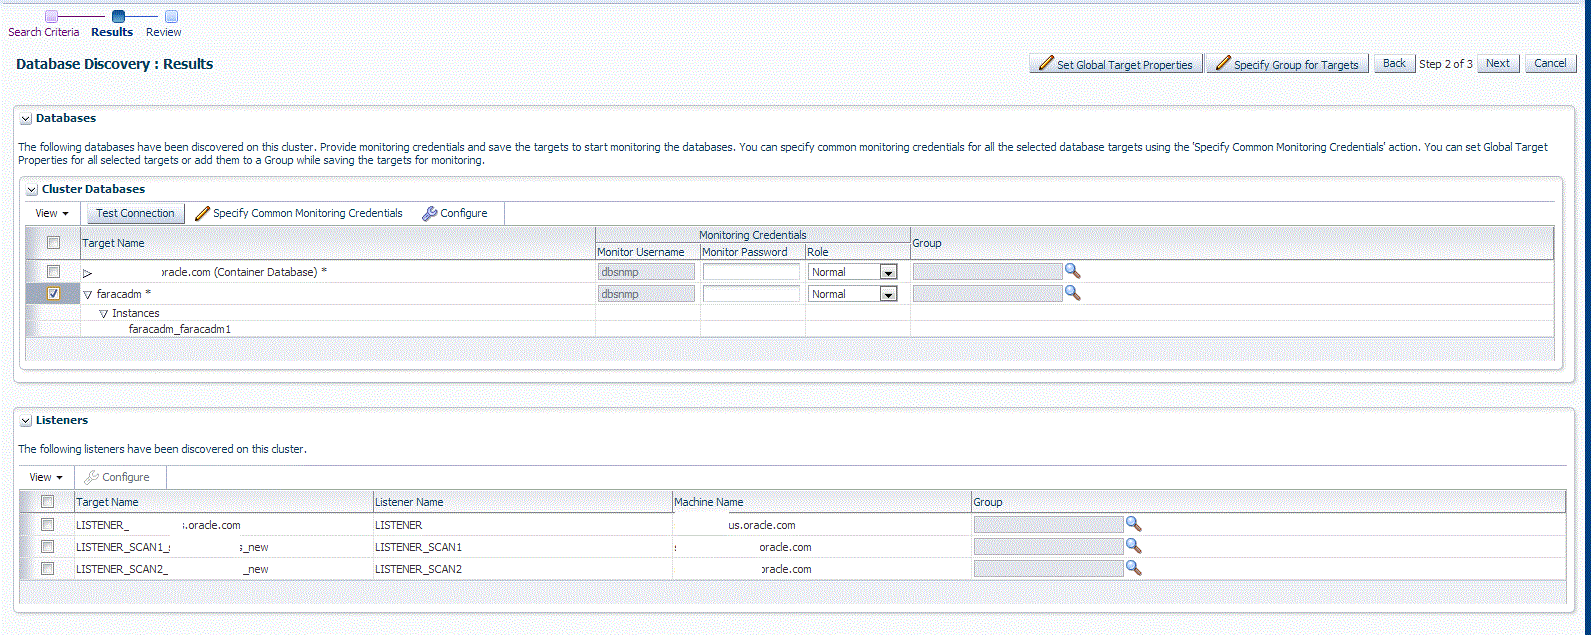
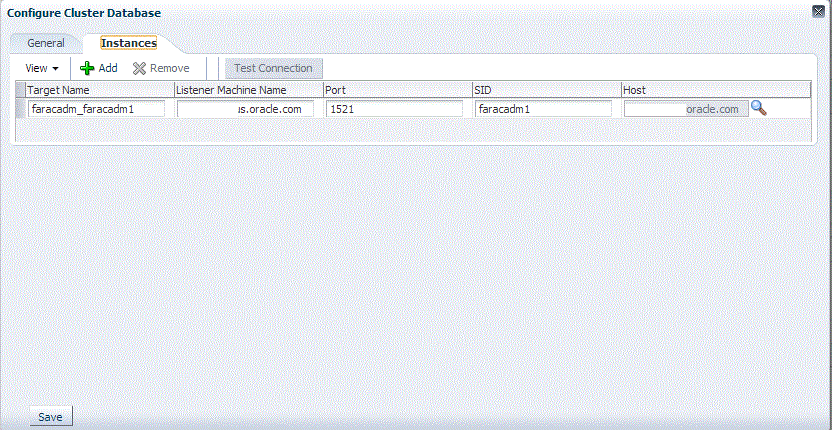
By default, selecting a cluster database target for promotion also selects all its associated discovered database instance targets for promotion. If you want to add or remove a database instance target from the ones selected for promotion, select the cluster database target, then click Configure. Select the Instances tab, then click Add or Remove. Click Save.
-
Specify the monitoring credentials for the selected cluster database target, that is, the user name, password, and role. Also, if you want the selected target to be added to a group, specify a value for Group.
If you specify Normal for Role, then the user name can be dbsnmp or a DB monitoring user. If you specify SYSDBA for Role, then you can provide any SYSDBA user.
Note:
Enterprise Manager lets you use the job system to automate database password change for the monitoring user. See Automate Monitoring and Non-monitoring User Password Management for more information. -
Click Test Connection to test the connection made to the cluster database target using the specified monitoring credentials.
-
To specify global target properties for all the targets you have selected on the Promote Target: Results page, click Set Global Target Properties, specify the required properties, then click OK.
To specify a common group for all the targets you have selected on the Promote Target: Results page, click Specify Group for Targets, select a group, then click Select.
If you have selected multiple databases and you want to set the same monitoring properties for all of them, select Specify Common Monitoring Credentials. Enter the monitoring credentials, monitoring password, and role. Click Apply.
-
Click Next.
-
Review the displayed information, then click Submit.
Adding Cluster Database Targets By Using the Declarative Process
To add a cluster database target declaratively by specifying target monitoring properties, follow these steps:
Note:
A database system is automatically created on discovery of an Oracle Database. The system is built on the new target and association model that can be used to monitor the database's storage, connectivity, and high availability. This also enables you to monitor and manage applications that are dependent on the database. Database System topology can be used to view relationship between various entities within the database system as well as external dependencies.
A database system contains a primary database and related targets such as Listener and Automatic Storage Management. It also includes standby databases and their related targets if the database is in a Data Guard configuration. However, you cannot create database systems for standby databases.
-
From the Setup menu, select Add Target, then select Add Targets Manually.
-
On the Add Targets Manually page, select Add Target Declaratively.
-
In the Add Target Declaratively dialog box, select Cluster Database, and click Add...
-
On the Configure Cluster Database: Properties, specify a name and a database system name for the cluster database target. Next, specify all the properties of the target, that is, Oracle Home path, monitoring username and password, role, Listener machine name, port, database SID, and preferred connect string.
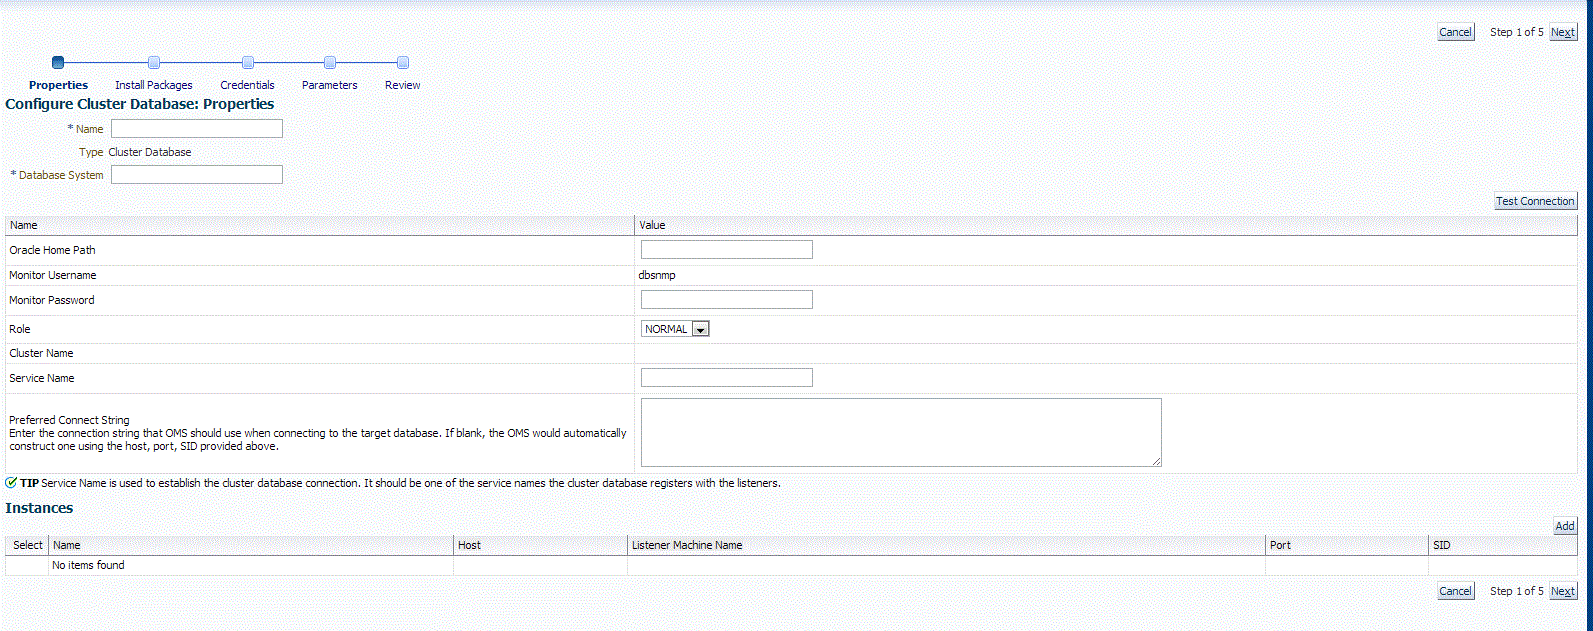
Click Next.
-
Specify all the details required on the Install Packages, Credentials, and Parameters pages. Click Next after each page until you reach the Review page.
Note:
Enterprise Manager lets you use the job system to automate database password change for the monitoring user. See Automate Monitoring and Non-monitoring User Password Management for more information. -
Review the displayed information, then click Submit.
Discovering and Adding Single Instance Database Targets
This section describes the different methods in which you can discover and add single instance database targets. In particular, this section covers the following:
Discovering Single Instance Database Targets Using Autodiscovery
Autodiscovery of databases is enabled by default. If autodiscovery has been disabled, follow the steps described in Enabling Autodiscovery of Database Targets.
Note:
A database system is automatically created on discovery of an Oracle Database. The system is built on the new target and association model that can be used to monitor the database's storage, connectivity, and high availability. This also enables you to monitor and manage applications that are dependent on the database. Database System topology can be used to view relationship between various entities within the database system as well as external dependencies.
A database system contains a primary database and related targets such as Listener and Automatic Storage Management. It also includes standby databases and their related targets if the database is in a Data Guard configuration. However, you cannot create database systems for standby databases.
To promote single instance database targets, follow these steps:
-
From the Setup menu, select Add Target, and then select Auto Discovery Results.
From the results table, from the Agent-based targets tab, select the discovered database instance target that you want to add for monitoring, and click Promote.

-
The Promote Targets:Result page displays the databases Select the database instance.
On the Promote Target: Results page, under the Databases section, in the Single Instance Databases section, select the database instance target that you want to promote.

-
Specify the monitoring credentials for the selected database instance target, that is, the Monitor user name, Monitor password, and role. Also, if you want the selected target to be added to a group, specify a value for Group.
If you specify Normal for Role, then the user name can be dbsnmp or a DB monitoring user. If you specify SYSDBA for Role, then you can provide any SYSDBA user.
Note:
Enterprise Manager lets you use the job system to automate database password change for the monitoring user. See Automate Monitoring and Non-monitoring User Password Management for more information. -
Click Test Connection to test the connection made to the database instance target using the specified monitoring credentials.
-
To specify global target properties for all the targets you have selected on the Promote Target: Results page, click Set Global Target Properties, specify the required properties, then click OK.
To specify a common group for all the targets you have selected on the Promote Target: Results page, click Specify Group for Targets, select a group, then click Select.
-
On the Configure Database Instance: Properties, specify a name and a database system name for the database instance target. Next, specify all the properties of the target.
Note:
In Enterprise Manager Release Update 12 and later, Service Name is now supported through Preferred Connection Strings. For more information, please view the following Preferred Connect Strings.
-
Click Next.
-
Review the displayed information, then click Submit.
Adding Single Instance Database Targets Using Guided Discovery Process
To add single instance database targets, follow these steps:
Note:
A database system is automatically created on discovery of an Oracle Database. The system is built on the new target and association model that can be used to monitor the database's storage, connectivity, and high availability. This also enables you to monitor and manage applications that are dependent on the database. Database System topology can be used to view relationship between various entities within the database system as well as external dependencies.
A database system contains a primary database and related targets such as Listener and Automatic Storage Management. It also includes standby databases and their related targets if the database is in a Data Guard configuration. However, you cannot create database systems for standby databases.
-
From the Setup menu, select Add Target, then select Add Targets Manually.
-
On the Add Targets Manually page, select Add Using Guided Process.
-
In the Add Using Guided Process dialog box, select Oracle Database, Listener, and Automatic Storage Management. Click Add...
-
On the Database Discovery: Search Criteria page, specify the database instance host, or click on the Specify Host or Cluster search icon to select the host.

If the host you select is a member of a cluster, then use this page to also indicate whether the databases should be searched only on the selected host or on all hosts within the cluster.
After you click the search icon, a Select Targets dialog box appears.Specify the target name or select a target from the target table. You can filter the search to search for all down targets or up targets, by clicking the filter arrows in the Status column.
You can also configure your search by clicking the Configuration Search icon. After you select the host, click Select.
You get an option to choose if you want to search for database targets only on the current host that you selected, or on all the hosts in the cluster that the host target is a member of.
This option enables you to save time, if you want to search for database targets only on the current host selected.
The Discovery Options section enables you to specify discovery hints. You can specify additional discovery options to change the default discovery behavior. Supported hints are
db_name, db_target_prefix, db_target_suffix, discovery_timeout <in seconds per host>, andno_db_domain.For example,
db_name=PRODUCTS, discovery timeout=15.Click Next to proceed with the discovery process.
Click Next.
-
The Database Discovery:Result page displays the databases discovered on the cluster. Select the database
On the Database Discovery: Results page, under the Databases section, in the Single Instance Databases section, select the database instance target that you want to promote.

-
On the Configure Database Instance: Properties, specify a name and a database system name for the database instance target. Next, specify all the properties of the target.
Note:
In Enterprise Manager Release Update 12 and later, Service Name is now supported through Preferred Connection Strings. For more information, please view the following Preferred Connect Strings.
-
Click Test Connection to test the connection made to the database instance target using the specified monitoring credentials.
-
To specify global target properties for all the targets you have selected on the Promote Target: Results page, click Set Global Target Properties, specify the required properties, then click OK.
To specify a common group for all the targets you have selected on the Promote Target: Results page, click Specify Group for Targets, select a group, then click Select.
-
If you have selected multiple databases and you want to set the same monitoring properties for all of them, select Specify Common Monitoring Credentials. Enter the monitoring credentials, monitoring password, and role. Click Apply.
-
Click Next.
-
Review the displayed information, then click Submit.
Adding Single Instance Database Targets By Using the Declarative Process
To add a single instance database target declaratively by specifying target monitoring properties, follow these steps:
Note:
A database system is automatically created on discovery of an Oracle Database. The system is built on the new target and association model that can be used to monitor the database's storage, connectivity, and high availability. This also enables you to monitor and manage applications that are dependent on the database. Database System topology can be used to view relationship between various entities within the database system as well as external dependencies.
A database system contains a primary database and related targets such as Listener and Automatic Storage Management. It also includes standby databases and their related targets if the database is in a Data Guard configuration. However, you cannot create database systems for standby databases.
-
From the Setup menu, select Add Target, then select Add Targets Manually.
-
On the Add Targets Manually page, select Add Target Declaratively.
-
In the Add Target Declaratively dialog box, select Database Instance.
-
In the Monitoring Agent field, select the Management Agent monitoring the database.
-
Click Add...
-
On the Configure Database Instance: Properties, specify a name and a database system name for the database instance target. Next, specify all the properties of the target.
Note:
In Enterprise Manager Release Update 12 and later, Service Name is now supported through Preferred Connection Strings. For more information, please view the following Preferred Connect Strings.
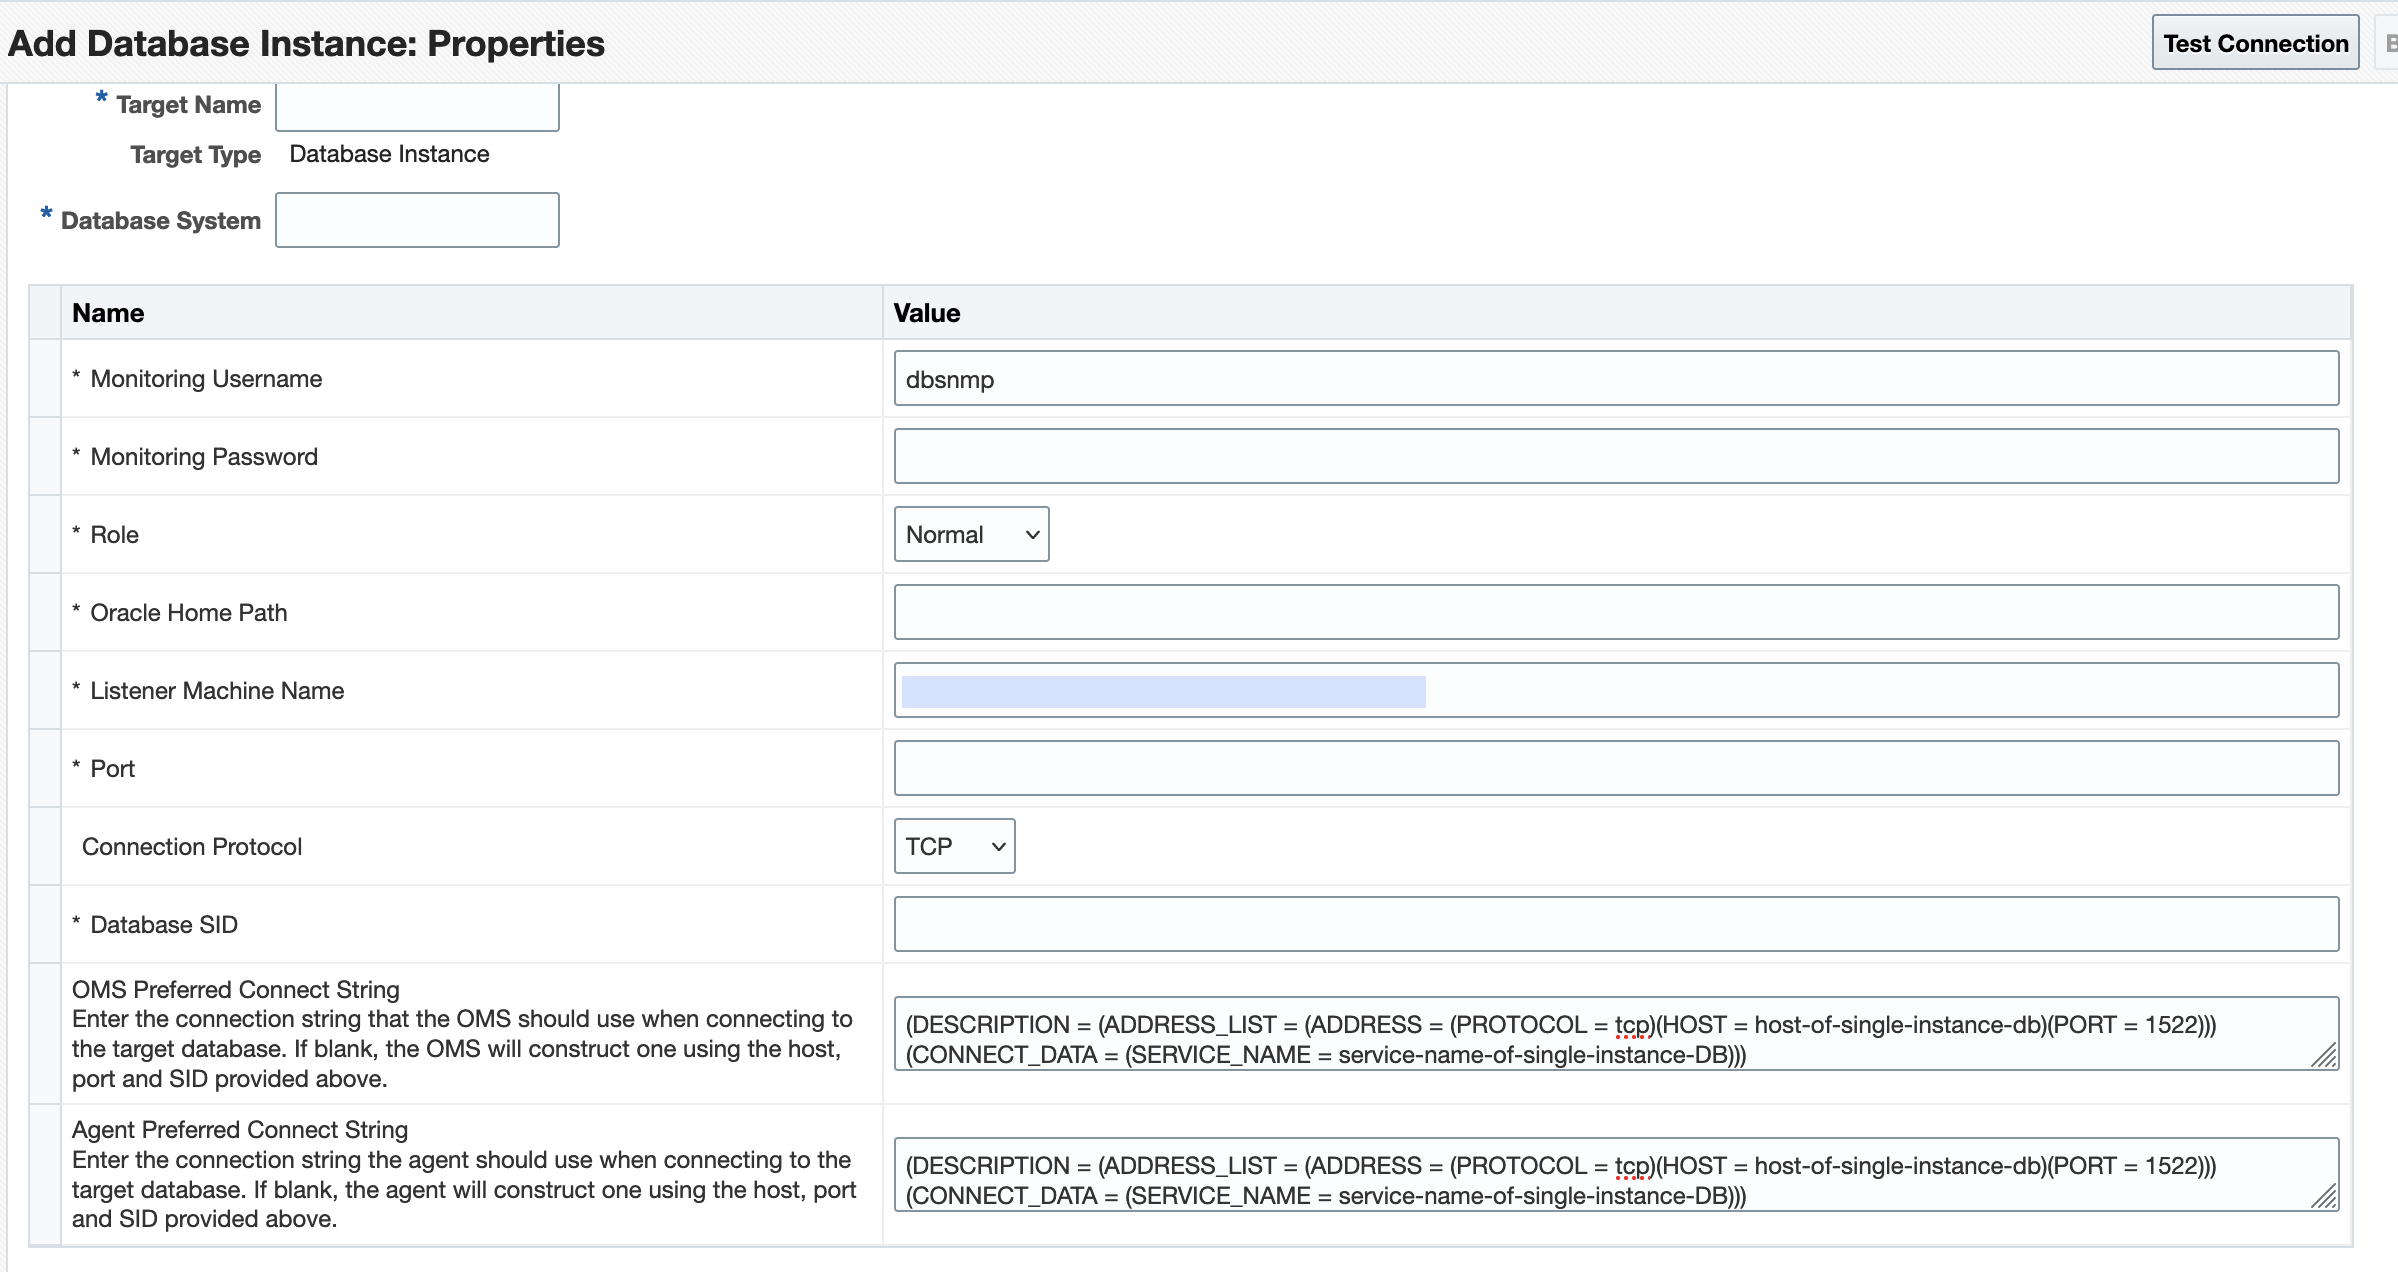
Click Next.
-
Specify all the details required on the Install Packages, Credentials, and Parameters pages. Click Next after each page until you reach the Review page.
Note:
Enterprise Manager lets you use the job system to automate database password change for the monitoring user. See Automate Monitoring and Non-monitoring User Password Management for more information. -
Review the displayed information, then click Submit.
Discovering and Adding Cluster Targets
This section describes the different methods in which you can discover and add cluster targets. In particular, this section covers the following:
Discovering Cluster Targets Using Autodiscovery
Autodiscovery of databases is enabled by default. If autodiscovery has been disabled, follow the steps described in Enabling Autodiscovery of Database Targets.
Note:
A database system is automatically created on discovery of an Oracle Database. The system is built on the new target and association model that can be used to monitor the database's storage, connectivity, and high availability. This also enables you to monitor and manage applications that are dependent on the database. Database System topology can be used to view relationship between various entities within the database system as well as external dependencies.
A database system contains a primary database and related targets such as Listener and Automatic Storage Management. It also includes standby databases and their related targets if the database is in a Data Guard configuration. However, you cannot create database systems for standby databases.
To promote cluster targets, follow these steps:
-
From the Setup menu, select Add Target, and then select Auto Discovery Results.
From the results table, from the Agent-based targets tab, select the discovered cluster target that you want to add for monitoring, and click Promote.

-
The Promote Targets:Result page displays the hosts discovered on the cluster. Select the host that you want to promote.
Note:
A host can belong to only one cluster. If a particular host is not displayed, it can mean that the host belongs to another cluster.
On the Promote Target: Results page, in the Clusters section, select the cluster target that you want to promote.
By default, selecting the cluster target for promotion also selects all its associated discovered hosts for promotion. If you want to add or remove a host from the ones selected for promotion, select the cluster database target, then click Configure. Select the Hosts tab, then click Add or Remove. Click Save.
-
In the Clusters section, specify the monitoring credentials for the selected cluster target, that is, the Monitor user name, Monitor password, and role. Also, if you want the selected target to be added to a group, specify a value for Group.
If you specify Normal for Role, then the user name can be dbsnmp or a DB monitoring user. If you specify SYSDBA for Role, then you can provide any SYSDBA user.
-
Click Test Connection to test the connection made to the cluster target using the specified monitoring credentials.
-
To specify global target properties for all the targets you have selected on the Promote Target: Results page, click Set Global Target Properties, specify the required properties, then click OK.
To specify a common group for all the targets you have selected on the Promote Target: Results page, click Specify Group for Targets, select a group, then click Select.
-
If you have selected multiple databases and you want to set the same monitoring properties for all of them, select Specify Common Monitoring Credentials. Enter the monitoring credentials, monitoring password, and role. Click Apply.
-
Click Next.
-
Review the displayed information, then click Submit.
Adding Cluster Targets Using the Guided Discovery Process
To add cluster targets using the guided process, follow these steps:
Note:
A database system is automatically created on discovery of an Oracle Database. The system is built on the new target and association model that can be used to monitor the database's storage, connectivity, and high availability. This also enables you to monitor and manage applications that are dependent on the database. Database System topology can be used to view relationship between various entities within the database system as well as external dependencies.
A database system contains a primary database and related targets such as Listener and Automatic Storage Management. It also includes standby databases and their related targets if the database is in a Data Guard configuration. However, you cannot create database systems for standby databases.
-
From the Setup menu, select Add Target, then select Add Targets Manually.
-
On the Add Targets Manually page, select Add Using Guided Process.
-
In the Add Using Guided Process dialog box, select Oracle Database, Listener, and Automatic Storage Management. Click Add...
-
On the Cluster Discovery: Specify Host page, specify the cluster host, or click on the Specify Host or Cluster search icon to select the cluster.

If the host you select is a member of a cluster, then use this page to also indicate whether the clusters should be searched only on the selected host or on all hosts within the cluster.
After you click the search icon, a Select Targets dialog box appears.Specify the target name or select a target from the target table. You can filter the search to search for all down targets or up targets, by clicking the filter arrows in the Status column.
You can also configure your search by clicking the Configuration Search icon. After you select the CDB, click Select.
You get an option to choose if you want to search for cluster targets only on the current host that you selected, or on all the hosts in the cluster that the host target is a member of.
This option enables you to save time, if you want to search for cluster targets only on the current host selected.
The Discovery Options section enables you to specify discovery hints. You can specify additional discovery options to change the default discovery behavior. Supported hints are
db_name, db_target_prefix, db_target_suffix, discovery_timeout <in seconds per host>, andno_db_domain.For example,
db_name=PRODUCTS, discovery timeout=15.Click Next to proceed with the discovery process.
Click Next.
-
The Cluster Discovery:Result page displays the hosts discovered on the cluster. Select the host that you want to add.
Note:
A host can belong to only one cluster. If a particular host is not displayed, it can mean that the host belongs to another cluster.
On the Cluster Discovery: Result page, in the Clusters Target Properties section, verify the properties of the cluster.

If you want to add or remove a host, select a host from the Cluster Host and High Availability Service Targets section. Click Add or Remove.
-
Click Next.
-
Review the displayed information, then click Submit.
Adding Cluster Targets By Using the Declarative Process
To add a cluster target declaratively by specifying target monitoring properties, follow these steps:
Note:
A database system is automatically created on discovery of an Oracle Database. The system is built on the new target and association model that can be used to monitor the database's storage, connectivity, and high availability. This also enables you to monitor and manage applications that are dependent on the database. Database System topology can be used to view relationship between various entities within the database system as well as external dependencies.
A database system contains a primary database and related targets such as Listener and Automatic Storage Management. It also includes standby databases and their related targets if the database is in a Data Guard configuration. However, you cannot create database systems for standby databases.
-
From the Setup menu, select Add Target, then select Add Targets Manually.
-
On the Add Targets Manually page, select Add Target Declaratively.
-
In the Add Target Declaratively dialog box, select Cluster.
-
In the Monitoring Agent field, select the Management Agent monitoring the database.
-
Click Add...
-
On the Cluster Discovery:Result page, specify the target name, Oracle Home, SCAN name, SCAN port, and ONS port.

Note:
The SCAN name, SCAN port, and ONS port properties are applicable only for Clusterware versions 11.2 and higher.
-
You can add more hosts and high availability service targets to the cluster. If a particular host is not displayed when you click Add, it is possible that the host already belongs to another cluster.
To specify global target properties for all the targets you have selected on the Promote Target: Results page, click Set Global Target Properties, specify the required properties, then click OK.
Click Next.
-
Review the displayed information, then click Submit.
Discovering and Adding Single Instance High Availability Service Targets
This section describes the different methods in which you can discover and add single instance high availability service targets. In particular, this section covers the following:
Discovering Single Instance High Availability Service Targets Using Autodiscovery
Autodiscovery of databases is enabled by default. If autodiscovery has been disabled, follow the steps described in Enabling Autodiscovery of Database Targets.
Note:
A database system is automatically created on discovery of an Oracle Database. The system is built on the new target and association model that can be used to monitor the database's storage, connectivity, and high availability. This also enables you to monitor and manage applications that are dependent on the database. Database System topology can be used to view relationship between various entities within the database system as well as external dependencies.
A database system contains a primary database and related targets such as Listener and Automatic Storage Management. It also includes standby databases and their related targets if the database is in a Data Guard configuration. However, you cannot create database systems for standby databases.
To promote single instance high availability targets, follow these steps:
-
From the Setup menu, select Add Target, and then select Auto Discovery Results.
Note:
If you do not see any results, then autodiscovery of targets has been disabled. To enable autodiscovery refer to Enabling Autodiscovery of Database Targets.
From the results table, from the Agent-based targets tab, select the discovered High Availability instance target that you want to add for monitoring, and click Promote.

-
The Promote Targets:Result page displays the High Availability instances discovered. Select the database
On the Promote Target: Results page, under the High Availability Services section, select the SIHA target that you want to promote.
-
Specify the monitoring credentials for the selected SIHA target, that is, the Monitor user name, Monitor password, and role. Also, if you want the selected target to be added to a group, specify a value for Group.
If you specify Normal for Role, then the user name can be dbsnmp or a DB monitoring user. If you specify SYSDBA for Role, then you can provide any SYSDBA user.
-
Click Test Connection to test the connection made to the SIHA target using the specified monitoring credentials.
-
To specify global target properties for all the targets you have selected on the Promote Target: Results page, click Set Global Target Properties, specify the required properties, then click OK.
To specify a common group for all the targets you have selected on the Promote Target: Results page, click Specify Group for Targets, select a group, then click Select.
-
If you have selected multiple databases and you want to set the same monitoring properties for all of them, select Specify Common Monitoring Credentials. Enter the monitoring credentials, monitoring password, and role. Click Apply.
-
Click Next.
-
Review the displayed information, then click Submit.
Adding Single Instance High Availability Service Targets Using the Guided Discovery Process
To add single instance high availability service targets using the guided process, follow these steps:
Note:
A database system is automatically created on discovery of an Oracle Database. The system is built on the new target and association model that can be used to monitor the database's storage, connectivity, and high availability. This also enables you to monitor and manage applications that are dependent on the database. Database System topology can be used to view relationship between various entities within the database system as well as external dependencies.
A database system contains a primary database and related targets such as Listener and Automatic Storage Management. It also includes standby databases and their related targets if the database is in a Data Guard configuration. However, you cannot create database systems for standby databases.
-
From the Setup menu, select Add Target, then select Add Targets Manually.
-
On the Add Targets Manually page, select Add Using Guided Process.
-
In the Add Using Guided Process dialog box, select Oracle Database, Listener, and Automatic Storage Management. Click Add...
-
On the Cluster Discovery: Specify Host page, specify the single instance high availability service host, or click on the Specify Host or Cluster search icon to select the cluster.

Click Next.
-
The Cluster Discovery:Result page displays the high availability service instances discovered.
On the Cluster Discovery: Result page, under the High Availability Services section, select the high availability service instance target that you want to promote.

-
Click Next.
-
Review the displayed information, then click Submit.
Adding Single Instance High Availability Service Targets By Using the Declarative Process
To add a single instance High Availability Service target declaratively by specifying target monitoring properties, follow these steps:
Note:
A database system is automatically created on discovery of an Oracle Database. The system is built on the new target and association model that can be used to monitor the database's storage, connectivity, and high availability. This also enables you to monitor and manage applications that are dependent on the database. Database System topology can be used to view relationship between various entities within the database system as well as external dependencies.
A database system contains a primary database and related targets such as Listener and Automatic Storage Management. It also includes standby databases and their related targets if the database is in a Data Guard configuration. However, you cannot create database systems for standby databases.
-
From the Setup menu, select Add Target, then select Add Targets Manually.
-
On the Add Targets Manually page, select Add Target Declaratively.
-
In the Add Target Declaratively dialog box, select Oracle High Availability Service.
-
In the Monitoring Agent field, select the Management Agent monitoring the database.
-
Click Add...
-
On the High Availability Service: Result page, specify a name for the target, the Oracle home, and the ONS port.

To specify global target properties for all the targets you have selected on the Promote Target: Results page, click Set Global Target Properties, specify the required properties, then click OK.
Click Next.
-
Review the displayed information, and then click Submit.
Discovering and Adding Cluster Automatic Storage Management Targets
This section describes the different methods in which you can discover and add ASM cluster targets. In particular, this section covers the following:
Discovering Cluster ASM Targets Using Autodiscovery
Autodiscovery of databases is enabled by default. If autodiscovery has been disabled, follow the steps described in Enabling Autodiscovery of Database Targets.
Note:
A database system is automatically created on discovery of an Oracle Database. The system is built on the new target and association model that can be used to monitor the database's storage, connectivity, and high availability. This also enables you to monitor and manage applications that are dependent on the database. Database System topology can be used to view relationship between various entities within the database system as well as external dependencies.
A database system contains a primary database and related targets such as Listener and Automatic Storage Management. It also includes standby databases and their related targets if the database is in a Data Guard configuration. However, you cannot create database systems for standby databases.
To promote Cluster Automatic Storage Management targets using autodiscovery, follow these steps:
-
From the Setup menu, select Add Target, and then select Auto Discovery Results.
Note:
If you do not see any results, then autodiscovery of targets has been disabled. To enable autodiscovery refer to Enabling Autodiscovery of Database Targets.
From the results table, from the Agent-based targets tab, select the discovered cluster ASM target that you want to add for monitoring, and click Promote.

-
The Promote Targets:Result page displays the targets discovered on the cluster ASM.
On the Promote Target: Results page, in the Cluster ASM section, select the target that you want to promote.
By default, selecting the cluster ASM target for promotion also selects all its associated discovered targets for promotion. If you want to add or remove a target from the ones selected for promotion, select the cluster ASM target, then click Configure. Select the Instances tab, then click Add or Remove. Click Save.
-
In the cluster ASM section, specify the monitoring credentials for the selected cluster ASM target, that is, the Monitor user name, Monitor password, and role. Also, if you want the selected target to be added to a group, specify a value for Group.
If you specify Normal for Role, then the user name can be dbsnmp or a DB monitoring user. If you specify SYSDBA for Role, then you can provide any SYSDBA user.
-
Click Test Connection to test the connection made to the cluster ASM target using the specified monitoring credentials.
-
To specify global target properties for all the targets you have selected on the Promote Target: Results page, click Set Global Target Properties, specify the required properties, then click OK.
To specify a common group for all the targets you have selected on the Promote Target: Results page, click Specify Group for Targets, select a group, then click Select.
-
If you have selected multiple targets and you want to set the same monitoring properties for all of them, select Specify Common Monitoring Credentials. Enter the monitoring credentials, monitoring password, and role. Click Apply.
-
Click Next.
-
Review the displayed information, then click Submit.
Adding Cluster ASM Targets Using the Guided Discovery Process
To add cluster ASM targets using the guided process, follow these steps:
Note:
A database system is automatically created on discovery of an Oracle Database. The system is built on the new target and association model that can be used to monitor the database's storage, connectivity, and high availability. This also enables you to monitor and manage applications that are dependent on the database. Database System topology can be used to view relationship between various entities within the database system as well as external dependencies.
A database system contains a primary database and related targets such as Listener and Automatic Storage Management. It also includes standby databases and their related targets if the database is in a Data Guard configuration. However, you cannot create database systems for standby databases.
-
From the Setup menu, select Add Target, then select Add Targets Manually.
-
On the Add Targets Manually page, select Add Using Guided Process.
-
In the Add Using Guided Process dialog box, select Oracle Database, Listener, and Automatic Storage Management. Click Add...
-
On the Database Discovery: Search Criteria page, specify the cluster ASM host, or click on the Specify Host or Cluster search icon to select the cluster.

If the host you select is a member of a cluster, then use this page to also indicate whether the Automated Storage Managers should be searched only on the selected host or on all hosts within the cluster.
After you click the search icon, a Select Targets dialog box appears. Specify the target name or select a target from the target table. You can filter the search to search for all down targets or up targets, by clicking the filter arrows in the Status column.
You can also configure your search by clicking the Configuration Search icon. After you select the CDB, click Select.
You get an option to choose if you want to search for ASM targets only on the current host that you selected, or on all the hosts in the cluster that the host target is a member of.
This option enables you to save time, if you want to search for ASM targets only on the current host selected.
The Discovery Options section enables you to specify discovery hints. You can specify additional discovery options to change the default discovery behavior. Supported hints are
db_name, db_target_prefix, db_target_suffix, discovery_timeout <in seconds per host>, andno_db_domain.For example,
db_name=PRODUCTS, discovery timeout=15.Click Next to proceed with the discovery process.
Click Next.
-
The Database Discovery:Result page displays the targets discovered on the cluster ASM target.
On the Database Discovery: Results page, in the Cluster ASM section, select the target that you want to promote.
By default, selecting the cluster ASM target for promotion also selects all its associated discovered targets for promotion. If you want to add or remove a target from the ones selected for promotion, select the cluster ASM target, then click Configure. Select the Instances tab, then click Add or Remove. Click Save.
-
In the cluster ASM section, specify the monitoring credentials for the selected cluster ASM target, that is, the Monitor user name, Monitor password, and role. Also, if you want the selected target to be added to a group, specify a value for Group.
If you specify Normal for Role, then the user name can be dbsnmp or a DB monitoring user. If you specify SYSDBA for Role, then you can provide any SYSDBA user.
-
Click Test Connection to test the connection made to the cluster ASM target using the specified monitoring credentials.
-
To specify global target properties for all the targets you have selected on the Promote Target: Results page, click Set Global Target Properties, specify the required properties, then click OK.
To specify a common group for all the targets you have selected on the Promote Target: Results page, click Specify Group for Targets, select a group, then click Select.
-
If you have selected multiple targets and you want to set the same monitoring properties for all of them, select Specify Common Monitoring Credentials. Enter the monitoring credentials, monitoring password, and role. Click Apply.
-
Click Next.
-
Review the displayed information, then click Submit.
Adding Cluster ASM Targets By Using the Declarative Process
To add a cluster ASM target declaratively by specifying target monitoring properties, follow these steps:
Note:
A database system is automatically created on discovery of an Oracle Database. The system is built on the new target and association model that can be used to monitor the database's storage, connectivity, and high availability. This also enables you to monitor and manage applications that are dependent on the database. Database System topology can be used to view relationship between various entities within the database system as well as external dependencies.
A database system contains a primary database and related targets such as Listener and Automatic Storage Management. It also includes standby databases and their related targets if the database is in a Data Guard configuration. However, you cannot create database systems for standby databases.
-
From the Setup menu, select Add Target, then select Add Targets Manually.
-
On the Add Targets Manually page, select Add Target Declaratively.
-
In the Add Target Declaratively dialog box, select Cluster ASM.
-
In the Monitoring Agent field, select the Management Agent monitoring the database.
-
Click Add...
-
On the Configure Cluster ASM: Properties page, specify a name for the Cluster ASM, the Oracle home path, username and password, role, cluster name, and service name.
Note:
The Service Name is used to establish the cluster ASM connection. It should be one of the service names the cluster ASM registers with the listeners.
-
You can add instances, ASM IO server instances, and ASM proxy instances by clicking Add in the respective sections.
Click Test Connection to test the connection made to the cluster ASM target using the specified monitoring credentials.
OK.
Configuring a Target Database for Secure Monitoring
This section covers the following:
About Secure Monitoring of Databases
The Oracle Database uses various encryption algorithms to secure the information moving across the network between the Oracle Database Server and a client. The Enterprise Manager agent communicates with the Database target over a TCP protocol to get real-time monitoring data. The Oracle Management Server (OMS) also communicates with the Database target in clear text over the network to manage the target. As TCP transfers data in clear text format over the network, anyone can access and modify the data. To secure the data exchanges between the OMS and managed target, Enterprise Manager can use the TCPS protocol to encrypt and protect the data.
The Secure Monitoring feature in Enterprise Manager allows you to monitor Oracle Database targets on secure channels using a TCP/IP with SSL (Secure Socket Layer) protocol. You can also discover and monitor the Listener processes running on TCPS ports using the Enterprise Manager console.
You can choose from the following options available for target monitoring:
-
Target Monitoring over TCP
In this case, Enterprise Manager connects to the target database for target monitoring using the TCP protocol. The data communication between the target database and the Enterprise Manager OMS happens in clear text form over the network.
-
Target Monitoring over TCPS with Server Authentication using Trusted Certificate
Enterprise Manager connects to the target database TCP over a secure socket layer (SSL) for target monitoring. In this case, the client authenticates the database server using a trusted certificate of the server. The data communicates over the network between Enterprise Manager and the target database in encrypted form.
-
Target Monitoring over TCPS with Server Authentication using Kerberos
Enterprise Manager connects to the target database TCP over a secure socket layer (SSL) for target monitoring. In this case, the client authenticates the database server using the Kerberos authentication protocol. The data communicates over the network between Enterprise Manager and the target database in encrypted form.
You can enable secure monitoring while discovering the target database, or you can change the secure monitoring settings for a target database on the Monitoring Configuration page.
Configuring a Target Database for Secure Monitoring
You can enable secure monitoring either while discovering a target database, or by changing the secure monitoring settings for a selected target database after discovery.
Note:
DB monitoring setup accepts case-sensitive user names. .Every Oracle database object has a name. In a SQL statement, you represent the name of an object with a quoted identifier or a non-quoted identifier.
A quoted identifier begins and ends with double quotation marks (").
- If you name a schema object using a quoted identifier, then you must use the double quotation marks whenever you refer to that object.
- This is a case-sensitive identifier.
A nonquoted identifier is not surrounded by any punctuation.
- This is not a case sensitive name.
When you set up the monitoring credentials you can provide either quoted (case-sensitive) or unquoted account names.
Adding Connection Manager Targets By Using the Declarative Process
To add a Connection Manager target declaratively by specifying target monitoring properties, follow these steps:
-
From the Setup menu, select Add Target, then select Add Targets Manually.
-
On the Add Targets Manually page, select Add Target Declaratively.
-
In the Add Target Declaratively dialog box, enter the host and select Connection Manager as the target type.
-
Click Add.
-
On the Add: Connection Manager page, specify a name and the credentials.
-
Specify all the properties of the target, that is, Connection Manager Name, Connection Protocol, Machine Name, Oracle Home, Port Number, and cman.ora Directory.
-
Click OK.
-
Review the displayed information, and then click Submit.
Preferred Connect Strings
A Preferred Connect String is a fully qualified connection descriptor that can override Enterprise Manager’s default connection configuration to the database with your preferred connection method. For example, you can create a preferred connect string using the host, port and service name (instead of SID), and specify that to be used for database connections. Preferred Connect Strings are supported for Single Instance, RAC and Pluggable databases.
There are two types of connections that support this configuration:
- From the OMS to a target database, used for access to database performance pages and for administration operations: To use a connect string for OMS-to-database connections, you specify an OMS Preferred Connect String (OMSPCS).
- Between an agent and a target database, used for metric collections: To use a connect string for agent-to-database connections, you specify an Agent Preferred Connect String (APCS).
The Preferred Connect Strings can be configured using EM console or EM CLI.
The OMS Preferred Connect String option is supported for all versions of Oracle Enterprise Manager 13c Release 5.
This Agent Preferred Connect String option is supported starting with Oracle Enterprise Manager 13c Release 5 Update 15 (13.5.0.15) and the EM agent version 13.5.0.15. The Agent Preferred Connect String is disabled by default. To enable it, run the following command, and restart the OMS:
emctl set property -name oracle.sysman.db.showapcs -value true -sysman_pwd <sysman_password>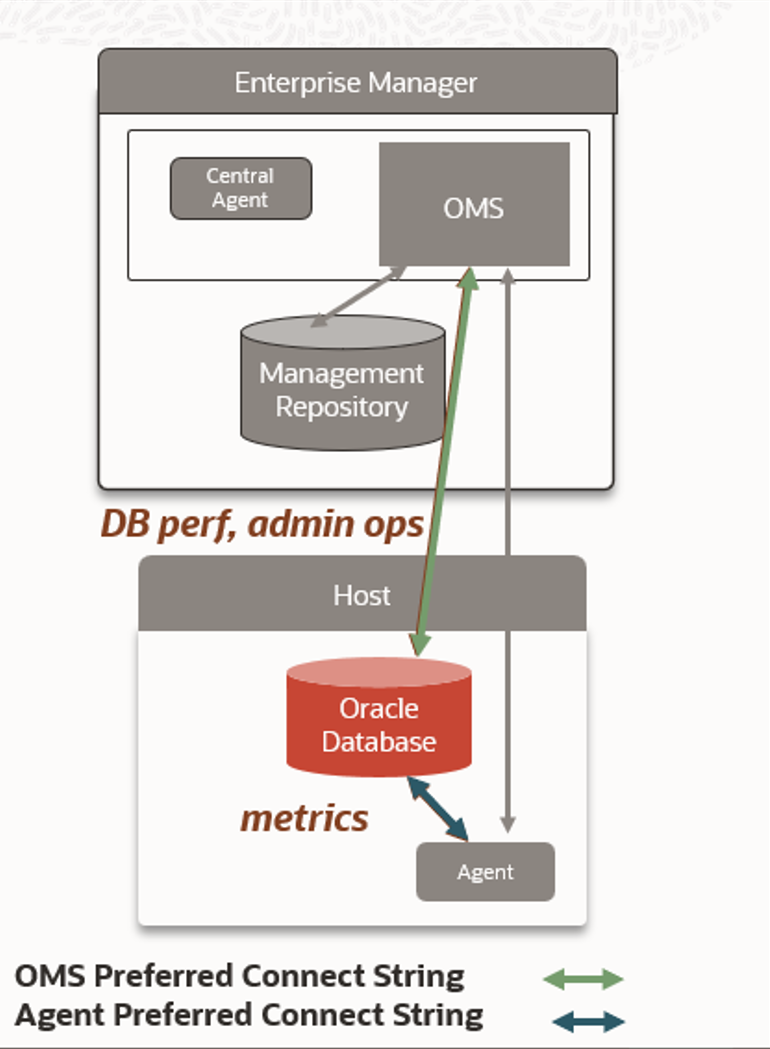
Preferred Connect String Configuration Steps
Choose one of the following methods to define the connect strings:
-
Using the EM Console: From the target's home page menu, go to Target Setup, then Monitoring Configuration.
Here is an example for the RAC (Cluster Database) Instance:
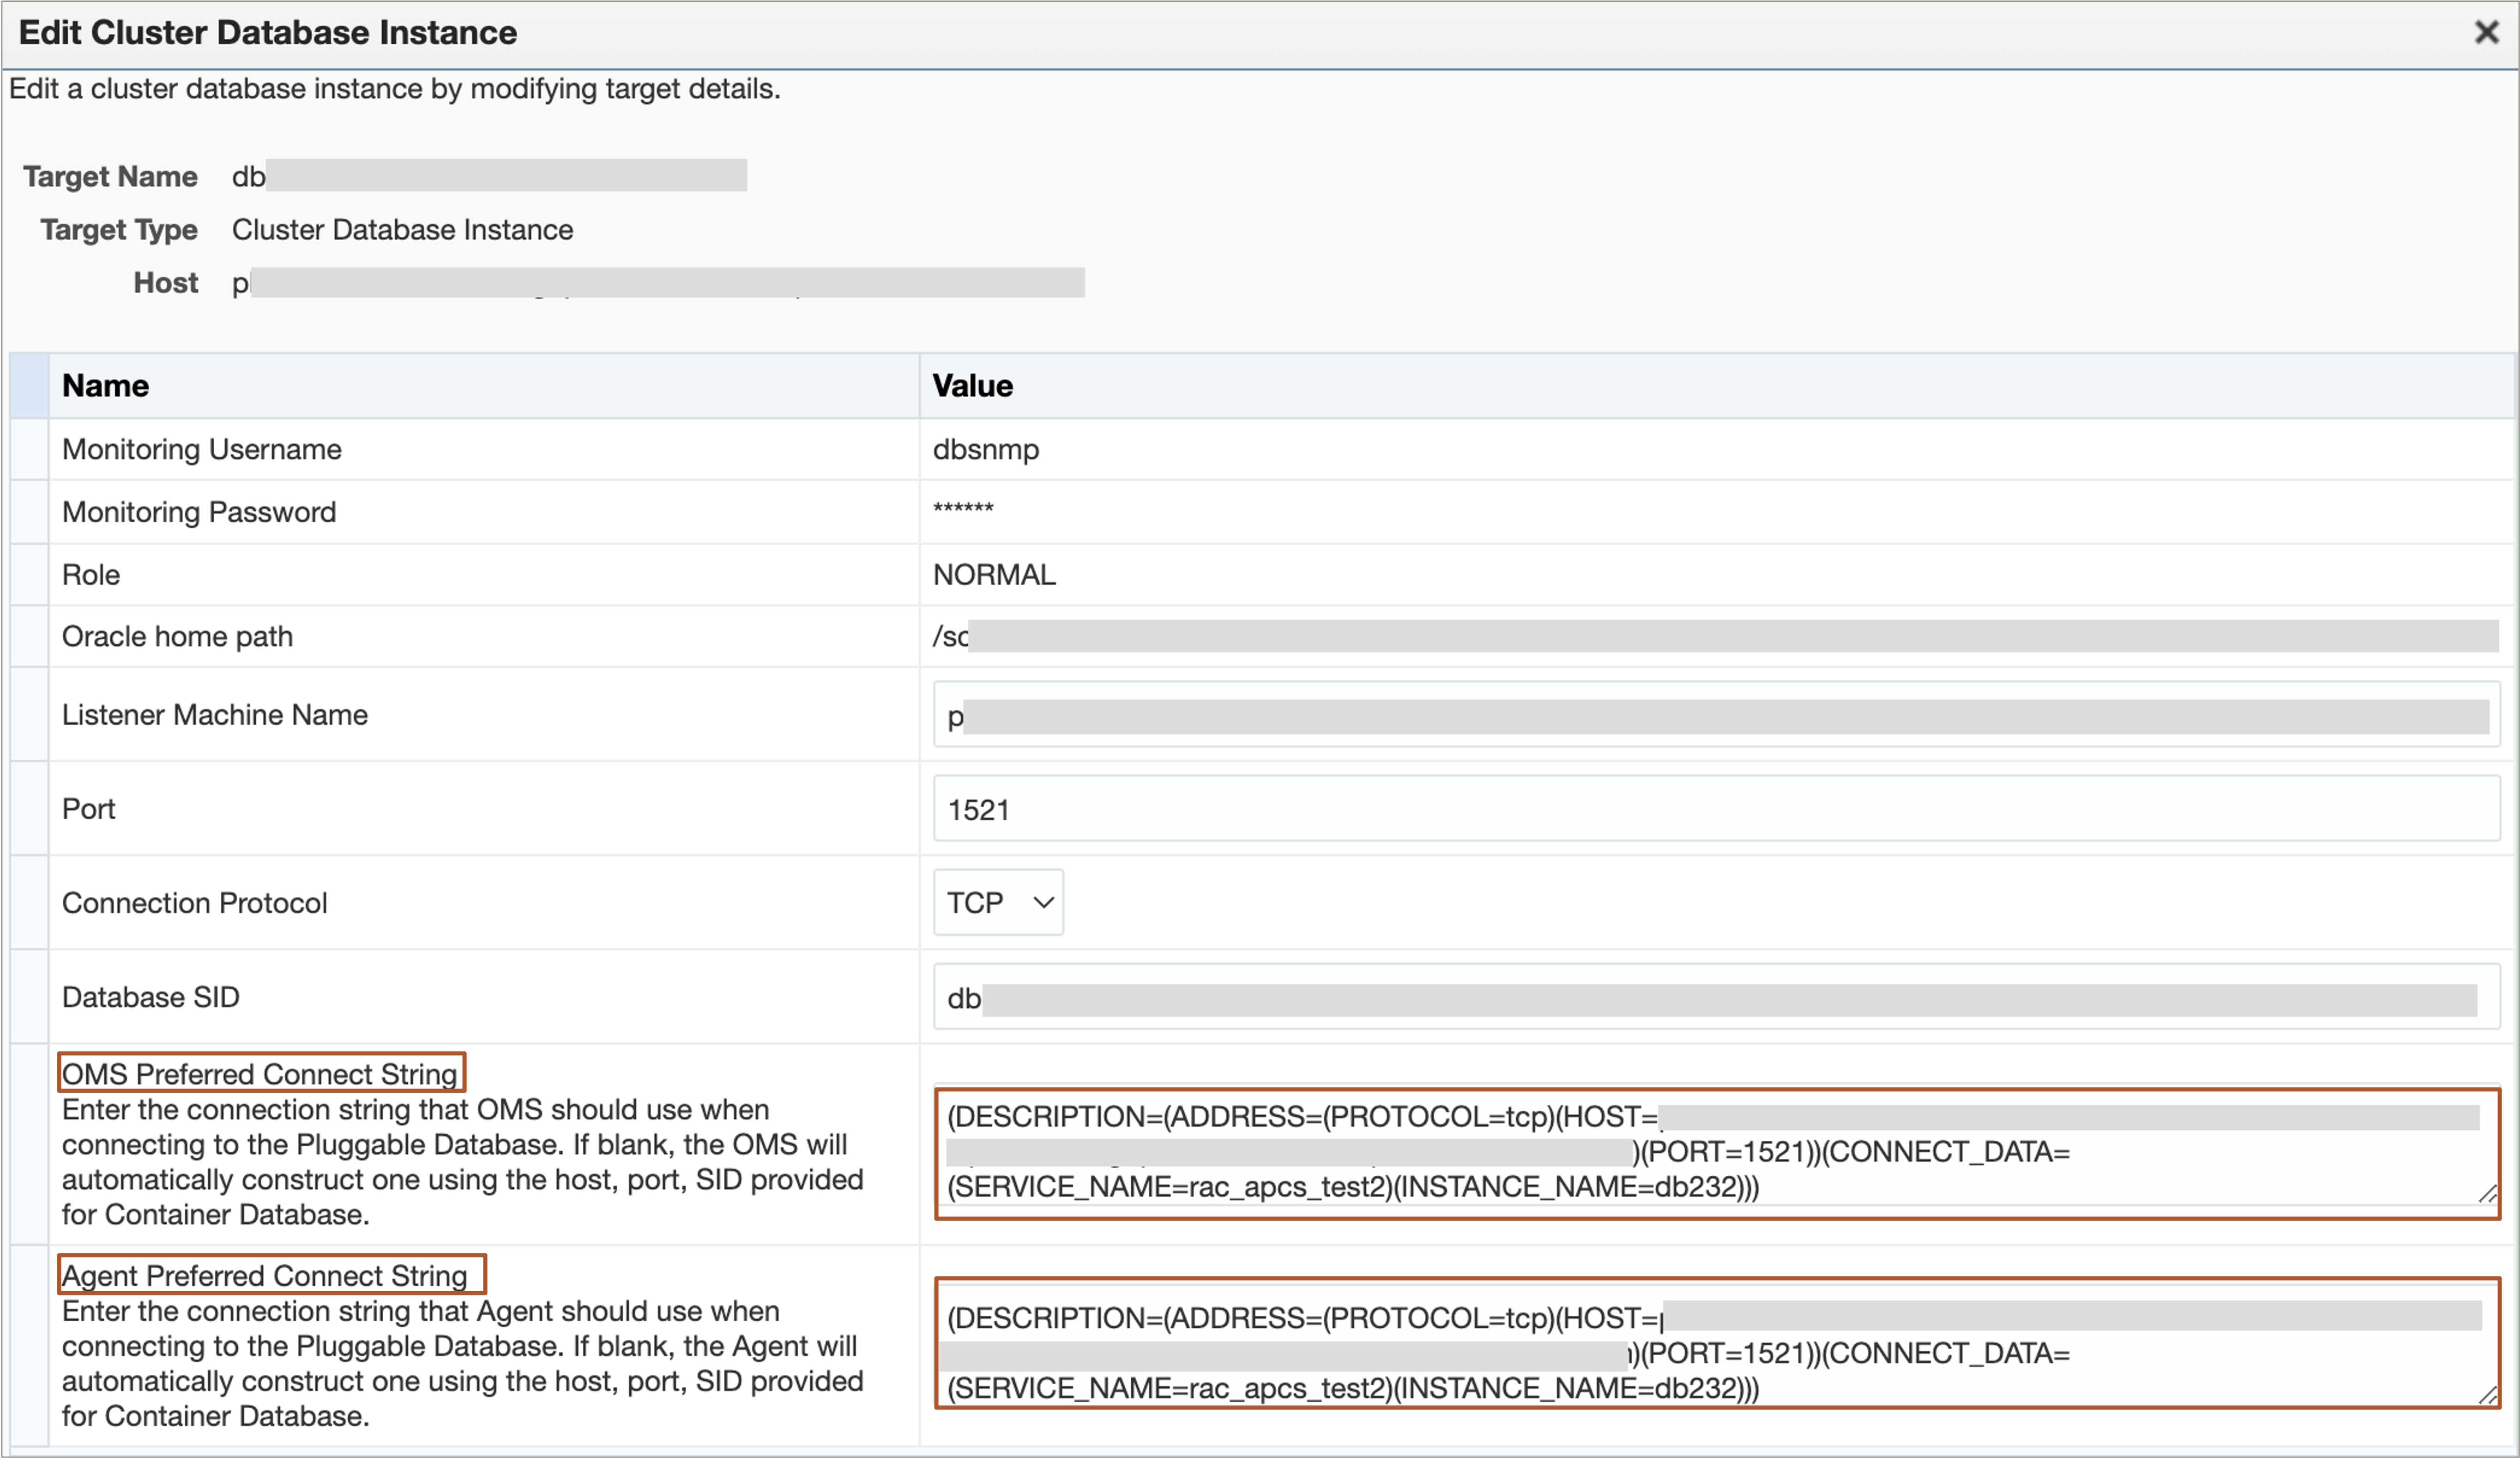
-
Using EMCLI: Specify the Preferred Connect String using EMCLI, using this format:
-
OMS Preferred Connect String
emcli modify_target
    -name=“<target_name>"
    -type=“<target_type>"
    -properties="PreferredConnectString:<connect string>"
    -on_agent
Example:
emcli modify_target -name="database_CDB1_PDB1" -type="oracle_pdb" -properties="PreferredConnectString:(DESCRIPTION=(ADDRESS=(PROTOCOL=tcp)(HOST=host1.example.com)(PORT=1521))(CONNECT_DATA=(SERVICE_NAME=myrac)(INSTANCE_NAME=db231)))" -on_agent - Agent Preferred Connect String
emcli modify_target
    -name=“<target_name>"
    -type=“<target_type>"
    -properties="AgentPreferredConnectString:<connect string>"
    -on_agent
Example:
emcli modify_target
    -name="MyPDB"
    -type="oracle_pdb"
    -properties="AgentPreferredConnectString: (DESCRIPTION = (ADDRESS_LIST = (ADDRESS = (PROTOCOL = tcp)(HOST = host1.example.com)(PORT = 1522)))(CONNECT_DATA = (SERVICE_NAME = MYPDB)))"
    -on_agent
If you updated the OMS Preferred Connect String, log out and re-log in to the EM Console to update the OMS-database cached connections.
-
Examples of Using the Preferred Connect Strings
-
Database Monitoring Using Service Name
By default, Enterprise Manager uses SID for connections to the database. You can use Preferred Connect Strings to have all EM database connections use the Service Names instead of SIDs. This includes OMS-to-database connections as well as Agent-to-database connections.
For single instance databases or RAC instances, specify the connect string using this format:
(DESCRIPTION=(ADDRESS=(PROTOCOL=<protocol,tcp/tcps)(HOST=<host name, e.g.
          myhost.example.com)(PORT=<port, e.g.
          1521>))(CONNECT_DATA=(SERVICE_NAME=<service name>)(INSTANCE_NAME=<instance
          name>)))
For RAC databases, set the Preferred Connect String for each RAC instance, where the host should be set to the virtual IP of the RAC node.
-
Monitoring PDBs in a Cluster Database (RAC)
You can use Preferred Connect Strings to monitor a PDB that is open only a preferred subset of RAC instances.
For this configuration, follow the steps below:
-
Create a service for this PDB.
-
Construct a fully qualified connect string that uses the SCAN listener and service for the PDB:
(DESCRIPTION = (ADDRESS_LIST = (ADDRESS = (PROTOCOL = tcp)(HOST = <hostname of the scan listener>)(PORT = 1521)))(CONNECT_DATA = (SERVICE_NAME = <service for the PDB))) -
Edit the Monitoring configuration UI for the PDB and specify your constructed connect string as the values for OMS Preferred Connect String and Agent Preferred Connect String
The agent will connect via the SCAN listener to the open PDB on the preferred RAC instance.
-
- Monitoring Using TCPS-based connections with SSL Server DN Match
TCPS offers enhanced levels of security and it can be configured with SSL Domain Name.
Configure the OMS Preferred Connect String with the SSL domain name as follows:
- Enable this setup in the OMS by running following command:
emctl set property -sysman_pwd <password> -name oracle.sysman.db.ssl_server_dn_match -value true - Run the following command on the database host to get the host domain name:
orapki wallet display -wallet "<path_to_wallet>" -pwd <wallet_password>Example output:
Oracle PKI Tool Release 21.0.0.0.0 - Production Version 21.0.0.0.0 Copyright (c) 2004, 2020, Oracle and/or its affiliates. All rights reserved.Requested Certificates: User Certificates: Subject: CN=<server_cert_name> <---- This is the HOST DN (CN=<server_cert_name>) you should use in Preferred Connect String Trusted Certificates: Subject: CN=<client_cert_name> Subject: CN=<server_cert_name> -
Construct the OMS Preferred Connect String using the certificate name as the SECURITY parameter, as shown:
(DESCRIPTION= (ADDRESS= (PROTOCOL=TCPS) (HOST=<DB_HOST>) (PORT=<TCPS_PORT>)) (CONNECT_DATA= (SID=<DB_SID>)) (SECURITY=(SSL_SERVER_CERT_DN=CN=<server_cert_name>))) - Specify the OMS Preferred Connect String either using the EM Console or EM CLI.
- Enable this setup in the OMS by running following command:
-
Monitoring Database Targets in Different Subnets
If your OMS cannot have direct connections to the database targets because they are in separate subnets, or in separate data centers, you can use the OMS Preferred Connect String to connect with a proxy server:
(DESCRIPTION= (ADDRESS=(HTTPS_PROXY=<proxy name, e.g.sales-proxy) (HTTPS_PROXY_PORT=8080) (PROTOCOL=TCPS) (HOST=<host name>) (PORT=443)) (CONNECT_DATA=(SERVICE_NAME=service1.example.com)))Note:
This feature requires Oracle Enterprise Manager 13c Release 5 Update 15 (13.5.0.15) or higher.

