8 Using the IaaS Self Service Portal
Note:
Click here to view a visual demonstration on how to allow users to create new deployment requests through the Cloud Self Service Portal, manage requested deployments, track metering and chargeback information, and author and enforce Cloud policies using Enterprise Manager Cloud Control 12c.
Using the Self Service Portal to Request Server Resources
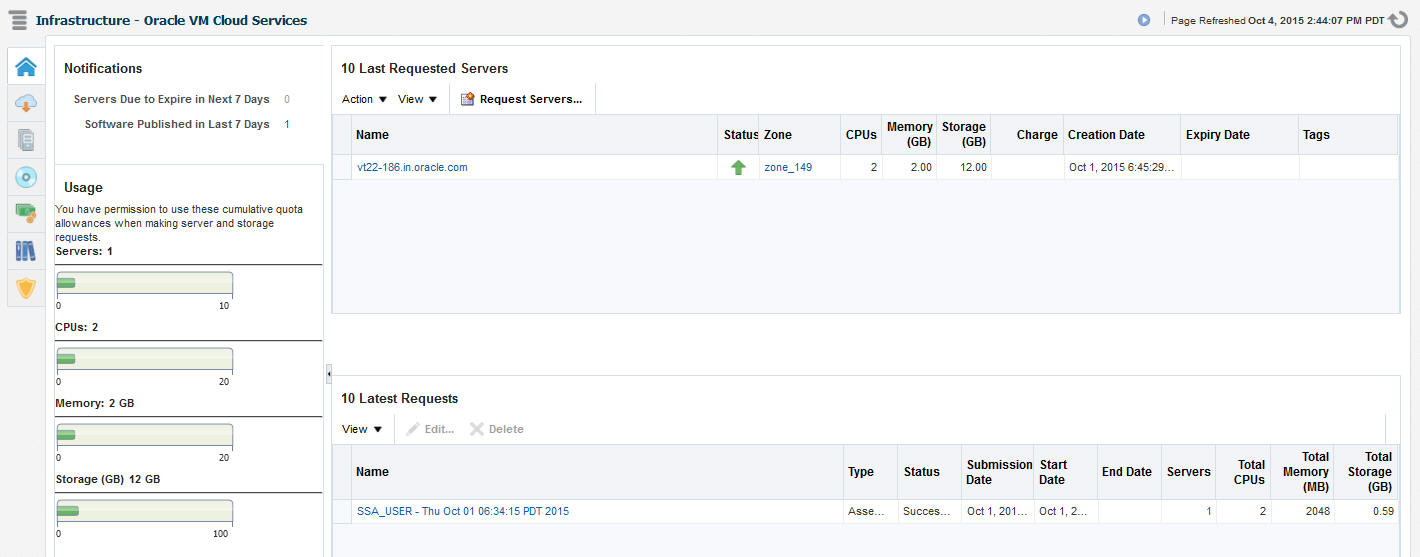
The Self Service Portal for IaaS provides a dashboard for business users and cloud consumers to request resources. It allows SSA users to request and manage resources, view the metering and usage of these resources, and define policies to manage the workload and deployment automatically. The SSA Portal allows users to:
-
Create new deployment requests
-
Manage requested deployments
-
Track metering and chargeback information
-
Author and enforce cloud policies.
To use the Self Service Portal, follow these steps:
Requesting Servers
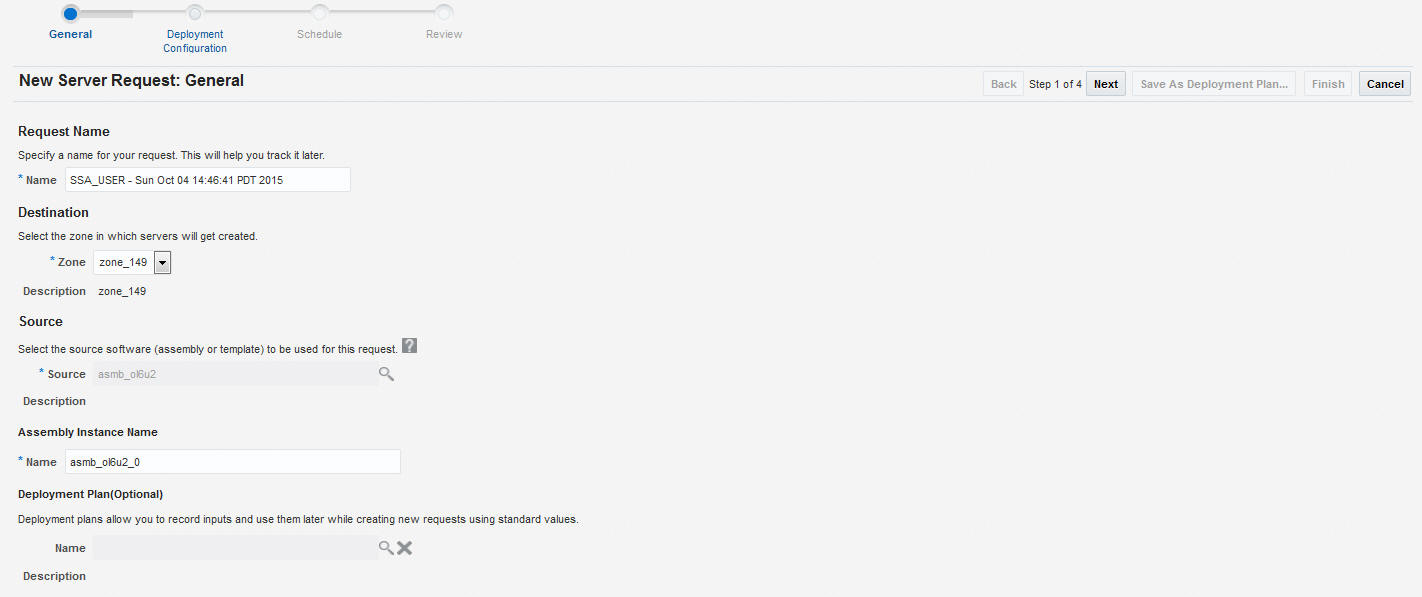
Follow this process if you need to request or reserve servers for a specific duration:
Viewing Requests
The Requests tab lists all the requests made by the SSA user.
Figure 8-3 Requests

The name of the request, status, start and end date, type of request, number of servers, total CPU, and memory appears. Click a Name to drill down to the Request Details page which shows complete details about the request.
You can:
-
Edit a Request: You can edit the following types of requests:
-
Scheduled: Select a request that is Scheduled and click Edit to modify the request configuration details. The Request Server wizard appears and you can modify the request server configuration as required. See Requesting Servers for details.
-
Executed: Select a request that has been executed successfully and click Edit. In the window that appears, specify a new End Date for the request and click Edit to edit the request.
-
-
Delete a Request: Select a request that has been scheduled or executed to click Delete to delete the request.
Viewing Servers
Click the Servers tab to view a list of servers grouped according to the zone. On this page, the self service user can view the specific assembly and template deployments, the tiers, and the servers in each tier. You will see a list of servers that you have requested and can perform a search based on either the name of the server or the tag.
Figure 8-4 My Servers

You can drill down to the Assembly or Tier Instance Home page or click a server name to drill down to the Server Details page. From this page, you can perform the following actions:
-
Request Servers: You can request or reserve servers for a specific duration. See Requesting Servers for details.
-
Assemblies: You can start, stop, delete an assembly instance, and add tiers. Select an assembly instance from the list and from the Actions menu, select an appropriate option. See Performing Assembly Operations.
-
Tiers: You can start, stop, scale up, and scale down a tier instance. Select a tier instance from the list and from the Actions menu, select an appropriate option. See Tier Operations.
-
Servers: You can modify the configuration of the server, stop, start or restart a server, clone a server, save as template, suspend, resume, and launch a VNC Console. See Server Operations.
Zone Details Page
The Zone Details page displays the details of all assemblies, tiers, and servers in the SSA Zone.
Figure 8-5 Zone Details Page
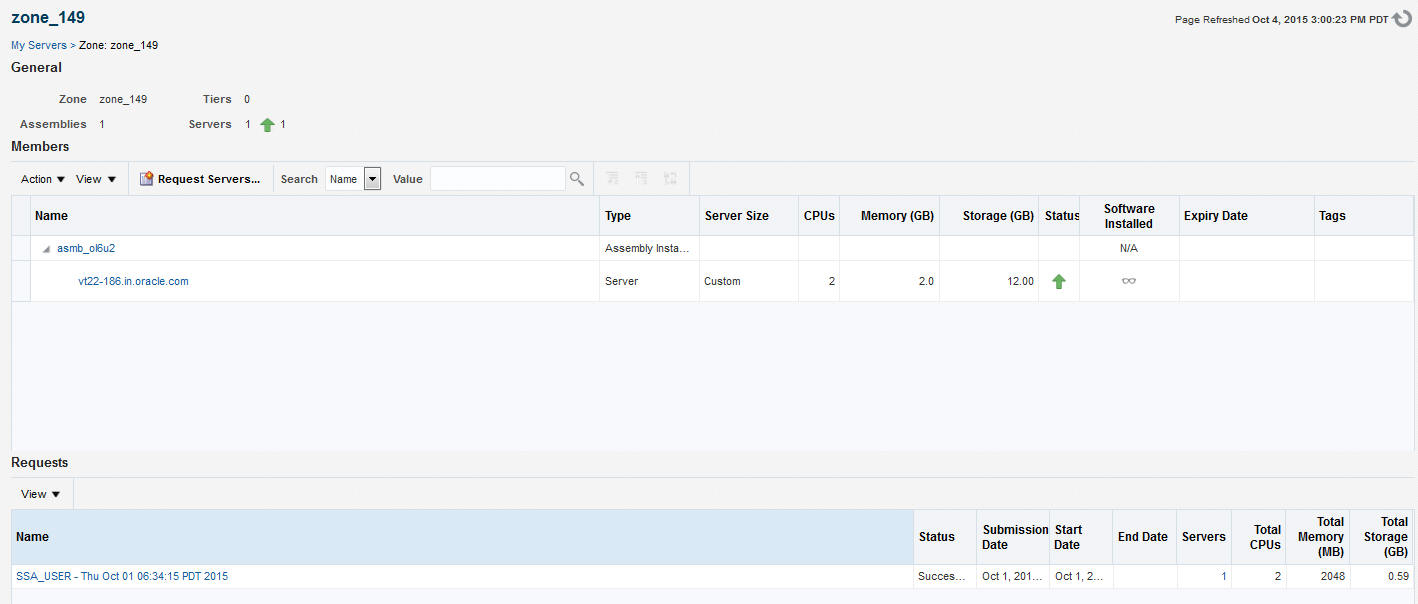
From this page, depending on the entity you select, the following options are available:
You can click a tier instance, assembly instance, or a server link to drill down to the Details page.
Performing Assembly Operations
You can perform the following operations on an assembly instance:
-
Start: Select an assembly instance and select Start from the Actions menu. A confirmation message is displayed. Click Start to submit the Start Assembly Instance job. You can start an assembly instance only if it has been stopped.
-
Stop: Select an assembly instance and select Stop from the Actions menu. A confirmation message is displayed. Click Stop to submit the Stop Assembly Instance job. You can stop an assembly instance only if it has been started.
-
Delete: Select an assembly instance and select Delete from the Actions menu. A confirmation message is displayed. Click Delete to submit the Delete Assembly Instance job.
-
Add Tier: Select an assembly instance and select Add Tier from the Actions menu.
Assembly Details Page
This page displays the details of the SSA Assembly Instance.
Figure 8-6 Assembly Details Page
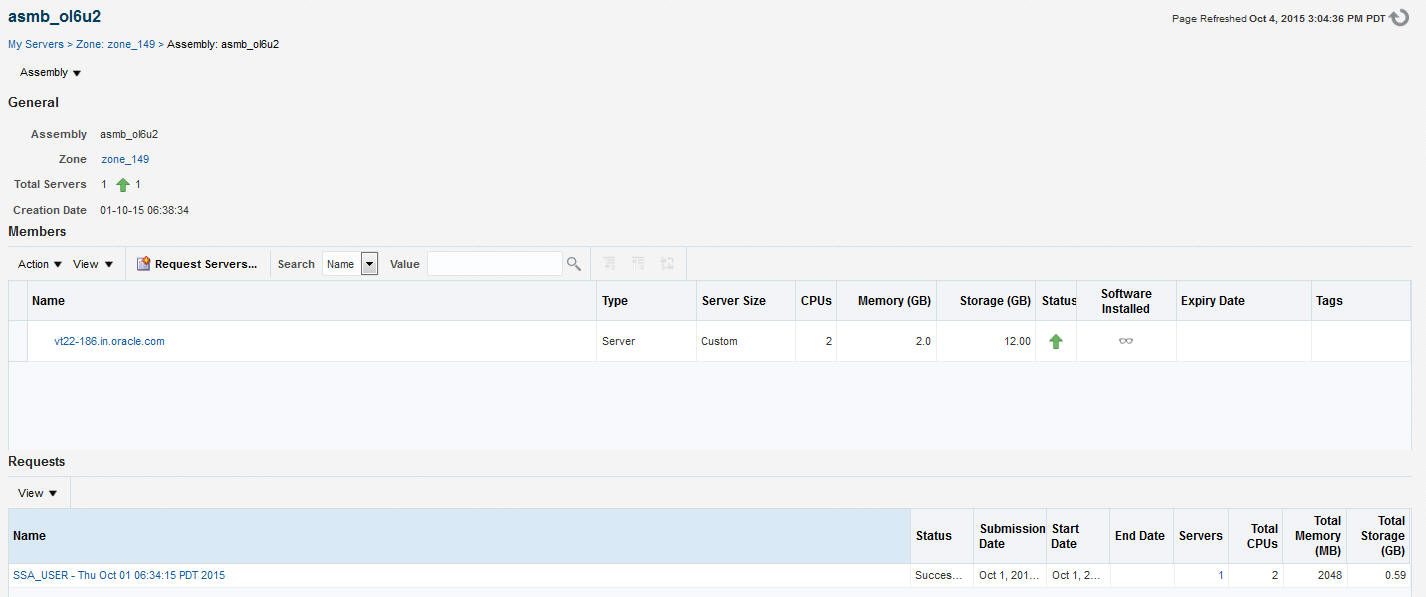
It contains the following sections:
-
General: This section displays the name of the assembly, the zone to which it belongs, the total number of servers or guest VMs deployed by the assembly, and the date on which the assembly was created.
-
Members: A hierarchical view of the members in the assembly is displayed here. Click on a link to drill down to the member Home page.
-
Request: This section lists all the requests corresponding to the assembly and its members. Click on a request link to drill down to the Request Details page.
You can perform operations such as Start, Stop, Delete, and Add Tiers on the assembly instance. Select the required option from the Assembly menu and click OK in the confirmation page to perform the selected operation.
Tier Operations
You can perform the following operations on an assembly tier instance:
-
Start: Select a tier instance and select Start from the Actions menu. A confirmation message is displayed. Click Start to submit the Start Tier Instance job. You can start a tier instance only if it has been stopped.
-
Stop: Select a tier instance and select Stop from the Actions menu. A confirmation message is displayed. Click Stop to submit the Stop Tier Instance job. You can stop an tier instance only if it has been started.
-
Scale Up: You can scale up or add more servers to a tier instance. See Scaling Up a Tier Instance.
-
Scale Down: You can scale down or stop servers that are part of a tier. See Scaling Down a Tier Instance.
Scaling Up a Tier Instance
A scalable tier allows creation of multiple servers and has a minimum and maximum limit. The scalability of the tier depends on how it is defined in the Assembly. See Provisioning Guest Virtual Machines Using Oracle Virtual Assemblies (OVA) for details. To scale up a tier instance, follow these steps:
Scaling Down a Tier Instance
You can scale down the servers belonging to a tier. To scale down a tier, follow these steps:
- Log in to Enterprise Manager as an user with the
EM_SSA_USERrole. - Click the My Servers tab, expand an assembly and click on a tier of the assembly.
- In the Tier Instance Home page, click the Scale Down option from the Tier menu.
- In the Scale Down page, select the servers to be included in the Scale Down operation and click OK. The selected servers will be stopped and scaled down.
Tier Details Page
This page displays the details of the SSA Tier Instance. It contains the following sections:
-
General: This section displays the name of the tier, the zone to which it belongs, the total number of servers or guest VMs deployed, and the date on which the tier was created.
-
Members: A hierarchical view of the members in the tier is displayed here. Click on a link to drill down to the member Home page.
-
Request: This section lists all the requests corresponding to the tier and its members. Click on a request link to drill down to the Request Details page.
You can perform operations such as Start, Stop, Scale Up, and Scale Down on the tier instance. Select the required option from the Tier menu and click OK in the confirmation page to perform the selected operation.
Performing Server Operations
You can perform the following operations for a server:
-
Modify Configuration: Select the server to be modified and select Modify Configuration from the Actions menu. Note that the server must be in a Stopped status if the configuration is to be modified.
-
Clone: Select the server to be cloned and select Clone from the Actions menu. See
-
Delete: You can delete a server that is Down or Suspended. Select the server to be deleted and select Delete from the Actions menu. A confirmation message is displayed. Click Delete to submit the Delete Server Job.
-
Save as Template: You can save a server that is Down or Suspended as a template for future use. Select the server and select Save as Template from the Actions menu. The Save as Template page appears. You can specify the following details:
-
Template Name: Enter a unique name for the template
-
Request Name: Enter a name for the Save as Template request.
-
Keymap: Select a keyboard type for the server.
-
Configuration: In this region, you can specify the default and maximum memory and number of CPUs.
Click OK to save as template.
-
-
Start: Select a server that is Stopped and select Start from the Actions menu. A confirmation message is displayed. Click Start to submit the Start Server job to start the server.
-
Stop: Select a server that is up and running and select Stop from the Actions menu. A confirmation message is displayed. Click Stop to submit the Stop Server job to stop the server.
-
Restart: A server that is up and running can be restarted.
-
Suspend: Select a server that is up and running and select Suspend from the Actions menu. A confirmation message is displayed. Click Suspend to submit the Suspend Server job.
-
Resume: Select a server that is Suspended and select Resume from the Actions menu. A confirmation message is displayed. Click Resume to submit the Resume Server job to start the server.
-
Launch VNC Console: Select this option from the Actions menu to launch a VNC Console. This option is available only if the server is up and running.
Modifying the Server Configuration
Select the server that is to be modified and select Modify Configuration from the Actions menu. The Modify Configuration page appears.You can modify the details such as Server Size, Keymap, Tags, Network, and Storage. Click OK to save the configuration.
Note:
If the server is up and running, you cannot modify the Maximum Memory, Maximum Number of CPUs, Network, and Storage. To modify these parameters, you must stop the server and then select the Modify Configuration option.
Cloning the Server
You can clone a server to create one or more servers. Select a server and select Clone from the Actions menu. The Clone Server Request: General page appears. Enter the name for the clone request. The name of the source server cloned and the zone in which the cloned server will appear is displayed. Click Next to continue to the Clone Server Request: Deployment Configuration page. In this page, you can specify the number of servers to be cloned and the resource configuration parameters. These parameters will be applicable to all the servers being cloned. Specify the schedule, review the details, and click Finish to submit the Clone Server operation.
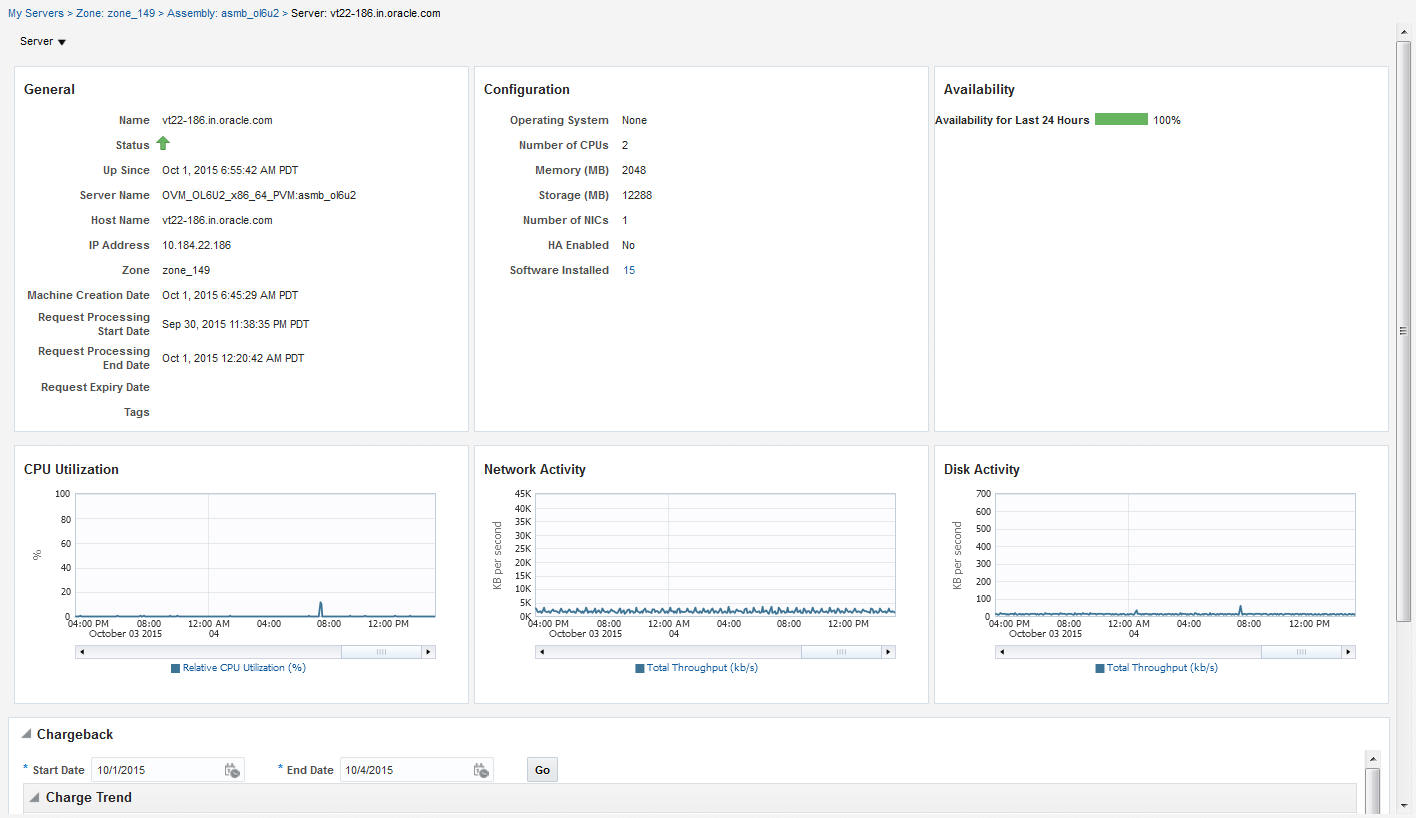
Server Details Page
The Server Details page displays detailed information about the server. From this page, you can modify configuration, clone, stop, restart, suspend, resume, and launch VNC console.
This page contains the following sections:
Figure 8-7 Server Details Page
-
General: Displays information like status of server, the associated zone, date from which it is available, and the expiry date.
-
Configuration: Displays configuration details of the server such as number of CPUs, memory, storage, operating system, and other software installed on the server.
-
Availability: Shows the availability status of the server over the last 24 hours.
-
Charts: You can see the Availability chart that displays the status of the server for past 24 hours, and the CPU, Memory, and Storage Utilization charts.
-
Chargeback Details: This section displays all the charge back break-up data for the server. The charge incurred will be calculated from the server requested date to the current date.
Viewing Kubernetes Clusters
Ensure that the following prerequisite tasks are performed to be able to view the Kubernetes Clusters:
-
Kubernetes is set up on Oracle Private Cloud Appliance. See Kubernetes Engine in Oracle Private Cloud Appliance Administrator's Guide for Release 2.4.3.
-
Oracle Private Cloud Appliance is discovered on Enterprise Manager. See Discover the Oracle Private Cloud Appliance in Monitoring an Oracle Private Cloud Appliance.
-
Oracle VM Manager of Oracle Private Cloud Appliance is registered in Enterprise Manager. See Registering Oracle VM Manager with Oracle Enterprise Manager 13c (Oracle Private Cloud Appliance Software Version 2.3.1 and above) in Monitoring an Oracle Private Cloud Appliance.
-
The user who is assigned the
EM_CLOUD_ADMINISTRATORrole imports the Kubernetes assembly to all the repositories and renames it as per the documentation in Kubernetes Engine in Oracle Private Cloud Appliance Administrator's Guide for Release 2.4.3. -
The user who is assigned the
EM_CLOUD_ADMINISTRATORrole creates the SSA Zone and includes the tenant group that is created withpca_admin. See Setting Up the Self Service Portal. -
The user who is assigned the role
EM_CLOUD_ADMINISTRATORcreates the network profile and assigns it to the external network. The user who is assigned the roleEM_SSA_ADMINISTRATORorEM_CLOUD_ADMINISTRATORassigns the previously created SSA Zone to the SSA user. Also, assign the network profile to the SSA user role. See Setting Up the Self Service Portal. -
The SSA role is assigned the view privilege for Oracle Private Cloud Appliance.
-
Sufficient quota is available for the deployment of Kubernetes Clusters.
Steps to View the Kubernetes Clusters
Click the Kubernetes Cluster tab ![]() to view the list of Kubernetes clusters that are available on the SSA
portal. On this page, the self service user can view the status of each cluster, the
tenant group it belongs to, the VRRP, the load balancer that is associated with it,
the network type that is used, and the time when the cluster was started.
to view the list of Kubernetes clusters that are available on the SSA
portal. On this page, the self service user can view the status of each cluster, the
tenant group it belongs to, the VRRP, the load balancer that is associated with it,
the network type that is used, and the time when the cluster was started.

Use the View menu to select, sort or reorder the columns of the cluster table.
From the Kubernetes Cluster tab, you can perform the following tasks:
Performing Kubernetes Cluster Operations
You can perform the following operations on a Kubernetes Cluster:
-
Create Kubernetes Cluster: Create a new Kubernetes cluster using this option. The Create Kubernetes Cluster wizard opens. For steps to create a new Kubernetes cluster, see Creating a Kubernetes Cluster.
-
Delete Kubernetes Cluster: Select a Kubernetes Cluster and click Delete from the Actions menu. A confirmation message is displayed. Click Delete to confirm.
-
Start Kubernetes Cluster: Select a Kubernetes Cluster and click Start from the Actions menu. A confirmation message is displayed. Click Start to confirm. You can start a cluster only if it has been stopped.
-
Stop Kubernetes Cluster: Select a Kubernetes Cluster and click Stop from the Actions menu. A confirmation message is displayed. Click Stop to confirm. You can stop a cluster only if it has been started.
-
Add Node Pool: Select a Kubernetes Cluster and click Add Node Pool from the Actions menu. The Add Node Pool: <cluster_name> page is displayed.
-
In the NodePool Name field, enter a name for the node pool.
-
In the Memory (MB) field, enter the memory for each of the nodes that you will add in this pool.
-
In the CPUs field , enter the number of CPUs for each of the nodes that you will add in this pool.
-
Click Submit.
Note that when you create a node pool, it will not have nodes in it yet. You can add nodes to the node pool by using the Scale Up Kubernetes Cluster option.
-
-
Remove Node Pool: Select a Kubernetes Cluster and click Remove Node Pool from the Actions menu. The Remove Node Pool from: <cluster_name> page is displayed.
-
In the Nodepool Name menu, select the name of the node pool that you want to remove from the cluster.
-
Click Submit.
When you remove a node pool, the nodes inside the node pool are removed too.
-
-
Scale Up Kubernetes Cluster: To add a node to a node pool in the Kubernetes cluster, select a Kubernetes Cluster and click Scale Up Kubernetes Cluster from the Actions menu. The Scale Up: <cluster_name> page is displayed.
-
In the Nodepool Name menu, select the name of the node pool to which you want to add a node.
-
Click Submit.
The node is now added to the specified node pool. You can verify this in the Kubernetes Cluster Details page. You can notice that the new node is listed in the Worker Nodes section.
-
-
Scale Down Kubernetes Cluster: To remove a node from a node pool in the Kubernetes cluster, select a Kubernetes Cluster and click Scale Down Kubernetes Cluster from the Actions menu. The Scale Down: <cluster_name> page is displayed.
-
In the Nodepool Name menu, select the name of the node pool from which you want to remove a node.
-
In the Node Name menu, select the node that you want to remove.
-
Click Submit.
The node is now removed from the specified node pool. You can verify this in the Kubernetes Cluster Details page. You can notice that the removed node is not listed in the Worker Nodes section.
-
Visiting Your Kubernetes Cluster Details Page
The Kubernetes Cluster Details page displays all the details about your Kubernetes Cluster, the requests placed, and their status.

Click the name of the master node or worker node to view the details of that server such as general server information, configuration, availability, CPU Utilization graph, Network Activity graph and Disk Activity graph.
Creating a Kubernetes Cluster
To create a new Kubernetes Cluster, click Create Kubernetes Cluster in the Kubernetes Cluster tab. Then the Create Kubernetes Cluster wizard opens.
-
General: Enter the following general information.
-
Request Name: Enter a name for your request. You can use this request name to track the status, edit it, or view the details of the request.
-
Destination: Select the zone in which you want to create the Kubernetes Cluster.
-
Cluster Name: Enter a name for this new Kubernetes Cluster.
-
-
Cluster Configuration: Enter the following Network Information:
-
Select the Network to use for the Kubernetes Cluster.
-
Specify the IP Assignment Type. Select between DHCP and Network Profile.
-
If you selected Network Profile for the IP assignment type, then specify the Network Profile Name and the following information:
-
Master Information: Select Memory (MB) and the number of CPUs to be allocated for the master node.
-
Worker Information: Specify the number of worker nodes to be created in the Number of Workers field, and select the Memory (MB) and the number of CPUs to be allocated for each worker node.
-
-
Select the Network Profile for Load Balancer.
-
Optionally, you can also specify the VRRP.
-
-
Schedule: Select a schedule for your request. Select the Start Date and End Date.
-
Review: Review your request and confirm the creation of the Kubernetes Cluster.
After the request is placed for creating the Kubernetes Cluster, wait for 45 to 60 minutes to complete the creation. You can view the new cluster in the Kubernetes Cluster tab.
Note:
Any Kubernetes Cluster created from the SSA portal must not be modified directly from Oracle Private Cloud Appliance.
Synchronizing Kubernetes Lifecycle Operations
By default, Kubernetes lifecycle operations (ADD_NODEPOOL, DELETE_NODEPOOL, ADD_WORKER, DELETE_WORKER and DELTE_CLUSTER) performed using PCA CLI are not synchronized with Enterprise Manager.
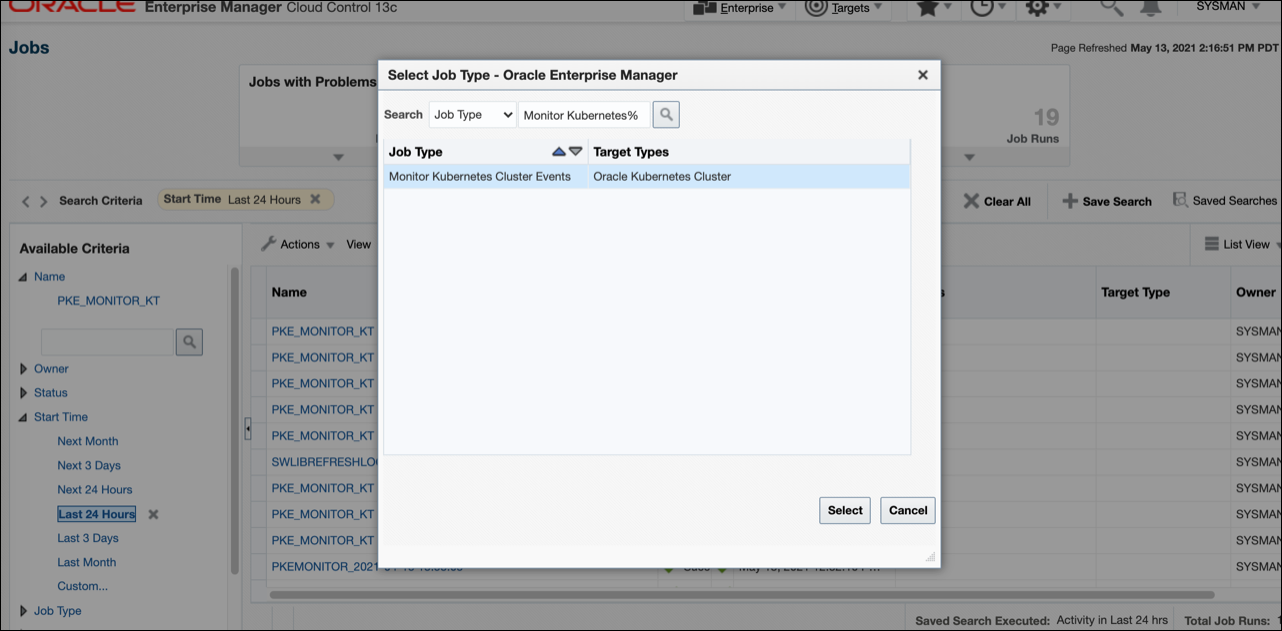
To enable synchronization, you must create and submit a MonitorPcaEvents job.
- From the Enterprise Manager console Enterprise menu, select Job and then Activity. The Job Activity page displays.
- Click Create Job.
- Look for the Monitor Kubernetes Cluster Events job as shown below.
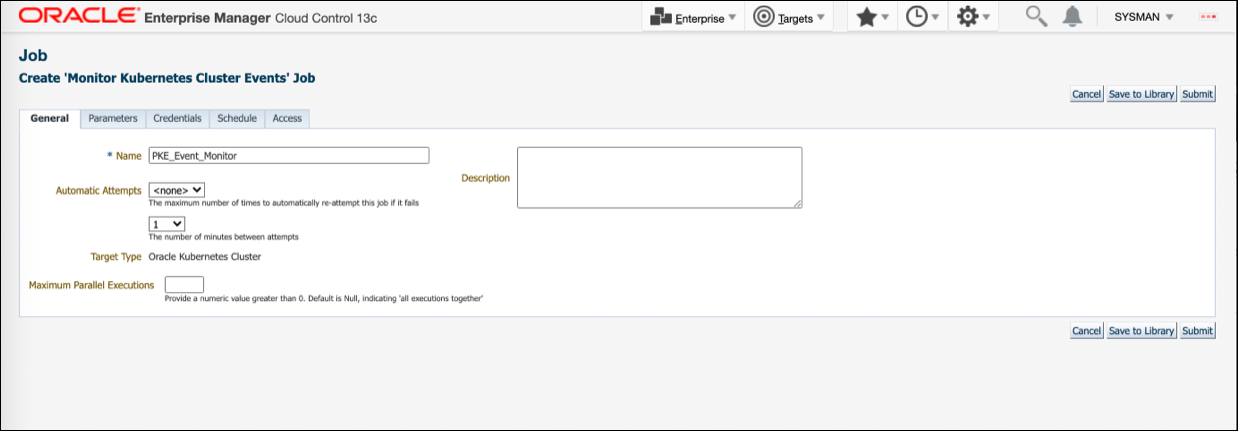
- Provide a name for the new job.
- Set the schedule to repeat every 10 minutes.
Note:
The 10 minutes interval is mandatory.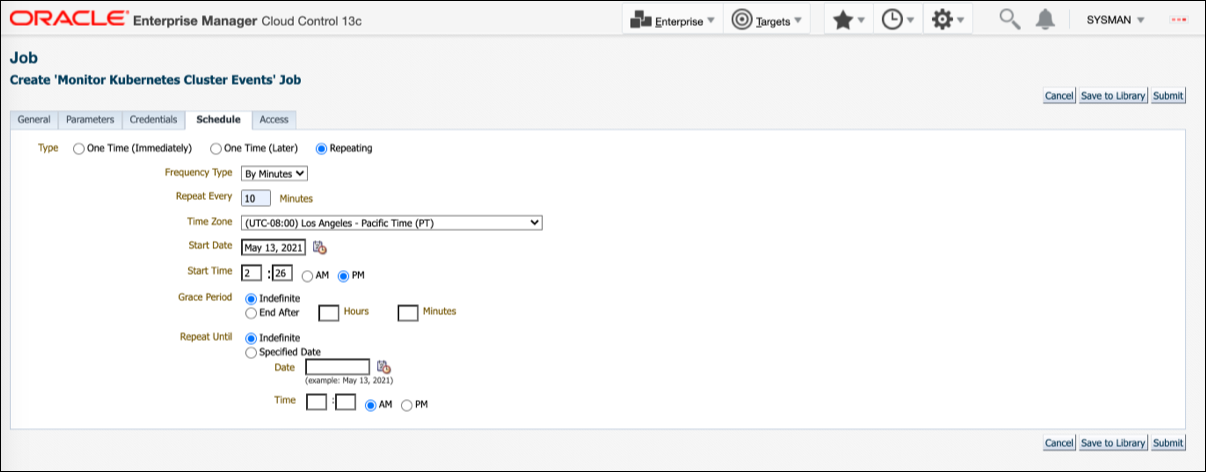
- Click Submit.
Viewing Storage
Click the Storage tab to view all the storage elements grouped by the Guest VMs with which they are associated. The Storage tab lists all the Servers owned by the EM_SSA_USER along with all the storage resources in tree format. The top level nodes represent the servers owned by the user and the sub nodes represent the storage disks that belong to the server. You can do the following:
-
Request Storage: This action allows the user to add a shared or non-shared storage disk to a server. Select one or more servers and click Request Storage. Enter the Disk Name, Size, and Mode. Select the Shared Disk check box to add a shared disk. If you create a non-shared storage disk, it is available only for the server on which it is created. A shared storage disk can be assigned to other servers. If you select multiple servers, you can create only non-shared storage disks.
-
Assign Storage: This action allows the user to assign shared storage disk to any other server owned by the
EM_SSA_USER. Select a server and click Assign Storage. The list of available shared storage disks are displayed. Select a disk from the list and click OK to assign the shared storage disk to the server. -
Release Storage: Select a server and click Release Storage. This action allows the user to release an existing shared or non-shared storage disks.
Viewing Chargeback Details
Click the Chargeback tab to view the chargeback details. The tab contains the following sections:
-
Charge Trend: The Charge Trend shows the charges across a date range for various metrics. You can set a date range and click Go to recalculate charges.
-
Details: This section shows charge details for the specified date range. You can reorder the data by selecting an option from the Detail Level drop-down menu. Click Export to export the details of the charge plan to a
.csvfile. -
Charge Plans: This section allows you to select a zone to see the charge plan in effect for the target type.
-
Oracle VM Guest (Default): If you are using the Extended Charge Plan, the base plan for the Oracle Guest VM target type appears here.
Viewing Library
Click the Library tab to view the list of assemblies, templates, and deployment plans that you can access. You can choose to view:
-
Public: The list published by the SSA Administrator for your role. The assemblies, templates and deployment plans on which you have view privileges. You will see the assemblies, templates, or deployment plans if the
EM_SSA_ADMINISTRATORhas published them or if anotherEM_SSA_USERhas made them shareable. -
Private: These include the assemblies, templates, and deployment plans that you own. Generally, an SSA user may not own assemblies but may own templates and deployment plans.
You can request servers from this page. See Requesting Servers for details.
You can upload software, share, delete, or stop sharing a software component that you own. Select a component from the list and click Share. Select one or more users with whom the entity is to be shared and click Share.
To unshare an entity, select a shared entity from the list and click Stop Sharing. The list of users with whom this component has been shared appears. Select one or users from the list and click Stop Sharing.
To upload software, click Upload. In the dialog box that appears, select the source file to be upload, enter a name and description, and specify the type (Assembly or Template) of component being uploaded. Click Upload to upload to software to My Library.
Viewing Policies
Click the Policies tab to view the list of policies that you have defined. You can create a new Performance or Schedule Based Policy or a Policy Group. For example, you can define a policy to start an automatic scale up for a tier if the CPU Utilization is greater than 90 for 5 consecutive occurrences.
For more details on creating and using policies, see About Cloud Policies.
Viewing Preferences
You can customize the self service portal settings by modifying the preferences. From the user menu on the top right corner of the page, select Preferences, then select SSA Portal Settings. Before you request resources using SSA, you can set up your user profile by specifying the following details:
-
General Preferences
-
Email Address: The default email address to be used to receive notifications.
-
Locale: The default locale for receiving cloud notifications.
-
Request Notifications: Select this checkbox to receive notifications of different statuses of the request.
-
Request Status: If you select the Request Notifications checkbox, select the status for each you wish to receive notifications from the drop down list.
-
Days Before the First / Second Notification: If you select the Instance Expiry Notifications checkbox, specify the number of days before the first and second notifications are sent.
-
Quota Notification: If you select this checkbox, notifications are sent when the quota reaches a specified threshold.
-
Quota Threshold (%): If you have selected the Quota Notification checkbox, specify the quota threshold in this field.
-
Self Service Portal: Select the default Self Service Portal page that should appear when you log in to the Self Service Portal.
-
