30 Decommissioning and Deinstalling Oracle Management Agents
This chapter describes how to decommission and deinstall standalone Oracle Management Agents (Management Agent). In particular, this chapter covers the following:
Decommissioning Oracle Management Agents
This section describes the various ways of decommissioning Oracle Management Agents. In particular, this section covers using the Agent Decommission feature from the Enterprise Manager Cloud Control console user interface and from command line using emcli commands. They both allow to decommission a single or multiple agents at the same time.
Decommissioning Management Agents Using Enterprise Manager Console
To decommission Management Agents using the Enterprise Manager Cloud Control console, you can use the Agent Decommission button under Setup > Manage Cloud Control>Agents page.
If you want to decommission a single agent, you can also use the Agent Decommission option from Agent Home page by going to Targets> Select Agent > Agent > Target Setup > Agent Decommission.
- Remove Agent from Repository: It removes the agent(s) selected and its targets from the repository. It doesn't require agent host credentials. Only super user credentials are sufficient.
- Remove Agent from Host and Repository: It removes the agent(s) selected and its targets from the repository. It also performs an agent software deinstallation from the host and it requires agent install user host credentials. If you select this option, there's no need to cleanup any directories or to do any agent deinstallation manually afterward.
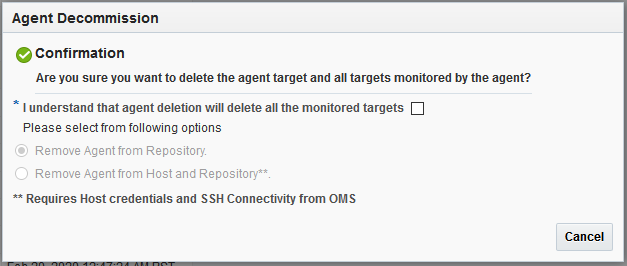
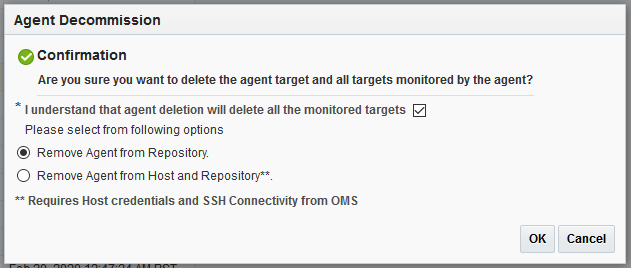
After you select the desired option, the Agent Decommission confirmation window will be displayed:

Check "I understand that agent deletion will delete all the monitored targets" checkbox. Then, select your option and press OK.

After confirmation, the Enterprise Manager Jobs page will open. You need to enter the required details information and click Submit. The Successful Job Submission window will be displayed with the link to the Agent Decommission job. In some cases, user may not see the complete job details since the targets and agents are already removed from repository.
Decommissioning Management Agents Using emcli
To decommission Management Agents using emcli commands, you can use the command line to create scripts and manage the agent decommission process by running the scripts manually.
emcli provides the following two options:
-
Remove Agent from Repository: It removes the desired agent(s) and its targets from the repository. This option doesn't require agent host credentials. Only super user credentials are sufficient. This option type is called
"Multiple Agents Decommission". -
Remove Agent from Host and Repository: It removes the desired agent(s) and its targets from the repository. It also performs an agent software deinstallation from the host and it requires agent install user host credentials. There's no need to cleanup any directories or to do any agent deinstallation manually afterward. This option type is called
"Multiple Agents Cleanup".
Follow the instructions below:
-
Create an input property file using a text editor with the following required parameters:
name is any job name you would like to use.
type is the agent decommission option type name. It can be
type=Multiple Agents Decommissionortype=Multiple Agents Cleanup.target_list specifies the list of targets using the fully qualified host name and port number. For example,
target_list=host1.example.com:1834:oracle_emd.schedule.frequency specifies the frequency. The supported value is
IMMEDIATE.cred.agent_creds.<all_targets>:oracle_emd specifies the agent credentials. This is a mandatory parameter only when using
type=Multiple Agents Cleanup. For example,cred.agent_creds.<all_targets>:oracle_emd=NAMED:agentinst-
Sample input property file for
type=Multiple Agents Cleanup
Ifname=Multi Agent Full Cleanup Job type=Multiple Agents Cleanup target_list=<FQDN_Host_Name1>:<port>:oracle_emd target_list=<FQDN_Host_Name2>:<port>:oracle_emd target_list=<FQDN_Host_Name3>:<port>:oracle_emd schedule.frequency=IMMEDIATE cred.agent_creds.<all_targets>:oracle_emd=NAMED:<Agent_Install_User>type=Multiple Agents Cleanup, all agents targets should have been installed with the same agent credentials. If there are agents targets installed with different credentials, the input property file with different credentials should be created. -
Sample input property file for
type=Multiple Agents Decommissionname=Multi Agent Decommission Repo only type=Multiple Agents Decommission target_list=<FQDN_Host_Name1>:<port>:oracle_emd target_list=<FQDN_Host_Name2>:<port>:oracle_emd target_list=<FQDN_Host_Name3>:<port>:oracle_emd schedule.frequency=IMMEDIATE
After creating the appropriate input property file, it can be saved as a text file. For example, it can be named
"decom_agent_multi.txt". -
- Run
emclicommand to create the job using the text file created in Step 1../emcli create_job -input_file=property_file:"decom_agent_multi.txt" Creation of job "MULTI AGENT FULL CLEANUP JOB" was successful. - Check status of the agent decommission job.
./emcli get_jobs -name="MULTI AGENT FULL CLEANUP JOB"
Name    Type
Job ID                            Execution ID                       Scheduled
Completed        TZ Offset   Status   Status ID  Owner   Target Type  Target Name
MULTI AGENT FULL CLEANUP JOB  Multiple Agents Decommission
90AF4B4FBAD35BAEE053BD70F00A8249  90AF4B4FBADC5BAEE053BD70F00A8249   2019-08-21 22:52:25
none             GMT-07:00  Running  2           SYSMAN  oracle_emd   <Host_Name1>:<port>
MULTI AGENT  FULL CLEANUP JOB  Multiple Agents Decommission
90AF4B4FBAD35BAEE053BD70F00A8249  90AF4B4FBAD55BAEE053BD70F00A8249   2019-08-21 22:52:25
none             GMT-07:00  Running  2           SYSMAN  oracle_emd   <Host_Name2>:<port>
MULTI AGENT  FULL CLEANUP JOB  Multiple Agents Decommission
90AF4B4FBAD35BAEE053BD70F00A8249  90AF4B4FBAD95BAEE053BD70F00A8249   2019-08-21 22:52:25
none             GMT-07:00  Running  2           SYSMAN  oracle_emd   <Host_Name3>:<port>
Deinstalling Oracle Management Agents
This section lists the deinstallation prerequisites and describes the various ways of deinstalling a standalone Oracle Management Agent. In particular, this section covers the following:
Note:
On a cluster, ensure that you deinstall the Management Agents from all the nodes one by one. To do so, follow the instructions outlined in this chapter.
Note:
When you deinstall an old standalone Management Agent and install a new standalone Management Agent on the same host, you will lose all historical target information from the Management Repository.
To avoid losing all historical target information, first install the new standalone Management Agent, then run the emcli relocate_targets command to hand over the targets from the old standalone Management Agent to the new standalone Management Agent, and then deinstall the old standalone Management Agent.
For information about the emcli relocate_targets command, see relocate_targets in the Oracle Enterprise Manager Cloud Control Command Line Interface Guide.
Deinstalling Standalone Management Agents
This section describes the following:
Deinstalling Standalone Management Agents Using the AgentDeinstall.pl Script
To deinstall a standalone Management Agent using the AgentDeinstall.pl script, follow these steps:
Note:
While deinstalling the standalone Management Agent, the Management Agent service is removed automatically. If the service is not removed automatically, you can remove it manually after the deinstall, by running the following command:
sc delete <service_name>
Deinstalling Shared Agents
To deinstall a Shared Agent, run the following command from the Master Agent home that is visible on the host where your Shared Agent is installed:
$<AGENT_HOME>/perl/bin/perl <AGENT_HOME>/sysman/install/NFSAgentDeInstall.pl AGENT_INSTANCE_HOME=<absolute_path_to_agent_instance_home> ORACLE_HOME=<absolute_path_to_agent_home>
For example,
/shared/app/agentbasedir/agent_13.5.0.0.0/perl/bin/perl
                    /shared/app/agentbasedir/agent_13.5.0.0.0/sysman/install/NFSAgentDeInstall.pl
                    AGENT_INSTANCE_HOME=/shared/app/agentbasedir/agent_inst
                    ORACLE_HOME=/shared/app/agentbasedir/agent_13.5.0.0.0
After Deinstalling Standalone Management Agents
After you deinstall a standalone Management Agent, follow these steps:
-
Verify that the Oracle homes you deinstalled are deregistered from the central inventory. However, some files might still remain in these Oracle homes. If they do, you can manually delete them.
You must also manually delete the auto-startup script called
gcstartupthat will be present under/etc/init.ddirectory.Note:
These auto-start scripts are not available on Microsoft Windows.
-
If you deinstalled on a Microsoft Windows platform, then follow these steps to remove the entries from the Microsoft Windows registry. Ensure that you are logged in as a user with Administrator privileges on that host.
-
Expand HKEY_LOCAL_MACHINE, SOFTWARE, Oracle, and then Sysman. Under the Sysman directory, delete the Management Agent service. For example,
Oracleagent13cAgent. -
Close the registry editor.
-
Deinstalling or Undeploying Only Plug-ins from the Oracle Management Agent
If you want to deinstall or undeploy only the plug-ins from the Management Agent, and not to deinstall the Management Agent itself, then use the Plug-ins page within the Enterprise Manager Cloud Control Console. For instructions, see Undeploying Plug-Ins from Oracle Management Agent in the Oracle Enterprise Manager Cloud Control Administrator's Guide.Do NOT use the installer to undeploy only the plug-ins.