Advanced Operations with Plug-Ins
This section explains the following:
Re-deploying Plug-Ins on Oracle Management Agent
Using re-deploy option, you can re-deploy plug-ins on Oracle Management Agent. The re-deploy plug-in option reconfigures the same plug-in on the Management Agent, and does not change the configuration details.
$emcli redeploy_plugin_on_agent
{-agent_names="agent1[;agent2...]" | -group_name="group1"}
-plugin="plug-in_id:version"
[-redeploy_noprompt]
Note:
While using this option, note that the existing plug-in home will be overwritten, and all applied patches will be lost.
The re-deploy wizard displays the following warning message:
Re-deployment of a plug-in overwrites the existing OracleHome of a plug-in and you will lose any patch(es) that has been applied on plug-in OracleHome.
However, if you have enabled -redeploy_nopromt option, then the warning message will not be displayed.
To continue, click Yes.
The redeploy command cannot be used on multiple Management Agents without having Custom Plug-in Update for a plug-in.
Note:
After a metadata plug-in is redeployed, it is recomended that you run the following command.
$emcli metric_control -command=flush_metadata_cache
The command should be run on all OMS instances.
Deploying Plug-In Patches While Deploying or Upgrading Management Agent (Create Custom Plug-In Update)
When a new plug-in is released, it can be downloaded using Self-update. If there are defects with the Management Agent plug-ins, Oracle then releases O-patch style patches. While plug-ins get deployed automatically during target discovery on Management Agents, patches for the plug-ins have to be applied on each plug-in manually.
Custom plug-in update is the user copy of the plug-in, along with patches applied to it. Using the Create Custom Plug-In Update command allows you to create a custom copy of plug-in along with the patches applied in self update. Once the patches are applied, you can create a custom plug-in update of the plug-ins on that Management Agent. The custom plug-in update then becomes a gold image for that plug-in with all the patches applied on that Oracle Home, along with the base plug-in binaries.
After the Custom Plug-in Update is created, any plug-in deployment operation for the plug-in on any Management Agent, using either UI or EMCLI, the new custom copy will be deployed instead of the Oracle supplied version. In this way you don't have to reapply the plug-in patches manually on each plugin home of agent. This custom plug-in image is also used by Agent deployment to upgrade activity so that the plug-ins getting deployed on these agents are with the patch included.
There are two methods of creating Custom Plug-in Update. The following sections describe the two methods.
Creating Custom Plug-In Update Using EMCLI
To create a custom plug-in update, follow these steps:
Note:
To overwrite and update your current custom plug-in update that is stored in a repository, use the overwrite option.
$emcli create_custom_plugin_update
-agent_name="agent_name"
-plugin_id="plugin_id"
[-overwrite]
This command creates and imports a custom plug-in update from an existing Management Agent where the selected plug-in is deployed. The custom plug-in update will be used for all subsequent plug-in deployments on any Management Agent, in place of Oracle supplied versions.
Custom plug-in update is created as per plug-in type. If a custom plug-in update is created, and after three days, a patch is applied, in order to include the patch, the custom plug-in update will have to be created again.
To view a list of all Custom Plug-in Updates created, run the following command.
$emcli list_custom_plugin_updates
To view a a list of patches included in a particular Custom Plug-in Update, run the following command.
$emcli list_patches_in_custom_plugin_update -plugin=<plugin_id>:<version> [-discovery]
On the Plug-in Manager console, when you select a plug-in, if a Custom Plug-in Update exists, an icon is displayed beside the version identifier, indicating that that particular plug-in version is customized in the environment, with a list of patches. Figure 4-10 displays the Custom Plug-in Update icon. Once the custom plug-in update exists, it will be used by the Management Agent for deployment and upgrade automatically.
Figure 4-10 Custom Plug-in Update Icon

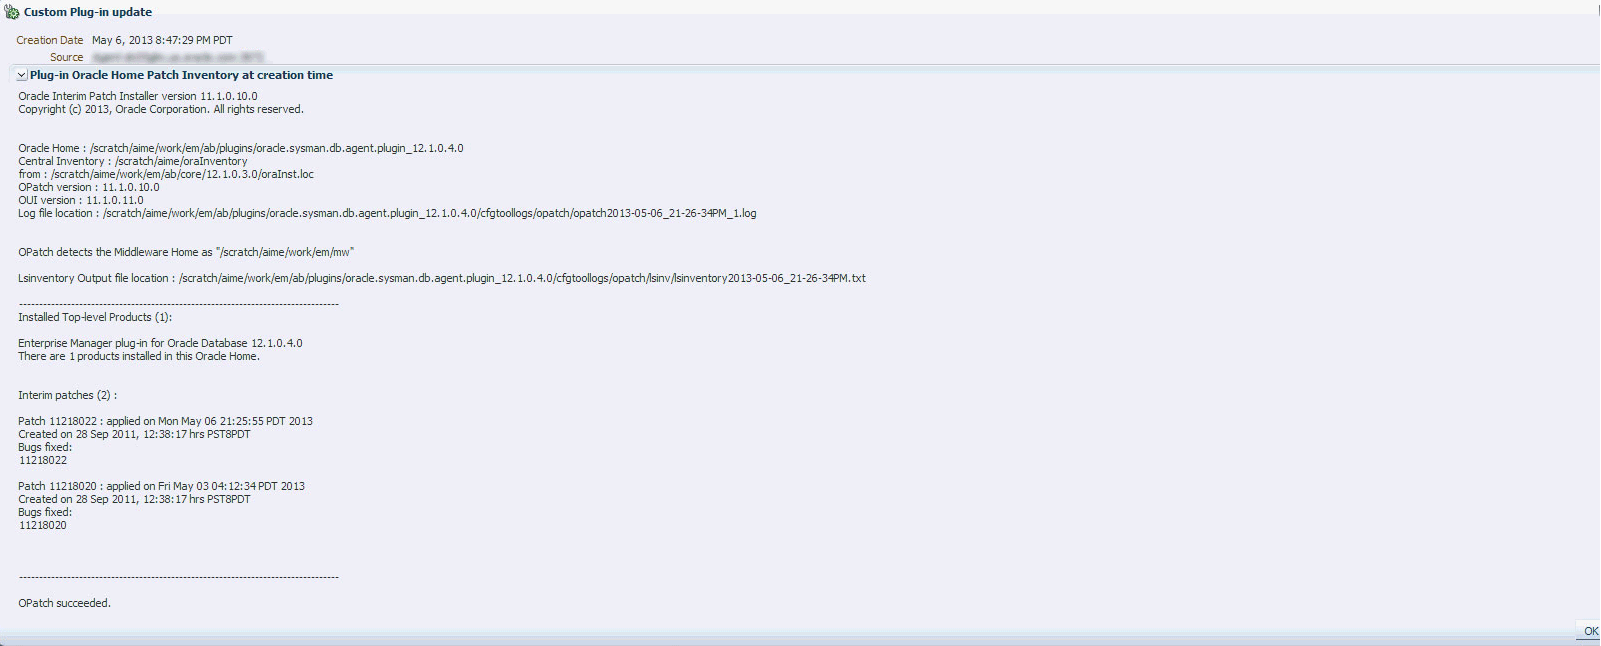
When you click the Custom Plug-in Update icon, the page that displays the information on Custom Plug-in Update is displayed. Figure 4-11 displays the Custom Plug-in Update information page.
Figure 4-11 Custom Plug-in Update Information Page

Creating Custom Plug-In Update Using EDK
To create custom plug-in update using EDK, follow these steps.
The plug-in update is saved to on a local directory as a .zip file. The .zip file has to be copied to an OMS instance. Once the .zip file is created, from the OMS Home, run the following command to import the custom plug-in update.
$emcli import_plugin_update -archive=<archive path>
On the Plug-in Manager console, when you select a plug-in, if a Custom Plug-in Update exists, an icon is displayed beside the version identifier, indicating that particular plug-in version is customized in the environment, with a list of patches.