29 Setting Up the WebLogic Self Service Portal
Setting Up the WebLogic Self Service Portal
The EM_SSA_ADMINISTRATOR can configure and set up the WebLogic Cloud Self Service Portal by creating middleware pools, setting up quotas, defining request settings, configuring the load balancer, creating service templates, and configuring chargeback.
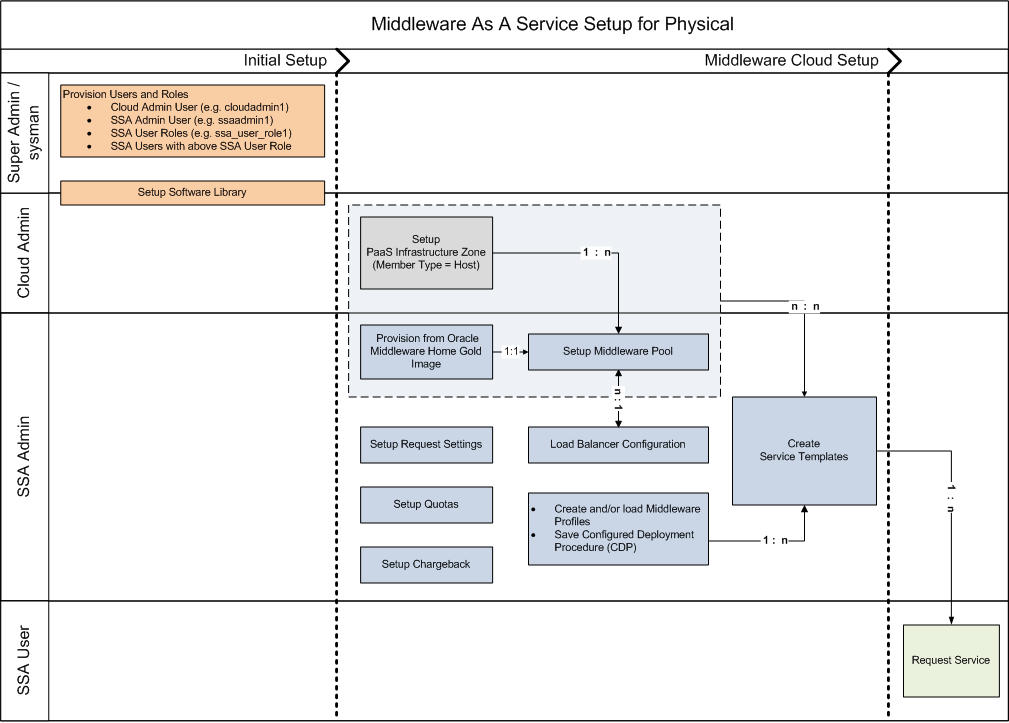
Figure 29-1 diagram shows the initial setup and the relationship between the various entities involved in setting up the WebLogic Middleware Self Service Portal.
Figure 29-1 Setting Up WebLogic as a Service
Prerequisites
-
One or more PaaS Infrastructure zones must have been created. See Creating a PaaS Infrastructure Zone for details.
To set up the WebLogic as a Service, follow these steps:
-
Set up one or more PaaS Infrastructure zones. See Creating a PaaS Infrastructure Zone for details.
-
Create a Middleware Pool. See Creating a Middleware Pool.
-
Optionally, you can configure an external load balancer. See Creating a Load Balancer Configuration.
-
Configure request settings. See Configuring Request Settings.
-
Define quotas for each self service user role. See Setting Up Quotas.
-
Create service templates. You can create service templates that can be used to provision an instance of a service in a set of selected zones. See Creating a WebLogic Service Template.
-
Optionally, you can configure the Chargeback Service. See Configuring Chargeback.
Creating a Load Balancer Configuration
You can configure external pre-configured load balancers such as Oracle HTTP Server (versions 11x are supported but it is recommended that you use 11g PS6), Oracle Traffic Director (versions 11x are supported but it is recommended that you use OTD 11x PS6) or a third party load balancer.
Note: If you are using a 11g PS6 managed or collocated OHS load balancer, you must ensure that no change is done through the Admin / MBean interfaces. The as-a-service solution modifies the OHS files directly on the file system, so any changes made on a collocated OHS may not be replicated to the Administration Server. Additionally, any changes made through the Admin interfaces (such as MBean, WLST, and so on), may override the changes made directly to the *.conf files.
If you want to configure a third party load balancer, you must use a custom script to update the load balancer configuration. For more details on this script, see Custom Script Guidelines. A Middleware Pool or a Deployment Plan can be associated with only one of the load balancer configurations.
Note:
Setting up the Load Balancer Configuration is an optional step.
Prerequisites
-
OTD and OHS load balancers being configured must be installed on an Enterprise Manager monitored host and is used to route Web traffic to one or more MWaaS service instances. When a MWaaS service instance is created, updated (scaled up or scaled down), or deleted, the load balancer configuration is automatically updated.
-
To route HTTPS Web traffic, you must do the following:
-
Create an OTD configuration (This is required only if you are configuring an Oracle Traffic Director type of load balancer).
-
Create or install a certificate.
For more details configuring SSL authentication, refer to the Oracle Traffic Director Administrator’s Guide and the Oracle HTTP Server Administrator’s Guide.
-
To configure a load balancer, follow the steps below:
Custom Script Guidelines
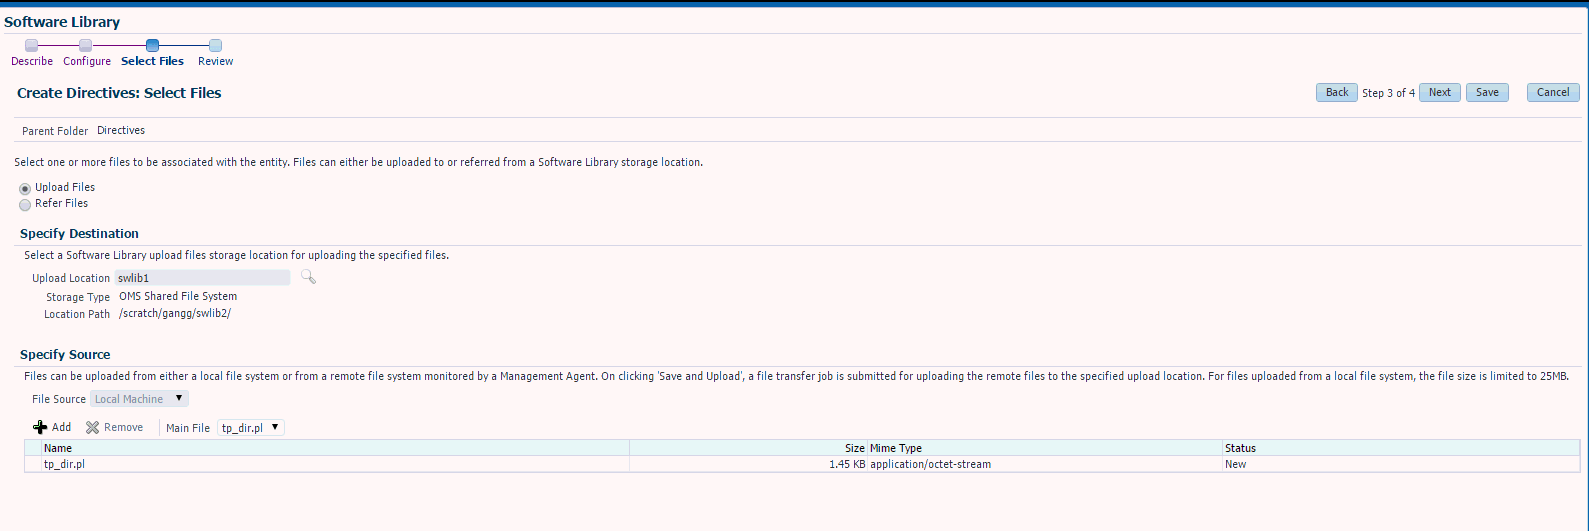
You can use a custom script to configure the load balancer. This script must be present in the Software Library as a directive. The directive must follow these guidelines:
-
LBR_WORK_DIRECTORY: Specifies the directory in which thelbr.propertiesfile will be staged. The name-value pairs present in thelbr.propertiesfile are extracted by the custom script and these values are used to configure the load balancer. -
The following properties must be present in the
lbr.propertiesfile:-
THIRDPARTY_ROUTING_PROTOCOL: This can be HTTP, HTTPS, or HTTP_HTTPS. -
HTTP_PORT_RANGE: The range of ports (separated by hyphen '-') that can be used to configure for HTTP protocol. For example, 5000-6000. -
HTTPS_PORT_RANGE: The range of ports (separated by hyphen '-') that can be used to configure for HTTPS protocol. For example, 7000-8000. -
LBR_HOST: The host on which the load balancer is installed. -
UNIQUE_URI_REFERENCE: This is the Service Instance Id (which is an unique value). This maps to the service instance (WebLogic Domain). If required, it can be used to uniquely identify an entity, such as the virtual server, route, and so on. -
CONFIGURATION_ACTION: The actions that can be performed are:-
CREATE: To create a service instance. -
ADD_SERVERS: To scale up or add one or more servers. -
DELETE_SERVERS: To scale down or delete one or more servers. -
REMOVE: To delete a service instance.
-
-
HTTP_WLS_MANAGED_SERVER_PORT_LIST: A comma separatedhost:port(Managed Servers) list whereportis a http port. For example, abc:123, xyz:456. -
HTTPS_WLS_MANAGED_SERVER_PORT_LIST: A comma separated host:port (Managed Servers) list whereportis an SSL port. For example, abc:123, xyz:456.
-
Sample Script (Oracle Cloud Application 12.1.0.8 or Earlier)
This sample script is applicable if are using 12.1.0.8 or earlier versions of the Oracle Cloud Application plugin.
Sample Script I
#!/usr/bin/perl
use File::Path;
#use File::Spec();
use File::Spec;
use Cwd;

my $dir = getcwd();
my $WORK_DIR = $ARGV[0];

print "The Input Parameters to the Third Party Script are as follows : "."\n";
print "lbrWorkDirectory = ".$WORK_DIR."\n";
print "======================================================================"."\n";
print "The lbr.property file contents accessible to this script are as follows "."\n";
my $textfile = "lbr.properties";

my @prop;
chdir($WORK_DIR) or die "Can't chdir to $WORK_DIR $!";
#Create Hash from properties
open FILE, "<$textfile" or die("Could not open text file '" . $textfile . "': $!");
my %hash;
while ($line4 = <FILE>)
{
chomp($line4);
my ($key, $val) = split(/=/,$line4);
print $key."= ".$val."\n";
$hash{$key}=$val;
}
close FILE;
print "======================================================================"."\n";
my $ACTION          = $hash{'CONFIGURATION_ACTION'};
if ( $ACTION eq "CREATE" ) {
    print " The Configuration Action is Create \n";
} elsif ( $ACTION eq "ADD_SERVERS" ) {
    print " The Configuration Action is Scale Up \n";
} elsif ( $ACTION eq "DELETE_SERVERS" ) {
    print " The Configuration Action is Scale Down \n";
} elsif ( $ACTION eq "REMOVE" ) {
    print " The Configuration Action is Remove \n";
} else {
    print " Unsuppported Configuration Action".$ACTION."\n";
}
print "======================================================================"."\n";
#
# logic to configure the LBR goes here
#
Sample Script (Oracle Fusion Middleware 12.1.0.7 or Later)
This sample script is applicable if you are using 12.1.0.7 or later versions of the Oracle Fusion Middleware plugin.
Sample Script II
#!/usr/bin/perl
use File::Path;
#use File::Spec();
use File::Spec;
use Cwd;

my $dir = getcwd();
my $WORK_DIR = $ARGV[0];

print "The Input Parameters to the Third Party Script are as follows : "."\n";
print "lbrWorkDirectory = ".$WORK_DIR."\n";
print "======================================================================"."\n";
print "The lbr.property file contents accessible to this script are as follows "."\n";
my $textfile = "lbr.properties";

my @prop;
chdir($WORK_DIR) or die "Can't chdir to $WORK_DIR $!";
#Create Hash from properties
open FILE, "<$textfile" or die("Could not open text file '" . $textfile . "': $!");
my %hash;
while ($line4 = <FILE>)
{
chomp($line4);
my ($key, $val) = split(/=/,$line4);
print $key."= ".$val."\n";
$hash{$key}=$val;
}
close FILE;

print "TP OUTPUT:FRONT_END_HOST_VALUE=example.yourhost.com#FRONT_END_HTTP_PORT_VALUE=9000#FRONT_END_HTTPS_PORT_VALUE=9090#URI_PREFIX=app1#"."\n";
#
# logic to configure the LBR goes here
#

print "======================================================================"."\n";
Note:
If you are using Oracle Fusion Middleware 12.1.0.7 or later, the script must meet the following guidelines:
-
After successfully completing the configuration, you must exit the program with command status '0'.
-
If the configuration fails, you must exit the program with a 'non-zero' command status.
-
Print the following information in the exact format as given below:
print "TP OUTPUT:FRONT_END_HOST_VALUE=<host-name>#FRONT_END_HTTP_PORT_VALUE=<http_port>#FRONT_END_HTTPS_PORT_VALUE=<https_port>#URI_PREFIX=<uri-prefix-if-applicable>#"."\n";
Setting Up Quotas
Quota is the aggregate amount of resources that can be granted to each self service user belonging to a certain role. This quota applies only to the service instances provisioned through the Middleware Self Service Portal. Each service instance that is provisioned including new service requests and scale up of existing service instances is subject to the quota allocated to the self service user. When the self service user has used up his allocated quota, he cannot make new service requests until a higher quota is allocated or his existing service instances have been reclaimed.
Creating a WebLogic Service Template
A service template can be used to provision an instance of a service into a set of selected PaaS Infrastructure zones.
Prerequisites
-
Set up and enable MWaaS as described in Getting Started with Middleware as a Service.
-
A PaaS Infrastructure Zone must have been created.
-
A WebLogic domain provisioning profile (see Creating a WebLogic Domain Provisioning Profile) with appropriate values must be present in the Software Library.
-
A middleware pool must have been created.
-
Named Credentials must be created. The user creating the service template must be the owner of the Named Credentials.
Note:
You can edit a service template that has active instances and modify the configuration parameters. When a service template is modified:
-
New instances created after the changes have been made will use the new parameters.
-
Old instances or instances created before the template was modified will use the earlier values.
-
Changes made to zones and roles will be applicable to both old and new instances.
To create a WebLogic Service Template, follow these steps:
-
Log into Enterprise Manager as a user with the
EM_SSA_ADMINISTRATORrole. -
From the Enterprise menu, select Cloud, then select Cloud Home. The Cloud Home page appears. From the Oracle Cloud menu, select Setup, then select Getting Started.
Note:
You can use a different navigation path to reach this page. Select Service Templates from the Oracle Home menu, click Create and select WebLogic service type.
-
Click on the Setup link next to the Middleware Service family and select the WebLogic service type from the drop down list.
-
Click the Service Templates link. You can create service templates that can be used to provision an instance of a service in a set of selected zones. Click Create.
-
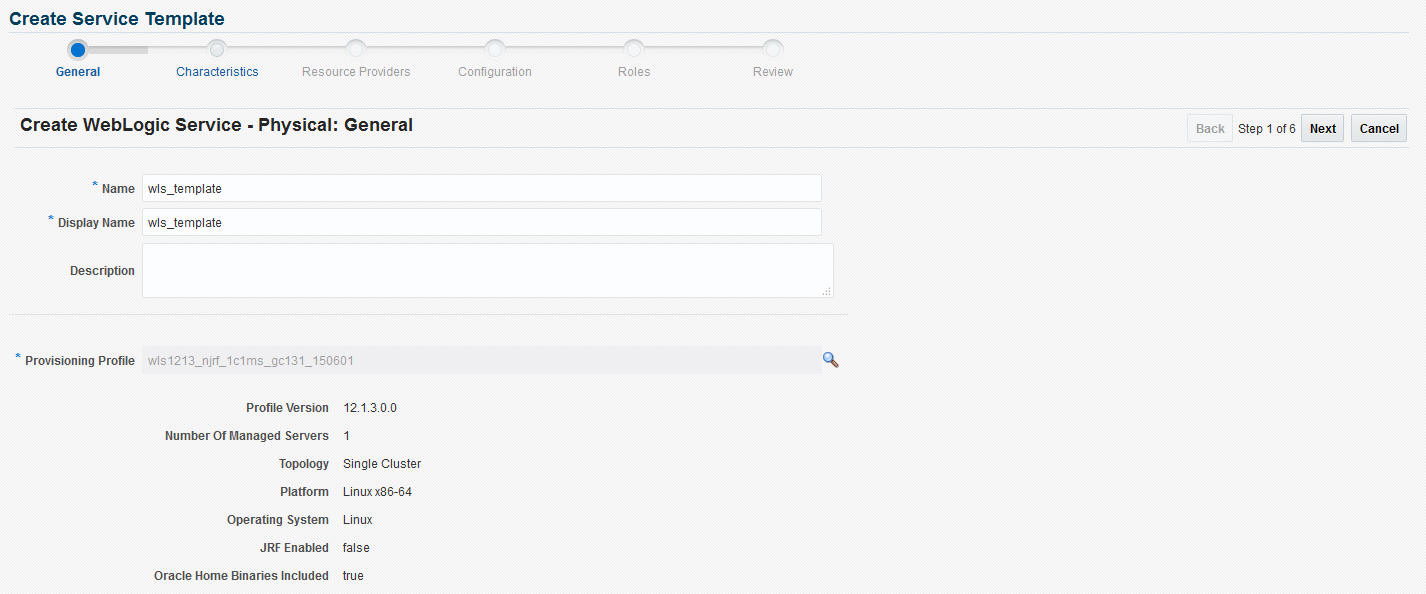
Enter a name and description for the service template. The description must be unique and provide information on the type of service template being created.
-
In the Provisioning Profile field, click the Search icon and select a WebLogic Domain Provisioning profile. The WebLogic Domain Provisioning Profile you select can contain either of the following:
-
One cluster with one or more WebLogic Servers. You can scale up or scale down by adding or deleting WebLogic servers to this cluster.
-
One WebLogic Server. In this case, the Scale Up and Scale Down options are not available.
The details of the selected profile such as profile version, number of managed servers, topology, and so on are displayed.
Figure 29-8 Create WebLogic Service Template: General
-
-
Click Next. The Characteristics page appears.
Figure 29-9 Create WebLogic Service Template: Characteristics
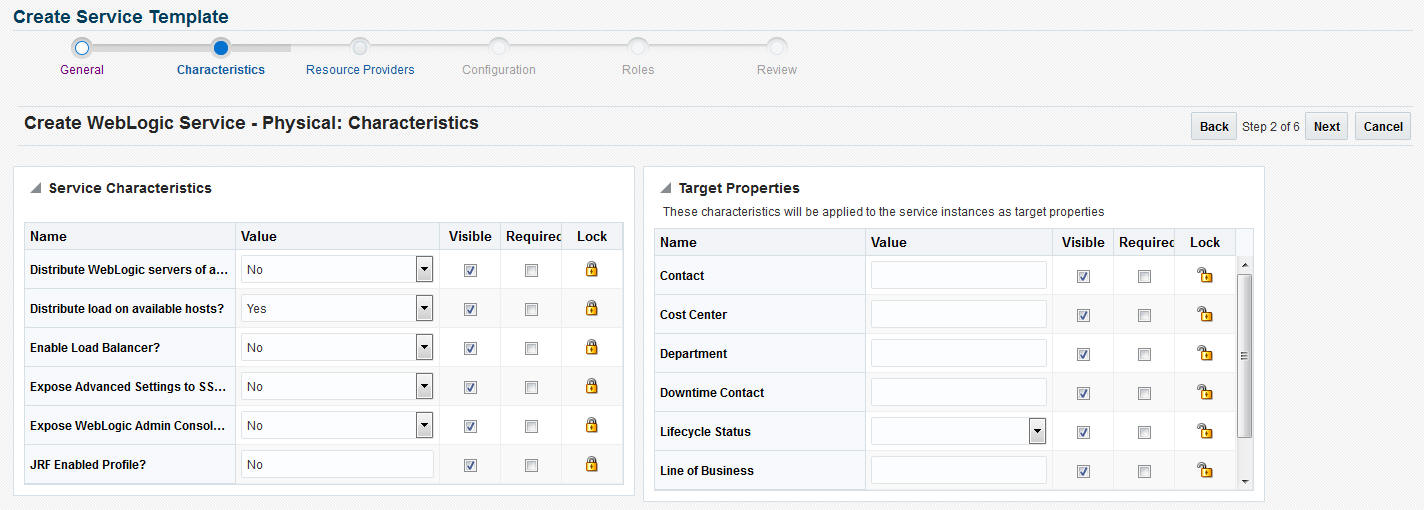
In the Service Characteristics region, specify the following:
-
Distribute WebLogic Servers of a service instance on hosts from different Exalogic Racks: Select Yes if the WebLogic Servers in a service instance are to be uniformly distributed on available Exalogic racks. Select No if the hosts are to be placed on the first available rack.
-
Distribute Load on Available Hosts: Select Yes if the WebLogic Servers are to be uniformly distributed on available hosts. If you select No, the maximum number of servers possible will be provisioned on the first available host before provisioning on other hosts.
-
Enable Load Balancer: Select Yes to enable the load balancer configuration for all the service instances that are created with this service template.
Note:
If the Enable Load Balancer field is set to 1 in the Create New Service Template: Configuration page, when you click Search, only middleware pools associated with a load balancer configuration are displayed. If there are no middleware pools associated with load balancer configurations, the list will be blank.
-
Expose Advanced Settings for the SSA User: When set to Yes, the self service user will have access to advanced options such as Operating System, Enable sharing Service Instances with other SSA Users, Setting Target Properties for Monitoring Templates, and so on.
-
Expose WebLogic Admin Console and Fusion Middleware Control to SSA User: If you select Yes, the users with the
EM_SSA_USERrole will have access to the WebLogic Admin Console and Fusion Middleware Control for each service instance created using this service template.Note:
This field must be set to Yes only if the
EM_SSA_USERneeds to have complete control over the WebLogic Server and Fusion Middleware Control consoles. TheEM_SSA_USERwill then be able to perform all configuration changes and life cycle management operations from each console. -
JRF Enabled Profile: Indicates if the selected profile is JRF enabled. If set to Yes for WebLogic Server 12.1.2 and 12.1.3 instances, the self service user will be prompted for the database connection string and schema password while requesting a service.
The self service user can either use a database that is cloned using the DBaaS RMAN Backup option, or a database that has been cloned outside DBaaS but discovered in Enterprise Manager. In the case of the latter option, after discovering the database, you must grant view privileges on the Database target to the self service user.
A JRF enabled profile cannot be used to create a non-JRF WebLogic domain. If the value for this field has been set to Yes, it is recommended that the value is not changed
-
-
In the Target Properties region, specify the characteristics that will be used to tag and identify the target properties. Service instances created from the template will have the characteristics.
-
Click Next. In the Create Middleware Service Template: Resource Providers page, click Add to select the Middleware Pool into which that the service instances are to be provisioned. The PaaS Infrastructure Zone with which the middleware pool is associated is displayed.
-
Click Next. The Configuration page appears.
Figure 29-10 Create WebLogic Template: Configuration
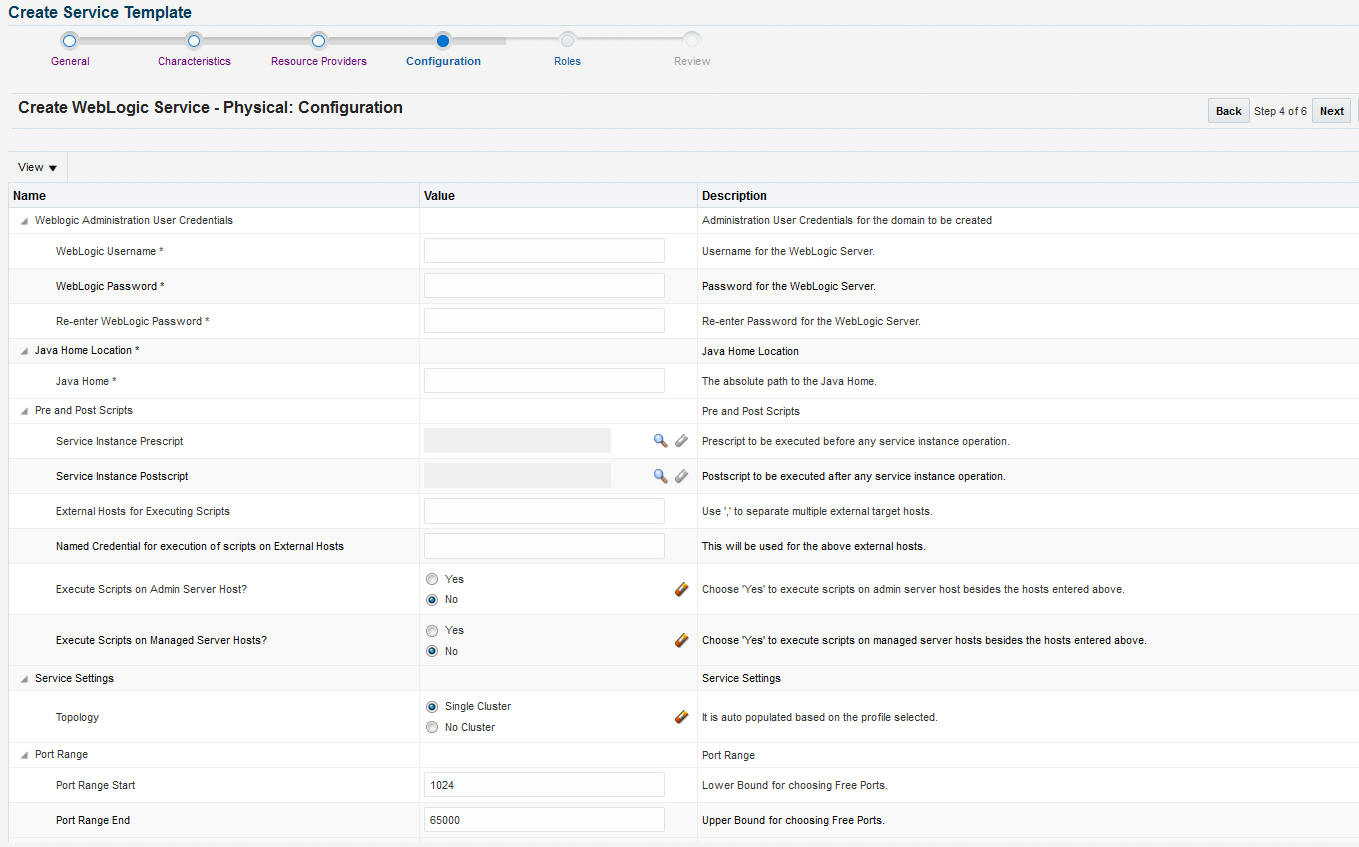
Enter the following details:
-
WebLogic Administration Credentials:
-
WebLogic Username: Enter a value of minimum 8 characters as the name of the user logging into the WebLogic server. This is a mandatory field.
-
WebLogic Password: Enter a value of minimum 8 characters as the password for the WebLogic server user. This is a mandatory field.
-
-
Java Home Location: Specify the absolute path to the Java Home. This field must be specified if the WebLogic Domain Provisioning Profile selected earlier contains Middleware Home binaries.
-
Pre and Post Scripts
-
Prescript for Service Instance: Select the script that should be executed before creating, deleting, scaling up, or scaling down a service instance.
-
Postscript for Service Instance: Select the script should be executed after creating, deleting, scaling up, or scaling down a service instance.
-
External Hosts for Executing Scripts: Specify the external hosts on which these scripts should be executed.
-
Named Credential for execution of scripts on external hosts: Specify the credentials required to run the scripts on external hosts.
-
Execute Scripts on Admin Server Host: Select Yes if the scripts are to be executed on the Administration Server Host.
-
Execute Scripts on Managed Server Hosts: Select Yes if the scripts are to be executed on the Managed Server Hosts.
Note:
Zone level credentials are used to run these scripts on the Administration Server Host and the Managed Server Host.
The scripts must meet the following guidelines:
-
Directive that is created should be a PERL directive.
-
An input parameter named
INPUT_FILE_LOCATIONmust be defined. -
The path to the location of a property file must be specified in the
INPUT_FILE_LOCATIONparameter. -
The property file contains information about the service instance and the domain.
See Sample Postscript for a sample script file, properties file, and the generated output.
-
-
Service Settings:
-
Topology: This field is automatically set based on the profile you have selected in the Create Middleware Service Template for Physical: General page.
-
-
Port Range (Start - End): Enter the port range for the WebLogic Server. The default start range is 1024 and the end range is 65000.
-
Placement Parameters:
-
Memory Usage Per Instance: Specify the memory required for each additional WebLogic Server instance. This parameter must be specified (cannot be left blank) and the value must match the -Xmx value specified in the profile. For example, if the profile specifies -Xmx512m, the memory required value must be set to 0.5. Similarly, a profile value of -Xmx1024m would need a memory required value of 1, and so on.
-
CPU Usage Per Instance: Specify the CPU required for each additional WebLogic Server instance.
-
-
Server Startup Arguments
-
Managed Server Startup Arguments: Specify the memory and Java arguments required to start the managed server. These arguments are used to control the memory size of the JVM server and create multiple templates with the same profile. For example, you can specify
-Xms1280m -Xmx1280m -XX:PermSize=128m -XX:MaxPermSize=256m -Dweblogic.security.SSL.ignoreHostnameVerification=true.Note: If the Expose Advanced Settings for the SSA User flag is set to True, the self service user can modify these arguments while requesting a service.
-
-
Resource Management Script Parameters
-
Resource Management Script: Specify the script for dynamic management of resources which allows you to increase or decrease the size of the middleware pool. This script must be present in the Software Library as a directive.
-
Host for Executing Resource Management Script: Select the host on which the resource provisioning script is to be executed.
-
Named Credentials for Host: Specify the named credentials for the selected host
-
-
-
Click Next. In the Create Middleware Service Template for Physical: Roles page, click Add to select the self service user roles to which this service template will be available. All users belonging to the selected role can use this service template.
-
Click Next. The Create Middleware Service Template for Physical: Review page appears. Review the information entered so far and click Submit. The newly created service template will appear in the Middleware Cloud Self Service Portal Setup: Service Templates page. You can click on the Service Template Name link to view additional details.
To edit an existing MWaaS service template, follow these steps:
- Click Edit in the Service templates page to launch to the Edit Service Template wizard.
- In this mode, you can modify the description, user name, password, and port range of the WebLogic Server instance being provisioned, add or remove PaaS Infrastructure Zones, Software Pools into which the template is being deployed, and add or remove users who can use this template.
Sample Postscript
This sample postscript prints the contents of the properties file and also prints details regarding the managed server, administration server, and so on.
Sample Properties File
The properties file contains the following:
OPERATION= CREATE
SERVICE_INSTANCE= inst_01
DOMAIN_NAME= inst_01_SSA_USER1
DOMAIN_HOME= /middleware/inst_01_SSA_USER1
MW_HOME= /middleware
WLS_HOME= /middleware/wlserver_10.3
ADMIN_SERVER= example.com,27877,8142
MANAGED_SERVERS= example.com,13614,1488,4166;
EXTERNAL_HOSTS= example.com
EXECUTE_SCRIPTS_ON_ADMIN_SERVER_HOST=  Yes
EXECUTE_SCRIPTS_ON_MANAGED_SERVER_HOSTS=  Yes
Sample Script
A sample script is given below:
#!/usr/bin/perl
use File::Path;
#use File::Spec();
use File::Spec;
use Cwd;

my $dir = getcwd();
my $inputFile = $ARGV[0];

print "Imput File Location = ".$inputFile."\n";
print "===================================================================="."\n";
print "The properties file contents accessible to this script are as follows "."\n";

my @prop;
#Create Hash from properties
open FILE, "<$inputFile" or die("Could not open text file '" . $inputFile . "': $!");
my %hash;
while ($line4 = <FILE>)
{
chomp($line4);
my ($key, $val) = split(/=/,$line4);
print $key."= ".$val."\n";
$hash{$key}=$val;
}
close FILE;
print "===================================================================="."\n";
my $ACTION = $hash{'OPERATION'};
if ( $ACTION eq "CREATE" ) {
    print " This is Service Instance Creation Operation \n";
} elsif ( $ACTION eq "SCALEUP" ) {
    print " This is Scale Up Operation \n";
} elsif ( $ACTION eq "SCALEDOWN" ) {
    print " This is Scale Down Operation \n";
} elsif ( $ACTION eq "DELETE" ) {
    print " This is Delete Service Instance Operation \n";
} else {
    print " Unsuppported Configuration Action".$ACTION."\n";
}
print "===================================================================="."\n";

my $ADMIN_SERVER = $hash{'ADMIN_SERVER'};

print "======================Admin Server Details Begins==================="."\n";
my @fields = split (/,/, $ADMIN_SERVER);
my $arraySize = @fields;
if ($arraySize == 4) {
    print "Admin Server Name is ".$fields[0]."\n";
    print "Admin Server Host Name is ".$fields[1]."\n";
    print "Admin Server NON SSL Port is ".$fields[2]."\n";
    print "Admin Server SSL Port is ".$fields[3]."\n";
} else {
    print "Admin Server Host Name is ".$fields[0]."\n";
    print "Admin Server NON SSL Port is ".$fields[1]."\n";
    print "Admin Server SSL Port is ".$fields[2]."\n";
}
print "======================Admin Server Details Ends===================="."\n";

print "\n";

print "======================Managed Server's Details Begins==============="."\n";
my $MANAGED_SERVERS = $hash{'MANAGED_SERVERS'};
my $managedServer;
my @noOfManagedServers = split (/;/, $MANAGED_SERVERS);
for ($count = 0; $count < @noOfManagedServers; $count++) {
     $managedServer = $noOfManagedServers[count];
     @fields = split (/,/, $managedServer);
     $arraySize = @fields;
     if ( $ACTION eq "SCALEDOWN" || $ACTION eq "DELETE" ) {
        print "Managed Server Name is ".$fields[0]."\n";
        print "Managed Server Host Name is ".$fields[1]."\n";
        print "Managed Server NON SSL Port is ".$fields[2]."\n";
        print "Managed Server SSL Port is ".$fields[3]."\n";
     } else {
        print "Managed Server Host Name is ".$fields[0]."\n";
        print "Managed Server NON SSL Port is ".$fields[1]."\n";
        print "Managed Server SSL Port is ".$fields[2]."\n";
    }
    print "\n"
}
print "===================Managed Server's Details Ends===================="."\n";

print "\n";

print "===================External Host's Details Begins==================="."\n";
my $EXTERNAL_HOSTS = $hash{'EXTERNAL_HOSTS'};
my @hosts = split (/,/, $EXTERNAL_HOSTS);
for ($count = 0; $count < @hosts; $count++) {
    print "External Host is ".$hosts[count]."\n";
}

print "=====================External Host's Details Ends==================="."\n";
Sample Script Output
The output of the directive is given below:
Imput File Location = /jan1215/work/agentStateDir/1422547083465.properties
======================================================================
The properties file contents accessible to this script are as follows
OPERATION= CREATE
SERVICE_INSTANCE= inst_01
DOMAIN_NAME= inst_01_SSA_USER1
DOMAIN_HOME= /middleware/inst_01_SSA_USER1
MW_HOME= /middleware
WLS_HOME= /middleware/wlserver_10.3
ADMIN_SERVER= example.com,27877,8142
MANAGED_SERVERS= example.com,13614,1488,4166;
EXTERNAL_HOSTS= example.com
EXECUTE_SCRIPTS_ON_ADMIN_SERVER_HOST=  Yes
EXECUTE_SCRIPTS_ON_MANAGED_SERVER_HOSTS=  Yes
======================================================================
 This is Service Instance Creation Operation
======================================================================
=======================Admin Server Details Begins===================
Admin Server Host Name is example.com
Admin Server NON SSL Port is 27877
Admin Server SSL Port is 8142
=======================Admin Server Details Ends====================

=======================Managed Server's Details Begins===============
Managed Server Host Name is example.com
Managed Server NON SSL Port is 13614
Managed Server SSL Port is 1488

=======================Managed Server's Details Ends====================

=======================External Host's Details Begins===================
External Host is example.com
=======================External Host's Details Ends===================
Resource Management Script
The Resource Management Script specifies the location of the property file which contains a list of name value pairs. The content of the file varies based on the Create, ScaleUp, ScaleDown, and Delete operations.
Create Operation
The content of the file for the Create operation are:
ACTION=CREATE
ZONE_NAME=<value>
POOL_NAME=<value>
NUMBER OF SERVERS BEFORE THIS REQUEST=<value>
NUMBER OF SERVERS REQUESTED=<value>
NUMBER OF SERVERS POSSIBLE WITH AVAILABLE RESOURCES=<value>
NUMBER OF SERVERS NEEDED=<value>
MAXIMUM SERVERS ALLOWED PER HOST=<value>
MIDDLEWARE_HOME=<value>
EXPECTED CPU UTILIZATION IN PERCENTAGE=<value>
EXPECTED MEMORY CONSUMPTION IN GB==<value>
Scaleup Operation
The content of the file for the Scaleup operation are:
ACTION=SCALEUP
ZONE_NAME=<value>
POOL_NAME=<value>
NUMBER OF SERVERS BEFORE THIS REQUEST=<value>
NUMBER OF SERVERS REQUESTED=<value>
NUMBER OF SERVERS POSSIBLE WITH AVAILABLE RESOURCES=<value>
NUMBER OF SERVERS NEEDED=<value>
MAXIMUM SERVERS ALLOWED PER HOST=<value>
MIDDLEWARE_HOME=<value>
DOMAIN_NAME=<value>
EXPECTED CPU UTILIZATION IN PERCENTAGE=<value>
EXPECTED MEMORY CONSUMPTION IN GB==<value>
Scaledown Operation
The content of the file for the Scaledown operation are:
ACTION=SCALEDOWN
ZONE_NAME=<value>
POOL_NAME=<value>
NUMBER OF SERVERS BEFORE THIS REQUEST=<value>
NUMBER OF SERVERS BEING REMOVED=<value>
HOSTS FROM WHERE SERVERS BEING REMOVED=<value>
MIDDLEWARE_HOME=<value>
DOMAIN_NAME=<value>
Configuring Chargeback
Click the Chargeback tab to add the middleware pools to the Chargeback Application. On this page, you can determine chargeback zones, services, items, and prices. After Chargeback is set up, you can view charges and plan details.
You can configure chargeback and metering data based on the configuration and monitoring metrics collected from associated targets such as the host, managed server, and the PaaS Infrastructure Zone. The charge plans are based on the host, WebLogic (domain, cluster, and server), PaaS Infrastructure Zone, and configuration such as the WebLogic Domain version, OS version, vendor, and so on.
For details on setting up the Chargeback Service, see Chargeback Administration.


