Configuring Recovery Appliance for Replication Using DBMS_RA
This section explains how to configure replication using command-line tools. The basic work flow is as follows:
-
Configure the downstream Recovery Appliance, as described in “Configuring a Downstream Recovery Appliance for Replication Using DBMS_RA”.
-
Configure the upstream Recovery Appliance, as described in “Configuring an Upstream Recovery Appliance for Replication Using DBMS_RA”.
-
Configure the protected databases involved in the replication, as described in “Configuring a Protected Database for Recovery Appliance Replication”.
-
Test the replication, as described in “Testing a Recovery Appliance Replication Server Configuration”.
Figure 10 is a graphic illustration of the configuration phases.
Figure 10: Overview of Manual Configuration for Replication
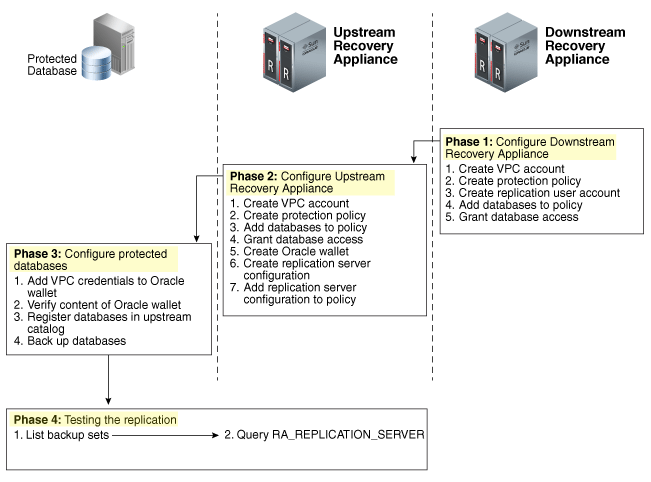
Description of the illustration amagd_vm_048.png
Assumptions for the Replication Examples
In the replication tasks that follow, assume that the following conditions are true:
-
You back up databases
orcl11andorcl12to a Recovery Appliance namedZDLRA Bostonthat you want to configure in the upstream replication role. -
You intend to use
ZDLRA Des Moinesas the downstream Recovery Appliance. -
On the downstream Recovery Appliance, you intend to create a Recovery Appliance user account named
repuser_from_boston. This account is the replication user account.Note: The naming convention for this account uses the Recovery Appliance from where the backups will be replicated-in this case,
ZDLRA Boston. In names of the protection policies in our examples, we useusfor upstream anddsfor downstream. -
On the downstream Recovery Appliance, you intend to create a protection policy named
reppolicy_ds_gold. This policy is exclusively for use by replication. -
On the downstream Recovery Appliance, you intend to create a virtual private catalog account named
vpc_des_moines1. RMAN uses this account to back up and restore databasesorcl11andorcl12. -
On the upstream Recovery Appliance, you intend to create a protection policy named
reppolicy_us_gold. This policy is exclusively for use by replication. -
On the upstream Recovery Appliance, you intend to create a virtual private catalog account named
vpc_boston1. RMAN uses this account to back up and restore databasesorcl11andorcl12.
Configuring a Downstream Recovery Appliance for Replication Using DBMS_RA
This section explains how to configure a downstream Recovery Appliance.
Note: When a Recovery Appliance has both the upstream and downstream roles, these instructions pertain to the role of a downstream Recovery Appliance only.
Task 1: Create a virtual private catalog account on the downstream Recovery Appliance
When backing up or restoring protected databases, RMAN uses this account to connect to the recovery catalog on the downstream Recovery Appliance.
This task assumes that you want to create a virtual private catalog account named vpc_des_moines1 on the downstream Recovery Appliance.
To create virtual private catalog account:
-
Follow the instructions in racli add db_user.
For example, execute the following statement to create user account
vpc_des_moines1:# ./racli add db_user --user_name=vpc_des_moines1 --user_type=vpc -
Enter the password for
vpc_des_moines1user when prompted.
See Also: Oracle Database Backup and Recovery User’s Guide to learn more about virtual private catalogs
Task 2: Create a replication protection policy on the downstream Recovery Appliance
To create a protection policy specifying recovery windows and other properties of backups replicated to this downstream Recovery Appliance, execute DBMS_RA.CREATE_PROTECTION_POLICY.
This task assumes that you create a reppolicy_ds_gold policy to protect the orcl11 and orcl12 databases. You will later associate this policy with a Recovery Appliance.
To create a replication protection policy:
-
With
SQL Plusor SQL Developer, connect to the downstream Recovery Appliance database asRASYS. -
Create a protection policy with the
DBMS_RA.CREATE_PROTECTION_POLICYprocedure.For example, execute the following PL/SQL program:
BEGIN
  DBMS_RA.CREATE_PROTECTION_POLICY (
    protection_policy_name => 'reppolicy_ds_gold',
    description            => 'For protected dbs in gold tier',
    storage_location_name  => 'delta',
    recovery_window_goal   => INTERVAL '28' DAY,
    guaranteed_copy        => 'NO');
END;
See Also:
-
“CREATE_PROTECTION_POLICY” for definitions of procedure arguments
Task 3: Create a replication user account on the downstream Recovery Appliance
When you configure a downstream Recovery Appliance to replicate backups for a protected database, you must create a replication user account that the upstream Recovery Appliance uses to log in to this downstream Recovery Appliance. The credentials for the user on the downstream Recovery Appliance are stored in the Oracle wallet of the upstream Recovery Appliance (see).
Note: For ease of administration, Oracle recommends that you create a replication user account exclusively for use with Recovery Appliance replication, and that you create a separate replication user account for each upstream appliance.
This task assumes that you want to create an account named repuser_from_boston that the upstream Recovery Appliance uses to authenticate on this Recovery Appliance.
To create a replication user account:
-
With
SQL*Plusor SQL Developer, connect to the downstream Recovery Appliance database asSYSTEMor any user with theDBArole. -
Create the replication user account.
For example, execute the following SQL statements to create the
repuser_from_bostondatabase user account and grant itCREATE SESSIONprivileges:# ./racli add db_user --user_name=repuser_from_boston --user_type=vpcNote: Oracle recommends that you use a highly complex password to enhance security. You add this password and user name to the Oracle wallet in a subsequent step. After you save these credentials in the wallet, you will not need to enter the password manually again.
See Also: Oracle Database Security Guide to learn how to create database user accounts
Task 4: Add databases to the protection policy on the downstream Recovery Appliance
To add the protected databases to the replication protection policy, execute DBMS_RA.ADD_DB. You must also specify the amount of disk space reserved for each protected database.
This task assumes that you want to add databases orcl11 and orcl12 to the reppolicy_ds_gold protection policy that you created in Task 2: Create a replication protection policy on the downstream Recovery Appliance and allocate 128 GB of reserved space for each protected database.
To add databases to a protection policy:
-
With
SQL*Plusor SQL Developer, connect to the downstream Recovery Appliance database asRASYS. -
Add metadata for each protected database using the
DBMS_RA.ADD_DBprocedure.For example, execute the following PL/SQL programs:
BEGIN
  DBMS_RA.ADD_DB (
    db_unique_name         => 'orcl11',
    protection_policy_name => 'reppolicy_ds_gold',
    reserved_space         => '128G');
END;
BEGIN
  DBMS_RA.ADD_DB (
    db_unique_name         => 'orcl12',
    protection_policy_name => 'reppolicy_ds_gold',
    reserved_space         => '128G');
END;
See Also: “ADD_DB”
Task 5: Grant database access on the downstream Recovery Appliance
Execute DBMS_RA.GRANT_DB_ACCESS to grant protected database access to the following database accounts:
-
The virtual private catalog account created in “Task 1: Create a virtual private catalog account on the downstream Recovery Appliance”
-
The replication user account created in “Task 3: Create a replication user account on the downstream Recovery Appliance”
To grant protected database access to the replication and catalog accounts:
-
With
SQL*Plusor SQL Developer, connect to the downstream Recovery Appliance database asRASYS. -
For each protected database that will send backups to the upstream Recovery Appliance that must authenticate with this account, grant privileges to the replication user.
The following example grants the replication user
repuser_from_bostonthe required privileges on protected databasesorcl11andorcl12:BEGIN DBMS_RA.GRANT_DB_ACCESS ( username => 'repuser_from_boston', db_unique_name => 'orcl11'); END; BEGIN DBMS_RA.GRANT_DB_ACCESS ( username => 'repuser_from_boston', db_unique_name => 'orcl12'); END; -
For each protected database on each upstream Recovery Appliance that will authenticate with this account, grant privileges to the virtual private catalog account.
The following example grants the recovery catalog account
vpc_des_moines1the required privileges on protected databasesorcl11andorcl12:BEGIN DBMS_RA.GRANT_DB_ACCESS ( username => 'vpc_des_moines1', db_unique_name => 'orcl11'); END; BEGIN DBMS_RA.GRANT_DB_ACCESS ( username => 'vpc_des_moines1', db_unique_name => 'orcl12'); END;
See Also: “GRANT_DB_ACCESS”
Configuring an Upstream Recovery Appliance for Replication Using DBMS_RA
This section explains how to configure an upstream Recovery Appliance. This section assumes that you have completed the steps in “Configuring a Downstream Recovery Appliance for Replication Using DBMS_RA”.
Note: When a Recovery Appliance has both the upstream and downstream roles, these instructions pertain to the upstream role only.
Task 1: Create a virtual private catalog account on the upstream Recovery Appliance
When backing up protected databases, RMAN uses this account to connect to the recovery catalog on the upstream Recovery Appliance.
This section assumes that you want to create a virtual private catalog account named vpc_boston1 on the upstream Recovery Appliance.
To create virtual private catalog account:
-
Follow the instructions in “racli add db_user”.
For example, execute the following statement to create user account
vpc_boston1:# ./racli add db_user --user_name=vpc_boston1 --user_type=vpc -
Enter the password for
vpc_boston1user when prompted.
See Also: Oracle Database Backup and Recovery User’s Guide to learn more about virtual private catalogs
Task 2: Create a protection policy on the upstream Recovery Appliance
Execute DBMS_RA.CREATE_PROTECTION_POLICY to create a protection policy to specify the disk recovery windows and other properties of backups to this upstream Recovery Appliance. The upstream Recovery Appliance replicates these backups to its downstream Recovery Appliance.
This task assumes that you create a reppolicy_us_gold policy to protect the orcl11 and orcl12 databases. In the next task, you associate this protection policy with the protected databases.
To create a protection policy for Recovery Appliance replication:
-
With
SQL*PlusorSQL Developer, connect to the upstream Recovery Appliance metadata database asRASYS. -
Create each protection policy with the
DBMS_RA.CREATE_PROTECTION_POLICYprocedure.For example, execute the following PL/SQL program:
BEGIN
  DBMS_RA.CREATE_PROTECTION_POLICY (
    protection_policy_name => 'reppolicy_us_gold',
    description            => 'For protected dbs in gold tier',
    storage_location_name  => 'delta',
    recovery_window_goal   => INTERVAL '28' DAY,
    guaranteed_copy        => 'NO');
END;
See Also:
-
“CREATE_PROTECTION_POLICY” for definitions of procedure arguments
Task 3: Add databases to the protection policy on the upstream Recovery Appliance
To add the protected databases to the replication protection policy, execute the DBMS_RA.ADD_DB procedure. You must also specify the amount of disk space reserved for each protected database.
This task assumes that you want to add databases orcl11 and orcl12 to the reppolicy_us_gold protection policy that you created in “Task 2: Create a protection policy on the upstream Recovery Appliance”, and allocate 128 GB of reserved space for each protected database.
To add databases to a protection policy:
-
With
SQL*PlusorSQL Developer, connect to the upstream Recovery Appliance metadata database asRASYS. -
Add metadata for each protected database using the
DBMS_RA.ADD_DBprocedure.For example, execute the following PL/SQL programs:
BEGIN
  DBMS_RA.ADD_DB (
    db_unique_name         => 'orcl11',
    protection_policy_name => 'reppolicy_us_gold',
    reserved_space         => '128G');
END;
BEGIN
  DBMS_RA.ADD_DB (
    db_unique_name         => 'orcl12',
    protection_policy_name => 'reppolicy_us_gold',
    reserved_space         => '128G');
END;
See Also:
Task 4: Grant database access to the virtual private catalog account on the upstream Recovery Appliance
To grant protected database access to the upstream catalog account created in “Task 1: Create a virtual private catalog account on the upstream Recovery Appliance”, execute DBMS_RA.GRANT_DB_ACCESS. This step makes it possible for RMAN to connect to the recovery catalog when it backs up or restores the protected databases.
To grant protected database access to the virtual private catalog:
-
With
SQL*Plusor SQL Developer, connect to the upstream Recovery Appliance metadata database asRASYS. -
For each protected database whose backups will be replicated, grant privileges to the virtual private catalog account.
The following example grants the catalog account
vpc_boston1the required privileges on protected databasesorcl11andorcl12:BEGIN DBMS_RA.GRANT_DB_ACCESS ( username => 'vpc_boston1', db_unique_name => 'orcl11'); END; BEGIN DBMS_RA.GRANT_DB_ACCESS ( username => 'vpc_boston1', db_unique_name => 'orcl12'); END;
See Also:
Task 5: Create an Oracle wallet on the upstream Recovery Appliance
On the upstream Recovery Appliance, use the mkstore utility to create an Oracle auto-login wallet and add the replication user credentials created in “Task 3: Create a replication user account on the downstream Recovery Appliance”. The upstream Recovery Appliance requires these credentials when it logs in to a downstream appliance. Each stored credential contains the name and verifier of a Recovery Appliance user account.
Note: If an existing wallet is an auto-login wallet (one that does not require you to enter a password each time the wallet is accessed), then you may use it. An Oracle wallet has a file extension of *.sso. To use an existing Oracle wallet, skip Step 2 below.
This task assumes the following:
-
You want to create the Oracle wallet used for replication in the
/dbfs_repdbfs/REPLICATIONdirectory on the upstream Recovery Appliance host. -
You want to add credentials for replication user
repuser_from_boston.
To create an Oracle Wallet on the upstream Recovery Appliance:
-
Log in to the upstream Recovery Appliance host as the operating system user who installed Recovery Appliance or as a member of that user’s operating system group.
-
To create the Oracle wallet, run the following command, where *wallet_location* is an existing directory on the upstream Recovery Appliance in which to store the wallet:
For example, the following command creates an auto-login wallet in the `/dbfs_repdbfs/REPLICATION` directory:orapki -wrl wallet_location -createALO
The `mkstore` utility creates a file named `cwallet.sso` in the designated location.orapki -wrl file:/dbfs_repdbfs/REPLICATION -createALO -
To add the credentials, run the following command:
mkstore -wrl wallet_location -createCredential serv_name ds_rep_user pwdThe placeholders are defined as follows:
-
wallet_location is the directory in which to create the wallet. The directory must exist.
-
serv_name is an Oracle network service name that you use in an EZ Connect descriptor to identify the downstream Recovery Appliance on an Oracle network.
-
ds_rep_user is the user name of the replication user account on the downstream Recovery Appliance.
-
pwd is the secure password of the replication user on the downstream Recovery Appliance.
For example, the following command adds credentials for the net service name
radsm01repl-scan.acme.comusing port1522and a database name ofzdlradsm, and the replication user namerepuser_from_boston:mkstore -wrl file:/dbfs_repdbfs/REPLICATION -createCredential \ "radsm01repl-scan.acme.com:1522/zdlradsm" "repuser_from_boston" "pwd" -
-
Verify that credentials were properly added for all users by running the following command, which lists the credentials in the Oracle wallet (no passwords or verifiers are displayed):
mkstore -wrl wallet_location -listCredentialFor example, the following command lists the credentials in the Oracle wallet stored in
/dbfs_repdbfs/REPLICATION:mkstore -wrl file:/dbfs_repdbfs/REPLICATION -listCredential Oracle Secret Store Tool : Version 12.1.0.1 Copyright (c) 2004, 2012, Oracle and/or its affiliates. All rights reserved. List credential (index: connect_string username) 1: radsm01repl-scan1.acme.com:1522/zdlradsm repuser_from_boston
See Also:
-
Oracle Database Net Services Administrator’s Guide for the location of
tnsnames.ora -
Oracle Database Net Services Administrator’s Guide to learn more about net service names
Task 6: Create the replication server configuration on the upstream Recovery Appliance
For each downstream Recovery Appliance to which this upstream Recovery Appliance will replicate, create a replication server configuration by executing DBMS_RA.CREATE_REPLICATION_SERVER.
Caution: If you run CREATE_REPLICATION_SERVER on the upstream Recovery Appliance before the downstream Recovery Appliance has added the databases to a protection policy (ADD_DB) and granted database access (GRANT_DB_ACCESS), then an ORA-* error can result.
This task assumes the following:
-
You want to create a replication server configuration named
zdlradsm_rep.Note: The replication server configuration name is arbitrary. However, Oracle recommends that you use the service name of the downstream Recovery Appliance, which is also the database name (
zdlradsmin this example) followed by_rep. -
You want the upstream Recovery Appliance to log in to its downstream Recovery Appliance using the replication account
repuser_from_boston. You created this account in “Task 3: Create a replication user account on the downstream Recovery Appliance”. -
The configuration uses the net service name
radsm01repl-scan.acme.com:1522/zdlradsmthat you stored in the Oracle wallet created in “Task 5: Create an Oracle wallet on the upstream Recovery Appliance”. -
The Oracle wallet is stored in
/dbfs_repdbfs/REPLICATION. -
The file name of the Recovery Appliance Backup Module, which is preinstalled on every Recovery Appliance, is
libra.so. The module functions as an SBT media management library. RMAN references this module when allocating or configuring a channel for backup to the Recovery Appliance (see “Configuring a Protected Database for Recovery Appliance Replication”).
To create a replication server configuration:
-
With
SQL*Plusor SQL Developer, connect to the upstream Recovery Appliance metadata database asRASYS. -
Run the
DBMS_RA.CREATE_REPLICATION_SERVERprocedure for each downstream Recovery Appliance.The following example creates the replication server configuration named
zdlradsm_repfor the downstream Recovery Appliance namedZDLRA Des Moines:BEGIN DBMS_RA.CREATE_REPLICATION_SERVER ( replication_server_name => 'zdlradsm_rep', sbt_so_name => 'libra.so', catalog_user_name => 'RASYS', wallet_alias => 'radsm01repl-scan.acme.com:1522/zdlradsm', wallet_path => 'file:/dbfs_repdbfs/REPLICATION'); END; -
Confirm the creation of the replication server configuration.
For example, run the following query:
SELECT COUNT(*) should_be_one
FROM   RA_REPLICATION_CONFIG
WHERE  REPLICATION_SERVER_NAME = 'ZDLRADSM_REP';

SHOULD_BE_ONE

-------------
1
If the configuration was created correctly, then the return value is
1.
See Also:
-
“CREATE_REPLICATION_SERVER” for procedure argument descriptions
-
Zero Data Loss Recovery Appliance Protected Database Configuration Guide to learn more about the Recovery Appliance Backup Module
-
Oracle Database Backup and Recovery User’s Guide for a list of valid client configuration file parameters and their definitions
Task 7: Associate the upstream Recovery Appliance with a protection policy
Specify the downstream Recovery Appliances to which each protected database replicates by assigning the replication server configuration to a protection policy. When this task is completed, Recovery Appliance replication is enabled.
Note: You can assign multiple replication server configurations to a protection policy.
This task assumes the following:
-
You want to use the replication server configuration named
zdlradsm_rep, which you created in “Task 6: Create the replication server configuration on the upstream Recovery Appliance”. -
You want to add the replication server configuration to protection policy
reppolicy_us_gold, which you created in “Task 2: Create a protection policy on the upstream Recovery Appliance”.
To associate a replication server configuration with a protection policy:
-
Ensure you are connected to the Recovery Appliance metadata database as the Recovery Appliance administrator.
-
Run the
DBMS_RA.ADD_REPLICATION_SERVERprocedure for each combination of protection policy and replication server configuration.For example, execute the following PL/SQL program:
BEGIN
  DBMS_RA.ADD_REPLICATION_SERVER (
   replication_server_name => 'zdlradsm_rep',
   protection_policy_name  => 'reppolicy_us_gold');
END;
See Also: “ADD_REPLICATION_SERVER”
Configuring a Protected Database for Recovery Appliance Replication
Each protected database that participates in a Recovery Appliance replication environment must be correctly configured. For example, for each protected database, you must:
-
Add the Oracle wallet credentials for the virtual private catalog owner on the upstream and downstream Recovery Appliances to the Oracle wallet.
Note: The replication configuration does not require you to add the downstream credentials. However, if the upstream Recovery Appliance were inaccessible, and if RMAN tried to restore backups from the downstream Recovery Appliance, then RMAN would need to connect directly to the virtual private catalog in the downstream Recovery Appliance. In this case, the Oracle wallet would require the downstream credentials.
-
Verify the content of the Oracle wallet.
-
Register the database in the virtual private catalog of the upstream Recovery Appliance.
-
Back up the protected database, making sure to specify the correct Oracle wallet location when allocating the RMAN channel.
To learn how to configure protected databases, see Zero Data Loss Recovery Appliance Protected Database Configuration Guide.
Testing a Recovery Appliance Replication Server Configuration
For every protected database involved in a replication scheme, use the following procedure to test replication from an upstream Recovery Appliance to all downstream Recovery Appliances. You can repeat this procedure to test each replication path of a complex replication topology.
This section assumes the following:
-
You want to test the replication of backups of
orcl11fromZDLRA Boston, which is the upstream Recovery Appliance, toZDLRA Des Moines, which is the downstream Recovery Appliance. -
ZDLRA Bostonalso backs up to tape.
To test the replication of a protected database:
-
Start RMAN, and connect to a protected database as
TARGET, and the virtual private catalog on the upstream Recovery Appliance asCATALOG.For example, enter the following command at the system prompt to connect to
orcl11asTARGETandzdlra_bostonasCATALOG:rman TARGET ra_admin@orcl11 CATALOG /@zdlra01bosingest-scan1.acme.com:1521/zdlrabos:dedicated -
List the backup sets, and confirm that the backups exist on the upstream and downstream Recovery Appliances.
For example, run the following command (sample output included):
RMAN> LIST BACKUPSET;
.
.
.

BS Key  Size

------- ----------
54746   224.25M

  List of Archived Logs in backup set 54746
  Thrd Seq     Low SCN    Low Time            Next SCN   Next Time

  ---- ------- ---------- ------------------- ---------- ---------
  1    17854   153525644  2014/07/01 12:59:40 153545145  2014/07/01 13:00:34
  1    17855   153545145  2014/07/01 13:00:34 153564529  2014/07/01 13:01:36
  1    17856   153564529  2014/07/01 13:01:36 153585644  2014/07/01 13:02:26
  1    17857   153585644  2014/07/01 13:02:26 153606722  2014/07/01 13:03:18
  1    17858   153606722  2014/07/01 13:03:18 153629480  2014/07/01 13:04:11
  1    17859   153629480  2014/07/01 13:04:11 153651278  2014/07/01 13:05:05
  1    17860   153651278  2014/07/01 13:05:05 153672263  2014/07/01 13:05:59

  Backup Set Copy #1 of backup set 54746
  Device Type Elapsed Time Completion Time     Compressed Tag

  ----------- ------------ ------------------- ---------- ---
  SBT_TAPE    02:52:20     2014/07/01 13:14:46 NO         TAG20140701T131434

    List of Backup Pieces for backup set 54746 Copy #1
    BP Key  Pc# Status      Media                   Piece Name

    ------- --- ----------- ----------------------- ----------
    54747   1   AVAILABLE   Oracle Recovery Appliance (ZDLRA Boston) 4qpca79s_1_1_DB1211LG

  Backup Set Copy #2 of backup set 54746
  Device Type Elapsed Time Completion Time     Compressed Tag

  ----------- ------------ ------------------- ---------- ---
  SBT_TAPE    02:52:20     2014/07/01 16:06:56 NO         TAG20140701T131434

    List of Backup Pieces for backup set 54746 Copy #2
    BP Key  Pc# Status      Media                   Piece Name

    ------- --- ----------- ----------------------- ----------
    55019   1   AVAILABLE   Oracle Recovery Appliance (ZDLRA Des Moines) RA_SBT_54971_4qpca79s_1_2_54746_1
.
.
.
In the preceding output, backup set
54746has two copies. Copy #1 resides onZDLRA Boston, which is the upstream Recovery Appliance, and copy #2 resides onZDLRA Des Moines, which is the downstream Recovery Appliance. -
With
SQL*Plusor SQL Developer, connect to the upstream Recovery Appliance as a named user withRASYSabilities. -
Confirm that the upstream Recovery Appliance has the correct replication status.
For example, query
RA_REPLICATION_CONFIG, which should show a state ofRUNNINGfor the replication server configuration that you created in “Task 6: Create the replication server configuration on the upstream Recovery Appliance”:SELECT REPLICATION_SERVER_NAME AS "RS_NAME", REPLICATION_SERVER_STATE AS "RS_STATE", FROM RA_REPLICATION_CONFIG; RS_NAME RS_STATE --------------- -------- ZDLRADSM_REP RUNNINGIf all preceding tests reveal the expected results, then the upstream Recovery Appliance is replicating backups of this protected database successfully.